


Media Storage
Quick Start Guide
Version: 1.00
NSA221
2-Bay Media Server


NSA221
2-Bay Digital Media Server
Version 4.00
Edition 1, 3/2010
DEFAULT LOGIN DETAILS
Web Address |
nsa221 |
Username: |
admin |
Password: |
1234 |
CONTENTS
ENGLISH |
3 |
DEUTSCH |
21 |
ESPAÑOL |
41 |
FRANÇAIS |
61 |
ITALIANO |
81 |
NEDERLANDS |
101 |
SVENSKA |
121 |
LEGAL |
139 |
www.zyxel.com |
C 2010 ZyXEL Communications Corporation |

Front and Rear Panels
On / Off
SYS LED
HDD 1 LED
HDD 2 LED
USB LED
COPY LED
COPY/SYNC button
 USB Port
USB Ports 
LAN Port
RESET
Power
2

ENGLISH
Introduction
The NSA221 lets you share files and back up data on your home network. You can also play video, music, and photo files stored on the NSA221 using your computer or a media client such as the DMA-2500.
How It Works
NSA
Above is the NSA221 in a home network. Users back up and share data on the NSA221. The DMA-2500 plays the NSA221’s media files on the TV. A USB hard drive provides extra storage space and files are copied directly from the USB memory stick to the NSA221 by using the COPY/SYNC button.
3

Place the NSA221 behind a firewall and/or IDP (Intrusion Detection and Prevention) device to protect it from attacks from the Internet.
See the User’s Guide on the included CD for details on configuring all of the NSA221’s features.
This Quick Start Guide shows you how to:
•Install Hard Drive, 5
•Connect the NSA221, 9
•Access the NSA221, 11
•Log into the NSA221, 17
Before You Begin
You need the following before you start:
•NSA221
•Included CD containing the NAS Starter Utility and User’s Guide
•Power cord and power supply (external)
•Included Ethernet cable
•One or two SATA I or SATA II (3.0 Gbit/s) (Serial Advanced Technology Attachment) compatible hard disk(s) with 15-pin SATA power connectors
4

ENGLISH
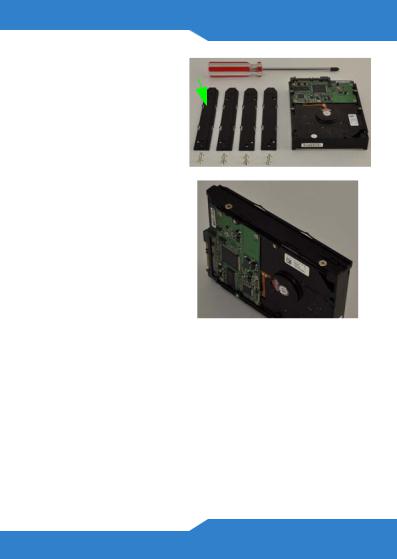
•Included hard disk chassis brackets (4) and screws (8)
•Phillips screwdriver to attach chassis brackets to the hard disk(s)
•USB cable (optional: you only need this if you want to expand storage capacity by connecting USB drives). Make sure that the USB device uses its own external power adapter if it has one.
•Computer with Network Interface Card (NIC) and TCP/ IP installed
•Network device such as a switch, router, or hub (optional)
Install Hard Drive
Once you install a hard drive on the NSA221 and create a volume, all existing data on the disk will be erased. If you want to install two hard drives and configure them as a RAID volume, it is recommended to use the same disk size and model for best performance.
The NSA221 must be turned off before you remove or install hard drive(s).
Creating a volume formats the hard drives. All data will be lost. Back up any files on the disk to another location before you install the disk in the NSA221.
5

1.Make sure the power and Ethernet cords are disconnected from the NSA221.
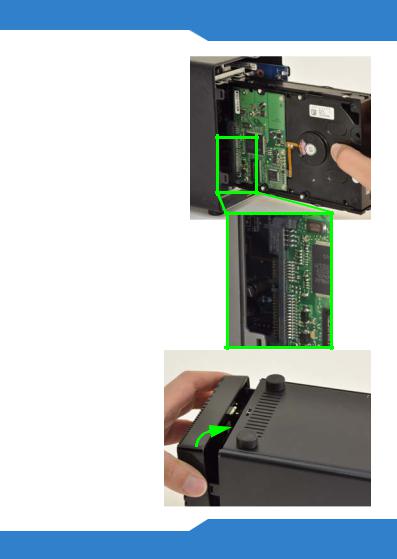
2.Place the NSA221 on a flat surface with the bottom panel facing up. Press a flat head screwdriver or coin into the slot near the front panel and remove the front panel.
6
ENGLISH
3. Place a chassis |
A |
|
bracket (A) on the |
||
|
||
side of a hard disk. |
|
|
Point the tapered |
|
|
end towards the hard |
|
|
disk’s connection |
|
|
end. Keep the |
|
|
countersunk (larger) |
|
|
screw holes facing |
|
|
up. Use two of the |
|
|
included screws to |
|
|
attach the chassis |
|
|
bracket to the hard |
|
|
disk. Do this for both |
|
|
sides of the hard |
|
|
disks. |
|
7
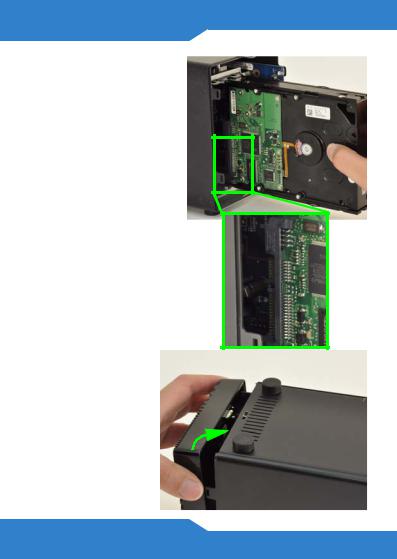
4.Slide each hard disk into the tray until the hard disk is fitted snugly inside the NSA221.
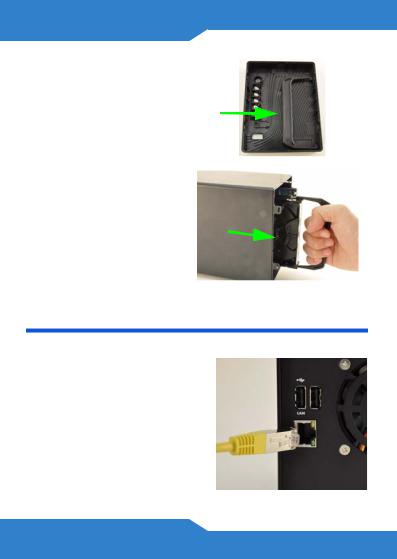
5.Attach the front panel.
8
ENGLISH
If you need to remove a hard drive, use the hard disk removal handle included inside the front lid.
Connect the NSA221
1.Use the included Ethernet cable to connect the LAN port on the rear of the NSA221 to a computer, switch, or router on your network.
9
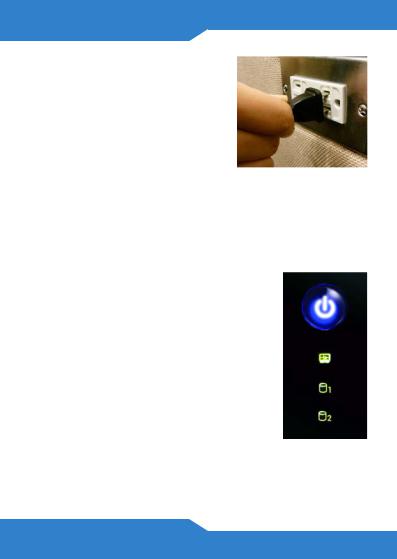
2.Use the included power supply and power cord to connect the POWER socket on the rear of the NSA221 to a power outlet.
Use ONLY the included power adapter.
3.Press the power button on the front of the NSA221 to turn it on. Look at the front panel lights.
If no lights turn on, make sure the power cord is not loose and that the power source is turned on.
•The power button light turns steady blue.
•The SYS light turns steady green after a successful startup (it takes about 50 seconds).
•The HDD lights come on if the NSA221 detects hard drives in the disk bays.
•The rear panel LAN port has a light that turns on if the Ethernet port is
properly connected to your network. It blinks while sending or receiving traffic.
10

ENGLISH
To turn off the NSA221, press the power button in and hold it until you hear a beep. Then release the button.
Access the NSA221
1.Insert the included CD into your CD-ROM drive. Click Setup in the screen that displays. Then click the NAS Starter Utility link.
If this screen does not display, use Windows Explorer (My Computer) to go to the CD-ROM. Double-click setup.exe.
11

2.The installation wizard begins. Follow the installer instructions. Click Finish to complete the installation.
3.In Windows, click Start > All Programs > ZyXEL > NSU to run the NAS Starter Utility. If your computer has more than one network card, then you will be prompted to select one.
12

ENGLISH
NSA221 Initialization
Make sure you have installed the hard drive before following these steps.
1.The utility discovers the NSA221 and information about your network. Click your NSA221’s button.
13

2. Click Run Initialization Wizard.
3.Enter the default username ‘admin’ and password ‘1234’ and click Next.
14

ENGLISH
The username and password are case sensitive. You may need to make sure you don’t have the caps lock on.
4.Choose Default Configuration (recommended) or manual configuration. For the manual option, refer to the help or the User’s Guide for more information. Then click Next and follow the screens to configure the NSA221.
5. You can now use your NSA221 and do the following:
15
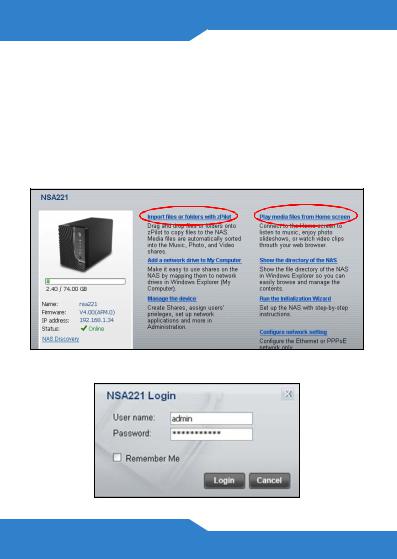
•Click Import files or folders with zPilot to launch zPilot. Drag files onto the zPilot icon to move them to the NSA221. Media files are automatically sorted into the Music, Photo, and Video folders. Other types of files go to the Public folder. For folders of files you are prompted to choose the target destination.
•Click Play Media Files from Home Screen to enjoy your media files though your web browser.
6. Enter your username and password and click Login.
16
ENGLISH
Log into the NSA221
This section shows you how to log into the NSA221 from your web browser.
If you cannot get to the login screen, see the troubleshooting section at the end of this guide.
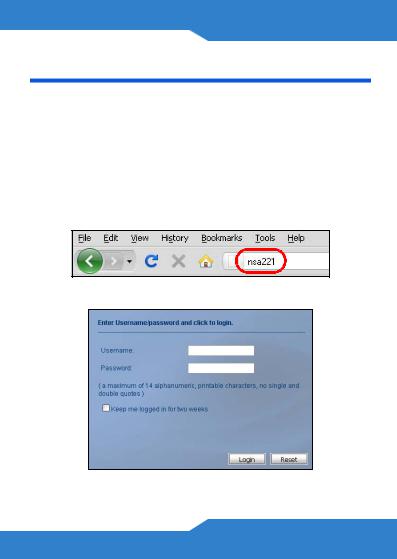
1.Open your web browser and type in the server name of the NSA221 (“nsa221” by default).
2.Enter your username and password and click Login.
17

3.The Home screen displays. Use the menus to play your media files.
Use the Memeo Autobackup software included on the CD to automatically back up selected files from your computer to the NSA221 whenever you modify the files. Refer to your User's Guide for details on this.
18
ENGLISH
Troubleshooting
Try the following if you cannot get to the NSA221 login screen.
•Make sure the NSA221 is turned on.
•Check the NSA221’s cable connections. Make sure the NSA221’s LAN LED (located on the LAN port) is on or flashing.
•If you were trying to login directly by typing the server name (default nsa221) into your web browsers address field, make sure you typed it correctly. If it still doesn’t work, try using the NAS Starter Utility.
•Make sure your computer’s IP address is in the same subnet as the NSA221’s IP address. You can use the NAS Starter Utility to find the NSA221’s IP address.
See the User’s Guide appendix on setting up your computer’s IP address for how to change your computer’s IP address. Skip this if you know that there are routers between your computer and the NSA221 (like if you are connecting through the Internet).
•Ping the NSA221 from your computer. Make sure your computer’s Ethernet adapter is installed and functioning properly. In a (Windows) computer, click
Start, (All) Programs, Accessories and then
19

Command Prompt. In the Command Prompt window, type “ping” followed by the NSA221’s IP address and press [ENTER]. Use the NAS Starter Utility to find the NSA221’s IP address if you don’t know it.
•Use Internet Explorer 6.0, Mozilla Firefox 2.00, or later versions of these with JavaScript enabled.
20

DEUTSCH
Einführung
Mit dem NSA221 können Sie in Ihrem Heimnetzwerk von verschiedenen Geräten aus gemeinsam auf Dateien zugreifen und Daten sichern. Sie können mit einem Medien-Client wie dem DMA-2500 auch Video-, Musikund Fotodateien abspielen, die auf dem Computer im NSA221 gespeichert sind.
So funktioniert es
NSA
Die obige Abbildung zeigt den NSA221 in einem Heimnetzwerk. Benutzer sichern Daten auf dem NSA221 und haben gemeinsamen Zugriff darauf. Der DMA-2500 spielt die Mediendateien des NSA221 auf
21

dem Fernsehgerät ab. Eine USB-Festplatte bietet zusätzlichen Speicherplatz, und Dateien werden durch Drücken der Taste COPY/SYNC direkt vom USBMemorystick auf den NSA221 geladen.
Schließen Sie das NAS möglichst hinter ihrem Router mit Firewall an.
Eine Beschreibung zum Konfigurieren aller Funktionen des NSA221 finden Sie im Benutzerhandbuch, das auf der CD enthalten ist.
Erste Schritte
•Installieren der Festplatten, 24
•Anschließen des NSA221, 28
•Zugreifen auf das NSA221, 30
•NSA221 Anmelden, 36
22

DEUTSCH
Vor der Installation
Bevor Sie anfangen, benötigen Sie Folgendes:
•Den NSA221
•Die mitgelieferte CD (mit dem NSA Starter UtilityProgramm, dem Memeo Autobackup-Programm, und dem Benutzerhandbuch)
•Netzadapter
•Das mitgelieferte Ethernet-Kabel
•Eine oder zwei Festplatten mit 15-poligen SATAAnschlüssen, die mit SATA I oder SATA II (3.0 Gbit/s) (Serial Advanced Technology Attachment) kompatibel sind.
•Kreuzschlitzschraubendreher zum Festschrauben der Festplatten in den Einschub.
•Enthalten sind Festplatten-Chassishalterungen (4) und Schrauben (8)
•Kreuzschraubendreher, um die Chassishalterunge an die Festplatte(n) zu schrauben
23

•USB-Kabel (optional: Dieses benötigen Sie nur, wenn Sie durch Anschließen von USB-Laufwerken (Ver. 2) die Speicherkapazität erweitern möchten). Es wird empfohlen, aktive USB Speichergeräte mit eigenem Netzadapter zu verwenden.
•Computer mit Netzwerkkarte (NIC) und installiertem TCP/IP Protokoll
•Netzwerkgerät wie Switch, Router oder Hub
Installieren der Festplatten
Sobald Sie eine Festplatte auf dem NSA221 installieren und ein Volume erstellen, werden alle auf der Disk vorhandenen Daten gelöscht. Wenn Sie zwei Festplatten installieren und sie als RAID-Volumes konfigurieren möchten, sollten Sie für eine optimale Leistung zweimal dasselbe Festplattenmodell mit derselben Größe verwenden.
Festplatten dürfen NICHT bei eingeschaltetem Gerät angeschlossen und abgetrennt werden. Schalten Sie das NSA221 aus, bevor Sie die Festplatte(n) einsetzen oder entfernen.
24

DEUTSCH
Beim Erstellen eines Volumes werden die Festplatten formatiert. Alle Daten gehen verloren. Bevor Sie die Festplatte im NSA221 installieren, sollten Sie alle anderen Dateien unbedingt an einem vorhandenen Speicherort sichern.
1.Stellen Sie sicher, dass das Netzund das Ethernetkabel vom NSA221 abgetrennt sind.
2.Legen Sie den NSA221 mit der Unterseite nach oben auf eine flache Unterlage. Drücken Sie einen Längsschlitzschraub endreher oder eine Münze in den Schlitz neben der
Frontplatte, und nehmen Sie die Frontplatte ab.
25

3. Setzen Sie eine |
A |
Chassishalterung (A) |
|
seitlich an die |
|
Festplatte an. |
|
Richten Sie das |
|
spitze Ende in |
|
Richtung |
|
Anschlussseite der |
|
Festplatte. Die |
|
größeren |
|
Schraublöcher |
|
müssen nach oben |
|
zeigen. Befestigen |
|
Sie die |
|
Chassishalterung mit |
|
den zwei mitgelieferten
Schrauben an der Festplatte. Führen Sie diesen Schritt an beiden Seiten der Festplatte aus.
26
DEUTSCH
4.Schieben Sie die Festplatte in die Lade, bis sie genau im NSA221 sitzt.
5.Befestigen Sie die Frontplatte.
27
Wenn Sie eine Festplatte entfernen müssen, verwenden Sie den Festplattengriff, der sich in der vorderen Abdeckung befindet.
Anschließen des NSA221
1.Schließen Sie das mitgelieferte EthernetKabel an den LAN-Port an der Rückseite des NSA221 und an einen Computer, Switch oder Router des Netzwerks an.
28
 Loading...