


NSA310
Quick Start Guide
1-Bay Media Server
Firmware Version 4.21
Edition 2, 7/2012
DEFAULT LOGIN DETAILS
Web Address |
nsa310 |
Password |
1234 |
CONTENTS
ENGLISH |
3 |
DEUTSCH |
13 |
ESPAÑOL |
24 |
FRANÇAIS |
34 |
|
|
ITALIANO |
45 |
NEDERLANDS |
56 |
SVENSKA |
67 |
|
|
|
77 |
|
|
www.zyxel.com |
C 2012 ZyXEL Communications Corporation |
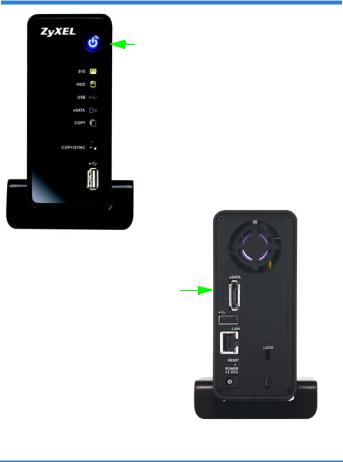
Device Panels
On / Off
 SYS LED
 HDD LED
 USB LED
 eSATA LED
 COPY LED
 COPY/SYNC button
 USB Port
eSATA Port
USB Port 
LAN Port 

RESET 

Power 
2
ENGLISH
Introduction
The NSA lets you share files and back up data on your home network. You can also play video, music, and photo files stored on the NSA using your computer or a media client such as the DMA2501.
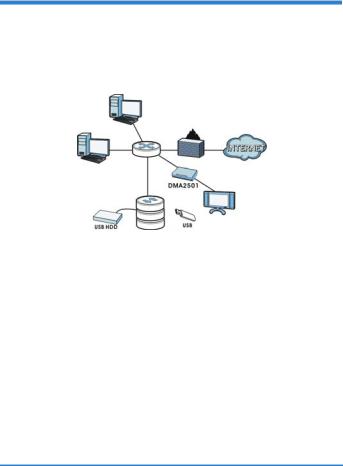
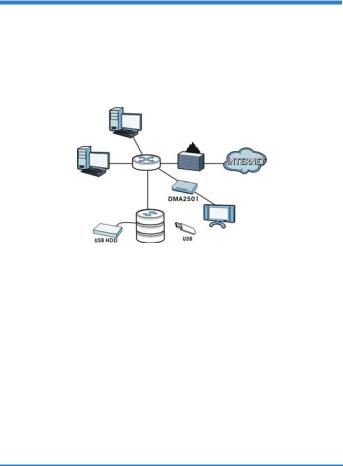
How It Works
NSA
Above is the NSA in a home network. Users back up and share data on the NSA. The DMA2501 plays the NSA’s media files on the TV. A USB hard drive provides extra storage space and files are copied directly from the USB memory stick to the NSA by using the COPY/SYNC button.
Place the NSA behind a firewall and/or IDP (Intrusion Detection and Prevention) device to protect it from attacks from the Internet.
See the User’s Guide on the included CD for details on configuring all of the NSA’s features.
This Quick Start Guide shows you how to:
•Install Hard Drive, 4
•Connect the NSA, 6
•Access the NSA310, 7
•Log into the NSA, 11
•Troubleshooting, 12
3

Before You Begin
You need the following before you start:
•NSA
•Included CD containing the NAS Starter Utility and User’s Guide
•Power adapter
•Included Ethernet cable
•One SATA II or SATA III compatible hard disk
•eSATA hard disk and cable (optional)
•USB cable (optional: you only need this if you want to expand storage capacity by connecting USB drives). Make sure that the USB device use it’s own external power adapter if it has one.
•Computer with an Ethernet port
•Network device such as a switch, router, or hub (optional)
Install Hard Drive
Once you install a hard drive on the NSA and create a volume, all existing data on the disk will be erased.
The NSA must be turned off before you remove or install hard drive.
Creating a volume formats the hard drive. All data will be lost. Back up any files on the disk to another location before you install the disk in the NSA.
1.Make sure the power and Ethernet cords are disconnected from the NSA.
4

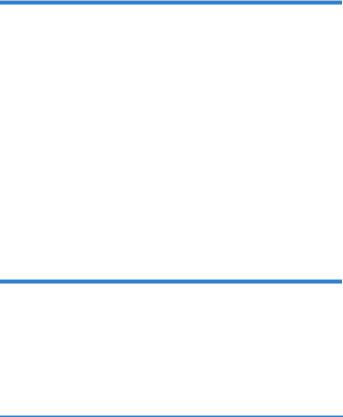
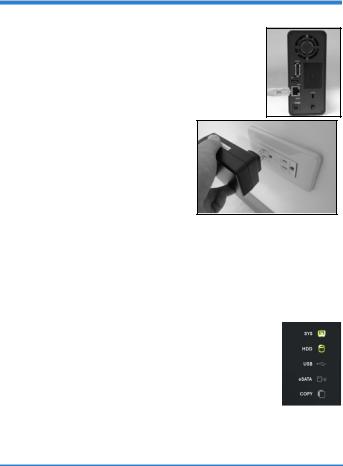
2.Place the NSA on a flat surface with the bottom panel facing up. This exposes the bottom panel where the thumbscrew is located. Loosen the thumbscrew using a flat head screwdriver or a coin.
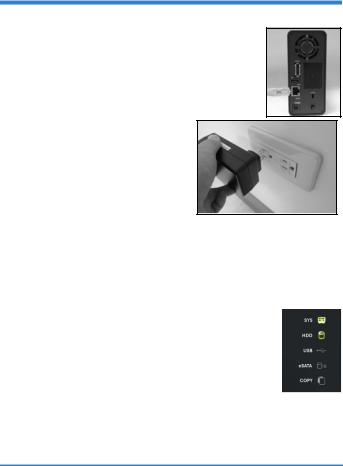
3. Bring the NSA to an upright position and take off the front lid to open the hard disk tray as shown in the following:
4. Slide in the hard disk into the tray until the hard disk is fitted snugly inside the NSA.
5.Attach the front panel to cover the hard disk tray. Place the NSA on a flat surface with the bottom panel facing up and tighten the screw.
If you want to use two hard drives and configure them as RAID volumes, you should have: 1) a SATA hard disk installed inside the NSA; and 2) an eSATA hard disk with its cable. It is also recommended to use the same disk size and model for best performance. Refer to the User’s Guide for the steps to create volumes on your NSA.
5
Connect the NSA
1.Use the included Ethernet cable to connect the LAN port on the rear of the NSA to a computer, switch, or router on your network.
2. Connect one end of the power cord to the POWER socket on the rear of the NSA and the other end to the external power supply. Connect the external power supply to a power outlet.
Use ONLY the included power adapter.
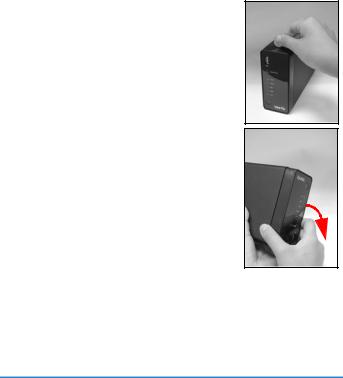
3. Press the power button on the front of the NSA to turn it on. Look at the front panel lights.
If no lights turn on, make sure the power cord is not loose and that the power source is turned on.
•The power button light turns steady blue.
•The SYS light turns steady green after a successful startup (it takes about 50 seconds).
•The HDD lights come on if the NSA detects hard drives in the disk bays.
•The rear panel LAN port has a light that turns on if
the Ethernet port is properly connected to your network. It blinks while sending or receiving traffic.
To turn off the NSA, press the power button in and hold it until you hear a beep. Then release the button.
6
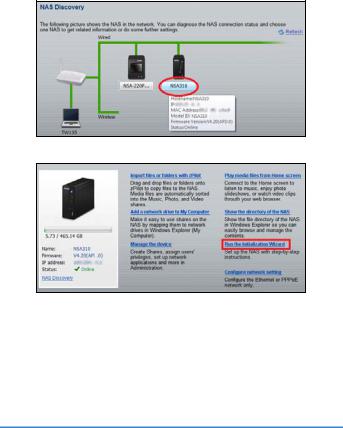
Access the NSA310
Use the NAS Starter Utility to access the NSA. Follow these steps:
1.Insert the included CD into your CD-ROM drive. Click Setup in the screen that displays. Then click the NAS Starter Utility link.
If this screen does not display, use Windows Explorer (My Computer) to go to the CD-ROM. Double-click setup.exe.
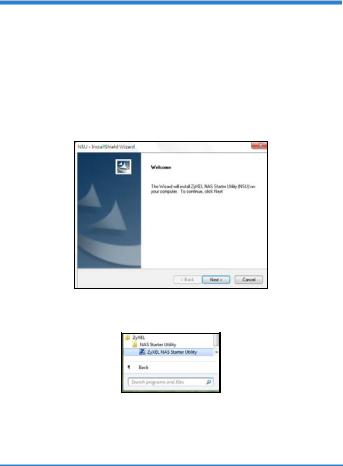
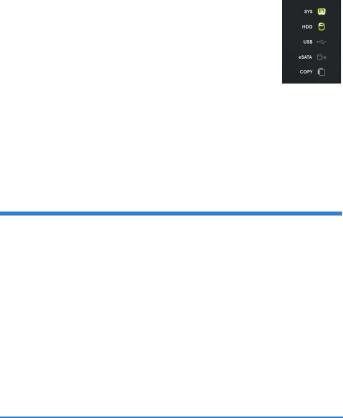
2.The installation wizard begins. Follow the installer instructions. Click Finish to complete the installation.
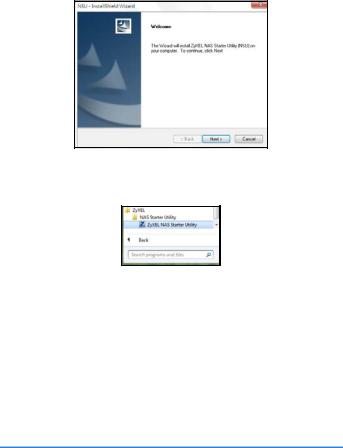
3.In Windows, click Start > All Programs > ZyXEL > NAS Starter Utility > ZyXEL NAS Starter Utility to run the NAS Starter Utility.
7
NSA Initialization
Make sure you have installed the hard drive before following these steps.
1. Click NSA310.
2. Click Run the Initialization Wizard.
8
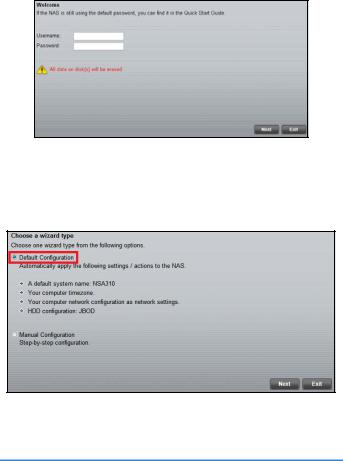
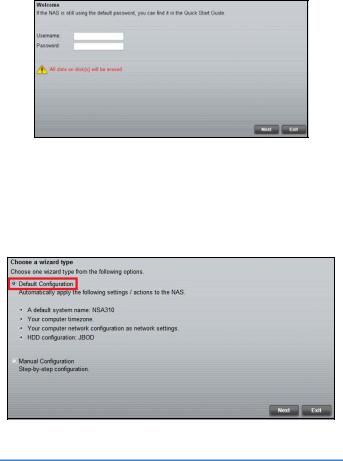
3.Enter the default username ‘admin’ and password ‘1234’ and click
Next.
The username and password are case sensitive. You may need to make sure you don’t have the caps lock on.
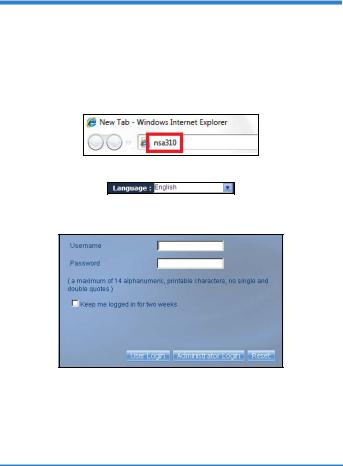
4.Choose Default Configuration (recommended) or manual configuration. For the manual option, refer to the help or the User’s Guide for more information. Then click Next and follow the screens to configure the NSA.
5. You can now use your NSA and do the following:
9
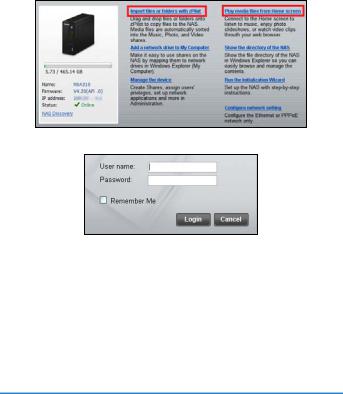
•Click Import files or folders with zPilot to launch zPilot. Drag files onto the zPilot icon to move them to the NSA. Media files are automatically sorted into the Music, Photo, and Video folders. Other types of files go to the Public folder. For folders of files you are prompted to choose the target destination.
•Click Play media files from Home screen to enjoy your media files though your web browser.
6. Enter your username and password and click Login.
10
Log into the NSA
This section shows you how to log into the NSA from your web browser.
If you cannot get to the login screen, see the troubleshooting section at the end of this guide.
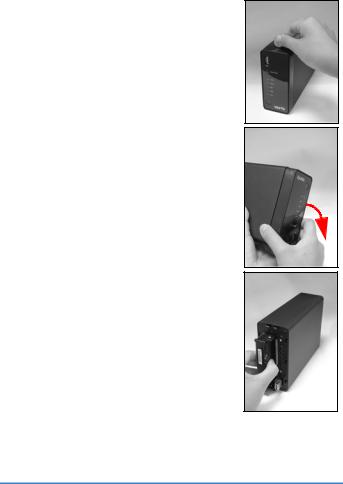
1.Open your web browser and type in the server name of the NSA (“nsa310” by default).
2.Select your language.
3.Enter your username and password and click User Login.
4. The Home screen displays. Use the menus to play your media files.
11

Troubleshooting
Try the following if you cannot get to the NSA login screen.
•Make sure the NSA is turned on.
•Check the NSA’s cable connections. Make sure the NSA’s LAN LED (located on the LAN port) is on or flashing.
•If you were trying to login directly by typing the server name (default nsa310) into your web browsers address field, make sure you typed it correctly. If it still doesn’t work, try using the NAS Starter Utility.
•Make sure your computer’s IP address is in the same subnet as the NSA’s IP address. You can use the NAS Starter Utility to find the NSA’s IP address. See the User’s Guide appendix on setting up your computer’s IP address for how to change your computer’s IP address. Skip this if you know that there are routers between your computer and the NSA (like if you are connecting through the Internet).
•Ping the NSA from your computer. Make sure your computer’s Ethernet adapter is installed and functioning properly. In a (Windows) computer, click Start, (All) Programs, Accessories and then Command Prompt. In the Command Prompt window, type “ping” followed by the NSA’s IP address and press [ENTER]. Use the NAS Starter Utility to find the NSA’s IP address if you don’t know it.
•Use Internet Explorer 7, Mozilla Firefox 3.6, or later versions of these with JavaScript enabled.
12
DEUTSCH
Einführung
Mit dem NSA können Sie in Ihrem Heimnetzwerk von verschiedenen Geräten aus gemeinsam auf Dateien zugreifen und Daten sichern. Sie können mit einem Medien-Client wie dem DMA2501 auch Video-, Musikund Fotodateien abspielen, die auf dem NSA gespeichert sind.
So funktioniert es
NSA
Die obige Abbildung zeigt den NSA in einem Heimnetzwerk. Benutzer sichern Daten auf dem NSA und haben gemeinsamen Zugriff darauf. Der DMA2501 spielt die Mediendateien des NSA auf dem Fernsehgerät ab. Eine USB-Festplatte bietet zusätzlichen Speicherplatz, und Dateien werden durch Drücken der Taste COPY/SYNC direkt vom USBMemorystick auf den NSA geladen.
Schließen Sie das NAS möglichst hinter ihrem Router mit Firewall an. Eine Beschreibung zum Konfigurieren aller Funktionen des NSA finden Sie im Benutzerhandbuch, das auf der CD enthalten ist.
Erste Schritte
•Installieren der Festplatten, 14
•Anschließen des NSA, 16
•Zugreifen auf das NSA310, 17
13
•NSA Anmelden, 22
•Problembeseitigung, 23
Vor der Installation
Bevor Sie anfangen, benötigen Sie Folgendes:
•Den NSA
•Die mitgelieferte CD (mit dem NSA Starter Utility-Programm und dem Benutzerhandbuch)
•Netzadapter
•Das mitgelieferte Ethernet-Kabel
•Eine Festplatte mit 15-poligen SATA-Anschlussen, die mit SATA II oder SATA III kompatibel sind.
•eSATA-Festplatte und Kabel (optional)
•USB-Kabel (optional: Dieses benötigen Sie nur, wenn Sie durch Anschließen von USB-Laufwerken (Ver. 2) die Speicherkapazität erweitern möchten). Es wird empfohlen, aktive USB Speichergeräte mit eigenem Netzadapter zu verwenden.
•Computer mit Netzwerkkarte (NIC) und installiertem TCP/IP Protokoll
•Netzwerkgerät wie Switch, Router oder Hub
Installieren der Festplatten
Sobald Sie eine Festplatte auf dem NSA installieren und ein Volume erstellen, werden alle auf der Disk vorhandenen Daten gelöscht.
Schalten Sie das NSA aus, bevor Sie die Festplatte(n) einsetzen oder entfernen.
14
Beim Erstellen eines Volumes werden die Festplatten formatiert. Alle Daten gehen verloren. Bevor Sie die Festplatte im dem NSA installieren, sollten Sie alle anderen Dateien unbedingt an einem vorhandenen Speicherort sichern.
1.Stellen Sie sicher, dass das Netzund das Ethernetkabel vom NSA abgetrennt sind.
2.Legen Sie den NSA mit der Unterseite nach oben auf eine flache Unterlage. An dieser Unterseite befindet sich eine Rändelschraube. Lösen Sie diese Schraube mit einem Schlitzschraubendreher oder einer Münze.
3. Stellen Sie den NSA aufrecht hin, und nehmen sie die vordere Abdeckung ab, um die Festplattenlade zu öffnen (siehe Abbildung).
15

4.Schieben Sie die Festplatte in die Lade, bis sie ganz im NSA sitzt.
5.Befestigen Sie die vordere Abdeckung wieder, um die Festplatte zu verdecken. Legen Sie den NSA wieder mit der Unterseite nach oben auf eine flache Unterlage, und ziehen Sie die Schraube fest.
Falls Sie zwei Festplatten verwenden möchten und diese als RAID Verbund konfigurieren möchten benötigen Sie: 1) eine SATA Festplatte installiert im NSA; und 2) eine eSATA Festplatte mit entsprechendem Anschlusskabel. Für
bestmögliche Leistung wird zudem empholen Festplatten vom gleichen Modell und gleicher Kapazität zu verwenden. Die weiteren Schritte zum Erstellen von Volumes im NSA entnehmen Sie bitte dem Handbuch.
Anschließen des NSA
1.Schließen Sie das mitgelieferte Ethernet-Kabel an den LAN-Port an der Rückseite des NSA und an einen Computer, Switch oder Router des Netzwerks an.
2. Schließen Sie ein Ende des Netzkabels an den POWER- Anschluss an der Rückseite des NSA und das andere Ende an das externe Netzteil an. Schließen Sie das externe Netzteil an eine Netzsteckdose an.
Verwenden Sie NUR das mitgelieferte Netzteil.
16
3. Drücken Sie auf die Ein/Aus-Taste an der Vorderseite des NSA, um das Gerät einzuschalten. Die LED-Anzeigen befinden sich an der Gerätevorderseite.
Wenn keine Anzeige leuchtet, prüfen Sie noch einmal die Kabelanschlüsse und die Stromquelle.
•Die Betriebsanzeige-LED leuchtet blau.
•Die SYS-LED leuchtet nach einem erfolgreichen Hochfahren des Geräts grün (dies dauert etwa 50 Sekunden).
•Die HDD-LED leuchtet, wenn das NSA in den Laufwerkschächten Festplatten erkennt.
•Der LAN-Anschluss an der Rückseite hat eine LED-
Anzeige, diese leuchtet, wenn der Ethernet-Anschluss richtig mit dem Netzwerk verbunden ist. Sie blinkt, wenn Daten gesendet oder empfangen werden.
Um das NSA auszuschalten, drücken Sie so lange auf die Ein/Aus-Taste, bis ein Signalton zu hören ist. Lassen Sie dann die Taste los. Der Gerät wird dann sicher herunter gefahren.
Zugreifen auf das NSA310
Verwenden Sie das NAS Starter-Utility, um auf den NSA zuzugreifen. Führen Sie diese Schritte aus:
1.Legen Sie die mitgelieferte CD in das CD-ROM-Laufwerk ein. Klicken Sie im nächsten Fenster auf Setup (Installieren). Klicken Sie dann auf die Verknüpfung NAS Starter Utility.
Wenn dieses Fenster nicht gezeigt wird, rufen Sie mit Windows Explorer (Arbeitsplatz) die CD-ROM (normalerweise Laufwerk D) auf. Klicken Sie doppelt auf setup.exe um die Installation manuell zu starten.
17
2.Auf dem Bildschirm wird der Installationsassistent angezeigt. Führen Sie die Anweisungen auf dem Bildschirm aus. Klicken Sie auf Finish (Fertig stellen), um die Installation abzuschließen.
3.Um das Discovery Utility zu starten, klicken Sie bei Windows auf
Start > Alle Programme > ZyXEL > NSA Starter Utility > ZyXEL NSA Starter Utility.
NSA Initialisierung
Stellen Sie sicher, dass die Festplatte installiert ist, bevor Sie diese Schritte ausführen.
18

1. Klicken Sie auf NSA310.
2.Klicken Sie auf Run the Initialization Wizard
(Initialisierungsassistent starten).
19
3.Geben Sie den Standard-Benutzernamen ‘admin’ und das StandardKennwort ‘1234’, und klicken Sie auf Next (Weiter).
Achten Sie bei der Eingabe des Benutzernamens und des Kennworts auf Großund Kleinschreibung. Die Feststelltaste darf nicht aktiviert sein.
4.Wählen Sie die Option Default Configuration
(Standardkonfiguration) (empfohlen), oder manuelle Konfiguration. Informationen zur manuellen Konfiguration finden Sie im Benutzerhandbuch. Klicken Sie auf Next (Weiter), und folgen Sie den Anweisungen der nächsten Fenster, um den NSA zu konfigurieren.
5. Sie können jetzt den NSA verwenden und folgendes tun:
20
•Klicken Sie auf Import files or folders with zPilot (Dateien oder Ordner mit zPilot importieren), um zPilot zu starten. Verschieben Sie Dateien auf das zPilot-Symbol, um sie auf den NSA zu verlagern. Mediendateien werden automatisch in die Ordner Music (Musik), Photo (Foto) und Video sortiert. Andere Dateitypen werden in den Ordner Public (Öffentlich) verschoben. Sie werden aufgefordert, den Speicherort für die Ordner und Dateien anzugeben.
•Klicken Sie auf Play media files from Home screen
(Mediendateien über das Startfenster abspielen), um Ihre Mediendateien über Ihren Internetbrowser abzuspielen.
6.Geben Sie Ihren Benutzernamen und das Kennwort ein, und klicken Sie auf Login (Anmelden).
21
NSA Anmelden
In diesem Abschnitt erfahren Sie, wie Sie sich über ihren Internetbrowser beim NSA anmelden.
Wenn das Anmeldefenster nicht angezeigt wird, lesen Sie im Abschnitt Problembeseitigung am Ende dieser Anleitung nach.
1.Öffnen Sie Ihren Internetbrowser, und geben Sie den Servernamen des NSA (standardmäßig "nsa310") ein.
2.Wahlen sie ihre Sprache.
1.Geben Sie Ihren Benutzernamen und das Kennwort ein, und klicken Sie auf User Login (Anmelden).
2. Das Fenster Home wird angezeigt.
22

Problembeseitigung
Wenn Sie nicht das Anmeldefenster des NSA aufrufen können, versuchen Sie Folgendes.
•Stellen Sie sicher, dass der NSA eingeschaltet ist.
•Prüfen Sie die Kabelverbindungen des NSA. Stellen Sie sicher, dass die LAN-LED des NSA (am LAN-port) leuchtet oder blinkt.
•Prüfen Sie, ob Sie den Servernamen (Standard nsa310) richtig in das Adressfeld des Internetbrowsers eingegeben haben. Versuchen Sie es mit dem NAS Starter-Utility.
•Stellen Sie sicher, dass sich die IP-Adresse des Computers im selben Subnetz wie die des NSA befindet. Sie können die IPAdresse des NSA mit dem Discovery Utility ermitteln. Eine Anleitung zum Einrichten oder Ändern der IP-Adresse des Computers finden Sie im Anhang des Benutzerhandbuchs. Überspringen Sie diesen Schritt, wenn sich zwischen dem Computer und dem NSA keine Router befinden (wenn Sie z. B. über das Internet verbunden sind).
•Versuchen Sie den NSA mit dem Ping Befehl vom Computer aus zu erreichen. Stellen Sie sicher, dass der Ethernet-Adapter des Computers angeschlossen ist und richtig funktioniert. Klicken Sie bei einem Windows-Computer auf Start, (Alle) Programme, Zubehör und dann auf Eingabeaufforderung. Geben Sie im Fenster der Eingabeaufforderung "Ping" und dann die IP-Adresse des NSA ein, und drücken Sie auf die Eingabetaste. Finden Sie die IPAdresse des NSA mit dem Discovery Utility-Programm heraus.
•Verwenden Sie Internet Explorer 7, Mozilla Firefox 3.6, oder spätere Versionen davon mit aktivierter Java-Script-Unterstützung.
23

ESPAÑOL
Introducción
El NSA le permite compartir archivos y copiar datos en su red doméstica. También puede reproducir vídeo, música y archivos de fotos guardados en el NSA utilizando su ordenador o un cliente de medios como el DMA2501.
Cómo funciona
NSA
Arriba el NSA está en una red doméstica. Los usuarios realizan copias de seguridad y comparten los datos en el NSA. El DMA2501 reproduce los archivos de medios del NSA en el televisor. Una unidad de disco duro USB ofrece espacio de almacenamiento extra y los archivos son copiados directamente de la unidad USB al NSA usando el botón
COPY/SYNC.
Proteja el NSA con un cortafuegos y/o un dispositivo IDP (Intrusion Detection and Prevention) para protegerlo de los ataques de Internet. Consulte la Guía del usuario en el CD incluido para más detalles sobre la configuración de todas las características del NSA.
Esta Guía de instalación rápida le muestra cómo:
•Instalar discos duros, 25
•Conectar el NSA, 27
•Acceso al NSA310, 28
24

•Inicio de sesión al NSA, 32
•Solución de problemas, 33
Antes de comenzar
Necesita lo siguiente antes de comenzar:
•NSA
•El CD incluido que contiene la utilidad NSA Starter y la Guía del usuario
•Adaptador de corriente
•Cable Ethernet incluido
•Un disco duro compatible SATA II o SATA III
•Disco duro eSATA y cable (opcional)
•Cable USB (opcional: sólo lo necesita si desea ampliar la capacidad de almacenamiento conectando unidades USB (versión 2 compatibles). Se recomienda que el dispositivo USB utilice su propio adaptador externo si tiene uno.
•Ordenador con Network Interface Card (NIC) y TCP/IP instalados
•Dispositivo de red como un switch, router o hub
Instalar discos duros
Una vez instalado el disco duro en el NSA y creado un volumen, se borrarán todos los datos existentes en el disco.
El NSA debe apagarse antes de quitar o instalar la(s) unidad(es) de disco duro.
Al crear un volumen se formatea la unidad de disco. Se perderán todos los datos. Realice copias de seguridad de los archivos en el disco en otra ubicación antes de instalar el disco en el NSA.
1. Compruebe que los cables Ethernet estén desconectados del NSA.
25
2.Coloque el NSA en una superficie plana con el panel inferior mirando hacia arriba. Esto deja expuesto el panel inferior donde está situado el tornillo. Afloje el tornillo con un destornillador de cabeza plana o con una moneda.
3. Coloque el NSA hacia arriba y quite la tapa frontal para abrir el disco duro.
4. Coloque el disco duro en la bandeja hasta que quede ajustado dentro del NSA.
5.Coloque el panel frontalpara cubrir la bandeja del disco duro. Coloque el NSA en una superficie plana con el panel inferior mirando arriba y apriete el tornillo.
Si desea usar dos discos duros y configurarlos como volúmenes RAID, debería tener: 1) un disco duro SATA instalado en el NSA; y 2) un disco duro eSATA con su cable. También se recomienda que utilice el mismo tamaño de disco y modelo para obtener el mejor
rendimiento. Consulte la Guía del usuario para ver los pasos para crear volúmenes en su NSA.
26
Conectar el NSA
1.Utilice el cable Ethernet incluido para conectar el puerto LAN de la parte posterior del NSA a un ordenador, switch o router en su red.
2. Conecte un extremo del cable de alimentación en el zócalo POWER de la parte posterior del NSA y el otro extremo en la fuente de alimentación externa. Conecte la fuente de alimentación externa en una toma de corriente.
Utilice SOLAMENTE la fuente de alimentación incluida.
3.Pulse el botón de alimentación de la parte frontal del NSA para encenderlo. Fíjese en las luces del panel frontal.
Si no se encienden luces, compruebe que el cable de alimentación no esté suelto y que la fuente de alimentación esté encendida.
•La luz del botón de alimentación permanece encendida en azul.
•La luz SYS permanece encendida en verde tras un arranque con éxito (tarda unos 50 segundos).
•La luz HDD se enciende si el NSA detecta discos duros en las bahías para discos.
•El puerto LAN del panel posterior tiene una luz que se enciende si el puerto Ethernet está correctamente conectado en su red. Parpadea mientras envía o recibe tráfico.
27
 Loading...