


Operation Manual
© 2018 ZOOM CORPORATION
Reproduction of this manual in whole or in part by any means without permission is prohibited.
|
|
Usage and safety precautions |
||
|
|
SAFETY PRECAUTIONS |
|
|
|
|
|
Precautions |
|
|
|
In this operation manual, symbols are used to |
Product handling |
|
|
|
highlight warnings and cautions that you must |
||
|
|
|
Do not drop, bump or apply excessive |
|
|
|
read to prevent accidents. The meanings of |
|
|
|
|
|
force to the unit. |
|
|
|
these symbols are as follows. |
|
|
|
|
|
Be careful not to allow foreign objects or |
|
|
|
|
|
|
|
|
Something that could cause serious |
|
liquids enter the unit. |
|
|
Warning injury or death |
Operating environment |
|
|
|
|
|
Do not use in extremely high or low |
|
|
Something that could cause injury |
|
|
|
|
|||
|
|
|
temperatures. |
|
Usage |
|
Caution or damage to the equipment |
|
|
|
|
Do not use near heaters, stoves and other |
||
|
|
|
||
|
Other symbols used |
|||
|
|
heat sources. |
||
and |
|
An action that is mandatory |
|
Do not use in very high humidity or where |
|
|
|
||
|
|
|
it could be splashed by water. |
|
safety |
|
|
|
|
|
An action that is prohibited |
|||
|
|
vibrations. |
||
|
|
|
|
Do not use in places with frequent |
precautions |
|
Use only a ZOOM AD-17 AC adapter (sold |
|
When disconnecting the power plug from |
|
|
Warnings |
|
Do not use in places with much dust or |
|
|
|
|
sand. |
|
|
Operation using an AC adapter |
AC adapter handling |
|
|
|
|
|
|
|
|
separately) with this unit. |
|
an outlet, always hold the plug when |
|
|
Do not do anything that could exceed the |
|
pulling. |
|
|
ratings of outlets and other electrical wir- |
|
Disconnect the power plug from the out- |
|
|
ing equipment. |
|
let during lightning storms and when not |
|
|
Do not use with power other than AC |
|
using the unit for a long time. |
|
|
100V. Before using the equipment in a for- |
Battery handling |
|
|
|
eign country or other region with a power |
|
Install the batteries with the correct |
|
|
voltage other than AC100V, always consult |
|
+/− orientation. |
|
|
with a shop that carries ZOOM products |
|
Use a specified battery type. Do not mix |
|
|
and use the appropriate AC adapter. |
|
new and old batteries or different brands |
|
Operation using batteries |
|
or types at the same time. |
|
|
|
Use 4 conventional 1.5-volt AA batteries |
|
When not using the unit for an extended |
|
|
|
period of time, remove the batteries. |
|
|
|
(alkaline or nickel-metal hydride). |
|
|
|
|
|
If a battery leak should occur, wipe the |
|
|
|
Read battery warning labels carefully. |
|
|
|
|
|
battery compartment and the battery ter- |
|
|
|
Always close the battery compartment |
|
|
|
|
|
minals carefully to remove all residue. |
|
|
|
cover when using the unit. |
|
|
|
|
|
|
|
|
Alterations |
|
|
|
 Do not open the case or modify the 02 product.
Mics
 Before connecting a mic, always turn the power off. Do not use excessive force when connecting a unit
 When not using a mic for a long time, put the protective cap on.
Connection cables and input/output jacks
 Always turn the power OFF for all equipment before connecting any cables.
 Always disconnect all connection cables and the AC adapter before moving the unit.
Volume
 Do not use at a loud volume for a long time.
Usage Precautions
Interference with other electrical equipment
In consideration of safety, the  has been designed to minimize its emission of electromagnetic waves and to suppress interference from external electromagnetic waves. However, equipment that is very susceptible to interference or that emits powerful electromagnetic waves could result in interference if placed nearby. If this occurs, place the
  and the other device farther apart.
With any type of electronic device that uses digital control, including the  , electromagnetic interference could cause malfunction, corrupt or destroy data and result in other unexpected trouble. Always use caution.
Cleaning
Use a soft cloth to clean the exterior of the unit if it becomes dirty. If necessary, use a damp cloth that has been wrung out well.
Never use abrasive cleansers, wax or solvents such as alcohol, benzene or paint thinner.
Breakdown and malfunction
If the unit becomes broken or malfunctions, immediately disconnect the AC adapter, turn the power OFF and disconnect other cables. Contact the store where you bought the unit or ZOOM service with the following information: product model, serial number and specific symptoms of breakdown or malfunction, along with your name, address and telephone number.
Copyrights
ږ Windows®, Windows® 8, Windows® 7, Windows Vista® and Windows® XP are trademarks or registered trademarks of Microsoft Corporation.
ږ Macintosh, Mac OS and iPad are trademarks or registered trademarks of Apple Inc.
ږThe SD, SDHC and SDXC logos are trademarks.
ږ The use of MPEG Layer-3 audio compression technology is licensed from Fraunhofer IIS and Sisvel SpA.
ږAll other product names, trademarks and company names in this document are the property of their respective owners.
Note: All trademarks and registered trademarks in this document are for identification purposes only and are not intended to infringe on the copyrights of their respective owners.
Recording for any purpose other than personal use from copyrighted sources, including CDs, records, tapes, live performances, video works and broadcasts, without permission of the copyright holder is prohibited by law.
Zoom Corporation will not assume any responsibility related to infringements of copyrights.

Introduction
Thank you very much for purchasing a ZOOM  Handy Recorder.The
  has the following features.
Ɣ Stereo mics can be changed according to use
An XY mic that can record sound images with depth and an MS mic that allows the stereo width to be adjusted freely are included.You can switch mics according to the situation as you would switch lenses on an SLR camera.
Options include a highly-directional shotgun mic and an external XLR/TRS input.
Ɣ Record up to 6 track at once
In addition to the swappable stereo mic (L/R input), the main unit has 4 XLR/TRS inputs (Inputs 1–4).
Use these to simultaneously record a maximum of 6 tracks, including ambiance, narration, a stereo image and the voices of multiple performers, for example.
Ɣ Advanced recording features
•The XY mic, which has newly-developed 14.6mm large diaphragm mics, records the full range of frequencies with good stereo placement.
•Using the L/R input mics, you can simultaneously record a backup file with a recording level that is 12 dB less than the regular recording.You can use this backup recording if an unexpected loud noise should cause the regular recording to distort, for example.
H6 Handy Recorder
•Inputs 1–4 have increased maximum gain compared to previous models. In response to popular demand, they have independent PAD switches that allow them to easily handle +4dB input.They can also provide phantom power (+12V/+24V/+48V).
•All input volume (gain) levels can be adjusted quickly by hand using dedicated knobs.
Ɣ Useful operation features
•High-capacity SDXC cards can be used as recording media, allowing even longer recording times.
•The color LCD is positioned to be easy to read even when mounted on an SLR camera.
•In addition to the standard headphones output, a line output jack is built-in.This allows you to send the audio signal to a video camera or other device while monitoring with headphones.
•When the  is connected by USB, in addition to card reader functions, it can be used as an audio interface that is either 2 IN and 2 OUT or 6 IN and 2 OUT (driver required for 6 IN use with Windows).
•Of course, a tuner, a metronome and playback speed and pitch adjustments are included among the useful functions that are also found in other models in the H series.
•An optional remote control (wired) is also available.
Please read this manual carefully to fully understand the functions of the  so that you can make the most of it for many years. After reading the manual, please keep it with the warranty in a safe place.
Introduction
03

Contents
Contents |
|
Usage and safety precautions............................... |
02 |
Introduction ............................................................ |
03 |
Contents.................................................................. |
04 |
Included items ........................................................ |
05 |
Names of parts ...................................................... |
06 |
Mic overview ......................................................... |
08 |
XY mic .................................................................. |
08 |
MS mic ................................................................. |
08 |
Connecting and disconnecting mics .................... |
09 |
Mic connection .................................................. |
09 |
Mic disconnection ............................................. |
09 |
Connecting mics/other devices to Inputs 1–4 ...... |
10 |
Connecting mics.................................................. |
10 |
Connecting instruments/other devices.............. |
10 |
Stereo inputs ....................................................... |
10 |
Connection examples ......................................... |
11 |
Optional accessories ............................................. |
12 |
Display overview.................................................... |
14 |
Home/Recording Screen .................................... |
14 |
Playback Screen .................................................. |
15 |
Preparations |
|
Supplying power ................................................... |
16 |
Using batteries .................................................... |
16 |
Using an AC adapter (sold separately) ............. |
17 |
Loading an SD card................................................ |
18 |
Turning the power on and off................................ |
19 |
Turning the power on.......................................... |
19 |
Turning the power off ......................................... |
19 |
Using the hold function ......................................... |
20 |
Activating the hold function............................... |
20 |
Deactivating the hold function........................... |
20 |
Setting the language.............................................. |
21 |
Setting the date and time ...................................... |
22 |
Setting the type of battery used............................ |
23 |
Recording |
|
Recording process.................................................. |
24 |
Folder and file structure......................................... |
25 |
Basic recording....................................................... |
26 |
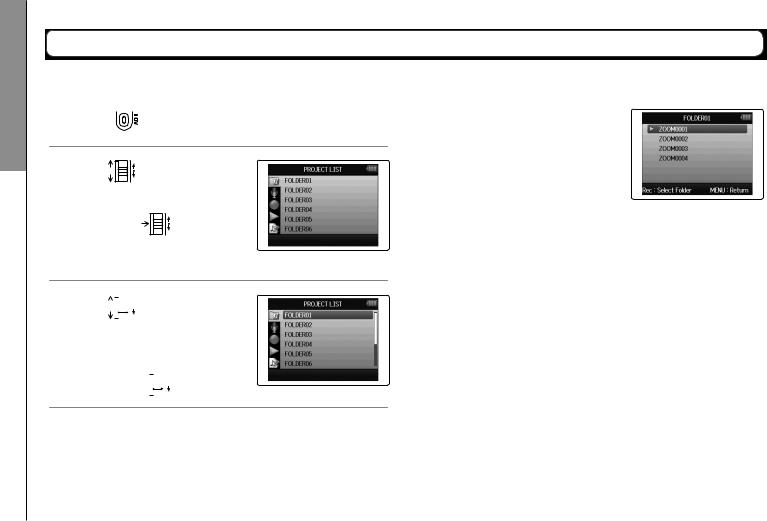
Selecting the folder where projects are saved .... |
28 |
Recording automatically........................................ |
29 |
Pre-recording.......................................................... |
31 |
Counting in before recording................................ |
32 |
Adjusting the side mic level .................................. |
33 |
Backup recording ................................................... |
34 |
Overdubbing........................................................... |
35 |
Playback |
|
Basic playback ........................................................ |
38 |
Select the playback project from the list .............. |
40 |
Changing the playback speed ............................... |
41 |
Repeat playback of a set interval (AB repeat) ...... |
42 |
Changing the playback mode................................ |
44 |
Changing the playback pitch (key) ........................ |
45 |
Mixing ..................................................................... |
46 |
Checking/editing projects/files |
|
Checking project information................................ |
48 |
Checking track marks ............................................. |
49 |
Changing project names........................................ |
50 |
Mixing down a project........................................... |
52 |
Normalizing tracks ................................................. |
54 |
Dividing projects .................................................... |
56 |
Trimming project beginnings and ends ............... |
58 |
Deleting one project............................................... |
60 |
Deleting all projects in a folder ............................. |
61 |
Rebuilding a project............................................... |
62 |
Recording a project voice memo .......................... |
63 |
Playing backup files ............................................... |
64 |
USB functions |
|
Data exchange with computers (card reader)...... |
66 |
Using as an audio interface................................... |
68 |
Audio interface settings......................................... |
70 |
Making direct monitoring settings..................... |
70 |
Using Loop Back (in stereo mix mode) ............. |
71 |
Mixing the inputs ................................................ |
72 |
Tools |
|
Using the tuner....................................................... |
74 |
Using the metronome............................................ |
76 |
Other settings |
|
Reducing noise (low cut filter) .............................. |
78 |
Using the input compressor/limiter...................... |
79 |
Adjusting the input signal monitoring mix.......... |
80 |
Monitoring MS-RAW signals................................. |
82 |
Setting the recording format................................. |
83 |
Changing automatic recording settings ............... |
84 |
Enabling automatic stopping ............................ |
85 |
Setting how projects are named ........................... |
86 |
Changing the phantom power setting.................. |
87 |
Using plug-in power .............................................. |
88 |
Using VU meters to check input levels ................. |
89 |
Setting the display to save power ........................ |
90 |
Adjusting the display brightness .......................... |
91 |
Checking the firmware versions............................ |
92 |
Restoring the default settings ............................... |
93 |
Other functions |
|
Checking SD card open space............................... |
94 |
Formatting SD cards .............................................. |
95 |
Testing SD card performance................................ |
96 |
Updating the firmware........................................... |
98 |
Using SD cards from older H series recorders .... |
99 |
Using a remote control (sold separately)........... |
100 |
Troubleshooting ................................................... |
101 |
Specifications ....................................................... |
102 |
04
H6 Handy Recorder
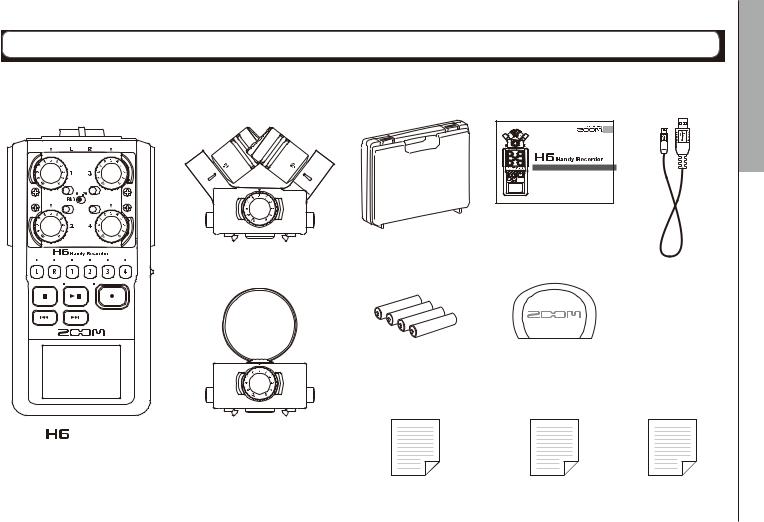
Included items
The package should contain the following items.
Please confirm that they have all been included.
Main unit case
XY mic
|
© 2013 ZOOM CORPORATION |
|
|
Operation manual (this document)
USB cable
4 AA batteries |
Wind screen |
(for unit testing) |
(sponge) |
main unit |
MS mic |
|
WaveLab LE download |
Cubase LE download |
Cubase LE |
access code sheet |
access code sheet |
startup guide |
ems i Included t
05

parts of Names
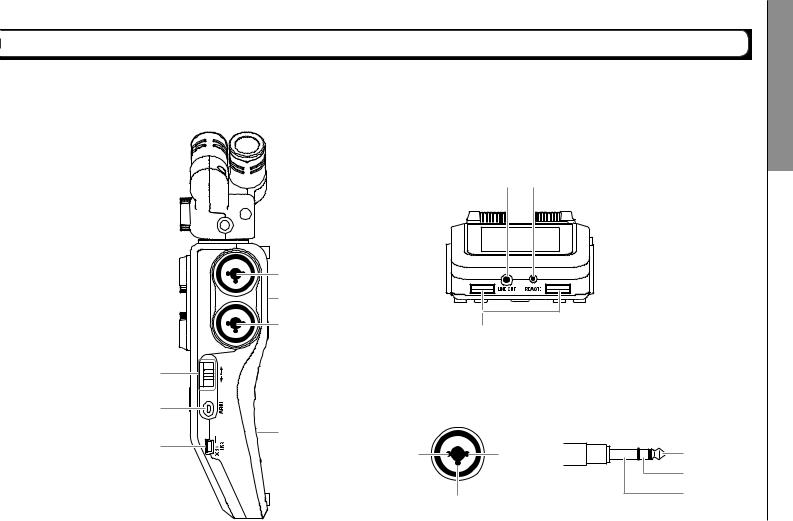
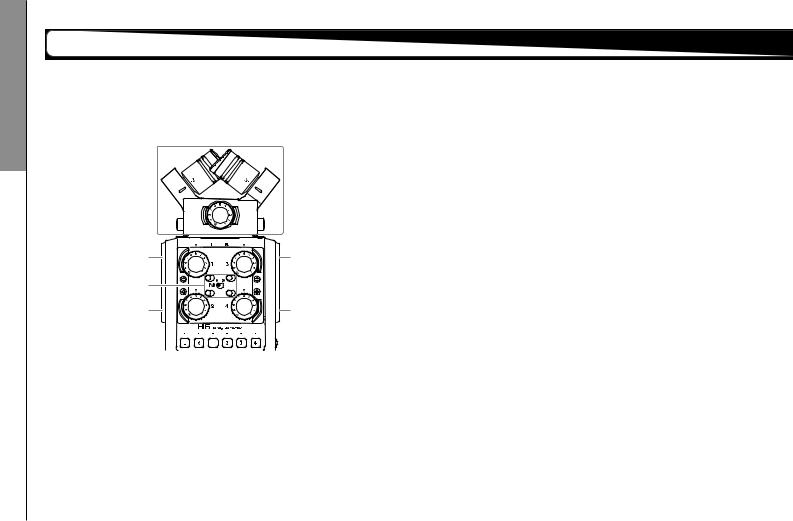
Names of parts
Left |
Front |
XY mic |
MS mic |
Input volume L/R
(Swappable)
Input 1 |
Input volume 1 |
Input volume 3 |
|
|
PAD switches (1–4) |
Input 2 |
Input volume 2 |
Input volume 4 |
|
|
|
Play/pause button |
||
|
Track buttons and |
|
& indicator |
|
|
|
Record button |
||
|
indicators |
Stop button |
||
|
& indicator |
|||
SD card slot |
(L, R, 1–4) |
|||
|
|
|||
VOLUME button |
|
|
|
|
PHONE jack
POWER/HOLD switch |
Display |
|
Back button Forward button
06
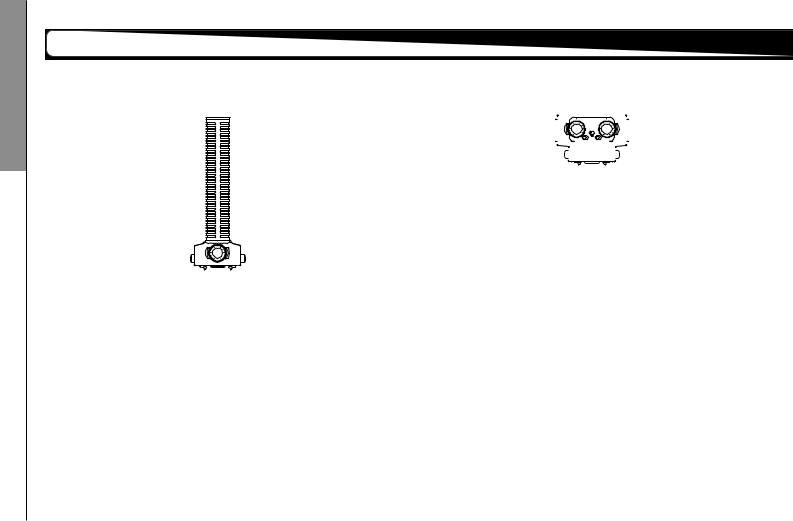
H6 Handy Recorder
Right (back) |
Bottom |
LINE OUT jack |
REMOTE jack (remote control sold separately) |
 MIC/LINE input jack
(supports plug-in power)
Input 3 |
Speaker (back) |
Input 4 |
Scroll button |
Up and down |
Select menu items |
Press: Confirm menu |
selection |
Strap holes
(can also be used with camera straps)
MENU button |
XLR |
|
TRS |
Press: |
|
||
Open menu, |
|
|
|
Return to last screen |
Battery cover (back) |
|
|
USB jack |
2 |
1 |
TIP: HOT |
|
|||
|
|
1: GND |
RING: COLD |
|
|
|
|
|
|
2: HOT |
SLEEVE: GND |
|
3 |
3: COLD |
|
|
|
parts of Names
07

overview Mic
08
Mic overview
The  includes XY and MS mics.These mics can be swapped according to your need.
A shotgun mic (SGH-6) and an external XLR/TRS input (EXH-6) are also available as optional accessories. ( P.12) The input from these mics (L/R input) is recorded on the L/R tracks.
XY mic
This has two crossing directional mics.
By rotating the mics, you can switch the width of the recording field between 90° and 120°.
L |
R |
L |
R |
|
90° |
|
120° |
Features:
Newly-developed large diaphragm mics enable low and high frequencies to be recorded with good stereo placement while sounds in the center are captured clearly.
This mic is ideal for recording at close and medium ranges when aimed at specific sound sources to capture a three-di- mensional sound with natural depth and width.
Use examples: solo performances, chamber music, live rehearsals, field recording
NOTE
The XY mic has a MIC/LINE input jack that can be used to connect an external mic or line-level device.This jack can also provide plug-in power to mics that use it. ( P.88)
MS mic
This mic combines a unidirectional mid mic that captures sound from the center with a bidirectional side mic that captures sound from the left and right.
By adjusting the side mic level, you can change the stereo width as you like. If you record in MS-RAW mode, you can adjust the side mic level after recording to change the stereo width.
|
Mid mic |
|
L |
R |
Mid mic |
|
Side mic |
|
Side mic level
Features:
This mic can capture a wide and detailed stereo image, making it ideal for recording wide open spaces with multiple sound sources.
With the side mic off it can also be used for mono recording. Use examples: orchestras, live concerts, soundscapes
Use examples with side mic off: interviews, narrations, meetings
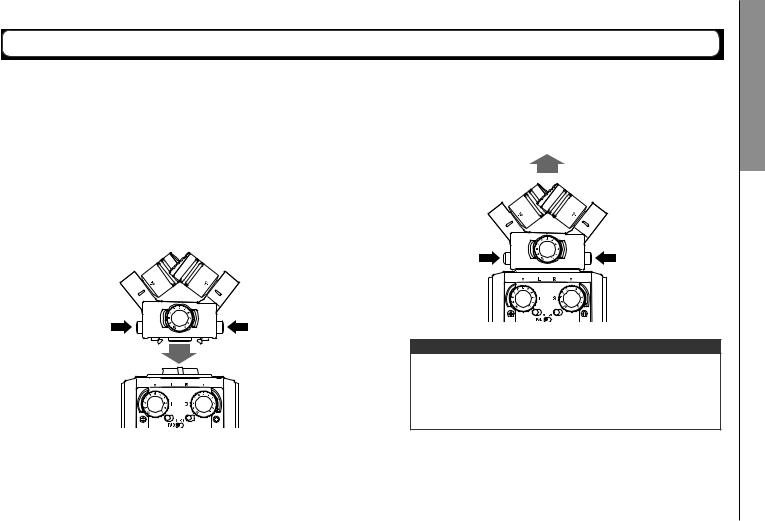
Connecting and disconnecting mics
Mic connection
1. Remove the protective caps from the  main unit and the mic.
2. While pressing the buttons on the sides of the mic, connect it to the main unit, inserting the connector completely.
H6 Handy Recorder
Mic disconnection
1. While pressing the buttons on the sides of the mic, pull it out of the main unit.
NOTE
•When disconnecting a mic, do not use too much force. Doing so could damage the mic or the main unit.
•Recording will stop if a mic is removed during recording.
•If a mic will not be attached for a long time, put on the protective cap.
mics disconnecting and Connecting
09
4–1 Inputs to devices mics/other Connecting
Connecting mics/other devices to Inputs 1–4
In addition to the input (L/R) from an XY or MS mic, the  also has Inputs 1–4. These can be used together to record up to six tracks at one time.
Mics, instruments and other equipment can be connected to Inputs 1–4 and recorded independently to tracks 1–4.
L/R inputs
Input 1 |
Input 3 |
PAD switch
Input 2 |
Input 4 |
Connecting mics
Connect dynamic mics and condenser mics to the Input 1–4 XLR jacks.
Phantom power (+12V/+24V/+48V) can be supplied to condenser mics. ( P.87)
Connecting instruments/other devices
Connect keyboards and mixers directly to the Input 1–4TRS jacks.
Direct input of passive guitars and basses is not supported. Connect these instruments through a mixer or effects device, for example.
Set the PAD switch to −20 when connecting a mixer or other device with a standard output level of +4dB.
Stereo inputs
By linking tracks 1 and 2 (or tracks 3 and 4) as a stereo tracks, Inputs 1/2 (or Inputs 3/4) can be used for stereo input. ( P.26)
In this case, Input 1 (Input 3) becomes the left channel and Input 2 (Input 4) becomes the right channel.
10
Connection examples
The  allows you to record in a variety of configurations.
While filming
•L/R input mic: Main subject
•Shotgun/lapel mics connected to Inputs 1/2: Performer
•Mics connected to Inputs 3/4: Ambient sound
Shotgun mic |
Lapel mic |
L/R
1 


 3
3
2 


 4
4
Lapel mic
Ambient mic |
Ambient mic |
H6 Handy Recorder
Concert recording |
|
|
• L/R input mic: Performance on stage |
|
|
• Inputs 1/2: Line outputs from mixer |
4–1Inputstodevicesmics/otherConnecting |
|
• Mics connected to Inputs 3/4: Audience sound |
||
|
L/R |
|
PA mixer |
1 |
3 |
|
|
|
|
2 |
4 |
|
|
|
|
|
|
|
|
Ambient mic |
|
Ambient mic |
11 |
||||
|
|
|
|
|
|
|
|
accessories Optional
Optional accessories
The following optional accessories are available for use with the  .
.
Shotgun mic attachment (SGH-6) |
External XLR/TRS input (EXH-6) |
|
|
|||||||||
|
|
|
|
|
|
|
|
|
|
|
|
|
|
|
|
|
|
|
|
|
|
|
|
|
|
|
|
|
|
|
|
|
|
|
|
|
|
|
|
|
|
|
|
|
|
|
|
|
|
|
|
|
|
|
|
|
|
|
|
|
|
|
|
|
|
|
|
|
|
|
|
|
|
|
|
|
|
Use instead of a stereo mic to give the  two more XLR/ TRS input jacks (L/R input).
•This does not support phantom power.
This highly-directional mic is great for capturing monophonic sound from a specific location. Use it in place of an  stereo mic.
•This mic records to the L/R track in mono.
12
H6 Handy Recorder
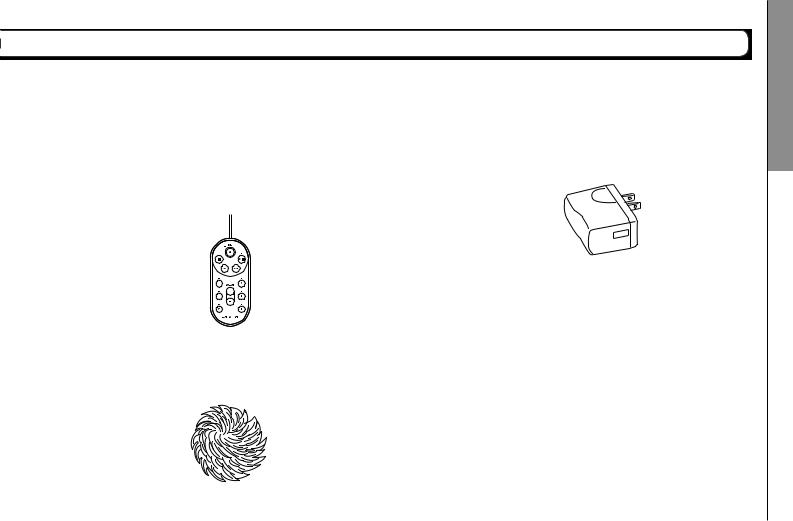
Accessory pack (APH-6)
This accessory pack includes the following 3 items: a remote control, a hairy windscreen and an AC adapter.
Remote control (RCH-6)
This is a wired remote control for use with the  . Connect it to the REMOTE jack.
AC adapter (AD-17)
This AC adapter is designed for use with the  . Connect it to the USB jack using a USB cable and plug it into an outlet.
Hairy windscreen
This windscreen can be used with both the XY and MS mics.
accessories Optional
13
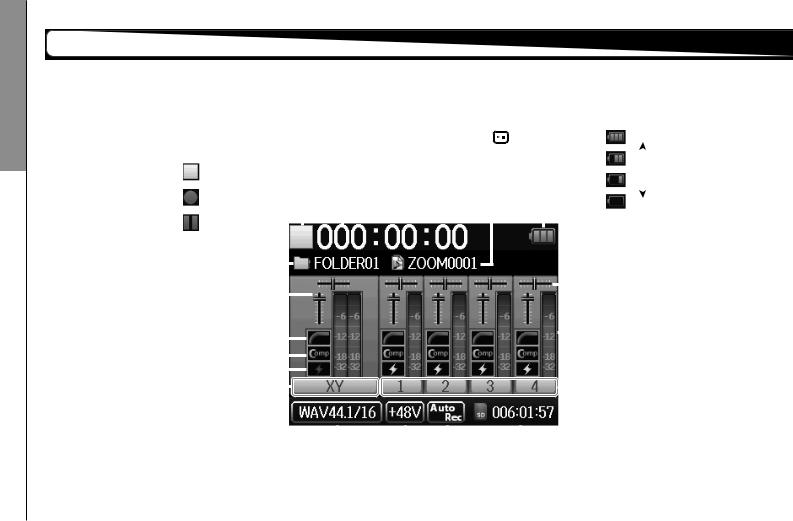
overview Display
Display overview
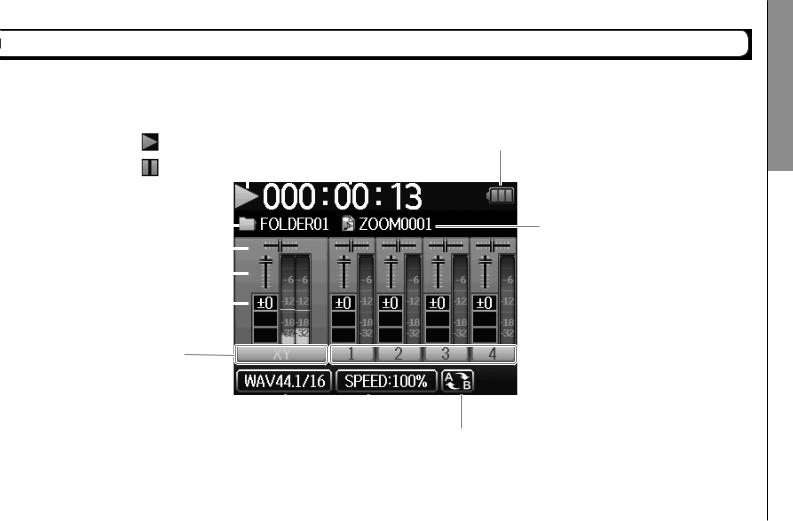
Home/Recording Screen
|
|
|
|
|
|
|
|
|
|
|
|
|
|
|
|
Name of project that |
|
|
|
Battery charge indicator |
||||||
|
|
|
|
|
|
|
|
|
|
|
|
|
|
|
|
|
|
|
|
|
||||||
|
|
|
|
|
|
|
|
|
|
|
|
|
|
|
|
will play when the |
|
|
|
Full |
||||||
Status icon |
|
|
|
|
|
|
|
|
|
|
|
|
|
|
button is pressed |
|
|
|
|
|
|
|
|
|||
|
|
|
|
|
|
|
|
|
|
|
|
|
|
|
|
|
|
|
|
|
|
|||||
|
|
|
|
|
|
|
|
|
|
|
|
Recording time |
(when recording, name of |
|
|
|
|
|
||||||||
Stopped |
|
|
project being recorded) |
|
|
|
|
|
||||||||||||||||||
|
|
|
|
|
|
|
|
|
|
|
|
|
|
|
|
|
||||||||||
Recording |
|
|
|
|
|
|
|
|
|
|
|
|
|
|
|
|
|
|||||||||
|
|
|
|
|
|
|
|
|
|
|
|
|
|
|
Empty |
|||||||||||
|
|
|
|
|
|
|
|
|
|
|
|
|
|
|
|
|
|
|
|
|
|
|
|
|
||
Paused |
|
|
|
|
|
|
|
|
|
|
|
|
|
|
|
|
|
|||||||||
Folder name |
|
|
|
|
|
|
|
|
|
|
|
|
Pan sliders |
|||||||||||||
|
|
|
|
|
|
|
|
|
|
|
||||||||||||||||
|
|
|
|
|
|
|
|
|
|
|
|
|
|
|
|
|
|
|
|
|
|
|
|
|
||
|
|
|
|
|
|
|
|
|
|
|
|
|
|
|
|
|
|
|
|
|
|
|
|
|
||
Monitoring volume |
|
|
|
|
|
|
|
|
|
|
|
|
|
(Monitoring mixer P.80) |
||||||||||||
|
|
|
|
|
|
|
|
|
|
|
|
|||||||||||||||
(Monitoring mixer P.80) |
|
|
|
|
|
|
|
|
|
|
|
|
||||||||||||||
Low cut indicator ( |
P.78) |
|
|
|
|
|
|
|
|
|
|
|
|
|
|
|
|
|
|
Level meter |
||||||
|
|
|
|
|
|
|
|
|
|
|
|
|
|
|
|
|
|
|||||||||
|
|
|
|
|
|
|
|
|
|
|
|
|
|
(Recording input level) |
||||||||||||
Compressor/limiter indicator ( |
P.79) |
|
|
|
|
|
|
|
|
|
|
|
|
|
|
|
|
|||||||||
|
|
|
|
|
|
|
|
|
|
|
|
|
|
|||||||||||||
Phantom power indicator ( |
P.87) |
|
|
|
|
|
|
|
|
|
|
|
|
|
|
Tracks 1–4 |
||||||||||
|
|
|
|
|
|
|
|
|
|
|
|
|||||||||||||||
L/R track |
|
|
|
|
|
|
|
|
|
|
|
|
|
|
|
|
|
|
||||||||
|
|
|
|
|
|
|
|
|
|
|
|
|
|
|
|
|
|
|
|
|
||||||
(Name of connected |
|
|
|
|
|
|
|
|
|
|
|
|
||||||||||||||
mic unit shown) |
|
|
|
|
|
|
|
|
|
|
|
|
||||||||||||||
Recording format |
|
|
|
|
|
|
|
|
|
|
|
|
|
|
|
|
|
|
|
|
|
|
||||
|
|
|
|
|
|
|
|
|
|
|
|
|
|
|
|
|
|
|
|
|
|
|||||
|
|
|
|
|
|
|
|
|
|
|
Auto record |
SD card icon and remaining |
|
|
||||||||||||
(When using as an audio interface, |
|
|
|
|||||||||||||||||||||||
|
( P.29) |
recording time |
|
|
||||||||||||||||||||||
computer or iPad setting shown) |
|
|
|
|||||||||||||||||||||||
|
|
|
|
|
|
|
|
|
|
|
|
|
|
Phantom power voltage |
|
|
|
|
|
|
|
|
||||
|
( |
P.87) |
|
|
|
|
|
|
|
|
|
|
|
|||||||||||||
14
Playback Screen
Status icon |
|
|
|
|
|
|
|
|
|
|
|
|
|
|
|
||||
Playing back |
|
|
Playback time |
||||||
Paused |
|
|
|
|
|
||||
|
|
|
|
|
|||||
Folder name |
|
|
|
|
|
|
|
|
|
|
|
|
|
|
|||||
|
|
|
|
||||||
Pan sliders |
|
|
|
|
|
|
|||
|
|
|
|
|
|||||
Playback volume |
|
|
|
|
|
|
|||
|
|
|
|
|
|||||
Pitch control |
|
|
|
|
|
|
|||
|
|
|
|
|
|||||
L/R track |
|
|
|
||||||
(Name of connected |
|
|
|
||||||
mic unit shown) |
|
|
|
||||||
|
|
|
|
|
|
|
|
|
|
|
|
|
|
|
|
|
|
|
|
|
|
|
|
|
Playback format |
|
Playback speed |
||
|
|
|
|
|
|
|
|
( P.41) |
|
H6 Handy Recorder
Battery charge indicator
Name of project playing back
 Level meter (playback level)
 Tracks 1–4
A-B repeat ( P.42)
(Shown when A and B points set)
overview Display
15
Preparations
power Supplying
Supplying power
Using batteries
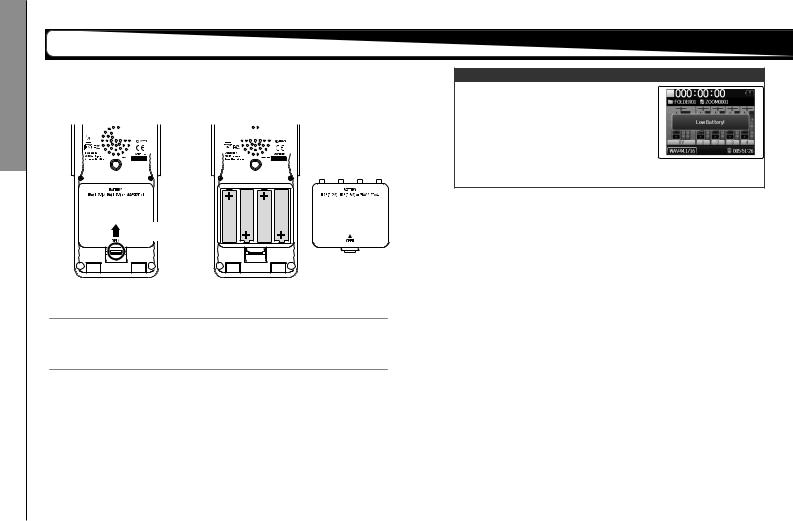
1. Turn the power off and then remove the battery cover.


Open while pushing up
2. Install the batteries.
3. Replace the battery cover.
NOTE
•Use alkaline batteries or nickelmetal hydride batteries.
•If the battery indicator becomes empty, turn the power off immediately and install new batteries.
•Set the type of battery being used. ( P.23)
16
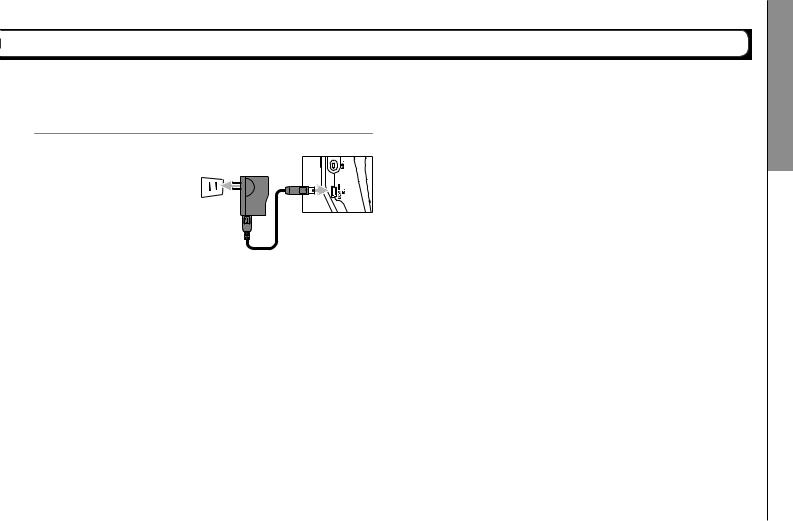
Using an AC adapter (sold separately)
1. Connect a USB cable to the USB jack.
2. Plug the adapter into an outlet.
H6 Handy Recorder
Preparations
power Supplying
17
Preparations
card SD an Loading
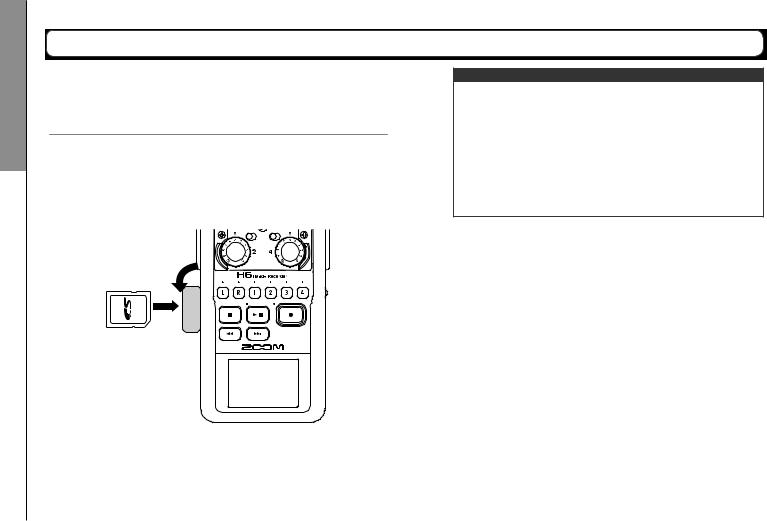
Loading an SD card
1. Turn the power off and then open the SD card slot
cover.
2. Insert the card in the slot.
To eject an SD card:
Push the card further into the slot and then pull it out.
SD card slot in center of left side
NOTE
•Always turn the power off before inserting or removing an SD card.
Inserting or removing a card while the power is on could result in data loss.
•When inserting an SD card, be sure to insert the correct end with the top side up as shown.
•When an SD card is not loaded, recording and playback are not possible.
• See “Formatting SD cards”. ( P.95)
18
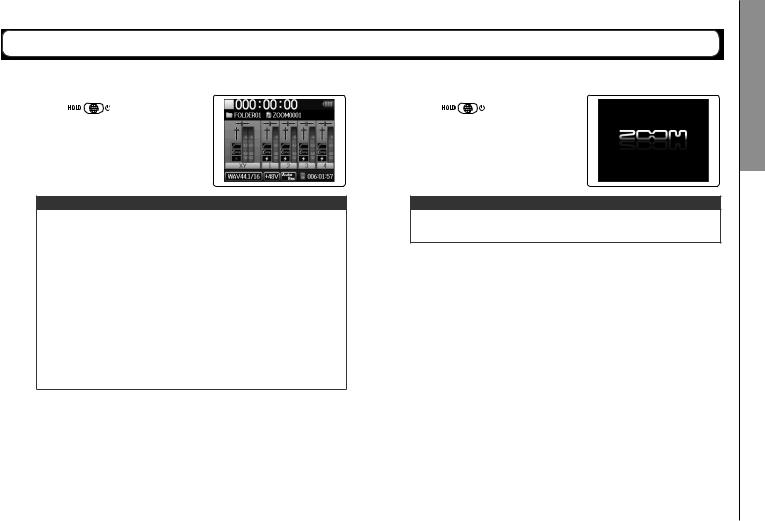
H6 Handy Recorder
Turning the power on and off
Turning the power on |
Turning the power off |
||
Ŷ Slide |
to the right. |
Ŷ Slide |
to the right. |
NOTE
• The first time you turn the power on after purchase, you must set the language ( P.21) and date/time ( P.22).You can also change these settings later.
•If “No SD Card!” appears on the display, confirm that the SD card is inserted properly.
•If “Card Protected!” appears on the display, the SD card write-protection is enabled. Slide the lock switch on the SD card to disable write-protection.
•If “Invalid Card!” appears on the display, the card is not correctly formatted for use with this recorder. Format the
card or use a different card. See “Formatting SD cards”. ( P.95)
NOTE
Keep holding the switch to the right until the ZOOM logo appears.
Preparations
off and on power the Turning
19
Preparations
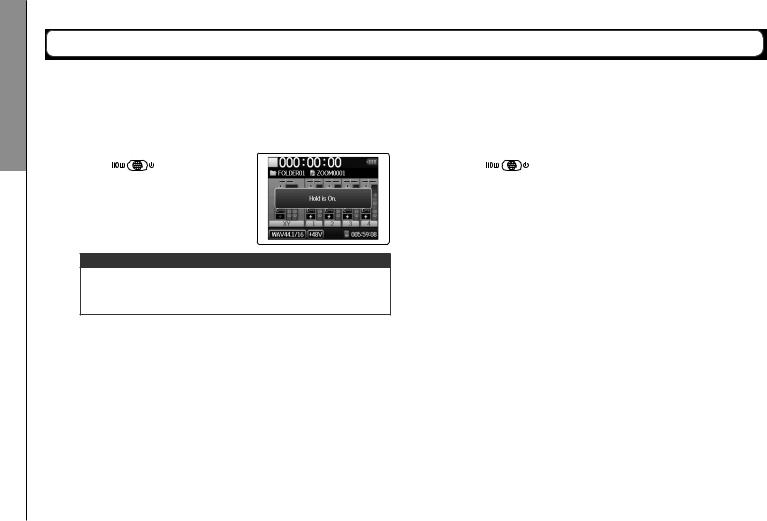
function hold the Using
Using the hold function
The  has a hold function that can be used to disable the buttons in order to prevent accidental operation during recording.
Activating the hold function |
Deactivating the hold function |
||
Ŷ Slide |
to the left. |
Ŷ Slide |
to the center. |
NOTE
The hold function does not affect the remote control (sold separately). Even when hold is active, the remote can still be used.
20
H6 Handy Recorder
Setting the language*
The language shown on the display can be set to English or Japanese.
1. Press  .
.
2. Use 
 to
to
select “LANGUAGE”, and press 

 .
.
3. Use 
 to select the language,
and press 

 .
.
*The first time you turn the power on after purchase, you must set the language and date/time.
Preparations
language the Setting
21
Preparations
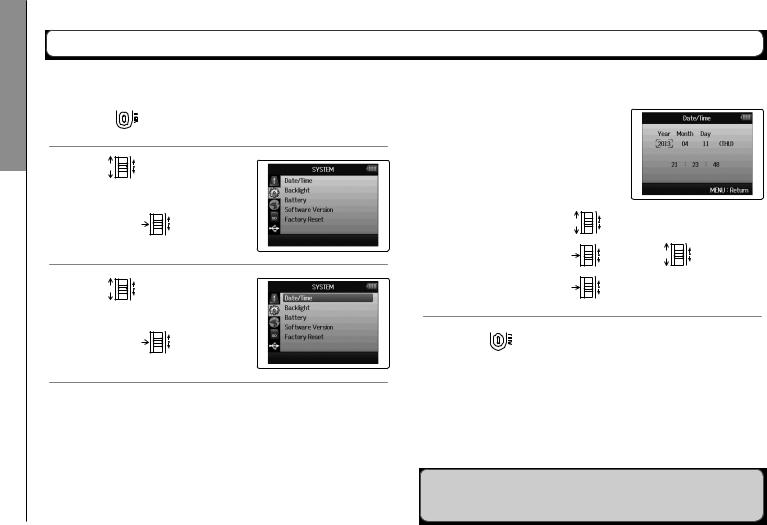
time and date the Setting
Setting the date and time*
When the date and time are set, the recorder can store accurate recording date and time information in files.
1. |
Press |
. |
4. Set the date and time. |
|
|
|
2. |
Use |
to select |
Ŷ Changing settings |
|
|
|
|
“SYSTEM”, |
|
|
|||
|
|
|
|
|
||
|
and press |
. |
Move cursor: Move |
up/down |
|
|
|
|
|
Select item: |
Press |
then move |
up/down |
3. |
Use |
to select |
Confirm change: Press |
|
|
|
|
“Date/Time”, |
5. Press |
|
|
|
|
|
and press |
. |
to complete the setting. |
|
||
*The first time you turn the power on after purchase, you must set the language and date/time.
22
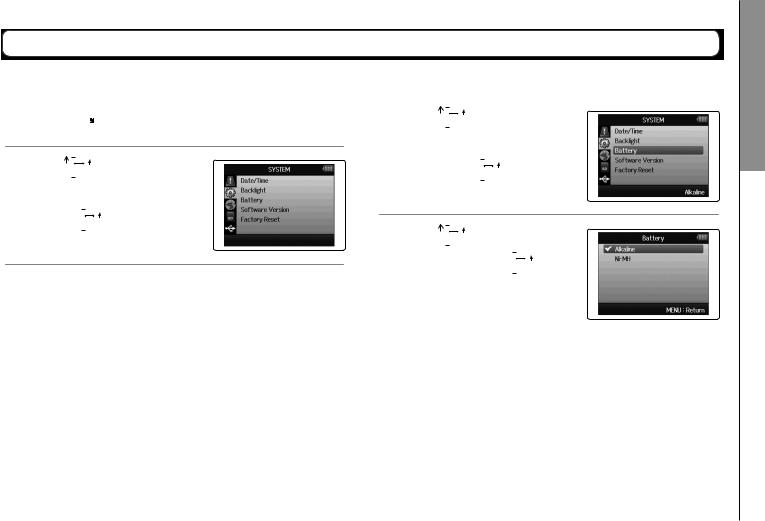
Setting the type of battery used
Set the type of battery used so that the amount of remaining battery charge can be shown accurately.
1.
2.
Press  .
.
Use 

 to select “SYSTEM”, and press

 .
.
3.
4.
Use 

 to select “Battery”, and press

 .
.
Use 

 to select the type, and press

 .
.
H6 Handy Recorder
Preparations
used battery of type the Setting
23
Recording
process Recording
Recording process
The recording process includes the following steps.
With the  , a unit of recording/playback data is called a project.
Connect |
Turn power |
Prepare to |
Record |
Playback and |
Overdub |
|
on ( P.19) |
record |
( P.24) |
check ( P.38) |
and edit |
• Connect the XY or MS mic unit. ( P.09)
•Connect mics, instruments and
other equipment to
Inputs 1–4. ( P.10)
•Start recording: 
•Stop recording: 
•You can also make mark settings.
•Pause recording: 
•Start playback: 
•Stop playback: 

•Make settings as desired for
mark, AB repeat ( |
P.42), |
|
playback speed ( |
P.41) |
|
playback pitch ( |
P.45), |
|
playback mode ( |
|
P.44), and |
the project mixer ( |
P.46). |
|
• You can overdub
( |
P.35), mix down |
to a stereo file |
|
( |
P.52) and check |
project/file information, for example.
1. Set the recording format (WAV/MP3). ( P.83)
•When set to MP3, a stereo mix will be recorded regardless of the number of tracks.
• You can also make automatic recording ( P.29), pre-recording ( P.31), backup recording
( |
P.34), low cut ( P.78), compressor/limiter |
( |
P.79) and metronome ( P.76) settings, |
for example.
2. Select recording tracks ( P.26)
•Use the track buttons to select. When the selected track indicator lights red, the input signal can be monitored.
•Press two track buttons at the same time to use them as a stereo track (stereo link).
3. Adjust input levels
•Use the  for each input.
•Adjust so that the level meter stays in the yellow when the loudest sound is input.
•When connecting a device with a standard output level of +4 dB or the level stays too high for any other reason, set the PAD switch to −20.
•You can also adjust the side mic level (when using
the MS mic unit) ( P.33) and show the VU meters ( P.89), for example.
24
H6 Handy Recorder
Folder and file structure
When recording with the  , the following folders and files are created on the SD card.
Root
|
Select FOLDER01 – FOLDER10 as the folder |
|
|
• • • • • • • |
||
|
where projects will be saved ( P.28) |
|
|
|||
FOLDER01 |
FOLDER02 |
FOLDER10 |
||||
|
|
|
|
|
|
|
|
|
|
|
|
|
|
|
|
|
|
|
|
|
ZOOM0001 |
ZOOM0002 |
|
Stereo file of |
ZOOM0003 |
First file when |
ZOOM0004 |
|
First stereo file |
||||||||
|
|
|
|
|
recorded L/R |
|
|
|
|
|
recording |
|
|
|
|
recorded on the L/R |
A folder named |
|
|
|
|
input signals |
|
|
|
|
|
exceeded 2GB |
|
|
|
|
tracks |
|
ZOOM0002_LR.WAV |
|
ZOOM0003_LR-0001.WAV |
|
ZOOM0004_LR.WAV |
|||||||||||
ZOOM0001 – |
|
|
|
|||||||||||||
|
|
|
|
|
|
|
|
|
|
|
|
|
|
|
|
|
ZOOM9999 is created |
|
|
|
|
Mono file of |
|
|
|
|
|
Second file when |
|
|
|
|
Additional stereo file |
for each project. |
|
|
|
|
|
|
|
|
|
|
|
|
|
|||
|
|
|
|
recorded Input 1 |
|
|
|
|
|
recording |
|
|
|
|
recorded on the 1/2 |
|
|
|
|
|
|
|
|
|
|
|
|
|
|
|
|||
|
|
|
|
|
|
|
|
|
|
|
|
|
||||
|
|
|
|
|
signal |
|
|
|
|
|
exceeded 2GB |
|
|
|
|
tracks ( P.35) |
|
|
ZOOM0002_Tr1.WAV |
|
ZOOM0003_LR-0002.WAV |
|
ZOOM0004_Tr12_01.WAV |
||||||||||
|
|
|
|
|
Stereo file of |
|
|
|
|
|
|
|
|
|
|
Stereo file created |
|
|
|
|
|
recorded Input 3/4 |
|
|
|
|
|
Recorded voice |
|
|
|
|
by mixing down |
|
|
|
|
|
|
|
|
|
|
|
|
|
||||
|
|
|
|
|
signals |
|
|
|
|
|
memo file ( P.63) |
|
|
|
|
( P.52) |
|
|
|
|
|
|
|
|
|
|
|
|
|
||||
|
|
ZOOM0002_Tr34.WAV |
|
ZOOM0003_VM.MP3 |
|
ZOOM0004_ST001.WAV |
||||||||||
|
|
|
|
|
L/R input backup |
|
|
|
|
|
The settings file |
|
|
|
|
Project file when |
|
|
|
|
|
recording file |
|
|
|
|
|
has the same |
|
|
|
|
project name is set |
|
|
|
|
|
( P.34) |
|
|
|
|
|
name as the |
|
|
|
|
to “Date” ( P.50) |
|
|
|
|
|
|
|
|
|
|
|
|
|
|
|||
|
|
|
|
|
|
|
|
|
|
|
|
|
||||
|
|
|
|
|
|
|
|
|
|
|
|
|
||||
|
|
ZOOM0002_BU.WAV |
|
JazzLive.hprj |
project name |
|
130410-163015.hprj |
|||||||||
|
|
|
|
|
Project settings |
|
|
|
|
|
|
|
|
|
|
|
|
|
|
|
|
file |
|
|
|
|
|
|
|
|
|
|
|
|
|
|
|
|
|
|
|
|
|
|
|
|
|
|
|
|
ZOOM0005
Recorded stereo MP3 file ( P.83)
ZOOM0005.MP3
ZOOM0005.hprj
Recording
structure file and Folder
ZOOM0002.hprj |
25 |
|
Recording
recording Basic
Basic recording
2 |
|
|
1 |
3 |
4 |
6 |
||
|
5 |
|
1. Press the button of the track that you want to record.
HINT
•The indicator of the selected track button lights red.
•If you press track button 2 while pressing and holding track button 1, tracks 1/2 will become a stereo track (stereo link). Tracks 3/4 can be made into a stereo track in the same way. Stereo links can also be deactivated in the same way.The L/ R track stereo link, however, cannot be deactivated.
HINT
•When recording, files are created for each selected track button as follows.
Tracks recorded |
File name |
Contents |
L/R track |
ZOOMnnnn-LR |
Stereo file |
Mono track |
ZOOMnnnn_Tr1 |
Mono file |
|
(for track 1) |
|
Stereo track |
ZOOMnnnn_Tr34 |
Stereo file |
|
(for tracks 3/4) |
|
Note: “nnnn” in the file name is the project number
•All the files that are created during the same recording are managed by the  as a single project unit.
26
2. Turn  for the selected input to adjust the input level.
HINT
• Adjust so that the peak level stays around −12dB.
• You can change the recording format. ( P.83)
•You can cut noise from wind and other sources during recording. ( P.78)
3.Press  to start recording.
4.Press 

 to add a mark.
H6 Handy Recorder
5. Press  to pause.
NOTE
When recording is paused, a mark is added at that point.
6. Press  to stop recording.
NOTE
•A maximum of 99 marks can be added to a single project.
•During recording if the file size exceeds 2 GB a new file will be created automatically in the same project and recording will continue without pause. When this happens, numbers will be added to the ends of the file names: “-0001” for the first file, “-0002” for the second file and so on.
Recording
recording Basic
27
Recording
saved are projects where folder the Selecting
Selecting the folder where projects are saved
Choose one of ten folders as the folder where new recorded projects will be saved.
1.
2.
3.
Press |
. |
Use |
to |
select “PROJECT LIST”,
and press |
. |
Use 

 to select the folder where you want to save new projects,
and press 

 .
.
4. Press  to confirm the folder selection and return to the Home Screen.
28

H6 Handy Recorder
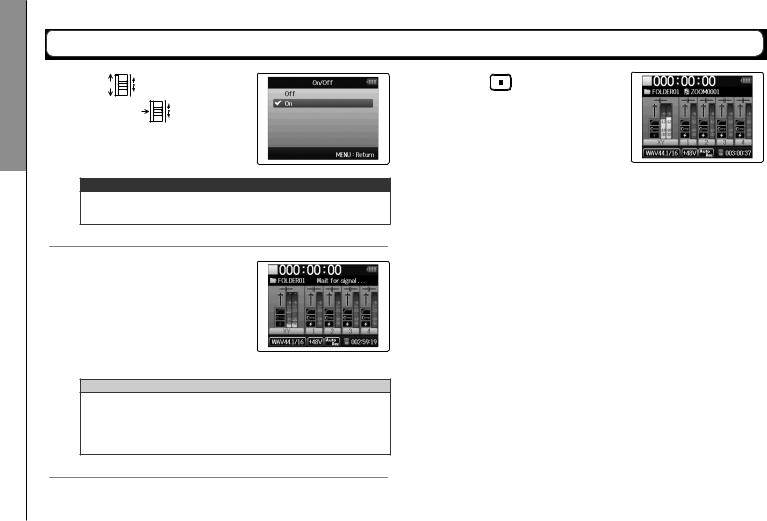
Recording automatically
Recording can be started and stopped automatically in response to the input level.
1.
2.
3.
Press  .
.
Use 
 to select “REC”, and press

 .
.
Use 
 to select “Auto Rec”, and press

 .
.
4. Use 
 to select “On/ Off”, and press

 .
.
NEXT
Recording
automatically Recording
29
Recording
automatically Recording
Recording automatically (continued)
5. Use |
to select “On”, |
7. Press |
to exit standby |
and press |
. |
or stop recording. |
|
NOTE
For details, see “Changing automatic recording function settings”. ( P.84)
6. Return to the Home Screen, and press  to put the recorder into
standby.
HINT
When the input exceeds the set level (shown on the level meters), recording starts automatically.You can also set the recording to stop automatically when the input goes below a set level. ( P.85)
30
 Loading...