


H8
Handy Recorder
Quick Guide
You must read the Usage and Safety Precautions before use.
The Operation Manual can be downloaded from the ZOOM website (www.zoom.jp/docs/h8). This page has files in PDF and ePub formats.
The PDF file format is suitable for printing on paper and reading on a computer.
The ePub format can be read with electronic document readers and is designed for reading on smartphones and tablets.
© 2020 ZOOM CORPORATION
Copying or reprinting this manual in part or in whole without permission is prohibited.
Product names, registered trademarks and company names in this document are the property of their respective companies.
All trademarks and registered trademarks in this document are for identification purposes only and are not intended to infringe on the copyrights of their respective owners.
You might need this manual in the future. Always keep it in a place where you can access it easily. The contents of this manual and the specifications of the product could be changed without notice.

Names of parts
Top |
|
|
Bottom |
|
|
|
|
Mic connector cap |
|
|
|
|
attachment points |
|
Mic input volume |
|
XY mic |
|
|
L/R |
|
|
|
|
|
|
Track buttons/ |
|
|
Mic track button |
|
indicators |
|
|
|
|
1/2/3/4/A/B |
|
Tripod mounting |
PAD switch 1 |
|
PAD switch 2 |
|
threads |
|
|
|
||
|
|
|
|
Battery |
Input volume |
|
Input |
|
compartment |
|
volume |
|
cover |
|
1/3/A |
|
2/4/B |
|
|
Hi-Z switch A |
|
Hi-Z switch B |
|
|
PAD switches |
|
|
|
|
3/4 |
|
|
|
|
Touchscreen |
|
|
|
|
|
|
STOP/HOME button |
|
|
|
|
PLAY/PAUSE button |
|
|
|
|
REC button |
|
|
Left side |
Right side |
|
Front |
|
|
|
|
Power/Hold switch |
|
|
|
MIC/LINE IN jack |
|
REMOTE jack |
|
|
(supports |
|
|
|
|
|
USB (Micro-B) port |
|
|
|
plug-in power) |
|
|
|
|
|
|
|
Input 1 |
|
Input 2 |
|
|
Input A |
Lock |
Input B |
|
|
|
release |
|
|
|
Input 3 |
buttons |
Input 4 |
LINE OUT |
PHONE OUT jack |
|
||||
|
jack |
|
||
|
|
|
|
|
|
|
|
|
Strap attachment holes |
SD card |
|
|
|
|
slot |
|
|
By connecting a ZOOM BTA-1 or other dedicated |
|
|
|
|
wireless adapter to the REMOTE jack and using |
|
|
|
|
the dedicated controller app, the H8 can be |
|
|
|
|
operated from an iOS/iPadOS device. |
|
2

Connection examples
Field recording
Wireless lavalier mics
Gun mic
Ambient |
Lavalier |
Lavalier |
Ambient |
mic |
receivers |
receivers |
mic |
Music creation
Vocal mic
Drum mic
Electric bass
Electric guitar
Keyboard
Podcasting
Mics with |
tabletop |
stands |
Audio device, etc.
 Headphone
3
Preparations
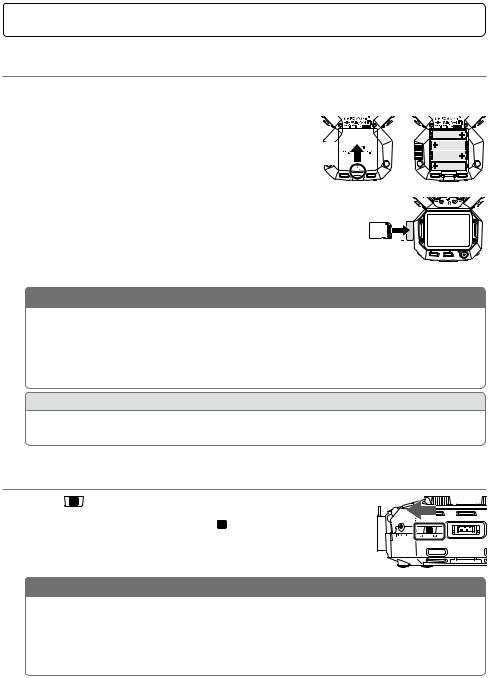
Installing batteries and an SD card
Installing batteries
1.After turning the power off, open the battery compartment cover and install batteries.
Installing an SD card
Open while pressing up
1.After turning the power off, open the SD card slot cover and insert an SD card.
To remove an SD card, push it further into the slot and then pull it out.
Left side of bottom section 
 SD card slot
NOTE
•Use alkaline batteries, rechargeable NiMH batteries or lithium batteries.
•To enable accurate display of remaining battery charge, set the battery type using Home Screen > SYSTEM > Battery.
•SD cards must be formatted by H8 before use.To format, use Home Screen > SD CARD > Format.
HINT
AC power can be used by connecting a dedicated AC adapter (ZOOM AD-17) to the USB port.
Turning the power on/off
1. Slide 

 toward
  to turn the power on.
When the power is off, keep sliding 

 toward
  until the ZOOM logo appears.
NOTE
•If “No Card !” appears on the display, confirm that an SD card is inserted properly.
•If “Card Protected !” appears on the display, the SD card write-protection is enabled. Slide the lock switch on the SD card to disable write-protection.
•If “Invalid Card !” appears on the display, the card is not formatted correctly. Format the card or use a different card.
4
HINT
• Sliding |
to toward HOLD will disable button and touchscreen operations. |
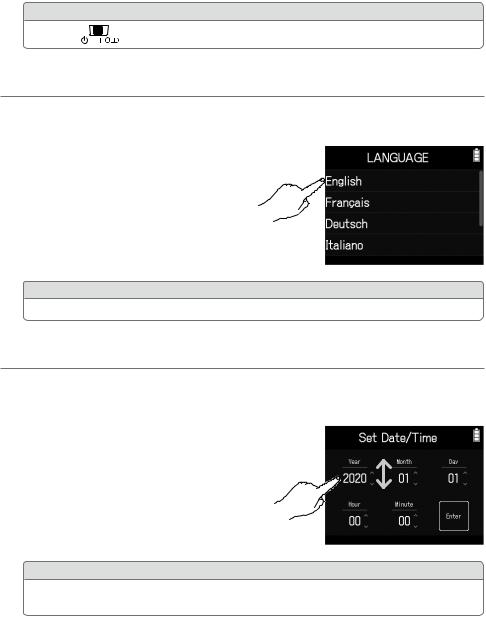
Setting the language (first time starting up)
The first time you turn the power on after purchase, set the touchscreen display language when the language setting screen opens.
1. Tap the language you want to set.
HINT
The display language can be changed later using Home Screen > LANGUAGE.
Setting the date and time (first time starting up)
When the date and time setting screen opens after the language settings screen, set the date and time.
1.
2.
Swipe the date and time items to set them.
Tap Enter.
HINT
The date and time setting can be changed later using Home Screen > SYSTEM > Date/Time > Set Date/Time.
5
 Loading...