


Vocal Processor
Operation Manual
You must read the Usage and Safety Precautions before use.
© 2019 ZOOM CORPORATION
Copying or reprinting this manual in part or in whole without permission is prohibited.
Product names, registered trademarks and company names in this document are the property of their respective companies. All trademarks and registered trademarks in this document are for identification purposes only and are not intended to infringe on the copyrights of their respective owners.
Proper display is not possible on grayscale devices.
■■Operation Manual overview
You might need this manual in the future. Always keep it in a place where you can access it easily. The contents of this document and the specifications of the product could be changed without notice.
•Windows® is a trademark or registered trademark of Microsoft® Corporation.
•Mac and macOS are trademarks or registered trademarks of Apple Inc.
•iOS is a trademark or registered trademark of Cisco Systems, Inc. and used under license.
•Other product names, registered trademarks and company names in this document are the property of their respective companies.
Note: All trademarks and registered trademarks in this document are for identification purposes only and are not intended to infringe on the copyrights of their respective owners.

Introduction
Thank you very much for purchasing a ZOOM Vocal Processor.
The has numerous functions for transforming vocals and is easy-to-use, so anyone can achieve powerful vocal sounds. After adjusting volume and clarity, you can, for example, correct the pitch of vocals while adding harmony and reverb.
Setting values and combinations can be saved as patch memories in the unit to be used whenever you like. You can try out a variety of vocal effects right away by switching among the preset patch memories.
With other features that include a unique formant pedal that can be used to change vocal characteristics, a looper that can record overdubs for up to 3.5 minutes and a super-directional ZOOM SGV-6 mic, this vocal processor is perfect for live performances.
We hope you will enjoy using it for many years.
Main features of the 
Easy sound creation
Creating sounds is as easy as turning knobs and pressing switches.
Super-directional ZOOM SGV-6 mic
The super-directional ZOOM SGV-6 mic, which is based on shotgun mic technologies, catches the sound of the vocalist with focused directionality. Using the SGV-6 suppresses feedback and interference from nearby instruments when capturing a voice, enabling more accurate pitch correction and harmonization.
Voice character manipulation pedal
The FORMANT pedal can be used to change vocal characteristics without changing pitch, making it sound like the voice of a different person.
The vocal automatically returns to its original character when the foot is removed from the pedal.
Singing assistance
Using the compressor to even out volume and the enhance function to add clarity helps make singing easier.
Voice, harmony and effect sections
The VOICE section allows you to easily pitch-correct vocals or create a robotic sound, for example.
The HARMONY section can be used to automatically generate third-degree and fifth-degree harmonies according to the KEY setting.
The EFFECT section is optimized for vocalists. The 10 types of effects include echo and reverb as well as aggressive distortion.
3.5-minute looper great for improvisations
The looper can be used to overdub processed vocals as many times as desired, greatly expanding performance possibilities.
Convenient undo and redo functions can be easily performed with a footswitch.
USB audio interface
The can be used as a 2-IN/2-OUT audio interface.
3

Terms used in this manual
Patch memory
Records of voice, harmony and effect settings are called “patch memories” and can be used to easily recall settings. Up to 100 patch memories can be stored.
Looper
Vocal loops can be recorded for up to 3.5 minutes and played back.
Loops can be layered for a variety of live performance techniques, including a cappella choruses and vocal percussion.
Memory mode
Use this mode to select patch memories with the footswitches.
Looper mode
Use this mode to operate the looper with the footswitches.
VOICE
This section can alter the sound of the voice. For example, use it to correct pitch according to the key or give the voice a childlike, synthesized or vocoder sound.
HARMONY
This can add up to two harmonizing voices.This generates optimal harmonies automatically according to the key.
EFFECT
This section adds reverb, distortion or another effect to the original sound to change its tone.
FORMANT
Formants are vocal characteristics created by differences in mouth and throat shapes.
The FORMANT pedal of the  can be used to change vocal characteristics without changing the pitch.
COMP (compressor)
Input sounds over a certain level can be compressed to lower their volume and even out the overall volume.
ENHANCE
This can make singing clearer by emphasizing high frequencies, and it can make the voice sound pleasanter by suppressing sibilant sounds as in “hiss” and “shhh”.
ECO mode
This function will automatically turn the power off 10 hours after the last operation.
4

Contents
Introduction 3
Terms used in this manual 4
Contents 5
 structure 6
Names and functions of parts 7
Making connections 10
ZOOM SGV-6 mic overview 11
Turning the power on 12 Using batteries 13
Adjusting the volume and tone 14 Adjusting the mic input volume 14 Reducing volume variation (compressor function) 14 Bringing out vocal character (enhance function)
15 Adjusting headphone volume 15
Selecting patch memories |
16 |
Using the VOICE section |
17 |
Using the HARMONY section |
19 |
Using the EFFECT section |
21 |
Saving settings in patch memories 23 |
|
Using the FORMANT pedal |
24 |
Adjusting the stiffness of the FORMANT pedal24 |
|
Using the looper |
25 |
Activating the looper |
25 |
Recording and playing loops |
25 |
Overdubbing loops |
26 |
Clearing the loop |
27 |
Display indicators |
27 |
Bypassing the effect of the |
28 |
Making other settings 29 Setting the standard pitch for voices and harmonies 29 Setting the type of batteries used 30 Setting ECO mode to turn the power off automatically when not used 31 Restoring factory default settings 32
Using audio interface functions |
33 |
Installing the driver |
33 |
Connecting to a computer |
34 |
Updating the firmware |
35 |
Troubleshooting |
36 |
Specifications |
38 |
5

structure |
|
|
|
|
|
■■Signal flow |
|
|
|
|
|
|
Clip LED |
Settings saved in patch memories |
|||
|
|
|
|
|
PA system |
|
Compressor |
Voice |
Formant |
Harmony |
Effect |
Volume |
|||||
INPUT |
Enhance |
|
|
|
|
|
|
|
|
|
|
|
|
|
|
|
OUTPUT |
|
|
|
Bypass |
|
Headphones |
|
|
|
|
|
|
|
|
|
|
|
USB Audio |
Computer
 The volume and tone of the input from the mic can be adjusted. “Adjusting the volume and tone” on page 14)
 This can alter vocals with pitch correction, pitch shifting, vocoder and other options. “Using the VOICE section” on page 17)
 The FORMANT pedal can be used to change vocal characteristics without changing the pitch. “Using the FORMANT pedal” on page 24)
 This can add up to two harmonizing voices. “Using the HARMONY section” on page 19)
 Use this to apply delay, reverb or another effect. “Using the EFFECT section” on page 21)
 Recorded loops can be played back repeatedly. “Using the looper” on page 25)
HINT
VOICE, HARMONY and EFFECT settings ( ,
,  and
and  ) can be saved in patch memories and easily recalled. (
 “Selecting patch memories” on page 16, “Saving settings in patch memories” on
page 23)
6

Names and functions of parts
■■Front panel
|
|
|
|
|
 VOICE section
Alter vocals with pitch correction, pitch shifting, vocoder and other options.
 VOICE ADJUST knob
Use to adjust the voice.
 VOICE selection knob
Select the voice type.
 KEY selection knob
Select the key for pitch correction.
 VOICE indicator
This shows whether the VOICE section is on or off.
 VOICE footswitch
Turn the VOICE section on/off.
 HARMONY section
Add up to two harmonizing voices.
 KEY selection knob
Select the key for harmonization.
 HARMONY style buttons
Press to activate harmony types.
 HARMONY MIX knob
Adjust the balance between the vocal and the harmony.
 HARMONY footswitch
Turn the HARMONY section on/off.
 HARMONY indicator
This shows whether the HARMONY section is on or off.
7
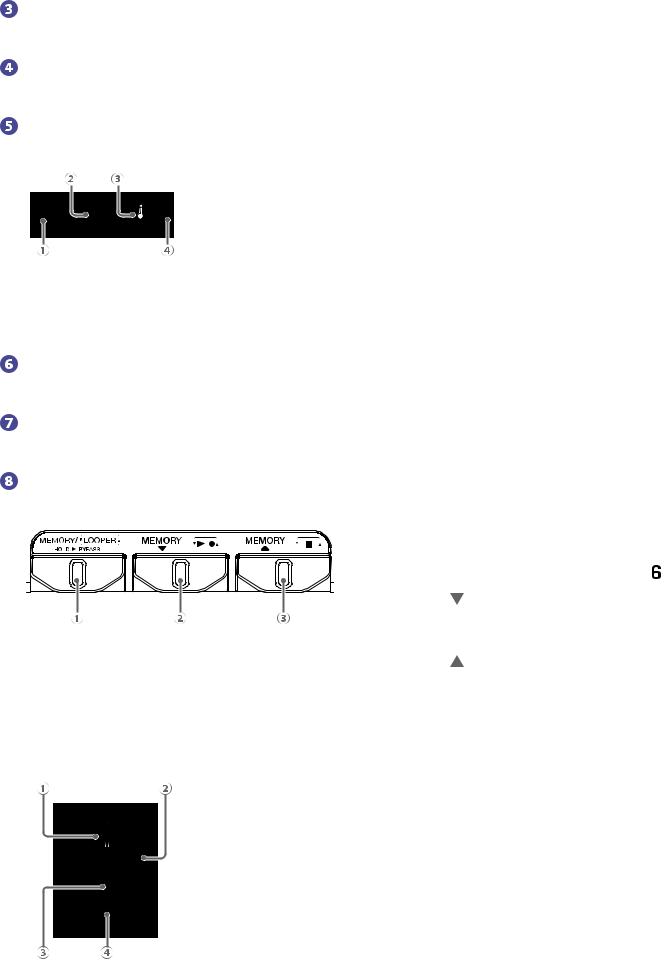
Display
This shows the selected patch memory number and looper status.
STORE button
Press to save the current settings to a patch memory.
Input control section
Adjust the volume and tone of the input from the mic.
 ENHANCE button
Turn the ENHANCE function on/off.
 COMP knob
Adjust the amount of compression.
 VOLUME knob
Adjust the mic input volume.
 CLIP indicator
This shows the status of the input sound.
POWER indicator
This shows whether the power is on or off and the remaining battery charge.
FORMANT pedal
Change the character of the voice.
Patch memory/looper control section
Select patch memories and operate the looper.
 MEMORY/LOOPER footswitch
Switch between memory and looper modes.
Press and hold to bypass the effect of the .
.
 MEMORY footswitch
Use to select patch memories.
When in looper mode, use to record and play loops.
 MEMORY footswitch
Use to select patch memories.
When in looper mode, use to stop loops.
 EFFECT section
Apply delay, reverb or another effect.
 EFFECT selection knob
Select the effect.
 EFFECT ADJUST knob
Adjust the effect.
 EFFECT indicator
This shows whether the EFFECT section is on or off.
 EFFECT footswitch
Turn the EFFECT section on/off.
8
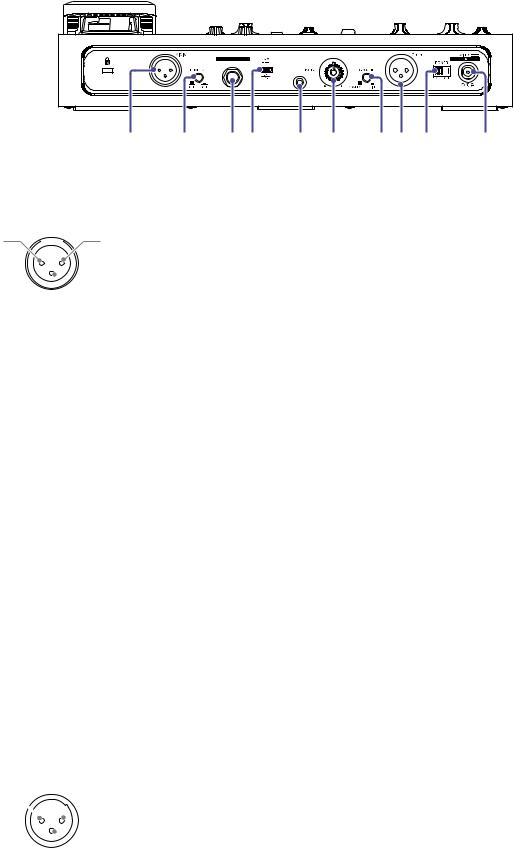
■■Rear panel
|
|
|
|
|
|
 MIC IN jack
Connect a mic here.
2: HOT |
1: GND |
 3: COLD
 PHANTOM switch
Turn +48V phantom power ON/OFF.
Turn this ON when connecting a ZOOM SGV-6 mic or a condenser mic that requires phantom power, for example.
 EFFECT CONTROL connector
An expression pedal (ZOOM FP02M) can be connected here to control the effect.
 USB port
Connect a computer here to use the as an audio interface or to update the
 firmware. A mobile battery, for example, can also be connected here to provide power.
 PHONES output jack
Connect headphones here.
 PHONES output volume knob
Adjust the headphone output volume.
 GROUND LIFT switch
This connects/disconnects the output jack ground.
 OUTPUT jack
Connect this to a mixer, other PA system, recorder or other audio device that can adjust sound balance.
1: GND

 2: HOT
 3: COLD
 POWER switch
Turn the power on/off.
 DC 9V AC adapter connector
Connect a dedicated AC adapter (ZOOM AD-16) here.
9
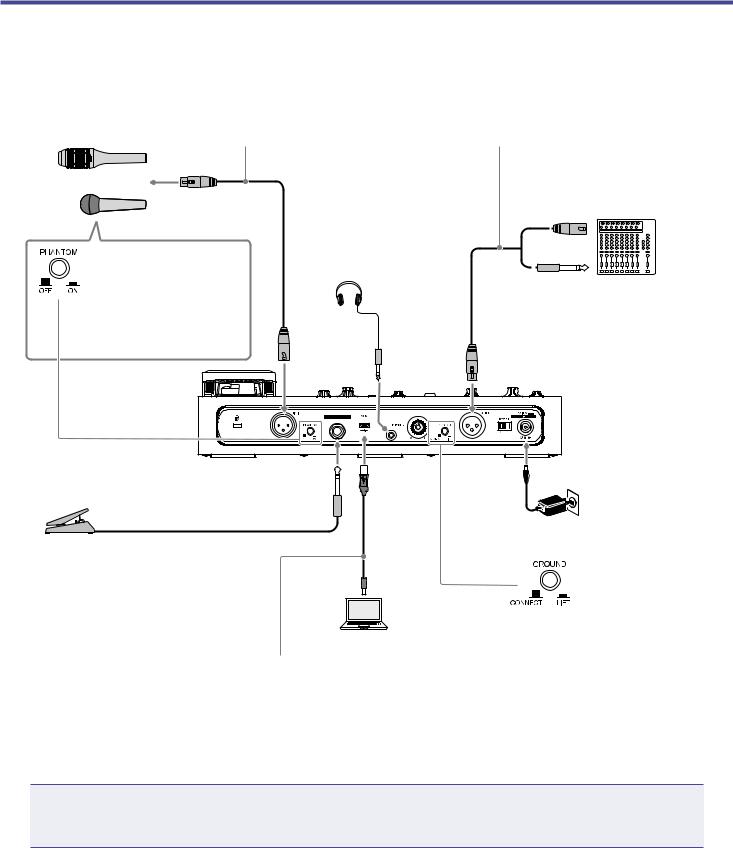
Making connections
Mic (ZOOM SGV-6 or commercially-avail- able mic)
Use a mic cable to connect it to the MIC IN jack.
Connect a cable with an XLR connector (female) to the OUTPUT jack.
Use a cable with a connector that suits the PA system or recorder input jack.
The 
 output is line level.
Connect it to a line input jack on the other equipment.
or |
|
Mixer, PA system, recorder, |
|
|
etc. |
When connecting a |
Stereo mini plug |
or |
headphones |
|
|
ZOOM SGV-6, condens- |
|
|
er mic or other device |
|
|
that requires phantom |
|
|
power, set the PHAN- |
|
|
TOM switch to ON. |
|
|
|
|
|
AC adapter (ZOOM |
|
|
|
|
AD-16) |
|
Expression pedal (ZOOM |
|
|
|
|
FP02M) |
|
|
|
|
Connected to the EFFECT |
|
|
|
|
CONTROL jack, the pedal |
|
|
|
|
can be used to control the |
|
This connects/disconnects the out- |
||
effect. |
|
|||
Computer |
put jack ground. |
|||
|
||||
|
|
|
||
Use a Micro USB ca- |
|
• |
CONNECT:The grounding pin is |
|
|
|
connected to the ground. |
||
ble to connect to the |
|
|
||
|
• |
LIFT:The grounding pin is discon- |
||
USB port. |
nected from the ground.This is |
|
|
|
effective if noise is caused by a |
|
ground loop. |
NOTE
Always set the PHANTOM switch to OFF when connecting a device that does not support phantom power.The device could be damaged if this is not done.
10
ZOOM SGV-6 mic overview
The SGV-6 is a mic with focused directionality based on the technologies of shotgun mics, which are designed to capture sound in the direction they are pointed.
By capturing only the vocal, sounds from other instruments on stage are suppressed, enabling accurate pitch correction and harmonization.
■■Using the SGV-6
 Sing towards this end.
 Holding this part will change its directionality, preventing it from functioning correctly. Avoid holding it during use.
NOTE
The SGV-6 is a delicate device. Do not drop it or hit it with excessive force.
11

Turning the power on
1.
2.
3.
Minimize the volume of output devices.
Set 


 to ON.
This turns the on, and
 lights green.
Raise the volume of output devices.
HINT
•4 AA batteries can also be used. Use only one type of battery (alkaline, NiMH or lithium) at a time. ( “Using batteries” on page 13)
•Power for operation can also be supplied through the USB port.
ECO mode overview
•By default, ECO mode is set to ON, so the power will automatically turn off if no use occurs for 10 hours.
•ECO mode can also be set to OFF on the SETTING screen. ( “Setting ECO mode to turn the power off automatically when not used” on page 31)
12
 Loading...