


 Loading...
[GB] Guide Operations Camera
3-087-923-12(1)
Camera
Operations Guide
Read this first
Digital Video Camera Recorder
DCR-TRV460E/TRV461E
TM
SERIES
© 2004 Sony Corporation

Read this first
Before operating the unit, please read this manual thoroughly, and retain it for future reference.
WARNING
To prevent fire or shock hazard, do not expose the unit to rain or moisture.
To avoid electrical shock, do not open the cabinet. Refer servicing to qualified personnel only.
FOR CUSTOMERS IN THE UNITED KINGDOM
NOTICE ON THE SUPPLIED AC ADAPTOR
A moulded plug complying with BS1363 is fitted to this equipment for your safety and convenience.
Should the fuse in the plug supplied need to be replaced, a fuse of the same rating as the supplied one and approved by ASTA or BSI to BS1362 (i.e., marked with  or
or  mark) must be used.
If the plug supplied with this equipment has a detachable fuse cover, be sure to attach the fuse cover after you change the fuse. Never use the plug without the fuse cover. If you should lose the fuse cover, please contact your nearest Sony service station.
FOR CUSTOMERS IN EUROPE
ATTENTION
The electromagnetic fields at the specific frequencies may influence the picture and sound of this camcorder.
This product has been tested and found compliant with the limits set out in the EMC Directive for using connection cables shorter than 3 meters (9.8 feet).
b Notice
If static electricity or electromagnetic interference causes data transfer to discontinue midway (fail), restart the application or disconnect and connect the USB cable again.
Notes on use
Note on a cassette tape
You can record on standard 8 mm  and Hi8
 , Digital8
  video cassettes in Digital8
  system only on your camcorder. See page 114 for details.
Notes on recording
•Before starting to record, test the recording function to make sure the picture and sound are recorded without any problems.
•Compensation for the contents of recordings cannot be provided, even if recording or playback is not possible due to a malfunction of the camcorder, storage media, etc.
•TV color systems differ depending on the country/ regions. To view your recordings on a TV, you need a PAL system-based TV.
•Television programs, films, video tapes, and other materials may be copyrighted. Unauthorized recording of such materials may be contrary to the copyright laws.
Notes on the LCD panel, viewfinder, and lens
•The LCD screen and the viewfinder are manufactured using extremely high-precision technology, so over 99.99% of the pixels are operational for effective use.
However, there may be some tiny black points and/ or bright points (white, red, blue, or green in color) that appear constantly on the LCD screen and the viewfinder.
These points are normal results of the manufacturing process and do not affect the recording in any way.
•Exposing the LCD screen, the viewfinder, or the lens to direct sunlight for long periods of time may cause malfunctions. Be careful when placing the camera near a window or outdoors.
2

•Do not aim at the sun. Doing so might cause your camcorder to malfunction. Take pictures of the sun only in low light conditions, such as at dusk.
Note on connecting other device
Before connecting your camcorder to other device such as a VCR or a computer with a USB or i.LINK cable, be sure to insert the connector plug in the proper direction. If you insert the connector plug forcibly in the wrong direction, the terminal may be damaged, or this may cause a malfunction of your camcorder.
Notes on using this manual
•The images of the LCD screen and the viewfinder used on this manual are captured using a digital still camera, and thus may appear different from what you see.
•Instructions with no specific model names are for all models.
Instructions with specific model names are for the indicated models only.
Before you start reading this manual, check the model name of your camcorder.
Notes on using the camcorder
• Hold your camcorder correctly.
•To ensure a good grip, fasten the grip belt as shown in the following illustration.
•When you are using the touch panel, place your hand on the back side of the LCD panel to support it. Then, touch the buttons displayed on the screen.
Touch the button on the LCD screen.
•You can change the language to be used for screen display on your camcorder (p. 22)
•Do not hold the camcorder by the following parts.
Viewfinder |
LCD panel |
Battery pack
3

Table of Contents
 : Features available for tape only.
 : Features available for “Memory Stick” only.
Read this first ............................................................................................. |
|
2 |
Quick Start Guide |
|
|
Recording movies ...................................................................................... |
|
8 |
Recording still images .............................................................................. |
|
10 |
Recording/Playing back with ease ........................................................... |
12 |
|
Getting started |
|
|
Step 1: Checking supplied items.............................................................. |
13 |
|
Step 2: Charging the battery pack............................................................ |
14 |
|
Using an outside power source ................................................................................. |
17 |
|
Step 3: Turning the power on................................................................... |
17 |
|
Step 4: Adjusting the LCD panel and viewfinder...................................... |
18 |
|
Adjusting the LCD panel ............................................................................................ |
|
18 |
Adjusting the viewfinder ............................................................................................. |
|
18 |
Step 5: Setting the date and time............................................................. |
19 |
|
Step 6: Inserting the recording media ...................................................... |
20 |
|
Inserting a cassette tape |
........................................................................................... |
20 |
Inserting a “Memory Stick” ......................................................................................... |
21 |
|
Step 7: Setting the screen language ........................................................ |
22 |
|
Recording |
|
|
Recording movies .................................................................................... |
|
24 |
Recording for a longer time ....................................................................................... |
26 |
|
Using zoom ................................................................................................................ |
|
26 |
Using the built-in light ................................................................................................ |
|
27 |
Recording in mirror mode .......................................................................................... |
28 |
|
Using the self-timer .................................................................................................... |
|
28 |
Recording still images |
– Memory photo recording............................. |
29 |
Selecting image quality .............................................................................................. |
|
31 |
Using the self-timer .................................................................................................... |
|
31 |
Recording a still image on a “Memory Stick” while recording movies on a tape ....... |
32 |
|
Recording with ease – Easy Handycam .................................................. |
33 |
|
Recording a movie ............................................................................................... |
|
33 |
Recording a still image |
......................................................................................... |
34 |
Making full use of Easy Handycam operation ........................................................... |
34 |
|
4

Adjusting the exposure............................................................................. |
|
|
35 |
Adjusting the exposure for backlit subjects ............................................................... |
35 |
||
Fixing the exposure for the selected subject – Flexible spot meter .......................... |
35 |
||
Adjusting the exposure manually |
.............................................................................. |
36 |
|
Recording in dark places – NightShot plus, etc. ...................................... |
37 |
||
Adjusting the focus................................................................................... |
|
|
38 |
Adjusting the focus for an off-center subject – SPOT FOCUS .................................. |
38 |
||
Adjusting the focus manually .................................................................................... |
|
39 |
|
Recording a picture using various effects ................................................ |
40 |
||
Fading in and out of a scene |
– FADER .............................................................. |
40 |
|
Using special effects |
– Digital effect .................................................................. |
41 |
|
Overlaying still images on movies on a tape – MEMORY MIX ................................. |
43 |
||
Searching for the starting point |
.......................................................... |
44 |
|
Searching for the last scene of the most recent recording – END SEARCH ............ |
44 |
||
Searching manually – EDIT SEARCH ...................................................................... |
45 |
||
Reviewing the most recently recorded scenes – Rec review .................................... |
45 |
||
Playback |
|
|
|
Viewing movies recorded on a tape ................................................... |
46 |
||
Playing back in various modes ................................................................................. |
|
47 |
|
Viewing recordings with added effects – Digital effect .............................................. |
48 |
||
Viewing recordings on a “Memory Stick” ........................................... |
49 |
||
Playing back in various modes from a “Memory Stick” ............................................. |
50 |
||
Playing back with ease – Easy Handycam .............................................. |
51 |
||
Making full use of Easy Handycam operation ........................................................... |
52 |
||
Various playback functions |
...................................................................... |
|
53 |
Magnifying pictures – Tape playback zoom/Memory playback zoom ....................... |
53 |
||
Displaying the screen indicators ............................................................................... |
|
54 |
|
Displaying the date/time and camera settings data – Data code .............................. |
54 |
||
Playing the picture on a TV ...................................................................... |
|
56 |
|
Locating a scene on a tape for playback ........................................... |
57 |
||
Searching quickly for a desired scene – Zero set memory ....................................... |
57 |
||
Searching for a scene by date of recording – Date search ....................................... |
57 |
||
,continued
5
Advanced operations
Using the Menu |
|
|
Selecting menu items ........................ |
59 |
|
Using the |
(CAMERA SET) menu |
|
– PROGRAM AE/16:9 WIDE, |
|
|
etc ................................................ |
|
61 |
Using the |
(MEMORY SET) menu |
|
– QUALITY/IMAGE SIZE/ALL |
|
|
ERASE/NEW FOLDER, etc ......... |
65 |
|
Using the |
(PICT. APPLI.) menu |
|
– PICT. EFFECT/SLIDE SHOW/ |
|
|
FRAME REC/INTERVAL REC, |
|
|
etc ................................................ |
|
68 |
Using the |
(EDIT/PLAY) menu |
|
– END SEARCH/TITLE, etc ......... |
73 |
|
Using the |
(STANDARD SET) menu |
|
– REC MODE/MULTI-SOUND/ |
|
|
AUDIO MIX/USB-CAMERA, |
|
|
etc ................................................ |
|
76 |
Using the |
(TIME/LANGU.) menu |
|
– CLOCK SET/WORLD TIME, |
|
|
etc ................................................ |
|
82 |
Customizing Personal Menu .............. |
83 |
|
Dubbing/Editing |
|
|
Connecting to a VCR or TV ............... |
86 |
|
Dubbing to another tape ............... |
87 |
|
Recording pictures from a VCR or TV 88 |
||
Dubbing pictures from a tape to a |
|
|
“Memory Stick” ............................. |
89 |
|
Dubbing still images from a “Memory |
||
Stick” to a tape |
............................. |
90 |
Dubbing selected scenes from a tape |
||
– Digital program editing .............. |
91 |
|
Deleting recorded pictures ............ |
98 |
|
Marking recorded images with specific |
||
information |
– Image protection/ |
|
Print mark ..................................... |
|
99 |
Printing recorded images (PictBridge |
|
|
compliant printer) .................. |
101 |
|
6

Troubleshooting |
|
Troubleshooting ............................... |
103 |
Warning indicators and messages.... |
110 |
Additional Information |
|
Using your camcorder abroad .......... |
114 |
Usable cassette tapes ..................... |
114 |
About the “Memory Stick” ................ |
115 |
About the “InfoLITHIUM” |
|
battery pack ................................ |
117 |
About i.LINK ..................................... |
119 |
Maintenance and precautions .......... |
120 |
Specification .................................... |
123 |
Quick Reference |
|
Identifying parts and controls ........... |
125 |
Index ................................................ |
131 |
Refer also to other operating instructions supplied with your camcorder:
• Editing images with your computer cComputer Applications Guide
7

Quick Start Guide
Recording movies
1 Attach the charged battery pack to the camcorder.
To charge the battery, see page 14.
a Lift up the viewfinder. b Slide the battery pack in the direction of the arrow until it clicks.
2 Insert a cassette into the camcorder.
a Slide the |
OPEN/ |
b Insert the cassette with |
EJECT lever in the |
its window-side facing |
|
direction of the arrow |
up, then push the center |
|
to open the lid. |
of the back of the |
|
The cassette compartment |
cassette. |
|
comes out automatically. |
|
|
cPress  .
.
Close the cassette lid after the cassette compartment slides back in by itself.
Window-side
 OPEN/EJECT lever
8 Quick Start Guide
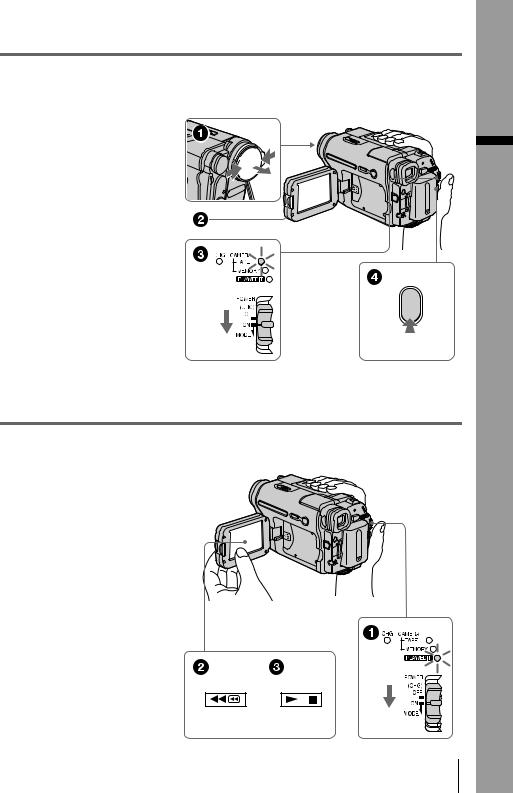
3 Start recording while checking the subject on the LCD screen.
The date and time is not set up in the default setting. To set the date and time, see page 19.
a Remove the lens cap.
Lens cap is not attached when you purchase your camcorder (p. 125).
b Press OPEN and
open the LCD panel.
c While pressing the green button, slide the POWER switch down to light up the CAMERA-TAPE lamp.
The power turns on.
d Press REC START/
STOP.
Recording starts. To change to standby mode, press REC START/STOP again.
4 View the recorded picture on the LCD screen.
a Slide the POWER switch repeatedly until the PLAY/EDIT lamp lights up.
b Touch  (rewind).
c Touch  (play) to start the playback.
To stop, press  .
.
To turn off the power, slide the
POWER switch up to (CHG)
OFF.
Guide Start Quick
Quick Start Guide 9

Recording still images
1 Attach the charged battery pack to the camcorder.
To charge the battery, see page 14.
a Lift up the viewfinder. b Slide the battery pack in the direction of the arrow until it clicks.
2 Insert a “Memory Stick” into the camcorder.
Insert it so that the b mark is at the bottom left corner. Push in until it clicks.
b mark
10 Quick Start Guide

3 Start recording while checking the subject on the LCD screen.
The date and time is not set up in the default setting. To set the date and time, see page 19.
a Remove the lens cap.
Lens cap is not attached when you purchase your camcorder (p. 125).
b Press OPEN and
open the LCD panel.
c While pressing the green button, slide the POWER switch repeatedly until the CAMERA-MEMORY lamp lights up.
The power turns on.
d Press PHOTO lightly.
A short beep sound is heard when the focus is adjusted.
ePress PHOTO fully.
A shutter sound is heard and the still image is recorded.
4 View the recorded picture on the LCD screen.
a Slide the POWER switch repeatedly until the PLAY/EDIT lamp lights up.
b Touch 

 .
.
The most recently recorded image is displayed.
c Touch 

 (next) or
 (previous) to view images in sequence.
To turn off the power, slide the
POWER switch up to (CHG)
OFF.
Guide Start Quick
Quick Start Guide 11
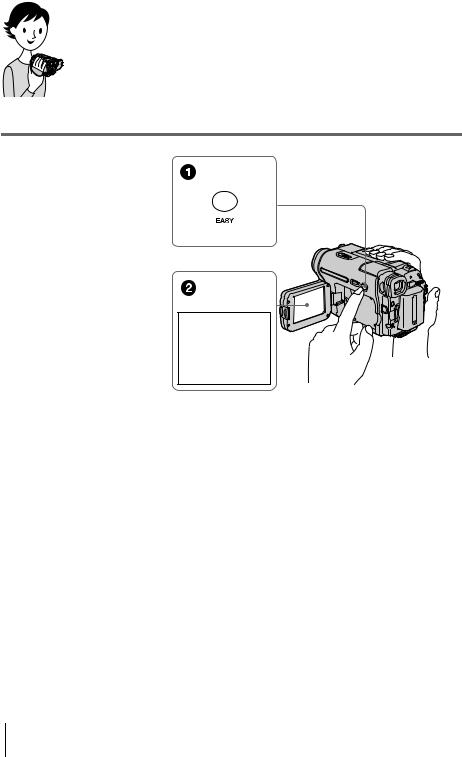
Recording/Playing back with ease
By switching to Easy Handycam operation, recording/playback operation becomes even easier.
Easy Handycam operation allows easy recording/playback for even first time users by providing only the basic functions for recording/playback.
Press EASY when recording/ playing back.
EASY lights up in blue (1) and screen font size increases (2) during Easy Handycam operation.
Easy Handycam operation
ON
For details, see instructions for each operation.
See page 33 for recording, page 51 for playback.
12 Quick Start Guide
Getting started
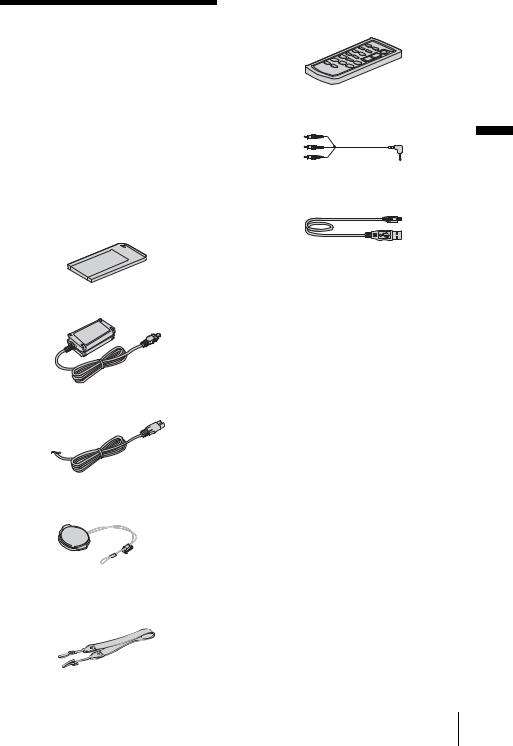
Step 1: Checking supplied items
Make sure you have following items supplied with your camcorder.
The number in parentheses indicates the number of that item supplied.
“Memory Stick” 8MB (1) (DCR-TRV461E)
“Memory Stick” media is only supplied with DCR-TRV461E.
There is no “Memory Stick” media supplied with DCR-TRV460E.
AC Adaptor (1)
Mains lead (1)
Lens cap (1)
See page 125 on how to attach the lens cap.
Shoulder strap (1)
See page 126 on how to attach the shoulder strap.
Wireless Remote Commander (1)
A button-type lithium battery is already installed.
A/V connecting cable (1)
USB cable (1)
Rechargeable battery pack NP-FM30 (1)
CD-ROM “SPVD-012 USB Driver” (1)
Cleaning cloth (1)
21-pin adaptor (1)
For the models with the 
 mark printed on their bottom surfaces only.
Camera Operations Guide (This manual) (1)
Computer Applications Guide (1)
started Getting
Getting started 13

Step 2: Charging the battery pack
You can charge the battery by attaching the
“InfoLITHIUM” battery pack (M series) to your camcorder.
b Notes
•You cannot use batteries other than the “InfoLITHIUM” battery pack (M series) (p. 117).
•Do not short-circuit the DC plug of the AC Adaptor or battery terminals with any metallic objects. This may cause a malfunction.
•Use a nearby wall socket when using the AC Adaptor. Disconnect the AC Adaptor from the wall socket immediately if any malfunction occurs.
Battery pack
DC IN jack
DC plug
Mains lead
AC Adaptor
To the wall socket
1 Lift up the viewfinder.
2 Attach the battery pack by sliding it in the direction of the arrow until it clicks.
3 With the v mark on the DC plug facing up, connect the AC Adaptor to the DC IN jack on your camcorder.
v mark
4 Connect the mains lead to the AC Adaptor.
5 Connect the mains lead to the wall socket.
14 Getting started

6 Slide the POWER switch up to (CHG) OFF.
The CHG (charge) lamp lights up and charging starts.
After charging the battery
The CHG (charge) lamp turns off when the battery is fully charged. Disconnect the AC Adaptor from the DC IN jack.
To remove the battery pack
POWER switch
BATT(battery) release button
1Set the POWER switch to (CHG) OFF.
2Lift up the viewfinder.
3Slide the battery pack out in the direction of the arrow pressing the BATT (battery) release button down.
b Note
•If you do not use the battery pack for a long time, use up the battery pack completely before storing it. See page 118 about storage of the battery pack.
To check the remaining battery – Battery Info
DSPL/BATT INFO
|
|
Getting |
OPEN |
POWER switch |
started |
|
You can check the battery’s current charge level and its current remaining recording time both during charging or when the power is turned off.
1Set the POWER switch to (CHG) OFF.
2Press OPEN and open the LCD panel.
3Press DSPL/BATT INFO.
The battery information appears for about 7 seconds.
Keep the button pressed to view it for about 20 seconds.
BATTERY INFO
BATTERY CHARGE LEVEL
0%0% |
50%50% |
100%100% |
REC TIME AVAILABLE
LCD SCREEN:: 72 min
VIEWFINDER:: 95 min
ABattery charge level: Displays approximate remaining amount of power left in the battery pack.
BApproximate possible recording time using the LCD panel.
CApproximate possible recording time using the viewfinder.
,continued
Getting started 15

Charging time
Approximate number of minutes required when you fully charge a fully discharged battery pack at 25°C (77°F). (10 – 30°C (50 – 86°F) recommended.)
Battery pack
NP-FM30 (supplied) |
145 |
|
|
NP-FM50 |
150 |
|
|
NP-QM71/QM71D |
260 |
|
|
NP-QM91/QM91D |
360 |
|
|
Recording time when recording with the LCD screen on
Approximate number of minutes available when you use a fully charged battery pack at 25°C (77°F).
Battery pack |
Continuous |
Typical* |
|
recording |
recording |
|
time |
time |
|
|
|
NP-FM30 |
80 |
40 |
(supplied) |
|
|
|
|
|
NP-FM50 |
130 |
60 |
|
|
|
NP-QM71/ |
315 |
150 |
QM71D |
|
|
|
|
|
NP-QM91/ |
475 |
230 |
QM91D |
|
|
|
|
|
Recording time when recording with the viewfinder
Approximate number of minutes available when you use a fully charged battery pack at 25°C (77°F).
Battery pack |
Continuous |
Typical* |
|
recording |
recording |
|
time |
time |
|
|
|
NP-FM30 |
105 |
50 |
(supplied) |
|
|
|
|
|
NP-FM50 |
170 |
85 |
|
|
|
NP-QM71/ |
415 |
205 |
QM71D |
|
|
|
|
|
NP-QM91/ |
625 |
310 |
QM91D |
|
|
|
|
|
*Approximate number of minutes when recording while you repeatedly record, start/stop, slide the POWER switch to change the power mode, and zoom. The actual battery life may be shorter.
Playing time
Approximate number of minutes available when you use a fully charged battery pack at 25°C (77°F).
This table shows the playing time for tapes recorded in the Digital8  system.
The playing time of tapes recorded on other devices in the Hi8 
 /standard 8 mm
  system is reduced by about 20%.
Battery pack |
LCD panel |
LCD panel |
|
opened |
closed |
|
|
|
NP-FM30 |
80 |
120 |
(supplied) |
|
|
|
|
|
NP-FM50 |
135 |
195 |
|
|
|
NP-QM71/ |
335 |
465 |
QM71D |
|
|
|
|
|
NP-QM91/ |
505 |
695 |
QM91D |
|
|
|
|
|
b Notes
•The power will not be supplied from the battery pack when the AC Adaptor is connected to the DC IN jack of your camcorder, even if its mains lead is disconnected from the wall socket.
•The recording and playback time will be shorter when you use your camcorder in low temperature.
•The CHG (charge) lamp flashes during charging, or the battery information will not be correctly displayed in following conditions.
–The battery pack is not attached correctly.
–The battery pack is damaged.
–The battery pack is fully discharged. (For Battery information only.)
16 Getting started
Using an outside power source
You can use the AC Adaptor as the power source when you do not want the battery to run out. While you are using the AC Adaptor, the battery pack will not lose its charge even when it is attached to your camcorder.
PRECAUTION
Even if your camcorder is turned off, AC power (mains) is still supplied to it while connected to the wall socket via the AC Adaptor.
Connect your camcorder as shown in “Charging the battery pack” (p. 14).
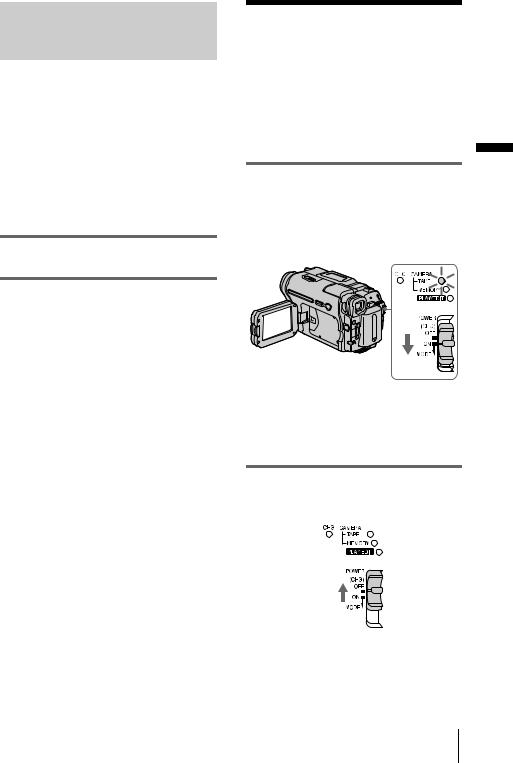
Step 3: Turning the power on
You need to slide the POWER switch repeatedly to select the desired power mode to record or play.
When using this camcorder for the first time, the [CLOCK SET] screen appears (p. 19).
While pressing the green button, slide the POWER switch down.
The power turns on.
To enter the recording or playing mode, slide the switch repeatedly until the respective lamp for the desired power mode lights up.
•CAMERA-TAPE mode: To record on a tape.
•CAMERA-MEMORY mode: To record on a “Memory Stick.”
•PLAY/EDIT mode: To play or edit pictures on a tape or “Memory Stick.”
To turn off the power
Slide the POWER switch up to (CHG) OFF.
started Getting
Getting started 17
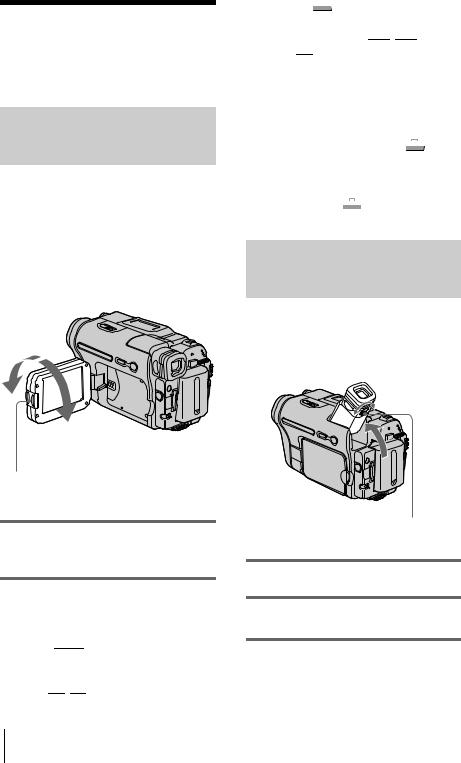
Step 4: Adjusting the LCD panel and viewfinder
Adjusting the LCD panel
You can adjust the angle and brightness of the LCD panel to meet various recording situations.
Even when there are obstructions between you and the subject, you can check the subject on the LCD screen during recording by adjusting the angle of the LCD panel.
Maximum 180 degrees
Maximum 90 degrees
Press OPEN and open the LCD panel.
Open the LCD panel 90 degrees to the camcorder, then rotate it to the desired position.
To adjust the brightness of the LCD screen
1Touch 


 .
.
2Touch [LCD BRIGHT].
If the item is not displayed on the screen, touch 

 /
/ 

 . If you cannot find it, touch
[MENU],  (STANDARD SET) menu, then touch [LCD SET] (p. 78).
3Adjust the item with 

 /
/ 

 , then touch
  .
.
z Tips
•If you rotate the LCD panel 180 degrees to the lens side, you can close the LCD panel with the LCD screen facing out.
•If you are using the battery pack for power source,
you can adjust the brightness by selecting [LCD BL LEVEL] from the [LCD SET] on the  (STANDARD SET) menu (p. 78).
•Even if you adjust the LCD screen backlight, the recorded picture will not be affected.
•You can turn off the operation confirmation beep by setting [BEEP] in the  (STANDARD SET) menu to [OFF] (p. 80).
Adjusting the viewfinder
You can view images using the viewfinder when you close the LCD panel. Use the viewfinder when the battery is running out, or when the screen is hard to see.
Viewfinder lens adjustment lever
1 Lift up the viewfinder.
2 Adjust the viewfinder lens adjustment lever until the picture is clear.
18 Getting started

To use the viewfinder during operation
When you are recording on a tape or a “Memory Stick”, you can adjust the exposure (p. 35) and fader (p. 40) while checking the image on the viewfinder. Have the LCD panel rotated 180 degrees and closed with the screen facing out.
1Set the power mode to CAMERA-TAPE or CAMERA-MEMORY (p. 17).
2Close the LCD panel with the screen facing out.
 appears on the screen.
3Touch 

 .
.
[Set LCD off?] appears on the screen.
4Touch [YES].
The LCD screen is turned off.
5Touch the LCD screen while checking the display in the viewfinder.
[EXPOSURE], etc. are displayed.
6Touch the button you want to set.
•[EXPOSURE]: Adjust with 

 /
/ 

 and touch

 .
.
•[FADER]: Touch it repeatedly to select a desired effect (only in the CAMERATAPE mode).
•


 : The LCD screen lights up.
To hide the buttons on the LCD screen, touch 

 .
.
To use the large-capacity battery pack
When you use the large-capacity battery pack (NP-QM71/QM71D/QM91/QM91D) on your camcorder, extend the viewfinder and pull it up to the optimal angle for viewing.
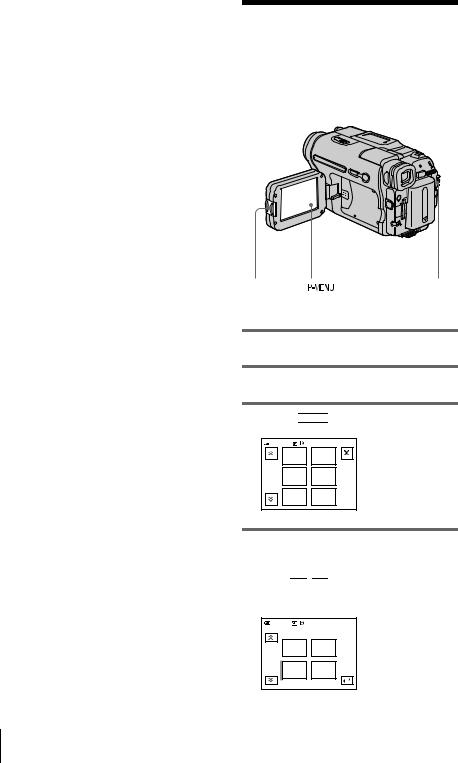
Step 5: Setting the date and time
Set the date and time when using this camcorder for the first time. If you do not set the date and time, the [CLOCK SET] screen appears every time you turn on your camcorder.
b Note |
Getting |
|
|
||
• If you do not use your camcorder for about 3 |
|
|
months, the built-in rechargeable button-type |
|
|
battery gets discharged and the date and time |
started |
|
settings may be cleared from the memory. In that |
||
|
||
case, charge the rechargeable button-type battery |
|
|
(p. 122) and then set the date and time again. |
|
OPEN |
|
POWER switch |
1 Turn on your camcorder (p. 17).
2 Press OPEN and open the LCD panel.
Proceed to step 7 when you set the clock for the first time.
3 Touch  .
.
60min |
–:––:–– |
||
|
MENU |
EXPO– |
|
|
SURE |
||
|
|
||
1/3 |
FADER |
SPOT |
|
FOCUS |
|||
|
|
||
|
SPOT |
PRGRAM |
|
|
METER |
AE |
|
,continued
Getting started 19

4 Touch [MENU].
60min |
–:––:–– |
|
CAMERA SET |
|
PROGRAM AE |
|
SPOT METER |
|
EXPOSURE |
|
OK |
5 Select |
(TIME/LANGU.) with |
|
/ |
, then touch |
. |
60min |
|
–:––:–– |
|
DISPLAY |
|
|
MENU ROTATE |
|
|
A. SHUT OFF |
|
|
CLOCK SET |
|
|
WORLD TIME |
|
|
LANGUAGE |
OK |
|
PROGRAM AE |
|
|
|
6 Select [CLOCK SET] with 

 /
/ 

 , then touch

 .
.
CLOCK SET |
|
–:––:–– |
|
|
|
|
|
DATE

 2004Y 1M 1D 0: 00
OK
7 Set [Y] (year) with  /
/  , then touch


 .
.
CLOCK SET |
|
|
–:––:–– |
|
DATE |
1M |
1D |
0: |
00 |
2004Y |
||||
|
|
|
|
OK |
You can set any year up to the year 2079.
8 Set [M] (month), [D] (day), hour and minute in the same way as was done in step 7, then touch  .
.
Step 6: Inserting the recording media
Inserting a cassette tape
You can record on standard 8 mm  ,
,
Hi8 


 and Digital8
  cassettes in Digital8
  system only. For details on these cassettes
(such as write-protection), see page 114.
b Notes
•Do not force the cassette into the compartment. This may cause a malfunction of your camcorder.
•The recording time when you use your camcorder is 2/3 of the indicated time on Hi8 


 tape. If you select the LP mode in the menu settings, the recording time is the indicated time on Hi8


 tape.
tape.
1 Slide the  OPEN/EJECT lever in the direction of the arrow and open the lid.
 OPEN/EJECT lever Lid
The cassette compartment automatically comes out and opens up.
20 Getting started
2 Insert a cassette with its window-side facing up.
Window-side
Push the center of the back of the cassette lightly.
3 Press  .
.
The cassette compartment automatically slides back in.
4 Close the lid.
To eject the cassette
1Slide the  OPEN/EJECT lever in the direction of the arrow and open the lid.
The cassette compartment automatically comes out.
2Take out the cassette, then press  .
.
The cassette compartment automatically slides back in.
3Close the lid.
Inserting a “Memory Stick”
For details on the “Memory Stick” (such as write-protection), see page 115.
b Note |
|
|
• When using the half-sized “Memory Stick,” the |
|
|
“Memory Stick Duo,” make sure you attach the |
|
|
Memory Stick Duo adaptor. Your camcorder may |
Getting |
|
malfunction when it is inserted without an adaptor |
||
|
||
(p. 116). |
|
|
Access |
started |
|
lamp |
||
|
b mark
Insert the “Memory Stick” with the b mark at the bottom left corner until it clicks.
To eject a “Memory Stick”
Lightly push the “Memory Stick” in once.
Lightly push in once.
,continued
Getting started 21
b Notes
•If you force the “Memory Stick” into the “Memory Stick” slot in the wrong direction, the “Memory Stick” slot may be damaged.
•Do not insert anything other than a “Memory Stick” into the “Memory Stick” slot. Doing so may cause a malfunction of your camcorder.
•When the access lamp is lit or flashing, your camcorder is reading/writing data from/to the “Memory Stick.” Do not shake or knock your camcorder, turn the power off, eject the “Memory Stick,” or remove the battery pack. Otherwise, image data may be damaged.
Step 7: Setting the screen language
You can select the language to be used on the LCD screen.
OPEN |
|
POWER switch |
|
1 Turn on your camcorder.
2 Press OPEN to open the LCD panel.
3 Touch 


 .
.
60min |
STBY |
0:00:00 |
|
|
MENU |
EXPO– |
|
|
SURE |
|
|
|
|
|
|
1/3 |
FADER |
SPOT |
|
FOCUS |
|
||
|
|
|
|
|
SPOT |
PRGRAM |
|
|
METER |
AE |
|
4 Touch [LANGUAGE].
If the item is not displayed on the screen, touch 

 /
/ 

 . If you cannot find it, touch [MENU], and select it from the
  (TIME/LANGU.) menu. (p. 82)
60min |
STBY |
0:00:00 |
LANGUAGE: |
ENGLISH |
|
DEU |
ΕΛΛΗ |
|
TSCH |
ΝΙΚΑ |
|
1/4 |
|
|
ENG |
ENG |
|
LISH |
[SIMP] |
|
22 Getting started

5 Select the desired language with  /
/  , then touch
  .
.
z Tip
•Your camcorder offers [ENG[SIMP]](simplified English) for when you cannot find your native tongue among the options.
started Getting
Getting started 23

Recording
Recording movies
You can record movies on a tape or a “Memory Stick.”
Before recording, follow steps 1 to 7 in “Getting started” (p. 13 - p. 22).
When you are recording on a tape, movies will be recorded along with stereo sound. When you are recording on a “Memory Stick,” the movie will be recorded with monaural sound.
Camera recording lamp
OPEN REC START/STOP |
POWER switch |
z Tip
•Performing Easy Handycam operation, even first time users can record easily. For details,see page 33.
1 Remove the lens cap. Pull the lens cap string down and attach it to the grip belt.
2 Press OPEN and open the LCD panel.
3 Select the recording mode.
 To record on a tape
Slide the POWER switch until the CAMERA-TAPE lamp lights up, and your camcorder is set to the standby mode.
Slide the POWER switch while pressing the green button.
 To record on a “Memory Stick” – MPEG MOVIE EX
Slide the POWER switch repeatedly until the CAMERA-MEMORY lamp lights up, and the currently selected recording folder appears on the screen.
Slide the POWER switch while pressing the green button.
4 Press REC START/STOP.
Recording starts. [REC] appears on the LCD screen and the Camera recording lamp lights up.
Press REC START/STOP again to stop recording.
To check the most recently recorded MPEG movie – Review
Touch 

 . Playback starts automatically. Touch

 again to return to standby.
To delete the movie, touch  after playback is finished, then [YES].
To cancel deleting, touch [NO].
To turn the power off
Slide the POWER switch up to (CHG) OFF.
24 Recording
b Note
•While recording movies on a “Memory Stick,” the only menu items available will be those with short cuts on the Personal Menu. In order to use other menu items, add them to the Personal Menu.
z Tip
•If you do not use your camcorder for a long time, remove the cassette and store it.
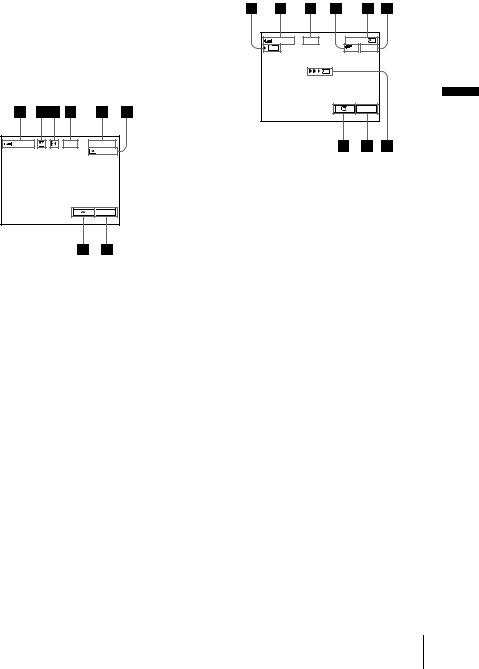
Indicators displayed during recording on a tape
The indicators will not be recorded on the tape. Date/time and the camera settings data (p. 54) will not be displayed during recording.
60min |
REC 0:00:00 |
|
|
|
|

 P-MENU
ARemaining battery
The indicated time may not be correct depending on the environment of use. When you opened or closed the LCD panel, it takes about 1 minute to display the correct remaining battery time.
B Recording mode (SP or LP)
C Format indicator
DRecording status ([STBY] (standby) or [REC] (recording))
ETime code or tape counter (hour: minute: second)
FRecording capacity of the tape
Displayed after you run the tape for a while.
G Personal Menu button (p. 59)
HEND SEARCH/EDIT SEARCH/Rec review display switch button (p. 44)
Indicators displayed during recording on a “Memory Stick”
The indicators will not be recorded on the “Memory Stick.”
Date/time (p. 54) will not be displayed during recording.
60min |
REC |
0:00:00 |
|
101 |
|
320 2min |
|
|
|
P-MENU |
Recording |
A Recording folder
BRemaining battery
The indicated time may not be correct depending on the environment of use. When you opened or closed the LCD panel, it takes about 1 minute to display the correct remaining battery time.
C Recording status ([REC] (recording))
D Movie size
E Recorded time (hour: minute: second)
FRecording capacity of the “Memory Stick”
G“Memory Stick” recording start indicator (appears for about 5 seconds)
H Personal Menu button (p. 59)
I Review button (p. 24)
b Notes
•Before changing the battery pack, slide the POWER switch up to (CHG) OFF.
•In the default setting, when you do not operate the camcorder for more than about 5 minutes, the power will automatically turn off to prevent battery loss ([A.SHUT OFF], p. 81). To restart recording, slide the POWER switch down to select CAMERATAPE or CAMERA-MEMORY, and then press REC START/STOP.
,continued
Recording 25
z Tips
•To ensure smooth transition on a tape from the last recorded scene to the next, note the following.
–Do not remove the cassette. (The picture will be recorded continuously without a break even when you turn the power off).
–Do not record pictures in SP mode and LP mode on the same tape.
–Avoid stopping then recording a movie in the LP mode.
•See “To record for a longer time on a “Memory Stick”” (p. 26) for the approximate length of time it is possible to record on a “Memory Stick” of different capacities.
•The recording time, date, and the camera settings data (for tape only) are recorded automatically on the recording media without being displayed on the screen. You can view this information during playback by selecting [DATA CODE] in the menu setting (p. 54).
Recording for a longer time
To record for a longer time on a tape
In the  (STANDARD SET) menu, select [
  REC MODE], then [LP] (p. 76).
In the LP mode, you can record 1.5 times longer than you can when recording in the SP mode. A tape recorded in the LP mode should be played back only on this camcorder.
To record for a longer time on a “Memory Stick”
In the  (MEMORY SET) menu, select [MOVIE SET], [
  IMAGE SIZE], then [160 × 112] (p. 65).
The length of time you can record on a “Memory Stick” varies depending on the image size and the recording environment.
Refer to the following list for approximate length of time you can record movies on a “Memory Stick” formatted on your camcorder.
Image size and time (hour: minute: second)
|
[320 × 240] |
[160 × 112] |
||||
|
|
|
|
|
|
|
|
|
|
|
|
|
|
|
|
|
|
|
|
|
8MB* |
00:01:20 |
00:05:20 |
||||
|
|
|
|
|
|
|
16MB |
00:02:40 |
00:10:40 |
||||
|
|
|
|
|
|
|
32MB |
00:05:20 |
00:21:20 |
||||
|
|
|
|
|
|
|
64MB |
00:10:40 |
00:42:40 |
||||
|
|
|
|
|
|
|
128MB |
00:21:20 |
01:25:20 |
||||
|
|
|
|
|
|
|
256MB |
00:42:40 |
02:50:40 |
||||
(MSX-256) |
|
|
|
|
|
|
|
|
|
|
|
|
|
512MB |
01:25:20 |
05:41:20 |
||||
(MSX-512) |
|
|
|
|
|
|
|
|
|
|
|
|
|
1GB |
02:50:40 |
11:22:40 |
||||
(MSX-1G) |
|
|
|
|
|
|
|
|
|
|
|
|
|
* Supplied with DCR-TRV461E only.
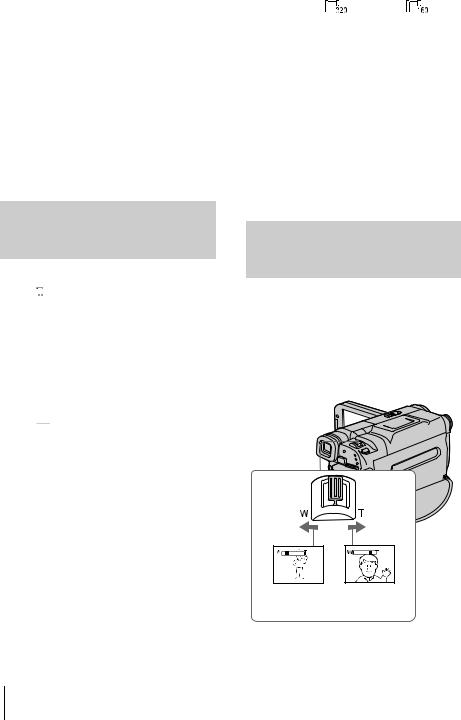
Using zoom
When the CAMERA-TAPE mode is selected, you can choose zoom to magnification levels greater than 20 times, and from that point activate the digital zoom ([DIGITAL ZOOM], p. 63).
Occasional use of the zoom is effective, but use it sparingly for best results.
1 cm (approx. |
80 cm (approx. |
1/2 inch)* |
2 5/8 feet)* |
*The minimum distance required between your camcorder and the subject to get a sharp focus in that position of the lever.
26 Recording

Move the power zoom lever slightly for a slower zoom. Move it further for a faster zoom.
To record wider range of view
Move the power zoom lever towards W. The subject appears farther away (Wide angle).
To record closer view
Move the power zoom lever towards T. The subject appears closer (Telephoto).
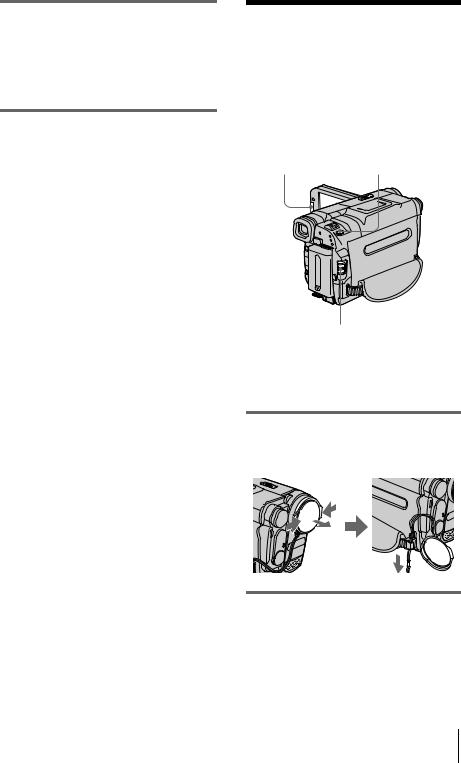
Using the built-in light
You can use the built-in light to suit your shooting situation. The recommended distance between the subject and camcorder is about 1.5 m (5 feet).
Built-in light
LIGHT
Press LIGHT repeatedly to select a setting.
The settings are displayed cyclically in the following order.
No indicator displayed: Always records without using the built-in light.
m


 : Automatically turns on and off according to the ambient brightness.
m

 : Always turns on.
b Notes
•The built-in video light emits very bright light, which is perfectly safe in normal use. However, avoid directly aiming the light at a subject’s eyes from very close range.
•The battery pack discharges quickly while the builtin light is turned on.
•When you do not use your camcorder, turn the builtin light off and remove the battery pack to avoid turning on the built-in light accidentally.
•When flickering occurs while shooting in the


 mode, press LIGHT until
 appears.
•The built-in light may turn on/off when you use the [PROGRAM AE] or backlight function while shooting in the 

 mode.
mode.
•The built-in light is turned off in the following cases:
–While the END SEARCH function is working.
–Interval time of Interval recording.
–When you leave it on for more than 5 minutes with the POWER switch set to CAMERA-MEMORY.
–When it stays on in the 

 mode for more than 5 minutes.
–When you leave it on for more than 5 minutes with no cassette inserted or after the tape has run out.
•When you use the conversion lens (optional), light from the built-in light is blocked and may not illuminate the subject properly.
Recording
To turn off the built-in light
Press LIGHT repeatedly until no indicator appears on the screen.
,continued
Recording 27
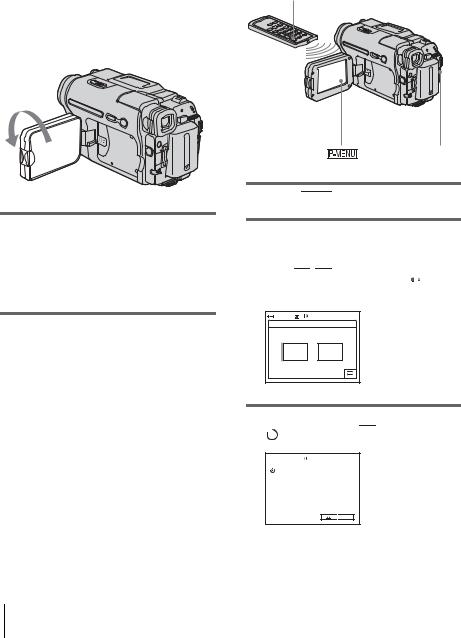
Recording in mirror mode |
|
Using the self-timer |
|
|
|
You can turn the LCD panel towards the subject so that you and your subject can share the image being recorded. You can also utilize this function when recording yourself, to keep the attention of small children attracted to the camcorder while you record them.
With the self-timer, you can start recording after a delay of about 10 seconds.
REC START/STOP
REC START/STOP
Open the LCD panel 90 degrees to the camcorder, then rotate it 180 degrees towards the subject.
A mirror-image of the subject appears on the LCD screen, but the picture will be normal when recorded.
1 Touch 


 .
.
2 Touch [SELF-TIMER].
If the item is not displayed on the screen, touch 

 /
/ 

 . If you cannot find it, touch [MENU], and select it from the

 (CAMERA SET) menu.
60min |
STBY |
0:00:00 |
SELF–TIMER: |
OFF |
|
OFF |
|
ON |
3 Touch [ON], then  .
.  appears.
 60min
60min  STBY 0:00:00

 P-MENU
28 Recording
4 Press REC START/STOP.
You will hear a beep sound counting down for about 10 seconds (The count down indication begins from 8).
The recording starts.
To stop recording, press REC START/ STOP.
To cancel the count down
Touch [RESET] or press REC START/STOP.
To cancel the self-timer
Follow steps 1 and 2, then select [OFF] in step 3.
Recording still
images  – Memory photo
recording
You can record still images on a “Memory Stick.” Before recording, follow steps 1 to 7 in “Getting started” (p. 13 - p. 22).
OPEN |
PHOTO |
|
|
|
|
|
|
|
Recording
POWER switch
z Tip
•Performing Easy Handycam operation, even first time users can record easily. For details, see page 33.
1 Remove the lens cap. Pull the lens cap string down and attach it to the grip belt.
2 Press OPEN and open the LCD panel.
,continued
Recording 29

3 Slide the POWER switch repeatedly until the CAMERA-MEMORY lamp lights up.
The selected recording folder is displayed.
Slide the POWER switch while pressing the green button.
4 Press and hold PHOTO lightly.
You will hear a light beeping sound when the focus and brightness settings are adjusted. Recording does not start at this point.
The indicator stops flashing.
The number of images that can be recorded.*
60min |
FINE |
20 |
 101
101

 P-MENU
*The number of images that can be recorded varies depending on the image quality setting and the recording environment.
5 Press PHOTO fully.
A shutter sound is heard. When bars of


 disappears, the image is recorded on the “Memory Stick.”
To check the most recently recorded image – Review
Touch 

 .
.
Touch 

 to return to standby.
To delete the image, touch  , then [YES]. To cancel deleting, touch [NO].
To turn the power off
Slide the POWER switch up to (CHG) OFF.
To record moving subjects correcting jitter - FIELD/FRAME
Select the  (MEMORY SET) menu, [STILL SET], then [
  FLD/FRAME].
Your camcorder compensates for camera-shake when recording moving subjects in the [FIELD] mode. Your camcorder records in high quality in the [FRAME] mode (p. 65).
Indicators displayed during recording
 60min FINE
 101
101

 P-MENU
A Recording folder
BQuality

 ([FINE]) or
 ([STANDARD])
C Personal Menu button (p. 59)
D Review button (p. 30)
b Notes
•When recording fast-moving subjects in the [FRAME] mode, the recorded image appears blurry.
•When recording in the [FRAME] mode, your camcorder may not correct camera-shake. We recommend that you shoot objects with a tripod.
z Tips
•When you press PHOTO on your Remote Commander, the image displayed on the screen at that timing is recorded.
•The recording time, date, and the camera settings data are recorded automatically on the recording media without being displayed on the screen. You can view this information during playback by selecting [DATA CODE] in the menu setting
(p. 54).
30 Recording
Loading...