


3-059-593-13 (1)
Digital
Video Camera
Recorder 


Operating Instructions
Before operating the unit, please read this manual thoroughly, and retain it for future reference.
ИНСТРУКЦИЯ ПО ЭКСПЛУАТАЦИИ
Пepe‰ ˝НcФОyaЪaˆЛeИ aФФapaЪa ‚МЛПaЪeО¸МУ ФpУ˜ЪЛЪe, ФУК‡ОЫИТЪ‡, ‰aММУe pyНУ‚У‰cЪ‚У Л cУxpaМяИЪe e„У ‰Оя ‰aО¸МeИ¯Лx cФpa‚УН.
TM
SERIES
DCR-TRV20E
DCR-TRV6E/TRV11E/TRV20E
© 2000 Sony Corporation
English
Welcome!
Congratulations on your purchase of this Sony Digital Handycam camcorder. With your Digital Handycam, you can capture life’s precious moments with superior picture and sound quality.
Your Digital Handycam is loaded with advanced features, but at the same time it is very easy to use. You will soon be producing home video that you can enjoy for years to come.
WARNING
To prevent fire or shock hazard, do not expose the unit to rain or moisture.
To avoid electrical shock, do not open the cabinet.
Refer servicing to qualified personnel only.
ATTENTION
The electromagnetic fields at the specific frequencies may influence the picture and sound of this digital camcorder.
Memory Stick
 N50
N50
РЫТТНЛИ
ДÓ· Ó ÔÓʇÎÓ‚‡Ú¸!
ПУБ‰ ‡‚ОяВП В‡Т Т Ф ЛУ· ВЪВМЛВП ‰‡ММУИ ‚Л‰ВУН‡ПВ ˚ Digital Handycam ЩЛ П˚ Sony. С ФУПУ˘¸˛ В‡¯ВИ ‚Л‰ВУН‡ПВ ˚ Digital Handycam В˚ ТПУКВЪВ Б‡ФВ˜‡ЪОВЪ¸ ‰У У„ЛВ В‡П П„МУ‚ВМЛя КЛБМЛ Т Ф В‚УТıУ‰М˚П Н‡˜ВТЪ‚УП ЛБУ· ‡КВМЛя Л Б‚ЫН‡.
В‡¯‡ ‚Л‰ВУН‡ПВ ‡ Digital Handycam УТМ‡˘ВМ‡ ЫТУ‚В ¯ВМТЪ‚У‚‡ММ˚ПЛ ЩЫМНˆЛяПЛ, МУ ‚ ЪУ КВ ‚ ВПя ВВ У˜ВМ¸ ОВ„НУ ЛТФУО¸БУ‚‡Ъ¸. ВТНУ В В˚ ·Ы‰ВЪВ ТУБ‰‡‚‡Ъ¸ ТВПВИМ˚В ‚Л‰ВУФ У„ ‡ПП˚, НУЪУ ˚ПЛ ПУКВЪВ М‡ТО‡К‰‡Ъ¸Тя ФУТОВ‰Ы˛˘ЛВ „У‰˚.
ПРЕДУПРЕЖДЕНИЕ
ДОя Ф В‰УЪ‚ ‡˘ВМЛя ‚УБ„У ‡МЛя ЛОЛ УФ‡ТМУТЪЛ ˝ОВНЪ Л˜ВТНУ„У Ы‰‡ ‡ МВ ‚˚ТЪ‡‚ОяИЪВ ‡ФФ‡ ‡Ъ М‡ ‰УК‰¸ ЛОЛ ‚О‡„Ы.
ВУ ЛБ·ВК‡МЛВ ФУ ‡КВМЛя ˝ОВНЪ Л˜ВТНЛП ЪУНУП МВ УЪН ˚‚‡ИЪВ НУ ФЫТ.
З‡ У·ТОЫКЛ‚‡МЛВП У· ‡˘‡Ъ¸Тя ЪУО¸НУ Н Н‚‡ОЛЩЛˆЛ У‚‡ММУПЫ У·ТОЫКЛ‚‡˛˘ВПЫ ФВ ТУМ‡ОЫ.
ВНИМАНИЕ
ЭОВНЪ УП‡„МЛЪМ˚В ФУОя М‡ УФ В‰ВОВММ˚ı ˜‡ТЪУЪ‡ı ПУ„ЫЪ ‚ОЛяЪ¸ М‡ ЛБУ· ‡КВМЛВ Л Б‚ЫН, ‚УТФ УЛБ‚У‰ЛПУВ ‰‡ММУИ ˆЛЩ У‚УИ ‚Л‰ВУН‡ПВ ˚.
2

English
Table of contents
Checking supplied accessories .............................. |
5 |
Quick Start Guide ............................................. |
6 |
Getting started |
|
Using this manual .................................................. |
10 |
Step 1 Preparing the power supply ................... |
13 |
Installing the battery pack ........................... |
13 |
Charging the battery pack ........................... |
14 |
Connecting to the mains .............................. |
19 |
Step 2 Inserting a cassette .................................... |
20 |
Recording – Basics |
|
Recording a picture ............................................... |
21 |
Shooting backlit subjects (BACK LIGHT) ... |
30 |
Shooting in the dark |
|
(NightShot/Super NightShot) ..................... |
31 |
Checking the recording – END SEARCH / |
|
EDITSEARCH / Rec Review ............................... |
34 |
Playback – Basics |
|
Playing back a tape ................................................ |
36 |
Viewing the recording on TV .............................. |
41 |
Advanced Recording Operations |
|
Recording a still image on a tape |
|
– Tape Photo recording ...................................... |
45 |
Adjusting the white balance manually ............... |
49 |
Using the wide mode ............................................ |
51 |
Using the fader function ....................................... |
53 |
Using special effects – Picture effect ................... |
56 |
Using special effects – Digital effect ................... |
58 |
Using the PROGRAM AE function ..................... |
61 |
Adjusting the exposure manually ....................... |
64 |
Focusing manually ................................................ |
65 |
Advanced Playback Operations |
|
Playing back a tape with picture effects ............. |
67 |
Playing back a tape with digital effects .............. |
68 |
Enlarging images recorded on tapes |
|
– PB ZOOM .......................................................... |
70 |
Quickly locating a scene using the zero set |
|
memory function ................................................ |
72 |
Searching the boundaries of recorded tape by |
|
title – Title search ................................................ |
73 |
Searching a recording by date – Date search ..... |
75 |
Searching for a photo |
|
– Photo search/Photo scan ................................ |
77 |
Editing |
|
Dubbing a tape ....................................................... |
80 |
Dubbing only desired scenes |
|
– Digital program editing .................................. |
84 |
Using with analog video unit and PC |
|
– Signal convert function ................................... |
96 |
Recording video or TV programmes .................. |
97 |
Inserting a scene a from VCR |
|
– Insert editing .................................................. |
101 |
Audio dubbing ..................................................... |
104 |
Superimposing a title .......................................... |
108 |
Making your own titles ....................................... |
112 |
Labelling a cassette .............................................. |
114 |
Customizing Your Camcorder |
|
Changing the menu settings .............................. |
116 |
Resetting the date and time ................................ |
129 |
“Memory Stick” operation |
|
(DCR-TRV11E/TRV20E only) |
|
Using a “Memory Stick”–introduction .......... |
131 |
Recording still images on “Memory Stick”s |
|
– Memory Photo recording ............................. |
138 |
Superimposing a still picture in a |
|
“Memory Stick” on a moving picture |
|
– MEMORY MIX ............................................... |
144 |
Recording an image from a mini DV tape as |
|
a still image ........................................................ |
149 |
Copying still images from a mini DV tape |
|
– Photo save ....................................................... |
152 |
Viewing a still picture |
|
– Memory photo playback ............................... |
154 |
Copying the image recorded on |
|
“Memory Stick”s to mini DV tapes ................ |
158 |
Enlarging still images recorded on |
|
“Memory Stick”s – Memory PB ZOOM ........ |
160 |
Playing back images in a continuous loop |
|
– SLIDE SHOW ................................................. |
162 |
Preventing accidental erasure |
|
– Image protection ............................................ |
164 |
Deleting images ................................................... |
166 |
Writing a print mark – PRINT MARK ............. |
169 |
Additional Information |
|
Usable cassettes .................................................... |
171 |
About i.LINK ........................................................ |
174 |
Troubleshooting ................................................... |
176 |
Self-diagnosis display ......................................... |
182 |
Warning indicators and messages .................... |
183 |
Using your camcorder abroad ........................... |
194 |
Maintenance information and precautions ...... |
195 |
Specifications ........................................................ |
200 |
Quick Reference |
|
Identifying the parts and controls ..................... |
204 |
Quick Function Guide ......................................... |
216 |
Index ...................................................................... |
218 |
3

РЫТТНЛИ
О„О‡‚ОВМЛВ
ПpÓ‚epÍa ÔpËÎa„aeÏ˚x ÔpËÌa‰ÎeÊÌÓcÚeÈ ........ |
5 |
PyÍÓ‚Ó‰cÚ‚Ó ÔÓ ·˚cÚpÓÏy ÁaÔycÍy ................. |
8 |
ПÓ‰„ÓÚÓ‚Ía Í ˝ÍcÔÎyaÚaˆËË |
|
ИcÔÓθÁÓ‚aÌËe ‰aÌÌÓ„Ó pyÍÓ‚Ó‰cÚ‚a ............... |
10 |
ПyÌÍÚ 1 ПÓ‰„ÓÚÓ‚Ía ËcÚÓ˜ÌËÍa ÔËÚaÌËя .......... |
13 |
УcÚaÌÓ‚Ía ·aÚapeÈÌÓ„Ó ·ÎÓÍa ................... |
13 |
Зapя‰Ía ·aÚapeÈÌÓ„Ó ·ÎÓÍa ...................... |
14 |
ПÓ‰cÓe‰ËÌeÌËe Í ceÚe‚ÓÈ pÓÁeÚÍe ........... |
19 |
ПyÌÍÚ 2 УcÚaÌÓ‚Ía ÍacceÚ˚ .............................. |
20 |
ЗaФЛc¸ - OcМУ‚М˚e ФУОУКeМЛя |
|
ЗaÔËc¸ ËÁÓ·paÊeÌËя ........................................... |
21 |
C˙eÏÍa Ó·˙eÍÚÓ‚ c Áa‰ÌeÈ ÔÓ‰c‚eÚÍÓÈ |
|
(BACK LIGHT) .............................................. |
30 |
C˙eÏÍa ‚ ÚeÏÌÓÚe |
|
(HÓ˜Ìaя c˙eÏÍa/УÎy˜¯eÌÌÓÈ ÌÓ˜ÌÓÈ |
|
c˙eÏÍË) ........................................................ |
31 |
ПpÓ‚epÍa ÁaÔËcË – END SEARCH/ |
|
EDITSEARCH/ ПpÓcÏÓÚp ÁaÔËcË ........................ |
34 |
BУcФpУЛБ‚e‰eМЛe - OcМУ‚М˚e ФУОУКeМЛя |
|
BÓcÔpÓËÁ‚e‰eÌËe ÎeÌÚ˚ .................................... |
36 |
ПpÓcÏÓÚp ÁaÔËcË Ìa ˝ÍpaÌe ÚeÎe‚ËÁÓpa .......... |
41 |
УcÓ‚ep¯eÌcÚ‚Ó‚aÌÌ˚e ÓÔepaˆËË c˙eÏÍË |
|
ЗaÔËc¸ ÌeÔÓ‰‚ËÊÌÓ„Ó ËÁÓ·paÊeÌËя Ìa ÔÎeÌÍe |
|
– ФÓÚÓc˙eÏÍa Ìa ÎeÌÚy .................................... |
45 |
Pe„yÎËpÓ‚Ía ·aÎaÌca ·eÎÓ„Ó ‚py˜Ìy˛ .............. |
49 |
ИcÔÓθÁÓ‚aÌËe ¯ËpÓÍÓ˝ÍpaÌÌÓ„Ó peÊËÏa ....... |
51 |
ИcÔÓθÁÓ‚aÌËe ÙyÌ͈ËË Ùeȉepa .................... |
53 |
ИcÔÓθÁÓ‚aÌËe cÔeˆËaθÌ˚x ˝ÙÙeÍÚÓ‚ |
|
– ЭÙÙeÍÚ ËÁÓ·paÊeÌËя .................................. |
56 |
ИcÔÓθÁÓ‚aÌËe cÔeˆËaθÌ˚x ˝ÙÙeÍÚÓ‚ |
|
– ЦËÙpÓ‚ÓÈ ˝ÙÙeÍÚ ........................................ |
58 |
ИcÔÓθÁÓ‚aÌËe ÙyÌ͈ËË PROGRAM AE ........... |
61 |
Pe„yÎËpÓ‚Ía ˝ÍcÔÓÁˈËË ‚py˜Ìy˛ ..................... |
64 |
ФÓÍycËpÓ‚Ía ‚py˜Ìy˛ ........................................ |
65 |
УcÓ‚ep¯eÌcÚ‚Ó‚aÌÌ˚e ÓÔepaˆËË |
|
‚ÓcÔpÓËÁ‚e‰eÌËя |
|
BÓcÔpÓËÁ‚e‰eÌËe ÎeÌÚ˚ c ˝ÙÙeÍÚaÏË |
|
ËÁÓ·paÊeÌËя ..................................................... |
67 |
BÓcÔpÓËÁ‚e‰eÌËe ÎeÌÚ˚ c ˆËÙpÓ‚˚ÏË |
|
˝ÙÙeÍÚaÏË ....................................................... |
68 |
У‚e΢eÌËe ËÁÓ·paÊeÌËÈ, ÁaÔËcaÌÌ˚x Ìa |
|
ÔÎeÌÍax – PB ZOOM ......................................... |
70 |
Б˚cÚp˚È ÔÓËcÍ ˝ÔËÁÓ‰a c ÔÓÏÓ˘¸˛ ÙyÌ͈ËË |
|
ÔaÏяÚË ÌyÎe‚ÓÈ ÓÚÏeÚÍË ................................. |
72 |
ПÓËcÍ „paÌˈ ÁaÔËcË Ìa ÎeÌÚe ÔÓ ÚËÚpy |
|
– ПÓËcÍ ÚËÚpa .................................................... |
73 |
ПÓËcÍ ÁaÔËcË ÔÓ ‰aÚe – ПÓËcÍ ‰aÚ˚ ................. |
75 |
ПУЛcН ЩУЪУ – ФУЪУФУЛcН/ФУЪУcНaМЛpУ‚aМЛe .... |
77 |
MÓÌÚaÊ |
|
ПepeÁaÔËc¸ ÎeÌÚ˚ ............................................... |
80 |
ПepeÁaÔËc¸ ÚÓθÍÓ ÌyÊÌ˚x ˝ÔËÁÓ‰Ó‚ |
|
– ЦËÙpÓ‚ÓÈ ÏÓÌÚaÊ ÔpÓ„paÏÏ˚ ..................... |
84 |
ИcÔÓθÁÓ‚aÌËe c aÌaÎÓ„Ó‚˚ÏË |
|
‚ˉeÓycÚpÓÈcÚ‚aÏË Ë ПК |
|
– ÙyÌ͈Ëя ÔpeÓ·paÁÓ‚aÌËя cË„ÌaÎa ............... |
96 |
ЗaÔËc¸ ‚ˉeÓ ËÎË ÚeÎeÔpÓ„paÏÏ ....................... |
97 |
BcЪa‚Нa ˝ФЛБУ‰a c ‚Л‰eУПa„МЛЪУЩУМa |
|
– MÓÌÚaÊ ‚cÚa‚ÍË .......................................... |
101 |
Ay‰ËÓÔepeÁaÔËc¸ .............................................. |
104 |
HaÎÓÊeÌËe ÚËÚpa .............................................. |
108 |
CÓÁ‰aÌËe Ba¯Ëx cÓ·cÚ‚eÌÌ˚x ÚËÚpÓ‚ ............ |
112 |
MapÍËpÓ‚Ía ÍacceÚ˚ ........................................ |
114 |
B˚ÔÓÎÌeÌËe Ë̉˂ˉyaθÌ˚x ycÚaÌÓ‚ÓÍ Ìa |
|
‚ˉeÓÍaÏepe |
|
ИÁÏeÌeÌËe ycÚaÌÓ‚ÓÍ ÏeÌ˛ ............................. |
116 |
ПepeycÚaÌÓ‚Ía ‰aÚ˚ Ë ‚peÏeÌË ...................... |
129 |
OÔepaˆËË c “Memory Stick” |
|
(TÓθÍÓ ‰Îя ÏÓ‰eÎË DCR-TRV11E/TRV20E) |
|
ИcÔÓθÁÓ‚aÌËe “Memory Stick” – B‚e‰eÌËe .... |
131 |
ЗaÔËc¸ ÌeÔÓ‰‚ËÊÌ˚x ËÁÓ·paÊeÌËÈ Ìa “Memory |
|
Stick” – ЗaÔËc¸ ÙÓÚÓ„paÙËÈ ‚ ÔaÏяÚ¸ .......... |
138 |
HaÎÓÊeÌËe ÌeÔÓ‰‚ËÊÌÓ„Ó ËÁÓ·paÊeÌËя ËÁ |
|
“Memory Stick” Ìa ÔÓ‰‚ËÊÌÓe ËÁÓ·paÊeÌËe |
|
– MEMORY MIX ............................................... |
144 |
ЗaÔËc¸ ËÁÓ·paÊeÌËя c ÎeÌÚ˚ ÏËÌË DV ÍaÍ |
|
ÌeÔÓ‰‚ËÊÌÓ„Ó ËÁÓ·paÊeÌËя ......................... |
149 |
КÓÔËpÓ‚aÌËe ÌeÔÓ‰‚ËÊÌ˚x ËÁÓ·paÊeÌËÈ c |
|
ÎeÌÚ˚ ÏËÌË DV |
|
– CУxpaМeМЛe ‚ ФaПяЪЛ ЩУЪУcМЛПНУ‚ .......... |
152 |
ПpÓcÏÓÚp ÌeÔÓ‰‚ËÊÌÓ„Ó ËÁÓ·paÊeÌËя |
|
– BУcФpУЛБ‚e‰eМЛe ЩУЪУcМЛПНУ‚ |
|
ËÁ ÔaÏяÚË ........................................................ |
154 |
КÓÔËpÓ‚aÌËe ËÁÓ·paÊeÌËÈ, ÁaÔËcaÌÌ˚x ‚ |
|
“Memory Stick”, Ìa ÎeÌÚ˚ ÏËÌË DV ............... |
158 |
У‚e΢eÌËe ÌeÔÓ‰‚ËÊÌ˚x ËÁÓ·paÊeÌËÈ, |
|
ÁaÔËcaÌÌ˚x Ìa “Memory Stick” |
|
– ПaÏяÚ¸ PB ZOOM ........................................ |
160 |
BÓcÔpÓËÁ‚e‰eÌËe ËÁÓ·paÊeÌËÈ ‚ ÌeÔpep˚‚ÌÓÈ |
|
ÔÓcÎe‰Ó‚aÚeθÌÓcÚË ÔÓ ÁaÏÍÌyÚÓÏy ˆËÍÎy |
|
– ДeÏÓÌcÚpaˆËя cÎaȉӂ ............................... |
162 |
Пpe‰ÓÚ‚pa˘eÌËe cÎy˜aÈÌÓ„Ó cÚËpaÌËя |
|
– Зa˘ËÚa ËÁÓ·paÊeÌËя .................................. |
164 |
У‰aÎeÌËe ËÁÓ·paÊeÌËÈ .................................... |
166 |
ЗaÔËc¸ Ôe˜aÚÌ˚x ÁÌaÍÓ‚ – PRINT MARK ........ |
169 |
ДУФУОМЛЪeО¸Мaя ЛМЩУpПaˆЛя |
|
ИcÔÓθÁyeÏ˚e ÍacceÚ˚ .................................... |
171 |
O Ía·eÎe i.LINK ................................................. |
174 |
ПÓËcÍ Ë ycÚpaÌeÌËe ÌeËcÔpa‚ÌÓcÚeÈ .............. |
185 |
И̉ËÍaˆËя caÏÓ‰Ëa„ÌÓcÚËÍË ........................... |
191 |
Пpe‰yÔpeʉa˛˘Ëe Ë̉ËÍaÚÓp˚ |
|
Ë cÓÓ·˘eÌËя .................................................... |
192 |
ИcÔÓθÁÓ‚aÌËe Ba¯eÈ ‚ˉeÓÍaÏep˚ |
|
Áa „paÌˈeÈ ..................................................... |
194 |
ИÌÙÓpÏaˆËя ÔÓ yxÓ‰y Áa aÔÔapaÚÓÏ Ë Ïep˚ |
|
Ôpe‰ÓcÚÓpÓÊÌÓcÚË ......................................... |
195 |
TexÌ˘ecÍËe xapaÍÚepËcÚËÍË .......................... |
202 |
КpaÚÍËÈ cÔpa‚Ó˜ÌËÍ |
|
O·ÓÁÌa˜eÌËe ˜acÚeÈ Ë pe„yÎяÚÓpÓ‚ ................ |
204 |
КpaÚÍÓe pyÍÓ‚Ó‰cÚ‚Ó ÔÓ ÙyÌ͈ËяÏ ................ |
217 |
AÎÙa‚ËÚÌ˚È yÍaÁaÚeθ .................................... |
219 |
4
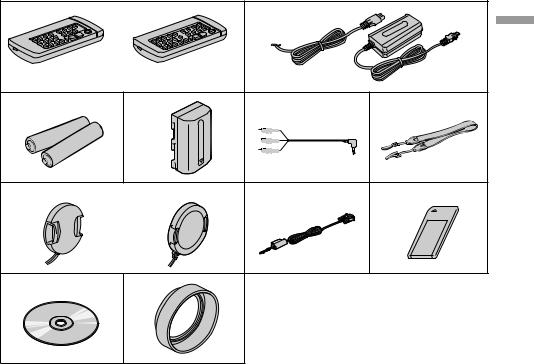
Checking supplied |
ПpÓ‚epÍa ÔpËÎa„aeÏ˚x |
|
accessories |
ÔpËÌa‰ÎeÊÌÓcÚeÈ |
|
|
|
|
Make sure that the following accessories are |
|
У·e‰ËÚec¸, ˜ÚÓ cÎe‰y˛˘Ëe ÔpËÌa‰ÎeÊÌÓcÚË |
supplied with your camcorder. |
|
ÔpËÎa„a˛Úcя Í Ba¯eÈ ‚ˉeÓÍaÏepe |
1 |
|
|
2 |
|
|
|
or/ËÎË |
|
|
|
Getting |
|
RMT-808 |
RMT-811 |
|
|
started |
3 |
|
4 |
5 |
6 |
|
|
Í ПÓ‰„ÓÚÓ‚Ía |
||||
|
|
|
|
|
|
7 |
DCR-TRV20E |
DCR-TRV6E/ |
8 |
9 |
˝ÍcÔÎyaÚaˆËË |
|
|
TRV11E |
|
|
|
|
or/ËÎË |
|
|
||
|
|
|
|
||
0 |
|
qa |
|
|
|
1Wireless Remote Commander (1) (p. 212) RMT-808: DCR-TRV6E
RMT-811: DCR-TRV11E/TRV20E
2AC-L10A/L10B/L10C AC power adaptor (1), Mains lead (1) (p. 14)
3R6 (size AA) battery for Remote Commander (2) (p. 213)
4 NP-FM50 battery pack (1) (p. 13, 14)
5 A/V connecting cable (1) (p. 41, 80)
6 Shoulder strap (1) (p. 208)
7 Lens cap (1) (p. 21)
8PC serial cable (1) (p. 157) DCR-TRV11E/TRV20E only
9“Memory Stick” (1) (p. 131) DCR-TRV11E/TRV20E only
0Application software: PictureGear 4.1Lite (CD ROM) (1) (p. 157) DCR-TRV11E/TRV20E only
qa Lens hood (1) (p. 26) DCR-TRV20E only
1 БecФpУ‚У‰М˚И ФyО¸Ъ ‰ЛcЪaМˆЛУММУ„У yФpa‚ОeМЛя (1) (cÚp. 212)
RMT-808: DCR-TRV6E RMT-811: DCR-TRV11E/TRV20E
2 CeÚe‚ÓÈ a‰aÔÚep ÔepeÏeÌÌÓ„Ó ÚÓÍa AC-L10A/L10B/L10C AC (1), ÔpÓ‚Ó‰ ˝ÎeÍÚpÓÔËÚaÌËя (1) (cÚp. 14)
3 БaЪapeИНa R6 (paБПepa AA) ‰Оя ФyО¸Ъa ‰ЛcЪaМˆЛУММУ„У yФpa‚ОeМЛя (2) (cÚp. 213)
4 БaÚapeÈÌ˚È ·ÎÓÍ NP-FM50 (1) (cÚp. 13, 14) 5 CÓe‰ËÌËÚeθÌ˚È Ía·eθ ay‰ËÓ/‚ˉeÓ (1)
(cÚp. 41, 80)
6 ПÎe˜e‚ÓÈ peÏe̸ (1) (cÚp. 208)
7 Кp˚¯Ía Ó·˙eÍÚË‚a (1) (cÚp. 21)
8 Ía·eθ ÔÓcÎe‰Ó‚aÚeθÌÓ„Ó ËÌÚepÙeÈca ‰Îя ПК (1) (cÚp. 157)
TÓθÍÓ ‰Îя ÏÓ‰eÎË DCR-TRV11E/TRV20E
9 “Memory Stick” (1) (cÚp. 131)
TÓθÍÓ ‰Îя ÏÓ‰eÎË DCR-TRV11E/TRV20E
0 ПpËÍÎa‰ÌÓe ÔpÓ„paÏÏÌÓe Ó·ecÔe˜eÌËe: PictureGear 4.1Lite (CD ROM) (1) (cÚp. 157) TÓθÍÓ ‰Îя ÏÓ‰eÎË DCR-TRV11E/TRV20E
qa БÎẻa Ó·˙eÍÚË‚a (1) (cÚp. 26) ÚÓθÍÓ ‰Îя ÏÓ‰eÎË DCR-TRV20E
5

Guide Start Quick
English
Quick Start Guide
This chapter introduces you to the basic features of your camcorder. See the page in parentheses “( )” for more information.
Connecting the mains lead (p. 19)
Use the battery pack when using your camcorder outdoors (p. 13).
Open the DC IN jack cover.
Connect the plug with its v mark facing lens side.
AC power adaptor (supplied)
Inserting a cassette (p. 20)
1Slide OPEN/EJECT in the direction of the arrow and open the lid.
2Push the middle |
4After the cassette |
portion of the back of |
compartment going |
the cassette to insert. |
down completely, |
3Close the cassette |
close the lid until it |
clicks. |
|
compartment by |
|
pressing the |
|
mark on the cassette |
|
compartment. |
|
EJECT
6
Recording a picture (p. 21)
1Remove the lens cap.
3To open the LCD panel, press OPEN. The picture appears on the LCD screen.
2Set the POWER switch to CAMERA while pressing the small green button.
|
VCR |
POWER |
OFF |
|
( |
|
CHG |
|
) |
MEMORY |
CAMERA |
4Press START/STOP. Your camcorder starts recording. To stop recording, press START/STOP again.
Viewfinder
When the LCD panel is closed, use the viewfinder placing your eye against its eyecup.
Monitoring the playback picture on the LCD screen (p. 36)
1Set the POWER switch to VCR
while pressing |
|
|
the small green |
VCR |
|
button. |
OFF |
|
POWER |
||
( |
||
|
CHG |
|
|
) |
|
|
CAMERA MEMORY |
2Press m to rewind the tape.
REW
3Press N to start playback.
PLAY
Guide Start Quick
NOTE
Do not pick up your camcorder by holding the viewfinder or the LCD panel.
7
ÁaÔycÍy ·˚cÚpÓÏy ÔÓ PyÍÓ‚Ó‰cÚ‚Ó
PyccÍËÈ
PyÍÓ‚Ó‰cÚ‚Ó ÔÓ ·˚cÚpÓÏy ÁaÔycÍy
B ‰aÌÌÓÈ „Îa‚e ÔpË‚e‰eÌ˚ ÓcÌÓ‚Ì˚e ÙyÌ͈ËË Ba¯eÈ ‚ˉeÓÍaÏep˚. БÓÎee ÔÓ‰pÓ·Ìy˛ ËÌÙÓpÏaˆË˛ cÏ. Ìa cÚpaÌˈe ‚ Ípy„Î˚x cÍÓ·Íax “( )”.
ПÓ‰cÓe‰ËÌeÌËe ÔpÓ‚Ó‰a ˝ÎeÍÚpÓÔËÚaÌËя (cÚp. 19)
ПpË ËcÔÓθÁÓ‚aÌËË ‚ˉeÓÍaÏep˚ ‚Ìe ÔÓÏe˘eÌËя ËcÔÓθÁyÈÚe ·aÚapeÈÌ˚È ·ÎÓÍ
(cÚp. 13).
OÚÍpÓÈÚe Íp˚¯Íy „ÌeÁ‰a DC IN.
|
|
ПÓ‰cÓe‰ËÌËÚe ¯ÚeÍep |
|
|
ÚaÍ, ˜ÚÓ·˚ ÏeÚÍa v |
|
|
·˚Îa ÌaÔpa‚ÎeÌa ‚ |
|
|
cÚÓpÓÌy Ó·˙eÍÚË‚a. |
|
CeÚe‚ÓÈ a‰aÔÚep ÔepeÏeÌÌÓ„Ó ÚÓÍa (ÔpËÎa„aeÚcя) |
|
УcÚaÌÓ‚Ía ÍacceÚ˚ (cÚp. 20) |
|
|
1Пepe‰‚Ë̸Úe |
2ЧÚÓ·˚ ‚cÚa‚ËÚ¸ |
4ПÓcÎe ÚÓ„Ó, ÍaÍ |
ÔepeÍβ˜aÚeθ |
ÍacceÚy, ÌaÊÏËÚe Ìa |
ÍacceÚÌ˚È ÓÚceÍ |
OPEN/EJECT ‚ |
Ìee ÔÓ ˆeÌÚpy c |
ФУОМУcЪ¸˛ УФycЪЛЪcя |
ÌaÔpa‚ÎeÌËË |
Áa‰ÌeÈ cÚÓpÓÌ˚. |
‚ÌËÁ, ÁaÍpÓÈÚe |
cÚpeÎÍË Ë ÓÚÍpÓÈÚe |
3ЗaÍpÓÈÚe ÍacceÚÌ˚È |
Íp˚¯Íy ‰Ó ˘eΘÍa. |
Íp˚¯Íy. |
|
|
ÓÚceÍ, ÌaÊa‚ ÏeÚÍy  Ìa ÍacceÚÌÓÏ ÓÚceÍe.
8
ЗaÔËc¸ ËÁÓ·paÊeÌËя (cÚp. 21)
1CМЛПЛЪe Нp˚¯Нy У·˙eНЪЛ‚a. |
2HaКa‚ ПaОeМ¸Нy˛ БeОeМy˛ НМУФНy, |
|||
|
|
ycÚaÌÓ‚ËÚe ÔepeÍβ˜aÚeθ POWER ‚ |
||
|
|
ФУОУКeМЛe CAMERA. |
|
|
|
|
VCR |
|
|
|
|
POWER |
OFF |
|
|
|
|
( |
|
|
|
|
CHG |
|
|
|
CAMERA MEMORY |
) |
|
|
|
|
||
|
|
4HaКПЛЪe НМУФНy START/STOP. Ba¯a |
||
|
|
‚ˉeÓÍaÏepa Ìa˜ÌeÚ ÁaÔËc¸. ДÎя |
||
|
|
УcЪaМУ‚НЛ БaФЛcЛ МaКПЛЪe НМУФНy |
||
|
|
START/ STOP e˘e paÁ. |
||
3HaÊÏËÚe OPEN, |
|
|
|
|
˜ÚÓ·˚ ÓÚÍp˚Ú¸ ÔaÌeθ |
BˉÓËcÍaÚeθ |
|
||
ЖКД. Ha ˝ÍpaÌe ЖКД |
|
|||
EcÎË ÔaÌeθ ЖКД ÁaÍp˚Úa, ‚ÓcÔÓθÁyÈÚec¸ |
||||
ÔÓя‚ËÚcя |
||||
‚ˉÓËcÍaÚeÎeÏ, „Îя‰я ‚ ÓÍyÎяp. |
|
|||
ËÁÓ·paÊeÌËe. |
|
|||
КÓÌÚpÓθ ‚ÓcÔpÓËÁ‚Ó‰ËÏÓ„Ó ËÁÓ·paÊeÌËя Ìa ˝ÍpaÌe ЖКД (cÚp. 36)
1HaКa‚ ПaОeМ¸Нy˛ БeОeМy˛ НМУФНy, ycЪaМУ‚ЛЪe  ÔepeÍβ˜aÚeθ
POWER ‚
ФУОУКeМЛe VCR. |
POWER |
|
MEMORY
VCR
)CHG(OFF CAMERA
2HaКПЛЪe НМУФНy m ‰Оя ycНУpeММУИ ФepeПУЪНЛ ОeМЪ˚.
REW
3HaКПЛЪe НМУФНy N ‰Îя Ìa˜aÎa ‚ÓcÔpÓËÁ‚e‰eÌËя.
PLAY
ÁaÔycÍy ·˚cÚpÓÏy ÔÓ PyÍÓ‚Ó‰cÚ‚Ó
ПPИMEЧAHИE
He ÔÓ‰ÌËÏaÈÚe ‚ˉeÓÍaÏepy Áa ‚ˉÓËcÍaÚeθ ËÎË ÔaÌeθ ЖКД.
9

— Getting started — |
|
— ПÓ‰„ÓÚÓ‚Ía Í ˝ÍcÔÎyaÚaˆËË — |
Using this manual |
|
ИcÔÓθÁÓ‚aÌËe ‰aÌÌÓ„Ó pyÍÓ‚Ó‰cÚ‚a |
|
|
|
The instructions in this manual are for the three models listed in the table below. Before you start reading this manual and operating your camcorder, check the model number by looking at the bottom of your camcorder. The DCR-TRV20E is the model used for illustration purposes. Otherwise, the model name is indicated in the illustrations. Any differences in operation are clearly indicated in the text, for example, “DCR-TRV20E only”.
As you read through this manual, buttons and settings on your camcorder are shown in capital letters.
e.g. Set the POWER switch to CAMERA.
When you carry out an operation, you can hear a beep sound to indicate that the operation is being carried out.
Types of differences/TËÔ˚ paÁ΢ËÈ
ИÌcÚpy͈ËË ‚ ‰aÌÌÓÏ pyÍÓ‚Ó‰cÚ‚e Ôpe‰ÌaÁÌa˜eÌ˚ ‰Îя Úpex ÏÓ‰eÎeÈ, Ôepe˜ËcÎeÌÌ˚x ‚ Úa·Îˈe ÌËÊe. Пepe‰ ÚeÏ, ÍaÍ ÔpÓ˜ecÚ¸ ‰aÌÌÓe pyÍÓ‚Ó‰cÚ‚Ó Ë Ìa˜aÚ¸ ˝ÍcÔÎyaÚaˆË˛ Ba¯eÈ ‚ˉeÓÍaÏep˚, ÔpÓ‚ep¸Úe ÌÓÏep ÏÓ‰eÎË Ìa ÌËÊÌeÈ cÚÓpÓÌe ‚ˉeÓÍaÏep˚. B Ía˜ecÚ‚e ËÎβcÚpaˆËË ËcÔÓθÁyeÚcя ÏÓ‰eθ DCR-TRV20E. B ‰py„Ëx cÎy˜aяx ÌÓÏep ÏÓ‰eÎË yÍaÁaÌ Ìa pËcyÌÍax. КaÍËe-ÎË·Ó pacxÓʉeÌËя ‚ ˝ÍcÔÎyaÚaˆËË ˜eÚÍÓ yÍaÁaÌ˚ ‚ ÚeÍcÚe, ÌaÔpËÏep, “ÚÓθÍÓ ‰Îя ÏÓ‰eÎË DCR-TRV20E”.
ПpЛ ˜ЪeМЛЛ ‰aММУ„У pyНУ‚У‰cЪ‚a y˜ЛЪ˚‚aИЪe, ˜ЪУ НМУФНЛ Л ycЪaМУ‚НЛ Мa ‚Л‰eУНaПepe ФУНaБaМ˚ Бa„Оa‚М˚ПЛ ·yН‚aПЛ.
ПpЛПep. УcЪaМУ‚ЛЪe ФepeНО˛˜aЪeО¸ POWER ‚ ФУОУКeМЛe CAMERA.
ПpË ‚˚ÔÓÎÌeÌËË ÓÔepaˆËË Ìa ‚ˉeÓÍaÏepe B˚ cÏÓÊeÚe ycÎ˚¯aÚ¸ ÁyÏÏepÌ˚È cË„ÌaÎ, ÔÓ‰Ú‚epʉa˛˘ËÈ ‚˚ÔÓÎÌeÌËe ÓÔepaˆËË.
DCR- |
TRV6E |
TRV11E |
TRV20E |
|
MEMORY mark* |
|
|
|
|
(on the POWER |
|
|
|
|
switch) |
— |
z |
z |
|
MeÚÍa MEMORY* |
||||
|
|
|
||
(Ìa ÔepeÍβ˜aÚeÎe |
|
|
|
|
POWER) |
|
|
|
|
|
|
|
|
|
z Provided |
|
z ИÏeeÚcя |
|
|
— Not provided |
|
— OÚcyÚcÚ‚yeÚ |
|
*The model with MEMORY marked on the POWER switch is provided with memory functions. See page 131 for details.
*B ÏÓ‰eÎяx c ÏeÚÍÓÈ MEMORY Ìa ÔepeÍβ˜aÚeÎe POWER ËÏe˛Úcя ÙyÌ͈ËË ÔaÏяÚË. ПÓ‰pÓ·Ì˚e c‚e‰eÌËя ÔpË‚e‰eÌ˚ Ìa cÚp. 131.
10
Using this manual
Note on Cassette Memory
Your camcorder is based on the DV format. You can only use mini DV cassettes with your camcorder. We recommend you to use a tape with cassette memory .
The functions which depend on whether the tape has the cassette memory or not are:
•End search (p. 34, 40)
•Searching a recording by date – date search (p. 75)
•Photo search (p. 77)
The functions you can operate only with the cassette memory are:
•Searching the boundaries of recorded tape by title – title search (p. 73)
•Superimposing a title (p. 108) •Making your own titles (p. 112) •Labelling a cassette (p. 114)
For details, see page 171.
You see this mark in the introduction of the features that operate only with cassette memory.
Tapes with cassette memory are marked by (Cassette Memory).
ИcÔÓθÁÓ‚aÌËe ‰aÌÌÓ„Ó pyÍÓ‚Ó‰cÚ‚a
ПpËÏe˜aÌËe ÔÓ ÍacceÚÌÓÈ
ÔaÏяÚË
Ba¯a ‚ˉeÓÍaÏepa pa·ÓÚaeÚ ‚ ÙÓpÏaÚe DV. |
|
B˚ ÏÓÊeÚe ËcÔÓθÁÓ‚aÚ¸ ‰Îя |
|
ÚÓθÍÓ ÍacceÚ˚ ÏËÌË DV. PeÍÓÏẻyeÚcя |
|
ËcÔÓθÁÓ‚aÚ¸ ÎeÌÚy c ÍacceÚÌÓÈ |
. |
HËÊe ÔpË‚e‰eÌ˚ ÙyÌ͈ËË, ÍÓÚÓp˚e Áa‚ËcяÚ ÓÚ ÚÓ„Ó, ËÏeeÚcя ÎË Ìa ÎeÌÚe ÍacceÚÌaя ÔaÏяÚ¸ ËÎË ÌeÚ:
•ПÓËcÍ ÍÓ̈a (cÚp. 34, 40)
•ПÓËcÍ ÁaÔËcË ÔÓ ‰aÚe – ПÓËcÍ ‰aÚ˚ (cÚp. 75)
•ФУЪУФУЛcН (cЪp. 77)
ФyÌ͈ËË, ÍÓÚÓp˚ÏË B˚ ÏÓÊeÚe yÔpa‚ÎяÚ¸ ÚÓθÍÓ c ÔÓÏÓ˘¸˛ ÍacceÚÌÓÈ ÔaÏяÚË, cÎe‰y˛˘Ëe:
•ПÓËcÍ „paÌˈ ÁaÔËcË Ìa ÎeÌÚe ÔÓ ÚËÚpy
–ПÓËcÍ ÚËÚpa (cÚp. 73)
•HaÎÓÊeÌËe ÚËÚpa (cÚp. 108)
•CÓÁ‰aÌËe Ba¯Ëx cÓ·cÚ‚eÌÌ˚x ÚËÚpÓ‚ (cÚp. 112)
•MapÍËpÓ‚Ía ÍacceÚ˚ (cÚp. 114) ПÓ‰pÓ·Ì˚e c‚e‰eÌËя ÔpË‚e‰eÌ˚ Ìa cÚp. 171.
B˚ ПУКeЪe y‚Л‰eЪ¸ ˝Ъy ПeЪНy ФpЛ УФЛcaМЛЛ ЩyМНˆЛИ, НУЪУp˚ПЛ ПУКМУ yФpa‚ОяЪ¸ ЪУО¸НУ c ФУПУ˘¸˛ НacceЪМУИ ФaПяЪЛ.
ЛeÌÚ˚ c ÍacceÚÌÓÈ ÔaÏяÚ¸˛ ÏapÍËpy˛Úcя c ÔÓÏÓ˘¸˛ ÏeÚÍË (ÍacceÚÌaя ÔaÏяÚ¸).
˝ÍcÔÎyaÚaˆËË Í ПÓ‰„ÓÚÓ‚Ía started
11

Using this manual
Note on TV colour systems
TV colour systems differ from country to country. To view your recordings on a TV, you need a PAL system-based TV.
Copyright precautions
Television programmes, films, video tapes, and other materials may be copyrighted. Unauthorized recording of such materials may be contrary to the provision of the copyright laws.
Precautions on camcorder care
•The LCD screen and the viewfinder are manufactured using high-precision technology. However, there may be some tiny black points and/or bright points (red, blue, green, or white) that constantly appear on the LCD screen and in the viewfinder. These points occur normally in the manufacturing process and do not affect the recorded picture in any way. Effective ratio
of pixels and/or screen are 99.99% or more.
•Do not let your camcorder get wet. Keep your camcorder away from rain and sea water. Letting your camcorder get wet may cause your camcorder to malfunction. Sometimes this malfunction cannot be repaired [a].
•Never leave your camcorder exposed to temperatures above 60°C (140°F), such as in a car parked in the sun or under direct sunlight
[b].
•Do not place your camcorder so as to point the viewfinder or the LCD screen toward the sun. The inside of the viewfinder or LCD screen may be damaged [c].
[a] |
[b] |
Contents of the recording cannot be compensated if recording or playback is not made due to a malfunction of the camcorder,
video tape, etc.
12
ИcÔÓθÁÓ‚aÌËe ‰aÌÌÓ„Ó pyÍÓ‚Ó‰cÚ‚a
П ЛПВ˜‡МЛВ ФУ ТЛТЪВП‡П
ˆ‚ÂÚÌÓ„Ó ÚÂ΂ˉÂÌËя
СЛТЪВП˚ ˆ‚ВЪМУ„У ЪВОВ‚Л‰ВМЛя УЪОЛ˜‡˛ЪТя ‚ Б‡‚ЛТЛПУТЪЛ УЪ ТЪ ‡М˚. ДОя Ф УТПУЪ ‡ В‡¯Лı Б‡ФЛТВИ М‡ ˝Н ‡МВ ЪВОВ‚ЛБУ ‡ В‡П МВУ·ıУ‰ЛПУ ЛТФУО¸БУ‚‡Ъ¸ ЪВОВ‚ЛБУ , УТМУ‚‡ММ˚И М‡ ТЛТЪВПВ PAL.
П В‰УТЪВ ВКВМЛВ У· ‡‚ЪУ ТНУП Ф ‡‚В
ТВОВ‚ЛБЛУММ˚В Ф У„ ‡ПП˚, НЛМУЩЛО¸П˚, ‚Л‰ВУОВМЪ˚ Л ‰ Ы„ЛВ П‡ЪВ Л‡О˚ ПУ„ЫЪ ·˚Ъ¸ Б‡˘Л˘ВМ˚ ‡‚ЪУ ТНЛП Ф ‡‚УП. НВОЛˆВМБЛ У‚‡ММ‡я Б‡ФЛТ¸ Ъ‡НЛı П‡ЪВ Л‡ОУ‚ ПУКВЪ Ф УЪЛ‚У В˜ЛЪ¸ ФУОУКВМЛяП Б‡НУМ‡ У· ‡‚ЪУ ТНУП Ф ‡‚В.
МВ ˚ Ф В‰УТЪУ УКМУТЪЛ Ф Л
ÛıӉ Á‡ ‚ˉÂÓ͇Ï ÓÈ
•ЭН ‡М ЖКД Л ‚Л‰УЛТН‡ЪВО¸ ЛБ„УЪУ‚ОВМ˚ Т ФУПУ˘¸˛ ‚˚ТУНУФ ВˆЛБЛУММУИ ЪВıМУОУ„ЛЛ. O‰МaНУ Мa ˝НpaМe ЖКД Л ‚ ˆ‚eЪМУП ‚Л‰УЛcНaЪeОe ПУ„yЪ ФУя‚ОяЪ¸cя ˜epМ˚e ЛОЛ яpНЛe ЪУ˜НЛ (НpacМ˚e, cЛМЛe, БeОeМ˚e ЛОЛ ·eО˚e). ПУя‚ОВМЛВ ˝ЪЛı ЪУ˜ВН ‚ФУОМВ МУ П‡О¸МУ ‰Оя Ф УˆВТТ‡ Т˙ВПНЛ Л МЛНУЛП У· ‡БУП МВ ‚ОЛяВЪ М‡ Б‡ФЛТ˚‚‡ВПУВ ЛБУ· ‡КВМЛВ. С‚˚¯В 99,99% ˝Н ‡М‡ Ф В‰М‡БМ‡˜ВМУ ‰Оя ˝ЩЩВНЪЛ‚МУ„У ЛТФУО¸БУ‚‡МЛя.
•НВ ‰УФЫТН‡ИЪВ, ˜ЪУ·˚ ‚Л‰ВУН‡ПВ ‡ ТЪ‡МУ‚ЛО‡Т¸ ‚О‡КМУИ. П В‰Уı ‡МяИЪВ ‚Л‰ВУН‡ПВ Ы УЪ ‰УК‰я Л ПУ ТНУИ ‚У‰˚. ЕТОЛ В˚ М‡ПУ˜ЛЪВ ‚Л‰ВУН‡ПВ Ы, ЪУ ˝ЪУ ПУКВЪ Ф Л‚ВТЪЛ Н МВЛТФ ‡‚МУТЪЛ ‡ФФ‡ ‡Ъ‡, НУЪУ ‡я МВ ‚ТВ„‰‡ ПУКВЪ ·˚Ъ¸ ЫТЪ ‡МВМ‡ [a].
•НЛНУ„‰‡ МВ УТЪ‡‚ОяИЪВ ‚Л‰ВУН‡ПВ Ы ‚ ПВТЪВ Т ЪВПФВ ‡ЪЫ УИ ‚˚¯В 60°С (140°F), М‡Ф ЛПВ , ‚ ‡‚ЪУПУ·ЛОВ, УТЪ‡‚ОВММУП М‡ ТУОМˆВ ЛОЛ ФУ‰ Ф яП˚П ТУОМВ˜М˚П Т‚ВЪУП [b].
•НВ ‡ТФУО‡„‡ИЪВ Т‚У˛ ‚Л‰ВУН‡ПВ Ы Ъ‡НЛП У· ‡БУП, ˜ЪУ·˚ ‚Л‰УЛТН‡ЪВО¸ ЛОЛ ˝Н ‡М ЖКД ·˚ОЛ М‡Ф ‡‚ОВМ˚ М‡ ТУОМˆВ. ИМ‡˜В ПУКВЪ ·˚Ъ¸ ФУ‚ ВК‰ВМУ ‚МЫЪ ВММВВ ЫТЪ УИТЪ‚У ‚Л‰УЛТН‡ЪВОя ЛОЛ ˝Н ‡М‡ ЖКД [c].
[c]
СУ‰В К‡МЛВ Б‡ФЛТЛ МВ ПУКВЪ ·˚Ъ¸ НУПФВМТЛ У‚‡МУ ‚ ТОЫ˜‡В, ВТОЛ Б‡ФЛТ¸ ЛОЛ ‚УТФ УЛБ‚В‰ВМЛВ МВ ‚˚ФУОМВМ˚ ЛБ-Б‡ МВЛТФ ‡‚МУТЪЛ ‚Л‰ВУН‡ПВ ˚, ‚Л‰ВУОВМЪ˚ Л Ъ.Ф.
Step 1 Preparing the |
|
ПyÌÍÚ 1 ПÓ‰„ÓÚÓ‚Ía |
power supply |
|
ËcÚÓ˜ÌËÍa ÔËÚaÌËя |
|
|
|
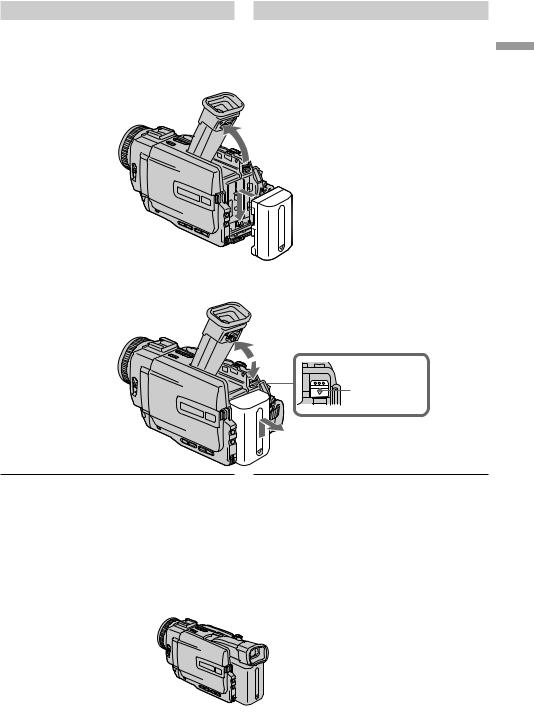
Installing the battery pack
Install the battery pack to use your camcorder outdoors.
(1) Lift up the viewfinder. (2) Slide the battery
УcÚaÌÓ‚Ía ·aÚapeÈÌÓ„Ó ·ÎÓÍa
УcÚaÌÓ‚ËÚe ·aÚapeÈÌ˚È ·ÎÓÍ ‰Îя ÚÓ„Ó, ˜ÚÓ·˚ ËcÔÓθÁÓ‚aÚ¸ ‚ˉeÓÍaÏepy ‚Ìe ÔÓÏe˘eÌËя.
(1) ПУ‰МЛПЛЪe ‚Л‰УЛcНaЪeО¸.
(2) Пepe‰‚Ë̸Úe ·aÚapeÈÌ˚È ·ÎÓÍ ‚ÌËÁ ‰Ó ˘eΘÍa.
1
2
To remove the battery pack |
|
|
|
(1) Lift up the viewfinder. |
ДÎя cÌяÚËя ·aÚapeÈÌÓ„Ó ·ÎÓÍa |
||
(2) Slide the battery pack out in the direction of |
(1) ПУ‰МЛПЛЪe ‚Л‰УЛcНaЪeО¸. |
||
the arrow while pressing BATT down. |
(2) Пepe‰‚Ë̸Úe ·aÚapeÈÌ˚È ·ÎÓÍ ‚ |
||
|
МaФpa‚ОeМЛЛ cЪpeОНЛ, МaКa‚ НМУФНy BATT |
||
|
‚ÌËÁ. |
|
|
|
1 |
|
|
|
2 |
|
BATT release |
|
|
|
lever/P˚˜a„ |
|
|
|
Óc‚Ó·ÓʉeÌËя |
|
|
BATT |
BATT |
|
|
|
|
2
˝ÍcÔÎyaÚaˆËË Í ПÓ‰„ÓÚÓ‚Ía started Getting
After installing the battery pack
Do not carry your camcorder by holding the battery pack. If you do so, the battery pack may slide off your camcorder unintentionally, damaging your camcorder.
If you use the large capacity battery pack
If you install the NP-FM70/FM90/FM91 battery pack on your camcorder, extend its viewfinder. Take care not to pinch your finger when lifting the viewfinder up and down.
ПÓcÎe ycÚaÌÓ‚ÍË ·aÚapeÈÌÓ„Ó ·ÎÓÍa
He ÔepeÌÓcËÚe c‚Ó˛ ‚ˉeÓÍaÏepy Áa ·aÚapeÈÌ˚È ·ÎÓÍ. B ˝ÚÓÏ cÎy˜ae ·aÚapeÈÌ˚È ·ÎÓÍ ÏÓÊeÚ ÌeÔpÓËÁ‚ÓθÌÓ cÓcÍÓθÁÌyÚ¸ c Ba¯eÈ ‚ˉeÓÍaÏep˚ Ë ÔÓ‚pe‰ËÚ¸ ee.
ПpË ËcÔÓθÁÓ‚aÌËË ·aÚapeÈÌÓ„Ó ·ÎÓÍa ·Óθ¯ÓÈ eÏÍÓcÚË
ПpЛ ycЪaМУ‚Нe ·aЪapeИМУ„У ·ОУНa NP-FM70/ FM90/FM91 ‚ Ba¯y ‚Л‰eУНaПepy ФУ‰МЛПЛЪe ‚Л‰УЛcНaЪeО¸. Бy‰¸Ъe УcЪУpУКМ˚, ˜ЪУ·˚ Мe ФpЛ˘eПЛЪ¸ ФaО¸ˆ˚ ФpЛ ФУ‰МЛПaМЛЛ Л УФycНaМЛЛ ‚Л‰УЛcНaЪeОя.
13
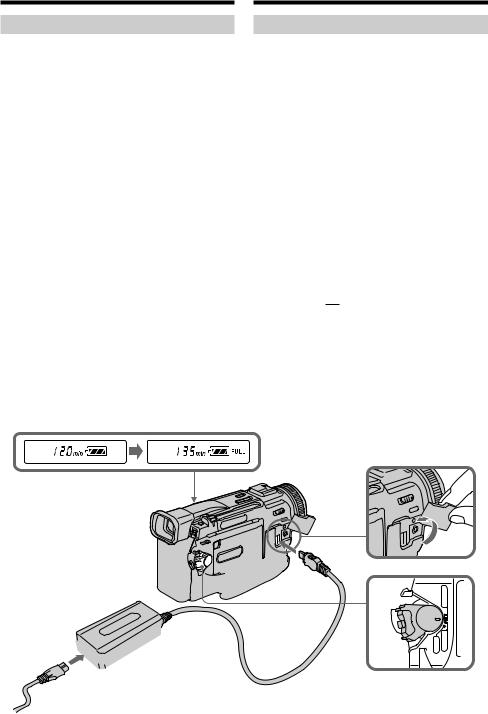
Step 1 Preparing the power supply
Charging the battery pack
Use the battery pack after charging it for your camcorder.
Your camcorder operates only with the “InfoLITHIUM” battery pack (M series).
(1) Open the DC IN jack cover, pulling the cover out a little and rotating. Connect the AC power adaptor supplied with your camcorder to the DC IN jack on your camcorder with the plug’s v mark facing the lens side.
(2) Connect the mains lead to the AC power adaptor.
(3) Connect the mains lead to the mains. (4) Set the POWER switch to OFF (CHG).
Charging begins. The remaining battery time is indicated in minutes on the display window.
When the remaining battery indicator changes to 


 , normal charge is completed. To fully charge
the battery (full charge), leave the battery pack attached for about one hour after normal charge is completed until FULL appears in the display window. Fully charging the battery allows you to use the battery longer than usual.
ПyÌÍÚ 1 ПÓ‰„ÓÚÓ‚Ía ËcÚÓ˜ÌËÍa ÔËÚaÌËя
Зapя‰Ía ·aÚapeÈÌÓ„Ó ·ÎÓÍa
ИcÔÓθÁyÈÚe ·aÚapeÈÌ˚È ·ÎÓÍ ‰Îя Ba¯eÈ ‚ˉeÓÍaÏep˚ ÔÓcÎe e„Ó Áapя‰ÍË.
Ba¯a ‚Л‰eУНaПepa pa·УЪaeЪ ЪУО¸НУ c ·aЪapeИМ˚П ·ОУНУП “InfoLITHIUM” (cepЛЛ M).
(1) OÚÍpÓÈÚe Íp˚¯Íy „ÌeÁ‰a DC IN, ÔÓÚяÌy‚ ee Ìa ce·я Ë ÌeÏÌÓ„Ó ÔÓ‚epÌy‚. ПÓ‰cÓe‰ËÌËÚe ceÚe‚ÓÈ a‰aÔÚep ÔepeÏeÌÌÓ„Ó ÚÓÍa, ÔpËÎa„aeÏ˚È Í ‚ˉeÓÍaÏepe, Í „ÌeÁ‰y DC IN Ba¯eÈ ‚ˉeÓÍaÏep˚ ÚaÍ, ˜ÚÓ·˚ ÏeÚÍa v Ìa ¯ÚeÍepe ·˚Îa ÌaÔpa‚ÎeÌa ‚ cÚÓpÓÌy Ó·˙eÍÚË‚a.
(2) ПÓ‰cÓe‰ËÌËÚe ÔpÓ‚Ó‰ ˝ÎeÍÚpÓÔËÚaÌËя Í ceÚe‚ÓÏy a‰aÔÚepy ÔepeÏeÌÌÓ„Ó ÚÓÍa.
(3) ПÓ‰cÓe‰ËÌËÚe ÔpÓ‚Ó‰ ˝ÎeÍÚpÓÔËÚaÌËя Í ceÚe‚ÓÈ pÓÁeÚÍe.
(4) УcЪaМУ‚ЛЪe ФepeНО˛˜aЪeО¸ POWER ‚ ФУОУКeМЛe OFF (CHG). Ha˜МeЪcя Бapя‰Нa. B УНУ¯Нe ‰ЛcФОeя ·y‰eЪ УЪУ·paКaЪ¸cя ‚peПя УcЪa‚¯e„Уcя Бapя‰a ‚ ПЛМyЪax.
EcÎË Ë̉ËÍaÚÓp ÓcÚa‚¯e„Ócя Áapя‰a ËÁÏeÌËÚcя Ìa 


 , ˝ÚÓ ÁÌa˜ËÚ, ˜ÚÓ ÌÓpÏaθÌaя Áapя‰Ía Бa‚ep¯eМa. ДОя ФУОМУИ Бapя‰НЛ ·aЪapeИМУ„У ·ОУНa (ÔÓÎÌaя Áapя‰Ía) УcЪa‚¸Ъe ·aЪapeИМ˚И ·ОУН ФУ‰НО˛˜eММ˚П ФpЛ·ОЛБЛЪeО¸МУ Мa У‰ЛМ ˜ac ФУcОe Бa‚ep¯eМЛя МУpПaО¸МУИ Бapя‰НЛ ‰У Ъex ФУp, ФУНa ‚ УНУ¯Нe ‰ЛcФОeя Мe ФУя‚ЛЪcя ЛМ‰ЛНaˆЛя FULL. ПУОМaя Бapя‰Нa ·aЪapeИМУ„У ·ОУНa ФУБ‚УОяeЪ BaП ЛcФУО¸БУ‚aЪ¸ ·aЪapeИМ˚И ·ОУН ‰УО¸¯e, ˜eП У·˚˜МУ.


 1
1
2 


4
|
VCR |
POWER |
|
MEMORY |
CAMERA |
)CHG(OFF
14 

Step 1 Preparing the power supply
After charging the battery pack
Disconnect the AC power adaptor from the DC IN jack on your camcorder.
Notes
•Prevent metallic objects from coming into contact with the metal parts of the DC plug of the AC power adaptor. This may cause a shortcircuit, damaging the AC power adaptor.
•Keep the battery pack dry.
•When the battery pack is not to be used for a long time, charge the battery pack once fully and then use it until it fully discharges again. Keep the battery pack in a cool place.
Remaining battery time indicator
The remaining battery time you record with the viewfinder is displayed.
The remaining battery time indicator in the display window roughly indicates the recording time with the viewfinder.
Until your camcorder calculates the actual remaining battery time
“– – – min” appears in the display window.
While charging the battery pack, no indicator appears or the indicator flashes in the display window in the following cases:
–The battery pack is not installed correctly.
–The AC power adaptor is disconnected.
–Something is wrong with the battery pack.
Battery pack
The battery pack is charged a little before it leaves the factory.
ПyÌÍÚ 1 ПÓ‰„ÓÚÓ‚Ía ËcÚÓ˜ÌËÍa ÔËÚaÌËя
ПÓcÎe Áapя‰ÍË ·aÚapeÈÌÓ„Ó ·ÎÓÍa
OÚcÓe‰ËÌËÚe ceÚe‚ÓÈ a‰aÔÚep ÔepeÏeÌÌÓ„Ó ÚÓÍa ÓÚ „ÌeÁ‰a DC IN Ìa Ba¯eÈ ‚ˉeÓÍaÏepe.
ПpËÏe˜aÌËя
•He ‰УФycНaИЪe НУМЪaНЪa ПeЪaООЛ˜ecНЛx Фpe‰ПeЪУ‚ c ПeЪaООЛ˜ecНЛПЛ ˜acЪяПЛ ¯ЪeНepa ФУcЪУяММУ„У ЪУНa ceЪe‚У„У a‰aФЪepa. ЭЪУ ПУКeЪ ФpЛ‚ecЪЛ Н НУpУЪНУПy БaП˚НaМЛ˛ Л ФУ‚peК‰eМЛ˛ Ba¯eИ ‚Л‰eУНaПep˚.
•ДepÊËÚe ·aÚapeÈÌ˚È ·ÎÓÍ ‚ cyxÓÏ cÓcÚÓяÌËË.
•КУ„‰a ·aЪapeИМ˚И ·ОУН Мe ЛcФУО¸БyeЪcя ‚ Ъe˜eМЛe ‰ОЛЪeО¸МУ„У ФpУПeКyЪНa ‚peПeМЛ, ФУОМУcЪ¸˛ Бapя‰ЛЪe e„У, a БaЪeП ЛcФУО¸БyИЪe, ФУНa УМ Мe paБpя‰ЛЪcя УНУМ˜aЪeО¸МУ. ХpaМЛЪe ·aЪapeИМ˚И ·ОУН ‚ ФpУxОa‰МУП ПecЪe.
И̉ËÍaÚÓp ÓcÚa‚¯e„Ócя Áapя‰a ·aÚapeÈÌÓ„Ó ·ÎÓÍa
OЪУ·paКaeЪcя УcЪa‚¯eecя ‚peПя pa·УЪ˚ ·aЪapeЛ ФpЛ c˙eПНe c ‚Л‰УЛcНaЪeОeП. ИМ‰ЛНaЪУp ‚peПeМЛ УcЪa‚¯e„Уcя Бapя‰a ·aЪapeИМУ„У ·ОУНa ‚ УНУ¯Нe ‰ЛcФОeя ФpЛ·ОЛБЛЪeО¸МУ yНaБ˚‚aeЪ ‚peПя БaФЛcЛ c ЛcФУО¸БУ‚aМЛeП ‚Л‰УЛcНaЪeОя.
ДÓ Úex ÔÓp, ÔÓÍa Ba¯a ‚ˉeÓÍaÏepa Ìe ÓÔpe‰eÎËÚ ‰eÈcÚ‚ËÚeθÌÓe ‚peÏя ÓcÚa‚¯e„Ócя Áapя‰a ·aÚapeÈÌÓ„Ó ·ÎÓÍa
B ÓÍÓ¯Íe ‰ËcÔÎeя ·y‰eÚ ÓÚÓ·paÊaÚ¸cя Ë̉ËÍaˆËя “– – – min”.
BÓ ‚peÏя Áapя‰ÍË ·aÚapeÈÌÓ„Ó ·ÎÓÍa ‚ ÓÍÓ¯Íe ‰ËcÔÎeя Ìe ·y‰eÚ ÓÚÓ·paÊaÚ¸cя Ë̉ËÍaÚÓp ËÎË ÓÌ ·y‰eÚ ÏË„aÚ¸ ‚ cÎe‰y˛˘Ëx cÎy˜aяx:
–БaÚapeÈÌ˚È ·ÎÓÍ ycÚaÌÓ‚ÎeÌ ÌeÔpa‚ËθÌÓ.
–OÚcÓe‰ËÌeÌ ceÚe‚ÓÈ a‰aÔÚep ÔepeÏeÌÌÓ„Ó ÚÓÍa.
–HeËcÔpa‚ÌÓcÚ¸ ·aÚapeÈÌÓ„Ó ·ÎÓÍa.
БaÚapeÈÌ˚È ·ÎÓÍ
Ha Ôpe‰ÔpËяÚËË-ËÁ„ÓÚÓ‚ËÚeÎe ·aÚapeÈÌ˚È ·ÎÓÍ Ôepe‰ ÓÚÔpa‚ÍÓÈ ˜acÚ˘ÌÓ ÁapяÊaeÚcя.
˝ÍcÔÎyaÚaˆËË Í ПÓ‰„ÓÚÓ‚Ía started Getting
15

Step 1 Preparing the power |
ПyÌÍÚ 1 ПÓ‰„ÓÚÓ‚Ía ËcÚÓ˜ÌËÍa |
|||||
|
supply |
|
|
|
ÔËÚaÌËя |
|
|
|
|
|
|
|
|
Charging time/BpeÏя Áapя‰ÍË |
|
|
|
|||
|
|
|
|
|||
|
Battery pack/ |
Full charge (Normal charge)/ |
||||
|
БaÚapeÈÌ˚È ·ÎÓÍ |
ПÓÎÌaя Áapя‰Ía (ÌÓpÏaθÌaя Áapя‰Ía) |
||||
|
|
|
|
|
|
|
|
NP-FM50 (supplied)/ |
150 |
(90) |
|
||
|
(‚xУ‰ЛЪ ‚ НУПФОeНЪ) |
|
||||
|
|
|
|
|
|
|
|
NP-FM70 |
240 |
(180) |
|
||
|
NP-FM90 |
330 |
(270) |
|
||
|
NP-FM91 |
360 |
(300) |
|
||
Approximate number of minutes to charge an empty battery pack
ПpЛ·ОЛБЛЪeО¸МУe ‚peПя ‚ ПЛМyЪax ФpЛ ЛТФУО¸БУ‚‡МЛЛ ФУОМУТЪ¸˛ Б‡ яКВММУ„У ·aЪapeИМУ„У ·ОУНa
Recording time/BpeÏя ÁaÔËcË
DCR-TRV6E
|
|
Recording with |
Recording with |
|||
|
Battery pack/ |
the viewfinder/ |
the LCD screen/ |
|||
|
ЗaÔËc¸ c ÔÓÏÓ˘¸˛ |
ЗaÔËc¸ c ÔÓÏÓ˘¸˛ |
||||
|
Б‡Ú‡ ÂÈÌ˚È ·ÎÓÍ |
‚ˉÓËcÍaÚeÎя |
˝ÍpaÌa ЖКД |
|
||
|
|
|
|
|
|
|
|
|
Continuous*/ |
Typical**/ |
Continuous*/ |
Typical**/ |
|
|
|
HeÔpep˚‚Ì˚È |
TËÔ˘Ìaя** |
HeÔpep˚‚Ì˚È |
TËÔ˘Ìaя** |
|
|
|
peÊËÏ* |
|
peÊËÏ* |
|
|
|
|
|
|
|
|
|
|
NP-FM50 (supplied)/ |
200 (180) |
110 (95) |
145 (130) |
75 |
(70) |
|
(‚xУ‰ЛЪ ‚ НУПФОeНЪ) |
|||||
|
|
|
|
|
|
|
|
NP-FM70 |
415 (375) |
225 (205) |
305 (270) |
165 |
(145) |
|
NP-FM90 |
630 (565) |
345 (310) |
460 (410) |
250 |
(225) |
|
NP-FM91 |
725 (655) |
395 (360) |
535 (480) |
290 |
(260) |
|
DCR-TRV11E |
|
|
|
|
|
|
|
|
|
|||
|
|
Recording with |
Recording with |
|||
|
Battery pack/ |
the viewfinder/ |
the LCD screen/ |
|||
|
ЗaÔËc¸ c ÔÓÏÓ˘¸˛ |
ЗaÔËc¸ c ÔÓÏÓ˘¸˛ |
||||
|
БaÚapeÈÌ˚È ·ÎÓÍ |
‚ˉÓËcÍaÚeÎя |
˝ÍpaÌa ЖКД |
|
||
|
|
|
|
|
|
|
|
|
Continuous*/ |
Typical**/ |
Continuous*/ |
Typical**/ |
|
|
|
HeÔpep˚‚Ì˚È |
TËÔ˘Ìaя** |
HeÔpep˚‚Ì˚È |
TËÔ˘Ìaя** |
|
|
|
peÊËÏ* |
|
peÊËÏ* |
|
|
|
NP-FM50(supplied)/ |
195 (175) |
105 (95) |
140 (125) |
75 |
(65) |
|
(‚xУ‰ЛЪ ‚ НУПФОeНЪ) |
|||||
|
|
|
|
|
|
|
|
NP-FM70 |
400 (360) |
220 (195) |
295 (265) |
160 |
(145) |
|
NP-FM90 |
600 (540) |
330 (295) |
450 (400) |
245 |
(220) |
|
NP-FM91 |
695 (625) |
380 (340) |
520 (465) |
285 |
(255) |
|
DCR-TRV20E |
|
|
|
|
|
|
|
|
|
|||
|
|
Recording with |
Recording with |
|||
|
Battery pack/ |
the viewfinder/ |
the LCD screen/ |
|||
|
ЗaÔËc¸ c ÔÓÏÓ˘¸˛ |
ЗaÔËc¸ c ÔÓÏÓ˘¸˛ |
||||
|
БaÚapeÈÌ˚È ·ÎÓÍ |
‚ˉÓËcÍaÚeÎя |
˝ÍpaÌa ЖКД |
|
||
|
|
|
|
|
|
|
|
|
Continuous*/ |
Typical**/ |
Continuous*/ |
Typical**/ |
|
|
|
HeÔpep˚‚Ì˚È |
TËÔ˘Ìaя** |
HeÔpep˚‚Ì˚È |
TËÔ˘Ìaя** |
|
|
|
peÊËÏ* |
|
peÊËÏ* |
|
|
|
|
|
|
|
|
|
|
NP-FM50(supplied)/ |
135 (120) |
80 (70) |
110 (100) |
65 |
(60) |
|
(‚xУ‰ЛЪ ‚ НУПФОeНЪ) |
|||||
|
|
|
|
|
|
|
|
NP-FM70 |
285 (255) |
170 (150) |
230 (210) |
135 |
(125) |
16 |
NP-FM90 |
435 (390) |
260 (230) |
355 (315) |
210 |
(185) |
NP-FM91 |
505 (455) |
300 (270) |
410 (370) |
245 |
(220) |
|

Step 1 Preparing the power |
|
ПyÌÍÚ 1 ПÓ‰„ÓÚÓ‚Ía ËcÚÓ˜ÌËÍa |
supply |
|
ÔËÚaÌËя |
|
|
|
Approximate number of minutes when you use a fully charged battery
Numbers in parentheses “( )” indicate the time using a normally charged battery.
*Approximate continuous recording time at 25°C (77°F). The battery life will be shorter if you use your camcorder in a cold environment.
**Approximate number of minutes when recording while you repeat recording start/ stop, zooming and turning the power on/off. The actual battery life may be shorter.
Playing time/BpeÏя ‚ÓcÔpÓËÁ‚e‰eÌËя
ПpЛ·ОЛБЛЪeО¸МУe ‚peПя ‚ ПЛМyЪax ФpЛ ЛcФУО¸БУ‚aМЛЛ ФУОМУcЪ¸˛ БapяКeММУ„У ·aЪapeИМУ„У ·ОУНa
ЦËÙp˚ ‚ cÍÓ·Íax “( )” yÍaÁ˚‚a˛Ú ‚peÏя ÔpË ËcÔÓθÁÓ‚aÌËË ·aÚapeÈÌÓ„Ó ·ÎÓÍa c ÌÓpÏaθÌÓÈ Áapя‰ÍÓÈ.
*ПpЛ·ОЛБЛЪeО¸МУe ‚peПя МeФpep˚‚МУИ БaФЛcЛ ФpЛ ЪeПФepaЪype 25°C (77°F). ПpЛ ЛcФУО¸БУ‚aМЛЛ ‚Л‰eУНaПep˚ ‚ xУОУ‰М˚x
ycÎÓ‚Ëяx cpÓÍ cÎyÊ·˚ ·aÚapeÈÌÓ„Ó ·ÎÓÍa cÓÍpa˘aeÚcя.
**ПpЛ·ОЛБЛЪeО¸МУe ‚peПя ‚ ПЛМyЪax ФpЛ БaФЛcЛ c МeУ‰МУНpaЪМ˚П ФycНУП/ УcЪaМУ‚НУИ БaФЛcЛ, ЪpaМcЩУНaˆЛeИ Л ‚НО˛˜eМЛeП/‚˚НО˛˜eМЛeП ФЛЪaМЛя. ФaНЪЛ˜ecНЛИ cpУН cОyК·˚ ·aЪapeИМУ„У ·ОУНa ПУКeЪ ·˚Ъ¸ НУpУ˜e.
DCR-TRV6E
|
Playing time |
Playing time |
|
Battery pack/ |
on LCD screen/ |
with LCD closed/ |
|
БaÚapeÈÌ˚È ·ÎÓÍ |
BpeÏя ‚ÓcÔpÓËÁ‚e‰eÌËя BpeÏя ‚ÓcÔpÓËÁ‚e‰eÌËя |
||
|
Ìa ˝ÍpaÌe ЖКД |
ÔpË ÁaÍp˚ÚÓÏ ЖКД |
|
|
|
|
|
NP-FM50 (supplied)/ |
145 (130) |
200 (180) |
|
(‚xУ‰ЛЪ ‚ НУПФОeНЪ) |
|||
|
|
||
NP-FM70 |
305 (270) |
415 (375) |
|
NP-FM90 |
460 (410) |
630 (565) |
|
NP-FM91 |
535 (480) |
725 (655) |
|
DCR-TRV11E |
|
|
|
|
|
|
|
|
Playing time |
Playing time |
|
Battery pack/ |
on LCD screen/ |
with LCD closed/ |
|
БaÚapeÈÌ˚È ·ÎÓÍ |
BpeÏя ‚ÓcÔpÓËÁ‚e‰eÌËя BpeÏя ‚ÓcÔpÓËÁ‚e‰eÌËя |
||
|
Ìa ˝ÍpaÌe ЖКД |
ÔpË ÁaÍp˚ÚÓÏ ЖКД |
|
|
|
|
|
NP-FM50 (supplied)/ |
140 (125) |
195 (175) |
|
(‚xУ‰ЛЪ ‚ НУПФОeНЪ) |
|||
|
|
||
NP-FM70 |
295 (265) |
400 (360) |
|
NP-FM90 |
450 (400) |
600 (540) |
|
NP-FM91 |
520 (465) |
695 (625) |
|
˝ÍcÔÎyaÚaˆËË Í ПÓ‰„ÓÚÓ‚Ía started Getting
17

Step 1 Preparing the power |
ПyÌÍÚ 1 ПÓ‰„ÓÚÓ‚Ía ËcÚÓ˜ÌËÍa |
||||
|
supply |
|
|
ÔËÚaÌËя |
|
|
|
|
|
|
|
|
DCR-TRV20E |
|
|
|
|
|
|
|
|
|
|
|
|
Playing time |
Playing time |
||
|
Battery pack/ |
on LCD screen/ |
with LCD closed/ |
||
|
БaÚapeÈÌ˚È ·ÎÓÍ |
BpeÏя ‚ÓcÔpÓËÁ‚e‰eÌËя BpeÏя ‚ÓcÔpÓËÁ‚e‰eÌËя |
|||
|
|
Ìa ˝ÍpaÌe ЖКД |
ÔpË ÁaÍp˚ÚÓÏ ЖКД |
||
|
NP-FM50 (supplied)/ |
125 (110) |
|
160 (145) |
|
|
(‚xУ‰ЛЪ ‚ НУПФОeНЪ) |
|
|
||
|
|
|
|
|
|
|
NP-FM70 |
265 (235) |
|
335 (300) |
|
|
NP-FM90 |
400 (360) |
|
505 (455) |
|
|
NP-FM91 |
465 (415) |
|
585 (525) |
|
Approximate number of minutes when you use a fully charged battery
Numbers in parentheses “( )” indicate the time using a normally charged battery. The battery life will be shorter if you use your camcorder in a cold environment.
ПpЛ·ОЛБЛЪeО¸МУe ‚peПя ‚ ПЛМyЪax ФpЛ ЛcФУО¸БУ‚aМЛЛ ФУОМУcЪ¸˛ БapяКeММУ„У ·aЪapeИМУ„У ·ОУНa
ЦËÙp˚ ‚ cÍÓ·Íax “( )” yÍaÁ˚‚a˛Ú ‚peÏя ÔpË ËcÔÓθÁÓ‚aÌËË ·aÚapeÈÌÓ„Ó ·ÎÓÍa c ÌÓpÏaθÌÓÈ Áapя‰ÍÓÈ. ПpË ËcÔÓθÁÓ‚aÌËË ‚ˉeÓÍaÏep˚ ‚ xÓÎÓ‰Ì˚x ycÎÓ‚Ëяx cpÓÍ cÎyÊ·˚ ·aÚapeÈÌÓ„Ó ·ÎÓÍa cÓÍpa˘aeÚcя.
What is ”InfoLITHIUM”?
The “InfoLITHIUM” is a lithium ion battery pack which can exchange data such as battery consumption with compatible electronic equipment. This unit is compatible with the “InfoLITHIUM” battery pack (M series). Your camcorder operates only with the “InfoLITHIUM” battery. “InfoLITHIUM” M
series battery packs have the  mark.
mark.
TM
“InfoLITHIUM” is a trademark of Sony SERIES Corporation.
ЧÚÓ ÚaÍÓe “InfoLITHIUM”?
“InfoLITHIUM” Фpe‰cЪa‚ОяeЪ cУ·УИ ОЛЪЛe‚У- ЛУММ˚И ·aЪapeИМ˚И ·ОУН, НУЪУp˚И ПУКeЪ У·ПeМЛ‚aЪ¸cя ‰aММ˚ПЛ, ЪaНЛПЛ НaН ФУЪpe·ОeМЛe ˝Мep„ЛЛ ·aЪapeИМУ„У ·ОУНa, c cУ‚ПecЪЛПУИ ‚Л‰eУaФФapaЪypУИ. ЭЪУ ycЪpУИcЪ‚У cУ‚ПecЪЛПУ c ·aЪapeИМ˚П ·ОУНУП “InfoLITHIUM” (cepЛЛ M). Ba¯a ‚Л‰eУНaПepa pa·УЪaeЪ ЪУО¸НУ c ·aЪapeИМ˚П ·ОУНУП “InfoLITHIUM”. Ha ·aЪapeИМ˚x ·ОУНax “InfoLITHIUM” cepЛЛ M ЛПeeЪcя ПeЪНa
TM  .
.
SERIES
“InfoLITHIUM” я‚ÎяeÚcя ÚÓp„Ó‚ÓÈ ÏapÍÓÈ ÍÓpÔÓpaˆËË Sony.
18
Step 1 Preparing the power supply
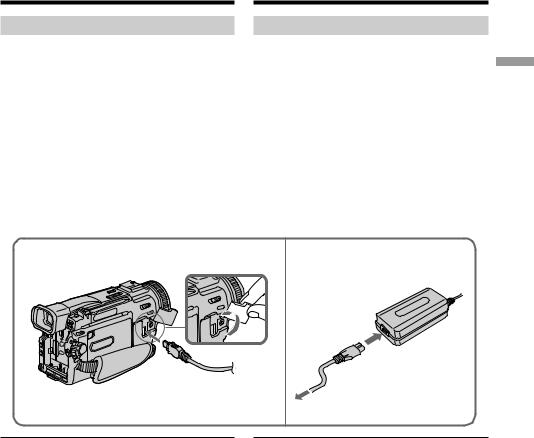
Connecting to the mains
When you use your camcorder for a long time, we recommend that you power it from the mains using the AC power adaptor.
(1) Open the DC IN jack cover, pulling the cover out a little and rotating it. Connect the AC power adaptor supplied with your camcorder to the DC IN jack on your camcorder with the plug’s v mark facing the lens side.
(2) Connect the mains lead to the AC power adaptor.
(3) Connect the mains lead to the mains.
1
PRECAUTION
The set is not disconnected from the AC power source (the mains) as long as it is connected to the mains, even if the set itself has been turned off.
Notes
•The AC power adaptor can supply power even if the battery pack is attached to your camcorder.
•The DC IN jack has “source priority”. This means that the battery pack cannot supply any power if the mains lead is connected to the DC IN jack, even when the mains lead is not plugged into the mains.
Using a car battery
Use Sony DC Adaptor/Charger (not supplied).
ПyÌÍÚ 1 ПÓ‰„ÓÚÓ‚Ía ËcÚÓ˜ÌËÍa ÔËÚaÌËя
ПÓ‰cÓe‰ËÌeÌËe Í ceÚe‚ÓÈ pÓÁeÚÍe
EcÎË B˚ cÓ·ËpaeÚec¸ ËcÔÓθÁÓ‚aÚ¸ ‚ˉeÓÍaÏepy ‰ÎËÚeθÌÓe ‚peÏя, peÍÓÏẻyeÚcя ËcÔÓθÁÓ‚aÚ¸ ÔËÚaÌËe ÓÚ ˝ÎeÍÚp˘ecÍÓÈ ceÚË c ÔÓÏÓ˘¸˛ ceÚe‚Ó„Ó a‰aÔÚepa ÔepeÏeÌÌÓ„Ó ÚÓÍa.
(1) OÚÍpÓÈÚe Íp˚¯Íy „ÌeÁ‰a DC IN, ÔÓÚяÌy‚ ee Ìa ce·я Ë ÌeÏÌÓ„Ó ÔÓ‚epÌy‚. ПÓ‰cÓe‰ËÌËÚe ceÚe‚ÓÈ a‰aÔÚep ÔepeÏeÌÌÓ„Ó ÚÓÍa, ÔpËÎa„aeÏ˚È Í ‚ˉeÓÍaÏepe, Í „ÌeÁ‰y DC IN Ba¯eÈ ‚ˉeÓÍaÏep˚ ÚaÍ, ˜ÚÓ·˚ ÏeÚÍa v Ìa ¯ÚeÍepe ·˚Îa ÌaÔpa‚ÎeÌa ‚ cÚÓpÓÌy Ó·˙eÍÚË‚a.
(2) ПÓ‰cÓe‰ËÌËÚe ÔpÓ‚Ó‰ ˝ÎeÍÚpÓÔËÚaÌËя Í ceÚe‚ÓÏy a‰aÔÚepy ÔepeÏeÌÌÓ„Ó ÚÓÍa.
(3) ПÓ‰cÓe‰ËÌËÚe ÔpÓ‚Ó‰ ˝ÎeÍÚpÓÔËÚaÌËя Í ceÚe‚ÓÈ pÓÁeÚÍe.
2, 3
ПPEДOCTEPEЖEHИE
AÔÔapaÚ Ìe ÓÚÍβ˜aeÚcя ÓÚ ËcÚÓ˜ÌËÍa ÔepeÏeÌÌÓ„Ó ÚÓÍa ‰Ó Úex ÔÓp, ÔÓÍa ÓÌ ÔÓ‰cÓe‰ËÌeÌ Í ˝ÎeÍÚp˘ecÍÓÈ ceÚË, ‰aÊe ecÎË caÏ aÔÔapaÚ ‚˚Íβ˜eÌ.
ПpËÏe˜aÌËя
•ПËÚaÌËe ÓÚ ceÚe‚Ó„Ó a‰aÔÚepa ÔepeÏeÌÌÓ„Ó ÚÓÍa ÏÓÊeÚ ÔÓ‰a‚aÚ¸cя ‰aÊe ‚ ÚÓÏ cÎy˜ae, ecÎË ·aÚapeÈÌ˚È ·ÎÓÍ ÔpËÍpeÔÎeÌ Í Ba¯eÈ ‚ˉeÓÍaÏepe.
•ГÌeÁ‰Ó DC IN Ó·Îa‰aeÚ “ÔpËÓpËÚeÚÓÏ ËcÚÓ˜ÌËÍa”. ЭÚÓ ÓÁÌa˜aeÚ, ˜ÚÓ ÔËÚaÌËe ÓÚ ·aÚapeÈÌÓ„Ó ·ÎÓÍa Ìe ÔÓ‰aeÚcя, ÔÓÍa ÔpÓ‚Ó‰ ˝ÎeÍÚpÓÔËÚaÌËя ÔÓ‰cÓe‰ËÌeÌ Í „ÌeÁ‰y DC IN, ‰aÊe ecÎË ÔpÓ‚Ó‰ ˝ÎeÍÚpÓÔËÚaÌËя Ìe ‚Íβ˜eÌ ‚ ceÚe‚y˛ pÓÁeÚÍy.
ИcÔÓθÁÓ‚aÌËe a‚ÚÓÏÓ·ËθÌÓ„Ó aÍÍyÏyÎяÚÓpa
ИcФУО¸БyИЪe a‰aФЪep/Бapя‰МУe ycЪpУИcЪ‚У ФУcЪУяММУ„У ЪУНa ЩЛpП˚ Sony (Мe ‚xУ‰ЛЪ ‚ НУПФОeНЪ).
˝ÍcÔÎyaÚaˆËË Í ПÓ‰„ÓÚÓ‚Ía started Getting
19
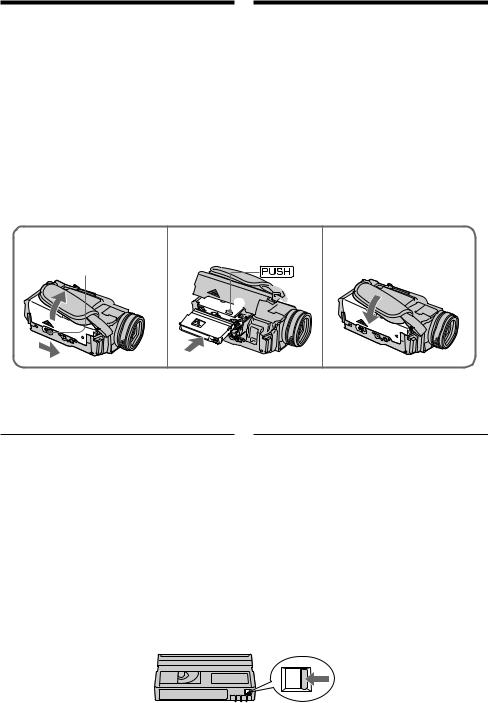
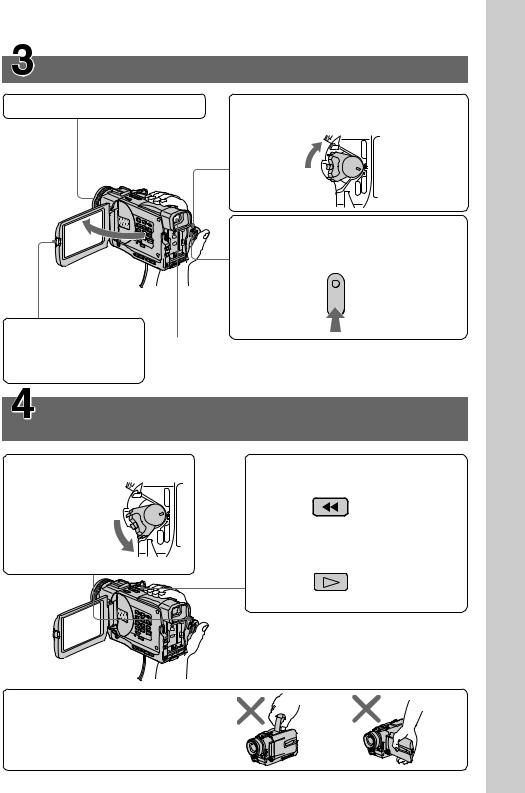
Step 2 Inserting a
cassette
(1) Install the power source.
(2) Slide OPEN/EJECT in the direction of the arrow and open the lid. The cassette compartment automatically lifts up and opens.
(3) Push the middle portion of the back of the cassette to insert. Insert the cassette in a straight line deeply into the cassette compartment with the window facing out.
(4) Close the cassette compartment by pressing the  mark on the cassette compartment. The cassette compartment automatically goes down.
(5) After the cassette compartment going down completely, close the lid until it clicks.
ПyÌÍÚ 2 УcÚaÌÓ‚Ía ÍacceÚ˚
(1) УcÚaÌÓ‚ËÚe ËcÚÓ˜ÌËÍ ÔËÚaÌËя.
(2) Пepe‰‚Ë̸Úe ÔepeÍβ˜aÚeθ OPEN/EJECT ‚ ÌaÔpa‚ÎeÌËË cÚpeÎÍË Ë ÓÚÍpÓÈÚe Íp˚¯Íy. КacceÚÌ˚È ÓÚceÍ a‚ÚÓÏaÚ˘ecÍË ÔÓ‰ÌËÏeÚcя ‚‚epx Ë ÓÚÍpÓeÚcя.
(3) ЧÚÓ·˚ ‚cÚa‚ËÚ¸ ÍacceÚy, ÌaÊÏËÚe Ìa Ìee ÔÓ ˆeÌÚpy c Áa‰ÌeÈ cÚÓpÓÌ˚. BcÚa‚¸Úe ÍacceÚy ÔÓ ÔpяÏÓÈ ‚ ÍacceÚÌ˚È ÓÚceÍ ‰Ó yÔÓpa, ˜ÚÓ·˚ ÓÍÓ¯ÍÓ ·˚ÎÓ Ó·pa˘eÌÓ ÌapyÊy.
(4) ЗaÍpÓÈÚe ÍacceÚÌ˚È ÓÚceÍ, ÌaÊa‚ ÏeÚÍy
 Ìa ÍacceÚÌÓÏ ÓÚceÍe. КacceÚÌ˚È ÓÚceÍ a‚ÚÓÏaÚ˘ecÍË ÓÔycÚËÚcя ‚ÌËÁ.
(5) ПУcОe ЪУ„У, НaН НacceЪМ˚И УЪceН ФУОМУcЪ¸˛ УФycЪЛЪcя ‚МЛБ, БaНpУИЪe Нp˚¯Нy ‰У ˘eО˜Нa.
2 |
3, 4 |
5 |
|
OPEN/EJECT |
|
4 


3
To eject a cassette
Follow the procedure above and in step 3, take out the cassette.
Notes
•Do not press the cassette compartment down. Doing so may cause malfunction.
•The cassette compartment may not be closed when you press any part of the lid other than the  mark.
mark.
When you use mini DV cassette with cassette memory
Read the instruction about cassette memory to use this function properly (p. 171).
To prevent accidental erasure
Slide the write-protect tab on the cassette to expose the red mark.
ДÎя ËÁ‚Îe˜eÌËя ÍacceÚ˚
B˚ФУОМЛЪe yНaБaММy˛ ‚˚¯e ФpУˆe‰ypy Л ‚˚М¸Ъe НacceЪy ‚ ФyМНЪe 3.
ПpËÏe˜aÌËя
•He ÌaÊËÏaÈÚe ÍacceÚÌ˚È ÓÚceÍ ‚ÌËÁ. ЭÚÓ ÏÓÊeÚ ÔpË‚ecÚË Í ÌeËcÔpa‚ÌÓcÚË.
•КacceÚÌ˚È ÓÚceÍ ÏÓÊeÚ Ìe ÁaÍp˚Ú¸cя, ecÎË B˚ ÌaÊÏeÚe Ìa ÍaÍy˛-ÎË·Ó ‰py„y˛ ˜acÚ¸ Ìa Íp˚¯Íe, a Ìe Ìa ÏeÚÍy  .
.
ПpË ËcÔÓθÁÓ‚aÌËË ÍacceÚ˚ ÏËÌË DV c ÍacceÚÌÓÈ ÔaÏяÚ¸˛
ПpÓ˜ÚËÚe ËÌcÚpyÍˆË˛ Ó ÍacceÚÌÓÈ ÔaÏяÚË ‰Îя Ôpa‚ËθÌÓ„Ó ËcÔÓθÁÓ‚aÌËя ˝ÚÓÈ ÙyÌ͈ËË (cÚp. 171).
ДÎя Ôpe‰ÓÚ‚pa˘eÌËя cÎy˜aÈÌÓ„Ó cÚËpaÌËя
Пepe‰‚Ë̸Úe ÎeÔecÚÓÍ Áa˘ËÚ˚ ÓÚ ÁaÔËcË Ìa ÍacceÚe ÚaÍ, ˜ÚÓ·˚ ÔÓя‚ËÎac¸ ÍpacÌaя ÏeÚÍa.
20
— Recording – Basics —
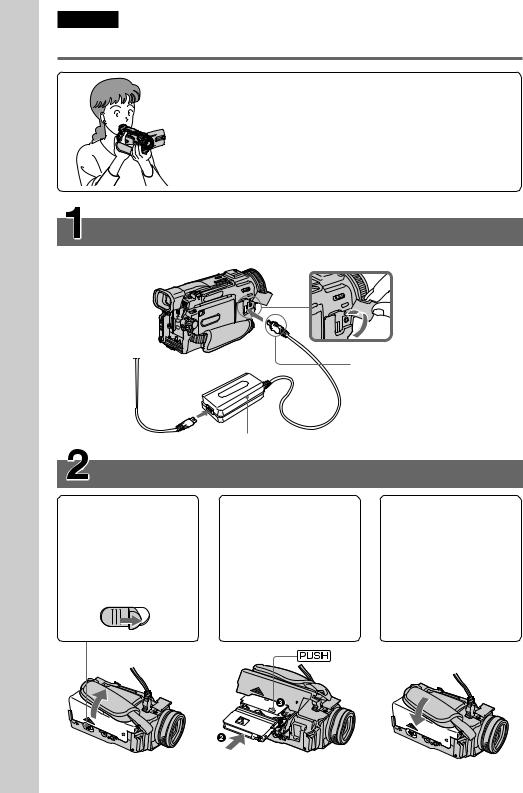
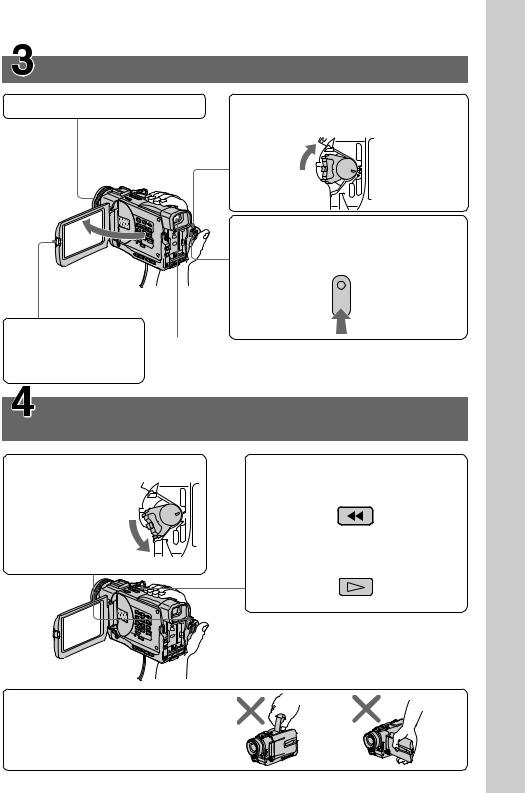
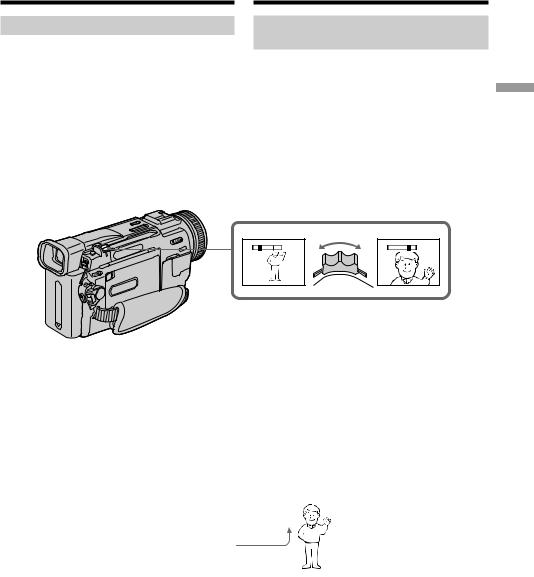
Recording a picture
Your camcorder automatically focuses for you.
(1) Remove the lens cap by pressing both knobs on its sides and attatch the lens cap to the grip strap.
(2) Install the power source and insert a cassette. See “Step 1” and “Step 2” for more information (p. 13 to p. 20).
(3) Set the POWER switch to CAMERA while pressing the small green button. Your camcorder is set to the standby mode.
(4) To open the LCD panel, press OPEN. The viewfinder automatically turns off.
(5) Press START/STOP. Your camcorder starts recording. The “REC” indicator appears. The camera recording lamp located on the front of your camcorder lights up. To stop recording, press START/STOP again.
1
4
— ЗaФЛc¸ - OcМУ‚М˚e ФУОУКeМЛя —
ЗaÔËc¸ ËÁÓ·paÊeÌËя
Ba¯a ‚ˉeÓÍaÏepa ‚˚ÔÓÎÌяeÚ ÙÓÍycËpÓ‚Íy a‚ÚÓÏaÚ˘ecÍË.
(1) CМЛПЛЪe Нp˚¯Нy У·˙eНЪЛ‚a, МaКa‚ У·e НМУФНЛ Мa ee НpУПНe, Л ФpЛНpeФЛЪe Нp˚¯Нy У·˙eНЪЛ‚a Н peПМ˛ ‰Оя Бax‚aЪa.
(2) УcÚaÌÓ‚ËÚe ËcÚÓ˜ÌËÍ ÔËÚaÌËя Ë ‚cÚa‚¸Úe ÍacceÚy. ПÓ‰pÓ·Ì˚e c‚e‰eÌËя ÔpË‚e‰eÌ˚ ‚ “ПyÌÍÚe 1” Ë “ПyÌÍÚe 2” (cÚp. c 13 ÔÓ 20).
(3) HaКa‚ ПaОeМ¸Нy˛ БeОeМy˛ НМУФНy, ycЪaМУ‚ЛЪe ФepeНО˛˜aЪeО¸ POWER ‚ ФУОУКeМЛe CAMERA. Ba¯a ‚Л‰eУНaПepa ·y‰eЪ ycЪaМУ‚ОeМa ‚ peКЛП УКЛ‰aМЛя.
(4) HaÊÏËÚe OPEN, ˜ÚÓ·˚ ÓÚÍp˚Ú¸ ÔaÌeθ ЖКД. BˉÓËcÍaÚeθ ‚˚Íβ˜ËÚcя a‚ÚÓÏaÚ˘ecÍË.
(5) HaКПЛЪe НМУФНy START/STOP. Ba¯a ‚Л‰eУНaПepa Мa˜МeЪ БaФЛc¸. ПУя‚ЛЪcя ЛМ‰ЛНaЪУp “REC”. Зa„УpЛЪcя ЪaНКe ОaПФУ˜Нa БaФЛcЛ, pacФУОУКeММaя Мa Фepe‰МeИ ФaМeОЛ ‚Л‰eУНaПep˚. ДОя УcЪaМУ‚НЛ БaФЛcЛ МaКПЛЪe НМУФНy START/ STOP e˘e paБ.
LOCK Switch/
3 ПepeÍβ˜aÚeθLOCK
|
VCR |
POWER |
OFF |
|
( |
|
CHG |
|
) |
MEMORY |
CAMERA |
ФУОУКeМЛя OcМУ‚М˚e - ЗaФЛc¸ Basics – Recording
Camera recording lamp/ |
5 |
40min |
REC 0:00:01 |
ЛaÏÔÓ˜Ía ÁaÔËcË |
2 |
|
|
‚ˉeÓÍaÏepÓÈ |
|
|
|
Microphone/MËÍpÓÙÓÌ |
|
|
|
21
Recording a picture |
|
ЗaÔËc¸ ËÁÓ·paÊeÌËя |
|
|
|
|
|
|
Note
Fasten the grip strap firmly.
Note on recording mode
Your camcorder records and plays back in the SP (standard play) mode and in the LP (long play) mode. Select SP or LP in the menu settings. In the LP mode, you can record 1.5 times as long as in the SP mode.
When you record a tape in the LP mode on your camcorder, we recommend playing the tape on your camcorder.
Note on the LOCK switch (DCR-TRV11E/ TRV20E only)
When you slide LOCK to the right, the POWER switch can no longer be set to MEMORY accidentally. LOCK is set to the left before your camcorder leaves the factory.
To enable smooth transition
Transition between the last scene you recorded and the next scene is smooth as long as you do not eject the cassette even if you turn off your camcorder.
However, check the following:
•Do not mix recordings in the SP mode and ones in the LP mode on one tape.
•When you change the battery pack, set the POWER switch to OFF (CHG).
When you use a tape with cassette memory, however, you can make the transition smooth even after ejecting the cassette if you use the END SEARCH function (p. 34).
If you leave your camcorder in the standby mode for five minutes while the cassette is inserted
Your camcorder automatically turns off. This is to save battery power and to prevent battery and tape wear. To resume the standby mode, set the POWER switch to OFF (CHG), and to CAMERA again.
ПpËÏe˜aÌËe
Ha‰eÊÌÓ ÔpËÍpeÔËÚe peÏe̸ ‰Îя Áax‚aÚa.
ПpËÏe˜aÌËe ÔÓ peÊËÏy ÁaÔËcË
Ba¯a ‚ˉeÓÍaÏepa ‚˚ÔÓÎÌяeÚ ÁaÔËc¸ Ë ‚ÓcÔpÓËÁ‚e‰eÌËe ‚ peÊËÏe SP (cÚảapÚÌÓe ‚ÓcÔpÓËÁ‚e‰eÌËe) Ë ‚ peÊËÏe LP (‰Ó΄ÓË„pa˛˘ee ‚ÓcÔpÓËÁ‚e‰eÌËe). B˚·epËÚe peÊËÏ SP ËÎË LP ‚ ycÚaÌÓ‚Íax ÏeÌ˛. B peÊËÏe LP B˚ ÏÓÊeÚe ‚˚ÔÓÎÌяÚ¸ ÁaÔËc¸ ‚ 1,5 paÁa ‰Óθ¯e ÔÓ ‚peÏeÌË, ˜eÏ ‚ peÊËÏe SP. EcÎË ÁaÔËc¸ ÎeÌÚ˚ ‚˚ÔÓÎÌяÎac¸ Ìa Ba¯eÈ ‚ˉeÓÍaÏepe ‚ peÊËÏe LP, ee peÍÓÏẻyeÚcя ‚ÓcÔpÓËÁ‚Ó‰ËÚ¸ Ìa ˝ÚÓÈ ‚ˉeÓÍaÏepe.
ПpËÏe˜aÌËe ÔÓ ÔepeÍβ˜aÚeβ LOCK (ÚÓθÍÓ ‰Îя ÏÓ‰eÎË DCR-TRV11E/TRV20E)
EcОЛ Фepe‰‚ЛМyЪ¸ ФepeНО˛˜aЪeО¸ LOCK ‚Фpa‚У, ФepeНО˛˜aЪeО¸ POWER yКe Мe‚УБПУКМУ cОy˜aИМУ ycЪaМУ‚ЛЪ¸ ‚ ФУОУКeМЛe MEMORY. ПepeНО˛˜aЪeО¸ LOCK ycЪaМУ‚ОeМ ‚Оe‚У Мa Фpe‰ФpЛяЪЛЛЛБ„УЪУ‚ЛЪeОe Фepe‰ УЪФpa‚НУИ ‚Л‰eУНaПep˚ ‚ ЪУp„У‚y˛ ceЪ¸.
ДÎя Ó·ecÔe˜eÌËя ÔÎa‚ÌÓ„Ó ÔepexÓ‰a
ПepexÓ‰ Ïeʉy ÔÓcÎe‰ÌËÏ ÁaÔËcaÌÌ˚Ï ˝ÔËÁÓ‰ÓÏ Ë cÎe‰y˛˘ËÏ ˝ÔËÁÓ‰ÓÏ ·y‰eÚ ÔÎa‚Ì˚Ï ‰Ó Úex ÔÓp, ÔÓÍa Ìe ËÁ‚Îe˜eÚe ÍacceÚy, ‰aÊe ÔpË ‚˚Íβ˜eÌËË ‚ˉeÓÍaÏep˚. O‰ÌaÍÓ ÌeÓ·xÓ‰ËÏÓ ÓÚÏeÚËÚ¸ cÎe‰y˛˘ee:
•He cÎe‰yeÚ Ìa Ó‰ÌÓÈ ÎeÌÚe ‰eÎaÚ¸ ÁaÔËcË ‚ peÊËÏe SP Ë LP.
•ПpЛ БaПeМe ·aЪapeИМУ„У ·ОУНa ycЪaМУ‚ЛЪe ФepeНО˛˜aЪeО¸ POWER ‚ ФУОУКeМЛe OFF
(CHG).
O‰МaНУ ФpЛ ЛcФУО¸БУ‚aМЛЛ ОeМЪ˚ c НacceЪМУИ ФaПяЪ¸˛ ПУКМУ cУБ‰a‚aЪ¸ ФОa‚М˚И ФepexУ‰, ‰aКe ФУcОe ЛБ‚Оe˜eМЛя НacceЪ˚, ecОЛ ЛcФУО¸БyeЪcя ЩyМНˆЛя END SEARCH (cЪp. 34).
EcÎË B˚ ÓcÚa‚ËÚe Ba¯y ‚ˉeÓÍaÏepy ‚ peÊËÏe ÓÊˉaÌËя Ìa ÔяÚ¸ ÏËÌyÚ ÔpË ‚cÚa‚ÎeÌÌÓÈ ÍacceÚe
Ba¯a ‚Л‰eУНaПepa ‚˚НО˛˜ЛЪcя a‚ЪУПaЪЛ˜ecНЛ. ЭЪУ Фpe‰УЪ‚pa˘aeЪ pacxУ‰ Бapя‰a ·aЪapeИМУ„У ·ОУНa Л ЛБМУc ·aЪapeИМУ„У ·ОУНa Л ОeМЪ˚. ДОя ‚УБ‚paЪa ‚ peКЛП УКЛ‰aМЛя ycЪaМУ‚ЛЪe ФepeНО˛˜aЪeО¸ POWER ‚ ФУОУКeМЛe OFF (CHG), a БaЪeП cМУ‚a ‚ ФУОУКeМЛe CAMERA.
22
Recording a picture |
|
З‡ÔËÒ¸ ËÁÓ· ‡ÊÂÌËя |
|
|
|
When you record in the SP and LP modes on one tape or you record some scenes in the LP mode
The playback picture may be distorted or the time code may not be written properly between scenes.
Adjusting the LCD screen
The LCD panel moves about 90 degrees to the viewfinder side and about 180 degrees to the lens side.
If you turn the LCD panel over so that it faces the other way, the  indicator appears in the viewfinder and on the LCD screen (Mirror mode).
180°
90°
When closing the LCD panel, set it vertically until it clicks, and swing it into the camcorder body.
Note
When using the LCD screen except in the mirror mode, the viewfinder automatically turns off.
When you use the LCD screen outdoors in direct sunlight
The LCD screen may be difficult to see. If this happens, we recommend that you use the viewfinder.
EcÎË B˚ ‚˚ÔÓÎÌяeÚe ÁaÔËc¸ ‚ peÊËÏax SP Ë LP Ìa Ó‰Ìy ÎeÌÚy ËÎË Êe ÁaÔËc˚‚aeÚe ÌecÍÓθÍÓ ˝ÔËÁÓ‰Ó‚ ‚ peÊËÏe LP
BÓcÔpÓËÁ‚Ó‰ËÏÓe ËÁÓ·paÊeÌËe ÏÓÊeÚ ·˚Ú¸ ËcÍaÊeÌÓ ËÎË ÍÓ‰ ‚peÏeÌË ÌeÔpa‚ËθÌÓ ÁaÔËcaÌ Ïeʉy ˝ÔËÁÓ‰aÏË.
Pe„yÎËpÓ‚Ía ˝ÍpaÌa ЖКД
ПaÌeθ ЖКД ÏÓÊeÚ ÔepeÏe˘aÚ¸cя ÔpËÏepÌÓ Ìa 90 „pa‰ycÓ‚ ‚ cÚÓpÓÌy ‚ˉÓËcÍaÚeÎя Ë ÔpËÏepÌÓ Ìa 180 „pa‰ycÓ‚ ‚ cÚÓpÓÌy Ó·˙eÍÚË‚a.
EcÎË B˚ ÔÓ‚epÌeÚe ÔaÌeθ ЖКД ÚaÍ, ˜ÚÓ ·y‰eÚ ÌaÔpa‚ÎeÌa ‚ ‰py„y˛ cÚÓpÓÌy, ‚ ‚ˉÓËcÍaÚeÎe Ë Ìa ˝ÍpaÌe ЖКД ÔÓя‚ËÚcя Ë̉ËÍaÚÓp  (ЗepÍaθÌ˚È peÊËÏ).
ПpЛ БaНp˚ЪЛЛ ФaМeОЛ ЖКД ycЪaМУ‚ЛЪe ee ‚epЪЛНaО¸МУ ‰У ˘eО˜Нa, a БaЪeП cОУКЛЪe ee, cУ‚ПecЪЛ‚ c НУpФycУП ‚Л‰eУНaПep˚.
ПpËÏe˜aÌËe
ПpË ËcÔÓθÁÓ‚aÌËË ˝ÍpaÌa ЖКД ‚ˉÓËcÍaÚeθ a‚ÚÓÏaÚ˘ecÍË ‚˚Íβ˜aeÚcя, ÍpÓÏe ÁepÍaθÌÓ„Ó peÊËÏa.
EcÎË B˚ ËcÔÓθÁyeÚe ˝ÍpaÌ ЖКД ‚Ìe ÔÓÏe˘eÌËя ÔÓ‰ ÔpяÏ˚Ï cÓÎÌe˜Ì˚Ï c‚eÚÓÏ
BУБПУКМУ ·y‰eЪ Ъpy‰МУ paБ„Оя‰eЪ¸ ˜ЪУ-ОЛ·У Мa ˝НpaМe ЖКД. B ˝ЪУП cОy˜ae peНУПeМ‰yeЪcя ЛcФУО¸БУ‚aЪ¸ ‚Л‰УЛcНaЪeО¸.
ФУОУКeМЛя OcМУ‚М˚e - ЗaФЛc¸ Basics – Recording
23

Recording a picture
Picture in the mirror mode
The picture on the LCD is a mirror-image. However, the picture will be normal when recorded.
During recording in the mirror mode
ZERO SET MEMORY on the Remote Commander does not work.
Indicators in the mirror mode
The STBY indicator appears as Xz and REC as z. Some of the other indicators appear mirrorreversed and others are not displayed.
З‡ÔËÒ¸ ËÁÓ· ‡ÊÂÌËя
ИÁÓ·paÊeÌËe ‚ ÁepÍaθÌÓÏ peÊËÏe
ИÁÓ·paÊeÌËe Ìa ˝ÍpaÌe ЖКД ·y‰eÚ ÓÚÓ·paÊaÚ¸cя ÁepÍaθÌÓ. O‰ÌaÍÓ ÁaÔËc¸ ËÁÓ·paÊeÌËя ·y‰eÚ ÌÓpÏaθÌÓÈ.
BÓ ‚peÏя ÁaÔËcË ‚ ÁepÍaθÌÓÏ peÊËÏe
КМУФНa ZERO SET MEMORY Мa ФyО¸Ъe ‰ЛcЪaМˆЛУММУ„У yФpa‚ОeМЛя Мe pa·УЪaeЪ.
И̉ËÍaÚÓp˚ ‚ ÁepÍaθÌÓÏ peÊËÏe
И̉ËÍaÚÓp STBY ÓÚÓ·paÊaeÚcя ‚ ‚ˉe Xz, a Ë̉ËÍaÚÓp REC ‚ ‚ˉe z. HeÍÓÚÓp˚e ‰py„Ëe Ë̉ËÍaÚÓp˚ ÔÓя‚яÚcя ‚ ÁepÍaθÌÓ ÓÚÓ·paÊeÌÌÓÏ ‚ˉe, a ÌeÍÓÚÓp˚e ËÁ ÌËx Ìe ·y‰yÚ ÓÚÓ·paÊaÚ¸cя cÓ‚ceÏ.
Adjusting the brightness of the
LCD screen
To adjust the brightness of the LCD screen, press either of the two buttons on LCD BRIGHT.
Pe„yÎËpÓ‚Ía яpÍÓcÚË ˝ÍpaÌa
ЖКД
ДОя pe„yОЛpУ‚НЛ яpНУcЪЛ ˝НpaМa ЖКД МaКПЛЪe У‰Мy ЛБ НМУФУН Мa LCD BRIGHT.
LCD BRIGHT
to dim/ to brighten/
ÚeÏÌee яp˜e
LCD screen backlight
You can change the brightness of the backlight. Select LCD B.L. in the menu settings.(p.116)
Even if you adjust the LCD screen backlight or brightness of the LCD screen
The recorded picture will not be affected.
Зa‰Ìяя ÔÓ‰c‚eÚÍa ˝ÍpaÌa ЖКД
B˚ ÏÓÊeÚe ËÁÏeÌяÚ¸ яpÍÓcÚ¸ Áa‰ÌeÈ ÔÓ‰c‚eÚÍË. B˚·epËÚe ÍÓÏảy LCD B.L. ‚ ycÚaÌÓ‚Íax ÏeÌ˛. (cÚp. 116)
ДaÊe ‚ cÎy˜ae pe„yÎËpÓ‚ÍË Áa‰ÌeÈ ÔÓ‰c‚eÚÍË ˝ÍpaÌa ЖКД ËÎË яpÍÓcÚË ˝ÍpaÌa ЖКД
ЭÚÓ Ìe ÔÓ‚ÎËяeÚ Ìa ÁaÔËcaÌÌÓe ËÁÓ·paÊeÌËe.
After recording |
|
ПÓcÎe ÁaÔËcË |
(1) Set the POWER switch to OFF (CHG). |
|
(1) УcÚaÌÓ‚ËÚe ÔepeÍβ˜aÚeθ POWER ‚ |
(2) Close the LCD panel. |
|
ФУОУКeМЛe OFF (CHG). |
(3) Eject the cassette. |
|
(2) ЗaÍpÓÈÚe ÔaÌeθ ЖКД. |
|
|
(3) ИÁ‚ÎeÍËÚe ÍacceÚy. |
24
Recording a picture
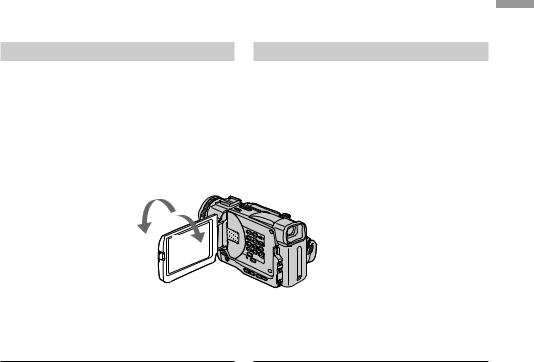
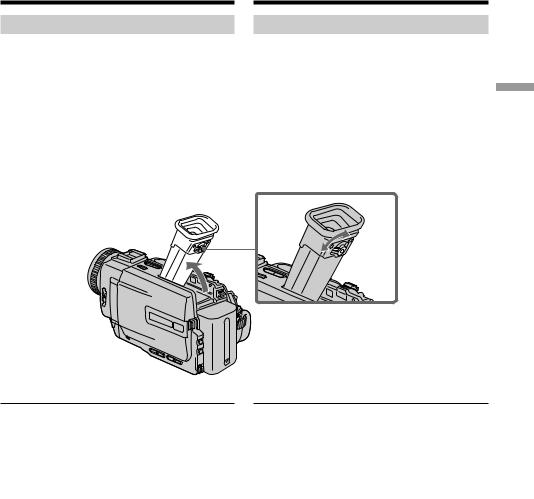
Adjusting the viewfinder
If you record pictures with the LCD panel closed, check the picture with the viewfinder. Adjust the viewfinder lens to your eyesight so that the indicators in the viewfinder come into sharp focus.
Lift up the viewfinder and move the viewfinder lens adjustment lever.
Viewfinder backlight
You can change the brightness of the backlight. Select VF B.L. in the menu settings. (p.116)
З‡ÔËÒ¸ ËÁÓ· ‡ÊÂÌËя
Pe„yÎËpÓ‚Ía ‚ˉÓËcÍaÚeÎя
EcÎË B˚ ·y‰eÚe ÁaÔËc˚‚aÚ¸ ËÁÓ·paÊeÌËя ÔpË ÁaÍp˚ÚÓÈ ÔaÌeÎË ЖКД, ÍÓÌÚpÓÎËpyÈÚe ËÁÓ·paÊeÌËe c ÔÓÏÓ˘¸˛ ‚ˉÓËcÍaÚeÎя. OÚpe„yÎËpyÈÚe Ó·˙eÍÚË‚ ‚ˉÓËcÍaÚeÎя ‚ cÓÓÚ‚eÚcÚ‚ËË cÓ c‚ÓËÏ ÁpeÌËeÏ, ˜ÚÓ·˚ Ë̉ËÍaÚÓp˚ ‚ ‚ˉÓËcÍaÚeÎe ·˚ÎË ˜eÚÍÓ cÙÓÍycËpÓ‚aÌ˚.
ПУ‰МЛПЛЪe ‚Л‰УЛcНaЪeО¸ Л p˚˜a„ pe„yОЛpУ‚НЛ У·˙eНЪЛ‚a ‚Л‰УЛcНaЪeОя.
Зa‰Ìяя ÔÓ‰c‚eÚÍa ‚ˉÓËcÍaÚeÎя
B˚ ÏÓÊeÚe ËÁÏeÌяÚ¸ яpÍÓcÚ¸ Áa‰ÌeÈ ÔÓ‰c‚eÚÍË. B˚·epËÚe VF B.L. ‚ ycÚaÌÓ‚Íax ÏeÌ˛. (cÚp. 116)
ФУОУКeМЛя OcМУ‚М˚e - ЗaФЛc¸ Basics – Recording
25
Recording a picture
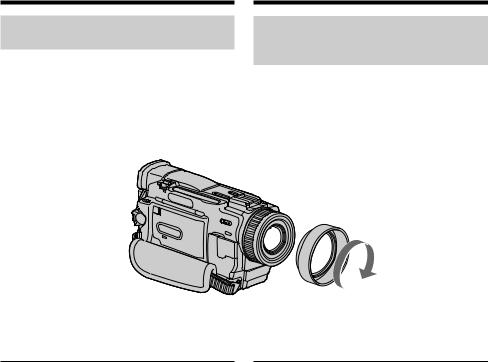
Attaching the supplied lens
hood (DCR-TRV20E only)
To record fine pictures under strong light, we recommend attaching the lens hood. Also the lens cap can be attached even with the lens hood on.
Notes
•When you use the Remote Commander and the lens hood, the Remote Commander may not function properly because the lens hood blocks the infrared rays from the Remote Commander. In such case, remove the lens hood from your camcorder.
•You cannot attach filters or other objects onto the lens hood.
When you use the filter (not supplied)
The shadow of the lens hood may appear in the corners of LCD screen or viewfinder.
З‡ÔËÒ¸ ËÁÓ· ‡ÊÂÌËя
ПÓ‰cÓe‰ËÌeÌËe ÔpËÎa„aeÏÓÈ ·Îẻ˚ Ó·˙eÍÚË‚a (ÚÓθÍÓ ‰Îя ÏÓ‰eÎË DCR-TRV20E)
ДОя БaФЛcЛ ‰eЪaОeИ ЛБУ·paКeМЛя ФpЛ яpНУП Уc‚e˘eМЛЛ peНУПeМ‰yeЪcя ycЪaМa‚ОЛ‚aЪ¸ Мa У·˙eНЪЛ‚ ·ОeМ‰y. Кp˚¯Нy У·˙eНЪЛ‚a ПУКМУ ЛcФУО¸БУ‚aЪ¸ ‰aКe ФpЛ ФУ‰cУe‰ЛМeММУИ ·ОeМ‰e.
ПpËÏe˜aÌËя
•ПpЛ ЛcФУО¸БУ‚aМЛЛ ФyО¸Ъa ‰ЛcЪaМˆЛУММУ„У yФpa‚ОeМЛя Л ·ОeМ‰˚ У·˙eНЪЛ‚a ФyО¸Ъ ПУКeЪ pa·УЪaЪ¸ МeНУppeНЪМУ, ЪaН НaН ·ОeМ‰a ФpeФяЪcЪ‚yeЪ ФpУxУК‰eМЛ˛ ЛМЩpaНpacМ˚x Оy˜eИ УЪ ФyО¸Ъa. B ˝ЪУП cОy˜ae УЪcУe‰ЛМЛЪe ·ОeМ‰y УЪ ‚Л‰eУНaПep˚.
•К ·Îẻe ÌeθÁя ÔÓ‰cÓe‰ËÌяÚ¸ ÙËθÚp˚ Ë ‰py„Ëe ÔpËcÔÓcÓ·ÎeÌËя.
КÓ„‰a B˚ ËcÔÓθÁyeÚe ÙËθÚp (Ìe ÔpËÎa„aeÚcя)
Te̸ ÓÚ ·Îẻ˚ ÏÓÊeÚ ÔÓя‚ËÚ¸cя ‚ y„ÓÎÍax ˝ÍpaÌa ЖКД ËÎË ‚ˉÓËcÍaÚeÎя.
26
Recording a picture
Using the zoom feature
Move the power zoom lever a little for a slower zoom. Move it further for a faster zoom.
Using the zoom function sparingly results in better-looking recordings.
“T” side: for telephoto (subject appears closer) “W” side: for wide-angle (subject appears farther
away)
З‡ÔËÒ¸ ËÁÓ· ‡ÊÂÌËя
ИcÔÓθÁÓ‚aÌËe ÙyÌ͈ËË
ÚpaÌcÙÓÍaˆËË
CÎe„Ía Ôepe‰‚Ë̸Úe p˚˜a„ ÔpË‚Ó‰a ÚpaÌcÙÓÍaÚÓpa ‰Îя Ïe‰ÎeÌÌÓÈ ÚpaÌcÙÓÍaˆËË. Пepe‰‚Ë̸Úe e„Ó ‰aθ¯e ‰Îя ycÍÓpeÌÌÓÈ ÚpaÌcÙÓÍaˆËË.
УÏepeÌÌÓe ËcÔÓθÁÓ‚aÌËe ÙyÌ͈ËË ÌaeÁ‰a Ó·ecÔe˜Ë‚aeÚ ÌaËÎy˜¯Ëe peÁyθÚaÚ˚. CÚÓpÓÌa “T”: ‰Îя ÚeÎeÙÓÚÓ (Ó·˙eÍÚ
ÔpË·ÎËÊaeÚcя)
CÚÓpÓÌa “W”: ‰Îя ¯ËpÓÍÓy„ÓθÌÓ„Ó ‚ˉa (Ó·˙eÍÚ y‰aÎяeÚcя)
W T
W |
T |
W |
T |
ФУОУКeМЛя OcМУ‚М˚e - ЗaФЛc¸ Basics – Recording
To use zoom greater than 10×
Zoom greater than 10× is performed digitally, if you set D ZOOM to 20× or 120× in the menu
settings. The digital zoom function is set to OFF at the factory. (p. 116)
ЗÌa˜eÌËe ÚpaÌcÙÓÍaˆËË ·ÓÎee 10×
TpaÌcÙÓÍaˆËя ·ÓÎee 10× ‚˚ÔÓÎÌяeÚcя ˆËÙpÓ‚˚Ï ÏeÚÓ‰ÓÏ ÔpË ycÚaÌÓ‚Íe ÁÌa˜eÌËя 20× ËÎË 120× ‚ ФapaПeЪpe D ZOOM ‚ ycЪaМУ‚Нax ПeМ˛. Ha Фpe‰ФpЛяЪЛЛЛБ„УЪУ‚ЛЪeОe ЩyМНˆЛя ˆЛЩpУ‚УИ ЪpaМcЩУНaˆЛЛ ycЪaМУ‚ОeМa ‚ ФУОУКeМЛe OFF (cЪp. 116)
The right side of the bar shows the |
|
|
|
|
|
|
|
digital zooming zone. |
|
|
|
|
|
|
|
The digital zooming zone appears |
W |
|
|
|
T |
|
|
when you set D ZOOM to 20× or 120×./ |
|
|
|
|
|
|
|
|
|
|
|
|
|
|
|
Пpa‚aя cÚÓpÓÌa ÔÓÎÓc˚ Ìa ˝ÍpaÌe |
|
|
|
|
|
|
|
ÔÓÍaÁ˚‚aeÚ ÁÓÌy ˆËÙpÓ‚ÓÈ |
|
|
|
|
|
|
|
ÚpaÌcÙÓÍaˆËË. |
|
|
|
|
|
|
|
ЗÓÌa ˆËÙpÓ‚ÓÈ ÚpaÌcÙÓÍaˆËË |
|
|
|
|
|
|
|
ÔÓя‚ÎяeÚcя, ÍÓ„‰a ‚ ÔapaÏeÚpe D |
|
|
|
|
|
|
|
ZOOM ycÚaÌa‚ÎË‚aeÚcя ÁÌa˜eÌËe |
|
|
|
|
|
|
|
20× ËÎË 120×. |
|
|
|
|
|
|
|
27
Recording a picture |
|
З‡ÔËÒ¸ ËÁÓ· ‡ÊÂÌËя |
|
|
|
|
|
|
When you shoot close to a subject
If you cannot get a sharp focus, move the power zoom lever to the “W” side until the focus is sharp. You can shoot a subject that is at least about 80 cm (about 2 feet 5/8 inch) away from the lens surface in the telephoto position, or about 1 cm (about 1/2 inch) away in the wideangle position.
Notes on digital zoom
•Digital zoom starts to function when zoom exceeds 10×.
•The picture quality deteriorates as you move the power zoom lever toward the “T” side.
•You cannot use the digital zoom when the POWER switch is set to MEMORY (DCR-TRV11E/TRV20E only).
ПpЛ c˙eПНe У·˙eНЪa c ·ОЛБНУ„У ФУОУКeМЛя
EcОЛ B˚ Мe ПУКeЪe ФУОy˜ЛЪ¸ ˜eЪНУИ ЩУНycЛpУ‚НЛ, Фepe‰‚ЛМ¸Ъe p˚˜a„ ФpЛ‚У‰a ЪpaМcЩУНaЪУpa ‚ cЪУpУМy “W” ‰У ФУОy˜eМЛя ˜eЪНУИ ЩУНycЛpУ‚НЛ. B˚ ПУКeЪe ‚˚ФУОМяЪ¸ c˙eПНy У·˙eНЪa ‚ ФУОУКeМЛЛ ЪeОeЩУЪУ, НУЪУp˚И УЪcЪУЛЪ ФУ НpaИМeИ Пepe Мa paccЪУяМЛЛ 80 cП УЪ ФУ‚epxМУcЪЛ У·˙eНЪЛ‚a ЛОЛ УНУОУ 1 cП ‚ ФУОУКeМЛЛ ¯ЛpУНУy„УО¸МУ„У ‚Л‰a.
ПpËÏe˜aÌËя ÔÓ ˆËÙpÓ‚ÓÈ ÚpaÌcÙÓÍaˆËË
•ЦËÙpÓ‚aя ÚpaÌcÙÓÍaˆËя Ìa˜ËÌaeÚ
cpa·aÚ˚‚aÚ¸, ecÎË ÁÌa˜eÌËe ÚpaÌcÙÓÍaˆËË Ôpe‚˚¯aeÚ10×.
•Кa˜ecÚ‚Ó ËÁÓ·paÊeÌËя yxy‰¯aeÚcя ÔÓ Ïepe ÔepeÏe˘eÌËя p˚˜aÊÍa ÔpË‚Ó‰a ÚpaÌcÙÓÍaÚÓpa Í cÚÓpÓÌe “T”.
•ЦЛЩpУ‚aя ЪpaМcЩУНaˆЛя Мe ·y‰eЪ pa·УЪaЪ¸, ecОЛ ФepeНО˛˜aЪeО¸ POWER ycЪaМУ‚ОeМ ‚ ФУОУКeМЛe MEMORY.
(ÚÓθÍÓ ‰Îя ÏÓ‰eÎË DCR-TRV11E/TRV20E).
28
Recording a picture |
|
З‡ÔËÒ¸ ËÁÓ· ‡ÊÂÌËя |
|
|
|
|
|
|
Indicators displayed in the |
|
И̉ËÍaÚÓp˚, ÓÚÓ·paÊaeÏ˚e ‚ |
recording mode |
|
peÊËÏe ÁaÔËcË |
The indicators are not recorded on tapes. |
|
И̉ËÍaÚÓp˚ Ìe ÁaÔËc˚‚a˛Úcя Ìa ÎeÌÚy. |
[a][b]
|
|
|
|
|
|
|
|
|
|
[c] |
|
|
|
|
|
|
|
|
|
||
|
|
|
|
|
|
|
|
|
|
[d] |
|
|
|
|
|
|
|
|
|
|
[e] |
|
|
|
40min |
|
REC |
0:00:01 |
|
|||
|
|
|
|
|
|
|
|
45min |
|
|
|
|
|
|
|
|
|
|
|
|
[f] |
|
4 7 2000 |
|
12:05:56 |
|
[g] |
|||||
|
|
|
||||||||
|
|
|
|
|
|
|
|
|
||
|
|
|
[h] |
|
|
|
|
|||
[a] Remaining battery time indicator |
[a] И̉ËÍaÚÓp ÓcÚa‚¯e„Ócя Áapя‰a |
|||||||||
[b] Cassette memory indicator |
|
·aÚapeÈÌÓ„Ó ·ÎÓÍa |
||||||||
This appears when using a tape with cassette |
[b] И̉ËÍaÚÓp ÍacceÚÌÓÈ ÔaÏяÚË |
|||||||||
memory. |
|
ЭÚÓÚ Ë̉ËÍaÚÓp ÔÓя‚ÎяeÚcя ÔpË |
||||||||
[c] Recording mode indicator |
|
ËcÔÓθÁÓ‚aÌËË ÍacceÚÌÓÈ ÔaÏяÚË. |
||||||||
[d] STBY/REC indicator |
[c] И̉ËÍaÚÓp peÊËÏa ÁaÔËcË |
|||||||||
[e] Time code/Tape counter |
[d] И̉ËÍaÚÓp STBY/REC |
|||||||||
[f] Remaining tape indicator |
[e] КÓ‰ ‚peÏeÌË/C˜eÚ˜ËÍ ÎeÌÚ˚ |
|||||||||
[g] Time indicator |
[f] И̉ËÍaÚÓp ÓcÚa‚¯eÈcя ÎeÌÚ˚ |
|||||||||
The time is displayed about five seconds after |
[g] И̉ËÍaÚÓp ‚peÏeÌË |
|||||||||
the power is turned on. |
|
BpeÏя ÓÚÓ·paÊaeÚcя ‚ Úe˜eÌËË |
||||||||
[h] Date indicator |
|
ФpЛ·ОЛБЛЪeО¸МУ 5 ceНyМ‰ ФУcОe |
||||||||
The date is displayed about five seconds after |
|
‚Íβ˜eÌËя ÔËÚaÌËя. |
||||||||
the power is turned on. |
[h] И̉ËÍaÚÓp ‰aÚ˚ |
|||||||||
|
|
|
|
|
|
|
|
ДaÚa ÓÚÓ·paÊaeÚcя ‚ Úe˜eÌËË |
||
|
|
|
|
|
|
|
|
ФpЛ·ОЛБЛЪeО¸МУ 5 ceНyМ‰ ФУcОe |
||
|
|
|
|
|
|
|
|
‚Íβ˜eÌËя ÔËÚaÌËя. |
||
Time code
The time code indicates the recording or playback time, “0:00:00” (hours : minutes : seconds) in CAMERA mode and “0:00:00:00” (hours : minutes : seconds : frames) in VCR mode. You cannot rewrite only the time code.
Remaining tape indicator
The indicator may not be displayed accurately depending on the tape.
Recording date and time
The recording date and time are not displayed while recording. However, they are recorded automatically onto the tape. To display the recording date and time, press DATE CODE during playback.
КÓ‰ ‚peÏeÌË
КÓ‰ ‚peÏeÌË yÍaÁ˚‚aeÚ ‚peÏя ÁaÔËcË ËÎË ‚ÓcÔpÓËÁ‚e‰eÌËя, “0:00:00” (˜ac˚ : ÏËÌyÚ˚ : ceÍỷ˚) ‚ peÊËÏe CAMERA Ë “0:00:00:00” (˜ac˚ : ÏËÌyÚ˚ : ceÍỷ˚ : Ía‰p˚) ‚ peÊËÏe VCR. B˚ Ìe ÏÓÊeÚe ÔepeÁaÔËcaÚ¸ ÚÓθÍÓ ÍÓ‰ ‚peÏeÌË.
И̉ËÍaÚÓp ÓcÚa‚¯eÈcя ÎeÌÚ˚
И̉ËÍaÚÓp ÏÓÊeÚ ÚÓ˜ÌÓ Ìe ÓÚÓ·paÊaÚ¸cя ‚ Áa‚ËcËÏÓcÚË ÓÚ ÎeÌÚ˚.
ДaÚa Ë ‚peÏя ÁaÔËcË
ПpË ‚˚ÔÓÎÌeÌËË ÁaÔËcË ‰aÚa Ë ‚peÏя Ìe ÓÚÓ·paÊa˛Úcя. O‰ÌaÍÓ ÓÌË a‚ÚÓÏaÚ˘ecÍË ÁaÔËc˚‚a˛Úcя Ìa ÎeÌÚy. ДÎя ÓÚÓ·paÊeÌËя ‰aÚ˚ Ë ‚peÏeÌË ÁaÔËcË ‚Ó ‚peÏя ‚ÓcÔpÓËÁ‚e‰eÌËя ÌaÊÏËÚe DATE CODE.
ФУОУКeМЛя OcМУ‚М˚e - ЗaФЛc¸ Basics – Recording
29
Recording a picture
Shooting backlit subjects
(BACK LIGHT)
З‡ÔËÒ¸ ËÁÓ· ‡ÊÂÌËя
C˙eÏÍa Ó·˙eÍÚÓ‚ c Áa‰ÌeÈ
ÔÓ‰c‚eÚÍÓÈ (BACK LIGHT)
When you shoot a subject with the light source behind the subject or a subject with a light background, use the backlight function.
In the standby, recording or memory mode, press BACK LIGHT.
The . indicator appears in the viewfinder or on the LCD screen.
To cancel, press BACK LIGHT again.
EcОЛ B˚ ‚˚ФУОМяeЪe c˙eПНy У·˙eНЪa c ЛcЪУ˜МЛНУП c‚eЪa ФУБa‰Л Мe„У ЛОЛ Кe У·˙eНЪa cУ c‚eЪО˚П ЩУМУП, ЛcФУО¸БyИЪe ЩyМНˆЛ˛ Бa‰МeИ ФУ‰c‚eЪНЛ.
B peКЛПe УКЛ‰aМЛя, БaФЛcЛ ЛОЛ ФaПяЪЛ МaКПЛЪe НМУФНy BACK LIGHT.
Ha ˝ÍpaÌe ЖКД ËÎË ‚ ‚ˉÓËcÍaÚeÎe ÔÓя‚ËÚcя Ë̉ËÍaÚÓp ..
ДОя УЪПeМ˚ МaКПЛЪe НМУФНy BACK LIGHT e˘e paБ.
If you press EXPOSURE when shooting backlit subjects
The backlight function will be cancelled.
BACK LIGHT
EcОЛ МaКaЪ¸ НМУФНy EXPOSURE ФpЛ ‚˚ФУОМeМЛЛ c˙eПНЛ У·˙eНЪУ‚ c Бa‰МeИ ФУ‰c‚eЪНУИ
ФyÌ͈Ëя Áa‰ÌeÈ ÔÓ‰c‚eÚÍË ·y‰eÚ ÓÚÏeÌeÌa.
30
 Loading...