


3-860-163-13 (1)
Mini Hi-Fi
Component
System
Operating Instructions |
|
|
EN |
|
|
|
|
Manual de Instrucciones |
|
ES |
|
fT 
DHC-EX77MD MHC-EX66 DHC-EX770MD MHC-EX660 DHC-MD77
©1997 by Sony Corporation
WARNING
To prevent fire or shock hazard, do not expose the unit to rain or moisture.
To avoid electrical shock, do not open the cabinet. Refer servicing to qualified personnel only.
Do not install the appliance in a confined space, such as a bookcase or built-in cabinet.
Laser component in this product is capable of emitting radiation exceeding the limit for Class 1.
This appliance is classified as a CLASS 1 LASER product. The CLASS 1 LASER PRODUCT MARKING is located on the rear exterior.
This caution label is located inside the unit.
This system is equipped with Dolby Noise Reduction* system (MHC-EX66/EX660 only).
*Dolby noise reduction manufactured under license from Dolby Laboratories Licensing Corporation.
“DOLBY” and the double-D symbol aare trademarks of Dolby Laboratories Licensing Corporation.
US and foreign patents licensed from Dolby Laboratories Licensing Corporation.
Table of Contents |
|
Getting Started |
|
Step 1: Hooking up the system |
|
For DHC-MD77/EX77MD/ |
|
EX770MD .......................................... |
4 |
For MHC-EX66/EX660 ................... |
7 |
Step 2: Setting the time ......................... |
9 |
Step 3: Presetting radio stations ........ |
10 |
Connecting the optional TC-TX77/ |
|
TX770 tape deck* ........................... |
12 |
Connecting optional AV |
|
components .................................... |
13 |
Connecting optional outdoor |
|
antennas .......................................... |
16 |
Basic Operations |
|
Playing a CD ......................................... |
17 |
Recording a CD on an MD* ................ |
18 |
Recording a CD on a tape** ................ |
20 |
Playing an MD* .................................... |
21 |
Playing a tape** .................................... |
22 |
Listening to the radio ........................... |
24 |
Recording from the radio .................... |
26 |
The CD Player |
|
Using the CD display ........................... |
28 |
Playing the CD tracks repeatedly ...... |
28 |
Playing the CD tracks in random |
|
order ................................................ |
29 |
Programming the CD tracks ............... |
29 |
Looping part of a CD ........................... |
31 |
The MD Deck* |
|
– Playback |
|
Using the MD display .......................... |
32 |
Playing the MD tracks repeatedly ..... |
33 |
Playing the MD tracks in random |
|
order ................................................ |
33 |
Programming the MD tracks .............. |
34 |
2EN

– Recording |
|
Before you start recording .................. |
35 |
Recording on an MD manually .......... |
36 |
Adjusting the recording level ............. |
37 |
Recording the favorite CD tracks |
|
on an MD ........................................ |
38 |
Recording only the first track on |
|
each CD ........................................... |
40 |
Starting recording with 2 seconds of |
|
prestored audio data ..................... |
41 |
Making a space between tracks |
|
3 seconds long ................................ |
42 |
Marking track numbers ....................... |
43 |
Monitoring the input signal ................ |
44 |
– Editing |
|
Before you start editing ....................... |
44 |
Erasing recordings ............................... |
45 |
Moving recorded tracks ...................... |
47 |
Dividing recorded tracks .................... |
48 |
Combining recorded tracks ................ |
49 |
Labeling an MD .................................... |
50 |
Undoing the last edit ........................... |
51 |
The Tape Deck** |
|
Recording on a tape manually .......... |
52 |
Recording the favorite CD tracks |
|
on a tape .......................................... |
54 |
Other Features
Adjusting the sound ............................ |
55 |
Singing along: Karaoke ...................... |
56 |
Labeling the preset stations ................ |
58 |
Using the Radio Data System (RDS) |
|
(European model only) ................. |
60 |
Falling asleep to music ........................ |
63 |
Waking up to music ............................. |
63 |
Timer-recording radio programs ....... |
65 |
Additional Information
Precautions ............................................ |
66 |
|
|
System limitations of MDs .................. |
68 |
|
|
Troubleshooting ................................... |
70 |
|
|
Specifications ........................................ |
73 |
|
|
Index |
76 |
|
|
EN |
|||
|
|
* DHC-MD77/EX77MD/EX770MD only. **MHC-EX66/EX660 or the optional TC-TX77/
TX770 users only.
Checking your model number
Before you read this manual, check your model number by looking at the front of the amplifier. Any differences in operation are clearly indicated in the text, for example, “DHC-MD77 only.”
Each model number consists of the following components:
|
DHC-MD77/EX77MD |
DHC-EX770MD |
MHC-EX66 |
MHC-EX660 |
|
CD Player |
CDP-EX77 |
CDP-EX770 |
CDP-EX77 |
CDP-EX770 |
|
|
|
|
|
|
|
Tuner |
ST-EX77 |
ST-EX770 |
ST-EX77 |
ST-EX770 |
|
|
|
|
|
|
|
MD Deck |
MDS-EX77 |
MDS-EX770 |
— |
— |
|
Tape Deck |
— |
— |
TC-EX66 |
TC-EX660 |
|
Integrated Stereo Amplifier |
TA-EX77 |
TA-EX770 |
TA-EX66 |
TA-EX660 |
|
Speaker System |
SS-MD77/EX77 |
SS-EX880 |
SS-MD77/EX77 |
SS-EX880 |
|
Optional Tape Deck |
TC-TX77 |
TC-TX770 |
— |
— |
|
|
|
|
|
|
3EN |
|
|
|
|
|
|
Getting Started
Step 1: Hooking up the system
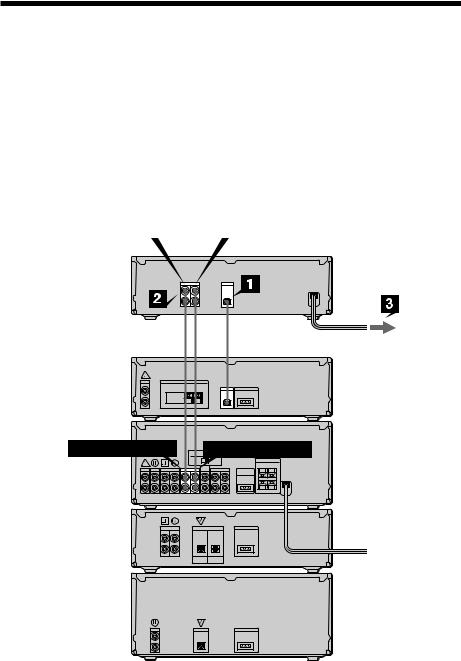
For DHC-MD77/EX77MD/EX770MD
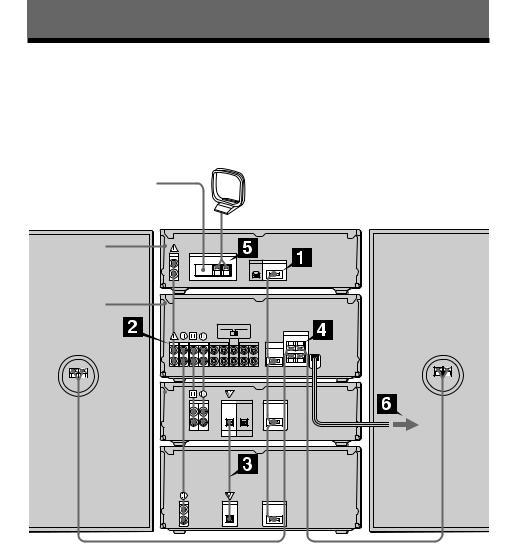
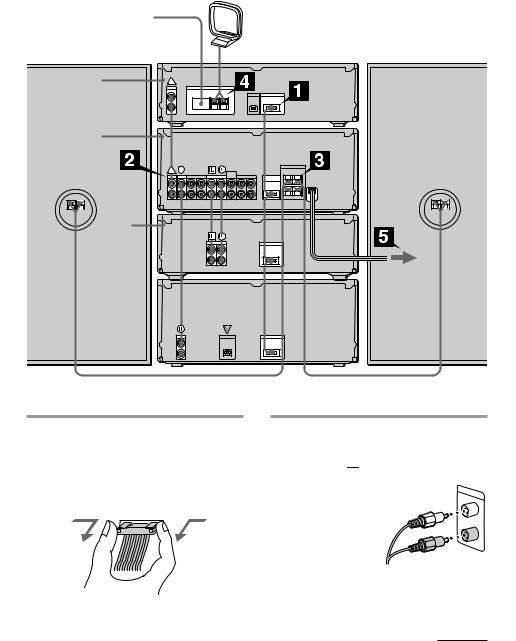
Perform the following procedure 1 to 6 to hook up your system using the supplied cords and accessories. To complete the setup, do steps 2 and 3 also.
AM loop antenna
FM lead antenna
DHC-MD77/EX77MD/
Right speaker |
EX770MD rear panel |
Left speaker |
Tuner
Amplifier
MD deck 
CD player 
4EN
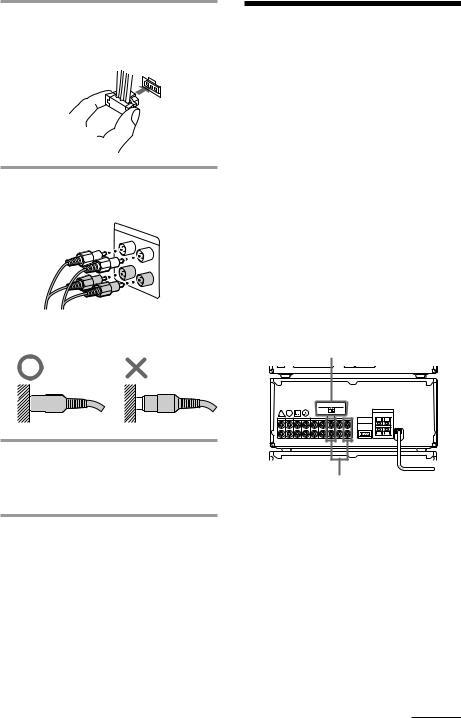
1Connect the flat cord to the SYSTEM CONTROL connectors on each component with the same color until it clicks.
To disconnect
2Connect the audio cords to the jacks with the same Roman numerals
(  ,
,  ,
, 


 ,
,  ).
).
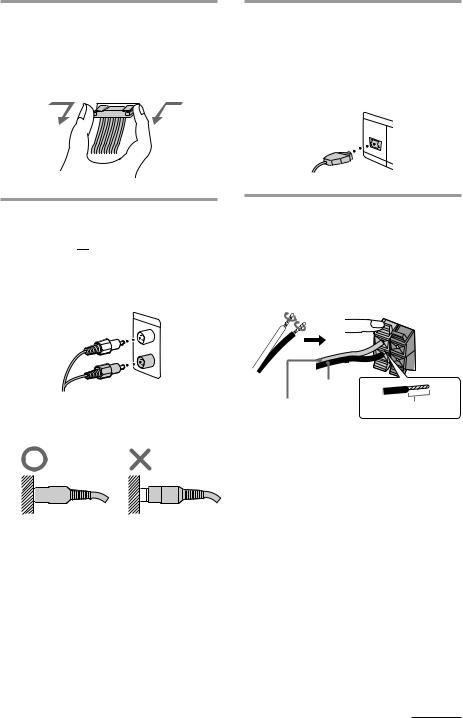
Connect the amplifier to the tuner, CD player and MD deck, using the audio cords (you have four). Match the color of the plugs and the jacks.
Insert the plugs firmly, pushing them in all the way.
3Connect the CD player and the MD deck, using the optical cable.
Note
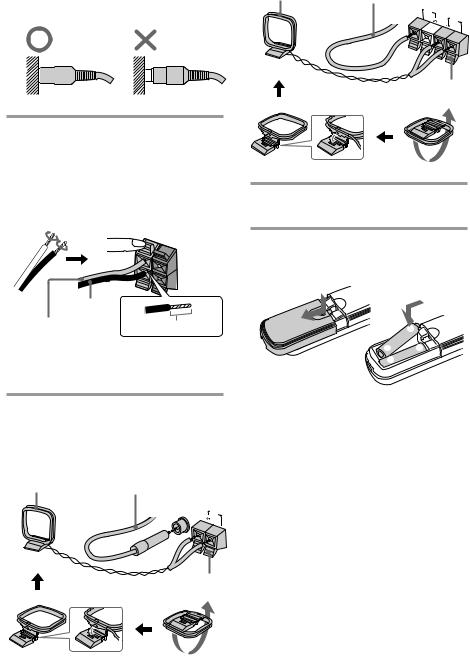
Take the caps off the OPTICAL connectors before connecting the optical cable. Keep them for future use.
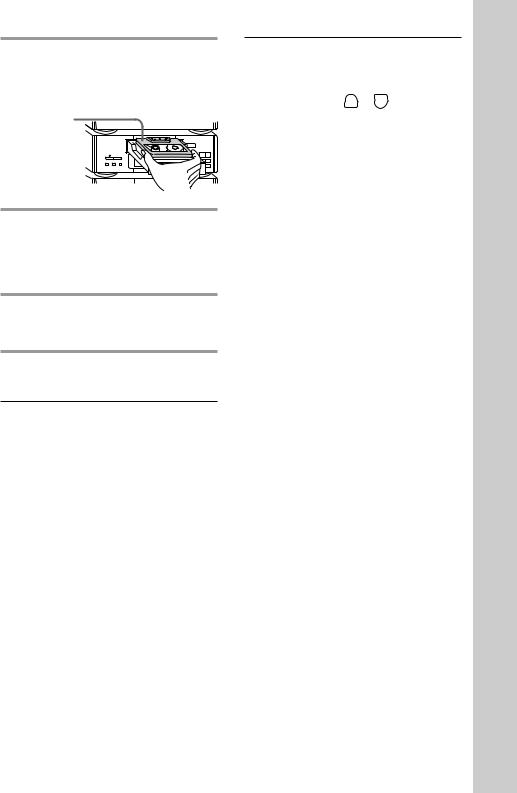
4Connect the speakers.
Connect the speaker cords to the SPEAKER jacks of the same color. Keep the speaker cords away from the antennas to prevent noise.
Pull the lever toward you after connecting the speaker cords.
|
R |
L |
|
|
|
|
|
+ |
|
|
– |
Black* (’) |
|
|
Red* (‘) |
Insert this portion. |
|
*The color of your speaker cords might be different. See the manual provided with your speaker system for details.
continued
5EN
Step 1: Hooking up the system (continued)
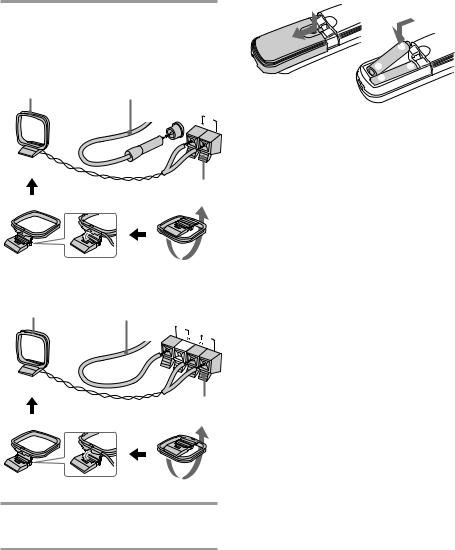
5Connect the FM/AM antennas.
Set up the AM loop antenna, then connect it.
For DHC-EX77MD/EX770MD
AM loop antenna |
Extend the FM lead |
antenna horizontally. |
|
|
FM |
|
75Ω |
|
AM |
|
COAXIAL |
Pull the lever toward you after connecting the antenna.
Inserting two R6 (size AA) batteries into the remote
]
} } 

 ]
]
Tip
With normal use, the batteries should last for about six months. When the remote no longer operates the system, replace both batteries with new ones.
Note
If you do not use the remote for a long period of time, remove the batteries to avoid possible damage from battery leakage.
For DHC-MD77
AM loop antenna |
Extend the FM lead |
|
antenna horizontally. |
||
|
FM 75Ω
AM
Pull the lever toward you after connecting the antenna.
6Connect the power cord to a wall outlet.
6EN
For MHC-EX66/EX660
Perform the following procedure 1to 5 to hook up your system using the supplied cords and accessories. To complete the setup, do steps 2 and 3 also.
AM loop antenna
FM lead antenna
|
MHC-EX66/EX660 |
|
Right speaker |
rear panel |
Left speaker |
Tuner
Amplifier
Tape deck
CD player 
1Connect the flat cord to the SYSTEM CONTROL connectors on each component with the same color until it clicks.
To disconnect
2Connect the audio cords to the jacks with the same Roman numerals
(  ,
,  ,
, 


 ,
,  ).
).
Connect the amplifier to the tuner, CD player and tape deck,
using the audio cords
(you have four). Match the color of
the plugs and the jacks.
continued
7EN
Step 1: Hooking up the system (continued)
Insert the plugs firmly, pushing them in all the way.
For other models
AM loop antenna |
Extend the FM lead |
|
antenna horizontally. |
|
|
|
|
|
|
FM |
|
|
75Ω |
AM |
Pull the lever toward you after connecting the antenna.
3Connect the speakers.
Connect the speaker cords to the SPEAKER jacks of the same color. Keep the speaker cords away from the antennas to prevent noise.
Pull the lever toward you after connecting the speaker cords.
R |
L |
|
|
|
+ |
|
– |
Black* (’) |
|
Red* (‘) |
Insert this portion. |
|
*The color of your speaker cords might be different. See the manual provided with your speaker system for details.
4Connect the FM/AM antennas.
Set up the AM loop antenna, then connect it.
For European model
AM loop antenna |
Extend the FM lead |
antenna horizontally. |
|
|
FM |
|
75Ω |
|
AM |
|
COAXIAL |
Pull the lever toward you after connecting the antenna.
5Connect the power cord to a wall outlet.
Inserting two R6 (size AA) batteries into the remote
]
} } 

 ]
]
Tip
With normal use, the batteries should last for about six months. When the remote no longer operates the system, replace both batteries with new ones.
Note
If you do not use the remote for a long period of time, remove the batteries to avoid possible damage from battery leakage.
8EN
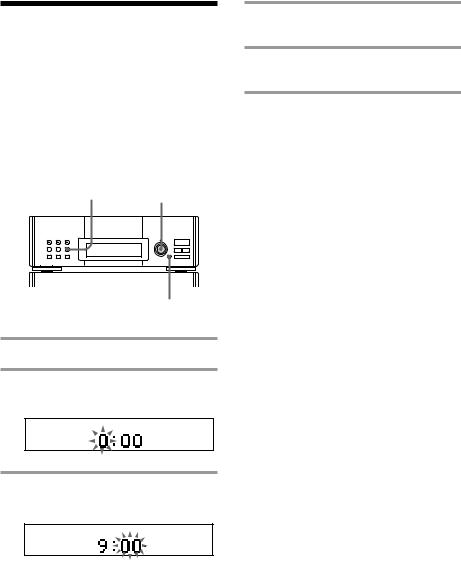
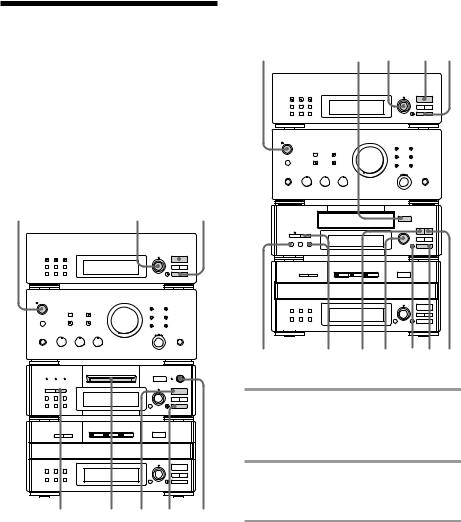
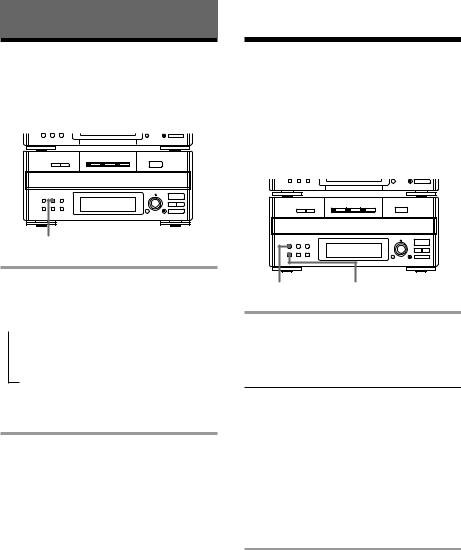
Step 2: Setting the time
You must set the time beforehand to use the timer function.
The clock is on a 24-hour system for the European model, and a 12-hour system for other models.
The European model is used for illustration purpose.
1 2,4
3,5
1 Press CLOCK SET.
2 Turn MULTI CONTROLLER and
set the hour.
4 Turn MULTI CONTROLLER and
set the minute.
5 Press ENTER/NEXT.
The clock starts working.
To change the preset time
Start over from step 1.
Tips
•The built-in clock shows the time in the display while the power is off.
•The upper dot flashes for the first half of a minute (0 to 29 seconds), and the lower dot flashes for the last half of a minute (30 to 59 seconds).
3 Press ENTER/NEXT.
The minute indication flashes.
9EN
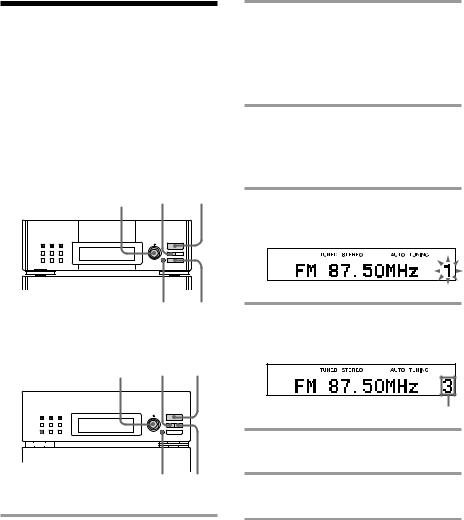
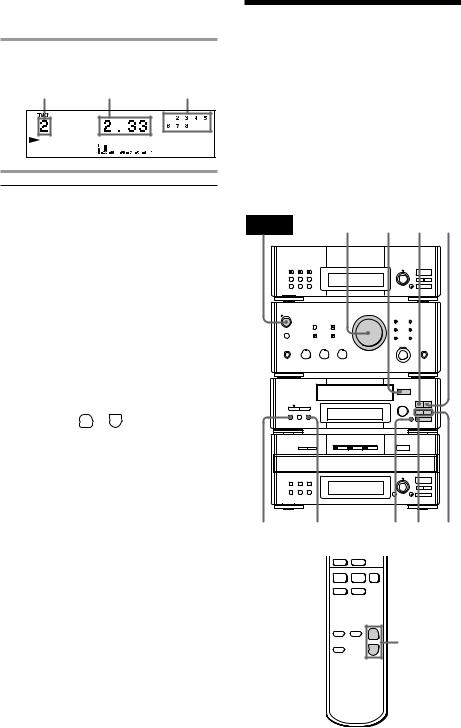
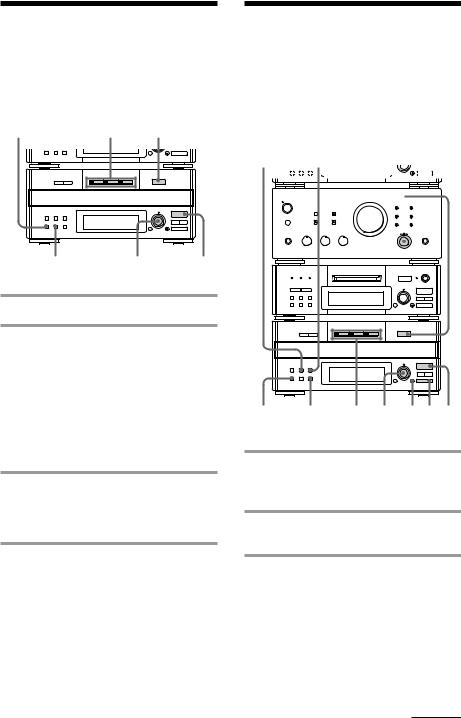
Step 3: Presetting radio stations
The bands you can receive vary depending on the model you purchased.
The European model lets you preset up to 40 stations, 20 for FM, 10 for MW and 10 for LW. The other models let you preset up to 30 stations, 20 for FM and 10 for AM.
For European model
3,5 4 1
6 2
For other models
3,5 MANUAL 1
|
|
|
|
|
|
|
|
|
|
|
2 |
|
|
|
|
|
|
|
|
|
|
|
|
|
|
|
|
|
|
|
|
|
|
|
|
|
|
|
|
|
|
|
|
|
|
|
|
|
|
|
|
|
|
|
|
|
|
|
|
4 |
6 |
|
|
||||||||
1 Press TUNER/BAND repeatedly until the band you want appears in the display.
Each time you press the button, the band changes as follows:
European model:
FM nMW nLW
Other models:
FM nAM
2 For European model:
Press TUNING MODE repeatedly until “AUTO TUNING” appears.
For other models:
Press AUTO.
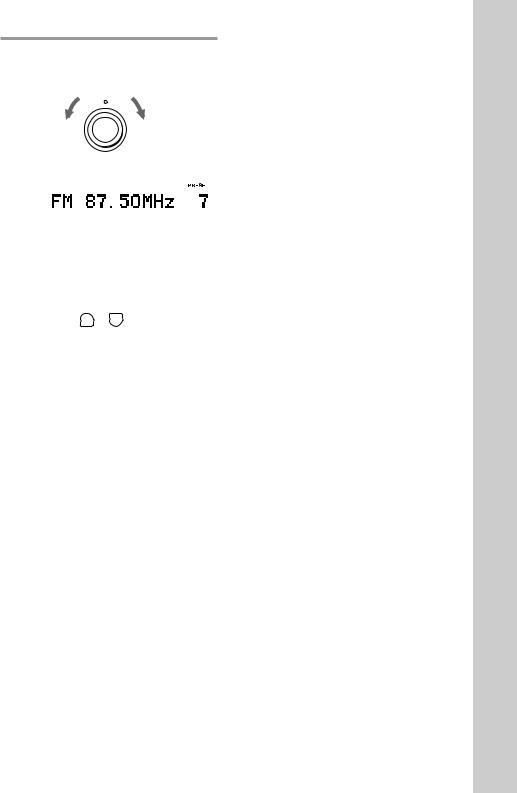
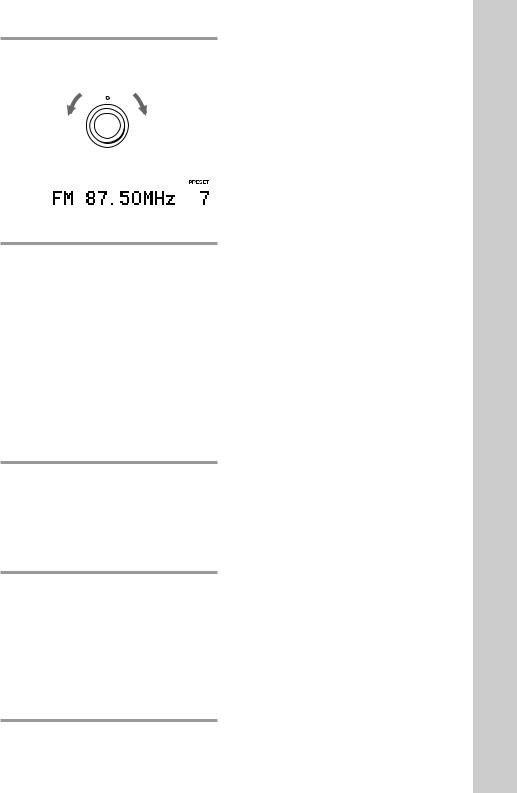
3 Turn MULTI CONTROLLER.
The frequency indication changes and scanning stops when the system tunes in a station. “TUNED” and “STEREO” (for a stereo program) appear.
4 Press MEMORY.
A preset station number flashes for eight seconds.
5 Turn MULTI CONTROLLER and select the preset number you want while it is flashing.
Preset number
6 Press ENTER/NEXT.
The station is stored.
7 Repeat steps 1 to 6 to store other stations.
10EN
To tune in a station with a weak signal
For European model
Press TUNING MODE repeatedly until “TUNING” appears in step 2, then turn MULTI CONTROLLER to tune in the desired station.
For other models
Press MANUAL in step 2, then turn MULTI CONTROLLER to tune in the desired station.
To change the preset number
Start over from step 1.
To change the AM tuning interval (except for European model)
The AM tuning interval is factory-preset to 9 kHz. To change the AM tuning interval, tune in any AM station first, then turn off the power. While holding down the ENTER/
NEXT button, turn the power back on. When you change the interval, all the preset stations will be erased. To reset the interval, repeat the same procedure.
Tip
The preset stations are retained for a week even if you pull off the power cord or if a power interruption occurs.
11EN
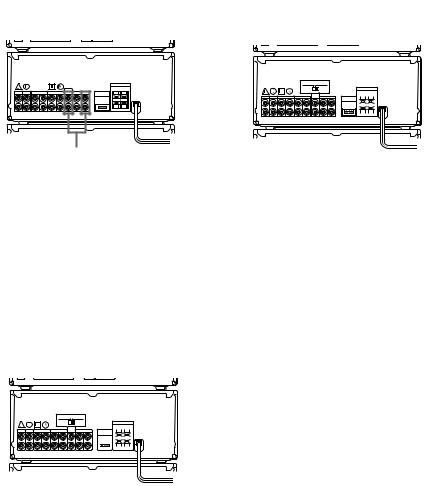
Connecting the optional TC-TX77/TX770 tape deck
(DHC-MD77/EX77MD/EX770MD only)
You can use the optional TC-TX77/TX770 tape deck, which is designed for use with the DHCMD77/EX77MD/EX770MD.
Perform the following procedure 1 to 3 to connect the TC-TX77/TX770 to your system using the cords supplied on the TC-TX77/TX770.
Note
The TAPE IN/OUT and VIDEO IN/OUT jacks on the DHC-MD77/EX77MD/EX770MD are equipped with a cap to prevent incorrect connections. Remove the cap before making connections, and keep it for future use. You can divide the cap into two parts. If you do not use the VIDEO jacks, leave them capped.
To TAPE IN |
|
To TAPE OUT |
TC-TX77/ |
|
TX770 |
|
rear panel |
|
ç |
ç |
DHC-MD77/ |
|
EX77MD/ |
|
EX770MD |
|
rear panel |
|
To TAPE OUT |
To TAPE IN |
ç: Signal flow
12EN
1Connect the audio bus cable to the AU BUS connectors on each component until it clicks.
2Connect the audio cords.
Use the two audio cords, matching the color of the plugs and the jacks.
Insert the plugs firmly, pushing them in all the way.
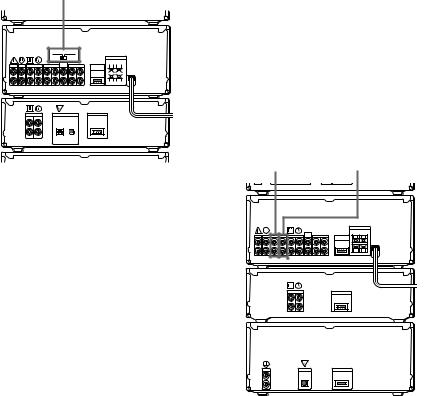
Connecting optional AV components
To enhance your system, you can connect optional components using audio cords (sold separately). Refer to the instructions of each component. Before making connections, take the cap off the jacks to be used, and keep it for future use.
Connecting a TV/VCR
Make sure to match the color of the plugs and the jacks.
For DHC-MD77/EX77MD/EX770MD
Connect a TV/VCR to VIDEO1, VIDEO2 (DHC-MD77) or VIDEO2/AUX (DHCEX77MD/EX770MD) on the amplifier.
Set MODE SELECTOR to ANALOG REC when you connect a TV/VCR to VIDEO2 (DHC-MD77) or VIDEO2/AUX (DHCEX77MD/EX770MD).
MODE SELECTOR |
3Connect the power cord to a wall
outlet after you have made all the  connections of your system and tape To the audio output of a TV/VCR deck.
continued
13EN
Connecting optional AV components (continued)
For MHC-EX66/EX660
Connect a TV/VCR to VIDEO1 or VIDEO2/ AUX on the amplifier.
To the audio output of a TV/VCR
To listen to the sound of TV/VCR
Turn FUNCTION until the VIDEO 1, VIDEO 2 (DHC-MD77) or VIDEO 2/AUX (other models) indicator lights up.
Connecting audio components
Connecting a tape deck
Connect a tape deck to TAPE on the amplifier.
Make sure to match the color of the plugs and the jacks.
|
|
|
|
|
|
|
|
|
|
|
|
|
|
|
|
|
|
|
|
|
|
|
|
|
|
|
|
|
|
|
|
|
|
|
|
|
|
|
|
|
|
|
|
|
|
|
|
|
|
|
|
|
|
|
|
|
|
|
|
|
|
|
|
|
|
|
|
|
|
To the audio |
|
To the audio |
|||||||||||
input of a |
|
output of a |
|||||||||||
tape deck |
|
tape deck |
|||||||||||
To listen to the sound of a tape deck
Turn FUNCTION until the TAPE indicator lights up.
Connecting other analog components
Connect an analog component to VIDEO1 on the amplifier.
Make sure to match the color of the plugs and the jacks.
|
|
|
|
|
|
|
|
|
|
|
|
|
|
|
|
|
|
|
|
|
|
|
|
|
|
|
|
|
|
|
|
|
|
|
|
|
|
|
|
|
|
|
|
|
|
|
|
|
|
|
|
|
|
|
|
|
|
|
|
To the audio |
To the audio |
||||||||
input of an |
output of an |
||||||||
analog component |
analog component |
||||||||
To listen to the sound of the connected component
Turn FUNCTION until the VIDEO 1 indicator lights up.
Connecting digital components
For DHC-MD77/EX77MD/EX770MD
You can make a digital recording onto the system’s own MD deck from the connected digital component (e.g., a DAT deck, BS tuner or another MD deck).
•Connect a digital component to VIDEO 2 DIGITAL IN on the MD deck using an optical cable.
•Connect a digital component to VIDEO2 (DHC-MD77) or VIDEO2/AUX (DHCEX77MD/EX770MD) on the amplifier using audio cords.
•Set MODE SELECTOR to DIGITAL REC.
14EN
MODE SELECTOR
|
|
|
|
|
|
|
|
|
|
|
|
|
|
|
|
|
|
|
|
|
|
|
|
|
|
|
|
|
|
|
|
|
|
|
|
|
|
|
|
|
|
|
|
|
|
|
|
|
|
|
|
|
|
|
|
|
|
|
|
|
|
|
|
|
|
|
|
|
|
|
|
|
|
|
|
|
|
|
|
|
|
|
|
|
|
|
|
|
|
|
|
|
|
|
|
|
|
|
|
|
|
|
|
|
|
|
|
|
|
To the analog (line) |
|
To the digital |
||||||||
output of a digital |
|
output of a digital |
||||||||
component |
|
component |
||||||||
To listen to the sound of the connected component
Turn FUNCTION until the VIDEO 2 (DHCMD77) or VIDEO 2/AUX (DHC-EX77MD/ EX770MD) indicator lights up.
Tip
A built-in sampling rate converter automatically converts the sampling frequency of various digital sources to the 44.1 kHz sampling rate of the MD deck. This lets you record sources such as 32and 48-kHz DAT or satellite broadcasts, as well as CDs and other MDs.
Notes
•If “Din Unlock” or “Cannot Copy” appears in the display, you cannot make a digital recording. In this case, record the sound source with MODE SELECTOR set to ANALOG REC.
•When you make a digital recording using an optical cable, you cannot adjust the recording level.
•When audio cords are not connected to VIDEO2 (DHC-MD77) or VIDEO2/AUX (DHC-EX77MD/ EX770MD) on the amplifier, you cannot listen to the digital component.
For MHC-EX66/EX660
You can make a digital recording onto the connected MD deck from the system’s own CD player. You can also make an analog recording if you connect the MD deck using audio cords.
•Connect an MD deck to DIGITAL OUT on the CD player using an optical cable.
•Connect an MD deck to MD on the amplifier using audio cords.
To the analog |
To the analog |
(line) input of |
(line) output of |
an MD deck |
an MD deck |
To the digital input of an MD deck
To listen to the sound of the MD deck
Turn FUNCTION until the MD indicator lights up.
15EN
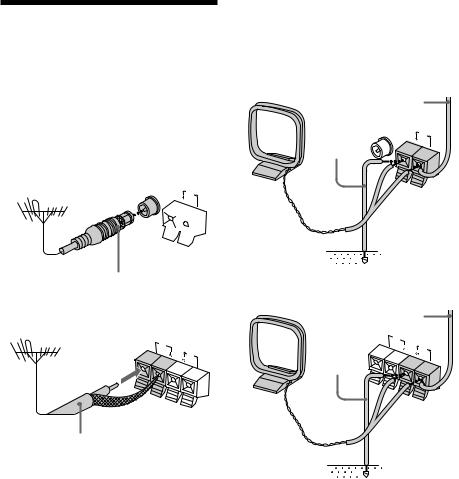
Connecting optional outdoor antennas
Connect the outdoor antenna to improve the reception.
FM antenna
Connect the optional FM outdoor antenna. You can also use the TV antenna instead.
For European model
FM 75Ω
AM
COAXIAL 
IEC standard socket connector (not supplied)
For other models
FM |
|
75Ω |
AM |
75-ohm coaxial cable (not supplied)
AM antenna
Connect a 6- to 15meter insulated wire to the AM antenna terminal. Leave the supplied AM loop antenna connected.
For European model
|
Insulated wire |
|
|
(not supplied) |
|
|
FM |
|
Ground |
75Ω |
AM |
|
||
wire (not |
|
|
supplied) |
|
|
|
COAXIAL |
|
For other models
|
Insulated wire |
||
|
(not supplied) |
||
Ground |
FM |
AM |
|
75Ω |
|||
|
|
||
wire (not supplied)
Important
If you connect an outdoor antenna, ground it against lightning. To prevent a gas explosion, do not connect the ground wire to a gas pipe.
16EN
Basic Operations
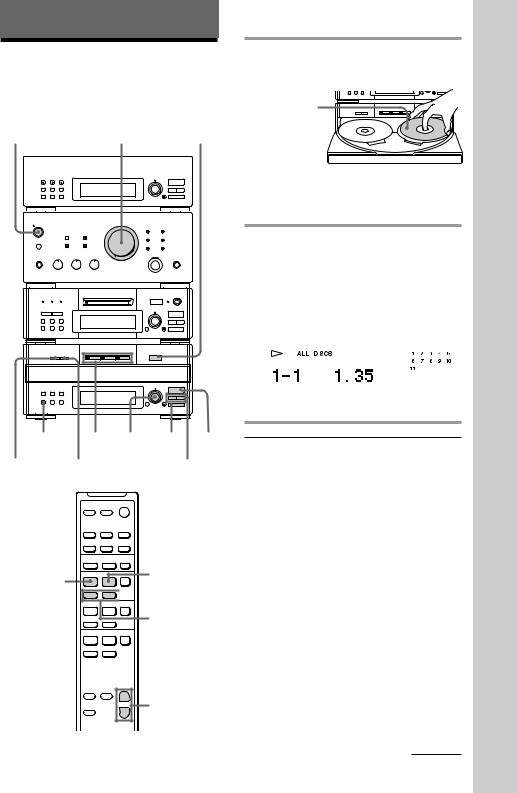
Playing a CD
You can play up to three CDs in a row.
POWER |
|
|
|
|
|
VOLUME |
1 |
||||||||
|
|
|
|
|
|
|
|
|
|
|
|
|
|
|
|
|
|
|
|
|
|
|
|
|
|
|
|
|
|
|
|
|
|
|
|
|
|
|
|
|
|
|
|
|
|
|
|
|
|
|
|
|
|
|
|
|
|
|
|
|
|
|
|
|
|
|
|
|
|
|
|
|
|
|
|
|
|
|
|
|
|
|
|
|
|
|
|
|
|
|
|
|
|
|
|
|
|
|
|
|
|
|
|
|
|
|
|
|
|
|
|
|
|
|
|
|
|
|
|
|
|
|
|
|
|
|
|
|
|
|
|
|
|
|
|
|
|
|
|
|
|
|
|
|
|
|
• |
• • |
|
|
§ |
• |
• |
|
|
• |
• |
|
|
|
EJECT |
• |
• |
|
|
= SELECTOR + |
|
|
|
r REC |
|
· |
|
|
|
|
||
|
|
|
0 |
) |
|
|
|
p |
|
|
|
§ |
|
|
|
|
OPEN/CLOSE |
|
|
|
|
=SELECTOR + |
|
|
|
|
|
· |
|
|
|
|
0 |
) |
|
|
|
p |
|
CONTINUE |
2 SELECTOR |
p |
· |
|
EX-CHANGE |
DISC SKIP |
0/) |
||
–+
· · P p P
=+ 
 D.SKIP
·P p
= + |
=/+ |
|
ª · p
0)
+
VOL (+/–)
–
1 Press §OPEN/CLOSE and place a CD on the disc tray.
·
With the label side up. When you play a single
CD, place it on the inner circle
p
of the tray.
To place the third disc, press DISC SKIP (or D.SKIP on the remote) to rotate the disc tray.
2 Press one of the DISC 1 – 3 buttons.
The disc tray closes and play starts.
If you press · (or · on the remote) when the disc tray is closed, play starts from the CD loaded on the tray whose button is lit green.
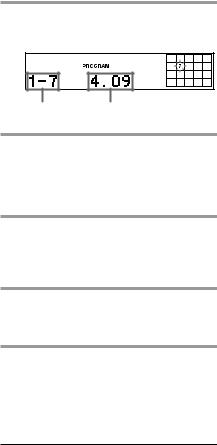
Track number |
|
|
Music calendar |
||||||||||||||
|
|
|
|
|
|
|
|
|
|
|
|
|
|
|
|
|
|
|
|
|
|
|
|
|
|
|
|
|
|
|
|
|
|
|
|
|
|
|
|
|
|
|
|
|
|
|
|
|
|
|
|
|
|
|
|
|
|
|
|
|
|
|
|
|
|
|
|
|
|
|
|
|
|
|
|
|
|
|
|
|
|
|
|
|
|
|
|
|
|
|
|
|
|
|
|
|
|
|
|
|
|
|
|
|
|
|
|
Disc tray number Playing time
To |
Do this |
Stop play |
Press p. |
Pause |
Press · (or Pon the |
|
remote). Press again to resume |
|
play. |
|
|
Select a track |
Turn SELECTOR clockwise (to |
|
go forward) or counter- |
|
clockwise (to go back) and |
|
release it when you locate the |
|
desired track (or press +or |
|
=on the remote). Turn and |
|
hold SELECTOR to locate other |
|
discs. |
|
|
Find a point in |
Press ) or 0during play |
a track |
and release it at the desired |
|
point. |
|
|
continued
Operations Basic
17EN

Playing a CD (continued)
To |
Do this |
|
|
||||
Select a CD |
Press DISC 1 – 3 button or DISC |
||||||
|
SKIP (or D.SKIP on the remote). |
||||||
|
|
|
|
|
|
|
|
Play only the |
Press CONTINUE repeatedly |
||||||
CD you have |
until “1 DISC” appears. |
||||||
selected |
|
|
|
|
|
|
|
|
|
|
|
|
|
|
|
Play all CDs |
Press CONTINUE repeatedly |
||||||
|
until “ALL DISCS” appears. |
||||||
|
|
|
|
|
|
|
|
Remove or |
Press § OPEN/CLOSE. |
||||||
exchange the |
|
|
|
|
|
|
|
CD |
|
|
|
|
|
|
|
|
|
|
|
|
|
|
|
Exchange the |
Press EX-CHANGE. Press again |
||||||
CD during |
to close the disc tray. |
||||||
play |
|
|
|
|
|
|
|
|
|
|
|
|
|
|
|
Adjust the |
Turn VOLUME (or press VOL |
||||||
volume |
|
|
|
|
or |
|
on the remote). |
|
|
|
|
|
|
|
|
Tips
•Pressing · when the power is off automatically turns the power on and starts CD playback if there is a CD on the tray (One Touch Play).
•You can switch from another source to the CD
player and start playing a CD just by pressing · or the DISC 1 – 3 buttons* (Automatic Source Selection).
*Pressing the DISC 1 – 3 buttons works as the Automatic Source Selection feature while normal play or “1 DISC SHUFFLE” is appearing in the display.
•If there is no CD in the player, “NO DISC” appears.
•When the disc tray is selected or the CD loaded on the tray is playing, the DISC 1 – 3 button for the tray is lit green.
Recording a CD on an MD
EX770MD only)
— CD Synchro Recording
You can make a digital recording of a CD on an MD, marking track numbers in the same sequence as the original CD. In addition, you can record a program of favorite tracks (see page 38), record only the first track on each CD (Hit Parade, see page 40), and edit an MD after recording (see pages 45 to 51).
POWER |
1 |
5 6 |
|
• |
• • |
§ |
• |
• |
• |
• |
|
EJECT |
• |
• |
=SELECTOR + |
· |
|
r REC |
||
|
0 |
) |
|
p |
|
§ |
|
|
OPEN/CLOSE |
|
|
= SELECTOR + |
|
|
|
· |
|
|
0 |
) |
|
p |
|
4 |
3 |
4 |
2 |
p |
|
|
– |
+ |
|
|
· |
P |
p |
|
= + |
D.SKIP |
|
|
· |
P |
p P |
18EN |
= + |
|
|
ª |
· |
p |
|
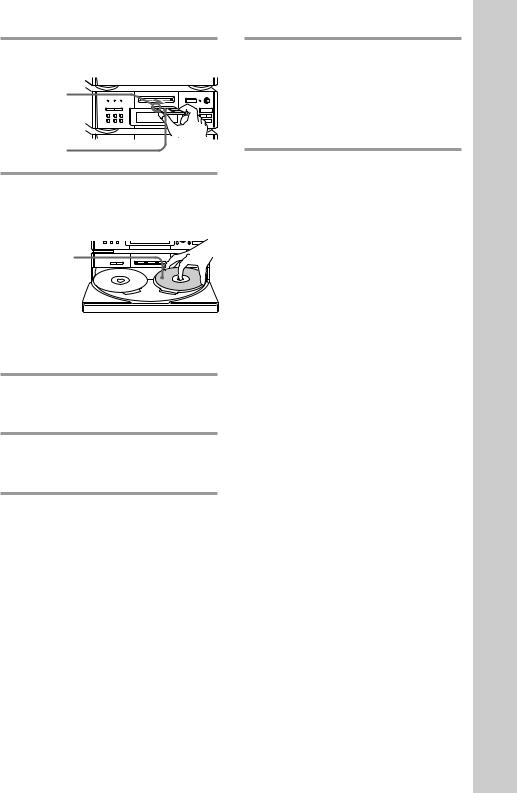
1 Insert a recordable MD.
With the arrow pointing
toward the deck |
§ |
• |
• |
• |
|
||
|
|
· |
|
With the label |
|
0 ) |
|
|
p |
|
|
side up, sliding |
|
|
|
the tab |
|
|
|
rightward |
|
|
|
2 Press §OPEN/CLOSE and place a CD on the disc tray.
The disc tray opens.
With the label side up. When you play a single CD, place it on the inner circle of the tray.
0 )
p
§
· 
0 )
p
To place the third disc, press DISC SKIP (or D.SKIP on the remote) to rotate the disc tray.
3 Press DISC SKIP (or D.SKIP on the remote) repeatedly until the DISC 1 – 3 button you want lights green.
4 Press CD SYNC, then turn SELECTOR on the MD deck until “NORMAL ?” appears.
5 Press ENTER/YES.
The MD deck stands by for recording and the CD is in pause for playback.
6 Press · on the MD deck (or P on the remote).
Recording starts. The CD player stops and the MD deck pauses automatically when the recording is completed. If there is no remaining recording time on the MD, the MD deck stops.
To stop recording
Press pon the MD deck.
While “TOC” lights up or is flashing
Do not move the deck or pull out the power cord to ensure the complete recording. The deck is currently updating the Table Of Contents (TOC).
Tips
•Inserting an MD when the power is off automatically turns the power on.
•The MD recording is complete only after all the recording information is entered to TOC at which point TOC stops flashing and goes out. Be careful not to disconnect the mains lead or move the deck before this point. Before disconnecting the mains lead, do the following:
–Remove the MD.
–Press SYSTEM POWER, to turn off the system.
Operations Basic
19EN
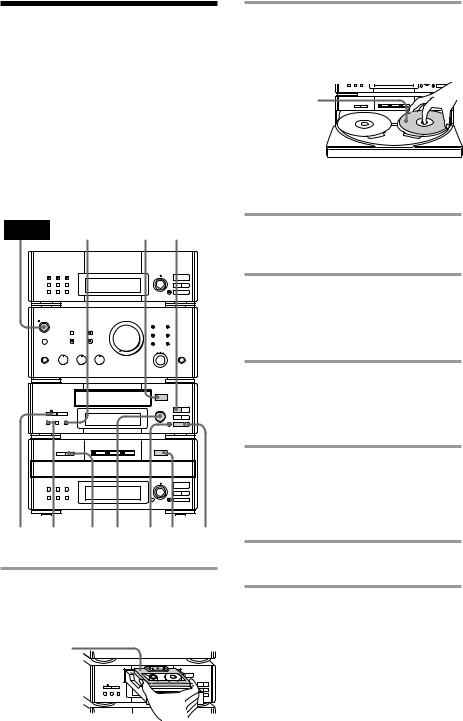
Recording a CD on a tape
optional TC-TX77/TX770 users only)
— CD Synchro Recording
The CD SYNC button lets you record from a CD to a tape easily. You can use TYPE-I (normal), TYPE-II (CrO2) and TYPE-IV (metal) tapes. The deck detects the tape type automatically.
MHC-EX66/EX660 is used for illustration purpose.
POWER 4 1 ª
|
|
§ |
|
|
|
|
|
OPEN/CLOSE |
|
|
|
|
|
• • • |
|
ª · |
|
|
|
• |
• |
|
|
|
|
• |
• |
0 |
) |
|
|
• |
• |
|
|
|
|
|
P |
|
p |
|
|
§ |
|
|
|
|
|
OPEN/CLOSE |
|
|
|
|
|
=SELECTOR + |
|
|
|
|
|
|
|
· |
|
|
|
|
|
0 |
) |
|
|
|
|
|
p |
6 DOLBY NR 3 |
5 |
7 2 |
p |
||
1 Press §OPEN/CLOSE on the tape deck and insert a blank tape.
Press §OPEN/CLOSE again to close the tray.
With the side |
|
|
|
|
you want to |
|
|
|
|
record on |
|
§ |
|
|
facing up |
• |
• |
• |
ª · |
• |
|
|
• |
|
• |
|
|
• |
0 ) |
• |
|
|
• |
|
|
|
|
P |
p |
2 Press §OPEN/CLOSE on the CD player and place a CD on the disc tray.
The disc tray opens.
With the label |
|
side up. When |
|
you play a single |
|
CD, place it on |
|
the inner circle |
p |
of the tray. |
|
To place the third disc, press DISC SKIP (or D.SKIP on the remote) to rotate the disc tray.
3 Press DISC SKIP (or D.SKIP on the remote) repeatedly until the DISC 1 – 3 button you want lights green.
4 Press DIRECTION repeatedly to select the side you want to record on.
Select A to record on one side. Select Åor ato record on both sides.
5 Turn REC LEVEL to adjust the recording level.
The fourth dot is satisfactory for most purposes. For details, see “Recording on a tape manually” on page 52.
6 Press CD SYNC on the tape deck.
The tape deck stands by for recording and the CD is in pause for playback. The CD SYNC indicator lights up and “PLAY ·P {REC}” (for front side) appears.
7 Press Pon the tape deck.
Recording starts.
20EN
To stop recording
Press pon the tape deck or the CD player.
Tips
•Pressing SYSTEM POWER on the DHC-MD77/ EX77MD/EX770MD automatically turns on the TC-TX77/TX770 deck if you connect them to each other using the audio bus cable.
•If you want to record from the reverse side, press ªin step 6 so that “ªPLAY P {REC}” (for reverse side) appears.
•When you record on both sides, be sure to start from the front side. If you start from the reverse
side, recording stops at the end of the reverse side even though you select a.
•When you want to reduce the hiss noise in lowlevel high-frequency signals, press DOLBY NR repeatedly to select B or C before step 5. You cannot switch DOLBY NR during recording.
•If the tape reaches the end of its front side while dual-sided recording, the fadeout feature works so that a track is not abruptly cut off at the end of the tape (Fade Synchro). The track will be recorded again from the beginning on the reverse side. The Fade Synchro feature works during one-side recording, too.
•You cannot perform CD Synchro Recording by pressing the CD SYNC buttons on both the tape deck and the MD deck at the same time.
Use the CD Synchro Recording feature for a tape and record on an MD manually. This method is recommended since on the MD deck, you can erase the overlapping track recorded using the Fade Synchro feature just by specifying its track number (Erase Function).
Note
You cannot listen to other sources while recording.
Playing an MD
(DHC-MD77/EX77MD/EX770MD only)
You can play an MD just like a CD.
POWER VOLUME §EJECT 2
|
• |
• • |
§ |
• |
• |
• |
• |
|
EJECT |
• |
• |
= SELECTOR + |
|
|
r REC |
· |
|
|
0 |
) |
|
p |
|
§ |
|
|
OPEN/CLOSE |
|
|
= SELECTOR + |
|
|
|
· |
|
|
0 |
) |
|
p |
|
· P |
p 1 SELECTOR p 0/) |
|
– + |
|
|
= + |
P |
|
· · P |
||
p |
||
= + |
=/+ |
|
|
||
ª · |
p |
|
0 ) |
|
+ |
VOL (+/–) |
|
– |
||
|
1 Insert an MD.
With the arrow |
|
|
pointing |
• |
• |
§ |
• |
|
toward the |
|
|
deck |
) |
|
With the label |
|
|
side up |
|
|
continued
Operations Basic
21EN
Playing an MD (continued)
2 Press · (or ·on the remote).
Playback starts.
Track number Playing time Music calendar
To |
Do this |
|
|||||
Stop play |
Press p. |
|
|||||
|
|
|
|
|
|
|
|
Pause |
Press · (or P on the |
||||||
|
remote). Press again to resume |
||||||
|
play. |
|
|||||
|
|
|
|
|
|
|
|
Select a track |
Turn SELECTOR clockwise (to |
||||||
|
go forward) or counter- |
||||||
|
clockwise (to go back) and |
||||||
|
release it when you locate the |
||||||
|
desired track (or press +or |
||||||
|
= on the remote). |
||||||
|
|
|
|
|
|
|
|
Find a point |
Press )or 0during play |
||||||
in a track |
and release it at the desired |
||||||
|
point. |
|
|||||
|
|
|
|
|
|
|
|
Remove the |
Press §EJECT. |
||||||
MD |
|
|
|
|
|
|
|
|
|
|
|
|
|
|
|
Adjust the |
Turn VOLUME (or press VOL |
||||||
volume |
|
|
|
|
or |
|
on the remote). |
|
|
|
|
|
|
|
|
Tips
•You can start playing from the desired track. Before pressing · in step 2, turn SELECTOR until the desired track appears.
•Pressing · when the power is off automatically turns the power on and starts MD playback if there is an MD in the deck (One Touch Play).
•You can switch from another source to the MD
deck and start playing an MD just by pressing · (Automatic Source Selection).
•Inserting an MD when the power is off automatically turns the power on.
Playing a tape
(MHC-EX66/EX660 or the optional TC-TX77/TX770 users only)
You can use any type of tape, TYPE-I (normal), TYPE-II (CrO2) and TYPE-IV (metal), since the deck automatically detects the tape type (ATS*).
MHC-EX66/EX660 is used for illustration purpose.
*The Automatic Tape Selection (ATS) feature automatically sets the equalization and bias to match the inserted tape type.
POWER VOLUME 1 ª 3
|
§ |
|
|
|
OPEN/CLOSE |
|
|
||
• |
• • |
|
ª · |
|
• |
|
• |
|
|
• |
|
• |
0 |
) |
• |
|
• |
|
|
|
|
P |
|
p |
|
§ |
|
|
|
OPEN/CLOSE |
|
|
||
=SELECTOR + |
|
|
||
|
|
|
· |
|
|
|
|
0 |
) |
|
|
|
|
p |
DOLBY NR 2 |
P p 0/) |
=+
ª · p
0)
+
VOL (+/–)
–
22EN
1 Press §OPEN/CLOSE on the tape deck and insert a recorded tape.
Press §OPEN/CLOSE again to close the tray.
With the side |
|
|
|
you want to |
|
|
|
play facing up |
§ |
|
|
• |
• |
• |
ª · |
• |
|
• |
|
• |
|
• |
0 ) |
• |
|
• |
|
|
|
P |
p |
2 Press DIRECTION repeatedly to select the side you want to play.
Select A to play one side. Select Åto play both sides once. To play both sides in succession, select a*.
3 Press ·.
Press ªto play the reverse side. Playback starts.
*The deck stops automatically after repeating the sequence five times.
To |
Do this |
Stop play |
Press p. |
|
|
Pause |
Press P. Press again to |
|
resume play. |
|
|
Fast-forward |
Press p, then press ) (for |
|
front side) or 0(for reverse |
|
side). |
|
|
Rewind |
Press p, then press 0 (for |
|
front side) or )(for reverse |
|
side). |
Select a track |
Press ) (to go forward) or |
(AMS*) |
0(to go back) during the |
|
front side playback. |
|
Press 0 (to go forward) or |
|
)(to go back) during the |
|
reverse side playback. |
To |
Do this |
|
|
||||
Remove the |
Press § OPEN/CLOSE. |
||||||
tape |
|
|
|
|
|
|
|
|
|
|
|
|
|
|
|
Adjust the |
Turn VOLUME (or press |
||||||
volume |
VOL |
|
|
|
or |
|
on the remote). |
|
|
|
|
|
|
|
|
*The Automatic Music Sensor (AMS) feature detects a blank space of more than four seconds between tracks and locates the track quickly.
Tips
•Pressing SYSTEM POWER on the DHC-MD77/ EX77MD/EX770MD automatically turns on the TC-TX77/TX770 deck if you connect them to each other using the audio bus cable.
•Pressing ·or ª when the power is off automatically turns the power on and starts tape playback if there is a tape in the deck (One Touch Play).
•You can switch from another source to the tape deck just by pressing ·or ª(Automatic Source Selection).
•To start playing automatically from the beginning
of the tape after fast winding (Auto Play), press · while holding down 0(for front side) or press ª while holding down )(for reverse side).
•When you want to reduce the hiss noise in lowlevel high-frequency signals, press DOLBY NR repeatedly to select B or C.
Notes
The AMS feature may not work properly when:
–The blank space between tracks is less than four seconds long.
–Different material is recorded on the left and right channels (e.g., karaoke tapes with the instrumental music and a singer’s voice, foreign language practice tapes, etc.).
–Very low-level signals or low-frequency signals such as a bass saxophone are continuously recorded on the tape.
–The system is placed too close to a TV. (Move the system away from the TV or turn off the TV.)
Operations Basic
23EN

Listening to the radio
–– Preset Tuning
Preset radio stations in the tuner’s memory first (see page 10).
For European model
POWER |
|
3 1 |
|
|||||||||||
|
|
|
|
|
|
|
|
|
|
|
|
|
|
|
|
|
|
|
|
|
|
|
|
|
|
|
|
|
|
|
|
|
|
|
|
|
|
|
|
|
|
|
|
|
|
|
|
|
|
|
|
|
|
|
|
|
|
|
|
|
|
|
|
|
|
|
|
|
|
|
|
|
|
|
|
|
|
|
|
|
|
|
|
|
|
|
|
|
|
|
• |
• • |
§ |
• |
• |
• |
• |
|
EJECT |
• |
• |
= SELECTOR + |
· |
|
r REC |
||
|
0 |
) |
|
p |
|
§ |
|
|
OPEN/CLOSE |
|
|
=SELECTOR +
·
0 )
p
VOLUME 2 ST/MONO
PRESET (–/+)
–+
BAND
·P p = + 
·P p = +
ª · p
0)
+ |
VOL (+/–) |
|
– |
||
|
For other models
POWER |
3 MANUAL 1 |
||
|
|
• |
• • |
|
§ |
• |
• |
|
• |
• |
|
|
EJECT |
• |
• |
|
= SELECTOR + |
|
|
rREC |
|
· |
|
|
|
0 |
) |
|
|
p |
|
|
§ |
|
|
|
OPEN/CLOSE |
|
|
|
=SELECTOR + |
|
|
|
|
· |
|
|
|
0 |
) |
|
|
p |
|
STEREO/MONO |
VOLUME |
2 AUTO |
|
1 Press TUNER/BAND (or BAND on the remote) repeatedly until the band you want appears.
Each time you press the button, the band changes as follows:
European model:
FM nMW nLW
Other models:
FM nAM
2 For European model:
Press TUNING MODE repeatedly until “PRESET” appears.
For other models:
Press PRESET.
24EN
3 Turn MULTI CONTROLLER to tune in the desired preset station.
Turn counter- – MULTI CONTROLLER + |
Turn clockwise |
|||||||
clockwise |
(or press |
|||||||
(or press |
PRESET + on |
|||||||
PRESET – |
the remote) |
|||||||
on the remote) |
for higher |
|||||||
for lower preset |
preset |
|||||||
numbers. |
numbers. |
|||||||
|
|
|
|
|
|
|
|
|
|
|
|
|
|
|
|
|
|
|
|
|
|
|
|
|
|
|
|
|
|
|
|
|
|
|
|
|
Frequency |
Preset number |
||||||
|
|
|
||||||
|
|
|
||||||
To |
Do this |
|
||||||
Turn off the |
Press SYSTEM POWER. |
|||||||
radio |
|
|
|
|
|
|
|
|
Adjust the |
Turn VOLUME (or press VOL |
|||||||
volume |
|
|
|
|
or |
|
|
on the remote). |
|
|
|
|
|
|
|
|
|
To listen to non-preset radio stations
For European model:
Press TUNING MODE repeatedly until “TUNING” appears in step 2, then turn MULTI CONTROLLER to tune in the desired station (Manual Tuning).
Press TUNING MODE repeatedly until “AUTO TUNING” appears in step 2, then turn MULTI CONTROLLER.
The frequency indication changes and scanning stops when the system tunes in a station (Automatic Tuning).
For other models:
Press MANUAL in step 2, then turn MULTI CONTROLLER to tune in the desired station (Manual Tuning).
Press AUTO in step 2, then turn MULTI CONTROLLER.
The frequency indication changes and scanning stops when the system tunes in a station (Automatic Tuning).
Tips
•Pressing TUNER/BAND when the power is off automatically turns the power on and tunes to the last received station (One Touch Play).
•You can switch from another source to the tuner just by pressing TUNER/BAND (Automatic Source Selection).
•To improve broadcast reception, reorient the supplied antennas.
•When an FM program is noisy, press ST/MONO (European model) or STEREO/MONO (other models) so that “MONO” appears. There will be no stereo effect, but the reception will improve. Press the button again to restore the stereo effect.
Operations Basic
25EN
Recording from the radio
You can record a radio program on an MD (DHC-MD77/EX77MD/EX770MD) or on a tape (MHC-EX66/EX660 or the TC-TX77/ TX770 users) by calling up the preset station. To record after erasing all tracks on an MD, see page 46 (DHC-MD77/EX77MD/ EX770MD only).
DHC-MD77/EX77MD/EX770MD
POWER |
|
4 2 3 |
||||||||||||
|
|
|
|
|
|
|
|
|
|
|
|
|
|
|
|
|
|
|
|
|
|
|
|
|
|
|
|
|
|
|
|
|
|
|
|
|
|
|
|
|
|
|
|
|
|
|
|
|
|
|
|
|
|
|
|
|
|
|
|
|
|
|
|
|
|
|
|
|
|
|
|
|
|
|
|
|
|
|
|
|
|
|
|
|
|
|
|
|
|
|
• |
• • |
§ |
• |
• |
• |
• |
|
EJECT |
• |
• |
=SELECTOR + |
· |
|
r REC |
||
|
0 |
) |
|
p |
|
§ |
|
|
OPEN/CLOSE |
|
|
=SELECTOR + |
|
|
|
· |
|
|
0 |
) |
|
p |
|
5 1 7 p 6
MHC-EX66/EX660 or the TC-TX77/TX770 users
POWER |
|
1 4 2 3 |
|||||||||||
|
|
|
|
|
|
|
|
|
|
|
|
|
|
|
|
|
|
|
|
|
|
|
|
|
|
|
|
|
|
|
|
|
|
|
|
|
|
|
|
|
|
|
|
|
|
|
|
|
|
|
|
|
|
|
|
|
|
|
|
|
|
|
|
|
|
|
|
|
|
§
OPEN/CLOSE
• |
• |
• |
ª · |
|
• |
|
• |
|
|
• |
|
• |
0 |
) |
• |
|
• |
|
|
|
|
P |
|
p |
|
§ |
|
|
|
OPEN/CLOSE |
|
|
||
=SELECTOR + |
|
|
||
|
|
|
· |
|
|
|
|
0 |
) |
|
|
|
|
p |
DOLBY NR 5 ª 6 7 p 7
1 Insert a recordable MD or a blank tape.
To insert an MD, see page 19. To insert a tape, see page 20.
2 Press TUNER/BAND (or BAND on the remote) repeatedly until the band you want appears.
3 For European model:
Press TUNING MODE repeatedly until “PRESET” appears.
For other models:
Press PRESET.
26EN
4 Turn MULTI CONTROLLER to tune in the desired preset station.
Turn counter- – MULTI CONTROLLER + |
Turn clockwise |
|||||||
clockwise |
(or press |
|||||||
(or press |
PRESET + on |
|||||||
PRESET – |
the remote) |
|||||||
on the remote) |
for higher |
|||||||
for lower preset |
preset |
|||||||
numbers. |
numbers. |
|||||||
|
|
|
|
|
|
|
|
|
|
|
|
|
|
|
|
|
|
|
|
|
|
|
|
|
|
|
|
|
|
|
|
|
|
|
|
Frequency |
Preset number |
5 For DHC-MD77/EX77MD/ EX770MD:
Press rREC on the MD deck.
The MD deck stands by for recording.
For MHC-EX66/EX660 or the TC-TX77/TX770 users:
Press DIRECTION repeatedly to select the side you want to record on (one side: Aor both sides: Åor a), then press rREC on the tape deck.
The tape deck stands by for recording and “PLAY ·P {REC}” appears.
6 Turn REC LEVEL to adjust the recording level.
For details, see “Adjusting the recording level” on page 37 (DHC-MD77/ EX77MD/EX770MD) or “Recording on a tape manually” on page 52 (MHC-EX66/ EX660 or the TC-TX77/TX770 users).
7 For DHC-MD77/EX77MD/ EX770MD:
Press · on the MD deck (or P on the remote).
For MHC-EX66/EX660 or the TC-TX77/TX770 users:
Press Por ·on the tape deck.
Recording starts.
To stop recording
Press pon the MD deck or the tape deck.
Tips
•To record non-preset stations, press TUNING MODE repeatedly until “TUNING” appears in step 3 (European model) or press MANUAL in step 3 (other models), then turn MULTI CONTROLLER to tune in the desired station.
•If noise is heard while recording an AM radio program, move the AM antenna to reduce the noise.
Note on recording on an MD
The MD recording is complete only after all the recording information is entered to TOC at which point TOC stops flashing and goes out. Be careful not to disconnect the mains lead or move the deck before this point. Before disconnecting the mains lead, do the following:
–Remove the MD.
–Press SYSTEM POWER, to turn off the system.
Notes on recording on a tape
•If you want to record from the reverse side, press ª after pressing r REC on the tape deck in step 5 so that “ªPLAY P {REC}” appears.
•When you want to reduce the hiss noise in lowlevel high-frequency signals, press DOLBY NR repeatedly to select B or C before step 5. You cannot switch DOLBY NR during recording.
Operations Basic
27EN
The CD player
Using the CD display
You can check the remaining time of the current track or that of the CD.
p
§
OPEN/CLOSE
= SELECTOR +
·
0 )
p
TIME
Press TIME repeatedly during play.
Each time you press the button, the display changes as follows:
n Playing time on the current track
µ
Remaining time on the current track
µ
Remaining time on the current CD*
*The remaining time on the CD is not displayed during Program or Shuffle Play.
To check the total playing time and the number of tracks on the CD
Press TIME in normal or shuffle play stop mode.
Tips
•Tracks numbered 1 to 20 appear in the Music Calendar Display. Tracks numbered 21 or over are not displayed.
•“--.--” appears when you check the remaining time of a track whose number is 21 or over.
Playing the CD tracks repeatedly
–– Repeat Play
This function lets you repeat a single CD or all CDs in normal play, Shuffle Play and Program Play.
p
§ |
|
OPEN/CLOSE |
|
=SELECTOR + |
|
· |
|
0 |
) |
|
p |
REPEAT CONTINUE
Press REPEAT during play until “REPEAT” appears.
Repeat Play starts. Do the following procedure to change the repeat mode.
To repeat |
Press |
All the tracks on |
CONTINUE repeatedly until |
the current CD |
“1 DISC” appears. |
|
|
All the tracks on |
CONTINUE repeatedly until |
all CDs |
“ALL DISCS” appears. |
|
|
Only one track* |
REPEAT repeatedly until |
|
“REPEAT 1” appears while |
|
playing the track you want to |
|
repeat. |
|
|
*You cannot repeat a single track during Shuffle Play and Program Play.
To cancel Repeat Play
Press REPEAT repeatedly until “REPEAT” or “REPEAT 1” disappears.
28EN
Playing the CD tracks in random order
–– Shuffle Play
You can play all the tracks on one CD or all CDs in random order.
|
|
• |
• |
• |
CONTINUE rREC |
§ |
• |
|
• |
• |
|
• |
||
DISC 1 – 3 1= |
+ |
|
|
|
|
EJECT |
• |
|
• |
|
SELECTOR |
|
|
|
|
|
· |
||
|
|
0 |
|
) |
|
|
p |
|
|
|
§ |
|
|
|
|
OPEN/CLOSE |
|
|
|
|
=SELECTOR + |
|
|
|
|
|
· |
||
|
|
0 |
|
) |
|
|
p |
|
|
2 |
SELECTOR |
|
|
3 |
|
|
|
|
|
1 Place a CD (CDs) on the disc tray.
2 Press SHUFFLE.
“SHUFFLE” appears.
Each time you press the button, the display changes as follows:
“ALL DISCS” ˜ “1 DISC”
(All the CDs play |
(A single CD whose |
in random order.) |
DISC 1 – 3 button |
|
lights green plays in |
|
random order.) |
3 Press · (or · on the remote).
The sound source automatically switches to the CD player. “J” appears, then all the tracks play in random order.
To cancel Shuffle Play
Press CONTINUE.
To select a desired CD
Press DISC 1 – 3 button while “1 DISC” is appearing in the display.
Tips
•You can start Shuffle Play during normal play by pressing SHUFFLE.
•To skip a track, turn SELECTOR clockwise (or press +on the remote).
Programming the CD tracks
–– Program Play
You can make a program of up to 32 tracks from all the CDs in the order you want them to be played. You can also record the program you made.
TIME CLEAR |
1 |
|
|
|
|
||||||||
|
|
|
|
|
|
|
|
|
|
|
|
|
|
|
|
|
|
|
|
|
|
|
|
|
|
|
|
|
|
|
|
|
|
|
|
|
|
|
|
|
|
|
|
|
|
|
|
|
|
|
|
|
|
|
|
|
|
|
|
|
|
|
|
|
|
|
|
|
|
|
|
|
|
|
|
|
|
|
|
|
|
|
|
|
|
|
|
|
|
|
|
|
|
|
|
|
|
|
|
• |
• • |
|
§ |
• |
• |
|
• |
• |
|
|
EJECT |
• |
• |
|
=SELECTOR + |
· |
|
r REC |
|
||
|
|
0 |
) |
|
|
p |
|
|
§ |
|
|
|
OPEN/CLOSE |
|
|
|
=SELECTOR + |
|
|
|
|
· |
|
|
|
0 |
) |
|
|
p |
|
CONTINUE 2 |
3 4 5 p 7 |
||
1 Turn FUNCTION until the CD indicator lights up, then place a CD (CDs) on the disc tray.
2 Press PROGRAM.
“PROGRAM” appears.
3 Press one of the DISC 1 – 3 buttons to select a CD.
continued
29EN
Programming the CD tracks (continued)
4 Turn SELECTOR until the desired track number appears.
Selected track Playing time
5 Press ENTER.
The track is programmed. The last programmed track appears, followed by the total playing time. If you have made a mistake, press CLEAR.
6 To program additional tracks, repeat steps 3 to 5.
Skip step 3 if you select a track from the same disc.
7 Press · (or ·on the remote).
All the tracks play in the order you selected.
To check the total number of the programmed tracks
Press TIME in stop mode.
“Step” appears, followed by the total number of the programmed tracks.
To |
Do this |
Cancel Program |
Press CONTINUE. |
Play |
|
Clear a track |
Press CLEAR. |
from the end |
|
(in stop mode) |
|
Add a track to |
Do steps 3 to 5 in |
the program |
“Programming the CD |
(in stop mode) |
tracks.” |
Clear the entire |
Press p once in stop mode. |
program |
|
|
|
Tips
•To program the entire CD as one step of the program, skip step 4.
•When you want to record the program, see “Recording the favorite CD tracks on an MD” (see page 38) or “Recording the favorite CD tracks on a tape” (see page 54).
•The program you made remains after the Program
Play has finished. To play the same program again, press · . However, when you make a recording with the Hit Parade feature, the program is erased.
•The total playing time is not displayed when you select a track whose number is 21 or over, or the total program time exceeds 100 minutes.
30EN
 Loading...