


3-858-327-15(1)
Digital Still Camera
Operating Instructions
Before operating the unit, please read this manual thoroughly and retain it for future reference.
DKC-ID1
1996 by Sony Corporation

WARNING
To prevent fire or shock hazard, do not expose the unit to rain or moisture.
To avoid electrical shock, do not disassemble. Refer servicing to qualified personnel only.
For Customers in the USA
This equipment has been tested and found to comply with the limits for a Class B digital device, pursuant to Part 15 of the FCC Rules. These limits are designed to provide reasonable protection against harmful interference in a residential installation. This equipment generates, uses, and can radiate radio frequency energy and, if not installed and used in accordance with the instructions, may cause harmful interference to radio communications. However, there is no guarantee that interference will not occur in a particular installation. If this equipment does cause harmful interference to radio or television reception, which can be determined by turning the equipment off and on, the user is encouraged to try to correct the interference by one or more of the following measures:
–Reorient or relocate the receiving antenna.
–Increase the separation between the equipment and receiver.
–Connect the equipment into an outlet on a circuit different from that to which the receiver is connected.
–Consult the dealer or an experienced radio/ TV technician for help.
This device requires shielded interface cable to comply with FCC emission limits.
You are cautioned that any changes or modifications not expressly approved in this manual could void your authority to operate this equipment.
Voor de Klanten in Nederland
Bij dit produkt zijn batterijen geleverd. Wanneer deze leeg zijn, moet u ze niet weggooien maar inleveren als KCA.
When the lithium battery becomes weak, the battery indicator blinks. In this case, replace the battery with a Sony CR2025 lithium battery. Use of another battery may present a risk of fire or explosion.
WARNING:
Battery may explode if mistreated. Do not recharge, disassemble or dispose of in fire. Keep the lithium battery out of the reach of children. Should the battery be swallowed, consult a doctor immediately.
ADVARSEL!
Lithiumbatteri-Eksplosionsfare ved fejlagtig håndtering.
Üdskiftning må kun ske med batteri af samme fabrikat og type.
Levér det brugte batteri tilbage til leverandøren.
ADVARSEL
Lithiumbatteri-Eksplosjonsfare.
Ved utskifting benyttes kun batteri som anbefalt av apparatfabrikanten.
Brukt batteri returneres apparatleverandøren.
VARNING
Explosionsfara vid felaktigt batteribyte. Använd samma batterityp eller en ekvivalent type som rekommenderas av apparattillverkaren.
Kassera använt batteri enlight fabrikantens instruktion.
VAROITUS
Paristo voi räjähtää jos se on virheellisesti asennettu.
Vaihda paristo ainoastaan laitevalmistajan suosittelemaan tyyppiin. Hävitä käytetty paristo valmistajan ohjeiden mukaisesti.
2

Table of Contents |
|
|
WARNING ............................................................................................................... |
|
2 |
Precautions ............................................................................................................ |
|
5 |
Checking the supplied accessories .................................................................... |
8 |
|
Features ................................................................................................................. |
|
9 |
Location of parts and controls .......................................................................... |
11 |
|
Front ............................................................................................................................................. |
|
11 |
Rear .............................................................................................................................................. |
|
12 |
Top ............................................................................................................................................... |
|
13 |
Bottom ......................................................................................................................................... |
|
14 |
Liquid crystal display indicators .................................................................................................. |
15 |
|
Viewfinder indicators ................................................................................................................... |
15 |
|
■ Preparations |
|
|
Getting started ..................................................................................................... |
|
16 |
Preparations–1 |
Charging the battery ........................................................................................... |
16 |
Preparations–2 |
Attaching the battery .......................................................................................... |
17 |
Preparations–3 |
Inserting the lithium button battery ................................................................... |
18 |
Preparations–4 |
Setting the date and time .................................................................................... |
19 |
Preparations–5 |
Inserting/initializing a PC card .......................................................................... |
20 |
Preparations–6 Removing the lens cap ....................................................................................... |
22 |
|
Preparations–7 |
Attaching the grip strap ...................................................................................... |
23 |
Preparations–8 |
Adjusting the viewfinder focus .......................................................................... |
24 |
■ Taking a picture shooting |
|
|
Taking a picture |
................................................................................................... |
25 |
Notes on auto focus ...................................................................................................................... |
26 |
|
Focus lock .................................................................................................................................... |
|
26 |
Manual Focus ............................................................................................................................... |
|
27 |
■ Viewing |
|
|
Checking the picture ........................................................................................... |
28 |
|
Viewing each picture ................................................................................................................... |
28 |
|
Viewing pictures in succession .................................................................................................... |
29 |
|
Connecting with a computer .............................................................................. |
30 |
|
Using a PC card reader ....................................................................................... |
32 |
|
■ Advanced operations |
|
|
— Shooting — |
|
|
Selecting the picture mode ................................................................................ |
33 |
|
Setting picture brightness with EV (exposure value) compensation ........................................... |
33 |
|
Selecting the picture quality mode/number of available shots .................................................... |
34 |
|
Using the automatic exposure mode (the AE mode) ................................................................... |
35 |
|
Using the Flash ............................................................................................................................ |
|
37 |
Technics for using the flash ......................................................................................................... |
38 |
|
Setting the white balance – taking a picture with more natural colors ........................................ |
40 |
|
— Playing back picture data — |
|
|
Playing back pictures in sequence.................................................................... |
42 |
|
Playing back a specific picture .......................................................................... |
43 |
|
3

Table of Contents |
|
Cycling pictures automatically .......................................................................... |
44 |
Setting the picture display time ......................................................................... |
45 |
Stopping the playback ........................................................................................ |
46 |
— Erasing picture data — |
|
Erasing all pictures ............................................................................................. |
47 |
Erasing one picture ............................................................................................. |
48 |
— Other — |
|
Plugging into an AC wall socket ........................................................................ |
49 |
■ Miscellaneous |
|
Replacing the Lithium button battery ............................................................... |
50 |
Setting a user ID number .................................................................................... |
51 |
Setting DIP Switches .......................................................................................... |
52 |
Maintenance ........................................................................................................ |
53 |
Troubleshooting .................................................................................................. |
54 |
Warning indicators and messages .................................................................... |
57 |
Error messages ................................................................................................... |
60 |
Using overseas .................................................................................................... |
61 |
Specifications ...................................................................................................... |
62 |
4

Precautions
Do not touch switches other than those specified
When adjusting the internal switches, be careful not to adjust switches not specified in this manual. Adjusting the wrong switch can lead to breakdown.
Operating and storage locations
Avoid operating or storing the camera in the following locations:
•Extremely hot or cold places. The camera operating temperature is 0°C to +40°C (32°F to 104°F).
•In direct sunlight for long periods, or close to heating equipment (e.g., near heaters)
•Humid or dusty places
•Where it is exposed to rain
•Places subject to strong vibration
•Close to sources of strong magnetism
•Close to sources of powerful electromagnetic radiation, such as radios or TV transmitters
Ventilation
Do not wrap cloth or other material around the camera when using it. This will cause internal heat build-up, and may lead to breakdown.
Transportation
When transporting the camera, pack it in its original box and packing materials to protect it from shock during transportation.
Cleaning
•Use a blower to remove dust from the lens or optical filter.
•Use a soft, dry cloth to clean the external surfaces of the camera. If it is very dirty, use a soft cloth dampened with a small quantity of neutral detergent, then wipe dry.
•Do not use volatile solvents such as alcohol, benzene or thinners as they may damage the surface finish.
Test shooting
Before shooting, you should always take a few test shots and review them to see that the camera is functioning normally.
5

Precautions
Copyright laws
You may take pictures for your personal enjoyment with this digital still camera. However, it is illegal to take pictures of items protected by copyright laws without the permission of the copyright owner. Keep this in mind when shooting in concerts, shows and exhibitions, etc.–many of the items on display are protected by copyrights.
AC adapter
The AC-V615 power adapter (not supplied) and the DK-315 connecting cord (supplied with the AC-V615) is recommended for use with the DKCID1.
Battery pack
• The camera uses a lithium-ion battery. Use the correct Sony battery (e.g., NP-F530, NP-F730, NP-F930). Charge the battery first.
PC Card
•The camera uses a PC card (ATA) (JEIDA and PCMCIA standards) for data storage.
•Use a Sony PC card (DKA-MC10F, DKA-MC2F).
Do not use a SRAM card or a modem card. Using such cards may damage the camera and/or cards.
Picture data
•The camera plays back the pictures taken by the camera itself.
•If you need to erase image data, erase the data in the camera, not from your computer. If you try to erase data from your computer, the camera may be damaged.
•Image files are in MS-DOS1) format. Some erase functions will not work correctly, otherwise.
Note
If you use a PC card that was not formatted by the camera (i.e., the folder was not created by the camera), you cannot replay the image from the PC card. Similarly, a PC card formatted by the camera will not be compatible with another manufacturer.
................................................................................................................................................................
1) MS-DOS is a registered trademark of Microsoft Corporation in the U.S. and other countries.
6

PC card data filing system
The image files are in MS-DOS format. The computer that has a PC card reader or a PC card slot can directly read the files.
Some computers may have some restrictions.
The data saved in the PC card has the format described below.
When you mount a PC card (MS-DOS format) in the camera, the camera automatically creates a folder named IMID1_D5. The camera saves image data in this folder; the data file has the following format:
File name: XXXXXXXX.JPG
.
Assign the user ID using the first 4 digits.
The last 4 digits are an image number which is set by the camera automatically.
For details on the user ID, see Page 51.
Memory card
Available memory cards
Use a Sony memory card: DKA-MC2F, DKA-MC10F.
DKA-MC2F and DKA-MC10F comply with JEIDA Ver4.2 (PCMCIA
Rel2.1).
Precautions using the memory card
•Do not remove the card or cut the power while the camera is accessing the memory card (saving, erasing, initializing or replaying). Removing the memory card or cutting the power while the camera is accessing the memory card may damage the card and/or data.
•Check with your dealer or Sony, before using a non-Sony card. Using a non-Sony card may damage the camera. (Even if you use a non-Sony memory card, thoroughly check for compatibility first.)
•Do not bend, drop, or expose the card to shock. Because memory cards are sensitive, they may be easily damaged.
•Do not use or store a memory card where exists strong static electricity or electrical noise.
•Do not use or store a memory card in areas where temperatures or humidity are high, or corrosive conditions exist.
•Keep the connector clean.
•Use the specially designed case for transport. Carrying a memory card without the case may result in damage.
7
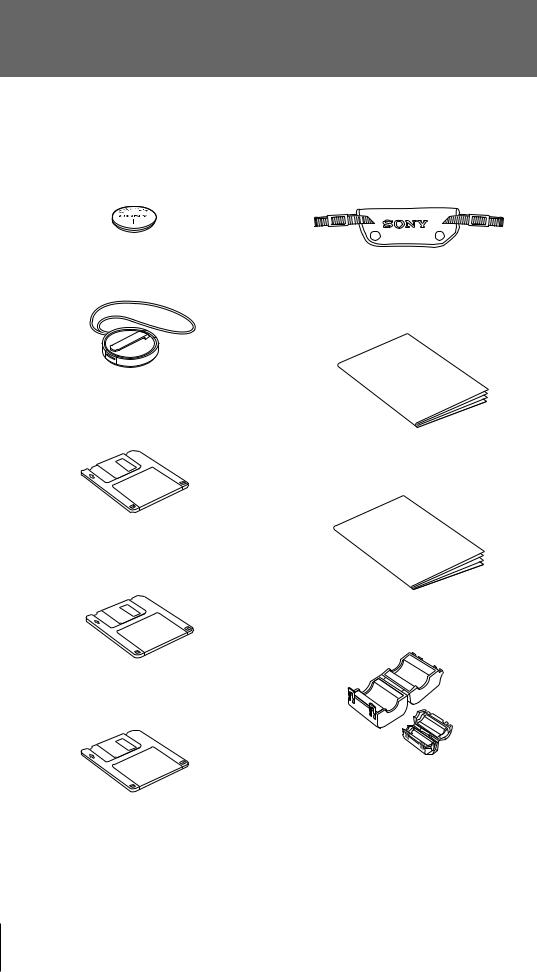
Checking the supplied accessories
Before attempting to use this camera, check to see that you have the following supplied accessories:
CR2025 Lithium button battery (1)
Grip belt (1)
Lens cap (1)
(The lens cap is attached to the lens.)
Operating instructions for camera (1)
Software floppy disks:
1.44 MB 2HD for Microsoft Windows1) 95 (1)
Operating instructions for software (1)
1.44 MB 2HD for Microsoft Windows 3.1 (1)
Ferrite filter (small) (1)
Ferrite filter (large) (1)
1.44MB 2HD floppy disk for Macintosh2) (1)
................................................................................................................................................................
1)Microsoft and Windows are registered trademarks of the Microsoft Corporation in the U.S. and other countries.
The formal name of Windows is the Microsoft Windows Operating System.
2)Macintosh is a registered trademark of Apple Computer, Inc.
8

Features
High quality still pictures
•The camera produces high-resolution pictures thanks to an all-pixel reading 1/3 inch CCD1) (PSCCD) with 450,000 effective picture dots. The PSCCD color filter also uses a color checker alley filter for natural color reproduction.
•The camera uses an electronic shutter for longer shutter life and highresolution pictures. Speeds can be set from 1/15 to 1/4000 sec.
Multiple shooting modes
•The DKC-ID1 digital still camera has all the functions needed for full automatic operation—a 12 × zoom lens for macro, telephoto and wide
applications, auto focus, programmed automatic exposure and a built-in flash. Optional telephoto and wide lenses are also available.
•Pictures can be viewed through the 113,000-pixel color viewfinder. This lets you confirm your pictures on the spot and helps you decide what other pictures you need to take.
•The camera uses a PC card (ATA) that complies with JEIDA and PCMCIA standards. High quality, high resolution color still images are recorded on the PC card (DKA-MC10F/DKA-MC2F).
You can digitally save images using the JPEG method. Select the JPEG compression method as described below.
A digital image processing system is superior to an analog system because it provides a better image (no jitters2) or skews3)). You can directly process digital color images using your personal computer or workstation.
Storage mode |
Number of images to be stored |
||
|
|
||
DKA-MC2F |
DKA-MC10F |
||
|
|||
Fine mode |
8 |
45 |
|
|
|
|
|
Normal mode |
30 |
158 |
|
|
|
|
|
Notes
•The number of images will differ when you use both the Fine and the Normal mode simultaneously in one PC card.
•If the card has another file or if there are some single erases, the remaining shots may differ.
•You can take the image with a user ID and an image number.
•The image files are in MS-DOS format. The computer that has a PC card reader or a PC card slot can directly read the files.
Some computers may have restrictions.
................................................................................................................................................................
1)CCD: Charge Coupled Device
2)Jitter: Picture shake caused by vibration of rotating video head.
3)Skew: The warping of the top part of a picture due to the video tape drive mechanism causing delay in each picture field.
9

Features
Advanced functions
•Two different automatic exposure modes—Programmed AE and Shutter Speed Priority AE—can be selected to suit shooting conditions.
•The built-in flash can be set to ON, OFF, or Auto.
•The date and time of the shooting are recorded onto each picture.
•The camera has three replay modes: single, sequential, and specific frame. You can also use an optional AC power adapter (AC-V615) and connector cable (DKA-K1) for longer operation.
Erase/Initialization
•Erase 1 frame
•Erase all frames
•Initialize PC card (automatic detection)
SCSI interface
Pictures stored on the PC card can be transferred directly to
an IBM PC/AT1) compatible computer or Macintosh through the camera SCSI interface. The software needed for this is supplied with the camera. The SCSI interface also allows the camera to be operated via a computer. The interface also lets you view pictures directly on a computer and set each mode.
................................................................................................................................................................
1) IBM and AT are registered trademarks of the International Business Machines Corporation.
10
Location of parts and controls
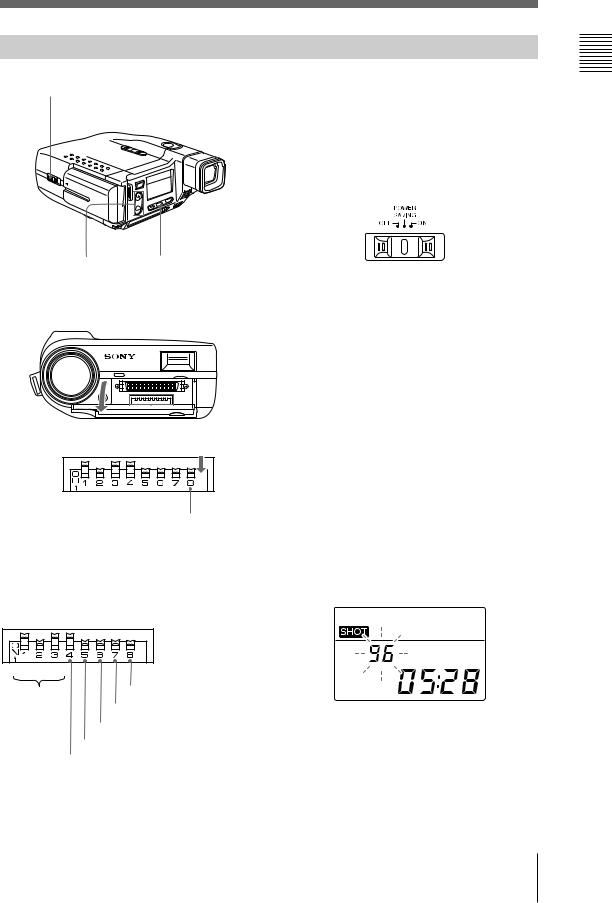
Front
1 2
3
6 5 |
4 |
1 12x Zoom Lens
Electric zoom lens with a zoom ratio of 12 x (38mm to 459mm on a 35mm camera).
2 Flash
Built-in Guide No. 16 flash.
3 SCSI connector
SCSI connector for transferring pictures to a computer. The connector uses half-pitch pins.
4 DIP switches
The DIP switches are set in accordance with the camera mode, as indicated in the following Figure. The settings in the Figure are the factory settings.
1 |
2 |
4 |
SCSI |
User ID |
|
ID setting
Computer
Terminator
SCSI ID setting
Termination switch
DIP switches 1 to 3: SCSI ID switches (0 to 7)
DIP switch 4: SCSI terminator ON/OFF
DIP switch 6: |
SCSI transfer PC ON/OFF |
DIP switch 8: |
User ID/Calendar clock |
|
switch |
|
|
DIP switch 5, 7: |
Not connected |
|
|
Note
When DIP switch 6 is set to ON, you cannot operate the following buttons: MODE button, ‘button, ’button, PLAY button, SELECT button, SHIFT button except Release button, T/W button, AF focus switch. This is not malfunction.
5 Extensions connector
Connector for future extensions.
6 Flash light sensor
Measures ambient light and adjusts flash intensity accordingly.
Be careful not to cover this sensor when using the flash.
11

Location of parts and controls
Rear
1 2 3
!™ |
4 |
|
!£ |
||
|
||
|
5 |
|
|
6 |
|
|
!¡ 0 9 8 7 |
1 MODE button
Selects the various camera modes.
2 Liquid crystal display
Displays the current modes and their settings.
3 View finder
The LCD color viewfinder lets you frame your subjects and view pictures taken.
4 AF (auto focus) focus switch
Switches between auto and manual focus.
5 Focus dial
Adjusts the focus manualy.
9 PLAY button
Plays back pictures recorded on a PC card.
!º PC card slot
The PC card is inserted here. The slot is kept covered when there is no PC card in the camera.
!¡ PC card EJECT button
Ejects the PC card when pressed.
!™ ‘ button
Used for selecting modes and picture numbers during playback. Also used for selecting shutter speeds.
6 Access lamp |
!£ ’button |
Lights in red whenever the memory card is being accessed.
Used for selecting modes and picture numbers during playback. Also used for selecting shutter speeds.
7 SHIFT button
The SHIFT button is pressed when selecting or executing a mode.
8 SELECT button
Used to set the internal calendar/clock, user ID and the display time when cycling pictures automatically.
12

Top
1
2
3
4
1 Release button
Operates the shutter when shooting.
2 T (Tele)/W (Wide) button
Changes the zoom ratio of the zoom lens. Pressing the T zooms the picture in. Pressing the W zooms the picture out.
3 Battery compartment
Connecting point for battery pack.
do not make any operations for 5 minutes, the viewfinder will switch itself off, and if you do not make any operations for a further 5 minutes, the camera will switch itself off altogether.
Once the camera has switched itself off, it will come back on again whenever you slide the POWER switch to ON or press the release button.
4 POWER switch
Switches the camera off and on.
The POWER switch has the following 3 positions.
OFF: Switches the camera OFF. SAVING: Helps save power.
When set to the SAVING position, the camera automatically goes into the power saving mode and switches off the electronic viewfinder 30 seconds after you press the release button. If you do not press any buttons for a further five minutes, the power is then switched off completely.
ON: Switches the camera ON.
When set to the ON position, power is supplied to all functions and the camera is always ready for shooting. However, if you
13
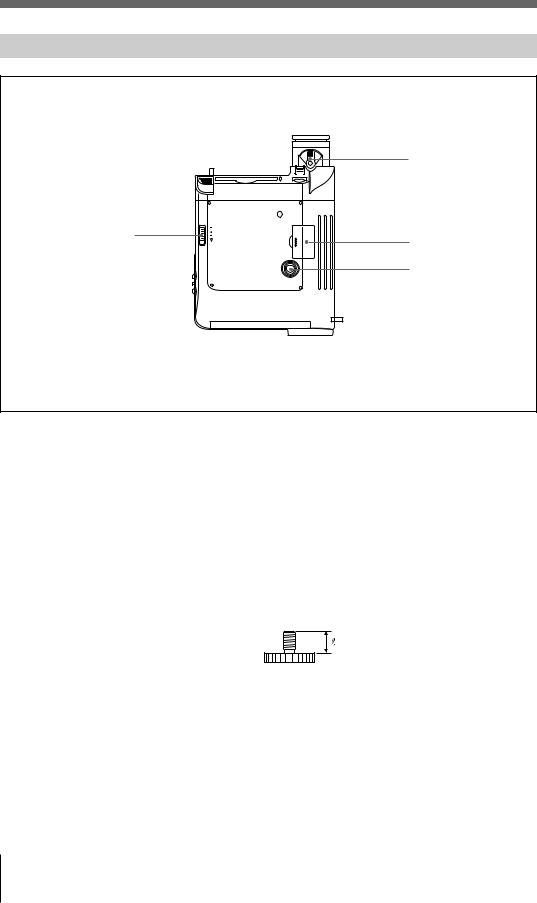
Location of parts and controls
Bottom
2
1 |
3 |
|
|
|
4 |
1 BATT eject lever
Ejects the battery.
2 Viewfinder focus lever
Adjusts the viewfinder focus to suit the eyesight of the user.
3 Button battery cover
Covers the lithium button battery (CR2025) compartment.
4 Tripod screw hole
ISO standard: n= 4.5 mm ±0.2 mm ASA standard: n= 0.197 inches
14
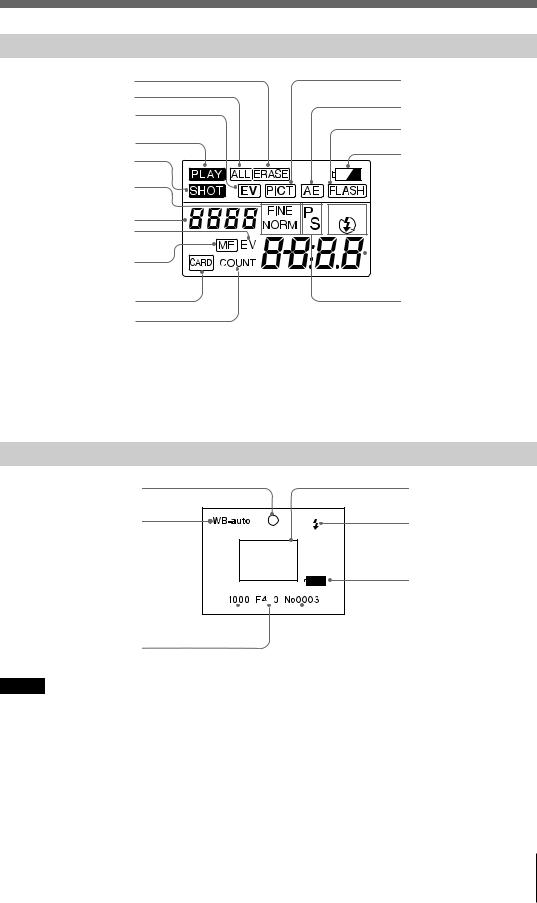
Liquid crystal display indicators
Single picture indicator
All picture erase indicator
EV (Exposure Value) compensation indicator
PLAY indicator
SHOT indicator
FINE/NORMAL indicator
Remaining SHOT no. indicator EV compensation value indicator
MF (manual focus) indicator
PC CARD indicator
COUNT (frame no.) indicator
Viewfinder indicators
AF focus indicator
(green / flashing green / red)
White Balance mode indicator
Shutter speed
PICT (picture quality) indicator
AE (Automatic Exposure) indicator
FLASH indicator Battery indicator


 Flash mode indicator
  (AUTO/ON/OFF)
PICTURE No. /SHOT No./
COUNT No. indicator
Programmed AE(P)/Shutter speed priority AE(S) indicator
AF frame
Flash indicator
Battery indicator
 Picture number
Aperture stop
Notes
•For improved understanding of this figure, all indicators are displayed here. In an actual camera use, all indicators will not be displayed simultaneously.
•When hot, the LCD may turn black. When cold, the LCD response speed may slow down. These are not malfunctions of the camera. In normal temperature ranges, these conditions will disappear.
•For LCD panel cautions and warning, see Page 57.
15
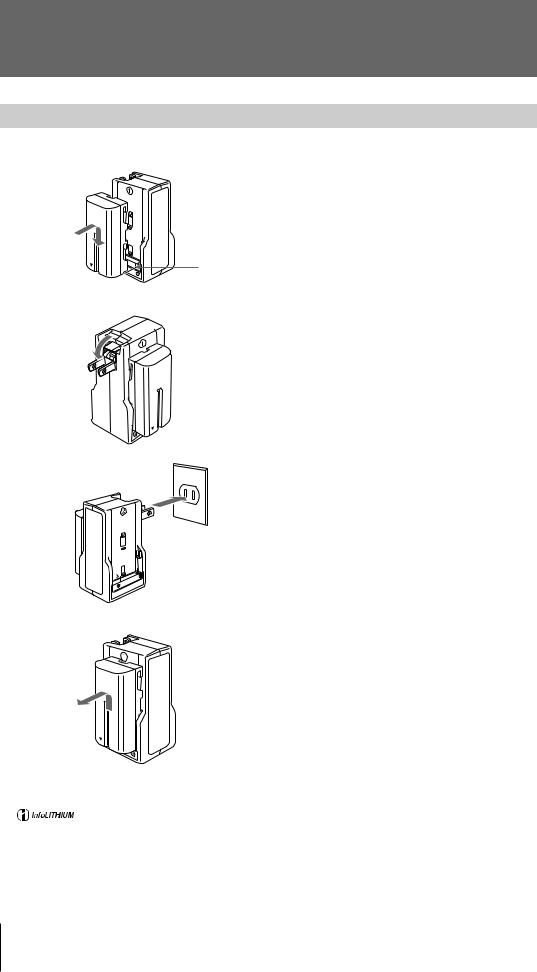
Getting started
Preparations – 1 Charging the battery
1
2
Terminal cover
The battery must be charged before using. The following are charging times when using the BC-V500 battery charger (not supplied).
Battery charging times
Battery Pack |
Charging timea) (min). |
|
|
NP-F530 |
180 (120) |
|
|
NP-F730 |
250 (190) |
|
|
NP-F930 |
330 (270) |
|
|
a)Approximate minutes needed to fully charge an empty battery pack using the BC-V500
battery charger.
The time required for a normal charge is indicated in parentheses.
1 Push the battery in and slide it down until the battery and charger terminals are aligned.
2 Fold out the AC wall plug and insert into an AC wall socket.
Once charging commences, the Charge lamp (orange) comes on. The lamp goes out once the battery has been charged enough to use. To fully charge the battery, leave the battery to charge for a further hour after the Charge lamp goes out.
To remove the battery from the charger:
Slide it back.
................................................................................................................................................................
An |
TM (InfoLITHIUM battery) is a lithium |
InfoLITHIUM batteries, but the remaining battery |
ion battery that transmits data on its condition to |
charge time will not be displayed. |
|
InfoLITHIUM-compatible equipment. |
InfoLITHIUM is a trademark of Sony Corporation. |
|
This camera can use the NP-F530 and the NP-F730 |
|
|
16

Preparations –2 Attaching the battery
Use the battery pack as a power source when shooting outdoors.
• Confirm the camera power switch is in the “OFF” position.
• Align the grooves on the battery with the tabs on the charger and slide the battery in.
To remove the battery:
Press the battery release lever and slide the battery toward the rear of the camera (z).
Note
Remove the battery pack if the camera is not used for a long period of time.
Preparations
Battery release lever
................................................................................................................................................................
Battery check tab |
Battery check tab |
The battery check tab helps you distinguish between |
charged batteries and those that are dead. Set the tab to display the “■” mark on batteries that have been used up.
17
Getting started
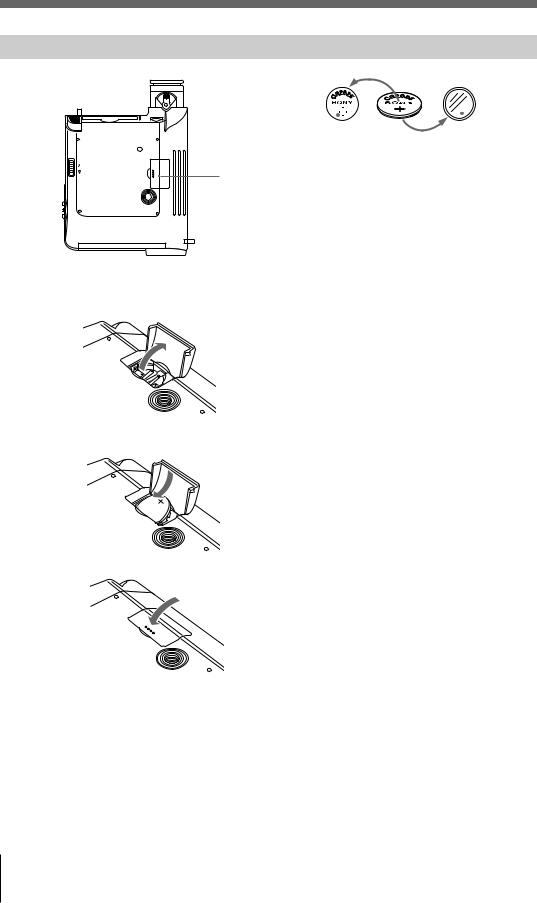
Preparations –3 Inserting the lithium button battery
1
2
|
|
|
|
|
|
|
|
|
|
|
|
|
|
|
|
|
|
|
|
|
Positive side ‘ |
Negative side ’ |
||||
|
|
|
||||||
1
The lithium button battery supplies power to the internal clock. It continues to supply power even when the POWER switch is switched off. The camera uses a CR2025 battery (supplied).
1 Open the lid covering the lithium button battery.
2 Insert the supplied CR2025 battery with the ‘ facing upwards.
3 Close the lid.
3
................................................................................................................................................................
Precautions when using button batteries
•To prevent accidental swallowing, keep this camera and any button batteries away from infants.
•If a button battery is swallowed accidentally, contact a doctor immediately.
•Before inserting the button battery, rub it over with a dry cloth to ensure proper contact.
•Do not dismantle the button battery, apply heat to it, short it out or throw it on the fire; it may explode. When disposing of, treat as non-combustible refuse.
18
Preparations –4 Setting the date and time
1
5 3,4
2
DIP switch functions
By setting the time and date on the camera you can record the year, date and time on your pictures.
1 Set the POWER switch to SAVING or ON . Press the green button and slide to the either position.
2 Open the lid at the front of the camera and check that DIP Switch 8 is set to the OFF position.
3 Press the SELECT button.
4 Press the SELECT button again for about one second. The year numbers will start flashing.
5 Use the ‘/’buttons to adjust the numbers.
Once adjusted, press the SELECT button. The month will then begin to flash. With each consecutive pressing of the SELECT button, the flashing moves from the month /day /hour /minute.
Positions indicated are the factory settings
1 |
2 |
4 |
SCSI |
User ID |
|
|
ID No. |
Not connected |
|
PC ON/OFF |
|
Not connected |
|
SCSI termination ON |
Once you have finished adjusting the minutes, press SELECT. The screen goes back to normal.
Preparations
19

Getting started
Preparations –5 Inserting/initializing a PC card
|
|
Cautions |
|
|
• If you mount a PC card in the camera’s card |
|
|
slot, the camera will automatically check the |
|
|
card format. If the PC card is not compatible, |
|
|
the camera will ask you if you want to |
|
|
initialize the card. You cannot use this card |
|
|
unless you initialize it. |
|
|
• If you initialize an old card, any data will be |
|
|
lost. Since an old card may contain important |
|
|
data, be sure to make a back-up from your |
1 |
|
personal computer as needed. |
|
• The time required for initializing a card differs |
|
|
depending on the type of card. |
|
|
|
1 Set the POWER switch to SAVING or ON. |
|
|
Press the green button and slide to the |
|
|
either position. |
|
|
2 Insert the PC card slowly into the back of |
|
|
the camera. |
|
|
Note |
|
|
When inserting the card, make sure you |
|
|
insert it with the front facing upwards. Do |
|
|
not force the card in; you may damage the |
|
|
camera or the card. |
|
|
If the card is being inserted used for the |
2 |
|
first time, the word “init” will appear on the |
|
LCD. |
|
|
|
|
|
|
For details on initializing the PC card, see |
|
|
page 21. |
|
3 |
3 If you insert a PC card in the slot, the |
|
camera will access the card. While the card |
|
|
|
|
|
|
is being accessed, the LED on the side of |
|
|
the slot will turn on (red). |
|
|
When the camera is ready, the remaining |
|
|
number of shots and the image number will |
|
|
be displayed on the LCD. |
|
|
Caution |
|
|
If you insert a PC card in the camera, the |
|
|
camera will automatically create a folder |
|
|
(IMID1_D5). Do not erase or rename this |
|
|
folder from your computer. Doing so, you |
|
|
cannot use the card with the camera. |
20
 Loading...