


3-865-968-14 (1)
Digital
Video Camera
Recorder
Operating Instructions
Before operating the unit, please read this manual thoroughly, and retain it for future reference.
ИНСТРУКЦИЯ ПО ЭКСПЛУАТАЦИИ
ПВ В‰ ˝НТФОЫ‡Ъ‡ˆЛВИ ‡ФФ‡ ‡Ъ‡ ‚МЛП‡ЪВО¸МУ Ф У˜ЪЛЪВ, ФУК‡ОЫИТЪ‡, ‰‡ММУВ ЫНУ‚У‰ТЪ‚У Л ТУı ‡МяИЪВ В„У ‰Оя ‰‡О¸МВИ¯Лı ТФ ‡‚УН.
DCR-TR7000E/TR7100E 
©1999 by Sony Corporation

English
Welcome!
Congratulations on your purchase of this Sony Digital Handycam camcorder. With your Digital Handycam you can capture life’s precious moments with superior picture and sound quality.
Your Digital Handycam is loaded with advanced features, but at the same time it is very easy to use. You will soon be producing home video that you can enjoy for years to come.
WARNING
To prevent fire or shock hazard, do not expose the unit to rain or moisture.
To avoid electrical shock, do not open the cabinet.
Refer servicing to qualified personnel only.
For the customers in Germany
Directive: EMC Directive 89/336/EEC. 92/31/EEC
This equipment complies with the EMC regulations when used under the following circumstances:
•Residential area •Business district •Light-industry district
(This equipment complies with the EMC standard regulations EN55022 Class B.)
ATTENTION
The electromagnetic fields at the specific frequencies may influence the picture and sound of this digital camcorder.
РЫТТНЛИ
ДÓ· Ó ÔÓʇÎÓ‚‡Ú¸!
ПУБ‰ ‡‚ОяВП В‡Т Т Ф ЛУ· ВЪВМЛВП ‰‡ММУИ ‚Л‰ВУН‡ПВ ˚ Digital Handycam ЩЛ П˚ Sony. С ФУПУ˘¸˛ В‡¯ВИ ‚Л‰ВУН‡ПВ ˚ Digital Handycam В˚ ТПУКВЪВ Б‡ФВ˜‡ЪОВЪ¸ ‰У У„ЛВ В‡П П„МУ‚ВМЛя КЛБМЛ Т Ф В‚УТıУ‰М˚П Н‡˜ВТЪ‚УП ЛБУ· ‡КВМЛя Л Б‚ЫН‡.
В‡¯‡ ‚Л‰ВУН‡ПВ ‡ Digital Handycam УТМ‡˘ВМ‡ ЫТУ‚В ¯ВМТЪ‚У‚‡ММ˚ПЛ ЩЫМНˆЛяПЛ, МУ ‚ ЪУ КВ ‚ ВПя В˛ У˜ВМ¸ ОВ„НУ ФУО¸БУ‚‡Ъ¸Тя. ВТНУ В В˚ ·Ы‰ВЪВ ТУБ‰‡‚‡Ъ¸ ТВПВИМ˚В ‚Л‰ВУФ У„ ‡ПП˚, НУЪУ ˚ПЛ ТПУКВЪВ М‡ТО‡К‰‡Ъ¸Тя ‚ТВ ФУТОВ‰Ы˛˘ЛВ „У‰˚.
ПРЕДУПРЕЖДЕНИЕ
ДОя Ф В‰УЪ‚ ‡˘ВМЛя ‚УБ„У ‡МЛя ЛОЛ УФ‡ТМУТЪЛ ˝ОВНЪ Л˜ВТНУ„У Ы‰‡ ‡ МВ ‚˚ТЪ‡‚ОяИЪВ ‡ФФ‡ ‡Ъ М‡ ‰УК‰¸ ЛОЛ ‚О‡„Ы.
ВУ ЛБ·ВК‡МЛВ ФУ ‡КВМЛя ˝ОВНЪ Л˜ВТНЛП ЪУНУП МВ УЪН ˚‚‡ИЪВ НУ ФЫТ.
З‡ У·ТОЫКЛ‚‡МЛВП У· ‡˘‡Ъ¸Тя ЪУО¸НУ Н Н‚‡ОЛЩЛˆЛ У‚‡ММУПЫ У·ТОЫКЛ‚‡˛˘ВПЫ ФВ ТУМ‡ОЫ.
ВНИМАНИЕ
ЭОВНЪ УП‡„МЛЪМ˚В ФУОя М‡ УФ В‰ВОВММ˚ı ˜‡ТЪУЪ‡ı ПУ„ЫЪ ‚ОЛяЪ¸ М‡ ЛБУ· ‡КВМЛВ Л Б‚˜Н, ‚УТФ УЛБ‚У‰ЛПУВ ‰‡ММУИ ˆЛЩ У‚УИ ‚Л‰ВУН‡ПВ ˚.
2

English
Table of contents
Checking supplied accessories ................... |
5 |
Quick Start Guide ....................................... |
6 |
Getting started |
|
Using this manual ...................................... |
10 |
Step 1 Preparing the power supply ........ |
12 |
Installing the battery pack ................. |
12 |
Charging the battery pack .................. |
13 |
Connecting to the mains ..................... |
17 |
Step 2 Inserting a cassette ........................ |
18 |
Advanced Playback Operations |
|
Playing back a tape with picture effects |
|
................................................................ |
58 |
Playing back a tape with digital effects .. |
59 |
Quickly locating a scene using the zero |
|
set memory function ........................... |
61 |
Searching a recording by date .................. |
62 |
Searching for a photo |
|
– Photo search/Photo scan ................ |
64 |
Recording – Basics |
|
Recording a picture.................................... |
19 |
Shooting backlit subjects |
|
(BACK LIGHT) ............................. |
25 |
Shooting in the dark (NightShot) ...... |
26 |
Checking the recording |
|
– EDITSEARCH / Rec Review .......... |
28 |
Playback – Basics |
|
Connections for playback ......................... |
29 |
Playing back a tape .................................... |
33 |
Advanced Recording Operations |
|
Photo recording .......................................... |
38 |
Using the wide mode ................................ |
41 |
Using the fader function ........................... |
42 |
Using special effects |
|
– Picture effect ...................................... |
45 |
Using special effects |
|
– Digital effect ...................................... |
47 |
Using the PROGRAM AE function ......... |
50 |
Adjusting the exposure manually ........... |
53 |
Focusing manually ..................................... |
54 |
Inserting a scene ......................................... |
56 |
Editing on Other Equipment |
|
Dubbing a tape ........................................... |
66 |
Customizing Your Camcorder |
|
Changing the MENU settings .................. |
69 |
Resetting the date and time ...................... |
78 |
Additional Information |
|
Digital8 system, recording and |
|
playback ................................................ |
80 |
Changing the lithium battery in your |
|
camcorder ............................................. |
83 |
Troubleshooting ......................................... |
85 |
Self-diagnosis display................................ |
89 |
Warning indicators and messages ........... |
90 |
Using your camcorder abroad ................. |
97 |
Maintenance information and |
|
precautions ........................................... |
98 |
Specifications ............................................ |
103 |
Quick Reference |
|
Identifying the parts and controls ......... |
105 |
Quick Function Guide ............................. |
114 |
Index .......................................................... |
116 |
3

РЫТТНЛИ
О„О‡‚ОВМЛВ
|
П Ó‚Â Í‡ Ô Ë·„‡ÂÏ˚ı |
|
|
Ф ЛМ‡‰ОВКМУТЪВИ ........................... |
5 |
|
РЫНУ‚У‰ТЪ‚У ФУ ·˚ТЪ УПЫ Б‡ФЫТНЫ |
|
|
.......................................................... |
8 |
|
ПУ‰„УЪУ‚Н‡ Н ˝НТФОЫ‡Ъ‡ˆЛЛ |
|
|
ИÒÔÓθÁÓ‚‡ÌË ‰‡ÌÌÓ„Ó ÛÍÓ‚Ó‰ÒÚ‚‡ |
|
|
........................................................ |
10 |
|
ПÛÌÍÚ 1 ПÓ‰„ÓÚӂ͇ ËÒÚÓ˜ÌË͇ ÔËÚ‡ÌËя |
|
|
........................................................ |
12 |
|
УÒÚ‡Ìӂ͇ ·‡Ú‡ ÂÈÌÓ„Ó ·ÎÓ͇ ..... |
12 |
|
З‡ я‰Í‡ ·‡Ú‡ ÂÈÌÓ„Ó ·ÎÓ͇ ........ |
13 |
|
ПУ‰ТУВ‰ЛМВМЛВ Н ТВЪВ‚УИ УБВЪНВ |
|
|
................................................... |
17 |
|
ПÛÌÍÚ 2 УÒÚ‡Ìӂ͇ ͇ÒÒÂÚ˚ ............... |
18 |
|
З‡ФЛТ¸ – ОТМУ‚М˚В ФУОУКВМЛя |
|
|
З‡ÔËÒ¸ ËÁÓ· ‡ÊÂÌËя ........................... |
19 |
|
С˙ÂÏ͇ Ó·˙ÂÍÚÓ‚ Ò Á‡‰ÌÂÈ |
|
|
ФУ‰Т‚ВЪНУИ (BACKLIGHT) ...... |
25 |
|
С˙ВПН‡ ‚ ЪВПМУЪВ |
|
|
(НӘ̇я Ò˙ÂÏ͇) ...................... |
26 |
|
П Ó‚Â Í‡ Á‡ÔËÒË – EDITSEARCH / |
|
|
П УТПУЪ Б‡ФЛТЛ ........................... |
28 |
|
ВÓÒÔ ÓËÁ‚‰ÂÌË – ОÒÌÓ‚Ì˚ |
|
|
ФУОУКВМЛя |
|
|
ПУ‰ТУВ‰ЛМВМЛя ‰Оя ‚УТФ УЛБ‚В‰ВМЛя |
|
|
........................................................ |
29 |
|
ВÓÒÔ ÓËÁ‚‰ÂÌË ÎÂÌÚ˚ ..................... |
33 |
|
УÒÓ‚Â ¯ÂÌÒÚ‚Ó‚‡ÌÌ˚ ÓÔ ‡ˆËË |
|
|
Ò˙ÂÏÍË |
|
|
ФÓÚÓÒ˙ÂÏ͇ .......................................... |
38 |
|
ИÒÔÓθÁÓ‚‡ÌË ¯Ë ÓÍÓ˝Í ‡ÌÌÓ„Ó |
|
|
ÂÊËχ ........................................... |
41 |
|
ИÒÔÓθÁÓ‚‡ÌË ÙÛÌ͈ËË ÙÂȉ ‡ .... |
42 |
|
ЛТФУО¸БУ‚‡МЛВ ТФВˆЛ‡О¸М˚ı ˝ЩЩВНЪУ‚ |
|
|
— ЭЩЩВНЪ ЛБУ· ‡КВМЛя ............. |
45 |
|
ИТФУО¸БУ‚‡МЛВ ТФВˆЛ‡О¸М˚ı ˝ЩЩВНЪУ‚ |
|
|
– ЦЛЩ У‚УИ ˝ЩЩВНЪ ..................... |
47 |
|
ИÒÔÓθÁÓ‚‡ÌË ÙÛÌ͈ËË PROGRAM AE |
|
|
........................................................ |
50 |
|
РВ„ЫОЛ У‚Н‡ ˝НТФУБЛˆЛЛ ‚ Ы˜МЫ˛ ..... |
53 |
|
ФУНЫТЛ У‚Н‡ ‚ Ы˜МЫ˛ ......................... |
54 |
4 |
ВÒÚ‡‚͇ ˝ÔËÁÓ‰‡ .................................. |
56 |
УÒÓ‚Â ¯ÂÌÒÚ‚Ó‚‡ÌÌ˚ ÓÔ ‡ˆËË ‚ÓÒÔ ÓËÁ‚‰ÂÌËя
ВУТФ УЛБ‚В‰ВМЛВ ОВМЪ˚ Т ˝ЩЩВНЪ‡ПЛ
ËÁÓ· ‡ÊÂÌËя .................................. |
58 |
ВÓÒÔ ÓËÁ‚‰ÂÌË ÎÂÌÚ˚ Ò ˆËÙ Ó‚˚ÏË
˝ЩЩВНЪ‡ПЛ .................................... |
59 |
Б˚ÒÚ Ó ÓÚ˚Ò͇ÌË ˝ÔËÁÓ‰‡ Ò ÔÓÏÓ˘¸˛
ÙÛÌ͈ËË Ô‡ÏяÚË ÌÛ΂ÓÈ |
|
УЪПВЪНЛ ........................................... |
61 |
ПÓËÒÍ Á‡ÔËÒË ÔÓ ‰‡Ú ......................... |
62 |
ПУЛТН ЩУЪУ – ФУЪУФУЛТН/ |
|
ФУЪУТН‡МЛ У‚‡МЛВ ......................... |
64 |
МÓÌÚ‡Ê Ì‡ ‰ Û„Û˛ ‡ÔÔ‡ ‡ÚÛ Û
П ÂÁ‡ÔËÒ¸ ÎÂÌÚ˚ ............................... |
66 |
В˚ФУОМВМЛВ ЛМ‰Л‚Л‰Ы‡О¸М˚ı ЫТЪ‡МУ‚УН М‡ ‚Л‰ВУН‡ПВ В
ИБПВМВМЛВ ЫТЪ‡МУ‚УН MENU ............. |
69 |
ПВ ВЫТЪ‡МУ‚Н‡ ‰‡Ъ˚ Л ‚ ВПВМЛ ........ |
78 |
ДУФУОМЛЪВО¸М‡я ЛМЩУ П‡ ˆЛя
ЦЛЩ У‚‡я ТЛТЪВП‡ Digital8 , Б‡ФЛТ¸ Л |
|
‚ÓÒÔ ÓËÁ‚‰ÂÌË .......................... |
80 |
З‡ПВМ‡ ОЛЪЛВ‚УИ ·‡Ъ‡ ВИНЛ ‚ В‡¯ВИ |
|
‚ˉÂÓ͇Ï  .................................. |
83 |
ПУЛТН Л ЫТЪ ‡МВМЛВ |
|
МВЛТФ ‡‚МУТЪВИ .............................. |
91 |
ИМ‰ЛН‡ˆЛя Т‡ПУ‰Л‡„МУТЪЛНЛ ............. |
95 |
П Â‰ÛÔ Âʉ‡˛˘Ë Ë̉Ë͇ÚÓ ˚ Ë |
|
ÒÓÓ·˘ÂÌËя ...................................... |
96 |
ИÒÔÓθÁÓ‚‡ÌËÂ В‡¯ÂÈ ‚ˉÂÓ͇Ï ˚ Á‡ |
|
„ ‡ÌˈÂÈ .......................................... |
97 |
ИÌÙÓ Ï‡ˆËя ÔÓ ÛıÓ‰Û Á‡ ‡ÔÔ‡ ‡ÚÓÏ Ë |
|
ПВ ˚ Ф В‰УТЪУ УКМУТЪЛ .............. |
98 |
ТВıМЛ˜ВТНЛВ ı‡ ‡НЪВ ЛТЪЛНЛ .......... |
104 |
ОÔ ‡ÚË‚Ì˚È ÒÔ ‡‚Ó˜ÌËÍ |
|
О·ÓÁ̇˜ÂÌË ˜‡ÒÚÂÈ Ë Â„ÛÎяÚÓ Ó‚ |
|
...................................................... |
105 |
РÛÍÓ‚Ó‰ÒÚ‚Ó ÔÓ ·˚ÒÚ ˚Ï ÙÛÌ͈ËяÏ |
|
...................................................... |
115 |
АÎÙ‡‚ËÚÌ˚È Û͇Á‡ÚÂθ .................... |
117 |
Checking supplied |
П Ó‚Â Í‡ Ô Ë·„‡ÂÏ˚ı |
|||
accessories |
|
Ф ЛМ‡‰ОВКМУТЪВИ |
||
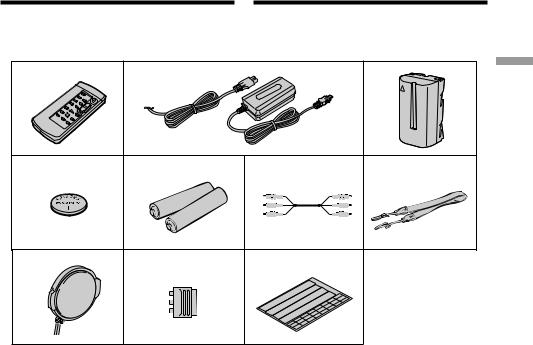
Make sure that the following accessories are |
У·В‰ЛЪВТ¸, ˜ЪУ ТОВ‰Ы˛˘ЛВ Ф ЛМ‡‰ОВКМУТЪЛ |
|||
supplied with your camcorder. |
Ô Ë·„‡˛ÚÒя Í В‡¯ÂÈ ‚ˉÂÓ͇Ï Â. |
|||
1 |
2 |
|
3 |
|
|
|
|
startedGetting |
|
4 |
5 |
6 |
7 |
|
|
|
|
ÍПÓ‰„ÓÚӂ͇ |
|
8 |
9 |
0 |
˝НТФОЫ‡Ъ‡ˆЛЛ |
|
|
|
|
||
1Wireless Remote Commander (1) |
1 БВТФ У‚У‰М˚И ФЫО¸Ъ ‰ЛТЪ‡МˆЛУММУ„У |
|||
(p. 110) |
|
ÛÔ ‡‚ÎÂÌËя (1) (ÒÚ . 110) |
||
2AC-L10A/L10B/L10C AC power adaptor (1), |
2 СВЪВ‚УИ ‡‰‡ФЪВ ФВ ВПВММУ„У ЪУН‡ AC- |
|||
Mains lead (1) (p. 13) |
|
L10A/L10B/L10C (1) (ÒÚ . 13) |
||
3NP-F330 battery pack (DCR-TR7000E)/ |
3 Б‡Ú‡ ÂÈÌ˚È·ÎÓÍNP-F330(DCR-TR7000E)/ |
|||
Б‡Ú‡ ÂÈÌ˚È ·ÎÓÍ NP-F550(DCR-TR7100E) |
||||
NP-F550 battery pack (DCR-TR7100E) (1) |
||||
(1) (ÒÚ . 12, 13) |
|
|||
(p. 12, 13) |
|
|
||
|
|
|
||
4CR2025 lithium battery (1) (p. 83)
The lithium battery is already installed in your camcorder.
5R6 (size AA) battery for Remote
Commander (2) (p. 111)
6A/V connecting cable (1) (p. 29)
7Shoulder strap (1) (p. 107)
8Lens cap (1) (p. 19)
921-pin adaptor (1) (p. 30)
!ºLabel sheet for cassette (1)
Stick this label on the recorded cassette.
4 ЛËÚË‚‡я ·‡Ú‡ ÂÈ͇ СR2025 (1) (ÒÚ . 83) ЛËÚË‚‡я ·‡Ú‡ ÂÈ͇ ÛÊ ÛÒÚ‡ÌÓ‚ÎÂ̇ ‚ В‡¯ÂÈ ‚ˉÂÓ͇Ï Â.
5 Б‡Ъ‡ ВИН‡ R6 ( ‡БПВ ‡ АА) ‰Оя ФЫО¸Ъ‡ ‰ЛТЪ‡МˆЛУММУ„У ЫФ ‡‚ОВМЛя (2) (ÒÚ . 111)
6 |
СУВ‰ЛМЛЪВО¸М˚И Н‡·ВО¸ ‡Ы‰ЛУ/‚Л‰ВУ |
|
|
(1) (ÒÚ . 29) |
|
7 |
ПΘ‚ÓÈ ÂÏÂ̸ (1) (ÒÚ . 107) |
|
8 |
К ˚¯Í‡ Ó·˙ÂÍÚË‚‡ (1) (ÒÚ . 19) |
|
9 |
21-¯Ú˚ ¸ÍÓ‚˚È ‡‰‡ÔÚ (1) (ÒÚ . 30) |
|
!º ЭЪЛНВЪН‡ ‰Оя Н‡ТТВЪ˚ (1) |
|
|
|
Н‡НОВИЪВ ˝ЪЫ ˝ЪЛНВЪНЫ М‡ Н‡ТТВЪЫ Т |
5 |
|
Á‡ÔËÒ¸˛. |
|

Guide Start Quick
English
Quick Start Guide
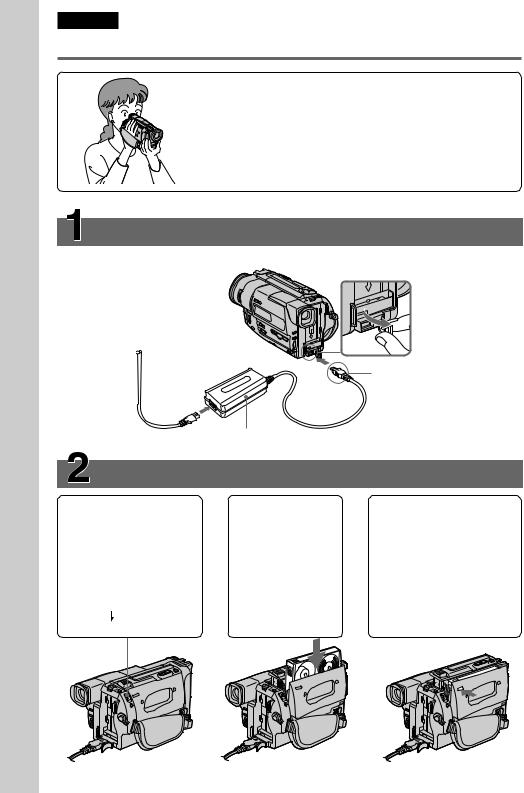
This chapter introduces you to the basic features of your camcorder. See the page in parentheses “( )” for more information.
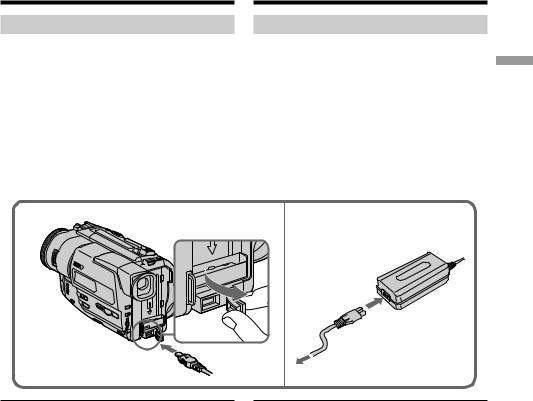
Connecting the mains lead (p. 17)
Use the battery pack when using your camcorder outdoors (p. 12).
Open the DC IN jack cover.
|
|
Connect the plug with |
|
|
its 4mark facing up. |
|
AC power adaptor (supplied) |
|
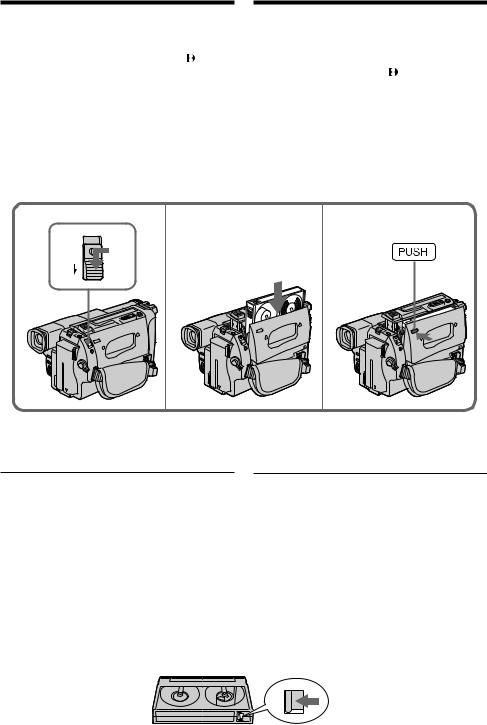
Inserting a cassette (p. 18) |
|
|
1Slide EJECT in the |
2Insert a cassette |
3Close the cassette |
direction of the arrow |
into the cassette |
compartment by |
while pressing the |
compartment |
pressing the “PUSH” |
small blue button. |
with its window |
mark on the cassette |
|
facing out. |
compartment. The |
|
|
cassette compartment |
EJECT |
|
automatically goes |
|
down. |
|
|
|
|
6
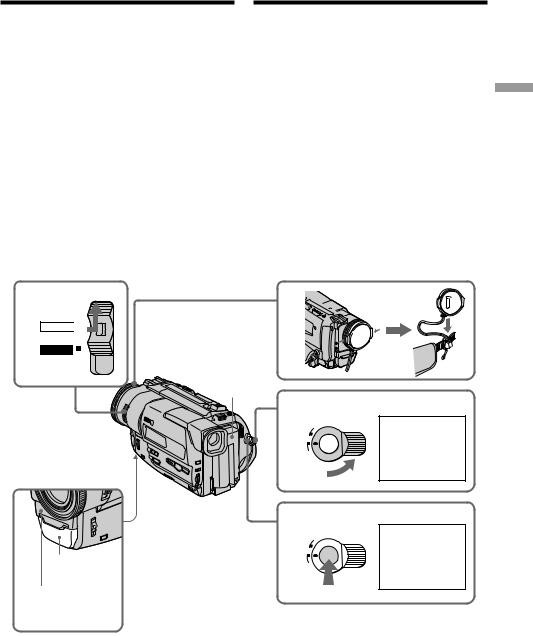
Recording a picture (p. 19)
1Remove the lens cap.
2Set the POWER switch to CAMERA
|
while pressing |
POWER |
the small green |
CAMERA |
button. |
OFF |
|
PLAYER |
|
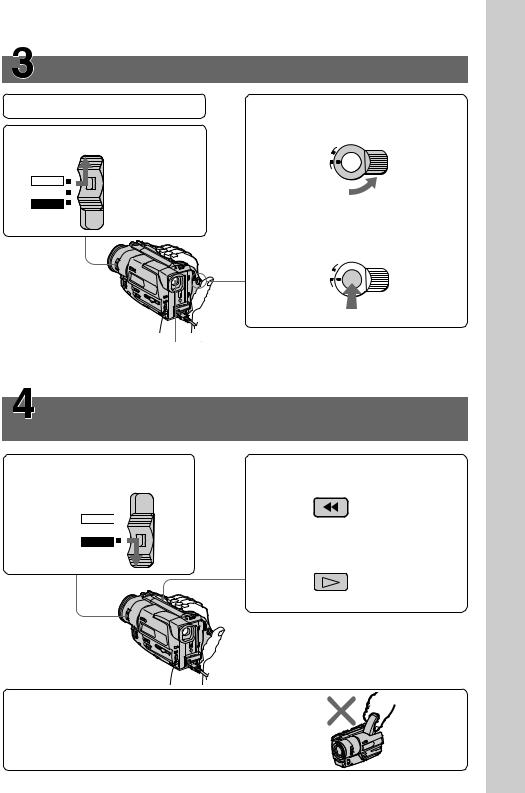
3Turn STANDBY to STANDBY. The picture appears in the viewfinder.
OCK
L
S
T
A
N
DBY
START/STOP
4Press the red button. Your camcorder starts recording. To stop recording, press the red button again.
OCK
L
S
T
A
N
DBY
START/STOP
Viewfinder
Use the viewfinder placing your eye against its eyecup.
Monitoring the playback picture in the viewfinder
(p. 21)
1Set the POWER switch to PLAYER while pressing the small
green button.
POWER CAMERA 

OFF 
PLAYER
2Press 0 to rewind the tape.
REW
3Press (to start playback.
PLAY
NOTE
Do not pick up your camcorder by holding the viewfinder.
Guide Start Quick
7
Б‡ФЫТНЫ УПЫ·˚ТЪ ФУ РЫНУ‚У‰ТЪ‚У
РЫТТНЛИ
РЫНУ‚У‰ТЪ‚У ФУ ·˚ТЪ УПЫ Б‡ФЫТНЫ
В ‰‡ÌÌÓÈ „·‚Â Ô Ë‚Â‰ÂÌ˚ ÓÒÌÓ‚Ì˚ ÙÛÌ͈ËË В‡¯ÂÈ ‚ˉÂÓ͇Ï ˚. ПÓ‰ Ó·Ì˚ ҂‰ÂÌËя Ô Ë‚Â‰ÂÌ˚ ̇ ÒÚ ‡Ìˈ ‚ Í Û„Î˚ı ÒÍӷ͇ı “( )”.
ПУ‰ТУВ‰ЛМВМЛВ Ф У‚У‰‡ ˝ОВНЪ УФЛЪ‡МЛя (ÒÚ . 17)
П Л ФУО¸БУ‚‡МЛЛ ‚Л‰ВУН‡ПВ УИ ‚МВ ФУПВ˘ВМЛя ЛТФУО¸БЫИЪВ ·‡Ъ‡ ВИМ˚И ·ОУН (ТЪ . 12). 
ОÚÍ ÓÈÚÂ Í ˚¯ÍÛ „ÌÂÁ‰‡ DC IN.
ПУ‰ТУВ‰ЛМЛЪВ ¯ЪВНВ Ъ‡Н, ˜ЪУ·˚ В„У БМ‡Н 4 ·˚О М‡Ф ‡‚ОВМ ‚‚В ı.
СВЪВ‚УИ ‡‰‡ФЪВ ФВ ВПВММУ„У ЪУН‡ (Ф ЛО‡„‡ВЪТя)
УÒÚ‡Ìӂ͇ ͇ÒÒÂÚ˚ (ÒÚ . 18)
1ПВ В‰‚ЛМ¸ЪВ ФВ ВНО˛˜‡ЪВО¸ EJECT ‚ М‡Ф ‡‚ОВМЛЛ
ТЪ ВОНЛ, М‡К‡‚ П‡ОВМ¸НЫ˛ ТЛМ˛˛ НМУФНЫ.
 EJECT
EJECT
2ВÒÚ‡‚¸Ú |
3З‡Н УИЪВ Н‡ТТВЪМ˚И |
Н‡ТТВЪЫ ‚ |
УЪТВН, М‡К‡‚ ПВЪНЫ |
Н‡ТТВЪМ˚И |
“PUSH” М‡ Н‡ТТВЪМУП |
УЪТВН Ъ‡Н, |
УЪТВНВ. К‡ТТВЪМ˚И |
˜ÚÓ·˚ ÓÍÓ¯ÍÓ |
УЪТВН ‡‚ЪУП‡ЪЛ˜ВТНЛ |
·˚ÎÓ Ó· ‡˘ÂÌÓ |
УФЫТЪЛЪТя. |
̇ ÛÊÛ. |
|
8

З‡ÔËÒ¸ ËÁÓ· ‡ÊÂÌËя (ÒÚ . 19)
1СМЛПЛЪВ Н ˚¯НЫ У·˙ВНЪЛ‚‡.
2УÒÚ‡ÌÓ‚ËÚ Ô ÂÍβ˜‡ÚÂθ
|
POWER ‚ |
|
POWER |
ФУОУКВМЛВ |
|
CAMERA, |
||
CAMERA |
||
̇ʇ‚ |
||
OFF |
||
χÎÂ̸ÍÛ˛ |
||
PLAYER |
||
БВОВМЫ˛ |
||
|
||
|
НМУФНЫ. |
3ПУ‚В МЛЪВ ˚˜‡„ STANDBY ‚ ФУОУКВМЛВ STANDBY. В ‚Л‰УЛТН‡- ЪВОВ ФУя‚ЛЪТя ЛБУ· ‡КВМЛВ.
OCK
L
S
T
A
N
DBY
START/STOP
4Н‡КПЛЪВ Н ‡ТМЫ˛ НМУФНЫ. В‡¯‡ ‚Л‰ВУН‡ПВ ‡ М‡˜МВЪ Б‡ФЛТ¸. ДОя УТЪ‡МУ‚НЛ Б‡ФЛТЛ М‡КПЛЪВ Н ‡ТМЫ˛ НМУФНЫ В˘В ‡Б.
OCK
L
S
T
A
N
DBY
START/STOP
ВˉÓËÒ͇ÚÂθ
ИТФУО¸БЫИЪВ ‚Л‰УЛТН‡ЪВО¸, Ф ЛТЪ‡‚Л‚ „О‡Б Н УНЫОя Ы.
КÓÌÚ Óθ ‚ÓÒÔ ÓËÁ‚Ó‰ËÏÓ„Ó ËÁÓ· ‡ÊÂÌËя ‚ ‚ˉÓËÒ͇ÚÂΠ(ÒÚ . 21)
1УТЪ‡МУ‚ЛЪВ ФВ ВНО˛˜‡ЪВО¸ POWER ‚ ФУОУКВМЛВ PLAYER, М‡К‡‚ П‡ОВМ¸НЫ˛ БВОВМЫ˛ НМУФНЫ.
POWER
CAMERA 
 OFF
OFF 
PLAYER
2Н‡КПЛЪВ НМУФНЫ 0‰Оя ФВ ВПУЪНЛ ОВМЪ˚.
REW
3Н‡КПЛЪВ НМУФНЫ ( ‰Оя М‡˜‡О‡ ‚УТФ УЛБ‚В‰ВМЛя.
PLAY
ПРИМЕЧАНИЕ
Н ÔÓ‰ÌËχÈÚ ‚ˉÂÓ͇Ï Û, ‚Áя‚¯ËÒ¸ Á‡ ‚ˉÓËÒ͇ÚÂθ.
Б‡ФЫТНЫ УПЫ·˚ТЪ ФУ РЫНУ‚У‰ТЪ‚У
9

— Getting started —
Using this manual
As you read through this manual, buttons and settings on your camcorder are shown in capital letters.
e.g. Set the POWER switch to CAMERA.
When you carry out an operation, you can hear a beep sound to indicate that the operation is being carried out.
Before using your camcorder
With your digital camcorder, you can use Hi8 video cassettes H.
Your camcorder records and plays back pictures in Digital8 system. Also, your camcorder plays back tapes recorded in the Hi8 H/standard 8 h(analog) system. You, however, cannot use the functions in “Advanced Playback Operations” on page 58 to 65 for playback in the Hi8 H/ standard 8 hsystem. To enable smooth transition, we recommend that you do not mix pictures recorded in the Hi8 H/standard 8 h with the Digital8 system on a tape.
Note on TV colour systems
TV colour systems differ from country to country. To view your recordings on a TV, you need a PAL system-based TV.
Copyright precautions
Television programmes, films, video tapes, and other materials may be copyrighted. Unauthorized recording of such materials may be contrary to the provision of the copyright laws.
Contents of the recording cannot be compensated if recording or playback is not made due to a malfunction of the camcorder, video tape, etc.
10
— ПУ‰„УЪУ‚Н‡ Н ˝НТФОЫ‡Ъ‡ˆЛЛ —
ИÒÔÓθÁÓ‚‡ÌË ‰‡ÌÌÓ„Ó ÛÍÓ‚Ó‰ÒÚ‚‡
П Л ˜ЪВМЛЛ ‰‡ММУ„У ЫНУ‚У‰ТЪ‚‡ Ы˜ЛЪ˚‚‡ИЪВ, ˜ЪУ НМУФНЛ Л ЫТЪ‡МУ‚НЛ М‡ ‚Л‰ВУН‡ПВ В ФУН‡Б‡М˚ Б‡„О‡‚М˚ПЛ ·ЫН‚‡ПЛ. П ЛП. УТЪ‡МУ‚ЛЪВ ‚˚НО˛˜‡ЪВО¸ POWER ‚ ФУОУКВМЛВ CAMERA.
П Л ‚˚ФУОМВМЛЛ УФВ ‡ˆЛЛ М‡ ‚Л‰ВУН‡ПВ В В˚ ТПУКВЪВ ЫТО˚¯‡Ъ¸ БЫППВ М˚И ТЛ„М‡О, ФУ‰Ъ‚В К‰‡˛˘ЛИ ‚˚ФУОМВМЛВ УФВ ‡ˆЛЛ.
ПВ В‰ М‡˜‡ОУП ˝НТФОЫ‡Ъ‡ˆЛЛ
В‡¯ÂÈ ‚ˉÂÓ͇Ï ˚
ДОя В‡¯ВИ ˆЛЩ У‚УИ ‚Л‰ВУН‡ПВ ˚ В˚ ПУКВЪВ ЛТФУО¸БУ‚‡Ъ¸ ‚Л‰ВУН‡ТТВЪ˚ Hi8 H. В‡¯‡ ‚Л‰ВУН‡ПВ ‡ Б‡ФЛТ˚‚‡ВЪ Л ‚УТФ УЛБ‚У‰ЛЪ ЛБУ· ‡КВМЛя ‚ ˆЛЩ У‚УИ ТЛТЪВПВ Digital8 .Т‡НКВ, В‡¯‡ ‚Л‰ВУН‡ПВ ‡ ‚УТФ УЛБ‚У‰ЛЪ ОВМЪ˚, Б‡ФЛТ‡ММ˚В ‚ ТЛТЪВПВ Hi8 H/ТЪ‡М‰‡ ЪМУИ (‡М‡ОУ„У‚УИ) ТЛТЪВПВ 8 h. О‰М‡НУ, В˚ МВ ПУКВЪВ ЛТФУО¸БУ‚‡Ъ¸ ˝ЪЛ ЩЫМНˆЛЛ ‚ ‡Б‰ВОВ “УТУ‚В ¯ВМТЪ‚У‚‡ММ˚В УФВ ‡ˆЛЛ ‚УТФ УЛБ‚В‰ВМЛя” М‡ ТЪ ‡МЛˆ‡ı Т 58 ФУ 65 ‰Оя ‚УТФ УЛБ‚В‰ВМЛя ‚ ТЛТЪВПВ Hi8 H/ТЪ‡М‰‡ ЪМУИ ТЛТЪВПВ 8 h. ДОя У·ВТФВ˜ВМЛя ФО‡‚МУ„У ФВ ВıУ‰‡ВНУПВМ‰ЫВЪТя МВ ТПВ¯Л‚‡Ъ¸ М‡ ОВМЪВ
ЛБУ· ‡КВМЛя, Б‡ФЛТ‡ММ˚В ‚ ТЛТЪВПВ Hi8 H/ ТЪ‡М‰‡ ЪМУИ ТЛТЪВПВ 8 h, Т ЛБУ· ‡КВМЛяПЛ, Б‡ФЛТ‡ММ˚ПЛ ‚ ˆЛЩ У‚УИ ТЛТЪВПВ Digital8 .
П ЛПВ˜‡МЛВ ФУ ТЛТЪВП‡П
ˆ‚ÂÚÌÓ„Ó ÚÂ΂ˉÂÌËя
СЛТЪВП˚ ˆ‚ВЪМУ„У ЪВОВ‚Л‰ВМЛя УЪОЛ˜‡˛ЪТя ‚ Б‡‚ЛТЛПУТЪЛ УЪ ТЪ ‡М˚. ДОя Ф УТПУЪ ‡ В‡¯Лı Б‡ФЛТВИ М‡ ˝Н ‡МВ ЪВОВ‚ЛБУ ‡ В‡П МВУ·ıУ‰ЛПУ ЛТФУО¸БУ‚‡Ъ¸ ЪВОВ‚ЛБУ , УТМУ‚‡ММ˚И М‡ ТЛТЪВПВ PAL.
П В‰УТЪВ ВКВМЛВ У· ‡‚ЪУ ТНУП
Ô ‡‚Â
ТВОВ‚ЛБЛУММ˚В Ф У„ ‡ПП˚, НЛМУЩЛО¸П˚, ‚Л‰ВУОВМЪ˚ Л ‰ Ы„ЛВ П‡ЪВ Л‡О˚ ПУ„ЫЪ ·˚Ъ¸ Б‡˘Л˘ВМ˚ ‡‚ЪУ ТНЛП Ф ‡‚УП. НВОЛˆВМБЛ У‚‡ММ‡я Б‡ФЛТ¸ Ъ‡НЛı П‡ЪВ Л‡ОУ‚ ПУКВЪ Ф УЪЛ‚У В˜ЛЪ¸ ФУОУКВМЛяП Б‡НУМ‡ У· ‡‚ЪУ ТНУП Ф ‡‚В.
СУ‰В К‡МЛВ Б‡ФЛТЛ МВ ПУКВЪ ·˚Ъ¸ НУПФВМТЛ У‚‡МУ ‚ ТОЫ˜‡В, ВТОЛ Б‡ФЛТ¸ ЛОЛ ‚УТФ УЛБ‚В‰ВМЛВ МВ ‚˚ФУОМВМ˚ ЛБ-Б‡ МВЛТФ ‡‚МУТЪЛ ‚Л‰ВУН‡ПВ ˚, ‚Л‰ВУОВМЪ˚ Л Ъ.Ф.
Using this manual
Precautions on camcorder care
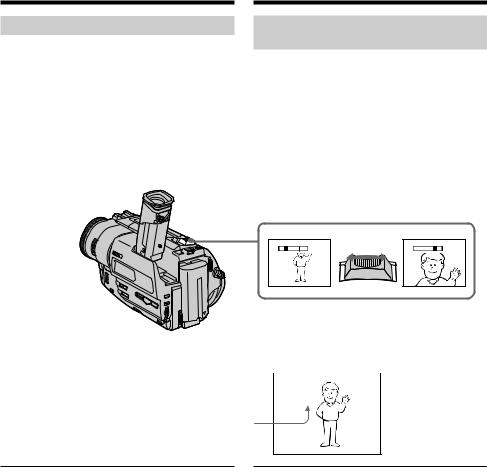
•The colour viewfinder is manufactured using high-precision technology. However, there may be some tiny black spots and/or bright spots (red, blue or green in colour) that constantly appear in the viewfinder. These spots occur normally in the manufacturing process and do not affect the recorded picture in any way. Effective number of pixels is 99.99% or more.
•Do not let your camcorder get wet. Keep your camcorder away from rain and sea water. Letting your camcorder get wet may cause your camcorder to malfunction. Sometimes this malfunction cannot be repaired [a].
•Never leave your camcorder exposed to temperatures above 60°C (140°F), such as in a car parked in the sun or under direct sunlight
[b].
•Do not place your camcorder so as to point the viewfinder toward the sun. The inside of the viewfinder may be damaged [c].
ИÒÔÓθÁÓ‚‡ÌË ‰‡ÌÌÓ„ÓÛÍÓ‚Ó‰ÒÚ‚‡
МВ ˚ Ф В‰УТЪУ УКМУТЪЛ Ф Л
ÛıӉ Á‡ ‚ˉÂÓ͇Ï ÓÈ
•Ц‚ВЪМУИ ‚Л‰УЛТН‡ЪВО¸ ЛБ„УЪУ‚ОВМ Т ФУПУ˘¸˛ ‚˚ТУНУФ ВˆЛБЛУММУИ ЪВıМУОУ„ЛЛ. О‰М‡НУ ‚ ‚Л‰УЛТН‡ЪВОВ ПУ„ЫЪ ФУТЪУяММУ ФУя‚ОяЪ¸Тя ˜В М˚В ЛОЛ я НЛВ ˆ‚ВЪМ˚В ЪУ˜НЛ (Н ‡ТМ˚В, ТЛМЛВ ЛОЛ БВОВМ˚В). ПУя‚ОВМЛВ ˝ЪЛı ЪУ˜ВН ‚ФУОМВ МУ П‡О¸МУ ‰Оя Ф УˆВТТ‡ Т˙ВПНЛ Л МЛНУЛП У· ‡БУП МВ ‚ОЛяВЪ М‡ Б‡ФЛТ˚‚‡ВПУВ ЛБУ· ‡КВМЛВ. С‚˚¯В 99,99% ˝Н ‡М‡ Ф В‰М‡БМ‡˜ВМУ ‰Оя ˝ЩЩВНЪЛ‚МУ„У ЛТФУО¸БУ‚‡МЛя.
•НВ ‰УФЫТН‡ИЪВ, ˜ЪУ·˚ ‚Л‰ВУН‡ПВ ‡ ТЪ‡МУ‚ЛО‡Т¸ ‚О‡КМУИ. П В‰Уı ‡МяИЪВ ‚Л‰ВУН‡ПВ Ы УЪ ‰УК‰я Л ПУ ТНУИ ‚У‰˚. ЕТОЛ В˚ М‡ПУ˜ЛЪВ ‚Л‰ВУН‡ПВ Ы, ЪУ ˝ЪУ ПУКВЪ Ф Л‚ВТЪЛ Н МВЛТФ ‡‚МУТЪЛ ‡ФФ‡ ‡Ъ‡, НУЪУ ‡я МВ ‚ТВ„‰‡ ПУКВЪ ·˚Ъ¸ ЫТЪ ‡МВМ‡
[a].
•НЛНУ„‰‡ МВ УТЪ‡‚ОяИЪВ ‚Л‰ВУН‡ПВ Ы ‚ ПВТЪВ Т ЪВПФВ ‡ЪЫ УИ ‚˚¯В 60°С (140°F), Н‡Н, М‡Ф ЛПВ , ‚ ‡‚ЪУПУ·ЛОВ, УТЪ‡‚ОВММУП М‡ ТУОМˆВ ЛОЛ ФУ‰ Ф яП˚П ТУОМВ˜М˚П Т‚ВЪУП [b].
•НВ ‡ТФУО‡„‡ИЪВ Т‚У˛ ‚Л‰ВУН‡ПВ Ы Ъ‡НЛП У· ‡БУП, ˜ЪУ·˚ ‚Л‰УЛТН‡ЪВО¸ ·˚О М‡Ф ‡‚ОВМ М‡ ТУОМˆВ. ИМ‡˜В ПУКВЪ ·˚Ъ¸ ФУ‚ ВК‰ВМУ ‚МЫЪ ВММВВ ЫТЪ УИТЪ‚У ‚Л‰УЛТН‡ЪВОя [c].
˝НТФОЫ‡Ъ‡ˆЛЛ Н ПУ‰„УЪУ‚Н‡ started Getting
[a] |
[b] |
[c] |
11

Step 1 Preparing the
power supply
Installing the battery pack
Install the battery pack to use your camcorder outdoors.
Slide the battery pack down.
To remove the battery pack
Slide the battery pack out in the direction of the arrow while pressing BATT RELEASE down.
After installing the battery pack
Do not carry your camcorder by holding the battery pack. If you do so, the battery pack may slide off your camcorder unintentionally, damaging your camcorder.
ПÛÌÍÚ 1 ПÓ‰„ÓÚӂ͇ ËÒÚÓ˜ÌË͇ÔËÚ‡ÌËя
УÒÚ‡Ìӂ͇ ·‡Ú‡ ÂÈÌÓ„Ó ·ÎÓ͇
УТЪ‡МУ‚ЛЪВ ·‡Ъ‡ ВИМ˚И ·ОУН ‰Оя ЪУ„У, ˜ЪУ·˚ ЛТФУО¸БУ‚‡Ъ¸ В‡¯Ы ‚Л‰ВУН‡ПВ Ы ‚МВ ФУПВ˘ВМЛя.
П ‰‚Ë̸Ú ·‡Ú‡ ÂÈÌ˚È ·ÎÓÍ ‚ÌËÁ.
ДÎя ÒÌяÚËя ·‡Ú‡ ÂÈÌÓ„Ó ·ÎÓ͇
ПВ В‰‚ЛМ¸ЪВ ·‡Ъ‡ ВИМ˚И ·ОУН ‚ М‡Ф ‡‚ОВМЛЛ ТЪ ВОНЛ, М‡К‡‚ НМУФНЫ BATT RELEASE ‚МЛБ.
BATT RELEASE
ПÓÒΠÛÒÚ‡ÌÓ‚ÍË ·‡Ú‡ ÂÈÌÓ„Ó ·ÎÓ͇
НВ ФВ ВМУТЛЪВ Т‚У˛ ‚Л‰ВУН‡ПВ Ы, ‚Бя‚¯ЛТ¸ Б‡ ·‡Ъ‡ ВИМ˚И ·ОУН. ЕТОЛ В˚ Ъ‡Н Т‰ВО‡ВЪВ, ·‡Ъ‡ ВИМ˚И ·ОУН ПУКВЪ МВФ УЛБ‚УО¸МУ ТУТНУО¸БМЫЪ¸ Т В‡¯ВИ ‚Л‰ВУН‡ПВ ˚ Л ФУ‚ В‰ЛЪ¸ ВВ.
12
Step 1 Preparing the power supply
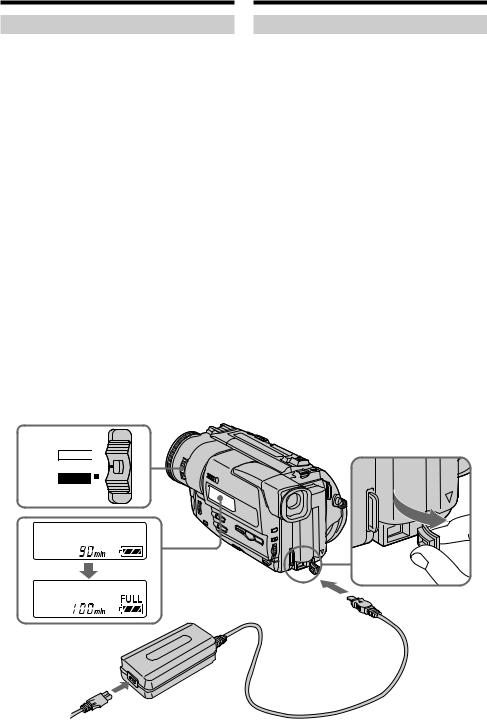
Charging the battery pack
Use the battery pack after charging it for your camcorder.
Your camcorder operates only with the “InfoLITHIUM” battery pack (L series).
“InfoLITHIUM” is a trademark of Sony Corporation.
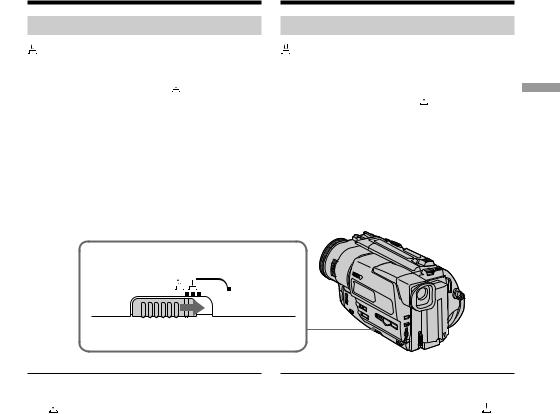
(1)Open the DC IN jack cover and connect the AC power adaptor supplied with your camcorder to the DC IN jack with the plug’s 4 mark facing up.
(2)Connect the mains lead to the AC power adaptor.
(3)Connect the mains lead to the mains. (4)Set the POWER switch to OFF. Charging
begins. The remaining battery time is indicated in minutes on the display window.
When the remaining battery indicator changes to ı, normal charge is completed. To fully charge the battery (full charge), leave the battery pack attached for about 1 hour after normal charge is completed until FULL appears in the display window. Fully charging the battery allows you to use the battery longer than usual.
4 POWER CAMERA 

OFF 
PLAYER
2
ПÛÌÍÚ 1 ПÓ‰„ÓÚӂ͇ ËÒÚÓ˜ÌË͇ ÔËÚ‡ÌËя
З‡ я‰Í‡ ·‡Ú‡ ÂÈÌÓ„Ó ·ÎÓ͇
ИТФУО¸БЫИЪВ ·‡Ъ‡ ВИМ˚И ·ОУН ‰Оя В‡¯ВИ |
|
|
‚Л‰ВУН‡ПВ ˚ ФУТОВ В„У Б‡ я‰НЛ. |
|
|
|
||
В‡¯‡ ‚ˉÂÓ͇Ï ‡ ‡·ÓÚ‡ÂÚ ÚÓθÍÓ Ò |
Getting |
|
·‡Ъ‡ ВИМ˚П ·ОУНУП “InfoLITHIUM” (ТВ ЛЛ L). |
||
|
||
“InfoLITHIUM” я‚ÎяÂÚÒя ÙË ÏÂÌÌ˚Ï Á̇ÍÓÏ |
started |
|
(1)ОÚÍ ÓÈÚÂ Í ˚¯ÍÛ „ÌÂÁ‰‡ DC IN Ë |
||
ÍÓ ÔÓ ‡ˆËË Sony. |
|
|
ФУ‰ТУВ‰ЛМЛЪВ ТВЪВ‚УИ ‡‰‡ФЪВ |
|
|
ФВ ВПВММУ„У ЪУН‡, Ф ЛО‡„‡ВП˚И Н В‡¯ВИ |
ПÓ‰„ÓÚӂ͇ |
|
ТВЪВ‚УПЫ ‡‰‡ФЪВ Ы ФВ ВПВММУ„У ЪУН‡. |
||
‚ˉÂÓ͇Ï Â, Í „ÌÂÁ‰Û DC IN, Ú‡Í ˜ÚÓ·˚ |
|
|
¯ÚÂÍ 4 ·˚Î Ì‡Ô ‡‚ÎÂÌ ‚‚ ı. |
|
|
(2)ПУ‰ТУВ‰ЛМЛЪВ Ф У‚У‰ ˝ОВНЪ УФЛЪ‡МЛя Н |
|
|
(3)ПУ‰ТУВ‰ЛМЛЪВ Ф У‚У‰ ˝ОВНЪ УФЛЪ‡МЛя Н |
Í |
|
ТВЪВ‚УИ УБВЪНВ. |
˝НТФОЫ‡Ъ‡ˆЛЛ |
|
|
||
(4)УÒÚ‡ÌÓ‚ËÚ Ô ÂÍβ˜‡ÚÂθ POWER ‚ |
|
|
ФУОУКВМЛВ OFF. Н‡˜МВЪТя Б‡ я‰Н‡. В |
|
|
УНУ¯НВ ‰ЛТФОВя ·Ы‰ВЪ УЪУ· ‡К‡Ъ¸Тя |
|
|
‚ ВПя УТЪ‡‚¯В„УТя Б‡ я‰‡ ‚ ПЛМЫЪ‡ı. |
|
|
ЕÒÎË Ë̉Ë͇ÚÓ ÓÒÚ‡‚¯Â„ÓÒя Á‡ я‰‡ |
|
|
ЛБПВМЛЪТя М‡ ı, ˝ÚÓ Á̇˜ËÚ, ˜ÚÓ |
|
|
МУ П‡О¸М‡я Б‡ я‰Н‡ Б‡‚В ¯ВМ‡. ДОя ФУОМУИ |
|
|
Á‡ я‰ÍË ·‡Ú‡ ÂÈÌÓ„Ó ·ÎÓ͇ (ÔÓÎ̇я |
|
|
Á‡ я‰Í‡) ÓÒÚ‡‚¸Ú ·‡Ú‡ ÂÈÌ˚È ·ÎÓÍ |
|
|
Ф ЛН ВФОВММ˚П М‡ ПВТЪВ Ф Л·ОЛБЛЪВО¸МУ М‡ |
|
|
У‰ЛМ ˜‡Т ФУТОВ Б‡‚В ¯ВМЛя МУ П‡О¸МУИ |
|
|
Б‡ я‰НЛ ‰У ЪВı ФУ , ФУН‡ ‚ УНУ¯НУ ‰ЛТФОВя |
|
|
Ì ÔÓя‚ËÚÒя Ë̉Ë͇ˆËя FULL. ПÓÎ̇я |
|
|
Á‡ я‰Í‡ ·‡Ú‡ ÂÈÌÓ„Ó ·ÎÓ͇ ÔÓÁ‚ÓÎяÂÚ В‡Ï |
|
|
ЛТФУО¸БУ‚‡Ъ¸ ·‡Ъ‡ ВИМ˚И ·ОУН ‰УО¸¯В ˜ВП |
|
|
Ó·˚˜ÌÓ. |
|
1
13

Step 1 Preparing the power supply
ПÛÌÍÚ 1 ПÓ‰„ÓÚӂ͇ ËÒÚÓ˜ÌË͇ ÔËÚ‡ÌËя
Note
Prevent metallic objects from coming into contact with the metal parts of the DC plug of the AC power adaptor. This may cause a short-circuit, damaging the AC power adaptor.
Remaining battery time indicator
The remaining battery time indicator in the display window roughly indicates the recording time.
Battery pack
The battery pack is charged a little before it leaves the factory.
Until your camcorder calculates the actual remaining battery time
“– – – – min” appears in the display window.
If there is a slight difference in shape between the plug of mains lead and the terminal of AC power adaptor.
It is ignorable for their mutual connection and power supply.
Plug the mains lead deeply
Be sure to plug the mains lead deeply into the terminal of AC power adaptor so that it is firmly locked. If there is a gap between the plug of mains lead and the terminal of AC power adaptor, it does not affect the efficiency of the AC power adaptor.
П ËϘ‡ÌËÂ
НВ ‰УФЫТН‡ИЪВ НУМЪ‡НЪ‡ ПВЪ‡ООЛ˜ВТНЛı Ф В‰ПВЪУ‚ Т ПВЪ‡ООЛ˜ВТНЛПЛ ˜‡ТЪяПЛ ¯ЪВНВ ‡ ФУТЪУяММУ„У ЪУН‡ ТВЪВ‚У„У ‡‰‡ФЪВ ‡. ЭЪУ ПУКВЪ Ф Л‚ВТЪЛ Н НУ УЪНУПЫ Б‡П˚Н‡МЛ˛ Л ФУ‚ ВК‰ВМЛ˛ В‡¯ВИ ‚Л‰ВУН‡ПВ ˚.
ИМ‰ЛН‡ЪУ ‚ ВПВМЛ УТЪ‡‚¯В„УТя Б‡ я‰‡ ·‡Ъ‡ ВИМУ„У ·ОУН‡
ИМ‰ЛН‡ЪУ ‚ ВПВМЛ УТЪ‡‚¯В„УТя Б‡ я‰‡ ·‡Ъ‡ ВИМУ„У ·ОУН‡ ‚ УНУ¯НВ ‰ЛТФОВя Ф Л·ОЛБЛЪВО¸МУ ЫН‡Б˚‚‡ВЪ ‚ ВПя Б‡ФЛТЛ Т ФУПУ˘¸˛ ‚Л‰УЛТН‡ЪВОя.
Б‡Ú‡ ÂÈÌ˚È ·ÎÓÍ
Б‡Ъ‡ ВИМ˚И ·ОУН ЫКВ МВПМУ„У Б‡ яКВМ М‡ Ф В‰Ф ЛяЪЛЛ-ЛБ„УЪУ‚ЛЪВОВ.
ДÓ ÚÂı ÔÓ , ÔÓ͇ В‡¯‡ ‚ˉÂÓ͇Ï ‡ ÓÔ Â‰ÂÎËÚ ‰ÂÈÒÚ‚ËÚÂθÌÓ ‚ ÂÏя ÓÒÚ‡‚¯Â„ÓÒя Á‡ я‰‡ ·‡Ú‡ ÂÈÌÓ„Ó ·ÎÓ͇
ВУНУ¯НВ ‰ЛТФОВя ·Ы‰ВЪ УЪУ· ‡К‡Ъ¸Тя ЛМ‰ЛН‡ˆЛя “– – – – min”.
ВТОЫ˜‡В УЪОЛ˜Ля ЩУ П˚ ¯ЪВНВ ‡ Ф У‚У‰‡ ˝ОВНЪ УФЛЪ‡МЛя Л „МВБ‰‡ ТВЪВ‚У„У ‡‰‡ФЪВ ‡ ФВ ВПВММУ„У ЪУН‡
СУВ‰ЛМВМЛВ ПВК‰Ы МЛПЛ Л ЛТЪУ˜МЛНУП ФЛЪ‡МЛя МВ‚УБПУКМУ.
ПУ‰ТУВ‰ЛМяИЪВ ¯МЫ ˝ОВНЪ УФЛЪ‡МЛя ФОУЪМУ
П У‚В ¸ЪВ, ˜ЪУ·˚ ¯ЪВНВ Ф У‚У‰‡ ˝ОВНЪ УФЛЪ‡МЛя ·˚О ФОУЪМУ ФУ‰ТУВ‰ЛМВМ Н „МВБ‰Ы ТВЪВ‚У„У ‡‰‡ФЪВ ‡ ФВ ВПВММУ„У ЪУН‡. ЕТОЛ ·Ы‰ВЪ Б‡БУ ПВК‰Ы ¯ЪВНВ УП Ф У‚У‰‡ ˝ОВНЪ УФЛЪ‡МЛя Л „МВБ‰УП ТВЪВ‚У„У ‡‰‡ФЪВ ‡ ФВ ВПВММУ„У ЪУН‡, ЪУ ТВЪВ‚УИ ‡‰‡ФЪВ ФВ ВПВММУ„У ЪУН‡ ПУКВЪ МВ ‡·УЪ‡Ъ¸.
14

Step 1 Preparing the power |
|
|
ПÛÌÍÚ 1 |
ПÓ‰„ÓÚӂ͇ ËÒÚÓ˜ÌË͇ |
|||||
|
supply |
|
|
|
|
ÔËÚ‡ÌËя |
|
|
|
|
|
|
|
|
|
|
|
|
|
Charging time |
|
|
|
В ÂÏя Á‡ я‰ÍË |
|
|
|||
|
|
|
|
|
|
||||
|
Battery pack |
Full charge (Normal charge) |
|
|
|||||
|
Б‡Ú‡ ÂÈÌ˚È ·ÎÓÍ |
ПÓÎ̇я Á‡ я‰Í‡ (ÌÓ Ï‡Î¸Ì‡я Á‡ я‰Í‡) |
|
|
|||||
|
|
|
|
|
|
|
|
||
|
NP-F3301) |
|
150 (90) |
|
|
|
|
||
|
NP-F530/F5502) |
|
210 (150) |
|
|
|
|
||
|
NP-F730/F750 |
|
300 (240) |
|
|
|
|
||
|
NP-F930/F950 |
|
390 (330) |
|
|
|
|
||
Approximate number of minutes to charge an |
|
|
П Л·ОЛБЛЪВО¸МУВ ‚ ВПя ‚ ПЛМЫЪ‡ı ‰Оя |
||||||
empty battery pack |
|
|
|
Б‡ я‰НЛ ФУОМУТЪ¸˛ ‡Б яКВММУ„У |
|||||
|
|
|
|
|
·‡Ú‡ ÂÈÌÓ„Ó ·ÎÓ͇ |
|
|
||
Recording time |
|
|
|
В ÂÏя Á‡ÔËÒË |
|
|
|||
|
|
|
|
|
|
|
|
||
|
Battery pack |
|
|
Continuous3) |
|
Typical4) |
|||
|
Б‡Ú‡ ÂÈÌ˚È ·ÎÓÍ |
|
НÂÔ Â ˚‚̇я3) |
|
ТËÔ˘̇я4) |
||||
|
NP-F3301) |
|
100 (90) |
55 |
(50) |
|
|||
|
NP-F530 |
|
165 (150) |
90 |
(80) |
|
|||
|
NP-F5502) |
|
200 (180) |
105 (95) |
|
||||
|
NP-F730 |
|
335 (300) |
185 |
(160) |
|
|||
|
NP-F750 |
|
410 (365) |
225 |
(200) |
|
|||
|
NP-F930 |
|
535 (480) |
290 |
(260) |
|
|||
|
NP-F950 |
|
630 (570) |
340 |
(310) |
|
|||
Approximate number of minutes when you use a fully charged battery
Numbers in parentheses “( )” indicate the time using a normally charged battery.
1)Supplied with DCR-TR7000E
2)Supplied with DCR-TR7100E
3)Approximate continuous recording time at 25°C (77°F). The battery life will be shorter if you use your camcorder in a cold environment.
4)Approximate number of minutes when recording while you repeat recording start/ stop, zooming and turning the power on/off. The actual battery life may be shorter.
П Л·ОЛБЛЪВО¸МУВ ‚ ВПя ‚ ПЛМЫЪ‡ı Ф Л ЛТФУО¸БУ‚‡МЛЛ ФУОМУТЪ¸˛ Б‡ яКВММУ„У ·‡Ъ‡ ВИМУ„У ·ОУН‡
ЧЛТО‡ ‚ ТНУ·Н‡ı “( )” ЫН‡Б˚‚‡˛Ъ ‚ ВПя Ф Л ЛТФУО¸БУ‚‡МЛЛ ·‡Ъ‡ ВИМУ„У ·ОУН‡ Т МУ П‡О¸МУИ Б‡ я‰НУИ.
1)Ô Ë·„‡ÂÚÒя Í ÏÓ‰ÂÎË DCR-TR7000E
2)Ô Ë·„‡ÂÚÒя Í ÏÓ‰ÂÎË DCR-TR7100E
3)П Л·ОЛБЛЪВО¸МУВ ‚ ВПя МВФ В ˚‚МУИ Б‡ФЛТЛ Ф Л ЪВПФВ ‡ЪЫ В 25°С (77°F). П Л ЛТФУО¸БУ‚‡МЛЛ ‚Л‰ВУН‡ПВ ˚ ‚ ıУОУ‰М˚ı ЫТОУ‚Ляı Т УН ТОЫК·˚ ·‡Ъ‡ ВИМУ„У ·ОУН‡ ·Ы‰ВЪ НУ У˜В.
4)П Л·ОЛБЛЪВО¸МУВ ‚ ВПя ‚ ПЛМЫЪ‡ı Ф Л Б‡ФЛТЛ Т МВУ‰МУН ‡ЪМ˚П ФЫТНУП/ УТЪ‡МУ‚НУИ Б‡ФЛТЛ, М‡ВБ‰УП ‚Л‰ВУН‡ПВ ˚ Л ‚НО˛˜ВМЛВП/‚˚НО˛˜ВМЛВП ФЛЪ‡МЛя. Ф‡НЪЛ˜ВТНЛИ Т УН ТОЫК·˚ Б‡ я‰‡ ·‡Ъ‡ ВИМУ„У ·ОУН‡ ПУКВЪ ·˚Ъ¸ НУ У˜В.
˝НТФОЫ‡Ъ‡ˆЛЛ Н ПУ‰„УЪУ‚Н‡ started Getting
15

Step 1 Preparing the power |
|
|
ПÛÌÍÚ 1 ПÓ‰„ÓÚӂ͇ ËÒÚÓ˜ÌË͇ |
|||
|
supply |
|
|
|
ÔËÚ‡ÌËя |
|
|
|
|
|
|
|
|
Playing time |
|
|
В ÂÏя ‚ÓÒÔ ÓËÁ‚‰ÂÌËя |
|||
|
|
|
|
|
||
|
Battery pack |
|
Playing time |
|||
|
Б‡Ú‡ ÂÈÌ˚È ·ÎÓÍ |
В ÂÏя ‚ÓÒÔ ÓËÁ‚‰ÂÌËя |
||||
|
NP-F3301) |
95 |
(85) |
|
||
|
NP-F530 |
160 |
(145) |
|
||
|
NP-F5502) |
195 |
(175) |
|
||
|
NP-F730 |
325 |
(290) |
|
||
|
NP-F750 |
395 |
(355) |
|
||
|
NP-F930 |
515 |
(465) |
|
||
|
NP-F950 |
610 |
(550) |
|
||
Approximate number of minutes when you use a fully charged battery
Numbers in parentheses “( )” indicate the time using a normally charged battery. The battery life will be shorter if you use your camcorder in a cold environment.
1)Supplied with DCR-TR7000E
2)Supplied with DCR-TR7100E
After charging the battery pack
Disconnect the AC power adaptor from the DC IN jack on your camcorder.
Note on the remaining battery time indicator during recording
The indicator may not be correct, depending on the conditions in which you are recording.
What is ”InfoLITHIUM”?
The “InfoLITHIUM” is a lithium ion battery pack which can exchange data such as battery consumption with compatible video equipment. This unit is compatible with the “InfoLITHIUM” battery pack (L series). Your camcorder operates only with the “InfoLITHIUM” battery. “InfoLITHIUM” battery packs have the


 mark.
mark.
“InfoLITHIUM” is a trademark of Sony Corporation.
П Л·ОЛБЛЪВО¸МУВ ‚ ВПя ‚ ПЛМЫЪ‡ı Ф Л ЛТФУО¸БУ‚‡МЛЛ ФУОМУТЪ¸˛ Б‡ яКВММУ„У ·‡Ъ‡ ВИМУ„У ·ОУН‡
ЦЛЩ ˚ ‚ ТНУ·Н‡ı “( )” ЫН‡Б˚‚‡˛Ъ ‚ ВПя Ф Л ЛТФУО¸БУ‚‡МЛЛ ·‡Ъ‡ ВИМУ„У ·ОУН‡ Т МУ П‡О¸МУИ Б‡ я‰НУИ. П Л ЛТФУО¸БУ‚‡МЛЛ ‚Л‰ВУН‡ПВ ˚ ‚ ıУОУ‰М˚ı ЫТОУ‚Ляı Т УН ТОЫК·˚ ·‡Ъ‡ ВИМУ„У ·ОУН‡ ·Ы‰ВЪ НУ У˜В.
1)Ô Ë·„‡ÂÚÒя Í ÏÓ‰ÂÎË DCR-TR7000E
2)Ô Ë·„‡ÂÚÒя Í ÏÓ‰ÂÎË DCR-TR7100E
ПÓÒΠÁ‡ я‰ÍË ·‡Ú‡ ÂÈÌÓ„Ó ·ÎÓ͇
ОЪТУВ‰ЛМЛЪВ ТВЪВ‚УИ ‡‰‡ФЪВ ФВ ВПВММУ„У ЪУН‡ УЪ „МВБ‰‡ DC IN М‡ В‡¯ВИ ‚Л‰ВУН‡ПВ В.
П ЛПВ˜‡МЛя ФУ ЛМ‰ЛН‡ЪУ Ы ‚ ВПВМЛ УТЪ‡‚¯В„УТя Б‡ я‰‡ ·‡Ъ‡ ВИМУ„У ·ОУН‡ ‚У ‚ ВПя Б‡ФЛТЛ
ИМ‰ЛН‡ЪУ ПУКВЪ ·˚Ъ¸ МВФ ‡‚ЛО¸М˚П ‚ Б‡‚ЛТЛПУТЪЛ УЪ ЫТОУ‚ЛИ, ‚ НУЪУ ˚ı ‚˚ФУОМяВЪТя Б‡ФЛТ¸.
ЧÚÓ Ú‡ÍÓ “InfoLITHIUM”?
“InfoLITHIUM” Ф В‰ТЪ‡‚ОяВЪ ТУ·УИ ОЛЪЛВ‚У- ЛУММ˚И ·‡Ъ‡ ВИМ˚И ·ОУН, НУЪУ ˚И ПУКВЪ У·ПВМЛ‚‡Ъ¸Тя ‰‡ММ˚ПЛ, Ъ‡НЛПЛ Н‡Н ФУЪ В·ОВМЛВ Б‡ я‰‡ ·‡Ъ‡ ВИМУ„У ·ОУН‡, Т ТУ‚ПВТЪЛПУИ ‚Л‰ВУ‡ФФ‡ ‡ЪЫ УИ. ЭЪУ ЫТЪ УИТЪ‚У ТУ‚ПВТЪЛПУ Т ·‡Ъ‡ ВИМ˚П ·ОУНУП “InfoLITHIUM” (cВ ЛЛ L). В‡¯‡ ‚Л‰ВУН‡ПВ ‡‡·УЪ‡ВЪ ЪУО¸НУ Т ·‡Ъ‡ ВИМ˚П ·ОУНУП “InfoLITHIUM”. Н‡ ·‡Ъ‡ ВИМ˚ı ·ОУН‡ı “InfoLITHIUM” ЛПВВЪТя БМ‡Н 


 . “InfoLITHIUM” я‚ÎяÂÚÒя ÚÓ „Ó‚ÓÈ Ï‡ ÍÓÈ ÍÓ ÔÓ ‡ˆËË Sony Corporation.
16
Step 1 Preparing the power supply
Connecting to the mains
When you use your camcorder for a long time, we recommend that you power it from the mains using the AC power adaptor.
(1)Open the DC IN jack cover, and connect the AC power adaptor to the DC IN jack on your camcorder with the plug’s 4mark facing up.
(2)Connect the mains lead to the AC power adaptor.
(3)Connect the mains lead to the mains.
1
WARNING
The mains lead must only be changed at a qualified service shop.
PRECAUTION
The set is not disconnected from the AC power source (the mains) as long as it is connected to the mains, even if the set itself has been turned off.
Notes
•The AC power adaptor can supply power even if the battery pack is attached to your camcorder.
•The DC IN jack has “source priority”. This means that the battery pack cannot supply any power if the mains lead is connected to the DC IN jack, even when the mains lead is not plugged into the mains.
•Keep the AC power adaptor away from the camcorder if the picture is disturbed.
Using a car battery
Use Sony DC Adaptor/Charger (not supplied).
ПÛÌÍÚ 1 ПÓ‰„ÓÚӂ͇ ËÒÚÓ˜ÌË͇ ÔËÚ‡ÌËя
ПУ‰ТУВ‰ЛМВМЛВНТВЪВ‚УИ УБВЪНВ
ЕТОЛ В˚ ТУ·Л ‡ВЪВТ¸ ЛТФУО¸БУ‚‡Ъ¸ ‚Л‰ВУН‡ПВ Ы ‰ОЛЪВО¸МУВ ‚ ВПя,ВНУПВМ‰ЫВЪТя ЛТФУО¸БУ‚‡Ъ¸ ФЛЪ‡МЛВ УЪ ˝ОВНЪ Л˜ВТНУИ ТВЪЛ Т ФУПУ˘¸˛ ТВЪВ‚У„У ‡‰‡ФЪВ ‡ ФВ ВПВММУ„У ЪУН‡.
(1)ОЪН УИЪВ Н ˚¯НЫ „МВБ‰‡ DC IN Л ФУ‰ТУВ‰ЛМЛЪВ ТВЪВ‚УИ ‡‰‡ФЪВ ФВ ВПВММУ„У ЪУН‡ Н „МВБ‰Ы DC IN М‡ В‡¯ВИ ‚Л‰ВУН‡ПВ Ы, Ъ‡Н ˜ЪУ·˚ БМ‡Н 4 М‡ ¯ЪВНВ В ·˚О У· ‡˘ВМ ‚‚В ı.
(2)ПУ‰ТУВ‰ЛМЛЪВ Ф У‚У‰ ˝ОВНЪ УФЛЪ‡МЛя Н ТВЪВ‚УПЫ ‡‰‡ФЪВ Ы ФВ ВПВММУ„У ЪУН‡.
(3)ПУ‰ТУВ‰ЛМЛЪВ Ф У‚У‰ ˝ОВНЪ УФЛЪ‡МЛя Н ТВЪВ‚УИ УБВЪНВ.
2, 3
ВНИМАНИЕ
П У‚У‰ ˝ОВНЪ УФЛЪ‡МЛя ТОВ‰ЫВЪ Б‡ПВМяЪ¸ ЪУО¸НУ ‚ П‡ТЪВ ТНУИ Н‚‡ОЛЩЛˆЛ У‚‡ММУ„У У·ТОЫКЛ‚‡МЛя.
ПРЕДОСТЕРЕЖЕНИЕ
АФФ‡ ‡Ъ‡ МВ УЪНО˛˜‡ВЪТя УЪ ЛТЪУ˜МЛН‡ ФВ ВПВММУ„У ЪУН‡ ‰У ЪВı ФУ , ФУН‡ УМ ФУ‰ТУВ‰ЛМВМ Н ˝ОВНЪ Л˜ВТНУИ ТВЪЛ, ‰‡КВ ВТОЛ Т‡П ‡ФФ‡ ‡Ъ Л ‚˚НО˛˜ВМ.
П ËϘ‡ÌËя
•ПЛЪ‡МЛВ УЪ ТВЪВ‚У„У ‡‰‡ФЪВ ‡ ФВ ВПВММУ„У ЪУН‡ ПУКВЪ ФУ‰‡‚‡Ъ¸Тя ‰‡КВ ‚ ТОЫ˜‡В, ВТОЛ ·‡Ъ‡ ВИМ˚И ·ОУН Ф ЛН ВФОВМ Н В‡¯ВИ ‚Л‰ВУН‡ПВ В.
•ГМВБ‰У DC IN ЛПВВЪ “Ф ЛУ ЛЪВЪ ЛТЪУ˜МЛН‡”. ЭЪУ БМ‡˜ЛЪ, ˜ЪУ ФЛЪ‡МЛВ УЪ ·‡Ъ‡ ВИМУ„У ·ОУН‡ МВ ПУКВЪ ФУ‰‡‚‡Ъ¸Тя, ВТОЛ Ф У‚У‰ ˝ОВНЪ УФЛЪ‡МЛя ФУ‰ТУВ‰ЛМВМ Н „МВБ‰Ы DC IN, ‰‡КВ ВТОЛ Ф У‚У‰ ˝ОВНЪ УФЛЪ‡МЛя Л МВ ФУ‰ТУВ‰ЛМВМ Н ТВЪВ‚УИ УБВЪНВ.
•ЕТОЛ ЛБУ· ‡КВМЛВ ЛТН‡КВМУ, УЪУ‰‚ЛМ¸ЪВ ТВЪВ‚УИ ‡‰‡ФЪВ ФВ ВПВММУ„У ЪУН‡ ФУ‰‡О¸¯В УЪ ‚Л‰ВУН‡ПВ ˚.
ИТФУО¸БУ‚‡МЛВ ‡‚ЪУПУ·ЛО¸МУ„У ‡ННЫПЫОяЪУ ‡
П Л ˝ЪУП ТОВ‰ЫВЪ ЛТФУО¸БУ‚‡Ъ¸ ‡‰‡ФЪВ / Б‡ я‰МУВ ЫТЪ УИТЪ‚У ФУТЪУяММУ„У ЪУН‡ Sony (МВ Ф ЛО‡„‡ВЪТя).
˝НТФОЫ‡Ъ‡ˆЛЛ Н ПУ‰„УЪУ‚Н‡ started Getting
17
Step 2 Inserting a
cassette
We recommend using Hi8 video cassettes H. If you use standard 8 htape, be sure to play back the tape on this camcorder.
Your camcorder records in the Digital8 system. (1) Slide EJECT in the direction of the arrow
while pressing the small blue button. The cassette compartment automatically lifts up and opens.
(2) Insert a cassette with its window facing out and the tab on the cassette up.
(3) Close the cassette compartment by pressing the “PUSH” mark on the cassette compartment. The cassette compartment automatically goes down.
ПÛÌÍÚ 2 УÒÚ‡Ìӂ͇ ͇ÒÒÂÚ˚
РВНУПВМ‰ЫВЪТя ЛТФУО¸БУ‚‡Ъ¸ ‚Л‰ВУН‡ТТВЪ˚ ЪЛФ‡ Hi8 ТУ БМ‡НУП H. П Л ЛТФУО¸БУ‚‡МЛЛ ТЪ‡М‰‡ ЪМУИ ОВМЪ˚ ЪЛФ‡8 hТОВ‰ЫВЪ ‚УТФ УЛБ-‚У‰ЛЪ¸ ОВМЪЫ М‡ БЪУИ ‚Л‰ВУН‡ПВ В. В‡¯‡ ‚Л‰ВУН‡ПВ ‡ ‚˚ФУОМяВЪ Б‡ФЛТ¸ ‚ ˆЛЩ У‚УИ ТЛТЪВПВ Digital8 .
(1)Н‡К‡‚ П‡ОВМ¸НЫ˛ ТЛМ˛˛ НМУФНЫ, ФВ В‰‚ЛМ¸ЪВ ФВ ВНО˛˜‡ЪВО¸ EJECT ‚ М‡Ф ‡‚ОВМЛЛ ТЪ ВОНЛ. ОЪТВН ‰Оя Н‡ТТВЪ˚ ‡‚ЪУП‡ЪЛ˜ВТНЛ ФУ‰МЛПВЪТя ‚‚В ı Л УЪН УВЪТя.
(2)ВТЪ‡‚¸ЪВ Н‡ТТВЪЫ, Ъ‡Н ˜ЪУ·˚ УНУ¯НЫ ·˚ОУ У· ‡˘ВМУ М‡ ЫКЫ, ‡ ОВФВТЪУН М‡ Н‡ТТВЪВ ‚‚В ı.
(3)З‡Н УИЪВ УЪТВН ‰Оя Н‡ТТВЪ˚, М‡К‡‚ ПВЪНЫ “PUSH” М‡ УЪТВНВ. ОЪТВН ‰Оя Н‡ТТВЪ˚ ‡‚ЪУП‡ЪЛ˜ВТНЛ УФЫТЪЛЪТя ‚МЛБ.
1 |
2 |
3 |
|
EJECT |
|
To eject a cassette
Slide EJECT in the direction of the arrow while pressing the small blue button.
Notes
•The recording time when you use your Digital8
 system camcorder on Hi8/standard 8 tape is 2/3 the recording time when using the conventional Hi8/standard 8 system camcorder.
•If you use standard 8 tape, be sure to play back the tape on this camcorder. Mosaic pattern noise may appear when you play back standard 8 tape on other VCRs.
•Do not press the cassette compartment down. Doing so may cause malfunction.
To prevent accidental erasure
Slide the write-protect tab on the cassette to expose the red mark.
ДÎя ËÁ‚ΘÂÌËя ͇ÒÒÂÚ˚
Н‡К‡‚ П‡ОВМ¸НЫ˛ ТЛМ˛˛ НМУФНЫ, ФВ В‰‚ЛМ¸ЪВ ФВ ВНО˛˜‡ЪВО¸ EJECT ‚ М‡Ф ‡‚ОВМЛЛ ТЪ ВОНЛ.
П ËϘ‡ÌËя
•В ВПя Б‡ФЛТЛ Ф Л ЛТФУО¸БУ‚‡МЛЛ В‡¯ВИ ˆЛЩ У‚УИ ‚Л‰ВУН‡ПВ ˚ Digital8  М‡ ОВМЪВ Hi8/ТЪ‡М‰‡ ЪМУИ ОВМЪВ 8 ТУТЪ‡‚ОяВЪ 2/3 ‚ ВПВМЛ Б‡ФЛТЛ Ф Л ЛТФУО¸БУ‚‡МЛЛ У·˚˜МУИ ‚Л‰ВУН‡ПВ ˚ Hi8/‚Л‰ВУН‡ПВ ˚ ТЪ‡М‰‡ ЪМУИ ТЛТЪВП˚ 8.
•П Л ЛТФУО¸БУ‚‡МЛЛ ТЪ‡М‰‡ ЪМУИ ОВМЪ˚ 8 ТОВ‰ЫВЪ ‚УТФ УЛБ‚У‰ЛЪ¸ ˝ЪЫ ОВМЪЫ М‡ В‡¯ВИ КВ ‚Л‰ВУН‡ПВ В. В ТОЫ˜‡В ‚УТФ УЛБ‚В‰ВМЛя ТЪ‡М‰‡ ЪМУИ ОВМЪ˚ 8 М‡ ‰ Ы„Лı КВМ ПУ„ЫЪ ФУя‚ОяЪ¸Тя ФУПВıЛ ПУБ‡Л˜МУ„У ЪЛФ‡.
•НВ М‡КЛП‡ИЪВ ‚МЛБ УЪТВН ‰Оя Н‡ТТВЪ˚. ЭЪУ ПУКВЪ Ф Л‚ВТЪЛ Н МВЛТФ ‡‚МУТЪЛ.
ДÎя Ô Â‰ÓÚ‚ ‡˘ÂÌËя ÒÎÛ˜‡ÈÌÓ„Ó ÒÚË ‡ÌËя
ПВ В‰‚ЛМ¸ЪВ ОВФВТЪУН Б‡˘ЛЪ˚ Б‡ФЛТЛ М‡ Н‡ТТВЪВ, Ъ‡Н ˜ЪУ·˚ ФУя‚ЛО‡Т¸ Н ‡ТМ‡я ПВЪН‡.
18
— Recording – Basics —
Recording a picture
Your camcorder automatically focuses for you. (1)Remove the lens cap by pressing both knobs
on its sides and attatch the lens cap to the grip strap.
(2)Install the power source and insert a cassette. See “Step 1” and “Step 2” for more information (p. 12 to p. 18).
(3)Set the POWER switch to CAMERA while pressing the small green button.
(4)Turn STANDBY to STANDBY.
(5)Press START/STOP. Your camcorder starts recording. The “REC” indicator appears. The camera recording lamp located on the front of your camcorder lights up. To stop recording, press START/STOP again.
3
POWER CAMERA 
 OFF
OFF 
PLAYER
2
Microphone
МËÍ ÓÙÓÌ
Camera recording lamp
Л‡ÔÏӘ͇ Á‡ÔËÒË ‚ˉÂÓ͇Ï ÓÈ
— З‡ФЛТ¸ – ОТМУ‚М˚В ФУОУКВМЛя —
З‡ÔËÒ¸ ËÁÓ· ‡ÊÂÌËя
В‡¯‡ ‚Л‰ВУН‡ПВ ‡ ‡‚ЪУП‡ЪЛ˜ВТНЛ ‚˚ФУОМяВЪ ЩУНЫТЛ У‚НЫ Б‡ В‡Т.
(1)СМЛПЛЪВ Н ˚¯НЫ У·˙ВНЪЛ‚‡, М‡К‡‚ У·В НМУФНЛ М‡ ВВ Н УПНВ, Л Ф ЛН ВФЛЪВ Н ˚¯НЫ У·˙ВНЪЛ‚‡ Н ВПМ˛ ‰Оя Б‡ı‚‡Ъ‡.
(2)УТЪ‡МУ‚ЛЪВ ЛТЪУ˜МЛН ФЛЪ‡МЛя Л ‚ТЪ‡‚¸ЪВ Н‡ТТВЪЫ. ПУ‰ У·М˚В Т‚В‰ВМЛя Ф Л‚В‰ВМ˚ ‚ “ПЫМНЪВ 1” Л “ПЫМНЪВ 2” (ТЪ . 12 - 18).
(3)Н‡К‡‚ П‡ОВМ¸НЫ˛ БВОВМЫ˛ НМУФНЫ, ЫТЪ‡МУ‚ЛЪВ ФВ ВНО˛˜‡ЪВО¸ POWER ‚ ФУОУКВМЛВ CAMERA.
(4)ПУ‚В МЛЪВ ˚˜‡„ STANDBY ‚ ФУОУКВМЛВ STANDBY.
(5)Н‡КПЛЪВ НМУФНЫ START/STOP. В‡¯‡ ‚Л‰ВУН‡ПВ ‡ М‡˜МВЪ Б‡ФЛТ¸. ПУя‚ЛЪТя ЛМ‰ЛН‡ЪУ “REC”. В˚Т‚ВЪЛЪТя Ъ‡НКВ О‡ПФУ˜Н‡ Б‡ФЛТЛ, ‡ТФУОУКВММ‡я М‡ ФВ В‰МВИ Ф‡МВОЛ ‚Л‰ВУН‡ПВ ˚. ДОя УТЪ‡МУ‚НЛ Б‡ФЛТЛ М‡КПЛЪВ НМУФНЫ START/ STOP В˘В ‡Б.
1 
4
OCK
L
S
T
A
N
DBY
START/STOP
5
OCK
L
S
T
A
N
DBY
START/STOP
 40min
40min  STBY 0:00:00
 40min
40min  REC 0:00:01
ФУОУКВМЛя ОТМУ‚М˚В – З‡ФЛТ¸ Basics – Recording
19

Recording a picture |
|
З‡ÔËÒ¸ ËÁÓ· ‡ÊÂÌËя |
|
|
|
|
|
|
Note
Fasten the grip strap firmly. Do not touch the built-in microphone during recording.
To enable smooth transition
You can make the transition between the last scene you recorded and the next scene smooth as long as you do not eject the cassette. When you exchange the battery pack in the recording mode, set STANDBY to LOCK.
If you leave your camcorder in the standby mode for 3 minutes while the cassette is inserted
Your camcorder automatically turns off. This is to save battery power and to prevent battery and tape wear. To resume the standby mode, turn STANDBY down and up again. To start recording, press START/STOP.
After recording
(1) Turn STANDBY down to LOCK. (2) Eject the cassette.
(3) Set the POWER switch to OFF.
П ËϘ‡ÌËÂ
ПОУЪМУ Ф ЛТЪВ„МЛЪВ ВПВМ¸ ‰Оя Б‡ı‚‡Ъ‡ ‚Л‰ВУН‡ПВ ˚. НВ Ф ЛН‡Т‡ИЪВТ¸ Н ‚ТЪ УВММУПЫ ПЛН УЩУМЫ ‚У ‚ ВПя Б‡ФЛТЛ.
ДÎя Ó·ÂÒÔ˜ÂÌËя Ô·‚ÌÓ„Ó Ô ÂıÓ‰‡
В˚ ПУКВЪВ ‚˚ФУОМяЪ¸ ФО‡‚М˚И ФВ ВıУ‰ ПВК‰Ы ФУТОВ‰МЛП Б‡ФЛТ‡ММ˚П ˝ФЛБУ‰УП Л ТОВ‰Ы˛˘ЛП ˝ФЛБУ‰УП ‰У ЪВı ФУ , ФУН‡ МВ ЛБ‚ОВ˜ВЪВ Н‡ТТВЪЫ. П Л Б‡ПВМВ ·‡Ъ‡ ВИМУ„У ·ОУН‡ ‚ ВКЛПВ Б‡ФЛТЛ ЫТЪ‡МУ‚ЛЪВ ˚˜‡„ STANDBY ‚ ФУОУКВМЛВ LOCK.
ЕТОЛ В˚ УТЪ‡‚ЛЪВ В‡¯Ы ‚Л‰ВУН‡ПВ Ы ‚ВКЛПВ „УЪУ‚МУТЪЛ М‡ 3 ПЛМЫЪ˚ Ф Л ‚ТЪ‡‚ОВММУИ Н‡ТТВЪВ
ВЛ‰ВУН‡ПВ ‡ ‚˚НО˛˜ЛЪТя ‡‚ЪУП‡ЪЛ˜ВТНЛ. ЭЪУ Ф В‰УЪ‚ ‡˘‡ВЪ ‡ТıУ‰ Б‡ я‰‡ ·‡Ъ‡ ВИМУ„У ·ОУН‡ Л ЛБМУТ ОВМЪ˚. ДОя ‚УБУ·МУ‚ОВМЛя ВКЛП‡ „УЪУ‚МУТЪЛ ФУ‚В МЛЪВ˚˜‡„ STANDBY ‚МЛБ Л ТМУ‚‡ ‚‚В ı. ДОя М‡˜‡О‡ Б‡ФЛТЛ М‡КПЛЪВ НМУФНЫ START/STOP.
ПÓÒΠÁ‡ÔËÒË
(1)ПУ‚В МЛЪВ ˚˜‡„ STANDBY ‚ ФУОУКВМЛВ LOCK.
(2)ИБ‚ОВНЛЪВ Н‡ТТВЪЫ.
(3)УТЪ‡МУ‚ЛЪВ ФВ ВНО˛˜‡ЪВО¸ POWER ‚ ФУОУКВМЛВ OFF.
20
Recording a picture
To record pictures with the viewfinder – adjusting the viewfinder
Adjust the viewfinder lens to your eyesight so that the indicators in the viewfinder come into sharp focus.
Lift up the viewfinder and move the viewfinder lens adjustment lever.
З‡ÔËÒ¸ ËÁÓ· ‡ÊÂÌËя
ДОя Б‡ФЛТЛ ЛБУ· ‡КВМЛИ Т ФУПУ˘¸˛ ‚Л‰УЛТН‡ЪВОя –В„ЫОЛ У‚Н‡ ‚Л‰УЛТН‡ЪВОя
ОЪ В„ЫОЛ ЫИЪВ У·˙ВНЪЛ‚ ‚Л‰УЛТН‡ЪВОя ‚ ТУУЪ‚ВЪТЪ‚ЛЛ ТУ Т‚УЛП Б ВМЛВП, Ъ‡Н ˜ЪУ·˚ ЛМ‰ЛН‡ЪУ ˚ ‚ ‚Л‰УЛТН‡ЪВОВ ·˚ОЛ ˜ВЪНУ ТЩУНЫТЛ У‚‡М˚.
ПУ‰МЛПЛЪВ ‚Л‰УЛТН‡ЪВО¸ Л ФУ‰‚Л„‡ИЪВ ˚˜‡„В„ЫОЛ У‚НЛ У·˙ВНЪЛ‚‡ ‚Л‰УЛТН‡ЪВОя.
ФУОУКВМЛя ОТМУ‚М˚В – З‡ФЛТ¸ Basics – Recording
21
Recording a picture
Using the zoom feature
Move the power zoom lever a little for a slower zoom. Move it further for a faster zoom.
Using the zoom function sparingly results in better-looking recordings.
“T” side: for telephoto (subject appears closer) “W” side: for wide-angle (subject appears farther
away)
З‡ÔËÒ¸ ËÁÓ· ‡ÊÂÌËя
ИÒÔÓθÁÓ‚‡ÌË ÙÛÌ͈ËË Ì‡ÂÁ‰‡
‚ˉÂÓ͇Ï ˚
ПВ В‰‚ЛМ¸ЪВ ˚˜‡„ Ф Л‚У‰МУ„У ‚‡ ЛУУ·˙ВНЪЛ‚‡ ТОВ„Н‡ ‰Оя УЪМУТЛЪВО¸МУ ПВ‰ОВММУ„У М‡ВБ‰‡ ‚Л‰ВУН‡ПВ ˚. ПВ В‰‚ЛМ¸ЪВ В„У ТЛО¸МВВ ‰Оя ЫТНУ ВММУ„У М‡ВБ‰‡ ‚Л‰ВУН‡ПВ ˚.
ИÒÔÓθÁÓ‚‡ÌË ÙÛÌ͈ËË Ì‡ÂÁ‰‡ ‚ˉÂÓ͇Ï ˚ ‚ Ì·Óθ¯ÓÏ ÍÓ΢ÂÒÚ‚Â Ó·ÂÒÔ˜˂‡ÂÚ Ì‡ËÎÛ˜¯Ë ÂÁÛθڇÚ˚.
СЪУ УМ‡ “Т”: ‰Оя ЪВОВЩУЪУ (У·˙ВНЪ Ф Л·ОЛК‡ВЪТя)
СÚÓ Ó̇ “W”: ‰Îя ¯Ë ÓÍÓÛ„ÓθÌÓ„Ó ‚ˉ‡ (Ó·˙ÂÍÚ Û‰‡ÎяÂÚÒя)
W |
T |
W |
T |
W |
T |
Zoom greater than 20× is performed digitally. |
Н‡ÂÁ‰ ‚ˉÂÓ͇Ï ˚ ·ÓΠ20× ‚˚ÔÓÎÌяÂÚÒя |
|||||||||
|
ˆËÙ Ó‚˚Ï ÏÂÚÓ‰ÓÏ. |
|||||||||
|
|
|
|
|
|
|
|
|
||
The right side of the bar shows |
|
|
|
|
|
|
|
|
||
W |
|
|
|
T |
|
|
|
|||
|
|
|
|
|
|
|||||
the digital zooming zone. |
|
|
|
|
|
|
|
|
|
|
|
|
|
|
|
|
|
|
|
|
|
П ‡‚‡я ТЪУ УМ‡ ФУОУТ˚ М‡ ˝Н ‡МВ ФУН‡Б˚‚‡ВЪ БУМЫ ˆЛЩ У‚УИ Ъ ‡МТЩУН‡ˆЛЛ.
When you shoot close to a subject
If you cannot get a sharp focus, move the power zoom lever to the “W” side until the focus is sharp. You can shoot a subject that is at least about 80 cm (about 2 feet 5/8 inch) away from the lens surface in the telephoto position, or about 1 cm (about 1/2 inch) away in the wideangle position.
Notes on digital zoom
•Digital zoom starts to function when zoom exceeds 20×.
•The picture quality deteriorates as you go toward the “T” side. Set D ZOOM to OFF in the MENU settings. Otherwise the digital zoom activates without notice (p. 69).
22
П Л Т˙ВПНВ У·˙ВНЪ‡ Т ·ОЛБНУ„У ФУОУКВМЛя
ЕТОЛ В˚ МВ ПУКВЪВ ФУОЫ˜ЛЪ¸ ˜ВЪНУИ ЩУНЫТЛ У‚НЛ, ФВ В‰‚ЛМ¸ЪВ ˚˜‡„ Ф Л‚У‰МУ„У ‚‡ ЛУУ·˙ВНЪЛ‚‡ ТЪУ УМЫ “W” ‰У ФУОЫ˜ВМЛя ˜ВЪНУИ ЩУНЫТЛ У‚НЛ. В˚ ПУКВЪВ ‚˚ФУОМяЪ¸ Т˙ВПНЫ У·˙ВНЪ‡ ‚ ФУОУКВМЛЛ ЪВОВЩУЪУ, НУЪУ ˚И УЪТЪУЛЪ ФУ Н ‡ИМВИ ПВ В М‡‡ТТЪУяМЛЛ 80 ТП УЪ ФУ‚В ıМУТЪЛ У·˙ВНЪЛ‚‡ ЛОЛ КВ УНУОУ 1 ТП ‚ ФУОУКВМЛЛ ¯Л УНУЫ„УО¸МУ„У ‚Л‰‡.
П ËϘ‡ÌËя Í Ì‡ÂÁ‰Û ‚ˉÂÓ͇Ï ˚ ˆËÙ Ó‚˚Ï ÏÂÚÓ‰ÓÏ
•ЦËÙ Ó‚ÓÈ ‚‡ ËÓÓ·˙ÂÍÚË‚ ̇˜Ë̇ÂÚ
Ò ‡·‡Ú˚‚‡Ú¸ ‚ ÒÎÛ˜‡Â, ÂÒÎË Ì‡ÂÁ‰ ‚ˉÂÓ͇Ï ˚ Ô Â‚˚¯‡ÂÚ 20×.
•К‡˜ВТЪ‚У ЛБУ· ‡КВМЛя ЫıЫ‰¯‡ВЪТя ФУ ПВ В Ф Л·ОЛКВМЛя Н ТЪУ УМВ “Т”. УТЪ‡МУ‚ЛЪВ ЩЫМНˆЛ˛ D ZOOM ‚ ЫТЪ‡МУ‚Н‡ı MENU ‚ ФУОУКВМЛВ OFF. В Ф УЪЛ‚МУП ТОЫ˜‡В ˆЛЩ У‚УИ ‚‡ ЛУУ·˙ВНЪЛ‚ ·Ы‰ВЪ Т ‡·‡Ъ˚‚‡Ъ¸ ·ВБ Ы‚В‰УПОВМЛя (ТЪ . 69).
Recording a picture
START/STOP MODE setting
:Recording starts when you press START/
STOP, and stops when you press it again (factory setting).
ANTI GROUND SHOOTING :
The camcorder records only while you press START/STOP. Use this mode to avoid recording unnecessary scenes.
5SEC: When you press use this mode to START/ STOP, your camcorder records for 5 seconds and then stops automatically.
З‡ÔËÒ¸ ËÁÓ· ‡ÊÂÌËя
УÒÚ‡Ìӂ͇ START/STOP MODE
:П Л М‡К‡ЪЛЛ НМУФНЛ START/STOP
М‡˜МВЪТя Б‡ФЛТ¸, ‡ Ф Л ФУ‚ЪУ МУП М‡К‡ЪЛЛ ˝ЪУИ НМУФНЛ Б‡ФЛТ¸ (Б‡‚У‰ТН‡я ЫТЪ‡МУ‚Н‡).
ANTI GROUND SHOOTING : ВЛ‰ВУН‡ПВ ‡ ·Ы‰ВЪ ‚˚ФУОМяЪ¸ Б‡ФЛТ¸ ЪУО¸НУ Ф Л М‡К‡ЪЛЛ НМУФНЛ START/ STOP. ИТФУО¸БЫИЪВ ˝ЪУЪ ВКЛП ‰Оя ЛБ·ВК‡МЛя Б‡ФЛТЛ МВКВО‡ЪВО¸М˚ı ˝ФЛБУ‰У‚.
5SEC: ЕТОЛ В˚ М‡КПВЪВ НМУФНЫ START/STOP, ‚Л‰ВУН‡ПВ ‡ ·Ы‰ВЪ ‚˚ФУОМяЪ¸ Б‡ФЛТ¸ ‚ ЪВ˜ВМЛВ 5 ТВНЫМ‰, ‡ Б‡ЪВП ‡‚ЪУП‡ЪЛ˜ВТНЛ УТЪ‡МУ‚ЛЪТя.
START/STOP MODE |
5SEC ANTI GROUND |
|
SHOOTING |
Notes |
П ËϘ‡ÌËя |
•You cannot use the fader function in the 5SEC |
•В˚ МВ ПУКВЪВ ЛТФУО¸БУ‚‡Ъ¸ ЩЫМНˆЛ˛ |
or mode. |
ЩВИ‰В ‡ ‚ ВКЛПВ 5SEC ЛОЛ ВКЛПВ . |
•The time code does not appear in the 5SEC |
•В ВКЛПВ 5SEC Т˜ВЪ˜ЛН ОВМЪ˚ МВ |
mode. |
ÔÓя‚ÎяÂÚÒя. |
ФУОУКВМЛя ОТМУ‚М˚В – З‡ФЛТ¸ Basics – Recording
To extend the recording time in the 5SEC
mode
Five dots (rrrrr) appear, and then disappear at a rate of one per second. To extend the recording time, press START/STOP again before all the dots disappear. Recording continues for about 5 seconds from the moment you press START/STOP.
ДОя Ы‰ОЛМВМЛя ‚ ВПВМЛ Б‡ФЛТЛ ‚ ВКЛПВ 5SEC
ПяЪ¸ ЪУ˜ВН (rrrrr) ·Ы‰ЫЪ ФУя‚ОяЪ¸Тя, ‡ Б‡ЪВП ЛТ˜ВБ‡Ъ¸ ФУ У‰МУИ Б‡ ТВНЫМ‰Ы. ДОя Ы‰ОЛМВМЛя ‚ ВПВМЛ Б‡ФЛТЛ М‡КПЛЪВ НМУФНЫ START/STOP ФВ В‰ ЪВП, Н‡Н ЛТ˜ВБМЫЪ ‚ТВ ЪУ˜НЛ. З‡ФЛТ¸ ·Ы‰ВЪ Ф У‰УОК‡Ъ¸Тя УНУОУ 5 ТВНЫМ‰ Т ПУПВМЪ‡ М‡К‡ЪЛя НМУФНЛ START/ STOP.
23
Recording a picture
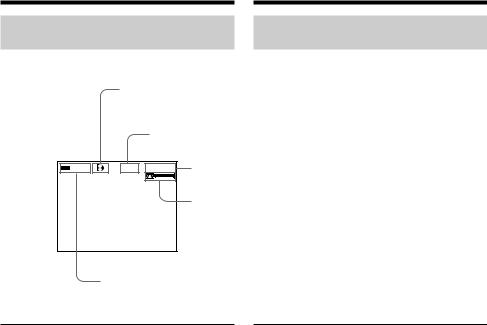
Indicators displayed in the
recording mode
The indicators are not recorded on tape.
З‡ÔËÒ¸ ËÁÓ· ‡ÊÂÌËя
И̉Ë͇ÚÓ ˚, ÓÚÓ· ‡Ê‡ÂÏ˚ ‚
ВКЛПВ Б‡ФЛТЛ
ИМ‰ЛН‡ЪУ ˚ МВ Б‡ФЛТ˚‚‡˛ЪТя М‡ ОВМЪЫ.
Format indicator
И̉Ë͇ÚÓ ÙÓ Ï‡Ú‡
STANDBY/REC indicator
И̉Ë͇ÚÓ STANDBY/REC
|
40min |
REC |
0:00:01 |
Time code/Tape counter |
|
||||
|
КУ‰ ‚ ВПВМЛ/С˜ВЪ˜ЛН ОВМЪ˚
Remaining tape indicator
This appears after you insert a cassette for a while.
И̉Ë͇ÚÓ ÓÒÚ‡‚¯ÂÈÒя ÎÂÌÚ˚
ЭЪУЪ ЛМ‰ЛН‡ЪУ ФУя‚ОяВЪТя ФУТОВ ЫТЪ‡МУ‚НЛ Н‡ТТВЪ˚.
Remaining battery time indicator
ИМ‰ЛН‡ЪУ ‚ ВПВМЛ УТЪ‡‚¯В„УТя Б‡ я‰‡ ·‡Ъ‡ ВИМУ„У ·ОУН‡
Time code (for tapes recorded in the Digital8  system only)
The time code indicates the recording or playback time, “0:00:00” (hours:minutes: seconds) in CAMERA mode and “0:00:00:00” (hours:minutes:seconds:frames) in PLAYER mode. You cannot rewrite only the time code. When you play back tapes recorded in the Hi8/standard 8 system, the tape counter appears.
КУ‰ ‚ ВПВМЛ (ЪУО¸НУ ‰Оя ОВМЪ, Б‡ФЛТ‡ММ˚ı ‚ ˆЛЩ У‚УИ ТЛТЪВПВ Digital8  )
)
КУ‰ ‚ ВПВМЛ ЫН‡Б˚‚‡ВЪ ‚ ВПя Б‡ФЛТЛ ЛОЛ ‚УТФ УЛБ‚В‰ВМЛя, “0:00:00” (˜‡Т˚ : ПЛМЫЪ˚ : ТВНЫМ‰˚) ‚ ВКЛПВ CAMERA Л “0:00:00” (˜‡Т˚ : ПЛМЫЪ˚ : ТВНЫМ‰˚ : Н‡‰ ˚) ‚ ВКЛПВ PLAYER. В˚ МВ ПУКВЪВ ФВ ВБ‡ФЛТ‡Ъ¸ ЪУО¸НУ НУ‰ ‚ ВПВМЛ. ЕТОЛ В˚ ‚УТФ УЛБ‚У‰ЛЪВ ОВМЪ˚, Б‡ФЛТ‡ММ˚В ‚ ТЛТЪВПВ Hi8/ ТЪ‡М‰‡ ЪМУИ ТЛТЪВПВ 8, ЪУ ФУя‚ЛЪТя Т˜ВЪ˜ЛН ОВМЪ˚.
24
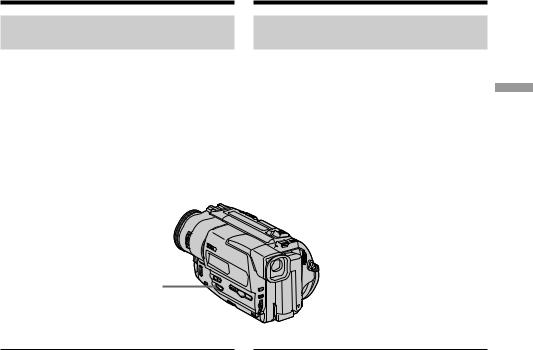
Recording a picture
Shooting backlit subjects
(BACK LIGHT)
When you shoot a subject with the light source behind the subject or a subject with a light background, use the backlight function.
Press BACK LIGHT in the recording or standby mode.
The cindicator appears in the viewfinder. To cancel, press BACK LIGHT again.
BACK LIGHT
If you press EXPOSURE when shooting backlit subjects
The backlight function will be canceled.
З‡ÔËÒ¸ ËÁÓ· ‡ÊÂÌËя
С˙ÂÏ͇ Ó·˙ÂÍÚÓ‚ Ò Á‡‰ÌÂÈ
ФУ‰Т‚ВЪНУИ (BACK LIGHT)
ЕТОЛ В˚ ‚˚ФУОМяВЪВ Т˙ВПНЫ У·˙ВНЪ‡ Т ЛТЪУ˜МЛНУП Т‚ВЪ‡ ФУБ‡‰Л МВ„У ЛОЛ КВ У·˙ВНЪ‡ ТУ Т‚ВЪО˚П ЩУМУП, ЛТФУО¸БЫИЪВ ЩЫМНˆЛ˛ Б‡‰МВИ ФУ‰Т‚ВЪНЛ.
Н‡КПЛЪВ НМУФНЫ BACK LIGHT ‚ ВКЛПВ Б‡ФЛТЛ ЛОЛ УКЛ‰‡МЛя.
В ‚Л‰УЛТН‡ЪВОВ ФУя‚ЛЪТя ЛМ‰ЛН‡ЪУ c. ДОя УЪПВМ˚ М‡КПЛЪВ НМУФНЫ BACK LIGHT В˘В ‡Б.
ЕТОЛ ‚˚ М‡КПВЪВ НМУФНЫ EXPOSURE Ф Л ‚˚ФУОМВМЛЛ Т˙ВПНЛ У·˙ВНЪУ‚ Т Б‡‰МВИ ФУ‰Т‚ВЪНУИ
ФЫМНˆЛя Б‡‰МВИ ФУ‰Т‚ВЪНЛ ·Ы‰ВЪ УЪПВМВМ‡.
ФУОУКВМЛя ОТМУ‚М˚В – З‡ФЛТ¸ Basics – Recording
25

Recording a picture |
|
З‡ÔËÒ¸ ËÁÓ· ‡ÊÂÌËя |
|
|
|
|
|
|
Shooting in the dark |
|
С˙ВПН‡ ‚ ЪВПМУЪВ |
(NightShot) |
|
(НӘ̇я Ò˙ÂÏ͇) |
|
|
|
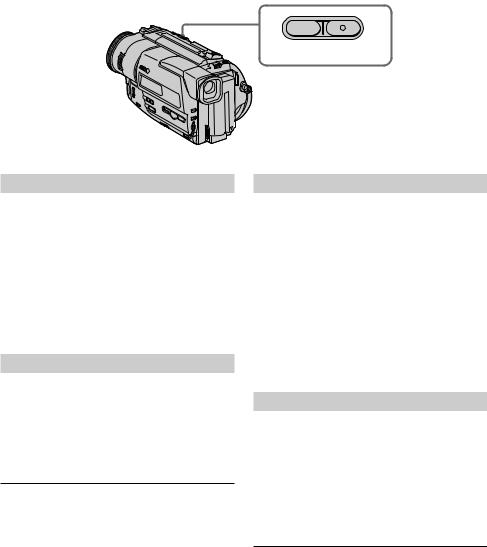
The NightShot function enables you to shoot a subject in a dark place. For example, you can satisfactorily record the environment of nocturnal animals for observation when you use this function.
(1) While your camcorder is in the standby mode, slide NIGHTSHOT to ON.
(2) Press START/STOP to start recording.
and “NIGHTSHOT” indicators flash in the viewfinder. To cancel the NightShot function, slide NIGHTSHOT to OFF.
ФЫМНˆЛя МУ˜МУИ Т˙ВПНЛ ФУБ‚УОяВЪ В‡П ‚˚ФУОМяЪ¸ Т˙ВПНЫ У·˙ВНЪУ‚ ‚ ЪВПМ˚ı ПВТЪ‡ı. Н‡Ф ЛПВ , В˚ ТПУКВЪВ Т ЫТФВıУП ‚˚ФУОМяЪ¸ Т˙ВПНЫ МУ˜М˚ı КЛ‚УЪМ˚ı ‰Оя М‡·О˛‰ВМЛя Ф Л ЛТФУО¸БУ‚‡МЛЛ ‰‡ММУИ ЩЫМНˆЛЛ.
(1)В ЪУ ‚ ВПя, НУ„‰‡ ‚Л‰ВУН‡ПВ ‡ М‡ıУ‰ЛЪТя ‚ ВКЛПВ УКЛ‰‡МЛя, ФВ В‰‚ЛМ¸ЪВ ФВ ВНО˛˜‡ЪВО¸ NIGHTSHOT ‚ ФУОУКВМЛВ ON.
(2)Н‡КПЛЪВ НМУФНЫ START/STOP ‰Оя М‡˜‡О‡ Б‡ФЛТЛ.
ИМ‰ЛН‡ЪУ ˚ Л “NIGHTSHOT” М‡˜МЫЪ ПЛ„‡Ъ¸ ‚ ‚Л‰УЛТН‡ЪВОВ. ДОя УЪПВМ˚ ЩЫМНˆЛЛ МУ˜МУИ Т˙ВПНЛ ФВ В‰‚ЛМ¸ЪВ ФВ ВНО˛˜‡ЪВО¸ NIGHTSHOT ‚ ФУОУКВМЛЛ OFF.
NIGHTSHOT
OFF  ON
ON +SLOW SHUTTER
NightShot Light emitter
ИÁÎÛ˜‡ÚÂθ ÔÓ‰Ò‚ÂÚÍË
 ‰Îя ÌÓ˜ÌÓÈ Ò˙ÂÏÍË
Using +SLOW SHUTTER
The NightShot +Slow shutter mode makes subjects more than four times brighter than those recorded in the NightShot mode.
(1) Slide NIGHTSHOT to ON in the standby mode. indicator appears.
(2) Press +SLOW SHUTTER until the desired NIGHTSHOT indicator flashes.
The indicator changes as follows:
(NIGHTSHOT) n |
(NIGHTSHOT1) n |
(NIGHTSHOT2) n |
(NIGHTSHOT) |
To cancel the NightShot +Slow shutter mode, slide NIGHTSHOT to OFF.
Using the NightShot Light
The picture will be clearer with the NightShot Light on. To enable NightShot Light, set N.S.LIGHT to ON in the MENU settings (p. 69).
26
ИÒÔÓθÁÓ‚‡ÌË ÂÊËχ +SLOW SHUTTER
РВКЛП МУ˜МУИ Т˙ВПНЛ +ПВ‰ОВММУ„У Б‡Ъ‚У ‡ ФУБ‚УОяВЪ Т‰ВО‡Ъ¸ У·˙ВНЪ˚ ·УОВВ ˜ВП ‚ ˜ВЪ˚ В ‡Б‡ я ˜В, ˜ВП ‚ ТОЫ˜‡В, ВТОЛ В˚ ·Ы‰ВЪВ ‚˚ФУОМяЪ¸ Т˙ВПНЫ ‚ ЪВПМУЪВ ‚ВКЛПВ МУ˜МУИ Т˙ВПНЛ.
(1)ПВ В‰‚ЛМ¸ЪВ ФВ ВНО˛˜‡ЪВО¸ NIGHTSHOT ‚ ФУОУКВМЛВ ON ‚ ВКЛПВ УКЛ‰‡МЛя. ПУя‚ЛЪТя ЛМ‰ЛН‡ЪУ .
(2)Н‡КЛП‡ИЪВ НМУФНЫ +SLOW SHUTTER ‰У ЪВı ФУ , ФУН‡ МВ М‡˜МВЪ ПЛ„‡Ъ¸ МЫКМ˚И ЛМ‰ЛН‡ЪУ NIGHTSHOT.
ИМ‰ЛН‡ЪУ ·Ы‰ВЪ ЛБПВМяЪ¸Тя ТОВ‰Ы˛˘ЛП
Ó· ‡ÁÓÏ: |
|
(NIGHTSHOT) n |
(NIGHTSHOT1) n |
(NIGHTSHOT2) n |
(NIGHTSHOT) |
ДОя УЪПВМ˚ ВКЛП‡ МУ˜МУИ Т˙ВПНЛ +ПВ‰ОВММУ„У Б‡Ъ‚У ‡ ФВ В‰‚ЛМ¸ЪВ ФВ ВНО˛˜‡ЪВО¸ NIGHTSHOT ‚ ФУОУКВМЛВ OFF.
ИТФУО¸БУ‚‡МЛВФУ‰Т‚ВЪНЛ‰ОяМУ˜МУИТ˙ВПНЛ
ИБУ· ‡КВМЛВ ТЪ‡МВЪ я ˜В, ВТОЛ ‚НО˛˜ЛЪ¸ ЩЫМНˆЛ˛ ФУ‰Т‚ВЪНЛ ‰Оя МУ˜МУИ Т˙ВПНЛ. ДОя ‚НО˛˜ВМЛя ЩЫМНˆЛЛ ФУ‰Т‚ВЪНЛ ‰Оя МУ˜МУИ Т˙ВПНЛ ЫТЪ‡МУ‚ЛЪВ ФВ ВНО˛˜‡ЪВО¸ N.S.LIGHT ‚ ФУОУКВМЛВ ON ‚ ЫТЪ‡МУ‚Н‡ı MENU (cЪ . 69).

Recording a picture |
|
З‡ÔËÒ¸ ËÁÓ· ‡ÊÂÌËя |
|
|
|
|
|
|
Notes
•Do not use the NightShot function in bright places (ex. outdoors in the daytime). This may cause your camcorder to malfunction.
•When you keep NIGHTSHOT set to ON in normal recording, the picture may be recorded in incorrect or unnatural colours.
•If focusing is difficult with the autofocus mode when using the NightShot function, focus manually.
While using the NightShot function, you can not use the following functions:
–Exposure
–PROGRAM AE
–Fader*
–Digital effect*
*You cannot use these functions only in the NightShot +Slow shutter mode.
Shutter speed in the NightShot +Slow shutter mode
Indicator |
Shutter speed |
(NIGHTSHOT1) |
1/12 |
|
|
(NIGHTSHOT2) |
1/3 |
The +SLOW SHUTTER button does not work:
–while the fader function is set or in use
–while the digital effect function is in use
–when NIGHTSHOT is set to OFF
NightShot Light
NightShot Light rays are infrared and so are invisible. The maximum shooting distance using the NightShot Light is about 3 m (10 feet). The shooting distance will be twice or more in the NightShot +Slow shutter mode.
П ËϘ‡ÌËя
•НВ ЛТФУО¸БЫИЪВ ЩЫМНˆЛ˛ МУ˜МУИ Т˙ВПНЛ ‚ я НЛı ПВТЪ‡ı (М‡Ф ЛПВ , М‡ ЫОЛˆВ ‚ ‰МВ‚МУВ
‚ ВПя). ЭЪУ ПУКВЪ Ф Л‚ВТЪЛ Н |
|
|
|
МВЛТФ ‡‚МУТЪЛ В‡¯ВИ ‚Л‰ВУН‡ПВ ˚. |
|
||
•П Ë Û‰Â Ê‡ÌËË ÛÒÚ‡ÌÓ‚ÍË NIGHTSHOT ‚ |
|
||
|
|||
ФУОУКВМЛЛ ON Ф Л МУ П‡О¸МУИ Б‡ФЛТЛ |
Recording |
||
•ЕТОЛ ЩУНЫТЛ У‚Н‡ Б‡Ъ Ы‰МВМ‡ ‚ |
|||
ЛБУ· ‡КВМЛВ ПУКВЪ ·˚Ъ¸ Б‡ФЛТ‡МУ ‚ |
|
||
МВФ ‡‚ЛО¸М˚ı ЛОЛ МВВТЪВТЪ‚ВММ˚ı ˆ‚ВЪ‡ı. |
|
||
‡‚ЪУП‡ЪЛ˜ВТНУП ВКЛПВ Ф Л ЛТФУО¸БУ‚‡МЛЛ |
– |
||
ЩУНЫТЛ У‚НЫ ‚ Ы˜МЫ˛. |
|
|
Basics |
ЩЫМНˆЛЛ МУ˜МУИ Т˙ВПНЛ, ‚˚ФУОМЛЪВ |
|
||
П Л ЛТФУО¸БУ‚‡МЛЛ ЩЫМНˆЛЛ МУ˜МУИ |
З‡ÔËÒ¸ |
||
Т˙ВПНЛ В˚ МВ ПУКВЪВ ЛТФУО¸БУ‚‡Ъ¸ |
|||
ÒÎÂ‰Û˛˘Ë ÙÛÌ͈ËË: |
|
|
|
– ЭНТФУБЛˆЛя |
|
|
– |
|
|
ОÒÌÓ‚Ì˚Â |
|
– PROGRAM AE |
|
|
|
|
|
|
|
– ФÂȉ * |
|
|
|
– ЦЛЩ У‚УИ ˝ЩЩВНЪ* |
|
|
|
* В˚ МВ ПУКВЪВ ЛТФУО¸БУ‚‡Ъ¸ ˝ЪЛ ЩЫМНˆЛЛ |
ФУОУКВМЛя |
||
СНУ УТЪ¸ Б‡Ъ‚У ‡ ‚ ВКЛПВ МУ˜МУИ Т˙ВПНЛ |
|||
ЪУО¸НУ ‚ ВКЛПВ МУ˜МУИ Т˙ВПНЛ |
|
||
+ПВ‰ОВММУ„У Б‡Ъ‚У ‡. |
|
|
|
+ПВ‰ОВММУ„У Б‡Ъ‚У ‡ |
|
|
|
|
|
|
|
ВÂ΢Ë̇ ÒÍÓ ÓÒÚË Á‡Ú‚Ó ‡ СÍÓ ÓÒÚ¸ Á‡Ú‚Ó ‡ |
|
||
|
|
|
|
(NIGHTSHOT1) |
1/12 |
|
|
(NIGHTSHOT2) |
1/3 |
|
|
|
|
|
|
КÌÓÔ͇ +SLOW SHUTTER Ì ‡·ÓÚ‡ÂÚ:
–ВТОЛ ЫТЪ‡МУ‚ОВМ‡ ЛОЛ ЛТФУО¸БЫВЪТя ЩЫМНˆЛя ЩВИ‰В ‡
–ВТОЛ ЛТФУО¸БЫВЪТя ЩЫМНˆЛя ˆЛЩ У‚У„У ˝ЩЩВНЪ‡
–ВТОЛ ФВ ВНО˛˜‡ЪВО¸ NIGHTSHOT ЫТЪ‡МУ‚ОВМ ‚ ФУОУКВМЛВ OFF
ПÓ‰Ò‚ÂÚ͇ ‰Îя ÌÓ˜ÌÓÈ Ò˙ÂÏÍË
ЛЫ˜Л ФУ‰Т‚ВЪНЛ ‰Оя МУ˜МУИ Т˙ВПНЛ я‚Оя˛ЪТя ЛМЩ ‡Н ‡ТМ˚ПЛ Л ФУ˝ЪУПЫ МВ‚Л‰ЛП˚ПЛ. М‡НТЛП‡О¸МУВ ‡ТТЪУяМЛВ ‰Оя Т˙ВПНЛ Ф Л ЛТФУО¸БУ‚‡МЛЛ ФУ‰Т‚ВЪНЛ ‰Оя МУ˜МУИ Т˙ВПНЛ‡‚МУ Ф ЛПВ МУ 3 П. В ВКЛПВ МУ˜МУИ Т˙ВПНЛ +ПВ‰ОВММУ„У Б‡Ъ‚У ‡ ‡ТТЪУяМЛВ ‰Оя Т˙ВПНЛ ·Ы‰ВЪ ‚ ‰‚‡ ЛОЛ ·УОВВ ‡Б ·УО¸¯В.
27
Checking the recording |
|
П Ó‚Â Í‡ Á‡ÔËÒË |
– EDITSEARCH / Rec Review |
|
– EDITSEARCH / П УТПУЪ Б‡ФЛТЛ |
|
|
|
You can use these buttons to check the recorded picture or shoot so that the transition between the last recorded scene and the next scene you record is smooth.
В˚ ПУКВЪВ ЛТФУО¸БУ‚‡Ъ¸ ˝ЪЛ НМУФНЛ ‰Оя Ф У‚В НЛ Б‡ФЛТ‡ММУ„У ЛБУ· ‡КВМЛя ЛОЛ Т˙ВПНЛ, Ъ‡Н ˜ЪУ·˚ ФВ ВıУ‰ ПВК‰Ы ФУТОВ‰МЛП Б‡ФЛТ‡ММ˚П ˝ФЛБУ‰УП Л ТОВ‰Ы˛˘ЛП Б‡ФЛТ˚‚‡ВП˚П ˝ФЛБУ‰УП ·˚О ФО‡‚М˚П.
 EDITSEARCH

EDITSEARCH
You can search for the next recording start point.
Hold down the +/– (Œ) side of EDITSEARCH in the standby mode. The recorded section is played back.
+ : to go forward
– : to go backward
Release EDITSEARCH to stop playback. If you press START/STOP, re-recording begins from the point you released EDITSEARCH. You cannot monitor the sound.
Rec Review
You can check the last recorded section.
Press the – (Œ) side of EDITSEARCH momentarily in the standby mode.
The last few seconds of the recorded section are played back. You can monitor the sound from headphones.
Note
EDITSEARCH and Rec Review work only for tapes recorded in the Digital8 system.
EDITSEARCH
В˚ ПУКВЪВ ‚˚ФУОМяЪ¸ ФУЛТН ПВТЪ‡ М‡˜‡О‡ ТОВ‰Ы˛˘ВИ Б‡ФЛТЛ.
ДВ КЛЪВ М‡К‡ЪУИ ТЪУ УМЫ +/– (Œ) НМУФНЛ EDITSEARCH ‚ ВКЛПВ УКЛ‰‡МЛя. БЫ‰ВЪ ‚УТФ УЛБ‚В‰ВМ‡ Б‡ФЛТ‡ММ‡я ˜‡ТЪ¸.
+ : ‰Оя Ф У‰‚ЛКВМЛя ‚ФВ В‰
– : ‰Оя Ф У‰‚ЛКВМЛя М‡Б‡‰ ОЪФЫТЪЛЪВ НМУФНЫ EDITSEARCH ‰Оя УТЪ‡МУ‚НЛ ‚УТФ УЛБ‚В‰ВМЛя. ЕТОЛ В˚
М‡КПВЪВ НМУФНЫ START/STOP, М‡˜МВЪТя ФВ ВБ‡ФЛТ¸ Т ЪУ„У ПВТЪ‡, „‰В В˚ УЪФЫТЪЛОЛ НМУФНЫ EDITSEARCH. В˚ МВ ПУКВЪВ НУМЪ УОЛ У‚‡Ъ¸ Б‚ЫН.
П УТПУЪ Б‡ФЛТЛ
В˚ ПУКВЪВ Ф У‚В ЛЪ¸ ФУТОВ‰М˛˛ Б‡ФЛТ‡ММЫ˛ ˜‡ТЪ¸.
Н‡КПЛЪВ Н ‡ЪНУ‚ ВПВММУ ТЪУ УМЫ – (Œ) НМУФНЛ EDITSEARCH ‚ ВКЛПВ УКЛ‰‡МЛя. БЫ‰ЫЪ ‚УТФ УЛБ‚В‰ВМ˚ ФУТОВ‰МЛВ МВТНУО¸НУ ТВНЫМ‰ Б‡ФЛТ‡ММУИ ˜‡ТЪЛ. В˚ ПУКВЪВ НУМЪ УОЛ У‚‡Ъ¸ Б‚ЫН ˜В ВБ „УОУ‚М˚В ЪВОВЩУМ˚.
П ËϘ‡ÌËÂ
ФЫМНˆЛЛ EDITSEARCH Л Ф УТПУЪ ‡ Б‡ФЛТЛ‡·УЪ‡˛Ъ ЪУО¸НУ ‰Оя ОВМЪ, Б‡ФЛТ‡ММ˚ı ‚ ˆЛЩ У‚УИ ТЛТЪВПВ Digital8  .
.
28
— Playback – Basics —
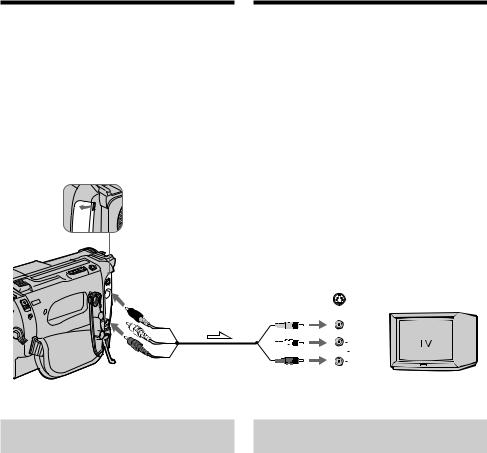
Connections for playback
Connect your camcorder to your TV or VCR with the A/V connecting cable supplied with your camcorder to watch the playback picture on the TV screen. When monitoring the playback picture on the TV screen, we recommend that you power your camcorder from the mains using the AC power adaptor (p. 17). Refer to the operating instructions of your TV or VCR.
Open the jack cover. Connect your camcorder to the TV using the A/V connecting cable. Then, set the TV/VCR selector on the TV to VCR.
 S VIDEO


 VIDEO
VIDEO
AUDIO
 : Signal flow / П ‰‡˜‡ Ò˄̇·
— ВУТФ УЛБ‚В‰ВМЛВ – ОТМУ‚М˚В ФУОУКВМЛя —
ПУ‰ТУВ‰ЛМВМЛя ‰Оя ‚УТФ УЛБ‚В‰ВМЛя
ПУ‰ТУВ‰ЛМЛЪВ В‡¯Ы ‚Л‰ВУН‡ПВ Ы Н В‡¯ВПЫ |
|
|||||||||
ÚÂ΂ËÁÓ Û ËÎË КВМ Ò ÔÓÏÓ˘¸˛ |
|
|||||||||
ТУВ‰ЛМЛЪВО¸МУ„У Н‡·ВОя ‡Ы‰ЛУ/‚Л‰ВУ, |
|
|||||||||
ÍÓÚÓ ˚È Ô Ë·„‡ÂÚÒя Í В‡¯ÂÈ ‚ˉÂÓ͇Ï  |
|
|||||||||
‰Оя Ф УТПУЪ ‡ ‚УТФ УЛБ‚У‰ЛПУ„У |
|
|||||||||
ËÁÓ· ‡ÊÂÌËя ̇ ˝Í ‡Ì ÚÂ΂ËÁÓ ‡. П Ë |
|
|||||||||
ЫФ ‡‚ОВМЛЛ ‚УТФ УЛБ‚У‰ЛП˚П ЛБУ· ‡КВМЛВП |
|
|||||||||
|
||||||||||
|
||||||||||
М‡ ˝Н ‡МВ ЪВОВ‚ЛБУ ‡ ВНУПВМ‰ЫВЪТя |
–Playback |
|||||||||
‡‰‡ФЪВ ‡ ФВ ВПВММУ„У ЪУН‡ (ТЪ . 17). СП. |
||||||||||
ÔÓ‰Íβ˜ËÚ¸ ÔËÚ‡ÌËÂ Í В‡¯ÂÈ ‚ˉÂÓ͇Ï  ÓÚ |
|
|||||||||
ТВЪВ‚УИ УБВЪНЛ Т ФУПУ˘¸˛ ТВЪВ‚У„У |
|
|||||||||
ЛМТЪ ЫНˆЛ˛ ФУ ˝НТФОЫ‡Ъ‡ˆЛЛ В‡¯В„У |
Basics |
|||||||||
ÚÂ΂ËÁÓ ‡ ËÎË КВМ. |
||||||||||
|
||||||||||
ОЪН УИЪВ Н ˚¯НЫ „МВБ‰. ПУ‰ТУВ‰ЛМЛЪВ В‡¯Ы |
–ÓËÁ‚‰ÂÌËÂВÓÒÔ |
|||||||||
‚ˉÂÓ͇ÏÂ Û Í ÚÂ΂ËÁÓ Û Ò ÔÓÏÓ˘¸˛ |
||||||||||
|
||||||||||
ТУВ‰ЛМЛЪВО¸МУ„У Н‡·ВОя ‡Ы‰ЛУ/‚Л‰ВУ. З‡ЪВП, |
|
|||||||||
ÛÒÚ‡ÌÓ‚ËÚ Ô ÂÍβ˜‡ÚÂθ TV/VCR ̇ В‡¯ÂÏ |
|
|||||||||
ЪВОВ‚ЛБУ В ‚ ФУОУКВМЛВ VCR. |
|
|||||||||
|
|
|
|
|
|
|
|
|
|
|
|
|
|
|
|
|
IN |
|
|
||
|
|
|
|
|
|
|
S VIDEO |
|
ОÒÌÓ‚Ì˚Â |
|
|
|
|
|
|
|
|
VIDEO |
|
||
|
|
|
|
|
|
|
|
|
||
|
|
|
|
|
|
|
|
|
||
|
|
|
|
|
|
|
AUDIO |
|
ФУОУКВМЛя |
|
|
|
|
|
|
|
|
|
|||
|
|
|
|
|
|
|
|
|
||
|
|
|
|
|
|
|
|
|
||
If your TV is already connected
to a VCR
Connect your camcorder to the LINE IN input on the VCR by using the A/V connecting cable supplied with your camcorder. Set the input selector on the VCR to LINE.
EcÎË Ba¯ ÚÂ΂ËÁÓ ÛÊÂ
ÔÓ‰ÒÓ‰ËÌÂÌ Í КВМ
ПУ‰ТУВ‰ЛМЛЪВ В‡¯Ы ‚Л‰ВУН‡ПВ Ы Н ‚ıУ‰МУПЫ „МВБ‰Ы LINE IN М‡ КВМ Т ФУПУ˘¸˛ ТУВ‰ЛМЛЪВО¸МУ„У Н‡·ВОя ‡Ы‰ЛУ/‚Л‰ВУ, НУЪУ ˚И Ф ЛО‡„‡ВЪТя Н В‡¯ВИ ‚Л‰ВУН‡ПВ В. УТЪ‡МУ‚ЛЪВ ТВОВНЪУ ‚ıУ‰МУ„У ТЛ„М‡О‡ М‡ КВМ ‚ ФУОУКВМЛВ LINE.
29
Connections for playback
If your TV or VCR is a monaural
type
Connect the yellow plug for video and the white plug for audio on both your camcorder and the TV or the VCR (you do not connect the red plug). With this connection, the sound is monaural even on stereo models.
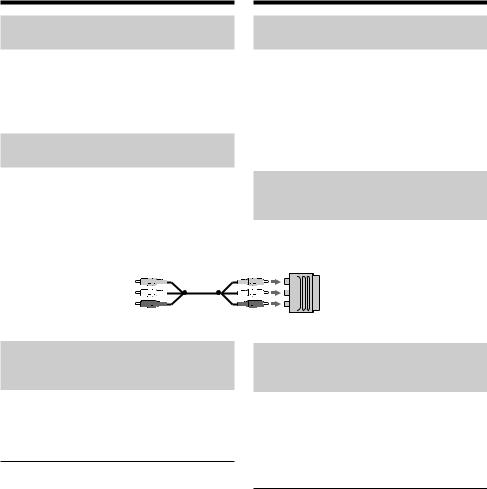
If your TV/VCR has a 21-pin
connector (EUROCONNECTOR)
Use the 21-pin adaptor supplied with your camcorder.
ПУ‰ТУВ‰ЛМВМЛя ‰Оя ‚УТФ УЛБ‚В‰ВМЛя
ЕÒÎË В‡¯ ÚÂ΂ËÁÓ ËÎË КВМ
ПУМУЩУМЛ˜ВТНУ„У ЪЛФ‡
ПУ‰ТУВ‰ЛМЛЪВ КВОЪ˚И ¯ЪВНВ ‰Оя ‚Л‰ВУТЛ„М‡О‡ Л ·ВО˚И ¯ЪВНВ ‰Оя ‡Ы‰ЛУТЛ„М‡О‡ Н В‡¯ВИ ‚Л‰ВУН‡ПВ В Л ЪВОВ‚ЛБУ Ы ЛОЛ КВМ (В‡П МВ МЫКМУ ФУ‰ТУВ‰ЛМяЪ¸ Н ‡ТМ˚И ¯ЪВНВ ).
П Л ‰‡ММУП ТУВ‰ЛМВМЛЛ Б‚ЫН ·Ы‰ВЪ ПУМУЩУМЛ˜ВТНЛП ‰‡КВ М‡ ТЪВ ВУЩУМЛ˜ВТНЛı ПУ‰ВОяı.
ЕТОЛ ‚ В‡¯ВП ЪВОВ‚ЛБУ В/КВМ ЛПВВЪТя 21-¯Ъ˚ ¸НУ‚˚И ‡Б˙ВП (EUROCONNECTOR)
ВУТФУО¸БЫИЪВТ¸ 21-¯Ъ˚ ¸НУ‚˚П ‡‰‡ФЪВ УП, Ф ЛО‡„‡ВП˚П Н В‡¯ВИ ‚Л‰ВУН‡ПВ В.
 TV
TV
To connect to a TV or VCR without Video/Audio input jacks
Use a PAL system RFU adaptor (not supplied). Refer to the operating instructions of your TV or VCR and the RFU adaptor. With an RFU adaptor, the sound is monaural.
If your TV or VCR has an S video jack
Connect using an S video cable (not supplied) to obtain high-quality pictures. With this connection, you do not need to connect the yellow (video) plug of the A/V connecting cable. Connect the S video cable (not supplied) to the S video jacks on both your camcorder and the TV or the VCR.
ДОя ФУ‰ТУВ‰ЛМВМЛя Н В‡¯ВПЫ ЪВОВ‚ЛБУ Ы ЛОЛ КВМ ·ВБ ‚ıУ‰М˚ı „МВБ‰ ‡Ы‰ЛУ/‚Л‰ВУ
ИТФУО¸БЫИЪВ ВЧ-‡‰‡ФЪВ ТЛТЪВП˚ PAL (МВ Ф ЛО‡„‡ВЪТя).
О· ‡ЪЛЪВТ¸ Н ЛМТЪ ЫНˆЛЛ ФУ ˝НТФОЫ‡Ъ‡ˆЛЛ В‡¯В„У ЪВОВ‚ЛБУ ‡ ЛОЛ КВМ Л ВЧ-‡‰‡ФЪВ ‡. П Л ЛТФУО¸БУ‚‡МЛЛ ВЧ-‡‰‡ФЪВ ‡ Б‚ЫН ·Ы‰ВЪ ПУМУЩУМЛ˜ВТНЛП.
ЕТОЛ ‚ В‡¯ВП ЪВОВ‚ЛБУ В ЛОЛ КВМ ЛПВВЪТя „МВБ‰У S ‚Л‰ВУ.
В˚ФУОМЛЪВ ТУВ‰ЛМВМЛВ Т ФУПУ˘¸˛ Н‡·ВОя S ‚Л‰ВУ (МВ Ф ЛО‡„‡ВЪТя) ‰Оя ФУОЫ˜ВМЛя ‚˚ТУНУН‡˜ВТЪ‚ВММУ„У ЛБУ· ‡КВМЛя. П Л ‰‡ММУП ТУВ‰ЛМВМЛЛ В‡П МВ МЫКМУ ФУ‰ТУВ‰ЛМяЪ¸ КВОЪ˚И ¯ЪВНВ (‚Л‰ВУ) ТУВ‰ЛМЛЪВО¸МУ„У Н‡·ВОя ‡Ы‰ЛУ/‚Л‰ВУ. ПУ‰ТУВ‰ЛМЛЪВ Н‡·ВО¸ S ‚Л‰ВУ (МВ Ф ЛО‡„‡ВЪТя) Н „МВБ‰‡П S ‚Л‰ВУ М‡ В‡¯ВИ ‚Л‰ВУН‡ПВ В Л В‡¯ВП ЪВОВ‚ЛБУ В ЛОЛ КВМ.
30
 Loading...