


3-072-650-12 (1)
Digital
Video Camera
Recorder
Operating Instructions
Before operating the unit, please read this manual thoroughly, and retain it for future reference.
Owner’s Record
The model and serial numbers are located on the bottom. Record the serial number in the space provided below. Refer to these numbers whenever you call upon your Sony dealer regarding this product.
Model No. DCR-TRV |
|
Model No. AC- |
|
||
|
|
||||
Serial No. |
|
|
Serial No. |
|
|
|
|
|
|
||
TM
SERIES
DCR-TRV240/TRV340/TRV740/
TRV840
©2002 Sony Corporation
Welcome!
Congratulations on your purchase of this Sony Handycam. With your Handycam, you can capture life’s precious moments with superior picture and sound quality. Your Handycam is loaded with advanced features, but at the same time it is very easy to use. You will soon be producing home video that you can enjoy for years to come.
WARNING
To prevent fire or shock hazard, do not expose the unit to rain or moisture.
This symbol is intended to alert the user to the presence of uninsulated “dangerous voltage” within the product’s enclosure that may be of sufficient magnitude to constitute a risk of electric shock to persons.
This symbol is intended to alert the user to the presence of important operating and maintenance (servicing) instructions in the literature accompanying the appliance.
Never expose the battery pack to temperatures above 60°C (140°F) such as in a car parked in the sun or under direct sunlight.
For customers in the U.S.A.
and CANADA
CAUTION
TO PREVENT ELECTRIC SHOCK, MATCH WIDE BLADE OF PLUG TO WIDE SLOT, FULLY INSERT.
RECYCLING LITHIUM-ION
Lithium-Ion batteries are recyclable.
You can help preserve environment by returning your used rechargeable batteries to the collection recycling location nearest you.
For more information
rechargeable batteries, call toll free 1-800-822- 8837, or visit http://www.rbrc.org/.
Caution: Do not handle damaged or leaking Lithium-Ion batteries.
“Memory Stick”
THIS DEVICE COMPLIES WITH PART 15 OF THE FCC RULES. OPERATION IS SUBJECT TO THE FOLLOWING TWO CONDITIONS:
(1) THIS DEVICE MAY NOT CAUSE HARMFUL INTERFERENCE, AND (2) THIS DEVICE MUST ACCEPT ANY INTERFERENCE RECEIVED, INCLUDING INTERFERENCE THAT MAY CAUSE UNDESIRED OPERAION.
THIS CLASS B DIGITAL APPARATUS COMPLIES WITH CANADIAN ICES-003.
2

For the customers in the U.S.A.
If you have any questions about this product, you may call:
Sony Customer Information Center 1-800-222- SONY (7669)
The number below is for the FCC related matters only.
Regulatory Information
Declaration of Conformity
Trade Name: |
SONY |
Model No.: |
DCR-TRV240, DCR- |
|
TRV340 |
Responsible Party: |
Sony Electronics Inc. |
Address: |
680 Kinderkamack |
|
Road, Oradell, |
|
NJ07649 U.S.A. |
Telephone No.: |
201-930-6972 |
This device complies with Part 15 of the FCC Rules. Operation is subject to the following two conditions: (1) This device may not cause harmful interference, and (2)this device must accept any interference received, including interference that may cause undesired operation.
Declaration of Conformity
Trade Name: |
SONY |
Model No.: |
DCR-TRV740, DCR- |
|
TRV840 |
Responsible Party: |
Sony Electronics Inc. |
Address: |
680 Kinderkamack |
|
Road, Oradell, |
|
NJ07649 U.S.A. |
Telephone No.: |
201-930-6972 |
This device complies with Part 15 of the FCC Rules. Operation is subject to the following two conditions: (1) This device may not cause harmful interference, and (2)this device must accept any interference received, including interference that may cause undesired operation.
CAUTION
You are cautioned that any changes or modifications not expressly approved in this manual could void your authority to operate this equipment.
Note:
This equipment has been tested and found to comply with the limits for a Class B digital device, pursuant to Part 15 of the FCC Rules. These limits are designed to provide reasonable protection against harmful interference in a residential installation. This equipment generates, uses, and can radiate radio frequency energy and, if not installed and used in accordance with the instructions, may cause harmful interference to radio communications. However, there is no guarantee that interference will not occur in a particular installation. If this equipment does cause harmful interference to radio or television reception, which can be determined by turning the equipment off and on, the user is encouraged to try to correct the interference by one or more of the following measures:
—Reorient or relocate the receiving antenna.
—Increase the separation between the equipment and receiver.
—Connect the equipment into an outlet on a circuit different from that to which the receiver is connected.
—Consult the dealer or an experienced radio/TV technician for help.
The supplied interface cable must be used with the equipment in order to comply with the limits for a digital device pursuant to Subpart B of Part 15 of FCC Rules.
3
Main features
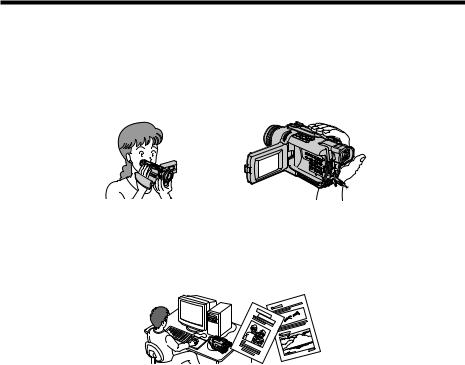
Recording moving or still images, and playing them back
•Recording moving pictures on a tape (p. 21) •Recording still images on a tape (p. 39) •Playing back a tape (p. 34)
•Recording still images on “Memory Stick”s (except DCR-TRV240) (p. 124) •Recording moving pictures on “Memory Stick”s (except DCR-TRV240) (p. 140) •Viewing still images recorded on “Memory Stick”s (except DCR-TRV240) (p. 150) •Viewing moving pictures on “Memory Stick”s (except DCR-TRV240) (p. 153)
b |
Capturing images on your computer
•Viewing images recorded on “Memory Stick”s using the USB cable (except DCR-TRV240) (p. 155)
•Viewing images recorded on a tape using the USB cable (p. 94)
•Viewing images live on your computer from your camcorder using the USB cable (p. 103)
•Capturing images from an analog video unit on your computer (p. 88)
Other uses
Functions for adjusting exposure in the recording mode
•BACKLIGHT (p. 28)
•NightShot/Super NightShot/Color Slow Shutter (p. 29) •PROGRAM AE (p. 51)
•Adjusting the exposure manually (p. 53)
Functions for giving images more impact
•Digital zoom [MENU] (p. 24) The default setting is OFF. (To zoom greater than 25× , (DCR-TRV240/TRV340)/15× (DCR-TRV740/TRV840), select the digital zoom power in D ZOOM in the menu settings.)
•Fader (p. 44) •Picture effects (p. 47) •Digital effects (p. 48) •Titles (p. 58, 60)
•MEMORY MIX (except DCR-TRV240) (p. 129)
Functions for giving a natural appearance to your recordings
•Sports lesson (p. 51) •Landscape (p. 51) •Manual focus (p. 54)
Functions for use on recorded tapes
•END SEARCH/EDITSEARCH/Rec Review (p. 32) •DATA CODE (p. 35)
•Tape PB ZOOM (p. 65) •ZERO SET MEMORY (p. 67)
4 •Digital program editing (on tapes) (p. 74)/(on “Memory Stick”s) (except DCRTRV240) (p. 146)

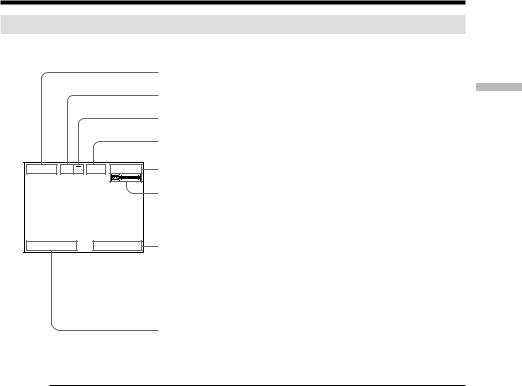
Checking supplied accessories
Make sure that the following accessories are supplied with your camcorder.
1 |
2 |
|
3 |
|
|
|
StartedGetting |
4 |
5 |
6 |
7 |
8 |
9 |
0 |
|
1Wireless Remote Commander (1) (p. 207)
2AC-L10A/L10B/L10C AC power adaptor (1), Power cord (1) (p. 13)
3NP-FM30 battery pack (1) (p. 12, 13) DCR-TRV240/TRV340
NP-FM50 battery pack (1) (p. 12, 13) DCR-TRV740/TRV840
4Size AA (R6) battery for Remote Commander (2) (p. 207)
5 A/V connecting cable (1) (p. 38)
6 Shoulder strap (1) (p. 201)
7 Lens cap (1) (p. 21)
8 USB cable (1) (p. 96, 156)
9“Memory Stick” (1)
(except DCR-TRV240) (p. 116)
0CD-ROM (SPVD-008 USB Driver) (1) (p. 96, 156)
Contents of the recording cannot be compensated if recording or playback is not made due to a malfunction of the camcorder, storage media, etc.
5

Table of contents
Main features ........................................... |
4 |
Checking supplied accessories .............. |
5 |
Quick Start Guide ............................. |
8 |
Getting Started |
|
Using this manual ................................. |
10 |
Step 1 Preparing the power supply ... |
12 |
Installing the battery pack ............ |
12 |
Charging the battery pack............. |
13 |
Connecting to a wall outlet ........... |
17 |
Step 2 Setting the date and time ........ |
18 |
Step 3 Inserting a cassette ................... |
20 |
Recording – Basics |
|
Recording a picture ............................... |
21 |
Shooting backlit subjects |
|
– BACK LIGHT ........................ |
28 |
Shooting in the dark |
|
– NightShot/Super NightShot/ |
|
Color Slow Shutter .................. |
29 |
Self-timer recording |
|
(except DCR-TRV240) ............. |
31 |
Checking recordings – END SEARCH/ |
|
EDITSEARCH/Rec Review .......... |
32 |
Playback – Basics |
|
Playing back a tape ............................... |
34 |
To display the screen indicators |
|
– Display function ................... |
35 |
Viewing recordings on TV ................... |
38 |
Advanced Recording Operations
Recording still images on a tape |
|
– Tape Photo recording ................. |
39 |
Using the wide mode ........................... |
42 |
Using the fader function ...................... |
44 |
Using special effects |
|
– Picture effect ................................. |
47 |
Using special effects |
|
– Digital effect ................................. |
48 |
Using the PROGRAM AE function .... |
51 |
Adjusting the exposure manually ...... |
53 |
Focusing manually ................................ |
54 |
Interval recording ................................. |
55 |
Frame by frame recording |
|
– Frame recording .......................... |
57 |
Superimposing a title ........................... |
58 |
Making your own titles ........................ |
60 |
Inserting a scene .................................... |
62 |
Advanced Playback Operations
Playing back tapes with picture |
|
effects ............................................... |
63 |
Playing back tapes with digital |
|
effects ............................................... |
64 |
Enlarging recorded images |
|
– Tape PB ZOOM ........................... |
65 |
Quickly locating a scene |
|
– ZERO SET MEMORY ................. |
67 |
Searching a recording by date |
|
– DATE SEARCH ........................... |
68 |
Searching for a photo – PHOTO |
|
SEARCH/PHOTO SCAN ............. |
69 |
Editing |
|
Dubbing a tape ...................................... |
71 |
Dubbing only desired scenes |
|
– Digital program editing |
|
(on tapes) ......................................... |
74 |
Capturing images from an analog |
|
video unit on your computer |
|
– Signal convert function ............... |
88 |
Recording video or TV programs ....... |
89 |
Inserting a scene from a VCR |
|
– Insert Editing ............................... |
92 |
Viewing images recorded on a tape |
|
on your computer |
|
(Windows users only) .................... |
94 |
Customizing Your Camcorder |
|
Changing the menu settings .............. |
105 |
6

Table of contents
“Memory Stick” operations |
|
(except DCR-TRV240) |
|
Using “Memory Stick” |
|
– Introduction ............................... |
116 |
Recording still images on |
|
“Memory Stick”s |
|
– Memory Photo recording ......... |
124 |
Superimposing a still image in the |
|
“Memory Stick” on an image |
|
– MEMORY MIX .......................... |
129 |
Recording images from a tape as still |
|
images ............................................ |
135 |
Copying still images from a tape |
|
– PHOTO SAVE ............................ |
138 |
Recording moving pictures on |
|
“Memory Stick”s |
|
– MPEG movie recording ............ |
140 |
Troubleshooting |
|
Types of trouble and how to correct |
|
trouble ............................................ |
178 |
Self-diagnosis display......................... |
184 |
Warning indicators and messages .... |
185 |
Additional Information |
|
Digital8 system, recording and |
|
playback ......................................... |
187 |
About the “InfoLITHIUM” battery |
|
pack ................................................ |
189 |
About i.LINK ....................................... |
191 |
Using your camcorder abroad .......... |
193 |
Maintenance information and |
|
precautions .................................... |
194 |
Specifications ....................................... |
199 |
Recording pictures from a tape as |
|
moving pictures ............................ |
142 |
Recording edited pictures as a |
|
moving picture |
|
– Digital program editing |
|
(on “Memory Stick”s) .................. |
146 |
Viewing still images |
|
– Memory Photo playback .......... |
150 |
Viewing moving pictures |
|
– MPEG movie playback ............. |
153 |
Viewing images recorded on |
|
“Memory Stick”s on your |
|
computer ........................................ |
155 |
Copying images recorded on |
|
“Memory Stick”s to tape ............. |
164 |
Enlarging still images recorded on |
|
“Memory Stick”s |
|
– Memory PB ZOOM ................... |
166 |
Playing back images in a continuous |
|
loop – SLIDE SHOW .................... |
168 |
Preventing accidental erasure |
|
– Image protection ........................ |
170 |
Deleting images – DELETE ............... |
171 |
Writing a print mark |
|
– PRINT MARK ............................ |
174 |
Using the optional printer ................. |
176 |
Quick Reference |
|
Identifying parts and controls ........... |
201 |
Index ..................................................... |
209 |
Started Getting
7
Guide Start Quick
Quick Start Guide
This chapter introduces you to the basic features of your camcorder. See the page in parentheses “( )” for more information.
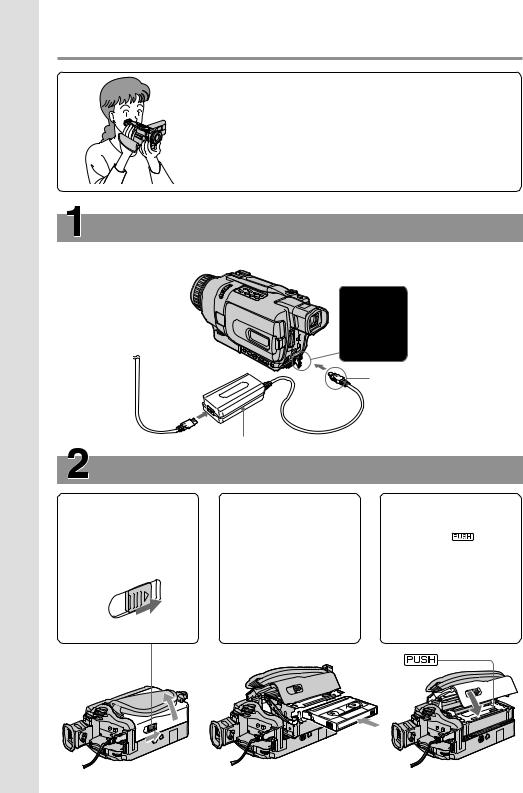
Connecting the power cord (p. 17)
Use the battery pack when using your camcorder outdoors (p. 12).
Open the DC IN jack cover.
Connect the plug with its vmark facing up.
AC power adaptor (supplied)
Inserting a cassette (p. 20)
1Slide OPEN/EJECT |
2Insert the cassette in |
3Close the cassette |
|
in the direction of the |
straight as far as |
compartment by |
|
arrow and open the |
possible into the |
pressing |
on the |
lid. |
cassette |
cassette |
|
|
compartment with |
compartment. |
|
|
the window facing |
After the cassette |
|
|
up. |
compartment goes |
|
|
Push the center of |
down completely, |
|
|
the cassette back to |
close the lid until it |
|
|
insert the cassette. |
clicks. |
|
8

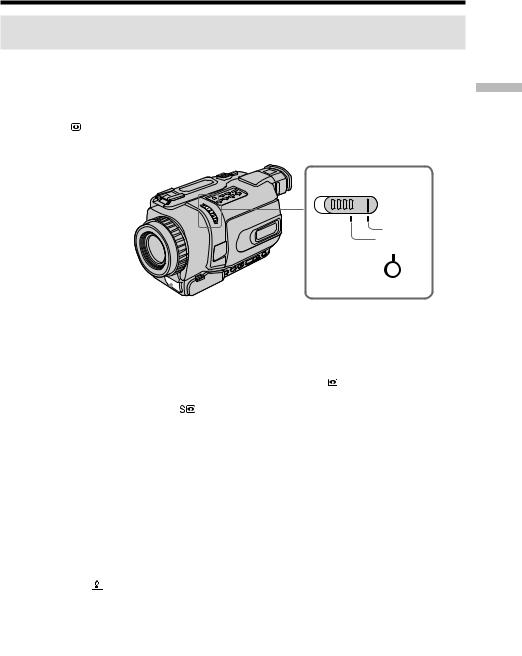
Recording a picture (p. 21)
1Remove the lens cap. |
2Set the POWER |
|
|
|
|
|
|
|
C |
F |
|||
|
|
|
V |
O |
||
|
|
|
F |
|||
|
switch to CAMERA |
|
R |
|
( |
|
|
|
|
|
|
G |
|
|
|
|
|
|
|
C |
|
|
POWER |
|
|
|
H |
|
while pressing the |
|
|
|
) |
|
|
|
M |
M |
A |
C |
|
|
small green button. |
|
E |
M |
|
|
|
O |
|
|
|||
|
YR |
A |
E |
|
|
|
|
|
|
R |
|
|
|
3Open the LCD panel while pressing OPEN. The picture appears on the LCD screen.
4Press START/STOP. Your camcorder starts recording. To stop recording, press START/STOP button again.
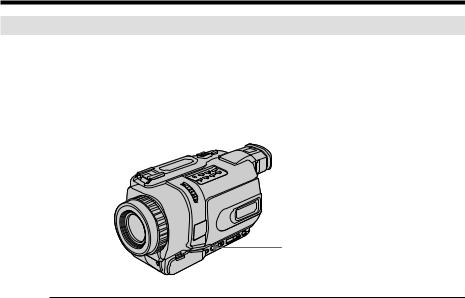
Viewfinder
When the LCD panel is closed, use the viewfinder with your eye against the eyecup.
The picture in the viewfinder is black and white.
When you purchase your camcorder, the clock setting is set to off. If you want to record the date and time for a picture, set the clock setting before recording (p. 18).
Monitoring the playback picture on the LCD screen (p. 34)
2Press mto rewind the tape.
REW 
3Press Nto start playback.
PLAY
1Set the POWER |
|
|
R |
|
( |
||
|
|
V |
O |
|
|||
|
|
|
F |
||||
|
|
|
C |
F |
|||
switch to VCR while |
WER |
|
|
|
|
|
C |
|
|
|
|
|
) |
||
|
|
|
|
|
|
|
H |
|
PO |
|
|
|
|
|
G |
pressing the small |
|
|
|
|
|
|
|
|
|
EM |
|
M |
A |
C |
|
green button. |
|
M |
|
|
|||
O |
|
|
|
|
|||
YR |
|
E |
|
|
|||
|
|
R |
|
|
|
||
|
|
A |
|
|
|
|
|
Note
Do not pick up your camcorder by holding the viewfinder, the LCD panel, or the battery pack.
Guide Start Quick
9
— Getting Started —
Using this manual
The instructions in this manual are for the four models listed in the table below. Before you start reading this manual and operating your camcorder, check the model number by looking at the bottom of your camcorder. The DCR-TRV740 is the model used for illustration purposes. Otherwise, the model name is indicated in the illustrations. Any differences in operation are clearly indicated in the text, for example, “except DCRTRV240.”
As you read through this manual, buttons and settings on your camcorder are shown in capital letters.
e.g. Set the POWER switch to CAMERA.
When you carry out an operation, you can hear a beep to indicate that the operation is being carried out.
Differences by camcorder model
DCR- |
TRV240 |
TRV340 |
TRV740 |
TRV840 |
|
MEMORY mark* |
— |
z |
z |
z |
|
(on the POWER switch) |
|||||
|
|
|
|
||
Self-timer |
— |
z |
z |
z |
|
Digital zoom |
700× |
700× |
420× |
420× |
|
LCD Screen |
6.2 cm |
6.2 cm |
6.2 cm |
8.8 cm |
|
(2.5 type) |
(2.5 type) |
(2.5 type) |
(3.5 type) |
||
|
|||||
|
|
|
|
|
|
z Provided |
|
|
|
|
|
— Not provided |
|
|
|
|
*The models with MEMORY marked on the POWER switch is provided with memory functions. See page 116 for details.
Before using your camcorder
With your digital camcorder, you can use Hi8 |
|
/Digital8 |
video cassettes. Your |
|
camcorder records and plays back pictures in the Digital8 |
system. Also, your |
|||
camcorder plays back tapes recorded in the Hi8 |
|
/standard 8 (analog) system. |
||
|
||||
You, however, cannot use the functions in “Advanced Playback Operations” on page
63 to 70 for playback in the Hi8 |
/standard 8 system. To enable smooth transition, |
|||
we recommend that you do not mix pictures recorded in the Hi8 |
|
/standard 8 |
||
|
||||
with the Digital8 system on a tape. |
|
|
||
Note on TV color systems
TV color systems differ from country to country. To view your recordings on a TV, you need an NTSC system-based TV.
Copyright precautions
Television programs, films, video tapes, and other materials may be copyrighted. Unauthorized recording of such materials may be contrary to the provision of the copyright laws.
10
Using this manual
Precautions on camcorder care
Lens and LCD screen/finder
•The LCD screen and the finder are manufactured using extremely high-precision technology so over 99.99% of the pixels are operational for effective use. However, there may be some tiny black points and/or bright points (white, red, blue or green in color) that constantly appear on the LCD screen and the finder. These points are normal in the manufacturing process and do not affect the recording in any way.
•Do not let your camcorder become wet. Keep your camcorder away from rain and sea water. Letting your camcorder become wet may cause your camcorder to malfunction. Sometimes this malfunction cannot be repaired [a].
•Never leave your camcorder exposed to temperatures above 60°C (140°F), such as in a car parked in the sun or under direct sunlight [b].
•Be careful when placing the camera near a window or outdoors. Exposing the LCD screen, the finder or the lens to direct sunlight for long periods may cause malfunctions [c].
•Do not directly shoot the sun. Doing so might cause your camcorder to malfunction. Take pictures of the sun in low light conditions such as dusk [d].
Started Getting
[a] |
[b] |
[c] |
[d] |
11
Step 1 Preparing the power supply
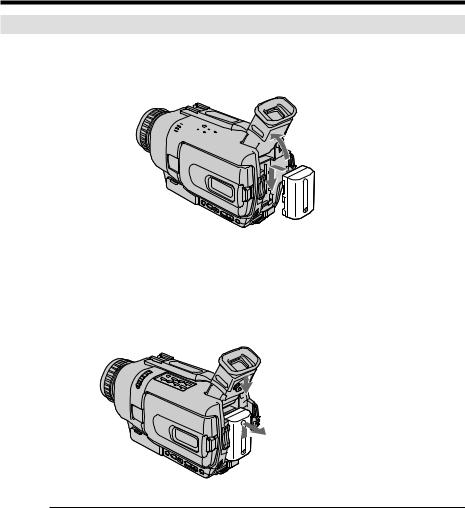
Installing the battery pack
(1) Lift up the viewfinder.
(2) Slide the battery pack down until it clicks.


 1
1
2
To remove the battery pack
(1) Lift up the viewfinder.
(2) Slide the battery pack out in the direction of the arrow while pressing BATT (battery) release lever down.
 BATT (battery)
release lever
If you install the large-capacity battery pack
If you install the NP-FM70/QM71/FM90/QM91/FM91 battery pack on your camcorder, extend its viewfinder.
12
Step 1 Preparing the power supply
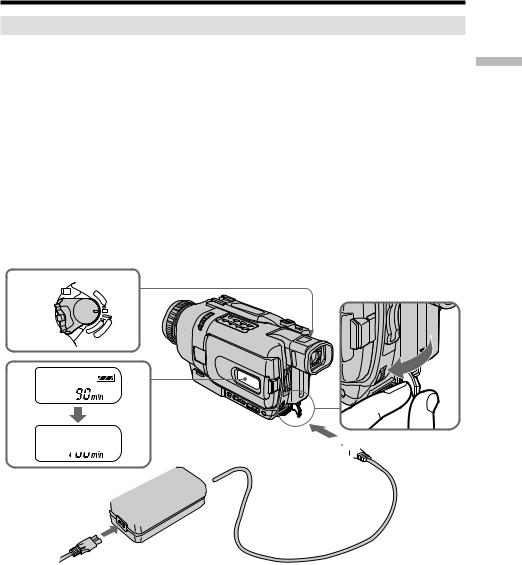
Charging the battery pack
Use the battery pack after charging it for your camcorder.
Your camcorder operates only with the “InfoLITHIUM” battery pack (M series). See page 189 for details of “InfoLITHIUM” battery pack.
(1) Open the DC IN jack cover and connect the AC power adaptor supplied with your camcorder to the DC IN jack with the plug’s vmark facing up.
(2) Connect the power cord to the AC power adaptor. (3) Connect the power cord to a wall outlet.
(4) Set the POWER switch to OFF (CHG). Charging begins. The remaining battery time is indicated in minutes on the display window.
When the remaining battery indicator changes to u, normal charge is completed. To fully charge the battery (full charge), leave the battery pack attached after normal charge is completed until FULL appears on the display window. Fully charging the battery allows you to use the battery longer than usual.
Started Getting
4
|
V |
O |
||||
|
|
F |
||||
|
|
C |
|
F |
||
|
|
R |
|
( |
||
|
|
|
|
|
|
C |
|
|
|
|
|
|
H |
POWER |
|
|
|
|
|
G |
|
|
|
|
|
) |
|
|
M |
M |
|
A |
C |
|
|
|
E |
|
M |
|
|
O |
|
|
|
|
||
YR |
|
|
E |
|
|
|
|
|
R |
|
|
|
|
|
A |
|
|
|
|
|


 1 2
1 2

The number in the illustration of the display window may differ from that on your camcorder.
After charging the battery pack
Disconnect the AC power adaptor from the DC IN jack on your camcorder.
13

Step 1 Preparing the power supply
Note
Prevent metallic objects from coming into contact with the metal parts on the DC plug of the AC power adaptor. This may cause a short-circuit, damaging the AC power adaptor.
When the battery pack is charged fully
The LCD backlight of the display window is turned off.
Remaining battery time indicator
The remaining battery time indicator in the display window roughly indicates the recording time when recording using the viewfinder.
Until your camcorder calculates the actual remaining battery time
“– – – – min” appears in the display window.
While charging the battery pack
No indicator appears or the indicator flashes in the display window in the following cases:
–The battery pack is not installed correctly.
–Something is wrong with the battery pack.
If the power may go off although the remaining battery time indicator indicates that the battery pack has enough power to operate
Charge the battery pack fully again so that the indication on the remaining battery time indicator is correct.
When you use the AC power adaptor
Place the AC power adaptor near a wall outlet. If any trouble occurs with this unit, disconnect the plug from the wall outlet as soon as possible to cut off the power.
Recommended charging temperature
We recommend charging the battery pack in an ambient temperature of between 10°C to 30°C (50°F to 86°F).
What is ”InfoLITHIUM”?
The “InfoLITHIUM” is a lithium ion battery pack that can exchange data such as battery consumption with compatible electronic equipment. This unit is compatible with the “InfoLITHIUM” battery pack (M series). Your camcorder operates only with the “InfoLITHIUM” battery. “InfoLITHIUM” M series battery packs have the


 mark.
mark.
TM
SERIES
“InfoLITHIUM” is a trademark of Sony Corporation.
14

Step 1 Preparing the power supply
Charging time
Battery pack |
Full charge (Normal charge) |
|
|
NP-FM30 1) |
145 (85) |
|
|
|
|||
|
|
|
|
NP-FM50 2) |
150 (90) |
|
Getting |
NP-FM70 |
240 (180) |
|
|
|
|
||
NP-QM71 |
260 (200) |
|
Started |
NP-FM90 |
330 (270) |
|
|
|
|
||
NP-QM91/FM91 |
360 (300) |
|
|
|
|
|
|
The charging time may increase if the battery’s temperature is extremely high or low because of the ambient temperature.
Approximate number of minutes to charge an empty battery pack at 25°C (77°F)
1)Supplied with DCR-TRV240/TRV340
2)Supplied with DCR-TRV740/TRV840
Recording time
DCR-TRV240/TRV340
|
Recording with |
Recording with |
||
Battery pack |
the viewfinder |
the LCD screen |
||
|
|
|
|
|
|
Continuous* |
Typical** |
Continuous* |
Typical** |
NP-FM30 (supplied) |
100 |
55 |
80 |
45 |
NP-FM50 |
165 |
95 |
130 |
75 |
NP-FM70 |
345 |
200 |
270 |
155 |
NP-QM71 |
400 |
230 |
315 |
180 |
NP-FM90 |
520 |
300 |
410 |
235 |
NP-QM91/FM91 |
605 |
350 |
475 |
275 |
DCR-TRV740 |
|
|
|
|
|
|
|
||
|
Recording with |
Recording with |
||
Battery pack |
the viewfinder |
the LCD screen |
||
|
|
|
|
|
|
Continuous* |
Typical** |
Continuous* |
Typical** |
NP-FM30 |
85 |
45 |
70 |
40 |
NP-FM50 (supplied) |
140 |
80 |
110 |
60 |
NP-FM70 |
295 |
170 |
240 |
135 |
NP-QM71 |
340 |
195 |
275 |
155 |
NP-FM90 |
450 |
260 |
360 |
205 |
NP-QM91/FM91 |
520 |
300 |
420 |
240 |
DCR-TRV840 |
|
|
|
|
|
|
|
||
|
Recording with |
Recording with |
||
Battery pack |
the viewfinder |
the LCD screen |
||
|
Continuous* |
Typical** |
Continuous* |
Typical** |
|
|
|
|
|
NP-FM30 |
85 |
45 |
65 |
35 |
NP-FM50 (supplied) |
140 |
80 |
105 |
60 |
NP-FM70 |
295 |
170 |
225 |
130 |
NP-QM71 |
340 |
195 |
265 |
150 |
NP-FM90 |
450 |
260 |
345 |
200 |
NP-QM91/FM91 |
520 |
300 |
400 |
230 |
15

Step 1 Preparing the power supply
Approximate number of minutes when you use a fully charged battery
*Approximate continuous recording time at 25°C (77°F). The battery life will be shorter if you use your camcorder in a cold environment.
**Approximate number of minutes when recording while you repeat recording start/ stop, zooming and turning the power on/off. The actual battery life may be shorter
Playing time
DCR-TRV240/TRV340
Battery pack |
Playing time |
Playing time |
|
on LCD screen |
with LCD closed |
||
|
|||
|
|
|
|
NP-FM30 (supplied) |
80 |
110 |
|
NP-FM50 |
130 |
180 |
|
NP-FM70 |
270 |
370 |
|
NP-QM71 |
315 |
430 |
|
NP-FM90 |
410 |
560 |
|
NP-QM91/FM91 |
475 |
645 |
|
DCR-TRV740 |
|
|
|
|
|
|
|
Battery pack |
Playing time |
Playing time |
|
on LCD screen |
with LCD closed |
||
|
|||
|
|
|
|
NP-FM30 |
80 |
105 |
|
NP-FM50 (supplied) |
135 |
170 |
|
NP-FM70 |
275 |
355 |
|
NP-QM71 |
325 |
415 |
|
NP-FM90 |
425 |
540 |
|
NP-QM91/FM91 |
490 |
625 |
|
DCR-TRV840 |
|
|
|
|
|
|
|
Battery pack |
Playing time |
Playing time |
|
on LCD screen |
with LCD closed |
||
|
|||
|
|
|
|
NP-FM30 |
75 |
105 |
|
NP-FM50 (supplied) |
125 |
170 |
|
NP-FM70 |
265 |
355 |
|
NP-QM71 |
305 |
415 |
|
NP-FM90 |
400 |
540 |
|
NP-QM91/FM91 |
465 |
625 |
Approximate number of minutes when you use a fully charged battery
Approximate continuous playing time at 25°C (77°F). The battery life will be shorter if you use your camcorder in a cold environment.
Note
The table shows the playing time for tapes recorded in the Digital8  system. The playing time of tapes recorded in the Hi8/standard 8 system is reduced by about 20%..
16

Step 1 Preparing the power supply
Connecting to a wall outlet
When you use your camcorder for a long time, we recommend that you power it from a wall outlet using the AC power adaptor.
(1) Open the DC IN jack cover, and connect the AC power adaptor to the DC IN jack on your camcorder with the plug’s vmark facing up.
(2) Connect the power cord to the AC power adaptor. (3) Connect the power cord to a wall outlet.
Started Getting
1 |
2, 3 |
PRECAUTION
The set is not disconnected from the AC power source (house current) as long as it is connected to the wall outlet, even if the set itself has been turned off.
Notes
•The AC power adaptor can supply power even if the battery pack is attached to your camcorder.
•The DC IN jack has “source priority”. This means that the battery pack cannot supply any power if the power cord is connected to the DC IN jack, even when the power cord is not plugged into a wall outlet.
Using a car battery
Use Sony Car Battery Adaptor (optional).
17
Step 2 Setting the date and time
Set the date and time settings when you use your camcorder for the first time. “CLOCK SET” will be displayed each time that you set the POWER switch to CAMERA/MEMORY (except DCR-TRV240) unless you set the date and time settings. If you do not use your camcorder for about half a year, the date and time settings may be cleared from memory (bars may appear) because the built-in rechargeable battery installed in your camcorder will have been discharged (p. 196).
Set the year, then the month, the day, the hour and then the minute.
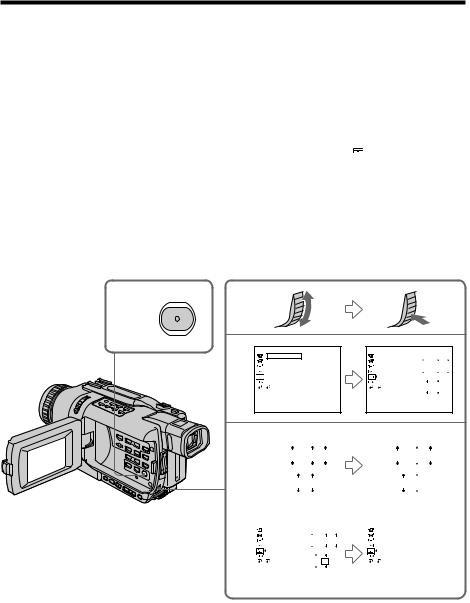
(1) Set the POWER switch to CAMERA or MEMORY (except DCR-TRV240), and then press MENU to display the menu settings.
(2) Turn the SEL/PUSH EXEC dial to select CLOCK SET in  , then press the dial.
(3) Turn the SEL/PUSH EXEC dial to adjust the desired year, then press the dial. (4) Set the month, day and hour by turning the SEL/PUSH EXEC dial and
pressing the dial.
(5) Set the minute by turning the SEL/PUSH EXEC dial and pressing the dial by the time signal. The clock starts to move.
(6) Press MENU to make the menu settings disappear.
1,6
MENU
2
SETUP MENU
CLOCK SET – –:– –:– –
USB STREAM
USBCONNECT
LTR SIZE
 LANGUAGE
DEMO MODE
RETURN
[MENU] : END
SETUP MENU |
|
|
||
|
CLOCK SET |
|
|
|
|
USB STREAM |
|
|
JAN 1 |
|
USBCONNECT |
2002 |
||
|
LTR SIZE |
|
|
|
|
LANGUAGE |
|
|
|
|
DEMO MODE |
12 |
00 AM |
|
|
RETURN |
|||
[MENU] : END
3 |
|
|
|
JAN |
1 |
|
|
2002 |
|
|
|
1 |
|
|
||
|
|
|
2002 |
|
JAN |
|
|
|
||||||||
|
12 |
00 AM |
|
12 |
00 AM |
|
|
|||||||||
|
|
|
|
|
|
|
|
|
|
|
|
|
|
|
|
|
|
|
|
|
|
|
|
|
|
|
|
|
|
|
|
|
|
5 |
|
|
|
|
|
|
|
|
|
|
|
|
|
|
|
|
SETUP MENU |
|
|
|
|
|
SETUP MENU |
|
|
|
|||||||
|
CLOCK SET |
|
|
|
|
|
|
CLOCK SET |
|
JUL |
4 2002 |
|
||||
|
USB STREAM |
|
|
|
|
|
|
USB STREAM |
5:30:00 PM |
|
||||||
|
|
USBCONNECT 2002 |
JUL 4 |
|
|
|
USBCONNECT |
|
|
|
||||||
|
|
LTR SIZE |
|
|
|
|
|
|
LTR SIZE |
|
|
|
|
|
|
|
|
|
LANGUAGE |
|
|
|
|
|
|
LANGUAGE |
|
|
|
|
|
|
|
|
|
DEMO MODE |
5 |
30 PM |
|
|
|
DEMO MODE |
|
|
|
|||||
|
|
RETURN |
|
|
|
RETURN |
|
|
|
|
|
|
||||
|
|
[MENU] : END |
|
|
|
|
|
[MENU] : END |
|
|
|
|||||
|
|
|
|
|
|
|
|
|
|
|
|
|
|
|
|
|
18

Step 2 Setting the date and time
The year changes as follows:
1995 T · · · · t 2002 T · · · · t 2079
If you do not set the date and time
“--- -- ----” “--:--:--” is recorded on the tape and the “Memory Stick”. (except DCR-TRV240)
Note on the time indicator
The internal clock of your camcorder operates on a 12-hour cycle.
•12:00 AM stands for midnight.
•12:00 PM stands for noon.
Started Getting
19
Step 3 Inserting a cassette
We recommend using Hi8 |
/Digital8 video cassettes. |
|
(1) Prepare the power source (p. 12).
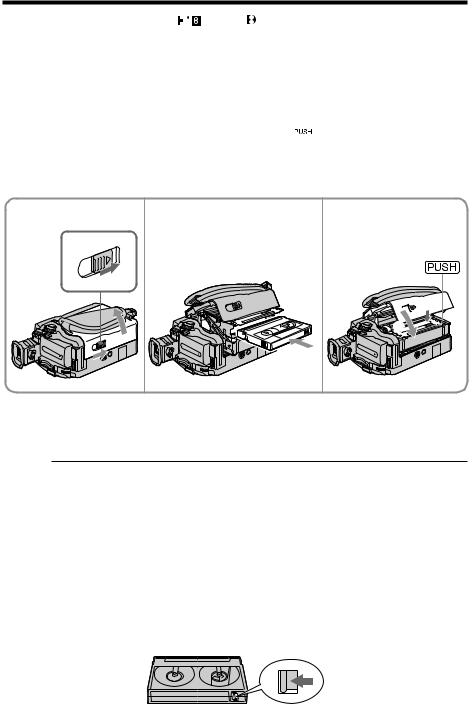
(2) Slide OPEN/EJECT in the direction of the arrow and open the lid. The cassette compartment automatically lifts up and opens.
(3) Insert the cassette straight as far as possible into the cassette compartment with the window facing up.
Push the center of the cassette back to insert.
(4) Close the cassette compartment by pressing  on the cassette compartment. The cassette compartment automatically goes down.
(5) After the cassette compartment going down completely, close the lid until it clicks.
2 |
3 |
4,5 |
 4
4
5
To eject a cassette
Follow the procedure above, and take out the cassette in step 3.
Notes
•Do not press the cassette compartment down. Doing so may cause a malfunction.
•Your camcorder records pictures in the Digital8  system.
•The recording time when you use your camcorder is half of indicated time on Hi8

 tape. If you select the LP mode in the menu settings, 3/4 of indicated time on Hi8
 tape.
tape.
•If you use standard 8  tape, be sure to play back the tape on your camcorder. Mosaic pattern noise may appear when you play back standard 8
  tape on other camcorders (including other DCR-TRV240/TRV340/TRV740/TRV840).
•The cassette compartment may not be closed when you press any part of the lid other than the  mark.
mark.
To prevent accidental erasure
Slide the write-protect tab on the cassette to expose the red mark.
20
— Recording – Basics —
Recording a picture
Your camcorder automatically focuses for you.
(1) Remove the lens cap by pressing both knobs on its sides and attach the lens cap to the grip strap.
(2) Install the power source and insert a cassette. See “Step 1” to “Step 3” for more information (p. 12 to 20).
(3) Set the POWER switch to CAMERA while pressing the small green button. This sets your camcorder to the standby mode.
(4) Open the LCD panel while pressing OPEN. The viewfinder automatically turns off.
(5) Press START/STOP. Your camcorder starts recording. The REC indicator appears on the screen. The camera recording lamp located on the front of your camcorder lights up. To stop recording, press START/STOP again.
The recording lamp lights up in the viewfinder when you record with the viewfinder.
1 |
3 |
|
|
|
|
|
|
|
|
|
|
V |
O |
|
|||
|
|
|
|
F |
||||
|
|
|
|
C |
|
F |
||
|
|
|
|
R |
( |
|||
|
|
|
|
|
|
|
|
C |
|
PO |
WER |
|
|
|
|
|
H |
|
|
|
|
|
|
G |
||
|
|
|
|
|
|
|
) |
|
|
|
|
M |
M |
|
A |
C |
|
|
|
|
|
E |
|
M |
|
|
|
|
O |
|
|
|
|
||
|
|
YR |
|
|
E |
|
|
|
|
|
|
|
R |
|
|
|
|
|
|
|
A |
|
|
|
|
|
5 |
|
50min |
SP REC 0:00:01 |
4 |
|
Basics – Recording
2
Camera recording lamp
Microphone
Notes
•Fasten the grip strap firmly.
•Do not touch the built-in microphone during recording.
21

Recording a picture
Note on recording mode
Your camcorder records and plays back in the SP (standard play) mode and in the LP (long play) mode. Select SP or LP in the menu settings (p. 105). In the LP mode, you can record 1.5 times as long as in the SP mode. When you record a tape in the LP mode on your camcorder, we recommend that you play back the tape on your camcorder.
Note on the LOCK switch (except DCR-TRV240)
When you slide the LOCK switch to the right, the POWER switch can no longer be set to MEMORY accidentally. The LOCK switch is released as the default setting.
To enable smooth transition
Transition between the last scene you recorded and the next scene is smooth as long as you do not eject the cassette even if you turn off your camcorder.
However, check the following:
–Do not mix recordings in the SP mode and in the LP mode on one tape.
–When you change the battery pack, set the POWER switch to OFF (CHG).
If you leave your camcorder in the standby mode for three minutes while the cassette is inserted
Your camcorder automatically turns off. This is to save battery power and to prevent battery and tape wear. To resume the standby mode, set the POWER switch to OFF (CHG) once, then turn it to CAMERA again. However, your camcorder does not turn off automatically while the cassette is not inserted.
When you record in the SP and LP modes on one tape or you record some scenes in the LP mode
•The transition between scenes may not be smooth.
•The playback picture may be distorted or the time code may not be written properly between scenes.
Recording data
The recording data (date/time or various settings when recorded) are not displayed while recording. However, they are recorded automatically onto the tape. To display the recording data, press DATA CODE on the Remote Commander during playback.
After recording
(1) Set the POWER switch to OFF (CHG). (2) Close the LCD panel.
(3) Eject the cassette.
(4) Remove the battery pack.
22
Recording a picture
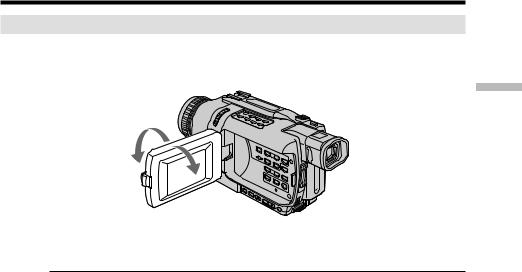
Adjusting the LCD screen
The LCD panel can be opened up to 90 degrees. The LCD panel moves about 90 degrees to the viewfinder side and about 180 degrees to the lens side.
180°
90°
Basics – Recording
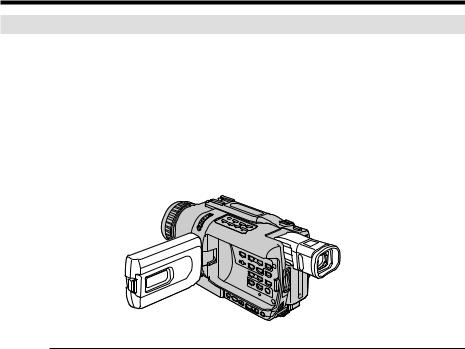
When closing the LCD panel, set it vertically until it clicks, and swing it into the camcorder body.
Note
When using the LCD screen except in the mirror mode, the viewfinder automatically turns off.
When you use the LCD screen outdoors in direct sunlight
The LCD screen may be difficult to see. If this happens, we recommend that you use the viewfinder.
When you adjust angles of the LCD panel
Make sure if the LCD panel is opened up to 90 degrees.
When recording with the LCD panel opened
Recording time becomes shorter a little compared with when recording with the LCD panel closed.
Brightness of the LCD screen
You can adjust the brightness of the LCD screen. Select LCD B.L. or LCD BRIGHT in the menu settings (p. 105). Even if you adjust the LCD B.L. or LCD BRIGHT, the recorded picture will not be affected.
23
Recording a picture
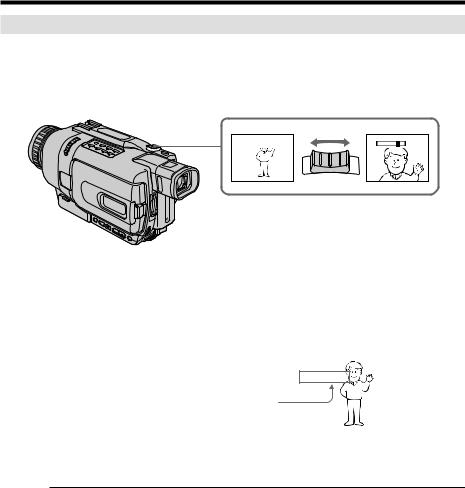
Using the zoom feature
Move the power zoom lever a little for a slower zoom. Move it further for a faster zoom. Using the zoom function sparingly results in better-looking recordings.
“T” side: for telephoto (subject appears closer)
“W” side: for wide-angle (subject appears farther away)
W T
W  T
T
W |
T |
To use zoom greater than 25× (DCR-TRV240/TRV340)/15× (DCR-TRV740/TRV840)
Zoom greater than 25× (DCR-TRV240/TRV340)/15× (DCR-TRV740/TRV840) is performed digitally. To activate digital zoom, select the digital zoom power in D ZOOM in the menu settings. (p. 105)
The digital zoom function is set to OFF as the default setting.
The right side of the bar shows the digital |
|
|
|
|
|
|
|
W |
|
|
|
T |
|
||
|
|
|
|
|
|||
zooming zone. |
|
|
|
|
|
|
|
The digital zooming zone appears when you |
|
|
|
|
|
|
|
select the digital zoom power in the menu |
|
|
|
|
|
|
|
settings. |
|
|
|
|
|
|
|
Notes on digital zoom
•Digital zoom starts to function when zoom exceeds 25× (DCR-TRV240/TRV340)/15× (DCR-TRV740/TRV840).
•The picture quality deteriorates as you go towards the “T” side.
When you shoot close to a subject
If you cannot get a sharp focus, move the power zoom lever to the “W” side until the focus is sharp. You can shoot a subject that is at least about 80 cm (about 2 feet 5/8 inch) away from the lens surface in the telephoto position, or about 1 cm (about 1/2 inch) away in the wide-angle position.
When the POWER switch is set to MEMORY (except DCR-TRV240)
You cannot use the digital zoom.
24
Recording a picture
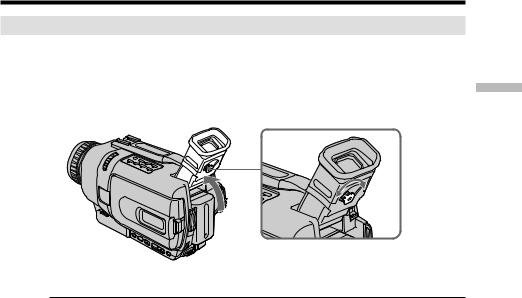
Adjusting the viewfinder
If you record pictures with the LCD panel closed, check the picture with the viewfinder. Adjust the viewfinder lens to your eyesight so that the indicators in the viewfinder come into sharp focus.
Lift up the viewfinder and move the viewfinder lens adjustment lever.
Viewfinder backlight
You can change the brightness of the backlight. Select VF B.L. in the menu settings (p. 105). Even if you adjust the VF B.L., the recorded picture will not be affected.
Basics – Recording
25
Recording a picture
Shooting with the Mirror Mode
This feature allows the camera subject to view him-or herself on the LCD screen. The subject uses this feature to check his or her own image on the LCD screen while you look at the subject in the viewfinder.
Set the POWER switch to CAMERA or MEMORY (except DCR-TRV240).
Rotate the LCD screen 180 degrees.
The  indicator appears in the viewfinder and on the LCD screen.
Xzappears in the standby mode, and zappears in the recording mode. Some of other indicators appear mirror-reversed and others are not displayed.
Pictures in the mirror mode
The picture on the LCD is a mirror-image. However, the picture will be normal when recorded.
During recording in the mirror mode
ZERO SET MEMORY on the Remote Commander does not work.
26
Recording a picture
Indicators displayed in the recording mode
Indicators are not recorded on tapes.
Remaining battery time
Format
Recording mode
STBY/REC
 50min
50min  SP REC 0:00:01
JUL 4 2002 |
12:05:56 PM |
Time code/Tape counter
Remaining tape
This appears after the POWER switch is set to CAMERA for a while.
Time
This is displayed for five seconds after the POWER switch is set to CAMERA or MEMORY (except DCR-TRV240).
Date
This is displayed for five seconds after the POWER switch is set to CAMERA or MEMORY (except DCR-TRV240).
Remaining battery time indicator during recording
The remaining battery time indicator roughly indicates the continuous recording time. The indicator may not be correct, depending on the conditions in which you are recording. When you close the LCD panel and open it again, it takes about one minute for the correct remaining battery time in minutes to be displayed.
Time code (for tapes recorded in the Digital8  system only)
The time code indicates the recording or playback time, “0:00:00” (hours:minutes: seconds) in CAMERA mode and “0:00:00:00” (hours:minutes:seconds:frames) in VCR mode. You cannot rewrite only the time code.
When you play back tapes recorded in the Hi8/standard 8 system, the tape counter appears on the screen.
You cannot reset the time code or the tape counter.
Basics – Recording
27
Recording a picture
Shooting backlit subjects – BACK LIGHT
When you shoot a subject with the light source behind the subject or a subject with a light background, use the backlight function.
In CAMERA or MEMORY (except DCR-TRV240) mode, press BACK LIGHT. The .indicator appears on the screen.
To cancel, press BACK LIGHT again.
BACK LIGHT
If you press EXPOSURE when shooting backlit subjects
The backlight function will be canceled.
28
Recording a picture
Shooting in the dark
– NightShot/Super NightShot/Color Slow Shutter
The NightShot function enables you to shoot a subject in a dark place. For example, you can satisfactorily record the environment of nocturnal animals for observation when you use this function.
In CAMERA or MEMORY (except DCR-TRV240) mode, slide NIGHTSHOT to ON. The and “NIGHTSHOT” indicators flash on the screen.
To cancel the NightShot function, slide NIGHTSHOT to OFF.
NIGHTSHOT
OFF ON
SUPER NS
COLOR SLOW S
Infrared rays 
 emitter
Using Super NightShot
The Super NightShot function makes subjects up to 16 times brighter than those recorded in the NightShot mode.
(1) In CAMERA mode, slide NIGHTSHOT to ON. The and “NIGHTSHOT” indicators flash on the screen.
(2) Press SUPER NS. The and “SUPER NIGHTSHOT” indicators flash on the screen.
To cancel the Super NightShot mode, press SUPER NS again.
Using the NightShot Light
The picture will be clearer with the NightShot Light on. To enable NightShot Light, set N.S.LIGHT to ON in the menu settings (The default setting is ON.) (p. 105).
Using Color Slow Shutter
The Color Slow Shutter function enables you to record color images in a dark place.
(1) Slide NIGHTSHOT to OFF in CAMERA mode. (2) Press COLOR SLOW S.
The  and COLOR SLOW SHUTTER indicators flash on the screen.
To cancel the Color Slow Shutter function, press COLOR SLOW S again.
Basics – Recording
29

Recording a picture
Notes
•Do not use the NightShot mode in bright places (e.g. outdoors in the daytime). This may cause your camcorder to malfunction.
•When you keep NIGHTSHOT set to ON in normal recording, the picture may be recorded in incorrect or unnatural colors.
•If focusing is difficult with the autofocus mode when using the NightShot function, focus manually.
•You cannot use the Color Slow Shutter function in dark places where the illumination is 0 lux.
While using the NightShot function, you can not use the following functions:
–Exposure
–PROGRAM AE
While using the Super NightShot or Color Slow Shutter function, you cannot use the following functions:
–Fader
–Digital effects
–Exposure
–PROGRAM AE
–Memory Photo recording (except DCR-TRV240)
While using the Super NightShot or Color Slow Shutter function
The shutter speed is automatically adjusted depending on the brightness. At this time, moving pictures may slow down.
When the POWER switch is set to MEMORY (except DCR-TRV240)
You cannot use the following functions:
–Super NightShot
–Color Slow Shutter
NightShot Light
NightShot Light rays are infrared and so are invisible. The maximum shooting distance using the NightShot Light is about 3 m (10 feet).
30
 Loading...