


 Loading...
Euroset 5015 Quick Guide
9 10 11 12 |
1 |
8 
7 
6 
5 4 3 2
Keys
1 Repertory keys
2 Last number redial key
3 Recall key
4 Mute key
5 Shift key
6 Quiet key
7 Loudspeaker key (handsfree)
8 Loud key
9 Set key
10 Lock key
11 Reset key (call duration)
12 Pause key
1
EN
Display symbols
PIn setting mode
‡Shift key pressed
---Ready for use
yMicrophone off
OEntry mark when setting (e.g. volume)
URecall key pressed
PPause
ZNo memory content
---- |
PIN entry |
ZZZZ |
Telephone locked |
0 – 9 |
Phone number |
With tone dialling:
N– * key pressed
-– # key pressed
With additional services from public network providers:
ëCall waiting
™Call forwarding immediately
˜ |
Call forwarding on no reply |
—Call forwarding when busy
Safety precautions
When installing, connecting and operating the telephone, always observe the following precautions:
Only use the plugs and leads supplied.
Only connect the connecting lead to the socket/jack provided for that purpose.
Only connect approved accessories.
Arrange the connecting lead where it will not cause accidents.
Position the telephone on a non-slip surface.
For your safety and protection, the telephone must not be used in bath or shower rooms (wet locations).
The telephone is not splash proof.
Never expose the telephone to sources of heat, direct sunlight or other electrical devices.
Protect your telephone from moisture, dust, corrosive liquids and vapours.
Never open up the telephone yourself.
Do not touch the plug contact with pointed or metallic objects.
Do not carry the telephone by the leads.
If you give your Euroset 5015 to someone else, make sure you also give them the user guide.
2
EN
All electrical and electronic products should be disposed of
separately from the municipal waste stream via designated
collection facilities appointed by the government or the local authorities.
This crossed-out wheeled bin symbol on the product means the product is covered by the European Directive 2002/96/EC.
The correct disposal and separate collection of your old appliance will help prevent potential negative consequences for the environment and human health. It is a precondition for reuse and recycling of used electrical and electronic equipment.
For more detailed information about disposal of your old appliance, please contact your city office, waste disposal service or the shop where you purchased the product.
Preparing the telephone for use
Recommended installation of telephone
Do not expose the telephone to direct sunlight or other sources of heat.
Operate at temperatures between +5°C and +40°C.
Maintain a distance of at least one metre between the telephone and radio equipment, e.g. wireless telephones, wireless pagers or TV sets. Otherwise, telephone communication could be impaired.
Do not install the telephone in dusty areas as this can shorten the service life of the telephone.
To clean, wipe with a moist or antistatic cloth only, never with a dry cloth (risk of electrostatic charging and discharge) or harsh cleaning agent.
Furniture lacquer and polish can be damaged by contact with parts of the unit (e.g. device feet).
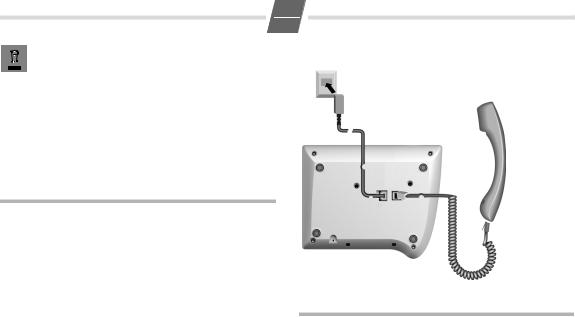
Connecting
Insert the short end of the coiled handset cord in the socket provided in the handset and the long end in the socket marked with an aon the underside of the device. Plug the phone cord into the outlet on the wall and the other end into the socket marked with a Y on the underside of the device. Then your telephone is ready to use.
Making calls
Dialling a number
co Lift handset, dial number.
Any digits after the 20th digit are moved from right to left in the display. The Pause key < can be used to insert pauses when dialling, starting from the 2nd digit.
Last number redial (one of the last 5 call numbers)
The last 5 different call numbers dialed are automatically saved (max. 32 digits each).
cLift handset (or press the Loudspeaker key L until the dialling tone is audible).
;...; Press the Redial key repeatedly until the required call number appears with the place number (1...5 on the left).
o |
Enter the place number (1...5). |
The relevant call number is redialed.
Dialling using the repertory keys
cLift handset (or press the Loudspeaker key L until the dialling tone is audible). (If necessary, press = for a 2nd level repertory key).
:Press repertory key.

3
EN
Saving numbers
Different telephone settings must be completed with the Set key ? so that they are available permanently.
In order to cancel without saving, e. g. after an incorrect entry, replace the handset instead of pressing ? at the end. The original setting is then retained.
Saving with notebook function
You can also save phone numbers during a conversation with the notebook function.
Saving repertory numbers
You can save up to 20 phone numbers (or even functions, see page 6) on both levels of the repertory keys.
c? Lift handset, press the Set key. (For 2nd memory level, also press =.)
:Press the repertory key under which you want to save the repertory number.
A number that has already been saved is shown in the display. If the memory for this repertory key is empty, Z appears in the display
o |
Enter the number to be saved (up to 32 digits). |
or ...
Saving from the redial list:
;...; Press the Redial key repeatedly until the desired phone number is displayed on the screen.
?a Press the Set key. Replace handset.
Pressing <allows you to save pauses (not at the 1st digit).
After the 20th digit, any following digits are moved from right to left in the display.
Delete all repertory numbers
c?1251
Lift handset, initiate function. ?a Press the Set key. Replace handset.
Adjusting the telephone
Adjusting the ringer volume
The volume of the ringer can be set to one of 7 levels and can also be deactivated completely (default setting: level 7, highest level) or deactivated completely. When the ringer is deactivated an incoming call is notified in the display only.
To adjust when the telephone is idle: c?5 Lift handset, initiate function.
H...I Adjust the volume with the Loud/Quiet key. ?a Press the Set key. Replace handset.
To adjust while the telephone is ringing:
Press H...I before lifting the handset.
The last value set is saved.
Setting the ringer frequency
The frequency (speed) of the ringer can be set to one of three levels (default setting: level 3).
c?6 Lift handset, initiate function.
1...3 Press one of the keys 1 |
...3: |
1: highest frequency; |
3: lowest frequency. |
?a Press the Set key. Replace handset.
Setting the ringtone
Ten different ringtones can be set for the ringer (default setting: ringtone 0).
c?7 Lift handset, initiate function. 0...9 Press one of the keys 0 ... 9 ?a Press the Set key. Replace handset.
Setting the handset volume
The volume on the handset can be set to one of 3 levels and saved (default setting: level 1).
c?9 Lift handset, initiate function.
H...I Adjust the volume with the Loud/Quiet key. ?a Press the Set key. Replace handset.
Mute
You can deactivate the telephone's handset and microphone. Then the other party can no longer hear you.
JDuring a call: Press the Mute key Activate: Press the key again.

4
EN
Adjusting the loudspeaker
While in handsfree mode, you can set the volume to one of 7 levels and save it (default setting: 7).
H...I Adjust the volume with the Loud/Quiet key.
Activating/deactivating open listening
The built-in loudspeaker means anyone in the room can lis- ten-in on a call.
LDuring a call:
press the Loudspeaker key.
To deactivate open listening: press the key again.
When the loudspeaker is activated and the handset is lifted, open listening is activated. The handsfree microphone is switched off.
When the loudspeaker is activated and the handset is replaced, handsfree talking via the handsfree microphone
is activated.
Activating/deactivating handsfree mode
With this telephone you can also make calls without lifting the handset. The optimum distance for speaking into the microphone is around 50 cm.
Activating via the handset during a call:
L + a Replace the handset while pressing the Loudspeaker key.
Activating before dialling a phone number
LBefore you dial: press and hold the Loudspeaker key until the dialling tone is audible.
Deactivating handsfree mode:
cLift the handset during a call.
Activating/deactivating the mute melody
You can activate and deactivate the mute melody for the mute (default setting: on).
c?19#
Lift handset, initiate function. 0/1 0: deactivate; 1: activate. ?a Press the Set key. Replace handset.
Baby call (direct call) number setting
If a phone number is set for the Baby Call function, it is dialled automatically when the telephone is locked after you lift the handset (or press the Loudspeaker key) and press any key (except ?, M, L, H and I). The telephone does not allow other phone numbers to be dialled, but incoming calls can be received.
c?M8
Lift handset, initiate function.
oEnter the PIN (default setting: 0000).
Activating
oEnter direct call number (max. 32 digits; not < for pause function!).
or ... |
|
|
Deleting |
; |
Press the Last number redial key. |
?a |
Press the Set key. Replace handset. |
Locking/unlocking the telephone
Only the Baby call number can be dialed when the telephone is locked.
c?M Lift handset, then start the function.
1 or 2 |
0: unlock; 1: lock |
o |
Enter the PIN (default setting: 0000). |
?a |
Press the Set key. Replace handset. |
If the telephone is locked, the display shows ZZZZ.
Temporarily deactivating the telephone lock (for one call)
cMo Lift the handset, press the lock key, enter the PIN (default setting: 0000).
oDial a call number.
The telephone lock is active again when the handset is replaced.
Locking/unlocking repertory numbers so they cannot be changed
c?M6
Lift handset, initiate function.
(If necessary, press =in order to lock/unlock the repertory key on the 2nd level.)
oEnter the PIN (default setting: 0000).
0/ 1 0: Repertory keys not locked
1: Repertory keys locked.
?a Press the Set key. Replace the handset.

5
EN
Changing the PIN
c?M9
Lift handset, initiate function.
oEnter the current PIN (default setting: 0000).
oEnter a new PIN (four digits).
oEnter the new PIN again to confirm. ?a Press the Set key. Replace the handset.
Call duration display
The telephone can display the approximate call duration in the display (up to 99 min. 59 sec.). If the call duration display is activated, the time display begins 12 seconds after the last digit is dialled.
Resetting the counter
After dialling the first digit or at any point during a call:
NPress the Reset key.
The counter goes back to 0 min. 0 sec.
Deactivating/activating
The call duration display is activated by default.
c?18#
Lift handset, initiate function.
0/ 1 |
0: deactivate; 1: activate. |
?a |
Press the Set key. Replace handset. |
Setting the pause time
If necessary, the pause time of the Pause key < (pause function from second input position) can be changed to 1, 3 or 6 seconds (default setting: 3 seconds).
c?102
Lift handset, initiate function.
0...2 |
0: 1 sec.; 1: 3 sec.; 2: 6 sec.. |
?a |
Press the Set key. Replace handset. |
Changing the dialling mode
c?# Lift handset, initiate function.
1/ 2 1: Tone dialling.
2: Pulse dialling without flash function. ?a Press the Set key. Replace handset.
Changing dialling modes during a call
If your telephone is set to pulse dialling and you want to use functions that require tone dialling (e.g. remote access to an answering machine), you can change the dialling mode during a call.
*With an open connection: press the star key.
oEnter digits for remote control/data transfer.
The telephone is reset to the original dialling mode by hanging up the handset.
Operation on a PABX
Enter/delete an external line prefixe
If you are using your telephone on a PABX, you may have to save one or more external line prefixes. A dialling pause is set automatically with the external line prefixe. You can save up to three external line prefixes.
c?0 Lift handset, initiate function.
If no external line prefixe has been set in a location, Z appears in the display.
If several external line prefixes are saved, these are displayed next to one another; the current external line prefixe to be edited flashes.
If necessary, use the ; key to toggle between the external line prefixes displayed, to edit them as follows:
To delete an external line prefix: ?a Press the Set key. Replace handset.
To enter an external line prefixe:
oEnter a oneto three-digit code.
Enter additional external line prefixes:
; o Press the Last number redial key, enter next external line prefixe.
?a Press the Set key. Replace handset.
Recall key (on a PABX)
During an external call, you can make a recall or divert the call. To do this, press the Recall key >. The subsequent procedure depends on your PABX. By default, the Recall key is preset to a flash time (interruption time) of 90 ms for use of new features on public telephone systems. With a connection to a PABX, it may be necessary to change the flash time (e.g. 600 ms). To do this, please refer to the operating instructions for your PABX.

6
EN
Setting the flash time for the Recall key c?195
Lift handset, initiate function. |
|
||
0...4 Enter desired flash code: |
|
||
0: |
90 ms (default setting); |
1: 120 ms; |
|
2: |
270 ms; |
3: 375 ms; |
4: 600 ms. |
?a Press the Set key. Replace handset.
Using functions for additional services of public telephone systems
If you want to use services that are to be triggered with the Recall key, make sure beforehand that the correct flash time is set for the key.
Recall key (in public telephone systems)
In public telephone systems, this key is required to use certain additional services.
The appropriate flashtime for the specific country must be set before using the Recall key can be used:
Belgium, Netherlands, Switzerland: 120 ms (access code 1)
France, Luxemburg, Portugal, Germany, Greece: 270 ms (access code 2)
other European countries: 90 ms (access code 0).
Using the repertory keys as "function keys"
Different public telephone services/functions – possibly by order/request – can be selected via predetermined key combinations which you can obtain from your network provider.
You can save the necessary key combinations like normal phone numbers on repertory keys and similarly "select" and also deactivate the service again.
Note:
If you activate the symbol display and save the function calls on the 2nd level of the repertory keys, you can link the activation and deactivation of different services for each "function key" with the display or hiding of certain symbols on the display.
Therefore, when setting the repertory keys on the 2nd level, bear in mind that activating and deactivating the display symbols ™, ˜, — and ëis linked to very specific keys in the 2nd level – regardless of the phone numbers or function calls stored on it!
Deactivating/activating the symbol display for additional services
Displaying the symbols can be activated or deactivated as needed. In the default setting, the display is deactivated.
c?145
Lift handset, initiate function. 0/1 0: deactivate; 1: activate. ?a Press the Set key. Replace handset.
Recommended assignment of symbols to keys
When the symbol display = is activated and you then press one of the following repertory keys, the display symbol assigned to each is activated or deactivated respectively (key numbering from top to bottom):
=+ |
Assignment |
|
Display |
|
|
|
icon |
|
|
|
|
: 1 |
Call forwarding immediately |
off |
™ |
: 2 |
on |
|
|
|
|
||
: 3 |
Call forwarding on no reply |
off |
˜ |
: 4 |
on |
|
|
|
|
||
: 5 |
Call forwarding when busy |
off |
— |
: 6 |
on |
|
|
|
|
||
: 7 |
Call waiting |
off |
ë |
: 8 |
on |
|
|
|
|
Example: Call forwarding
In the following, you will see an example of repertory keys used as "function keys". If the symbol display is activated, in the "call forwarding" example when the service is activated, the symbol provided for it is displayed, or hidden when the service is deactivated.
The key sequence for activating the function "call forwarding immediately" from your network provider consists of e.g. three parts:
Select function |
Forwarded call destination |
End of |
|
|
function |
|
|
|
*21* |
Phone number of the |
# |
|
forwarded call destination |
|
You now have the following options:
You can dial the entire key sequence each time on the keypad.
You can save the key sequence on repertory keys as an entire function together with the phone number of a set forwarded call destination

7
or
only the select function and the function end. With this, you still have the option to set a forwarded call destination that may change on a case-by-case basis.
Saving call forwarding on a function key c?= Lift handset, initiate function.
EN
to mark the end of the phone number entered. You may hear an announcement that the service is activated.
aReplace the handset.
Incoming calls will be forwarded from now on to the forwarded call destination. Your telephone will not ring.
:Press the repertory key that is designated for Saving "Deactivate call forwarding" on a function key
the symbol display "™ on" (see page 6). A number already saved is shown in the
display. If the memory for this repertory key is empty, Z appears in the display.
*21*
Enter the select function for "Immediate call forwarding".
(a) Set the phone number for the call forwarding
oEnter the phone number of the forwarded call destination.
# |
Press the hash key to mark the function end. |
?a |
Press the Set key. Replace handset. |
or ...
(b) Reserve changeable call forwarding
=Press the Shift key.
When "Call forwarding immediately" is activated later, this key makes the cursor for entering the phone number of the forwarded call destination flash.
# |
Press the hash key to mark the function end. |
?a |
Press the Set key. Replace handset. |
Activating call forwarding with a function key
The call forwarding, as described in the previous example, can be deactivated again with your network provider e.g. with key sequence #21#.
You can save this key sequence on a dedicated repertory key as well. If the symbol display is activated and the service is activated as described, the ™ symbol in the display disappears after the service is deactivated.
c?= Lift handset, initiate function.
:Press the repertory key that is designated for symbol display "™ off" (see page 6).
#21#
Enter the select function for "Immediate call forwarding".
?a Press the Set key. Replace handset.
Deactivating call forwarding with a function key c= Lift handset, press the Shift key.
:a Press the repertory key for symbol display "™ off". Replace handset.
The ™symbol disappears. You may hear an announcement that the service is deactivated.
Appendix
c= Lift handset, press Shift key.
:Press the repertory key for the symbol display "™ on".
™ appears in the display.
(a) Phone number for call forwarding set
You may hear an announcement that the service is activated.
aReplace the handset.
From now on, incoming calls will be forwarded to the forwarded call destination. Your telephone will not ring.
(b)Changeable call forwarding
o ; Enter the phone number of the forwarded call destination, press the Last number redial key
Care
To clean, wipe with a moist or antistatic cloth only, never with a dry cloth (risk of electrostatic charging and discharge) or harsh cleaning agent.
If your telephone is not working perfectly
No signal tone: The tone volume might be set to 0.
Lift handset, no dialling tone: Is the connecting lead correctly plugged into the telephone and the telephone socket?
Dialling tone audible but telephone will not dial:
The connection is OK. Is the dialling mode set correctly (see page 5)?

8
EN
PABX only: No connection or incorrect connection when
dialling from memory (e.g. redial, speed dial):
Program external line prefixe.
The other party cannot hear you: Have you pressed the Mute key? Press the key again. Is the plug from the handset cord inserted correctly?
Recall key does not work: Set appropriate flash time.
Insert strips
Blank insert strips for the repertory keys can be found on the Internet at http://www.siemens.com/euroset.
Contacts
If you should encounter any problems when operating the telephone connected to a communication system with analogue network access, please contact the network operator responsible or your dealer.
Authorisation
This device is intended for analogue phone lines in your network.
Country-specific requirements have been taken into consideration.
We, Siemens Home and Office Communication Devices GmbH & Co. KG, declare that this device meets the essential requirements and other relevant regulations laid down in Directive 1999/5/EC.
A copy of the 1999/5/EC Declaration of Conformity is available at this Internet address: http://www.siemens.com/gigasetdocs.

Présentation Euroset 5015
9 10 11 12 |
1 |
8 
7 
6 
5 4 3 2
Touches
1 Touches d'accès direct
2 Touche bis
3 Touche > de double appel
4 Touche secret microphone (Mute)
5Numérotation abrégée : touche de sélection (2nd niveau)
6 Touche de réduction du volume
7 Touche haut-parleur (mode mains-libres)
8 Touche d'augmentation du volume
9 Touche Enregistrer
10 Touche de verrouillage
11 Touche de réinitialisation (durée de la communication)
12 Touche de pause
Icônes d'affichage
PMode mémoire activé
‡2nd niveau activé (numérotation abrégée)
---Opérationnel
ySecret micro activé (Mute)
OCurseur de saisie des paramètres (par ex. volume)
U |
Touche > de double appel enfoncée |
PPause
1
F
ZAucun contenu mémorisé
---- |
Saisie du code PIN |
ZZZZ |
Téléphone verrouillé |
0 – 9 |
Numéro d'appel |
En mode fréquence vocale :
N– Touche * enfoncée
-– Touche # enfoncée
Pour les services supplémentaires proposés par des opérateurs publics :
ëSignal d'appel activé
™Renvoi d'appel immédiat
˜ |
Renvoi d'appel si non-réponse |
—Renvoi d'appel si occupé
Consignes de sécurité
Au cours de l'installation, du raccordement et pendant l'utilisation du téléphone, respectez absolument les consignes suivantes :
Utiliser uniquement les fiches et cordons livrés avec l'appareil.
Enficher le cordon de raccordement uniquement dans la prise/douille prévue à cet effet.
Ne jamais raccorder d'accessoire non autorisé.
Disposer le cordon de raccordement de façon à éviter tout risque d'accident.
Placer le téléphone à un endroit où il ne risque pas de glisser.
Pour des raisons de sécurité, le téléphone ne doit pas être utilisé dans un lieu humide (par ex. salle de bain, etc.). Il n'est pas étanche aux projections d'eau.
Ne jamais exposer le téléphone à des sources de chaleur telles que les rayons directs du soleil ou le rayonnement d'appareils électriques.
Protéger le téléphone contre l'humidité, la poussière et les vapeurs et liquides corrosifs.
Ne jamais ouvrir le téléphone sans les conseils d'un spécialiste.
Ne jamais toucher les contacts à fiche avec des objets métalliques et pointus.
Ne jamais porter le téléphone par les cordons.
Lorsque vous confiez votre téléphone Euroset 5015 à un tiers, joignez toujours le mode d'emploi.
La procédure d'élimination des produits électriques et électroniques diffère de celle des déchets municipaux et nécessite l'intervention de services désignés par le gouvernement ou les collectivités locales.
2
F
Le symbole de la poubelle barrée signifie que la directive européenne 2002/96/EC s'applique à ce produit.
Le tri et la collecte séparée de vos appareils usagés aide à prévenir toute conséquence négative pour l'environnement ou pour la santé publique. Il s'agit d'une condition primordiale pour le traitement et le recyclage des équipements électriques et électroniques usagés. Pour plus d'informations sur le traitement des appareils usagés, contacter votre mairie, la déchetterie la plus proche ou le revendeur du produit.
Mettre le téléphone en service
Conseils pour l'installation du téléphone
Ne jamais exposer le téléphone aux rayons du soleil ou à d'autres sources de chaleur.
Utiliser le téléphone à une température comprise entre +5°C et +40°C.
Prévoir une distance minimale d'un mètre entre le téléphone et les appareils radio, par ex. téléphones ou dispositifs d'appel de personnes, ou les postes de télévision, car des interférences risqueraient de gêner les communications téléphoniques.
Ne pas installer le téléphone dans un endroit poussiéreux, au risque de réduire sa durée de vie.
Pour nettoyer l'appareil, utiliser uniquement un chiffon légèrement humecté ou antistatique ; ne jamais utiliser de chiffon sec (risque de charge et de décharge électrostatiques) ou de détergent agressif.
Les peintures et vernis des meubles en contact avec des composants du téléphone (par ex. pieds) risquent de subir des détériorations.
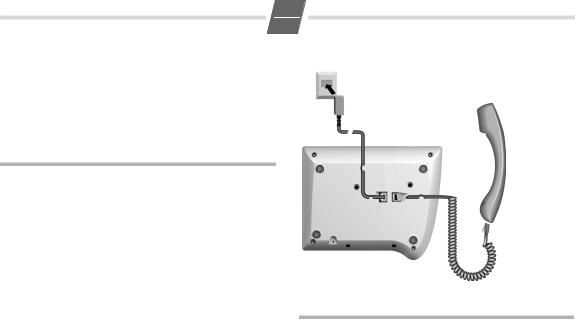
Raccordement
Brancher l'extrémité courte du cordon en spirale sur la prise prévue à cet effet sur le combiné, et l'extrémité longue sur la prise signalée par l'icône a sous l'appareil. Brancher le cordon du téléphone sur la prise de téléphone murale, et insérer l'autre extrémité dans la prise signalée par l'icône Y sous l'appareil. Votre téléphone est prêt à fonctionner.
Téléphoner
Composer un numéro
co Décrocher le combiné et composer un numéro.
Si le numéro excède 20 caractères, les chiffres se décalent sur l'écran de la droite vers la gauche. La touche <permet d'insérer des pauses dans la numérotation à partir du deuxième caractère.
Rappel/Bis (l'un des 5 derniers numéros composés)
Les 5 derniers numéros différents composés (32 caractères max.) sont automatiquement sauvegardés.
cDécrocher le combiné (ou appuyer sur la touche haut-parleur Ljusqu'à ce que la tonalité soit audible).
;...; Appuyer sur la touche bis jusqu'à ce que le numéro d'appel recherché s'affiche, sa position apparaissant à sa gauche (1 à 5) ou
osaisir la position du numéro (1 à 5).
La position correspondant au numéro est à nouveau composée.
3
F
Composer un numéro avec les touches d'accès direct
cDécrocher le combiné (ou appuyer sur la touche haut-parleur Ljusqu'à ce que la tonalité soit audible). (Au besoin, appuyer sur la touche = pour accéder au second niveau d'une touche d'accès direct.)
:Appuyer sur la touche d'accès direct appropriée.
Lorsque le numéro excède 20 chiffres, les caractères suivants se décalent sur l'écran de la droite vers la gauche.
Effacer tous les numéros de touches d'accès direct
c?1251
Décrocher le combiné et appuyer successivement sur la suite de touches ci-dessus.
?a Appuyer sur la touche Enregistrer et raccrocher.
Enregistrer un numéro d'appel
Pour être disponibles en permanence, certains paramétrages du téléphone doivent être confirmés avec la touche Enregistrer ?.
Pour interrompre le paramétrage (par ex. après une saisie incorrecte) sans sauvegarder, raccrocher au lieu d'appuyer sur la touche ?. Le réglage précédent reste ainsi en mémoire.
Enregistrer à l'aide de la fonction bloc-notes
Vous pouvez enregistrer des numéros pendant une communication au moyen de la fonction bloc-notes.
Programmer une touche d'accès direct
Grâce aux deux niveaux de touches d'accès direct, vous pouvez enregistrer jusqu'à 20 numéros (ou fonctions,
voir p. 6).
c? Décrocher le combiné et appuyer sur la touche Enregistrer (pour accéder au second niveau de mémoire, appuyer en plus sur la touche =).
:Appuyer sur la touche d'accès direct sous laquelle le numéro doit être mémorisé. Si un numéro est déjà enregistré sur cette touche d'accès direct, il s'affiche à l'écran.
Si aucun numéro n'est enregistré sur cette touche, l'icône Z s'affiche à l'écran.
oSaisir le numéro d'appel à enregistrer (32 caractères max.).
soit ...
Enregistrer un numéro à partir de la liste des numéros bis :
;...; Appuyer sur la touche bis jusqu'à ce que le numéro à enregistrer s'affiche à l'écran.
?a Appuyer sur la touche Enregistrer et raccrocher.
La touche < permet d'insérer des pauses (sauf à l'emplacement du premier caractère).
Réglages téléphone
Régler le volume de la sonnerie
Il existe 7 niveaux de réglage de la sonnerie (configuration usine : niveau 7, qui est le niveau le plus élevé). La sonnerie peut également être désactivée.
Réglage lorsque le téléphone est au repos : c?5 Décrocher le combiné et introduire la fonction.
H...I Régler le volume avec les touches d'augmentation et de réduction du volume.
?a Appuyer sur la touche Enregistrer et raccrocher.
Réglage lorsque le téléphone sonne :
Appuyer sur H...I avant de décrocher. La dernière intensité réglée est mémorisée.
Régler le cadencement de sonnerie
Le cadencement de la sonnerie (rapidité) peut être réglé sur 3 niveaux (configuration usine : niveau 3).
c?6 Décrocher le combiné et introduire la fonction.
1...3 Appuyer sur une des touches 1 à 3 : 1 : cadencement le plus faible ;
3 : cadencement le plus élevé.
?a Appuyer sur la touche Enregistrer et raccrocher.
Régler la mélodie de la sonnerie
10 mélodies différentes sont disponibles pour la sonnerie (configuration usine : mélodie 0).
c?7 Décrocher le combiné et introduire la fonction. 0...9 Appuyer sur une des touches de 0 à 9.
?a Appuyer sur la touche Enregistrer et raccrocher.
Loading...