


Congratulations
By purchasing a Gigaset, you have chosen a brand that is fully committed to sustainability. This product’s packaging is eco-friendly!
To learn more, visit www.gigaset.com.

Gigaset S810 – more than just a telephone
Gigaset S810 – more than just a telephone
Your telephone sets new standards for the way you communicate at home.
The configuration and user interface of the cordless phone are excellent, providing you with first-class voice quality in handsfree mode, while the various ports (Bluetooth, USB) offer you enormous flexibility.
The large TFT display, user-friendly keypad and clearly laid out menu are very simple to use.
Your phone can do a whole lot more:
uYou can use Bluetooth™ for wireless communication with other devices (e.g. headsets) that also use this technology.
u You can synchronise your directories on your telephone, mobile phone and PC
via Bluetooth™ or the USB port using the Gigaset QuickSync software (¢page 79).
u You can save appointments (¢page 54) and anniversaries, e.g., birthdays (¢page 39), in your phone and it will remind you of them in advance.
uYou can designate important people as VIPs to identify important calls from the ringtone (¢page 36).
uYou can assign a picture to entries in the directory – in future the picture will appear every time you receive a call from this number (¢page 36).
uIf you do not want to take calls where the caller has withheld their number, just
set your handset to only ring if Calling Line Identification has not been withheld (¢page 67).
uIf you do not wish to be disturbed, you can simply set up a time control so that your phone will only ring when it is convenient (¢page 67). VIP calls are still connected.
uYou can assign important numbers to the number keys on your phone. The number is then dialled by simply pressing a key (¢page 63).
¢page 66).
¢page 64).
uYou can set the display to large font to increase readability in particularly important situations (e.g., the directory and lists) (¢page 65).
u You can adapt the menu display to suit your individual requirements so that only
•the most important functions (standard mode) or all functions (expert mode ) are displayed (¢page•26). Menu options that are only available in expert
mode are marked with the icon.
uGigaset Green Home – Be environmentally aware when using your phone. Details about our ECO DECT products can be found at www.gigaset.com/service.
You can find additional information about your phone at www.gigaset.com/gigasets810.
Have fun using your new phone!
1
The handset at a glance
The handset at a glance
17 |
|
|
|
|
|
|
1 |
||||
|
|
|
|
|
|
|
|||||
|
|
|
i |
V |
|
|
2 |
||||
|
|
|
|
|
|||||||
|
|
||||||||||
|
|
|
|
|
|
|
|
|
|
|
|
|
|
|
|
|
|
|
|
|
07:15 |
|
|
|
|
|
|
|
|
|
|
||
|
|
|
|
|
|
INT 1 |
14 Oct |
||||||||||||||
|
|
|
|
|
|
|
|
|
|
|
3 |
||||||||||
|
|
|
|
|
|
|
|
|
|
||||||||||||
|
|
|
|
|
|
|
|
|
|
|
|
|
|
|
|
|
|
|
|
|
|
|
|
|
|
|
|
Calls |
SMS |
||||||||||||||
16 |
|
|
|
|
|
|
|
|
|
|
|
|
|
|
|
|
|
|
4 |
||
|
|
|
|
|
|
|
|
|
|
|
|
|
|
||||||||
|
|
|
|
|
|
|
|
|
|||||||||||||
|
|
|
|
|
|
|
|
|
|
|
|
|
|
||||||||
|
|
|
|
|
|
|
|
|
|
|
|
|
|
|
|
|
|
|
|
|
|
|
|
|
|
|
|
|
|
|
|
|
|
|
|
|
|
|
|
|
|
|
|
15 |
|
|
|
|
|
|
|
|
|
|
|
|
|
|
|
|
5 |
||||
|
|
|
|
|
|
|
|
|
|
|
|
|
|
|
|
||||||
|
|
|
|
|
|
|
|
|
|
|
|
|
|
|
|
||||||
14 |
|
|
|
|
|
|
|
|
|
|
|
6 |
|||||||||
|
|
|
|
|
|
|
|
|
|
||||||||||||
13 |
|
|
|
|
|
|
|
|
|
|
|
|
|
|
|
|
|
|
|
|
|
|
|
|
|
|
|
|
|
|
|
|
|
|
|
|
|
|
|
|
|
|
|
12 |
|
|
|
|
|
|
|
|
|
|
|
|
|
|
|
|
|
|
|
7 |
|
|
|
|
|
|
|
|
|
|
|
|
|
|
|
|
|
|
|
|
|||
11 |
|
|
|
|
|
|
|
|
|
|
|
|
|||||||||
|
|
|
|
|
|
|
|
|
|
|
|||||||||||
|
|
|
|
|
|
|
|
|
|
|
|
|
|
|
|
|
|
|
8 |
||
10 |
|
|
|
|
|
|
|
|
|
|
|
|
|
|
|
|
|||||
|
|
|
|
|
|
|
|
|
|
|
|
|
|||||||||
|
|
|
|
|
|
|
|
|
|
|
|
|
|
|
|
|
|
|
|||
9 |
|
|
|
|
|
|
|
|
|
|
|
|
|
|
|
|
|
|
|
|
|
|
|
|
|
|
|
|
|
|
|
|
|
|
|||||||||
|
|
|
|
|
|
|
|
|
|
|
|
|
|
|
|
|
|
|
|
||
|
|
|
|
|
|
|
|
|
|
|
|
|
|
|
|
|
|
|
|
|
|
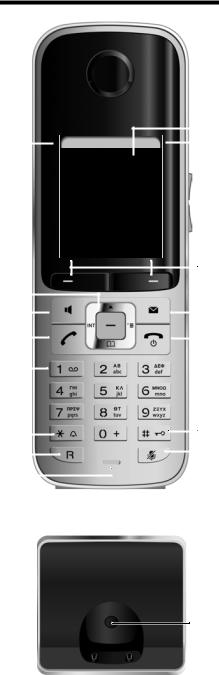
Base
1 |
Display in idle status |
2 |
Battery charge status (¢page 17) |
3 |
Side keys |
|
Set call (¢page 66) or ringtone volume |
|
(¢page 67) |
4 |
Display keys (¢page 21) |
5 |
Message key (¢page 41) |
Access to call and message lists;
Flashes: new message or new call
6End call key, On/Off key
End call, cancel function, go back one menu level (press briefly), back to idle status (press and hold), activate/deactivate handset (press and hold in idle status)
7 |
Hash key |
|
Keypad lock on/off (press and hold in |
|
idle status); |
|
toggles between upper/lower case and digits |
8 |
Mute key (¢page 32) |
|
Mute the microphone |
9 |
Microphone |
10Recall key
-Consultation call (flash)
-Insert a dialling pause (press and hold)
11Star key
Ringtone on/off (press and hold);
with an open connection: switch between pulse dialling/tone dialling (press briefly); text input: open table of special characters
12Headset socket (¢page 18)
13Key 1
Dial network mailbox (press and hold)
14Talk key
Flashes: incoming call;
Accept a call; open redial list (press briefly); start dialling (press and hold);
When writing an SMS: send SMS
15Handsfree key
Switch between earpiece and handsfree mode
16Control key (¢page¢ 20)
17Signal strength ( ¢page 17)
Green: Eco Mode ( page 53) activated
Registration/ Paging¢ key
( page 57)
2

The handset at a glance
Display symbols
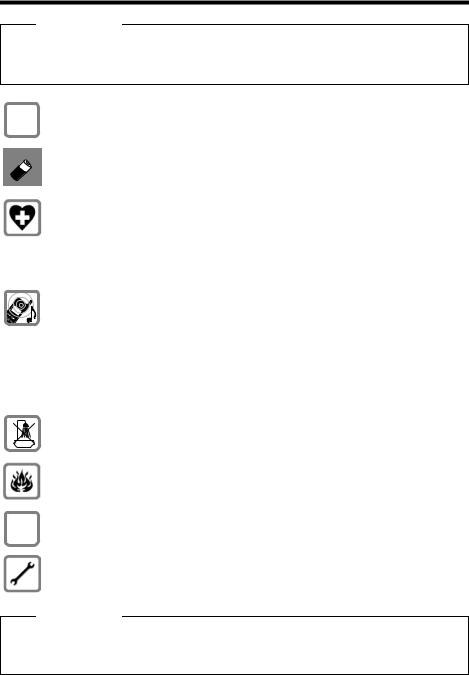
The following symbols are displayed dependent on the settings and the operating status of your telephone:
|
|
|
|
|
|
|
|
|
|
|
|
|
|
|
|
|
|
|
|
|
|
|
|
|
|
|
|
|
|
|
|
|
|
|
|
|
|
|
|
|
|
|
|
|
|
|
|
|
|
|
|
|
|
|
|
|
|
|
|
|
|
|
|
|
|
|
|
|
|
|
|
|
|
|
|
|
|
|
|||||
i » ó ˝ |
|
V |
|
|
|||||||
|
|
|
|
|
|
|
07:15 |
|
|
||
Û 08:00 |
|
|
|
|
|
||||||
|
|
|
|
|
|||||||
INT 1 |
|
14 Oct |
|
|
|||||||
|
|
|
|
||||||||
|
|
|
|
|
|
|
|
|
|
|
|
Ù ¾
02 10 09 08
Calls |
SMS |
|
|
Signalling
External call (¢page 30)
Ø«Ú
Alarm (¢page 56)
ØìÚ
Signal strength i (¢¢page 53) or ECO Mode+ icon ¼ ( page 53)
Bluetooth activated (¢page 61)
or ô/ õ (Bluetooth headset/data device) connected
Ringtone switched off (¢page¢ 67)
or ñ alert tone activated ( page 68) Keypad lock switched on (¢page 23)
Batteries are charged (¢page 17)
Charge status of the batteries (¢page 17)
Alarm switched on and wake-up time set (¢page 56) Current time (¢page 15)
Current day and month (¢page 15) Name of the handset (¢page 59)
Number of new messages: |
|
u à on the network mailbox (¢page 41) |
|
u |
™ in the list of missed calls (¢page 41) |
u |
¾ in the SMS list (¢page 46) |
u |
in the list of missed appointments (¢page 42) |
Internal call (¢page 57)
ØåÚ
Anniversary (¢page 54) |
Appointment (¢page 54) |
||
ØðÚ |
|
ØáÚ |
|
3

Contents
Contents
Gigaset S810 – more than just a telephone . . . . . . . . . . . . . . . . . . . . . . . . . . 1 The handset at a glance . . . . . . . . . . . . . . . . . . . . . . . . . . . . . . . . . . . . . . . . . . . . 2 Display symbols . . . . . . . . . . . . . . . . . . . . . . . . . . . . . . . . . . . . . . . . . . . . . . . . . . . 3 Safety precautions . . . . . . . . . . . . . . . . . . . . . . . . . . . . . . . . . . . . . . . . . . . . . . . . . 7 First steps . . . . . . . . . . . . . . . . . . . . . . . . . . . . . . . . . . . . . . . . . . . . . . . . . . . . . . . . . 8
Checking the package contents . . . . . . . . . . . . . . . . . . . . . . . . . . . . . . . . . . . . . . . . . . . . . . |
. 8 |
Setting up the base and charger (if included) . . . . . . . . . . . . . . . . . . . . . . . . . . . . . . . . . . |
9 |
Connecting the base . . . . . . . . . . . . . . . . . . . . . . . . . . . . . . . . . . . . . . . . . . . . . . . . . . . . . . . . . . |
9 |
Connecting the charger (if included) . . . . . . . . . . . . . . . . . . . . . . . . . . . . . . . . . . . . . . . . . |
10 |
Setting up the handset for use . . . . . . . . . . . . . . . . . . . . . . . . . . . . . . . . . . . . . . . . . . . . . . . |
11 |
Changing the display language . . . . . . . . . . . . . . . . . . . . . . . . . . . . . . . . . . . . . . . . . . . . . . |
14 |
Setting the date and time . . . . . . . . . . . . . . . . . . . . . . . . . . . . . . . . . . . . . . . . . . . . . . . . . . . . |
15 |
Connecting the headset . . . . . . . . . . . . . . . . . . . . . . . . . . . . . . . . . . . . . . . . . . . . . . . . . . . . . |
18 |
Connecting the USB data cable . . . . . . . . . . . . . . . . . . . . . . . . . . . . . . . . . . . . . . . . . . . . . . . |
18 |
What would you like to do next? . . . . . . . . . . . . . . . . . . . . . . . . . . . . . . . . . . . . . . . . . . . . . . |
19 |
Using the phone . . . . . . . . . . . . . . . . . . . . . . . . . . . . . . . . . . . . . . . . . . . . . . . . . . 20
Control key . . . . . . . . . . . . . . . . . . . . . . . . . . . . . . . . . . . . . . . . . . . . . . . . . . . . . . . . . . . . . . . . . . 20 Display keys . . . . . . . . . . . . . . . . . . . . . . . . . . . . . . . . . . . . . . . . . . . . . . . . . . . . . . . . . . . . . . . . . 21 Keys on the keypad . . . . . . . . . . . . . . . . . . . . . . . . . . . . . . . . . . . . . . . . . . . . . . . . . . . . . . . . . . 21 Side keys . . . . . . . . . . . . . . . . . . . . . . . . . . . . . . . . . . . . . . . . . . . . . . . . . . . . . . . . . . . . . . . . . . . . 21 Correcting incorrect entries . . . . . . . . . . . . . . . . . . . . . . . . . . . . . . . . . . . . . . . . . . . . . . . . . . 21 Using the menus . . . . . . . . . . . . . . . . . . . . . . . . . . . . . . . . . . . . . . . . . . . . . . . . . . . . . . . . . . . . . 22 Activating/deactivating the handset . . . . . . . . . . . . . . . . . . . . . . . . . . . . . . . . . . . . . . . . . . 23 Activating/deactivating the keypad lock . . . . . . . . . . . . . . . . . . . . . . . . . . . . . . . . . . . . . . 23 Using this guide . . . . . . . . . . . . . . . . . . . . . . . . . . . . . . . . . . . . . . . . . . . . . . . . . . . . . . . . . . . . . 24
Menu overview . . . . . . . . . . . . . . . . . . . . . . . . . . . . . . . . . . . . . . . . . . . . . . . . . . . 26 Making calls . . . . . . . . . . . . . . . . . . . . . . . . . . . . . . . . . . . . . . . . . . . . . . . . . . . . . . 29
Making an external call . . . . . . . . . . . . . . . . . . . . . . . . . . . . . . . . . . . . . . . . . . . . . . . . . . . . . . |
29 |
Ending a call . . . . . . . . . . . . . . . . . . . . . . . . . . . . . . . . . . . . . . . . . . . . . . . . . . . . . . . . . . . . . . . . . |
29 |
One Touch Call . . . . . . . . . . . . . . . . . . . . . . . . . . . . . . . . . . . . . . . . . . . . . . . . . . . . . . . . . . . . . . . |
29 |
Accepting a call . . . . . . . . . . . . . . . . . . . . . . . . . . . . . . . . . . . . . . . . . . . . . . . . . . . . . . . . . . . . . . |
30 |
Calling Line Identification . . . . . . . . . . . . . . . . . . . . . . . . . . . . . . . . . . . . . . . . . . . . . . . . . . . . |
30 |
Notes on calling line display (CLIP) . . . . . . . . . . . . . . . . . . . . . . . . . . . . . . . . . . . . . . . . . . . . |
31 |
Handsfree mode . . . . . . . . . . . . . . . . . . . . . . . . . . . . . . . . . . . . . . . . . . . . . . . . . . . . . . . . . . . . . |
31 |
Switching to mute . . . . . . . . . . . . . . . . . . . . . . . . . . . . . . . . . . . . . . . . . . . . . . . . . . . . . . . . . . . |
32 |
Making calls using network services . . . . . . . . . . . . . . . . . . . . . . . . . . . . . . . 33
Call waiting during an external call . . . . . . . . . . . . . . . . . . . . . . . . . . . . . . . . . . . . . . . . . . . 33 Call divert (CD) . . . . . . . . . . . . . . . . . . . . . . . . . . . . . . . . . . . . . . . . . . . . . . . . . . . . . . . . . . . . . . . 33 Consultation call, call swap, conference . . . . . . . . . . . . . . . . . . . . . . . . . . . . . . . . . . . . . . . 34 Further functions . . . . . . . . . . . . . . . . . . . . . . . . . . . . . . . . . . . . . . . . . . . . . . . . . . . . . . . . . . . . 35
4
Contents
Using the directory and lists . . . . . . . . . . . . . . . . . . . . . . . . . . . . . . . . . . . . . . . 36
Directory . . . . . . . . . . . . . . . . . . . . . . . . . . . . . . . . . . . . . . . . . . . . . . . . . . . . . . . . . . . . . . . . . . . . 36 Redial list . . . . . . . . . . . . . . . . . . . . . . . . . . . . . . . . . . . . . . . . . . . . . . . . . . . . . . . . . . . . . . . . . . . . 40 Incoming SMS message list . . . . . . . . . . . . . . . . . . . . . . . . . . . . . . . . . . . . . . . . . . . . . . . . . . 40 Call lists . . . . . . . . . . . . . . . . . . . . . . . . . . . . . . . . . . . . . . . . . . . . . . . . . . . . . . . . . . . . . . . . . . . . . 40 Message key function . . . . . . . . . . . . . . . . . . . . . . . . . . . . . . . . . . . . . . . . . . . . . . . . . . . . . . . . 41 List of missed alarms . . . . . . . . . . . . . . . . . . . . . . . . . . . . . . . . . . . . . . . . . . . . . . . . . . . . . . . . . 42
Making cost-effective calls . . . . . . . . . . . . . . . . . . . . . . . . . . . . . . . . . . . . . . . . 43
Automatic network provider code (preselection) . . . . . . . . . . . . . . . . . . . . . . . . . . . . . . 43
SMS (text messages) . . . . . . . . . . . . . . . . . . . . . . . . . . . . . . . . . . . . . . . . . . . . . . 44
Writing/sending an SMS . . . . . . . . . . . . . . . . . . . . . . . . . . . . . . . . . . . . . . . . . . . . . . . . . . . . . 44 Receiving an SMS . . . . . . . . . . . . . . . . . . . . . . . . . . . . . . . . . . . . . . . . . . . . . . . . . . . . . . . . . . . . 46 SMS with vCard . . . . . . . . . . . . . . . . . . . . . . . . . . . . . . . . . . . . . . . . . . . . . . . . . . . . . . . . . . . . . . 47 Notification via SMS . . . . . . . . . . . . . . . . . . . . . . . . . . . . . . . . . . . . . . . . . . . . . . . . . . . . . . . . . . 48 SMS mailboxes . . . . . . . . . . . . . . . . . . . . . . . . . . . . . . . . . . . . . . . . . . . . . . . . . . . . . . . . . . . . . . . 48 Setting SMS centres . . . . . . . . . . . . . . . . . . . . . . . . . . . . . . . . . . . . . . . . . . . . . . . . . . . . . . . . . . 49 SMS services . . . . . . . . . . . . . . . . . . . . . . . . . . . . . . . . . . . . . . . . . . . . . . . . . . . . . . . . . . . . . . . . . 50 SMS on a PABX . . . . . . . . . . . . . . . . . . . . . . . . . . . . . . . . . . . . . . . . . . . . . . . . . . . . . . . . . . . . . . . 50 Activating/deactivating SMS function . . . . . . . . . . . . . . . . . . . . . . . . . . . . . . . . . . . . . . . . 50 SMS troubleshooting . . . . . . . . . . . . . . . . . . . . . . . . . . . . . . . . . . . . . . . . . . . . . . . . . . . . . . . . 51
Using the network mailbox . . . . . . . . . . . . . . . . . . . . . . . . . . . . . . . . . . . . . . . 52
Configuring fast access for the network mailbox . . . . . . . . . . . . . . . . . . . . . . . . . . . . . . 52 Viewing the network mailbox message . . . . . . . . . . . . . . . . . . . . . . . . . . . . . . . . . . . . . . . 52
ECO DECT . . . . . . . . . . . . . . . . . . . . . . . . . . . . . . . . . . . . . . . . . . . . . . . . . . . . . . . . 53
Setting an appointment (calendar) . . . . . . . . . . . . . . . . . . . . . . . . . . . . . . . . 54
Displaying missed appointments, anniversaries . . . . . . . . . . . . . . . . . . . . . . . . . . . . . . . 55
Setting the alarm clock . . . . . . . . . . . . . . . . . . . . . . . . . . . . . . . . . . . . . . . . . . . 56
Using multiple handsets . . . . . . . . . . . . . . . . . . . . . . . . . . . . . . . . . . . . . . . . . . 56
Registering handsets . . . . . . . . . . . . . . . . . . . . . . . . . . . . . . . . . . . . . . . . . . . . . . . . . . . . . . . . . 56 De-registering handsets . . . . . . . . . . . . . . . . . . . . . . . . . . . . . . . . . . . . . . . . . . . . . . . . . . . . . . 57 Locating a handset ("Paging") . . . . . . . . . . . . . . . . . . . . . . . . . . . . . . . . . . . . . . . . . . . . . . . . 57 Changing the base . . . . . . . . . . . . . . . . . . . . . . . . . . . . . . . . . . . . . . . . . . . . . . . . . . . . . . . . . . . 57 Making internal calls . . . . . . . . . . . . . . . . . . . . . . . . . . . . . . . . . . . . . . . . . . . . . . . . . . . . . . . . . 57 Listening in to an external call . . . . . . . . . . . . . . . . . . . . . . . . . . . . . . . . . . . . . . . . . . . . . . . . 59 Changing the name of a handset . . . . . . . . . . . . . . . . . . . . . . . . . . . . . . . . . . . . . . . . . . . . . 59 Changing a handset's internal number . . . . . . . . . . . . . . . . . . . . . . . . . . . . . . . . . . . . . . . 59
Using a handset as a room monitor (Babyphone) . . . . . . . . . . . . . . . . . . . 60 Using Bluetooth devices . . . . . . . . . . . . . . . . . . . . . . . . . . . . . . . . . . . . . . . . . . 61
5
Contents
Handset settings . . . . . . . . . . . . . . . . . . . . . . . . . . . . . . . . . . . . . . . . . . . . . . . . . 63
Quick access to numbers and functions . . . . . . . . . . . . . . . . . . . . . . . . . . . . . . . . . . . . . . . 63 Changing the display language . . . . . . . . . . . . . . . . . . . . . . . . . . . . . . . . . . . . . . . . . . . . . . 64 Setting the display . . . . . . . . . . . . . . . . . . . . . . . . . . . . . . . . . . . . . . . . . . . . . . . . . . . . . . . . . . . 64 Setting keypad illumination . . . . . . . . . . . . . . . . . . . . . . . . . . . . . . . . . . . . . . . . . . . . . . . . . . 65 Activating/deactivating auto answer . . . . . . . . . . . . . . . . . . . . . . . . . . . . . . . . . . . . . . . . . 65 Changing the speaker/earpiece volume . . . . . . . . . . . . . . . . . . . . . . . . . . . . . . . . . . . . . . 66 Setting a handsfree profile . . . . . . . . . . . . . . . . . . . . . . . . . . . . . . . . . . . . . . . . . . . . . . . . . . . 66 Changing ringtones . . . . . . . . . . . . . . . . . . . . . . . . . . . . . . . . . . . . . . . . . . . . . . . . . . . . . . . . . . 67 Resource Directory . . . . . . . . . . . . . . . . . . . . . . . . . . . . . . . . . . . . . . . . . . . . . . . . . . . . . . . . . . . 68 Activating/deactivating advisory tones . . . . . . . . . . . . . . . . . . . . . . . . . . . . . . . . . . . . . . . 69 Setting your own area code . . . . . . . . . . . . . . . . . . . . . . . . . . . . . . . . . . . . . . . . . . . . . . . . . . 69 Restoring the handset default settings . . . . . . . . . . . . . . . . . . . . . . . . . . . . . . . . . . . . . . . . 69
Setting the base . . . . . . . . . . . . . . . . . . . . . . . . . . . . . . . . . . . . . . . . . . . . . . . . . . 70
Activating/deactivating music on hold . . . . . . . . . . . . . . . . . . . . . . . . . . . . . . . . . . . . . . . 70 Repeater support . . . . . . . . . . . . . . . . . . . . . . . . . . . . . . . . . . . . . . . . . . . . . . . . . . . . . . . . . . . . 70 Protecting against unauthorised access . . . . . . . . . . . . . . . . . . . . . . . . . . . . . . . . . . . . . . . 70 Resetting the base to the factory settings . . . . . . . . . . . . . . . . . . . . . . . . . . . . . . . . . . . . . 70
Connecting the base to the PABX . . . . . . . . . . . . . . . . . . . . . . . . . . . . . . . . . . 71
Dialling modes and recall . . . . . . . . . . . . . . . . . . . . . . . . . . . . . . . . . . . . . . . . . . . . . . . . . . . . 71 Saving an access code (outside line code) . . . . . . . . . . . . . . . . . . . . . . . . . . . . . . . . . . . . . 71 Setting pauses . . . . . . . . . . . . . . . . . . . . . . . . . . . . . . . . . . . . . . . . . . . . . . . . . . . . . . . . . . . . . . . 72 Switching temporarily to tone dialling (DTMF) . . . . . . . . . . . . . . . . . . . . . . . . . . . . . . . . 72
Customer Service & Assistance . . . . . . . . . . . . . . . . . . . . . . . . . . . . . . . . . . . . 73
Questions and answers . . . . . . . . . . . . . . . . . . . . . . . . . . . . . . . . . . . . . . . . . . . . . . . . . . . . . . |
74 |
Authorisation . . . . . . . . . . . . . . . . . . . . . . . . . . . . . . . . . . . . . . . . . . . . . . . . . . . . . . . . . . . . . . . . |
75 |
Guarantee Certificate . . . . . . . . . . . . . . . . . . . . . . . . . . . . . . . . . . . . . . . . . . . . . . . . . . . . . . . . |
75 |
Protecting our environment . . . . . . . . . . . . . . . . . . . . . . . . . . . . . . . . . . . . . . . 76
Appendix . . . . . . . . . . . . . . . . . . . . . . . . . . . . . . . . . . . . . . . . . . . . . . . . . . . . . . . . 77
Caring for your telephone . . . . . . . . . . . . . . . . . . . . . . . . . . . . . . . . . . . . . . . . . . . . . . . . . . . . 77 Contact with liquid . . . . . . . . . . . . . . . . . . . . . . . . . . . . . . . . . . . . . . . . . . . . . . . . . . . . . . . . . . 77 Specifications . . . . . . . . . . . . . . . . . . . . . . . . . . . . . . . . . . . . . . . . . . . . . . . . . . . . . . . . . . . . . . . . 77 Writing and editing text . . . . . . . . . . . . . . . . . . . . . . . . . . . . . . . . . . . . . . . . . . . . . . . . . . . . . . 78
Additional functions via the PC interface . . . . . . . . . . . . . . . . . . . . . . . . . . |
79 |
Accessories . . . . . . . . . . . . . . . . . . . . . . . . . . . . . . . . . . . . . . . . . . . . . . . . . . . . . . . |
81 |
Mounting the base on the wall . . . . . . . . . . . . . . . . . . . . . . . . . . . . . . . . . . . . |
84 |
Mounting the charger on the wall . . . . . . . . . . . . . . . . . . . . . . . . . . . . . . . . . |
84 |
Index . . . . . . . . . . . . . . . . . . . . . . . . . . . . . . . . . . . . . . . . . . . . . . . . . . . . . . . . . . . . |
85 |
6
Safety precautions
Safety precautions
Warning
Be sure to read this user guide and the safety precautions before using your telephone
Explain their content and the potential hazards associated with using the telephone to your children.
$ Use only the power adapter supplied, as indicated on the underside of the base.
Use only rechargeable batteries that correspond to the specification provided on page 77, as this could otherwise result in significant health risks and personal injury.
Using your telephone may affect nearby medical equipment. Be aware of the technical conditions in your particular environment, e.g., doctor's surgery.
If you use a medical device (e.g., a pacemaker), please contact the device manufacturer. They will be able to advise you regarding the susceptibility of the device to external sources of high frequency energy. Please refer to the "Appendix" chapter for the specifications of this Gigaset product.
Do not hold the rear of the handset to your ear when it is ringing or when handsfree mode is activated. Otherwise you risk serious and permanent damage to your hearing.
Your Gigaset is compatible with the majority of digital hearing aids on the market. However, perfect function with all hearing aids cannot be guaranteed.
The handset may cause interference in analogue hearing aids (humming or whistling) or cause them to overload. If you require assistance, please contact the hearing aid supplier.
Do not install the base or charger in bathrooms or shower rooms. The base and charger are not splashproof (¢page 77).
Do not use your phone in environments with a potential explosion hazard (e.g., paint shops).
ƒIf you give your Gigaset to a third party, make sure you also give them the user guide.
Remove faulty bases from use or have them repaired by our Service department, as they could interfere with other wireless services.
Please note
u Not all of the functions described in this user guide are available in all countries.
uThe device cannot be used in the event of a power failure. It is also not possible to transmit emergency calls.
7
First steps
First steps
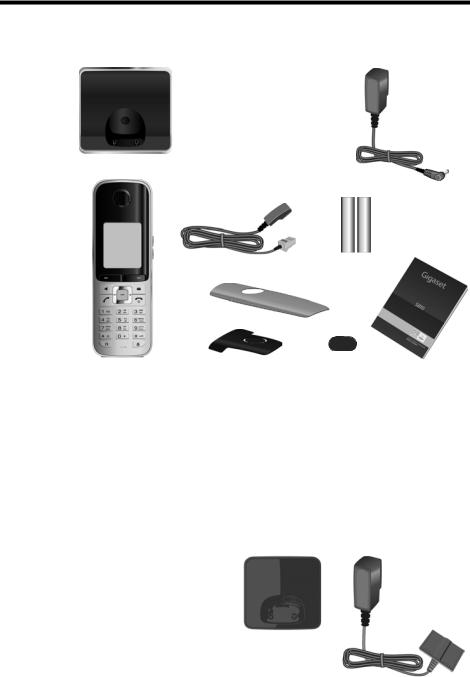
Checking the package contents
1 |
2 |
3 |
4 |
5 |
9
6 |
|
7 |
8 |
1 One Gigaset S810 base
2 One power adapter
3 One Gigaset S810H handset
4 One phone cord
5 Two batteries
6 One battery cover
7 One belt clip
8 One plastic headset socket cover
9 One user guide
If you have purchased a 9 J model with multiple hand-
sets the package should contain two batteries, a battery cover, a belt clip and a charger 9with power adapter Jfor each additional handset.
8
First steps
Setting up the base and charger (if included)
The base and charger are designed for use in dry rooms in a temperature range of
¤Set up the base at a central point in the building on a level, non-slip surface or mount the base or charger on the wall (¢page 84).+5°C to +45°C.
Please note
Pay attention to the range of the base.
This is up to 300 m in unobstructed outdoor areas and up to 50 m inside buildings. The range is reduced when Eco Mode (¢page 53) is activated.
The phone's feet do not usually leave any marks on surfaces. However, due to the multitude of different varnishes and polishes used on today's furnishings, the occurrence of marks on the surfaces cannot be completely ruled out.
Please note:
uNever expose the telephone to the influence of heat sources, direct sunlight or other electrical devices.
u Protect your Gigaset from moisture, dust, corrosive liquids and fumes.
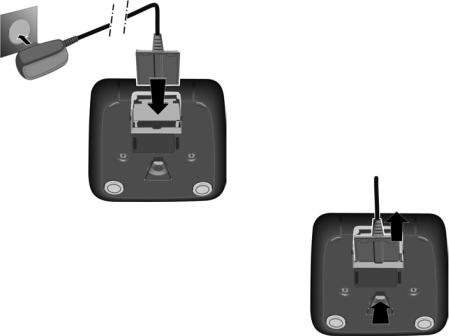
Connecting the base
¤ First connect the tel- |
1 |
ephone jack 2and |
|
insert the cables into |
|
the cable ducts. |
|
¤ Then connect the |
21 |
power adapter 1.
Please note:
uThe power adapter must always be connected, as the phone will not operate without a mains connection.
uUse only the power adapter and phone cord supplied. Pin connections on telephone cables can vary (pin connections ¢page 78).
9
First steps
Connecting the charger (if included)
2 |
¤ |
|
|
|
1 |
¤
Connect the flat plug from the power adapter 1.
Plug the power adapter into the plug socket 2.
4
To disconnect the plug from the charger, press the release button 3and disconnect the plug 4.
3
10

First steps
Setting up the handset for use
The display and keypad are protected by plastic films.
Remove the protective films!
Inserting the batteries and closing the battery cover
Warning
Use only rechargeable batteries recommended by Gigaset Communications GmbH (¢page 77), i.e., Never use conventional (non-rechargeable) batteries, as this could result in significant health risks and personal injury. For example, the outer casing of the batteries could be damaged or the batteries could explode. The phone could also malfunction or be damaged as a result of using batteries that are not of the recommended type.
¤Insert the batteries with the polarity in the correct direction.
The polarity is indicated in/on the battery compartment.
To open the battery cover, for instance to replace the batteries, insert a coin into the cavity on the left-hand side of the casing, then pull the battery cover in an upward direction.
¤First insert the battery cover at the top a.
¤Then press the cover b until it clicks into place.
11

First steps
¤Insert the plastic cover provided for the headset socket to ensure optimum sound in handsfree mode.
Attaching the belt clip
¤The handset has notches on each side to attach the belt clip. To attach – press the belt clip
onto the back of the handset so that the protrusions on the belt clip engage with the notches.
¤ To remove – press the centre of the belt clip firmly with your right thumb, push the fingernail of your left index finger up between the clip and the housing and pull the clip in an upward direction.
12
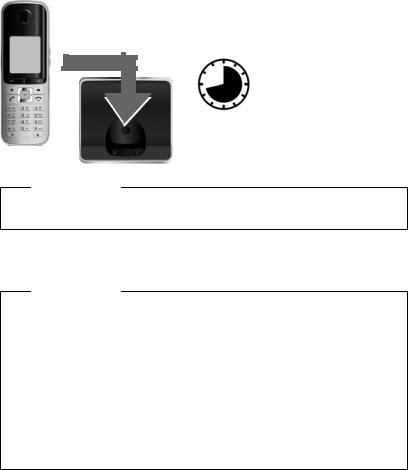
First steps
¤After charging, remove the handset from the base and only replace it when the batteries are fully discharged.
Please note
uEach handset is registered with the base at the factory. You do not need to register the handset again. If you wish to use your handset with a different
base or use further handsets with your base, you will need to register the handset manually (¢page 56).
uAfter the initial battery charge and discharge, you may place your handset in the base after every call.
uAlways repeat the charging and discharging procedure if you remove the batteries from the handset and reinsert them.
u The batteries may warm up during charging. This is not dangerous.
uAfter a while, the charge capacity of the batteries will decrease for technical reasons.
13
First steps
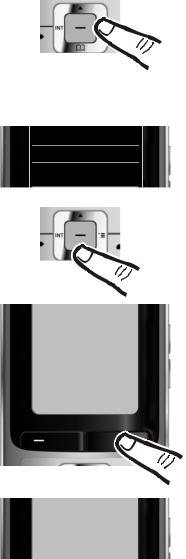
Changing the display language
Change the display language if you do not understand the language currently set.
O 5
Deutsch |
± |
English |
Ø |
Francais |
± |
|
± |
¤Press right on the control key.
¤Slowly press keys O and 5 one after the other.
The display for setting languages appears. The current language (e.g. English) is selected.
¤ Press down on the control key s ...
Deutsch |
± |
|
|
English |
Ø |
|
|
|
|
Francais |
± |
|
|
|
|
Italiano |
± |
x |
± |
Espanol |
|
|
|
Back |
Select |
|
|
Deutsch |
± |
|
|
English |
± |
|
|
|
|
Francais |
Ø |
|
|
|
|
|
± |
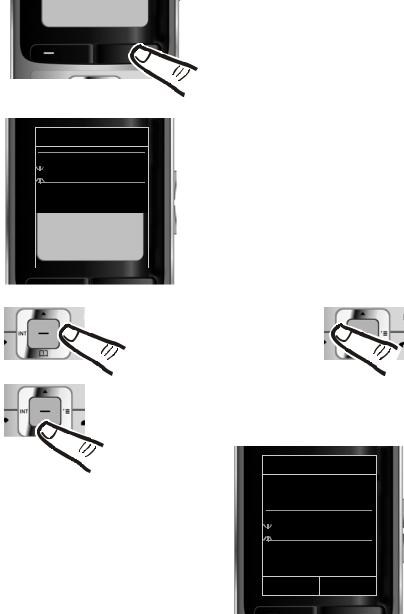
... until the language you wish to use is marked, e.g., French.
¤Press the right key directly below the display to select this language.
The selection is marked with Ø.
¤ Press and hold the end call key a to return to idle status.
14
First steps
Setting the date and time
Set the date and time so that the correct date and time can be assigned to incoming calls, and so that the alarm can be used.
|
|
|
|
Calls |
Time |
|
|
Date/Time
Date:
31.01.2011
Time:
00:00
¤Press the key below §Time§ on the display screen to open the input field. (If you have already set the time and
date, open the input field via the menu ¢page 28.)
The Date/Time submenu is shown on
the display.
¤
|
|
|
|
|
|
|
|
|
|
|
|
|
Back |
Save |
|
|
|
||
|
|
|
|
|
|
|
|
Press the right or left control key to change the input position and correct an entry.
¤ Press down on the control key to switch |
||
to the time input field. |
|
|
|
Date/Time |
|
|
Date: |
|
¤ Enter the hours and minutes in 4-digit |
14.10.2011 |
|
Time: |
|
|
format via the keypad, |
00:00 |
|
e.g., QM 5 for 07:15 am. |
|
|
|
|
|
Change the input position with |
|
|
the control key if necessary. |
|
|
|
Back |
Save |
15
First steps
|
|
Back |
Save |
|
|
Date/Time
‰
Saved
¤Press the key below §Save§ on the display screen to confirm your entry.
The display shows Saved. You will hear a confirmation tone and the handset will automatically return to idle status.
16

First steps
Display in idle status
Once the phone is registered and the time is set, the idle display is shown as in this example.
Displays |
i |
V |
|
u Reception between the base and the handset: |
|||
|
|
– |
Poor to good: Ð i Ñ Ò |
|
07:15 |
|
INT 1 |
14 Oct |
|||
– |
No reception: | |
|||
Green: Eco Mode activated (¢page 53) |
|
|
||
u Battery charge status: |
|
|
||
– |
{ white: charged over 66% |
|
|
|
– |
{ white: charged between 34% and 66% |
|
|
|
Calls |
SMS |
|||
– |
y white: charged between 11% and 33% |
|
|
|
|
|
|||
– |
y red: charged below 11% |
|
|
|
– |
y flashes red: battery almost empty |
|
|
|
|
(less than 10 minutes talktime) |
|
|
|
– |
xyxy x{x{ white: battery charging |
|
||
Please note
If you have chosen a colour scheme with a white background, the white symbols are displayed in black.
u INT 1
Internal name of the handset (¢page 59)
If Eco Mode+ (¢page 53) is activated, the ¼ icon is displayed in the top left corner of the display.
Your phone is now ready for use!
17
First steps
Connecting the headset
After removing the plastic cover, you can connect a headset to the left-hand side of your telephone with the 2.5 mm jack connector.
See the relevant product page at www.gigaset.com for information on recommended headsets.
The headset volume corresponds to the settings for the handset volume (¢page 66).
After using the headset, replace the plastic cover to enable optimum sound in handsfree mode.
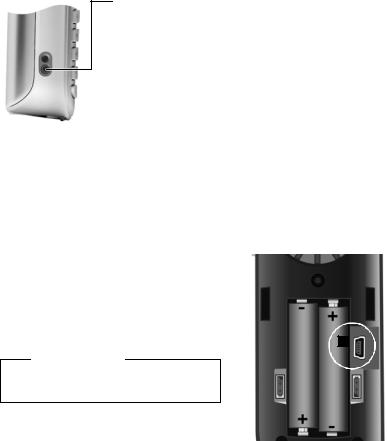
Connecting the USB data cable
You can connect a standard USB data cable with a mini-B connector to the back of your handset to connect the handset to a PC (¢page 79).
¤Remove the belt clip (if attached) (¢page 12).
¤Remove the battery cover (¢page 11).
¤Connect the USB data cable to USB socket 1.
Please note
Please connect your handset directly to the PC; do not connect via a USB hub.
18
First steps
What would you like to do next?
Now you have successfully set up your Gigaset, you will certainly want to adapt it to your personal requirements. Use the following guide to quickly locate the most important topics.
If you are unfamiliar with menu-driven devices such as other Gigaset telephones, read the section entitled "Using the phone" (¢page 20) first.
Information on ... |
... is located here. |
|
|
|
|
Setting the ringtone and volume |
|
page 67 |
|
|
|
|
|
|
Setting the earpiece volume |
|
page 66 |
|
|
|
|
|
|
Setting Eco Mode / Eco Mode+ |
|
page 53 |
|
|
|
|
|
|
Preparing the telephone for SMS reception |
|
page 44 |
|
|
|
|
|
|
Operating the telephone on a PABX |
|
page 71 |
|
|
|
|
|
|
Registering existing Gigaset handsets to a base |
|
page 56 |
|
|
|
|
|
|
Transferring directory entries from existing Gigaset |
|
page 38 |
handsets to new handset(s) |
|
|
|
|
|
|
|
|
|
|
|
Using Bluetooth devices |
|
page 61 |
|
|
|
|
|
|
Connecting the phone to the PC |
|
page 79 |
|
|
|
If you have any questions about using your phone, please read the tips on troubleshooting (¢page 74) or contact our Customer Care team (¢page 73).
19

Using the phone
Using the phone
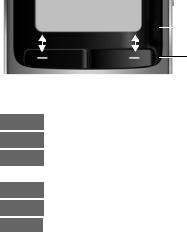
Control key
Below, the side of the control key that you must press in the respective operating situation is marked in black (top, bottom, right, left, centre), e.g., v for "press right on the control key" or w for "press the centre of the control key".
The control key has a number of different functions:
When the handset is in idle status |
|
s |
Open the directory. |
v |
Open the main menu. |
u |
Open the list of handsets. |
t |
Call up the menu for setting the handset's call volume (¢page 66). |
In the main menu t, s, v or u
Navigate to the required function.
In submenus and lists
t / s Scroll up/down line by line.
Use the control key to move the cursor up t, down s, right v or left u. Press and hold v or u to move the cursor word by word.
During an external call |
|
s |
Open the directory. |
u |
Initiate an internal consultation call. |
t |
Adjust the loudspeaker volume for earpiece and handsfree mode. |
Functions when pressing the middle of the control key
Depending on the operating situation, the key has different functions. u In idle status the key opens the main menu.
uIn submenus, selection and input fields, the key takes on the function of the display keys §OK§, §Yes§, §Save§, §Select§ or §Change§.
Please note
These instructions demonstrate the main menu being opened by pressing the right of the control key and functions being actuated by pressing the appropriate display key. However, if you prefer, you can use the control key as described above.
20
Using the phone
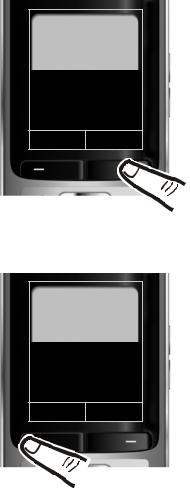
Display keys
The functions of the display keys change depending on the particular operating situation. Example:
|
|
|
|
Current display key functions. |
Back |
Save |
|
|
|
|
|
|||
|
|
|
|
|
Display keys
Some important display keys:
Options Open a menu for further functions.
OK Confirm selection.
ÛDelete key: delete character by character/word by word from right to left.
Back Go back one menu level or cancel operation.
Save Store entry.
Open the redial list.
Keys on the keypad
c / Q / * etc.
Press the matching key on the handset.
~Enter digits or letters.
Side keys
ø / ÷ Press the keys on the right of the handset to set the volume for the handset, ringtone, speaker, alarm, signalling of appointments and the headset depending on the situation.
Correcting incorrect entries
You can correct incorrect characters in the input fields by navigating to the incorrect entry using the control key. You can then:
uDelete the character to the left of the cursor with the display key Ñ(press and hold to delete the word)
u Insert characters at the cursor position
uOverwrite the highlighted (flashing) character, e.g., when entering time and date.
21

Using the phone
Using the menus
Your telephone's functions are accessed using a menu that has a number of levels.
The menu display can be extended (expert mode •) or restricted (standard mode). Expert mode is the active default setting.
|
• |
|
Settings or functions that are only available in expert mode are marked in these |
||
instructions by the |
|
icon. |
Switching between standard mode/expert mode and the menu overview (¢page 26).
Main menu (first menu level)
¤When the handset is in idle status press the right control key v to open the main menu.
The main menu functions are shown in the display with icons. The icon for the selected function is highlighted in orange and the name of the associated function appears in the display header.
To access a function, i.e., to open the corresponding submenu (next menu level):
¤ Use the control key p to select the required function and press the display key §OK§.
Briefly press the display key §Back§ or the end call key a to revert back to idle status.
|
Settings |
Ç |
ò É |
Ê Ë Ì |
|
á Â Ï |
|
Back |
OK |
Submenus
The functions in the submenus are displayed as lists (example on the right).
To access a function:
¤ Scroll to the function with the control key q and press §OK§.
Briefly press the display key §Back§ or the end call key a to return to the previous menu level/cancel the operation.
Settings
Date/Time
Audio Settings
Display
Language
Registration
|
|
Back |
OK |
|
|
22

Using the phone
Reverting to idle status
¤Press and hold the end call key a.
or:
¤Do not press any key: after 2 minutes the display will automatically revert to idle status.You can revert to idle status from anywhere in the menu as follows:
Settings that have not been saved by selecting the display keys §OK§, §Yes§, §Save§ or
§Change§ are lost.
An example of the display in idle status is shown on page 17.
Activating/deactivating the handset
aWith the phone in idle status, press and hold the end call key (confirmation tone) to switch off the handset.
Press and hold the end call key again to switch the handset on.
Please note
When the handset is switched on, an animation showing the Gigaset logo is displayed for several seconds.
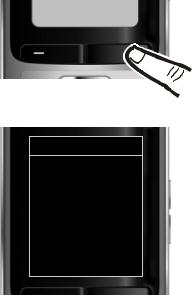
Activating/deactivating the keypad lock
The keypad lock prevents any inadvertent use of the phone.
#Press and hold the hash key in idle status to activate or deactivate the keypad lock. You will hear the confirmation tone.
If the keypad lock is activated, you will see a message when you press a key.
The keypad lock deactivates automatically when you receive a call. It is reactivated when the call is finished.
Please note
When the keypad lock is active, you cannot even call emergency numbers.
23

Using the phone
Using this guide
The operating steps are shown in abbreviated form.
Example:
The illustration:
v ¢Ï ¢Eco Mode
means:
¢Eco Mode+ (³ = on)
¤ Press right on the control key v to open the main menu.
|
Settings |
Ç |
ò É |
Ê Ë Ì |
|
á Â Ï |
|
Back |
OK |
¤
¤
Press right, left, down and up on control key p to navigate to the Settings submenu.
Press the display key §OK§ to confirm your selection.
Settings
Display
Language
Registration
Menu View
Eco Mode
Back |
OK |
|
|
¤Press down on the control key s until the Eco Mode menu option appears on the display.
¤Press the display key §OK§ to confirm your selection.
24
|
Eco Mode |
|
|
|
|
|
|
|
|
Eco Mode |
³ |
|||
|
|
|||
|
|
|
||
Eco Mode+ |
´ |
|||
|
|
|||
|
|
|
|
|
Back Change
Eco Mode |
|
|
|
|
|
Eco Mode |
³ |
|
|
||
|
|
|
Eco Mode+ |
³ |
|
|
||
|
|
Back Change
Using the phone
¤Press down on the control key s until the Eco Mode+ menu option appears on the display.
¤Press the display key §Change§ to activate/deactivate the function.
The change is effective immediately and does not need to be confirmed.
¤Press the key below §Back§ on the display screen to jump back to the previous menu level.
or
Press and hold the end call key a to return to idle status.
25

To change theseÏsettings:
Select v ¢ ¢Menu View ¢Simplified (standard mode) or Complete (expert mode) ¢§Select§ (the active mode is marked with Ø)
Open the main menu: press v when the phone is in idle mode.
Ç |
Select Services |
¢page 35 |
|
|
|
|
|||
|
|
|
||
|
Network Mailbox |
¢page 33 |
||
|
All Calls |
|
Call Divert |
|
|
|
|||
|
|
|
|
¢page 33 |
|
|
|
Call Waiting |
|
|
|
|
|
¢page 35 |
|
|
|
Fixed Destin. Call |
|
ò |
Bluetooth |
¢page 61 |
|
|
|
|
|||
|
|
|
||
|
Activation |
|
||
|
|
¢page 62 |
|
|
|
Search for Headset |
|
||
|
|
¢page 62 |
|
|
|
Search Data Device |
|
||
|
|
¢page 62 |
|
|
|
Known Devices |
|
||
|
|
¢page 63 |
|
|
|
Own Device |
|
||
É |
Additional Features |
¢page 60 |
|
|
|
|
|||
|
|
|
||
|
Room Monitor |
|
||
|
|
¢page 29 |
|
|
|
One Touch Call |
¢page 68 |
||
|
• Resource Directory |
|
Screensavers |
|
|
|
|||
|
|
|
|
¢page 68 |
|
|
|
Caller Pictures |
|
|
|
|
|
¢page 68 |
|
|
|
Sounds |
|
|
|
|
|
¢page 68 |
|
|
|
Capacity |
|
Ê |
Call Lists |
¢page 40 |
|
|
|
|
|||
|
|
|
||
|
All Calls |
|
||
|
|
¢page 40 |
|
|
|
Outgoing Calls |
|
||
|
|
¢page 40 |
|
|
|
Accepted Calls |
|
||
|
|
¢page 40 |
|
|
|
Missed Calls |
|
||
26
 Loading...