


Congratulations!
By purchasing a Gigaset, you have chosen a brand that is fully committed to sustainability.
This product’s packaging is eco-friendly! To learn more, visit www.gigaset.com.

Gigaset S820/S820A – Touch & Type
Gigaset S820/S820A – Touch & Type
|
|
|
|
|
|
|
|
|
|
|
|
|
|
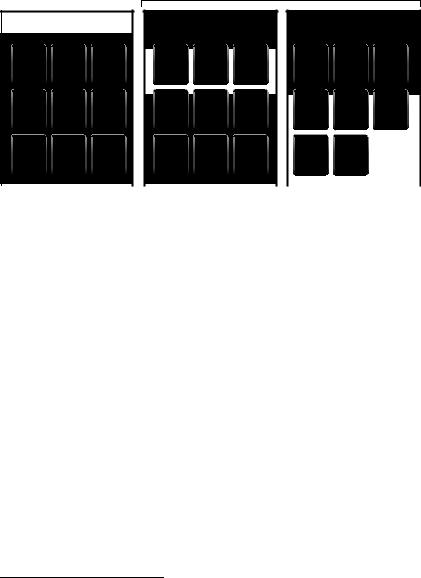
Touchscreen/display |
|
|
|
|
|
|
|
|
|
|
|
|
|
|
Status bar (¢ page 21) |
|
|
|
|
|
|
|
|
|
|
|
|
|
|
Icons (¢page 64) show the telephone's current set- |
|
|
|
|
|
|
|
|
|
|
|
|
|
|
|
|
|
|
|
|
|
|
|
|
|
|
|
|
|
tings and operating status. Touch the status bar to open |
|
|
|
|
|
|
|
|
|
|
|
|
|
|
the status page (¢page 21). |
|
|
Ð |
Ã Þ ò ô ó V |
|
|
|
|
|
Idle display (¢ page 17) or menu page |
|||||
|
|
|
|
|||||||||||
|
|
|
|
|
|
|
|
|
|
|
|
|
|
(¢ page 18) |
|
|
|
|
Apr |
|
|
|
|
|
|
|
|
|
Handset keys |
|
|
26 |
|
|
|
|
|
|
|
|
|
Side keys |
||
|
|
|
|
|
|
|
|
|
|
|
||||
|
|
|
|
Thu |
|
|
|
|
|
|
|
|
|
|
|
|
|
|
|
|
|
|
|
|
|
|
|
|
Set the volume during a call |
|
|
|
|
|
|
|
|
|
|
|
|
|
|
cTalk key |
|
|
|
|
|
|
|
|
|
|
|
|
|
|
|
|
|
|
|
|
|
|
|
|
|
|
|
|
||
|
|
|
 |
|
|
|
|
|
|
|
|
|
Dial displayed number, accept call, |
|
|
|
|
|
|
|
|
|
|
|
|
|
switch between earpiece and handsfree mode, |
||
|
|
|
|
˜ |
|
|
|
|
|
|
|
|
|
Press briefly: open redial list |
|
|
|
|
|
|
|
|
|
|
|
|
|
Press and hold: start dialling |
|
|
|
|
|
|
|
|
|
|
|
|
|
|
|
|
|
|
|
|
|
|
|
|
|
|
|
|
|
|
vMenu key |
|
|
|
|
|
|
|
|
|
||||||
|
|
|
|
|
|
|
|
|
|
|
|
|
|
Open the main menu/return to the idle display |
|
|
|
|
|
|
|
|
|
|
|
|
|
|
(¢page 18) |
|
|
|
|
|
|
|
|
|
|
|
|
|
|
aEnd call/end key |
|
|
|
|
|
|
|
|
|
|
|
|
|
|
Press briefly: end call/paging call, reject internal call, |
|
|
|
|
|
|
|
|
|
|
|
|
|
|
return to idle status |
|
|
|
|
|
|
|
|
|
|
|
|
|
|
Press and hold: switch handset on/off |
|
|
|
|
|
|
|
|
|
|
|
|
|
|
Star key |
|
|
|
|
|
|
|
|
|
|
|
|
|
|
Press and hold: activate/deactivate ringtones |
|
|
|
|
|
|
|
|
|
|
|
|
|
|
(¢page 35) |
|
|
|
|
|
|
|
|
|
|
|
|
|
|
Hash key |
|
|
|
|
|
|
|
|
|
|
|
|
|
|
Press and hold: activate/deactivate keypad and display |
|
|
|
|
|
|
|
|
|
|
|
|
|
|
lock (¢page 22) |
|
|
|
|
|
|
|
|
|
|
|
|
|
|
|
|
|
|
|
|
|
|
|
|
|
|
|
|
|
Recall key |
|
|
|
|
|
|
|
|
|
|
|
|
|
|
Recall (flash), |
|
|
|
|
|
|
|
|
|
|
|
|
|
|
Press and hold: enter dialling pause |
|
|
|
|
|
|
|
|
|
|
|
|
|
|
|
|
|
|
|
|
|
|
|
|
|
|
|
|
|
Message key |
|
|
|
|
|
|
|
|
|
|
|
|
|
|
Call up messages page (¢page 19) |
|
|
|
|
|
|
|
|
|
|
|
|
|
|
|
|
|
|
|
|
|
|
|
|
|
|
|
|
|
Mini USB connection socket |
|
|
|
|
|
|
|
|
|
|
|
|
|
|
Connect the handset to your PC (Gigaset QuickSync) |
1

Gigaset S820/S820A – Touch & Type
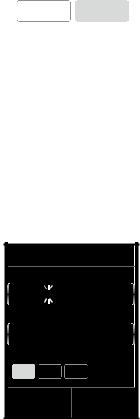
Registration/paging key¢on the base
Press briefly: start paging ( page 45) Press and¢hold: set base to registration mode ( page 44)
Answer machine display
(S820A only)
No light: answer machine is deactivated Light: answer machine is activated Pulsing: new messages on the answer machine
Flashing quickly: answer machine memory is full
Ã
Message/registration mode display
Pulsing: new messages received (excluding answer machine)
Flashing¢ : base in registration mode ( page 44)
Gigaset service contact numbers:
For personal advice on our range of products and for repairs or guarantee/warranty claims call:
Service Centre UK: |
08450 3181 90 |
|
(local call cost charge) |
Service Centre Ireland: 0818 200 033
(6.6561 Ct./Call)
Please have your proof of purchase ready when calling.
2

Contents
Contents
Gigaset S820/S820A – Touch & Type . . . . . . . . . . . . . . . . . . . . . . . . . . . . . . . . . . . . . . . . . . . . . . . . . . . . . . . . 1 Safety precautions . . . . . . . . . . . . . . . . . . . . . . . . . . . . . . . . . . . . . . . . . . . . . . . . . . . . . . . . . . . . . . . . . . . . . . . . . 4 Getting started . . . . . . . . . . . . . . . . . . . . . . . . . . . . . . . . . . . . . . . . . . . . . . . . . . . . . . . . . . . . . . . . . . . . . . . . . . . . 6 Understanding the operating steps . . . . . . . . . . . . . . . . . . . . . . . . . . . . . . . . . . . . . . . . . . . . . . . . . . . . . . . 16 Display pages . . . . . . . . . . . . . . . . . . . . . . . . . . . . . . . . . . . . . . . . . . . . . . . . . . . . . . . . . . . . . . . . . . . . . . . . . . . . 17 Using the telephone . . . . . . . . . . . . . . . . . . . . . . . . . . . . . . . . . . . . . . . . . . . . . . . . . . . . . . . . . . . . . . . . . . . . . . 22 Making calls . . . . . . . . . . . . . . . . . . . . . . . . . . . . . . . . . . . . . . . . . . . . . . . . . . . . . . . . . . . . . . . . . . . . . . . . . . . . . . 26 Changing phone settings . . . . . . . . . . . . . . . . . . . . . . . . . . . . . . . . . . . . . . . . . . . . . . . . . . . . . . . . . . . . . . . . . 33 ECO DECT . . . . . . . . . . . . . . . . . . . . . . . . . . . . . . . . . . . . . . . . . . . . . . . . . . . . . . . . . . . . . . . . . . . . . . . . . . . . . . . 39 Answer machine (Gigaset S820A) . . . . . . . . . . . . . . . . . . . . . . . . . . . . . . . . . . . . . . . . . . . . . . . . . . . . . . . . . 40 Network mailbox . . . . . . . . . . . . . . . . . . . . . . . . . . . . . . . . . . . . . . . . . . . . . . . . . . . . . . . . . . . . . . . . . . . . . . . . . 43 Multiple handsets . . . . . . . . . . . . . . . . . . . . . . . . . . . . . . . . . . . . . . . . . . . . . . . . . . . . . . . . . . . . . . . . . . . . . . . . 44 Bluetooth devices . . . . . . . . . . . . . . . . . . . . . . . . . . . . . . . . . . . . . . . . . . . . . . . . . . . . . . . . . . . . . . . . . . . . . . . . 47 Contacts (address book) . . . . . . . . . . . . . . . . . . . . . . . . . . . . . . . . . . . . . . . . . . . . . . . . . . . . . . . . . . . . . . . . . . 49 Call list . . . . . . . . . . . . . . . . . . . . . . . . . . . . . . . . . . . . . . . . . . . . . . . . . . . . . . . . . . . . . . . . . . . . . . . . . . . . . . . . . . . 53 Calendar . . . . . . . . . . . . . . . . . . . . . . . . . . . . . . . . . . . . . . . . . . . . . . . . . . . . . . . . . . . . . . . . . . . . . . . . . . . . . . . . . 54 Alarm . . . . . . . . . . . . . . . . . . . . . . . . . . . . . . . . . . . . . . . . . . . . . . . . . . . . . . . . . . . . . . . . . . . . . . . . . . . . . . . . . . . . 55 Baby phone . . . . . . . . . . . . . . . . . . . . . . . . . . . . . . . . . . . . . . . . . . . . . . . . . . . . . . . . . . . . . . . . . . . . . . . . . . . . . . 56 SMS (text messages) . . . . . . . . . . . . . . . . . . . . . . . . . . . . . . . . . . . . . . . . . . . . . . . . . . . . . . . . . . . . . . . . . . . . . . 57 Synchronisation with your PC (Gigaset QuickSync) . . . . . . . . . . . . . . . . . . . . . . . . . . . . . . . . . . . . . . . . . 61 Connecting the base station to the PABX/router . . . . . . . . . . . . . . . . . . . . . . . . . . . . . . . . . . . . . . . . . . . 62 Display icons . . . . . . . . . . . . . . . . . . . . . . . . . . . . . . . . . . . . . . . . . . . . . . . . . . . . . . . . . . . . . . . . . . . . . . . . . . . . . 64 Setting options . . . . . . . . . . . . . . . . . . . . . . . . . . . . . . . . . . . . . . . . . . . . . . . . . . . . . . . . . . . . . . . . . . . . . . . . . . . 66 Service (Customer Care) . . . . . . . . . . . . . . . . . . . . . . . . . . . . . . . . . . . . . . . . . . . . . . . . . . . . . . . . . . . . . . . . . . 69 Environment . . . . . . . . . . . . . . . . . . . . . . . . . . . . . . . . . . . . . . . . . . . . . . . . . . . . . . . . . . . . . . . . . . . . . . . . . . . . . 75 Appendix . . . . . . . . . . . . . . . . . . . . . . . . . . . . . . . . . . . . . . . . . . . . . . . . . . . . . . . . . . . . . . . . . . . . . . . . . . . . . . . . 76 Accessories . . . . . . . . . . . . . . . . . . . . . . . . . . . . . . . . . . . . . . . . . . . . . . . . . . . . . . . . . . . . . . . . . . . . . . . . . . . . . . . 79 Index . . . . . . . . . . . . . . . . . . . . . . . . . . . . . . . . . . . . . . . . . . . . . . . . . . . . . . . . . . . . . . . . . . . . . . . . . . . . . . . . . . . . . 83
3
Safety precautions
Safety precautions
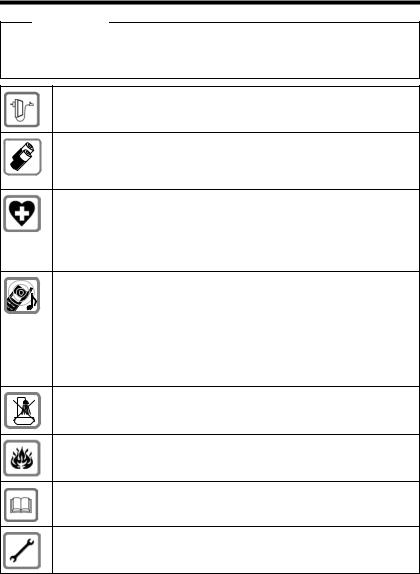
Warning
Read the safety precautions and the user guide before use.
Explain their content and the potential hazards associated with using the device to your children.
Use only the power adapter indicated on the device.
Use only rechargeable batteries that correspond to the specification (see "Technical Data"). Never use a conventional (non-rechargeable) battery or other battery types as this could result in significant health risks and personal injury. Rechargeable batteries, which are noticeably damaged, must be replaced.
Using your telephone may affect nearby medical equipment. Be aware of the technical conditions in your particular environment, e.g. doctor's surgery.
If you use a medical device (e.g. a pacemaker), please contact the device manufacturer. They will be able to advise you regarding the susceptibility of the device to external sources of high frequency energy (for the specifications of your Gigaset product see "Technical Data").
Do not hold the rear of the handset to your ear when it is ringing or when speaker mode is activated. Otherwise you risk serious and permanent damage to your hearing.
Your Gigaset is compatible with the majority of digital hearing aids on the market. However, perfect function with all hearing aids cannot be guaranteed.
The phone may cause interference in analogue hearing aids (humming or whistling) or cause them to overload. If you require assistance, please contact the hearing aid supplier.
The devices are not splashproof. For this reason do not install them in a damp environment such as bathrooms or shower rooms.
Do not use the devices in environments with a potential explosion hazard (e.g. paint shops).
If you give your Gigaset to a third party, make sure you also give them the user guide.
Remove faulty devices from use or have them repaired by our Service team, as these could interfere with other wireless services.
4

Safety precautions
Please note
uThe device cannot be used in the event of a power failure. It is also not possible to transmit emergency calls.
u Emergency numbers cannot be dialled if the keypad lock is activated!
5

Getting started
Getting started
Checking the package contents
u One Gigaset S820/S820A base u One power adapter for the base u One phone cord
u One Gigaset handset
u One battery cover (rear cover for the handset) u Two batteries
u One belt clip
u One rubber seal for the USB connection u One user guide.
If you have purchased a model with multiple handsets, the package should contain two batteries, a battery cover, a belt clip and a charger with a power adapter for each additional handset.
Setting up the base and charger (if included)
The base and charging cradle are designed for use in dry rooms in a temperature range of +5°C
to +45°C.
¤Set up the base on a level, non-slip surface at a central point in the building or mount the base on the wall.
Please note
Pay attention to the range of the base. In buildings this is up to 50 m, outdoors up to 300 m. The range is reduced when ECO DECT (¢ page 39) is activated.
The phone’s feet do not usually leave any marks on surfaces. However, due to the multitude of different varnishes and polishes used on today's furnishings, the occurrence of marks on the surfaces cannot be completely ruled out.
Please note:
uNever expose the telephone to the effects of heat sources, direct sunlight or other electrical devices.
u Protect your Gigaset from moisture, dust, corrosive liquids and fumes.
6
Getting started
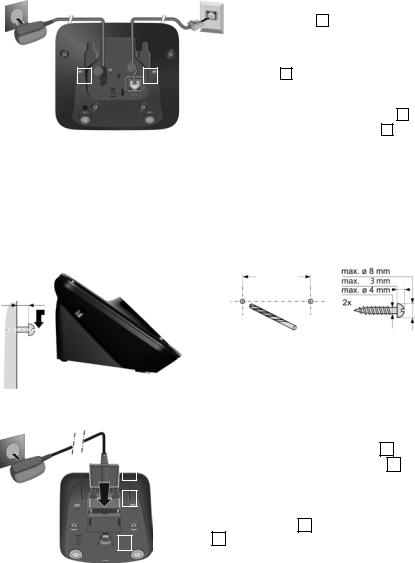
Connecting the base with the phone network and the mains power supply
|
|
|
|
|
|
|
¤ Plug the telephone cable into the con- |
|
|
|
|
|
|
|
|
|
nection socket 1 on the back of the |
|
|
|
|
|
|
|
|
base until it clicks into place; then push |
|
|
|
|
|
|
|
|
the cable into the clips. |
3 |
|
|
|
|
|
4 |
¤ Plug the power adapter cable into the |
|
|
|
|
|
|
|
|||
|
|
|
|
|||||
|
|
2 |
|
1 |
|
|
|
socket 2 on the back of the base and |
|
|
|
|
|
|
|
|
twist the angle plug underneath the |
|
|
|
|
|
|
|
|
|
|
|
|
|
|
|
|
¤ |
cable clips. |
|
|
|
|
|
|
|
First, connect the power adapter 3 . |
|
|
|
|
|
|
|
|
¤ |
Then connect the phone jack 4 . |
Please note:
uThe power adapter must always be connected, as the phone will not operate without a power supply.
uOnly use the power adapter and phone cord supplied. Pin connections on telephone cables can vary (pin connections, ¢ page 77).
Wall mounting the base (optional)
50 mm
Approx. 2 mm
Connecting the charger (if included)
|
|
|
|
|
|
¤ Connect the flat plug to the charger cradle |
1 . |
|
|
|
|
|
|
¤ |
Plug the power adapter into the plug socket |
2 . |
|
|
|
|
4 |
|
||||
|
|
|
|
If you have to remove the plug from the charger again: |
||||
|
|
|
|
|
|
|||
|
|
|
|
|
|
|||
|
|
|
|
|
|
¤ |
Disconnect the power adapter from the mains |
|
2 |
|
|
1 |
|
|
|||
|
|
|
|
|
|
|
power supply. |
|
|
|
|
|
|
¤ |
|
||
|
|
|
|
|
Press the release button 3 and disconnect the |
|||
|
|
|
|
|
|
|
plug 4 . |
|
|
|
3 |
|
|
|
|
||
|
|
|
|
|
|
|
||
|
|
|
|
|
|
|
|
|
7
Getting started
Setting up the handset for use
The handset’s display and keys are covered with a protective film.
Please remove the protective film!
Caution
Please do not use any touchscreen styli to operate the handset!
Do not use any protective sleeves/films from other manufacturers, as they may restrict the operation of your handset.
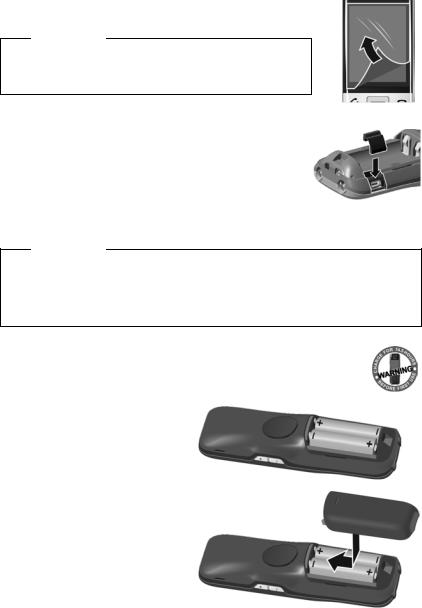
Inserting the rubber seal for the USB plug socket
Open the battery cover and insert the rubber seal into
the groove.
Inserting the battery and closing the battery cover
Caution
Use only rechargeable batteries (¢ page 76) recommended by Gigaset Communications GmbH, as this could otherwise result in significant health risks and personal injury. For example, the outer casing of the batteries could be destroyed or the batteries could explode. The phone could also malfunction or be damaged as a result of using batteries that are not of the recommended type.
¤Insert the batteries with the polarity in the correct direction.
The polarity is indicated in the battery compartment.
¤Insert the battery cover from above.
¤Then press the cover until it clicks into place.
8
Getting started
To reopen the battery cover to replace the battery:
¤Insert your fingernail into the notch on
the top of the cover and push downwards.
Attaching the belt clip
The handset has notches on each side to attach the belt clip.
uTo attach – press the belt clip onto the back of the handset so that the protrusions on the belt clip engage with the notches.
uTo remove – press the centre of the belt clip firmly with your right thumb, push the fingernail of your left
index finger up between the clip and the housing, and pull the clip in an upward direction.
Charging the battery
The battery is supplied with a partial charge. The batteries are fully charged when the lightning icon on the display goes out.
9.5 h 14.5 h
or
¤ Place the handset into the base for 9.5 hours or into the charger for 14.5 hours.
Please note
u The handset may only be placed in the designated base or charger.
uHandsets contained in the package have already been registered to the base. If, however,
a handset has not been registered (display "Handset not registered to any base"), please register it manually (¢ page 44).
uThe battery is also charged if the handset is connected via a USB connection to a PC with a power supply of 500 mA.
u The battery may heat up during charging. This is not dangerous.
u After a time, the charge capacity of the battery will decrease for technical reasons.
9

Getting started
Setting up the base and handset – installation wizard
The installation wizard starts automatically the first time your handset is connected to the base after switching on or after registration. It helps you to configure the following key settings on the handset and base. These keys are required for operation:
u Time and date u Display language
u Answer machine language (S820A only) u Country in which the phone will be used u Your own area code
Note: Some fields will not be displayed if your handset is registered with a base that has already been configured.
Welcome
Time
00:00
Date
01.04.2012
Display Language
English
Country
United Kingdom
|
Skip |
Save |
|
|
|
Settings |
|
|
|
|
|
Date and Time
Time
00:00
Time Format
24 hrs
Date
01.04.2012
Date Order
Day Month Year
|
Skip |
Save |
|
|
Settings |
Settings |
|
|
|
|
|
If you want to adjust the settings at a later date:
¤Touch the Skip Settings option at the bottom of the display.
The handset then switches to idle status.
You can configure the settings at any time using the Settings menu on your handset.
To configure the settings:
¤ Touch the Time field to configure this setting.
The Date and Time submenu opens.
Set the
-Time
-Time Format (12 hrs/24 hrs)
-Date
-Date Order (Day Month Year/Month Day Year)
by touching the fields in sequence and adjusting the settings (see the following illustrations).
10

Edit
Time
15:30
L ‰
Time Format
|
|
|
|
|
12 hrs |
± |
|
|
|
|
|
|
|
|
|
|
24 hrs |
|
|
|
|
|
|
|
|
|
|
Edit
Date
01/01/2012
Date Order
|
|
|
|
|
Day Month Year |
± |
|
|
|
|
|
|
|
|
|
|
Month Day Year |
|
|
|
|
|
|
|
|
|
|
The date order setting is indicated by ´.
¤Touch the Picon to change the format.
¤Touch the ‘icon. The setting is saved automatically. You return to the Date and Time page.
¤Touch Save Settings to return to the Welcome page.
11

Getting started
|
|
|
|
|
|
|
Setting the display language |
|
|
Welcome |
|
||||
|
|
|
|
The current language is displayed under Display Lan- |
|||
|
|
|
|
|
|
||
|
|
Time |
|
|
|
||
|
|
|
|
guage. |
|||
|
00:00 |
|
|
|
|
||
|
|
|
|
|
|
|
If you want to change the setting: |
|
|
Date |
|
|
|||
|
|
|
|
|
¤ Touch the Display Language field. |
||
|
01.04.2012 |
|
|
|
|
||
|
|
|
|
|
|
||
|
|
|
|
|
|
|
|
|
|
Display Language |
|
|
|
|
|
|
|
English |
|
|
|
|
|
|
|
|
|
|
|
|
|
|
|
Country |
|
|
|
|
|
|
|
United Kingdom |
|
|
|
|
|
|
|
|
|
|
|
|
|
|
|
Skip |
|
Save |
|
|
|
|
|
Settings |
|
Settings |
|
|
|
|
|
|
|
|
|
|
|
|
|
|
|
|
|
|
|
Display Language
|
|
|
|
|
English |
Ø |
|
|
|
|
|
|
|
|
|
|
Français |
± |
|
|
|
|
Castellano
Nederlands ±
L
The current language setting is indicated by ´.
¤Touch the Picon next to the language you want to set.
If your language is not displayed, the list may be "longer" than the display. You must then scroll through the list. To do this, put a finger on the display and move it slowly upwards.
¤Touch the ‘icon. The setting is saved automatically. You return to the Welcome page.
Welcome
Date
01.04.2012
Display Language
English
Country
United Kingdom
Area (Dial Code)
(not configured)
Skip |
Save |
Settings |
Settings |
|
|
|
|
Setting the country
The country in which you are going to use the phone and for which it is authorised must be indicated under
Country. If the setting is not correct:
¤Touch the Country field.
¤Set the country as described above.
12

Getting started
Please note
If you have selected Other Country instead of a country, the Welcome page will also show the Country (Dial Code) entry.
¤Press Country (Dial Code) and enter the International Prefix and International Area Code for the international country code as described below for the local area code.
Area (Dial Code)
(not configured)
Skip
Settings
Area (Dial Code)
Local Prefix
0
Local Area Code
20
ç
L ‰
Welcome
Date
01.04.2012
Display Language
English
Country
United Kingdom
Area (Dial Code)
020
Skip |
Save |
Settings |
Settings |
|
|
|
|
Entering the local area code
¤ Touch the Area (Dial Code) field.
The Local Prefix is the country-specific area code that precedes the Local Area Code when the country code is not dialled. In United Kingdom or in Ireland, the "0" Local Area Code is then e.g., 20 for London or 1 for Dublin.
¤Enter the Local Prefix of your country (max. 4 characters; "0" in the example). The field is already populated for the selected country.
¤Briefly touch the second input field and enter the Local Area Code (maximum 8 characters, "20" in the exam-
ple).
You can correct incorrect entries using $.
¤Touch èafter entering the numbers to save the entry.
The Welcome page is displayed again.
¤ Touch the Save Settings option to save your settings.
13

Getting started
ÐÃ Þ ò ô ó V
Apr
26
Thu
Â
˜
Once you have configured all the necessary settings, your handset switches to idle status.
Your phone is now ready for use.
14

Getting started
What would you like to do next?
After successfully setting up the phone, you can make calls straight away, customise your Gigaset according to your requirements or firstly familiarise yourself with the operating features.
Customising the idle display
You can select the functions you use most often to design the display according to your needs. Customisation allows you to directly access up to 6 functions such as alarm, calendar, contacts, call lists, etc., and call them up with a single touch of an icon (¢ page 17).
Synchronising with contacts in Google or Outlook
Synchronise your handset's directory using your PC and our Gigaset QuickSync software (¢ page 61).
For the free download and more information, see www.gigaset.com/gigasets820.
Setting ringtones
Assign specific tunes to internal and external calls, reminders, wake-up calls and to certain callers (¢ page 35).
Protecting yourself from undesired calls
Use the time control function or the blacklists. Set your telephone so that it does not ring when you receive an undesired call (¢ page 36).
Record your own announcements and set your recording parameters (¢ page 40).
Registering existing Gigaset handsets to the base
Continue using these handsets to make calls from your new base. Transfer contacts entries from these handsets to your new handset (¢ page 44/¢ page 51).
Reduce the transmission power (emissions) of your phone (¢ page 39).
Download your personal ringtones and images to your handset
Connect your handset to your PC via Bluetooth/USB and download ringtones and images to your handset with the help of our Gigaset QuickSync software. For the free download and more information, see www.gigaset.com/gigasets820.
If you have any questions about using your phone, please read the tips on troubleshooting (¢ page 70) or contact our Service team (¢ page 69).
15

Understanding the operating steps
Understanding the operating steps
In this user guide, the keys on your Gigaset S820/S820A are depicted as follows: |
||
c/ v/ a |
Talk key/menu key/end call key |
|
0to O |
Digit/letter keys |
|
* |
/ # |
Star key/hash key |
d |
/ þ |
Message key/R key |
All of the other icons are fields you need to touch on the touchscreen.
Example 1:
Menu key v¤ ÇBaby Phone
¤ Press the vmenu key in idle status. The Applications menu page is displayed.
|
Á |
|
|
icon. |
|
¤Touch the |
Phone |
|
|
Baby |
|
Example 2:
Menu key v¤ Settings menu page ¤ °Language +Location
¤ Press the vmenu key in idle status ¤Touch Settings in the right-hand side of the header to switch to the Settings menu page.
|
Æ |
|
|
¤Touch the |
+Location icon. |
|
Language |
16
Display pages
Display pages
Idle display (individually customisable)
You can customise the idle display to suit your needs. Bring together the key applications you want to start up directly from idle status with a single "touch". By default, the date and time are displayed and quick access to call lists and contacts is possible.
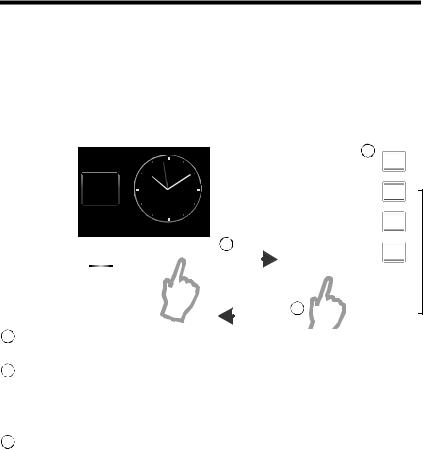
Changing the idle display
|
|
|
|
Idle status |
|
|
|
|
|
|
|
|
|
|
|
|
|
|
Configuration mode |
|
|
|
|||||
|
|
|
|
|
|
|
|
|
|
|
|
|
|
|
|
|
|
|
|
|
|
|
|
|
|
|
|
|
|
|
|
Ð |
Ã Þ ò ô ó V |
|
|
|
|
|
|
|
|
|
|
|
|
|
|
|
Show Applications |
|
|
|
|||
|
|
|
|
|
|
|
|
|
|
|
|
|
|
|
|
|
|
|
|
|
|
|
|
|
|||
|
|
|
|
|
|
|
|
|
|
|
|
|
|
|
|
|
|
|
|
|
|
|
|
|
|
|
|
Information |
|
|
|
|
|
|
|
|
|
|
|
|
|
|
|
|
|
|
|
|
l |
Time |
2 |
|
|
|
|
|
|
|
|
|
|
|
|
|
|
|
|
|
|
|
|
|
|
|
|
|
‰ |
|
|
||||
area |
|
|
|
|
|
|
|
|
|
|
|
|
|
|
|
|
|
|
|
|
|
|
|
|
|||
|
|
|
|
|
|
|
|
|
|
|
|
|
|
|
|
|
|
|
|
|
|
|
|||||
(configurable |
|
|
|
Apr |
|
|
|
|
|
|
|
|
|
|
|
|
|
|
|
|
|
|
|
|
|
|
|
|
|
|
|
|
|
|
|
|
|
|
|
|
|
|
Ù |
Alarm |
|
|
|
|
|
||||||
with a maxi- |
|
|
26 |
|
|
|
|
|
|
|
|
|
|
|
|
|
|
|
|
|
|
|
|
||||
mum of 3 ele- |
|
|
|
Thu |
|
|
|
|
|
|
|
|
|
|
|
|
|
|
|
|
|
|
|
|
|
||
ments) |
|
|
|
|
|
|
|
|
|
|
|
|
|
|
|
|
|
|
|
|
Calendar |
|
|
|
|
|
|
Application |
|
|
|
|
|
|
|
|
|
|
|
|
|
|
|
|
|
|
|
|
|
|
‰ |
|
|
||
|
|
|
|
|
|
|
|
|
|
|
|
|
|
|
|
|
|
|
|
|
|
|
|
||||
|
|
|
|
|
|
|
|
|
|
|
|
|
|
|
|
|
|
|
|
|
|
|
|
||||
area |
|
|
|
|
|
|
1 |
|
|
|
|
|
|
|
|
|
|
|
|
|
|
|
|
|
|
||
|
|
|
 |
|
|
|
|
|
|
|
|
|
|
|
|
 |
Contacts |
|
|
‰ |
|
||||||
(configurable |
|
|
|
|
|
|
|
|
|
|
|
|
|
|
|
|
|
|
|
|
|
|
|
|
|
||
with a maxi- |
|
|
|
|
|
|
|
|
|
|
|
|
|
|
|
|
|
|
|
|
|
|
|
|
|
|
|
mum of 6 ele- |
|
|
˜ |
|
|
Touch and |
|
L |
|
|
|
|
|
||||||||||||||
ments) |
|
|
|
hold |
|
|
|
|
|
|
|||||||||||||||||
|
|
|
|
|
|
|
|
|
|
|
|
|
|
|
|
|
|
|
|
|
|
|
|
|
|
|
|
|
|
|
|
|
|
|
|
|
|
|
|
|
|
|
|
|
|
|
|
|
3 |
|
Scroll bar |
||||
|
|
|
|
|
|
|
|
|
|
|
|
|
|
|
|
|
|
|
|
|
|
||||||
1  Switch to configuration mode:
Touch and hold (approx. 2 seconds) any free position on the configurable area on the display.
2  Select the desired applications/functions:
A selection bar with the available functions/applications is displayed. You can scroll through the list to display further entries. To do so, slide your finger vertically over the display while pressing down. Highlight the functions/applications you wish to see on your idle display by touching the relevant fields.
3  Return to the idle display:
Touch ‘or briefly touch the end call key a. Your selection is saved.
Selectable applications and functions
For the information area m Time (¢ page 11)
Ü Alarm (¢ page 55)
} Calendar (¢ page 54)
For the application area
œ Contacts (¢ page 49)
— Call List (¢ page 53)
‡ Internal Call (¢ page 45)
· Write SMS (¢ page 57)
Ç Baby Phone (¢ page 56)
T One Touch Call (¢ page 27)
3 Call Divert and Notifications (¢ page 30, ¢ page 30)
17
Display pages
Menu pages *
"Applications" "Settings"
|
Applications |
Settings |
|
Applications |
Settings |
|
Applications |
Settings |
|
|
|
|
|
|
|
|
|
Á |
ž |
|
|
|
|
|
|
|
|
|
|
ã |
|
í |
|
|
Š |
á |
ï |
i |
|
||||||||||||
Baby |
1 Touch |
Divert |
|
|
Date + |
Audio |
Display |
|
|
|
Select |
Call Pro- |
Quick |
|
||
Phone |
Call |
|
|
|
Time |
Settings |
|
|
|
|
|
Services |
tection |
Dial |
|
|
|
Ù |
¾ |
|
|
|
|
|
|
|
|
|
|
|
|
|
|
Æ |
Î |
Ï |
|
|
|
|
ª |
Ë |
» |
|
||||||
Calendar |
Alarm |
Write |
|
|
Language |
HS + |
System |
|
|
Tele- |
SMS |
Blue- |
|
|||
|
|
SMS |
|
|
+Location |
Base |
|
|
|
|
|
phony |
|
tooth |
|
|
˜ |
 |
å |
ã |
|
í |
|
|
|
|
Ì |
n |
|
|
|||
|
|
|
|
|
|
|||||||||||
Call List |
Contacts |
Internal |
|
|
Select |
Call Pro- |
Quick |
Answer |
Network |
|
|
|||||
|
|
Call |
|
|
Services |
tection |
Dial |
Machine |
Mailbox |
|
|
|||||
|
|
|
|
|
|
|
|
|
|
|
|
|
|
|
|
|
Start telephone applications |
|
Adapt telephone settings to suit your |
|
|
Gigaset S820A only |
|
||||||||||
|
|
|
|
|||||||||||||
|
|
|
|
|
|
|||||||||||
requirements
Switching from the idle display to the Applications menu page and back:
¤ Briefly press the vmenu key.
Switching between menu pages:
¤ Touch the desired page in the header.
Returning to the idle display from anywhere in the menu:
¤ Press the akey briefly.
If there are more elements than can be displayed at once:
A scroll bar will appear on the right of the display.
¤
*Please note: Applications/settings that are currently unavailable (e.g., because the handset is outside the range of the base) are greyed out.
18
Display pages
Messages page
You can call up the messages page by pressing the messages key don the keypad. You can access the following message lists:
u žAnswer machine list (Gigaset S820A only)
u 5Network mailbox, if your network provider supports this function and the number of the network mailbox is stored in your telephone
u ·SMS inbox
u ÕMissed calls list (see "Call list" ¢ page 53) u \Missed appointments list (¢ page 55) Messages page (example)
Message Centre
|
1 |
|
3 |
Number of new messages in the list |
|
¾ |
™ |
List type (see above) |
|||
|
|
||||
|
|
Number of old messages in the list |
|||
1 |
|
19 |
|
|
|
[ |
|
|
|
No new messages |
|
2 |
|
|
|
Number of old messages in the list |
|
|
|
|
|
The icon for the network mailbox is always displayed, provided the number is stored in the telephone. The other lists are only displayed if they contain messages.
¤Touch an icon to open the corresponding list.
Exception: If you touch the icon for the network mailbox, your telephone will dial the number for the network mailbox (¢ page 43). No list will open on the display.
Message pop-up
An advisory tone sounds as soon as a new entry arrives in a list. The message key also flashes (if activated,
¢ page 34). The message pop-up is displayed and partially covers the idle display.
The number of new messages in each list is displayed beneath the icons.
¤Close the pop-up: Touch é(top right).
¤Open the list: Touch the relevant list icon.
If the network mailbox has been configured: Touching 6opens the message page rather than a list.
¢page 34),The messages LED flashes (if activated,
until you have opened a list or the messages page.
Message pop-up (example)
À
You received:
Ù ¾
1 |
3 |
1 |
2 |
 Answer machine and/or Network mailbox
19

Display pages
List entry
The following information is displayed in the list entries: u The list type (in the header)
uIcon for the type of entry:
-Call list: ™(Missed), ›(Accepted), š(Outgoing), Ã(Call on the answer machine, Gigaset S820A only)
-SMS list: Œ(unread), †(read)
-Answer machine list: Ã(call on the
answer machine)
The icon is red for new (unread) entries.
uCaller’s number. The caller’s name and number type (Home, Office, Mobile) is displayed instead if the caller’s number is stored in the contacts. For missed calls, the number of calls from this number is also shown in square brackets.
u Date and time of call (if set).
Call list (example)
Missed Calls
ýJames Foster
™18:30, Home
™11.06., 18:30
01712233445566
|
L |
Show |
Show |
|
|
all |
by type |
|
|
|
|
|
|
|
Open the detail view: Touch an entry. The display shows all the available information. The message is played back in the answer machine list. The SMS text is displayed in the SMS inbox list. You can delete the entry or copy the number for the entry to the contacts (¢ page 52).
Call back a caller from the calls list: In the detail view, briefly touch the name or number.
Please note
If you press the ckey after you have opened a list, the number for the entry marked by a green dot is dialled.
Deleting lists
You can delete the entire contents of the individual lists:
Menu key v¤ Settings menu page ¤ ÊSystem ¤ Clean-up List ¤Touch the desired list
¤Touch the desired list type ¤Touch Yes to confirm.
20

Status bar and status page
The top line in the idle display is called the status bar. It shows the phone's current settings and operating state (meaning of the icons, ¢ page 64).
You can change the settings for ECO DECT (¹), the answer machine of the Gigaset S820A and the Bluetooth interface via the status bar.
¤Touch the status bar to open the status page.
¤Touch the keys to activate or deactivate components.
¤If you touch Answer Machine or Bluetooth, a page (submenu) will open where you can adjust the settings for that component.
¤Touch the W icon in the header or press the end call/ end key ato return to the idle display.
Display pages
ÐÃ Þ ò ô ó V
W
Max. Range  on
on
¹
No Radiation
off
à Answer Machine
on
ò Bluetooth
on
21

Using the telephone
Using the telephone
The Gigaset S820/S820A has a unique operating concept. It combines the benefits of the touchscreen with those of a conventional keypad. You navigate around the menu settings and applications and activate/deactivate functions via the touchscreen and can enter numbers and letters via the keypad.
Switching the handset on/off
¤Press and hold the end call key ain idle status to switch the handset off. You will hear a melody.
¤Press and hold the end call key aagain to switch the handset on again.
Returning to idle status
¤Briefly press the end call key a.
Or:
¤If you do not press any key and do not touch the display, the display automatically reverts to idle status after approximately three minutes.
Keypad and display lock
The keypad and display lock prevents the phone being operated unintentionally. If you touch the display when the lock is activated, nothing happens. A corresponding message will appear if you press a key.
Activating/deactivating the keypad and display lock
¤ Press and hold the #key to activate or deactivate the lock.
If a call is signalled on the handset, the keypad/display lock automatically deactivates and you can accept the call. The lock reactivates once the call has finished.
Activating/deactivating the automatic display lock
The display is automatically locked during a call or when listening to the answer machine to prevent inadvertent operation. You can briefly deactivate the lock (for 5 seconds) to operate the telephone via the display. The lock then reactivates automatically.
To unlock slide across the display from left to right, pressing down on the bottom line.
|
] |
|
Slide |
|
to |
|
unlock |
|
|
^ |
|
|
|
|
|
|
|
|
|
|
|
Unlocked |
|
|
|
^ |
|
|
||||
|
|
|
|
|
|
|
|
|
|
|
|
|
|
|
|
|
|
|
|
|
|
|||||||||||
|
|
|
|
|
|
|
|
|
|
|
|
|
|
|
|
|
|
|
|
|
|
|||||||||||
|
|
|
|
|
|
|
|
|
|
|
|
|
|
|
|
|
|
|
|
|
|
|
|
|
|
|
|
|
|
|
|
|
|
|
|
|
|
|
|
|
|
|
|
|
|
|
|
|
|
|
|
|
|
|
|
|
|
|
|
|
|
|
|
|
|
Please note
When the keypad lock is active, you cannot call emergency numbers.
22

Using the telephone
Operating the touchscreen
You operate the handset mainly via the display.
Icons, list entries, switches and selection areas shown on the display are touch sensitive areas. Touching these areas allows you to set and start functions and navigate between the various display screens (pages).
Selecting functions/list entries
Touch a list entry or the corresponding icon to select the list item (contacts, submenu, call lists) or to activate/deactivate a function.
Scrolling in lists and menus (scrolling vertically)
If there are more elements than those shown, a scroll bar appears on the right of the display. This shows the size and position of the visible section.
Slide vertically over the display while pressing down to scroll through the display.
Changing settings (user interface elements)
Touch an icon on one of the menu pages to open the corresponding application/function. The display shows the adjustable parameters and their current settings (marked orange), selection options or switches for activating/deactivating an application/function.
Examples:
Ringtones (Handset)
Volume
|
|
|
|
|
|
|
Crescendo |
|
|
|
|
off |
|
|
|
|
|
|
|
Current setting for Internal Calls |
Internal Calls |
|
|
|
16 Mellow |
|
|
||
|
|
|
|
|
|
|
|
|
|
Current setting for External Calls |
External Calls |
|
|
|
06 Gigaset |
|
|
||
|
|
|
|
|
L
Function
Adjust setting
(touch Ó/Ô) Switch:
Activate/deactivate the function
Call up submenus to adjust
settings
Return to previous display
view; settings are saved
Switch: Switching functions on/off (activating/deactivating) or selecting functions
Touch the switch briefly to activate/deactivate or select/ deselect functions.
The function is activated or selected if the switch is orange (text on) or the switch is light grey (‰icon).
Activated/ |
on |
‰ |
selected |
or
Deactivated/ deselected off
23
Using the telephone
Selection fields
If two or three alternative settings are available for one parameter, these alternatives are displayed in the form of selection fields. The current setting appears in orange.
¤To change it, briefly touch the selection field you require.
Call Divert selection field (example)
Call |
SMS |
Divert |
Notification |
|
|
Opening the sub-menu to set a parameter
¤ Briefly touch the parameter field to open the submenu.
Options and options bar
Many displays have an options bar at the bottom. This displays all the actions that you can apply in the current context.
¤Touch an option to perform the corresponding action or touch Options to display a list of further options.
Return to the previous display
You will see the ‘icon on many pages.
¤ Touch the icon to return to the previous display page.
Entering numbers and text
Use the keypad to enter characters.
When numerous number and/or text fields are displayed (e.g., First Name and Surname in a contacts entry), the first field is automatically activated. You need to touch any subsequent fields to activate them. A field is activated when the flashing cursor appears in the field.
Correcting incorrect entries
Briefly touch $to delete the character in front of the cursor.
Touch and hold $to delete the word in front of the cursor.
Options bar (example)
|
|
|
|
|
h |
Conf- |
Options |
|
erence |
|
|
|
|
|
|
|
|
|
|
Edit
First Name
James 
Surname
Abc 123 ;-@ ç
L ‰
24
Using the telephone
Entering text
uEach key between 0and Ois assigned several letters and characters. The characters are displayed in a selection line at the bottom of the screen when you press a key. The selected character is highlighted. Briefly press the key several times in succession to select the required letter/character.
uThe letter/characters are inserted at the cursor position. You can move the cursor by touching the desired position in the input field.
u Touch the Abc§ field to switch between lower and upper case for the subsequent letters.
uWhen editing a contact entry, the first letter and each letter following a space is automatically in upper case.
uTouch §123§ if you want to enter a digit. Touch §Abc§ to return to the letter keypad (upper/lower case).
u Touch §;-@§ to open the table with special characters. Touch the desired character to enter it.
uYou can enter special characters (marked/diacritical characters e.g., umlauts) by pressing the corresponding key repeatedly; see character set tables ¢ page 78.
25

Making calls
Making calls
Making an external call
¤ Enter the number and briefly press c.
Or:
¤ Press and hold c; enter number. You can cancel dialling by pressing a.
Dialling with the redial list
¤Briefly press c to open the redial list. You have the following options:
¤Press c. The phone dials the last dialled number (marked with a green dot).
Or:
¤Touch an entry to open the detail view.
¤Press c. The number of the entry marked with the green dot is dialled.
Or:
¤Touch the desired number.
Please note
The redial list contains the last twenty numbers dialled with this handset. You can manage them in the same way as the message lists on your telephone:
¤Open the detail view: Touch the entry. The display shows all the available information.
In the detail view, you can delete the entry or add the number to the contacts (¢ page 52).
Dialling from the call list
Menu key v¤ —Call List
You have the following options:
¤Press c. The number of the entry marked with the green dot is dialled.
Or:
¤ Touch an entry to open the detail view.
¤ Press c. The phone dials the last dialled number
(marked with a green dot).
Or:
¤ Touch the field with the green dot.
-No entry in contacts: The number is dialled.
-Entry incontacts: Detail view opens.
¤ Press . The phone dials the last dialled number
(marked with a green dot).
Or:
¤Touch the desired number.
Call list (example)
All Calls
ýJames Foster
™18:30, Home
01712233445566
™11.06., 18:30
š10.06., 17:13
0168123477945
|
L |
Show |
Show |
|
|
all |
by type |
|
|
|
|
|
|
|
26
 Loading...