


GIGASET SL910A
Congratulations
By purchasing a Gigaset, you have chosen a brand that is fully committed
to sustainability. This product’s packaging is eco-friendly!
To learn more, visit www.gigaset.com.


1
Gigaset SL910/SL910A – with the special "touch"
Gigaset SL910/SL910A – with the special "touch"
Congratulations on your purchase of the first Gigaset with touchscreen. This phone sets new
standards with its high-quality genuine metal frame, 3.2" TFT colour touchscreen and excel-
lent sound quality and, last but by no means least, its impressive interior qualities. Your Gigaset
can do a lot more than just make calls:
For more information about your phone, visit www.gigaset.com/gigasetsl910
After purchasing your Gigaset phone, please register it at www.gigaset.com/service
– this
will ensure any questions you may have or warranty services you request are dealt with even
faster!
If you have any questions about using your phone, please read the tips on troubleshooting
(
¢ page 83) or contact our Service team (¢ page 82).
Have fun using your new phone!
Set up one of the three home screens according to your needs
Bring together the important functions and numbers, which you can start up or call directly
from idle status with a single "touch" (
¢ page 72).
Customise
Give each caller his own personal portrait (¢ page 46), look at your personal pictures as a
screensaver slide show (
¢ page 75) and load the ringtones you want onto your handset
(
¢ page 87).
Make sure your phone is always up-to-date
Use the base's Ethernet connection to download new and expanded versions of the base
firmware directly from the Internet (
¢ page 85).
You can load new handset software from your PC to the handset using our Gigaset QuickSync
software (
¢ page 87).
Other practical information
Copy directories from existing Gigaset handsets (¢page 48), use the QuickDial function
(
¢ page 74), adapt your Gigaset to your handsfree needs (¢ page 76). Use the silent alert
(
¢ page 77), the time control for calls (¢ page 77) and much more...
Gigaset service contact numbers:
For personal advice on our range of products and for repairs or guarantee/warranty claims call:
Service Centre UK: 08453 6708 12
(local call cost charge)
Please have your proof of purchase ready when calling.

2
Gigaset SL910/SL910A – with the special "touch"
Important information:
This user guide describes the functions of the SL910/SL910A as supplied.
Some of the functions are only available after you have carried out a firmware
update for the base (
¢ page 85) and for the handset (¢ page 87).
These functions are marked with * in the user guide.

3
Contents
Contents
Gigaset SL910/SL910A – with the special "touch" . . . . . . . . . . . . . . . . . . . . 1
Overview of handset . . . . . . . . . . . . . . . . . . . . . . . . . . . . . . . . . . . . . . . . . . . . . . . 7
The base at a glance . . . . . . . . . . . . . . . . . . . . . . . . . . . . . . . . . . . . . . . . . . . . . . . 8
Display icons . . . . . . . . . . . . . . . . . . . . . . . . . . . . . . . . . . . . . . . . . . . . . . . . . . . . . . 8
Safety precautions . . . . . . . . . . . . . . . . . . . . . . . . . . . . . . . . . . . . . . . . . . . . . . . 11
First steps . . . . . . . . . . . . . . . . . . . . . . . . . . . . . . . . . . . . . . . . . . . . . . . . . . . . . . . . 12
Checking the package contents . . . . . . . . . . . . . . . . . . . . . . . . . . . . . . . . . . . . . . . . . . . . . . 12
Installing the base and charger . . . . . . . . . . . . . . . . . . . . . . . . . . . . . . . . . . . . . . . . . . . . . . . 12
Connecting the base with the phone network and the mains power supply . . . . 13
Wall mounting of the base (optional) . . . . . . . . . . . . . . . . . . . . . . . . . . . . . . . . . . . . . . . . . 14
Connecting the handset charger . . . . . . . . . . . . . . . . . . . . . . . . . . . . . . . . . . . . . . . . . . . . . 14
Setting up the handset for use . . . . . . . . . . . . . . . . . . . . . . . . . . . . . . . . . . . . . . . . . . . . . . . 15
Setting up the base and handset – installation wizard . . . . . . . . . . . . . . . . . . . . . . . . . 17
Handset in idle status . . . . . . . . . . . . . . . . . . . . . . . . . . . . . . . . . . . . . . . . . . . . . . . . . . . . . . . . 21
Using the phone . . . . . . . . . . . . . . . . . . . . . . . . . . . . . . . . . . . . . . . . . . . . . . . . . 22
Activating/deactivating the handset . . . . . . . . . . . . . . . . . . . . . . . . . . . . . . . . . . . . . . . . . . 22
Operating the touchscreen . . . . . . . . . . . . . . . . . . . . . . . . . . . . . . . . . . . . . . . . . . . . . . . . . . . 22
Handset idle display . . . . . . . . . . . . . . . . . . . . . . . . . . . . . . . . . . . . . . . . . . . . . . . . . . . . . . . . . 23
Using the menus . . . . . . . . . . . . . . . . . . . . . . . . . . . . . . . . . . . . . . . . . . . . . . . . . . . . . . . . . . . . . 24
Scrolling through lists (vertical scrolling) . . . . . . . . . . . . . . . . . . . . . . . . . . . . . . . . . . . . . . 26
Options . . . . . . . . . . . . . . . . . . . . . . . . . . . . . . . . . . . . . . . . . . . . . . . . . . . . . . . . . . . . . . . . . . . . . . 26
Entering numbers and text, incorrect entries . . . . . . . . . . . . . . . . . . . . . . . . . . . . . . . . . . 27
Returning to idle status . . . . . . . . . . . . . . . . . . . . . . . . . . . . . . . . . . . . . . . . . . . . . . . . . . . . . . 29
Returning to the previous display page . . . . . . . . . . . . . . . . . . . . . . . . . . . . . . . . . . . . . . . 29
Activating/deactivating key and display lock . . . . . . . . . . . . . . . . . . . . . . . . . . . . . . . . . . 29
Menu tree . . . . . . . . . . . . . . . . . . . . . . . . . . . . . . . . . . . . . . . . . . . . . . . . . . . . . . . 30
Applications menu . . . . . . . . . . . . . . . . . . . . . . . . . . . . . . . . . . . . . . . . . . . . . . . . . . . . . . . . . . 30
Settings menu . . . . . . . . . . . . . . . . . . . . . . . . . . . . . . . . . . . . . . . . . . . . . . . . . . . . . . . . . . . . . . . 31
Making calls . . . . . . . . . . . . . . . . . . . . . . . . . . . . . . . . . . . . . . . . . . . . . . . . . . . . . 36
Making an external call . . . . . . . . . . . . . . . . . . . . . . . . . . . . . . . . . . . . . . . . . . . . . . . . . . . . . . . 36
Accepting a call . . . . . . . . . . . . . . . . . . . . . . . . . . . . . . . . . . . . . . . . . . . . . . . . . . . . . . . . . . . . . . 36
Call display . . . . . . . . . . . . . . . . . . . . . . . . . . . . . . . . . . . . . . . . . . . . . . . . . . . . . . . . . . . . . . . . . . 37
Notes on phone number display (CLIP) . . . . . . . . . . . . . . . . . . . . . . . . . . . . . . . . . . . . . . . 37
Handsfree mode . . . . . . . . . . . . . . . . . . . . . . . . . . . . . . . . . . . . . . . . . . . . . . . . . . . . . . . . . . . . . 38
Switching to mute . . . . . . . . . . . . . . . . . . . . . . . . . . . . . . . . . . . . . . . . . . . . . . . . . . . . . . . . . . . 38
Security check . . . . . . . . . . . . . . . . . . . . . . . . . . . . . . . . . . . . . . . . . . . . . . . . . . . . . . . . . . . . . . . 38
Making calls via network services . . . . . . . . . . . . . . . . . . . . . . . . . . . . . . . . . 39
Network services for subsequent calls . . . . . . . . . . . . . . . . . . . . . . . . . . . . . . . . . . . . . . . . 39
Network services during an external call . . . . . . . . . . . . . . . . . . . . . . . . . . . . . . . . . . . . . . 40

4
Contents
Using lists . . . . . . . . . . . . . . . . . . . . . . . . . . . . . . . . . . . . . . . . . . . . . . . . . . . . . . . 42
Redial list . . . . . . . . . . . . . . . . . . . . . . . . . . . . . . . . . . . . . . . . . . . . . . . . . . . . . . . . . . . . . . . . . . . . 42
Text Messages Inbox . . . . . . . . . . . . . . . . . . . . . . . . . . . . . . . . . . . . . . . . . . . . . . . . . . . . . . . . 42
Answering machine list (Gigaset SL910A only) . . . . . . . . . . . . . . . . . . . . . . . . . . . . . . . . 42
Call lists . . . . . . . . . . . . . . . . . . . . . . . . . . . . . . . . . . . . . . . . . . . . . . . . . . . . . . . . . . . . . . . . . . . . . 42
Missed appointments list . . . . . . . . . . . . . . . . . . . . . . . . . . . . . . . . . . . . . . . . . . . . . . . . . . . . . 43
Opening lists via the message page in the idle display . . . . . . . . . . . . . . . . . . . . . . . . 44
Deleting lists . . . . . . . . . . . . . . . . . . . . . . . . . . . . . . . . . . . . . . . . . . . . . . . . . . . . . . . . . . . . . . . . . 44
Configuring the display of new messages . . . . . . . . . . . . . . . . . . . . . . . . . . . . . . . . . . . . . 44
Using Contacts . . . . . . . . . . . . . . . . . . . . . . . . . . . . . . . . . . . . . . . . . . . . . . . . . . 45
Opening Contacts (list of Contacts entries) . . . . . . . . . . . . . . . . . . . . . . . . . . . . . . . . . . . . 45
Creating a new entry in Contacts . . . . . . . . . . . . . . . . . . . . . . . . . . . . . . . . . . . . . . . . . . . . . 46
Order of Contacts entries . . . . . . . . . . . . . . . . . . . . . . . . . . . . . . . . . . . . . . . . . . . . . . . . . . . . . 46
Selecting a Contacts entry, navigating in Contacts . . . . . . . . . . . . . . . . . . . . . . . . . . . . 46
Dialling with Contacts . . . . . . . . . . . . . . . . . . . . . . . . . . . . . . . . . . . . . . . . . . . . . . . . . . . . . . . . 47
Managing Contacts entries . . . . . . . . . . . . . . . . . . . . . . . . . . . . . . . . . . . . . . . . . . . . . . . . . . . 47
Transferring an entry/Contacts to another handset . . . . . . . . . . . . . . . . . . . . . . . . . . . . 48
Transferring Contacts as a vCard with Bluetooth . . . . . . . . . . . . . . . . . . . . . . . . . . . . . . 48
Receiving a vCard with Bluetooth . . . . . . . . . . . . . . . . . . . . . . . . . . . . . . . . . . . . . . . . . . . . . 49
Adding a displayed number to Contacts . . . . . . . . . . . . . . . . . . . . . . . . . . . . . . . . . . . . . . 49
Copying a number from Contacts . . . . . . . . . . . . . . . . . . . . . . . . . . . . . . . . . . . . . . . . . . . . 49
Reminder call on an anniversary . . . . . . . . . . . . . . . . . . . . . . . . . . . . . . . . . . . . . . . . . . . . . . 49
Sending and receiving SMS messages (text messages) . . . . . . . . . . . . 50
Writing/sending SMS . . . . . . . . . . . . . . . . . . . . . . . . . . . . . . . . . . . . . . . . . . . . . . . . . . . . . . . . 50
Receiving SMS . . . . . . . . . . . . . . . . . . . . . . . . . . . . . . . . . . . . . . . . . . . . . . . . . . . . . . . . . . . . . . . 50
Setting up the SMS centre . . . . . . . . . . . . . . . . . . . . . . . . . . . . . . . . . . . . . . . . . . . . . . . . . . . . 52
SMS on a PABX . . . . . . . . . . . . . . . . . . . . . . . . . . . . . . . . . . . . . . . . . . . . . . . . . . . . . . . . . . . . . . . 52
Activating/deactivating the SMS function . . . . . . . . . . . . . . . . . . . . . . . . . . . . . . . . . . . . . 52
SMS troubleshooting . . . . . . . . . . . . . . . . . . . . . . . . . . . . . . . . . . . . . . . . . . . . . . . . . . . . . . . . 53
Operating the Gigaset SL910A base answering machine . . . . . . . . . . . 54
Operating via the handset . . . . . . . . . . . . . . . . . . . . . . . . . . . . . . . . . . . . . . . . . . . . . . . . . . . . 54
Activating/deactivating call screening on a handset . . . . . . . . . . . . . . . . . . . . . . . . . . . 56
Activating/deactivating playback of the recording time . . . . . . . . . . . . . . . . . . . . . . . 57
Setting the recording parameters . . . . . . . . . . . . . . . . . . . . . . . . . . . . . . . . . . . . . . . . . . . . 57
Operating when on the move (remote operation) . . . . . . . . . . . . . . . . . . . . . . . . . . . . . 57
Using the network mailbox . . . . . . . . . . . . . . . . . . . . . . . . . . . . . . . . . . . . . . . 59
Playing back network mailbox messages . . . . . . . . . . . . . . . . . . . . . . . . . . . . . . . . . . . . . 59
Using Bluetooth devices . . . . . . . . . . . . . . . . . . . . . . . . . . . . . . . . . . . . . . . . . 60
ECO DECT: reducing energy consumption and radiation . . . . . . . . . . . 62
Using a handset as a room monitor . . . . . . . . . . . . . . . . . . . . . . . . . . . . . . . 63
Setting an appointment (calendar) . . . . . . . . . . . . . . . . . . . . . . . . . . . . . . . 65
Displaying missed appointments, anniversaries . . . . . . . . . . . . . . . . . . . . . . . . . . . . . . . 66
Setting a reminder call . . . . . . . . . . . . . . . . . . . . . . . . . . . . . . . . . . . . . . . . . . . . . . . . . . . . . . . 66

5
Contents
Setting the alarm . . . . . . . . . . . . . . . . . . . . . . . . . . . . . . . . . . . . . . . . . . . . . . . . 67
Screensaver, caller pictures and sound pool . . . . . . . . . . . . . . . . . . . . . . . 67
Using multiple handsets . . . . . . . . . . . . . . . . . . . . . . . . . . . . . . . . . . . . . . . . . 68
Registering handsets . . . . . . . . . . . . . . . . . . . . . . . . . . . . . . . . . . . . . . . . . . . . . . . . . . . . . . . . . 68
De-registering handsets . . . . . . . . . . . . . . . . . . . . . . . . . . . . . . . . . . . . . . . . . . . . . . . . . . . . . . 69
Locating a handset ("paging") . . . . . . . . . . . . . . . . . . . . . . . . . . . . . . . . . . . . . . . . . . . . . . . . 69
Changing the base . . . . . . . . . . . . . . . . . . . . . . . . . . . . . . . . . . . . . . . . . . . . . . . . . . . . . . . . . . . 70
Changing the name of a handset . . . . . . . . . . . . . . . . . . . . . . . . . . . . . . . . . . . . . . . . . . . . . 70
Making internal calls . . . . . . . . . . . . . . . . . . . . . . . . . . . . . . . . . . . . . . . . . . . . . . . . . . . . . . . . . 70
Listening in to an external call . . . . . . . . . . . . . . . . . . . . . . . . . . . . . . . . . . . . . . . . . . . . . . . . 71
Setting up the handset . . . . . . . . . . . . . . . . . . . . . . . . . . . . . . . . . . . . . . . . . . . 72
Quick access to functions, QuickDial –
customising your own idle display page . . . . . . . . . . . . . . . . . . . . . . . . . . . . . . . . . . . . . . 72
Changing the display language . . . . . . . . . . . . . . . . . . . . . . . . . . . . . . . . . . . . . . . . . . . . . . 74
Setting the country and your own area code . . . . . . . . . . . . . . . . . . . . . . . . . . . . . . . . . . 74
Configuring the keyboard/keypad . . . . . . . . . . . . . . . . . . . . . . . . . . . . . . . . . . . . . . . . . . . . 75
Setting the display . . . . . . . . . . . . . . . . . . . . . . . . . . . . . . . . . . . . . . . . . . . . . . . . . . . . . . . . . . . 75
Activating/deactivating auto answer . . . . . . . . . . . . . . . . . . . . . . . . . . . . . . . . . . . . . . . . . 76
Changing the earpiece, handsfree and headset volume . . . . . . . . . . . . . . . . . . . . . . . 76
Setting a handsfree profile . . . . . . . . . . . . . . . . . . . . . . . . . . . . . . . . . . . . . . . . . . . . . . . . . . . 76
Setting ringtones . . . . . . . . . . . . . . . . . . . . . . . . . . . . . . . . . . . . . . . . . . . . . . . . . . . . . . . . . . . . 77
Activate/deactivate silent alert . . . . . . . . . . . . . . . . . . . . . . . . . . . . . . . . . . . . . . . . . . . . . . . 77
Activating/deactivating ringtone . . . . . . . . . . . . . . . . . . . . . . . . . . . . . . . . . . . . . . . . . . . . . 78
Activating/deactivating advisory tones . . . . . . . . . . . . . . . . . . . . . . . . . . . . . . . . . . . . . . . 78
Restoring the handset default settings . . . . . . . . . . . . . . . . . . . . . . . . . . . . . . . . . . . . . . . . 78
Setting up the base . . . . . . . . . . . . . . . . . . . . . . . . . . . . . . . . . . . . . . . . . . . . . . 79
Activating/deactivating music on hold . . . . . . . . . . . . . . . . . . . . . . . . . . . . . . . . . . . . . . . 79
Repeater support . . . . . . . . . . . . . . . . . . . . . . . . . . . . . . . . . . . . . . . . . . . . . . . . . . . . . . . . . . . . 79
Changing the system PIN . . . . . . . . . . . . . . . . . . . . . . . . . . . . . . . . . . . . . . . . . . . . . . . . . . . . . 79
Resetting the base to the default settings . . . . . . . . . . . . . . . . . . . . . . . . . . . . . . . . . . . . . 79
Connecting the base to the PABX . . . . . . . . . . . . . . . . . . . . . . . . . . . . . . . . . 80
Recall and dialling mode . . . . . . . . . . . . . . . . . . . . . . . . . . . . . . . . . . . . . . . . . . . . . . . . . . . . . 80
Saving an access code (outside line code) . . . . . . . . . . . . . . . . . . . . . . . . . . . . . . . . . . . . . 80
Setting pauses . . . . . . . . . . . . . . . . . . . . . . . . . . . . . . . . . . . . . . . . . . . . . . . . . . . . . . . . . . . . . . 80
Switching temporarily to tone dialling (Tone) . . . . . . . . . . . . . . . . . . . . . . . . . . . . . . . . . 81
Service (Customer Care) . . . . . . . . . . . . . . . . . . . . . . . . . . . . . . . . . . . . . . . . . . 82
Questions and answers . . . . . . . . . . . . . . . . . . . . . . . . . . . . . . . . . . . . . . . . . . . . . . . . . . . . . . 83
Exclusion of liability . . . . . . . . . . . . . . . . . . . . . . . . . . . . . . . . . . . . . . . . . . . . . . . . . . . . . . . . . . 84
Updating the base firmware . . . . . . . . . . . . . . . . . . . . . . . . . . . . . . . . . . . . . . 85
Connecting the base to the router/Internet (optional) . . . . . . . . . . . . . . . . . . . . . . . . . 85
Connecting the base to the local network (router) . . . . . . . . . . . . . . . . . . . . . . . . . . . . 85
Starting a firmware update . . . . . . . . . . . . . . . . . . . . . . . . . . . . . . . . . . . . . . . . . . . . . . . . . . . 86
Accessing additional functions via the PC interface . . . . . . . . . . . . . . . . 87

6
Contents
Checking base/handset service information . . . . . . . . . . . . . . . . . . . . . . . 88
Authorisation . . . . . . . . . . . . . . . . . . . . . . . . . . . . . . . . . . . . . . . . . . . . . . . . . . . . . . . . . . . . . . . . 88
Guarantee Certificate United Kingdom . . . . . . . . . . . . . . . . . . . . . . . . . . . . . . . . . . . . . . . 89
Guarantee Certificate Ireland . . . . . . . . . . . . . . . . . . . . . . . . . . . . . . . . . . . . . . . . . . . . . . . . . 90
Environment . . . . . . . . . . . . . . . . . . . . . . . . . . . . . . . . . . . . . . . . . . . . . . . . . . . . 91
Appendix . . . . . . . . . . . . . . . . . . . . . . . . . . . . . . . . . . . . . . . . . . . . . . . . . . . . . . . 92
Caring for your telephone . . . . . . . . . . . . . . . . . . . . . . . . . . . . . . . . . . . . . . . . . . . . . . . . . . . . 92
Contact with liquid . . . . . . . . . . . . . . . . . . . . . . . . . . . . . . . . . . . . . . . . . . . . . . . . . . . . . . . . . . 92
Specifications . . . . . . . . . . . . . . . . . . . . . . . . . . . . . . . . . . . . . . . . . . . . . . . . . . . . . . . . . . . . . . . . 92
Using Open Source software contained in the product . . . . . . . . . . . . . . 95
GNU General Public License (GPL) . . . . . . . . . . . . . . . . . . . . . . . . . . . . . . . . . . . . . . . . . . . . 95
GNU Lesser General Public License (LGPL) . . . . . . . . . . . . . . . . . . . . . . . . . . . . . . . . . . . . . 98
Index . . . . . . . . . . . . . . . . . . . . . . . . . . . . . . . . . . . . . . . . . . . . . . . . . . . . . . . . . . .102
7
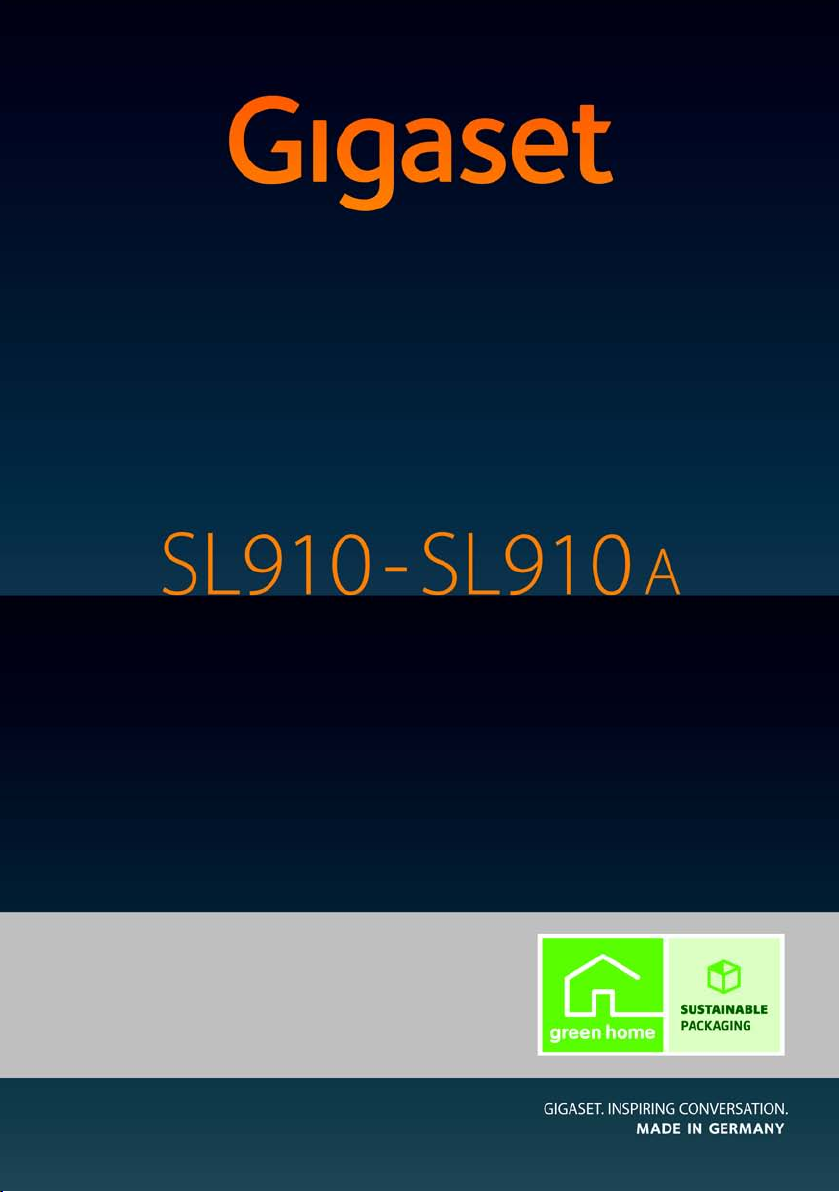
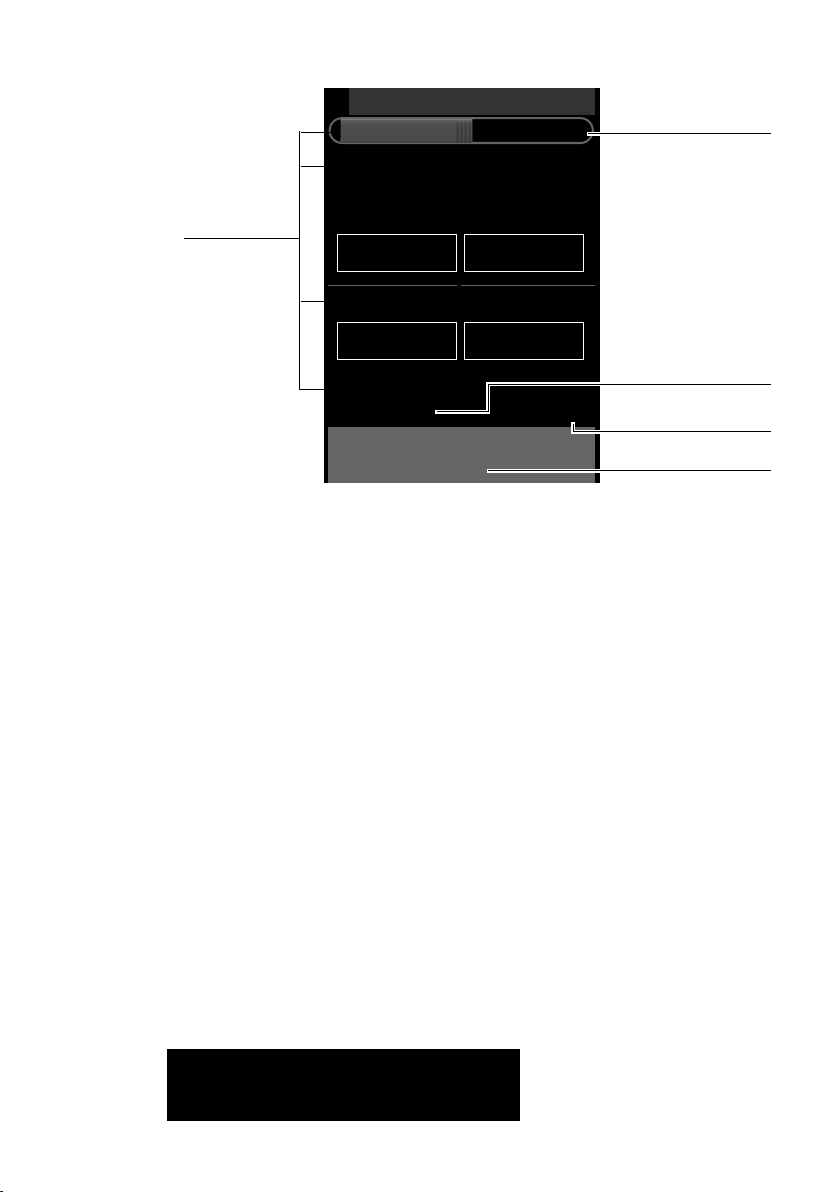
Overview of handset
Overview of handset
Status bar (¢page 24)
The internal handset name (e.g., INT 1) and icons
(¢page 8) that display the current settings and
the operating status of the phone
Touch the status bar to display the status page.
Navigation area (¢page 23)
Page position marker ,
change page
ê/ë.
Keypad
Numerical keypad to enter phone numbers
Å Ä Ä
v Menu key
Press briefly: open main menus (¢page 25)
Press and hold: key and display lock on/off
(
¢page 29)
Handset keys:
c Talk key
Dial displayed number, accept call
During a call/during playback of messages from
answering machine/when establishing a connec-
tion: switch between earpiece and handsfree mode
In idle status: open redial list (press briefly)
a End call/end key
Press briefly: end (active) call/paging call, reject
internal call
Switch off ringtone for external call
Otherwise: return to idle status
Press and hold: handset on/off
Touchscreen/display (¢ page 22)
Sample display: "dial page" for entering phone num-
bers in idle mode (one of three idle display pages;
¢page 23).
Option slider (¢ page 26)
Displays the possible actions
Ð INT 1
à òô
ó
¼
06:00
V
<
Å Ä Ä
>
ç
1 2 3
ABC DEF
4 5 6
GHI JKL MNO
7 8 9
PQRS TUV wxyz
*
0
#
˜
Âí å
Calls Contacts QuickDial Internal
Underside of the handset:
Mini USB connection socket
Connect wire-bound headset or handset to your PC
(Gigaset QuickSync)
Charging contacts
Message LED (¢page 44)
Proximity sensor (¢ page 29)
8
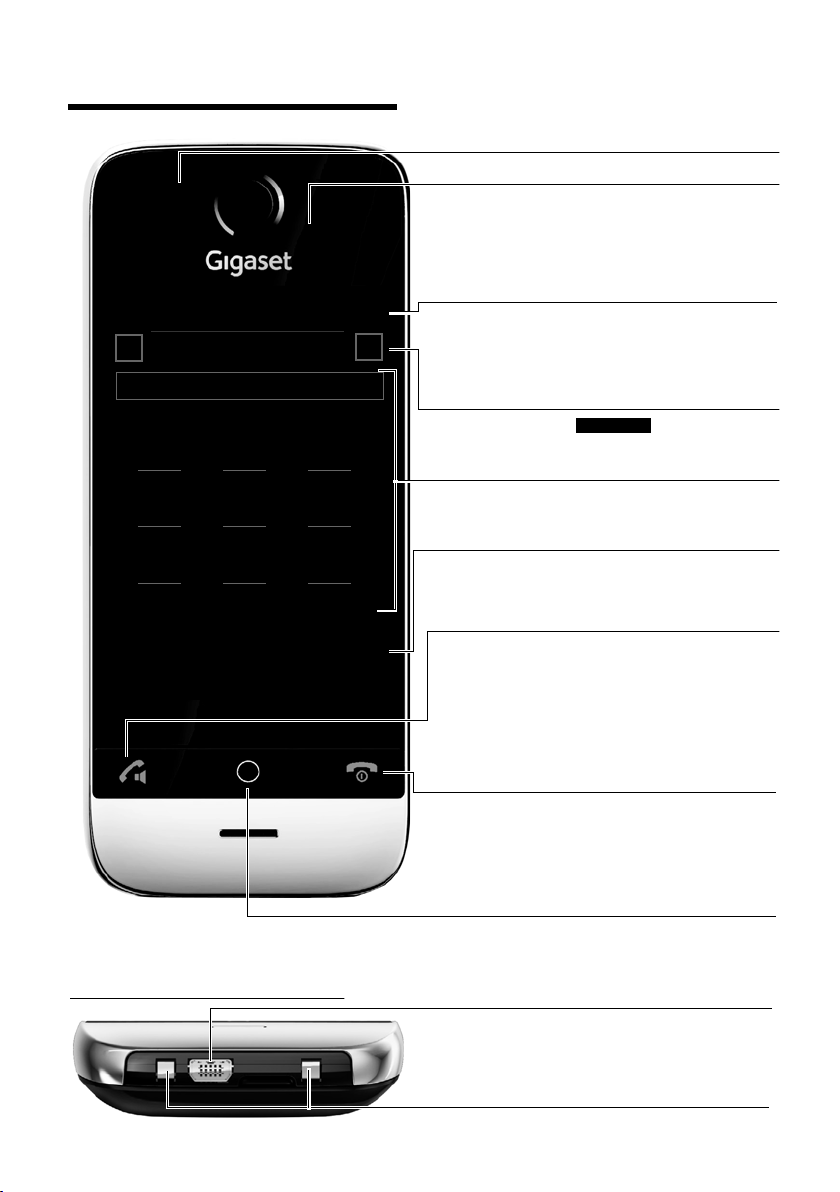
The base at a glance
The base at a glance
Display icons
Icons on the status bar
The following icons are displayed in the status bar depending on the settings and the operating
status of your telephone:
Paging key
Press briefly:
Start paging
Press and hold (approx. 3 seconds):
Set base to registration mode
Lights up:
LAN connection active (for firmware update only)
Icon Meaning
Signal strength (Eco Mode+ off)
76%–100%
51%–75%
26%–50%
1%–25%
Red: no connection to the base
Eco Mode+ on:
White if Eco Mode is off
Green if Eco Mode is on
Answering machine on (SL910A only)
Bluetooth on or
Bluetooth headset/data device con-
nected
Ringtone off
Alarm switched on and wake-up time
set
Ð
White if
Eco Mode is off
Green if
Eco Mode is on
}
i
Ñ
Ò
¹
¹
Ã
ò
ò ô
ó
¼ 06:00
Battery charge status:
{
White: charged over 66%
{
White: charged between 34%
and 66%
y
White: charged between 11%
and 33%
y
Red: charged below 11%
y
Flashing red: battery almost empty
(less than 10 minutes talktime)
Battery charging
(current charge status):
xy 0%–10%
xy 11%–33%
x{ 34%–66%
x{ 67%–100%
Icon Meaning
9
Display icons
Option slider icons
The functions on the option slider change depending on the operating situation.
*
* Important information: ¢ page 2
Icon Action
†
Activate handsfree mode
† (orange) (Handsfree mode is activated)
Deactivate handsfree mode
Ž
Handsfree profile
–
Deactivate handset microphone
– (orange) Reactivate handset microphone
”
Deactivate ringtone
R Set volume
—
Open call lists
œ
Open Contacts
¬
Copy number to Contacts
*Create SMS
*Send SMS
® *Reply to SMS
; *Open drafts list
ø
De-register handset
‡
Open list of internal callers/make
internal call
d
Create new Contacts entry
P Initiate consultation call
Initiate/end three-way
conference call
¥
QuickDial
:
Copy list
=
Copy entry
N
Edit entry
Q
Show keypad
m
¾
T
X
Determine free memory in the
resource directory
þ
Search
Skip settings
Delete
è
Save/select
n
Enter new appointment
>
Calendar: Set selected date
to To da y
Y
Change order (sort by last name
or first name)
÷
Contacts entry:
Delete caller ringtone assign-
ment
\
Contacts entry:
Delete caller picture assignment
þ
Delete anniversary
ÿ
Trust Bluetooth device found
Divert call to answering machine
û
Play messages
ý (red) Record announcement
ú
Stop recording
ö
For message playback: Go back
five seconds
ž
Initiate ringback
‰ (green) Accept waiting call
Please note
The menu icons can be found in the
menu overview on page 30.
Icon Action
õ
ü

10
Display icons
Other display icons:
Signalling icons
Establishing a connection
(outgoing call)
#
Connection established
Connection cannot be
established or connection
interrupted
Ø
w
Ú
Internal/external call
Ã
Answering machine
is recording
Ø
Ù
Ú
Alarm call
š b
Ø
á
Ú
Reminder call for appoint-
ment / anniversary
Information
-
(Security) prompt Please wait...
À
Action failed (red)
‰
Action complete (green)
,
Warning
+
11
Safety precautions
Safety precautions
Warning
Read the safety precautions and the user manual before use.
Explain their content and the potential hazards associated with using the telephone to your
children.
Use only the power adapter supplied, as indicated on the rear of the base.
Use only the supplied, original batteries (
¢ page 92) as this could otherwise result
in significant health risks and personal injury. Replacement batteries can be
obtained via the Gigaset Service Hotline.
Using your telephone may affect nearby medical equipment. Be aware of the tech-
nical conditions in your particular environment, e.g., doctor's surgery.
If you use a medical device (e.g., a pacemaker), please contact the device manufac-
turer. They will be able to advise you regarding the susceptibility of the device to
external sources of high frequency energy. Please refer to the "Appendix" chapter for
the specifications of this Gigaset product.
Do not hold the rear of the handset to your ear when it is ringing or when handsfree
mode is activated. Otherwise you risk serious and permanent damage to your hear-
ing.
Your Gigaset is compatible with the majority of digital hearing aids on the market.
However, perfect function with all hearing aids cannot be guaranteed.
The handset may cause interference in analogue hearing aids (humming or whis-
tling) or cause them to overload. If you require assistance, please contact the hearing
aid supplier.
Do not install the base or charger in bathrooms or shower rooms. The base and
charger are not splashproof (
¢ page 92).
Do not use your phone in environments with a potential explosion hazard (e.g., paint
shops).
If you give your phone to a third party, make sure you also give them the user guide.
Remove faulty bases from use or have them repaired by our Service team, as these
could interfere with other wireless services.
Please note
u Not all functions described in this user guide are available in all countries and with all net-
work providers.
u The device cannot be used in the event of a power failure. In this case, it is also not possi-
ble to transmit emergency calls.
$
ƒ

12
First steps
First steps
Checking the package contents
u One Gigaset SL910/SL910A base
u One power adapter for the base
u One phone cable (flattened)
u One Gigaset SL910H handset
u One battery cover (rear cover for the handset)
u One battery
u One charger
u One power adapter for the charger
u One user guide.
Installing the base and charger
The base and charger are designed for use in dry rooms in a temperature range of
+5°C to +45°C.
¤ Set up the base on a level, non-slip surface at a central point in the building or
mount the base on the wall (
¢ page 14).
The phone's feet do not usually leave any marks on surfaces. However, due to the
multitude of different varnishes and polishes used on today's furnishings, the
occurrence of marks on the surfaces cannot be completely ruled out.
Please note:
u Never expose the telephone to the effects of heat sources, direct sunlight or
other electrical devices.
u Protect your Gigaset from moisture, dust, corrosive liquids and fumes.
Please note
Pay attention to the range of the base.
This is up to 300 m in unobstructed outdoor areas and up to 50 m inside build-
ings. The range is reduced when Eco Mode is activated (
¢ page 62).
13
First steps
Connecting the base with the phone network and the mains
power supply
Please note:
u The power adapter must always be connected, as the phone will not operate
without a power supply.
u Use only the power adapter and phone cord supplied. Pin connections on tele-
phone cables can vary (pin connections,
¢ page 94).
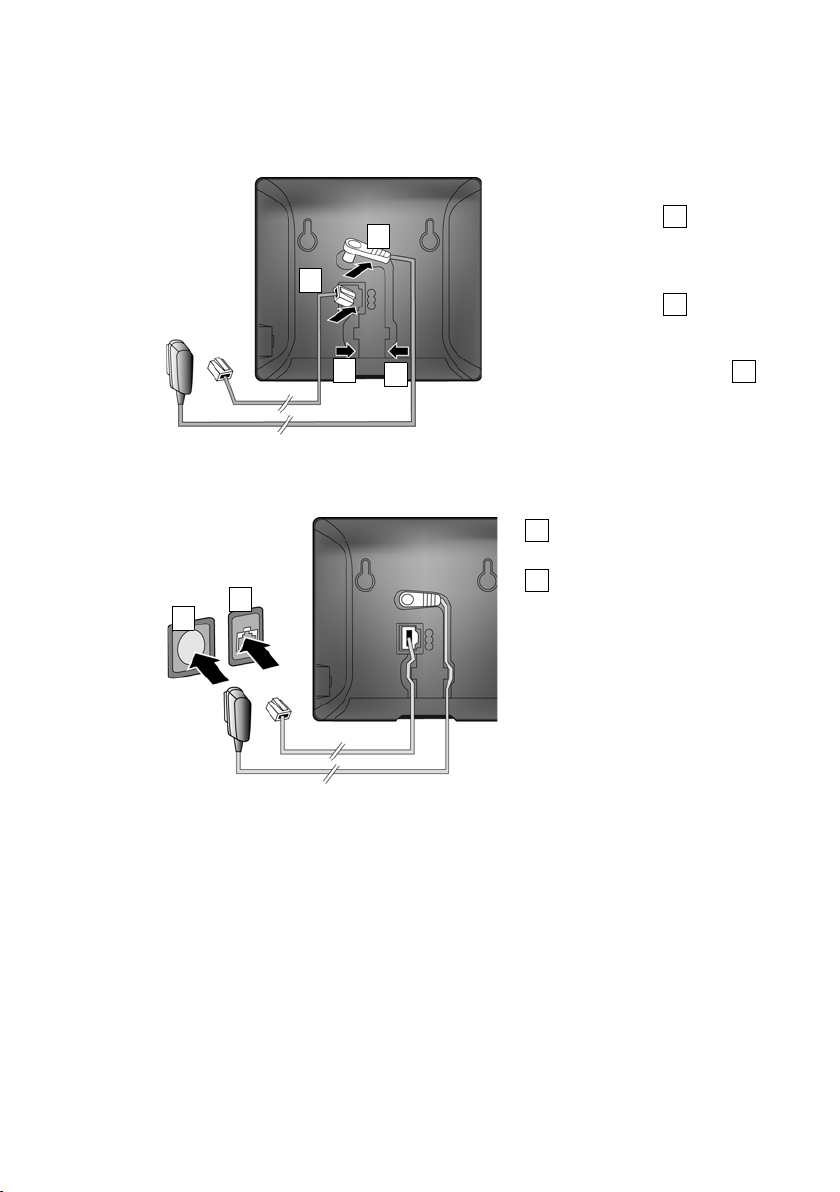
¤ Insert the phone cable (cable
slightly flattened) into the lower
connection socket at the rear
of the base.
¤ Insert the power cable for the
power adapter into the upper
connection socket at the rear
of the base.
¤ Insert both cables into the
appropriate cable channels .
¤ First, connect the power adapter
.
¤ Then connect the phone jack
.
C
B
A
C
A
B
C
B
A
A
B
14
First steps
Wall mounting of the base (optional)
Connecting the handset charger
¤ Connect the flat plug
on the power adapter .
¤ Plug the power adapter
into the plug socket .
1
2
If you have to remove the plug from
the charger again:
¤ Disconnect the power adapter
from the mains power supply.
¤ Press the release button
and disconnect the plug .
3
4
2
1
3
4
15
First steps
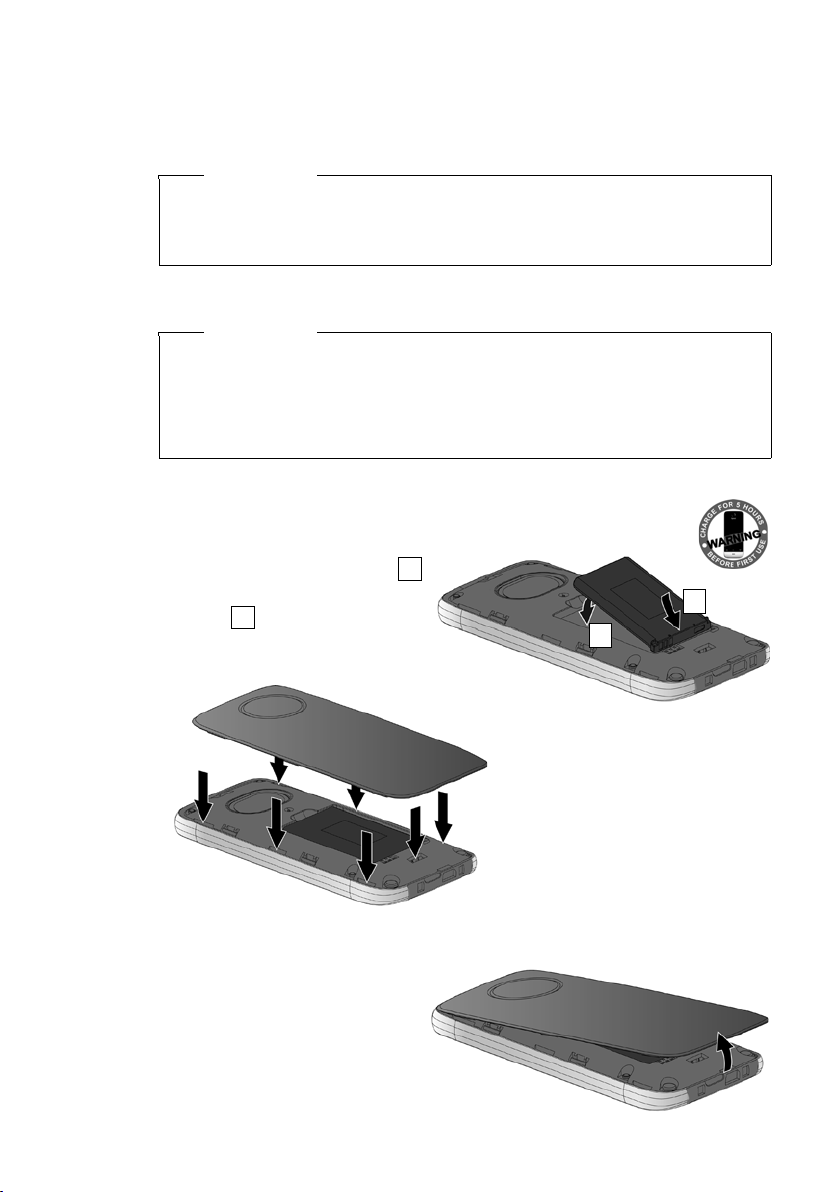
Setting up the handset for use
The handset's display and keys are covered with a protective film. Please remove
the protective film!
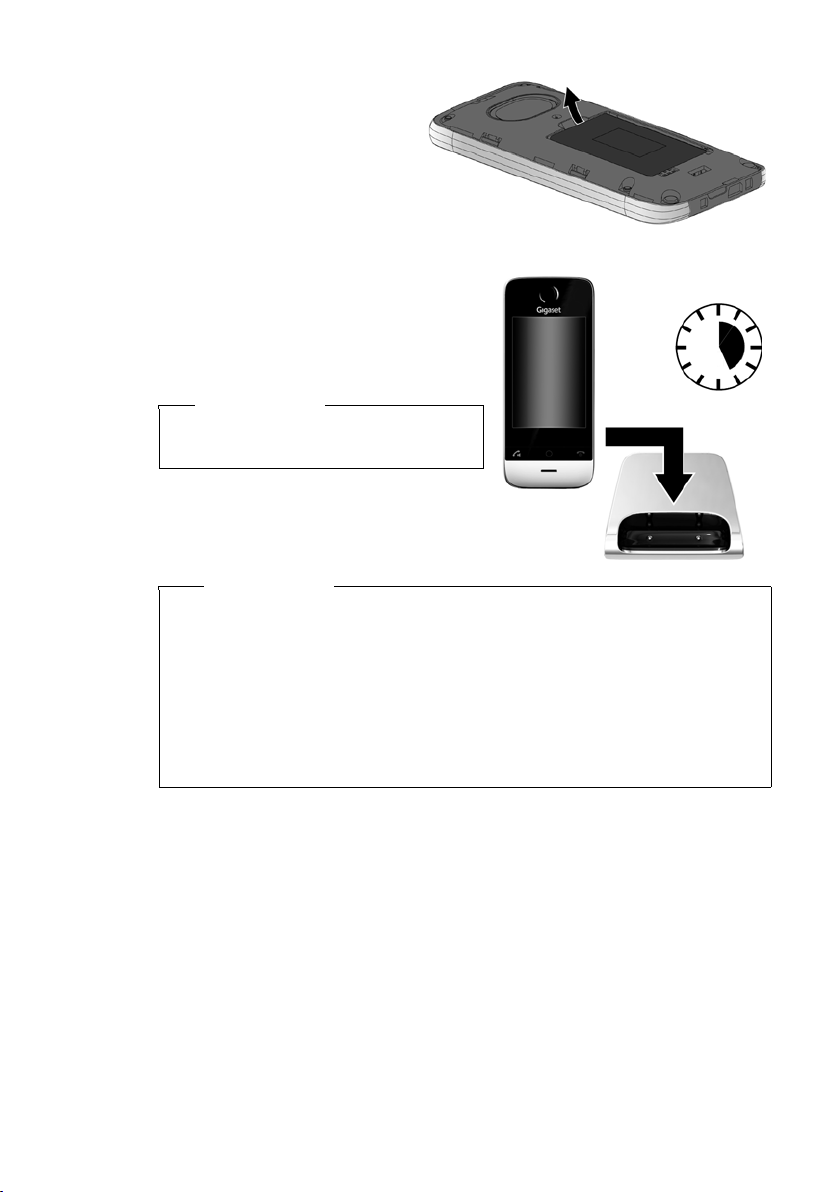
Inserting the battery and closing the battery cover
To reopen the battery cover to replace the battery:
¤ Insert your fingernail into the
cavity on the bottom of the
battery cover and pull the bat-
tery cover upwards.
Warning
Please do not use any touchscreen styli to operate the handset!
Do not use any protective sleeves/films from other manufacturers, as they may
restrict the operation of your handset.
Warning
Use only rechargeable batteries (¢ page 92) recommended by Gigaset Com-
munications GmbH, as this could result in significant health risks and personal
injury. For example, the outer casing of the battery could be destroyed or the
battery could explode. The phone could also malfunction or be damaged as a
result of using batteries that are not of the recommended type.
¤ First insert battery with the
contact surface facing down .
¤ Then press the battery down-
wards until it clicks into
place.
1
2
¤ First, align the protrusions on the
side of the battery cover with the
notches on the inside of the cas-
ing.
¤ Then press the cover until it clicks
into place.
1
2
16
First steps
¤ To remove the battery, insert
your fingernail into the cavity
on the casing and pull the bat-
tery upwards.
Charging the battery
The battery is supplied with a partial
charge. Please charge it completely before
use.
¤ Charge the handset in the charger for
5hours.
¤ Place your handset back in the charger
after every call.
Please note
The handset must only be placed in the
designated charger.
5 h
Please note
u Handsets contained in the package have already been registered to the base.
If, however, a handset has not been registered (display "Handset not regis-
tered to any base"), please register it manually (
¢ page 68).
u The battery is also charged if the handset is connected via a USB connection
to a PC with a power supply of 500 mA.
u The battery may heat up during charging. This is not dangerous.
u After a time, the charge capacity of the battery will decrease for technical
reasons.
17
First steps
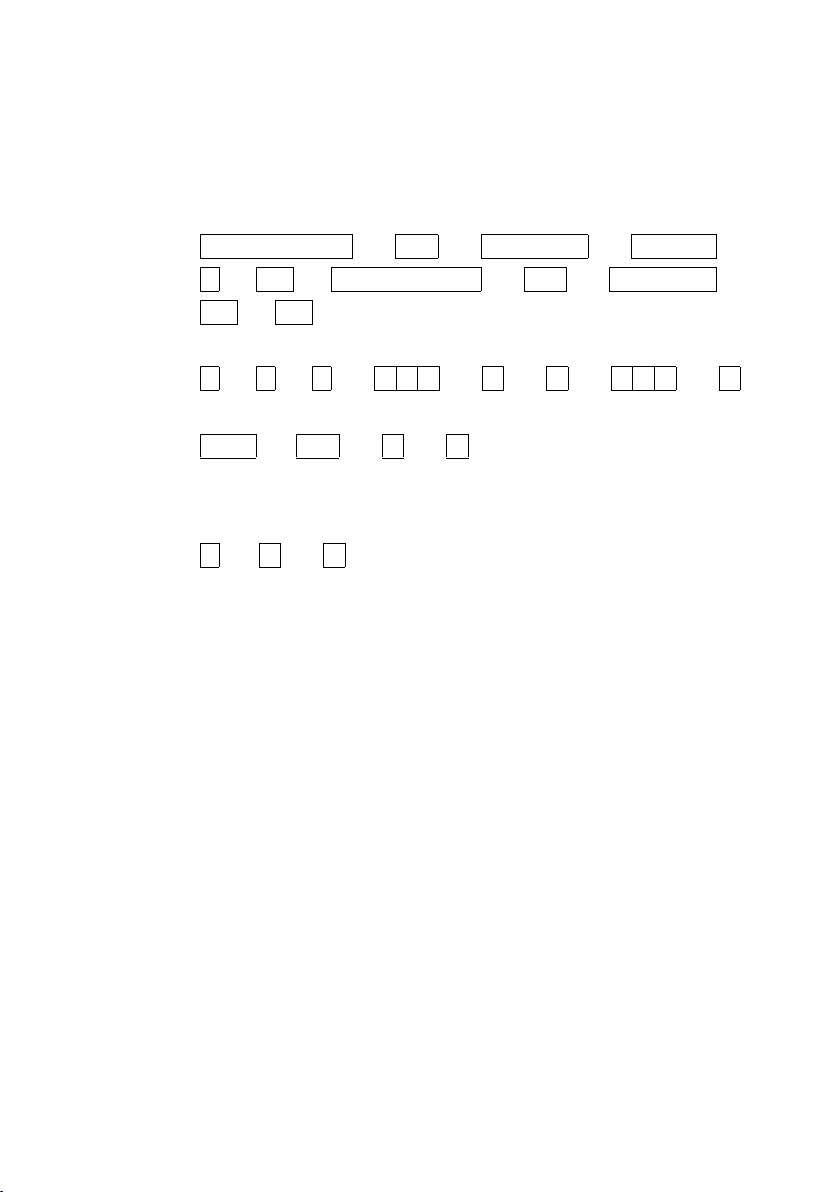
Setting up the base and handset – installation wizard
Once the battery has been inserted, the time and date symbols flash. The installa-
tion wizard starts automatically as soon as you touch one of the flashing symbols.
It helps you to configure the following key settings on the handset and base, which
are required for operation:
u Time and date
u Display language
u Country in which the phone will be used
u Your own are a code
If you do not want to configure the set-
tings at this point:
¤ Tou ch t he [ Skip Settings] option
at the bottom of the display.
The handset then switches to idle status.
You can configure the settings at a later
stage using the Settings menu on your
handset.
To configure the settings:
¤ Tou ch t he ’ icon next to the time to
set the time.
¤ Use the left-hand number wheel to
select the current hour by touching the
number wheel with a finger and mov-
ing it upwards or downwards. The
number wheel will follow your move-
ments.
¤ Operate the right-hand number wheel
in the same way to select the minutes.
¤ Specify whether you wish the time to
be displayed in 12 hrs or 24 hrs mode.
To do this, touch the corresponding
area under Time Format.
The current setting is highlighted.
¤ Tou ch the ‘ icon (at the top left of the
display) to return to the Welcom e
page.
L
Welc ome
Time
00:00
M
Date
01.04.2010 M
Display Language
English M
Country
United Kingdom M
Area (Dial Code)
(Not configured) M
õ
‰
Skip Settings Save Setting
õ
L
Time
Time
22 58
23 59
00
:
00
01 01
02 01
Time Format
24 hrs 12 hrs
2

18
First steps
Comment: If you set the 12 hrs mode, am/pm is shown next to the number
wheels.
¤ Tou ch t he ’ icon next to Date to set
the date.
¤ Use the three number wheels to set the
current date. The procedure is the
same as for setting the time.
The current mode for displaying the date
is displayed under Date Order (here: Day
Month Year). If you want to change the
mode:
¤ Tou ch t he ’ icon.
¤ Touch the required mode Day Month
Year / Month Day Year.
The selected mode is marked with Ø.
¤ Tou ch th e ‘ icon to return to the Date
page.
¤ Tou ch t he ‘ icon again to return to
the Welcome page.
The current language is displayed under
Display Language.
If you want to change the setting:
¤ Touch the ’ ico n n ex t t o t he l an gu age
displayed.
Date
01.04.2010 M
Display Language
English M
Country
M
L
Date
Date
30 Jun 2013
31 May 2012
01
.
Apr
.
2011
02 Mar 2010
03 Feb 2009
Date Order
M
Day Month Year
L
Date Order
Day Month Year
Ø
Month Day Year
±
L
Welc ome
Time
08:30
M
Date
01.07.2011 M
Display Language
English M
Country
M

19
First steps
This brings up a list containing all the
available languages.
The current language is marked with Ø.
¤ Touch the required language.
If your language is not displayed, the list
may be "longer" than the display. You
must then scroll through the list.
¤ To do this, put a finger on the display
and move it slowly upwards.
The lower section of the list is then dis-
played and you can select a language.
Enter the country under Country in which
you will operate the phone and for which
it is authorised. If the setting is not com-
patible:
¤ Touch the corresponding ’ icon.
A list of countries is displayed.
The current country is marked with Ø.
¤ Touch your country. You may have to
scroll through the list as described pre-
viously. The Ø icon moves to this
country.
¤ Tou ch t he ‘ icon again to return to
the Welcome page.
L
Display Language
English
±
Français
±
Castellano
±
Nederlands
±
Italiano
±
Português
±
Dansk
±
L
Welc ome
Country
United Kingdom M
Area (Dial Code)
(Not configured) M
L
Countr y
United Kingdom
Ø
USA
±
Uruguay
±
Venezuela
±
Vietnam
±
Please note
If you have selected Other Country instead of a country, the Welco me page will
also show the Country (Dial Code) entry.
¤ Touch the corresponding ’ icon and enter the International Prefix and
International Area Code for the international country code, as described
below for the area code.
Proceed as described below.

20
First steps
Finally, you have to enter your area code:
¤ Touch the corresponding ’ icon.
The Local Prefix refers to the country-spe-
cific prefix that is put in front of the area
code when you do not dial the country
code. In England this is "0". The Local Area
Code is then 20 for London, for example,
or 161 for Manchester.
The Local Prefix is only displayed if it is
not already stored in the phone for the
selected country.
¤ Use the keypad to enter the Local Pre-
fix if required (maximum 4 characters)
and the Local Area Code (maximum
8characters).
Before entering the numbers, briefly
touch the field where the numbers
should be entered.
You can correct incorrect entries
using $.
¤ Tou ch è after entering the numbers
to complete the entry.
L
Welc ome
Time
Area (Dial Code)
(Not configured) M
L
Area (Dial Code)
Local Prefix
Local Area Code
ç ‰
1 2 3
ABC DEF
4 5 6
GHI JKL MNO
7 8 9
PQRS TUV wxyz
*
0
#
21
First steps
Handset in idle status
Once you have configured all the necessary settings, your handset switches to idle
status. There are three idle display pages (
¢ page 23). When you first set up the
phone, the configurable page that you can customise is displayed. Here, you can
compile important functions and phone numbers for quick access (
¢ page 72).
Some are set by default.
Your phone is now ready for use.
The Welcome page is displayed again.
¤ Tou ch t he [ è Save Setting] option to
save your settings.
The handset switches to idle status.
L
Welc ome
Time
08:32
M
Date
01.07.2011 M
Display Language
English M
Country
United Kingdom M
Area (Dial Code)
020 M
õ
‰
Skip Settings Save Setting
Ð
INT 1
¼ 06:00 V
<
Ä Å Ä
>
Â
Contacts
˜
Call List
April
28
Thursday
Status bar
Contains the internal handset name (e.g.,
INT 1
;
if multiple handsets are registered
)
and icons
that display the current settings and the oper-
ating status of the phone. To discover the
meaning of the icons, see page 8
.
Touch the status bar to display the status page
(
¢page 24)
Current date
Time
Open call lists
Open Contacts

22
Using the phone
Using the phone
Activating/deactivating the handset
¤ Press and hold the end call key a in idle status to deactivate the handset.
You will hear a melody.
¤ Press and hold the end call key a again to reactivate the handset.
Operating the touchscreen
The Gigaset SL910H handset is primarily operated using the display and only to a
small extent using the three buttons on the handset.
Icons, list entries, buttons and sliders shown on the display are sensitive areas. You
can set up and activate functions, enter or dial phone numbers and navigate
between the various display screens (pages) by touching these areas and dragging
them across the display.
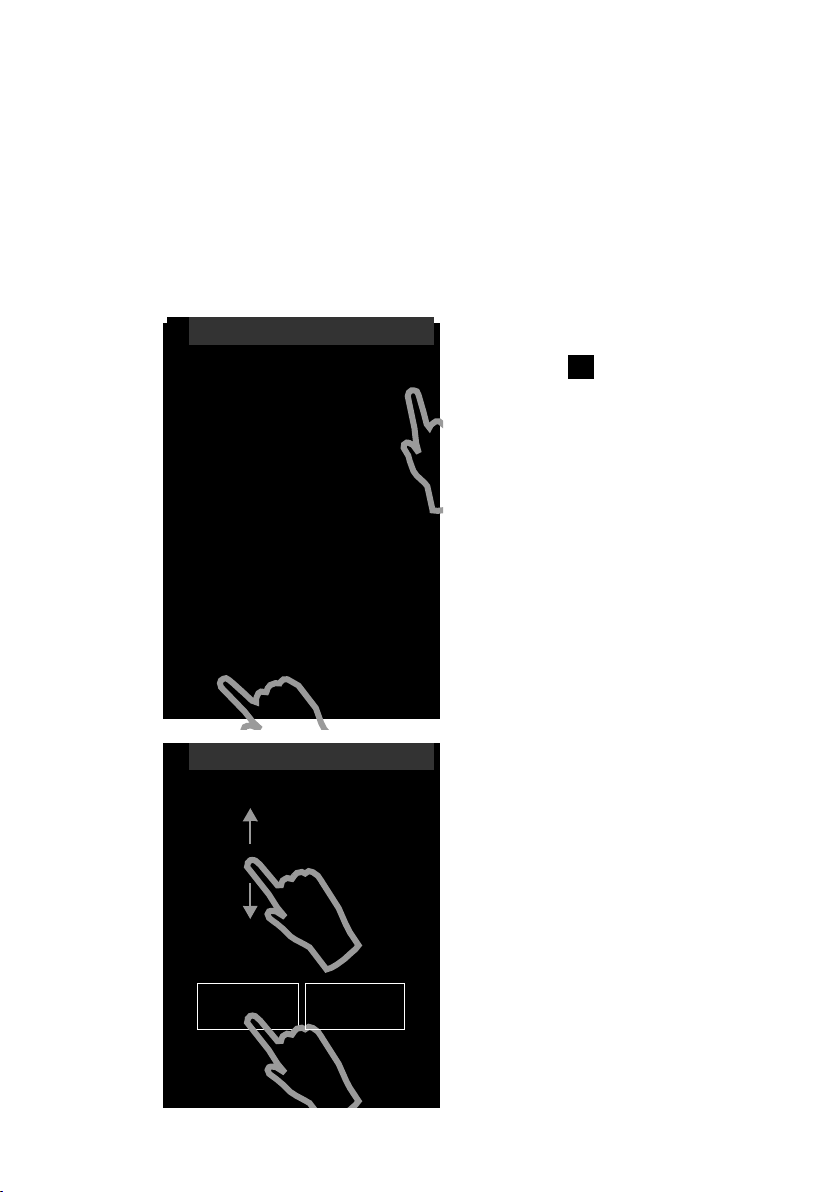
Selecting functions/list entries
To activate a function or select a list item (Contacts, submenu, call list), simply tap
your finger on the corresponding icon or on the required list entry on the display.
Activating/deactivating functions
Functions, e.g., room monitor, answering machine, are activated and deactivated
via buttons.
If the button slider is to the right, the func-
tion is activated. The area to the left of the
slider is highlighted (on).
If the button slider is to the left, the func-
tion is deactivated (off). The area to the
right of the slider is black.
There are two ways to operate a button:
¤ Slowly drag the slider to the right or left to activate or deactivate the function.
¤ Touch the area to the right or left of the slider briefly and the slider moves to the
right or left to the area that has been touched.
On
Slider
Function on
On Off
Slider
Function off

23
Using the phone
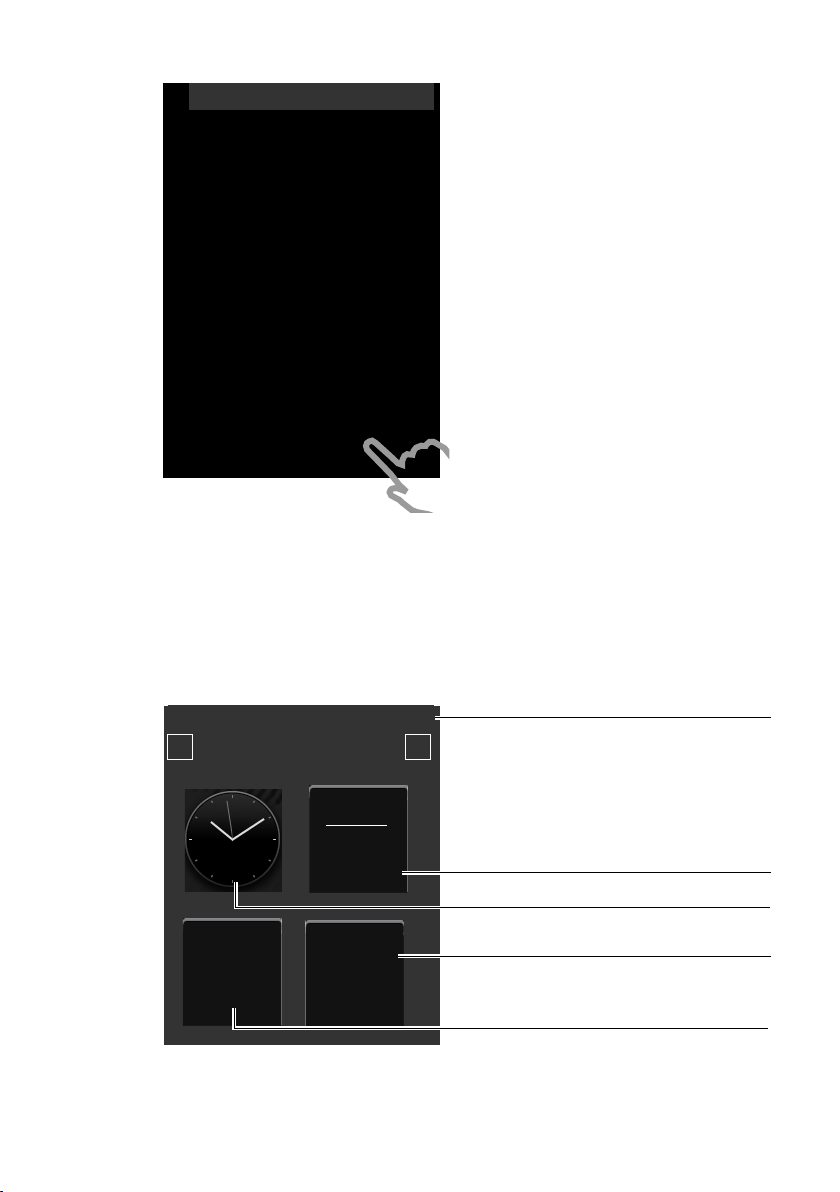
Handset idle display
The idle display consists of three pages that are shown separately on the display.
u The configurable page (example ¢ page 21)
You can customise this page yourself. More detailed information on configuring
this page is available on page 72.
By default, the date and time are displayed and quick access can be set for call
lists and Contacts (
¢ page 21).
u The dial page (example ¢page 7)
You will need this page to make calls. The dial page contains an optional field
(numerical keypad) to enter phone numbers. You can use the options on this
page to make internal calls and to dial numbers from Contacts and the call lists.
u The message page (example ¢ page 44)
You can use this page to go straight to the message lists for the phone: call lists,
answering machine list, text messages inbox and network mailbox. An icon and
the number of new and old messages are displayed for each list that contains
entries. Touch the icon to open the corresponding list.
The default configuration, i.e., after the handset is switched on for the first time,
is to display the configurable page.
Navigation area, changing the page
You have to scroll right or left to move from one page to the next.
Each idle display page therefore has a navigation area (example):
The page position marker shows which idle display page is currently
being displayed. The example shows the middle page.
¤ To scroll to the right, touch the ë icon in the navigation area or place a finger on
the display and drag it to the left.
¤ To scroll to the left, touch the ê icon or place a finger on the display and drag it
to the right.
The scroll function is continuous. On the third page (far right; ), touch ë
again to display the first page (far left; ).
<
Ä Å Ä
>
Ä Å Ä
Ä Ä Å
Å Ä Ä
24
Using the phone
Status bar and status page
On each of the three pages, a status bar appears in the header.
For the corresponding icons and their meaning, see page 8.
Touch the status bar to display the status page. This page gives you direct (quick)
access to the settings for Eco Mode, Eco Mode+, the answering machine for the
SL910A, the Bluetooth interface, the Do not disturb setting and the alarm.
Status page:
u You can use the button on the right to
activate or deactivate the relevant
components directly. To do this, drag
the slider on the touchscreen to
the right (on) or the left (off).
u Touching the list entry e.g., Alarm,
opens the corresponding pop-up
menu that you can use to configure
all the settings for the component.
u Touching Show Service Info displays
the service information for your
handset. You may need the service
information when you contact our
hotline.
Closing the status page
¤ Touch the icon in the header to
return to the idle display.
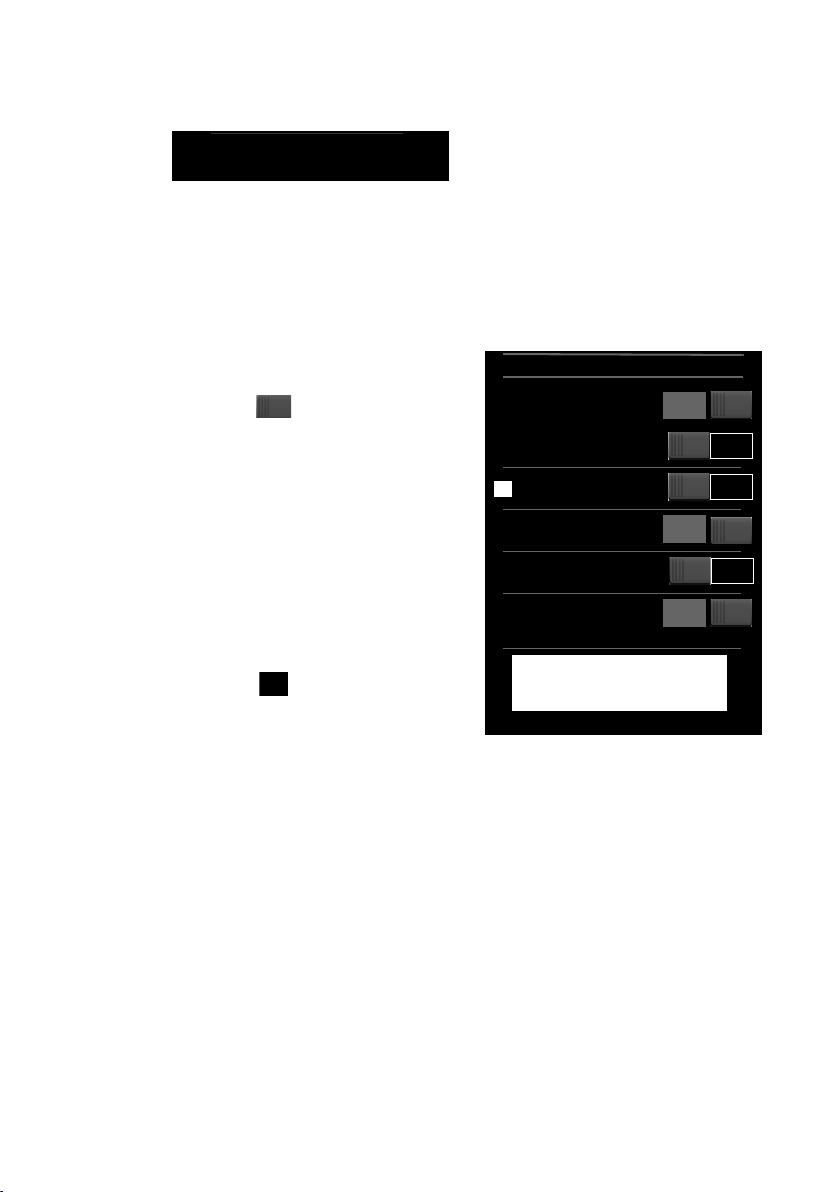
Using the menus
All the functions for the base and the handset are provided in a menu (main menu).
Open the menu:
¤ Briefly press the middle key v when the handset is in idle status.
The main menu is divided into two "pages" that are displayed separately. The Appli-
cations page (subsequently referred to as the Applications menu) comprises all
the applications offered by your base or handset. The Settings page (subsequently
referred to as the Settings menu) offers all the setting options for the base, handset
and telephony.
The following picture shows examples of the menus. The functions/applications
contained in the menus depend on the firmware version that is loaded.
Ð INT 1
à òô
ó
¼
06:00
V
>
Eco Mode on
¹
Eco Mode+ off
Ã
Answer Machine off
»
Bluetooth on
ó
Do not disturb off
Ù
Alarm
06:00
on
Show Service Info
<

25
Using the phone
Changing between the menu pages
You can switch between the menu pages in the same way as you switch between
the pages in idle mode, using ê, ë or dragging horizontally over the display
(
¢ page 23).
Applications that are currently unavailable and settings that cannot currently be
accessed (e.g., because the handset is out of range of the base) are greyed out.
Opening the submenu
Touch an icon on one of the main menu pages and it will be highlighted. The corre-
sponding submenu or a new display page is opened up with settings options for
the application.
The submenus are displayed as lists. The lists contain the parameters that can be
configured and the current setting, available options or buttons to activate/deacti-
vate.
L
Applications
<
Å Ä
>
Â
Contacts
¾
Write
Text Message
˜
Call List
Á
Room
Monitor
Calendar
×
Sounds
[
Caller
Pictures
Õ
Screensavers
L
Settings
<
Ä Å
>
ã
Select
Services
á
Date +
Time
ï
Audio
Settings
Æ
Language +
Location
i
Display +
Keypad
Î
Handsets +
Base
Ï
System
»
Bluetooth
Ë
SMS Service
Centres
ª
Tele ph on y
Ì
Answer
Machine
Ì
Network
Mailbox
Ù
Alarm
Applications menu Settings menu
Page position
marker
Switch to a different main menu page
Gigaset SL910A only
26
Using the phone
Scrolling through lists (vertical scrolling)
If lists (not submenus) are longer than the display, i.e., if it is not possible for all the
list entries to be displayed at once, then a drop shadow on the lower and/or upper
edge of the display indicates the direction you have to scroll in to view more of the
list.
You have to scroll vertically through lists:
¤ Drag from bottom to top over the display to scroll down in the list (i.e., it appears
as if you are pushing the section currently visible upwards out of the display so
that the bottom section appears in the display).
¤ Drag from top to bottom over the display to scroll upwards in the list.
As soon as you scroll in a list, a scroll bar is displayed on the right side of the display.
This shows the size and position of the visible section of the list.
Scrolling through lists is not continuous, i.e., you have to scroll back to return to the
top from the end of the list.
Options
Many display pages (especially lists like directories, call lists) have an option slider
in the lower section. This displays all the actions that you can apply in the current
context.
¤ Touch an option to perform the corresponding action.
Example (moveable option slider):
L
Room Monitor
Off
Sensitivity
k
k
Forw ard
Number
1234567890 M
N
Edit
Low High
Internal External
Opens another
submenu
Button
Current number
Setting options
Change your settings
˜Âí å
Calls Con tacts QuickDial Internal
><

27
Using the phone
If all of the options cannot be displayed at the same time in one row, a moveable
option slider is generally used. You can scroll horizontally using the option slider.
Moving the option slider (horizontal scrolling)
A moveable option slider is identified by an arrow to the right and/or left next to
the options (see the picture above). The arrows indicate that there are additional
options to those that are visible.
¤ Place a finger on the right of the option slider and drag it to the left to view the
options to the right on the display
¤ Drag your finger from left to right to view the options to the left on the display
Showing/hiding two-line option slider
While establishing an external connection and during an external call, an option
slider with two lines is used instead of the moveable option slider.
If the space is not sufficient for the options available, the icon is displayed below
the option slider.
¤ Touch to show further options.
¤ Touch to hide them again.
Entering numbers and text, incorrect entries
The appropriate keypads are displayed to enter numbers and text. An optional field
(numerical keypad) for entering phone numbers or a system PIN. A (typewriter) key-
pad for entering text.
You use them to enter characters by touching the relevant character on the display.
These then appear in the text or number field displayed on the page.
If several number and/or text fields are displayed (e.g., First Name and Surname in
a Contacts entry), you must activate the field by touching it before writing. The
flashing cursor is displayed in the activated field.
To avoid unnecessary incorrect entries: Touch a character on the keypad and this
character is enlarged. If the wrong character is enlarged, you can move your finger
to the required character (without lifting it from the display). The character is only
copied to the text field once you lift your finger from the display.
Correcting incorrect entries
Briefly touch $ to delete the last character.
Press and hold
$ to delete the whole content of the number or text field.
Entering text
¤ Touch the shift key to change between lower and upper case.
If upper case is activated, the keypad is shown in upper case letters, otherwise it
is in lower case. Upper case is only activated for the next character. Then lower
case is automatically reactivated.
When editing a Contacts entry, the first letter and each letter following a space
is automatically in upper case.
ë
28
Using the phone
¤ Tou ch §123§ if you want to enter a digit or a special character. Touch More... to
view other special characters. Touch
§abc§ to return to the normal keypad (lower
case).
¤ You enter special characters (marked/diacritical characters, e.g., umlauts) by
pressing and holding the corresponding initial letter and selecting the required
character from the list displayed.
Diacritical characters in the default character set:
Diacritical characters in the Greek character set:
Diacritical characters in the Cyrillic character set:
¤ Due to the larger space requirement of the Cyrillic character set, you can also
access the following letters by pressing and holding the bold characters shown
below. Touch the required character.
¤ Tou ch ° (if necessary several times) to change the character set or the keypad
layout. The following keypad layouts are available:
– Latin (default) character set with the keypad layouts QWERTZ, for Central
Europe, QWERTY (American default) and AZERTY, for the French-speaking
area
– Greek character set
– Cyrillic character set
Special features when writing an SMS
*
If the text of an SMS is so long that it cannot be completely displayed in the text
field, the first section of the text disappears upwards from the visible area. A scroll
bar is displayed on the right side of the text field, which you can use to scroll up and
down within the text.
You can position the cursor within the text, e.g., to make corrections or add text.
Touch the left half of a word and the cursor will be positioned at the start of this
word. Touch the right half and the cursor will be positioned at the end of this word.
Text entered afterwards will be inserted before this word.
a дбавгæåą c çć e ëéèêę i ïíìî
l ł n ńñ o цутфхшő s ßś u üúùûű
y ÿý z źż
α ά ε έ η ή ι ίϊΐ ο ό σ ς υ ύϋΰ
ω
ώ
е
э
ё
є и йї г ґ ь ъ
ц й x ъ ж э
* Important information: ¢ page 2
 Loading...