


Issued by
Gigaset Communications GmbH Schlavenhorst 66, D-46395 Bocholt
Gigaset Communications GmbH is a trademark licensee of Siemens AG
© Gigaset Communications GmbH 2008 All rights reserved.
Subject to availability. Rights of modifications reserved.
www.gigaset.com
Gigaset
SL560
Gigaset SL560 / EN for Greece / A31008-M1710-T111-2-8U19 / overview.fm / 22.10.08
Handset at a glance
18 |
|
|
|
|
|
|
|
|
|
|
1 |
|
|
|
|
|
|
|
|
|
|||
17 |
|
|
Ð ½ |
|
ò |
|
V |
|
2 |
||
|
|
|
|
||||||||
|
|
|
|||||||||
16 |
|
|
|
|
|
|
|
|
|
|
|
|
|
INT 1 |
|
|
|||||||
|
|
|
|
|
|||||||
15.11.0509:45
?SMS
|
|
|
|
|
|
3 |
||
|
|
|
|
|||||
15 |
|
|
|
|
|
|
4 |
|
|
|
|
|
|
|
|||
14 |
|
|
|
|
|
|
||
|
|
|
|
|||||
|
|
|
|
|
|
|
|
|
13 |
|
|
|
|
|
|
|
5 |
||
|
||||||||||
|
|
|
|
|
|
|
||||
12 |
|
|
|
|
|
|
|
|
|
|
|
|
|
|
|
|
|
|
|
||
11 |
|
|
|
|
|
|
|
|
6 |
|
|
|
|
|
|
|
|
|
|||
10 |
|
|
|
|
|
|
7 |
|||
|
|
|
|
|
||||||
9 |
|
|
|
|
|
|
|
|
|
|
|
|
|
|
|
|
|
|
|
||
|
|
|
|
|
|
|
|
|
||
|
|
|
|
|
|
|
|
|
||
|
|
8 |
|
|
|
|
|
|||
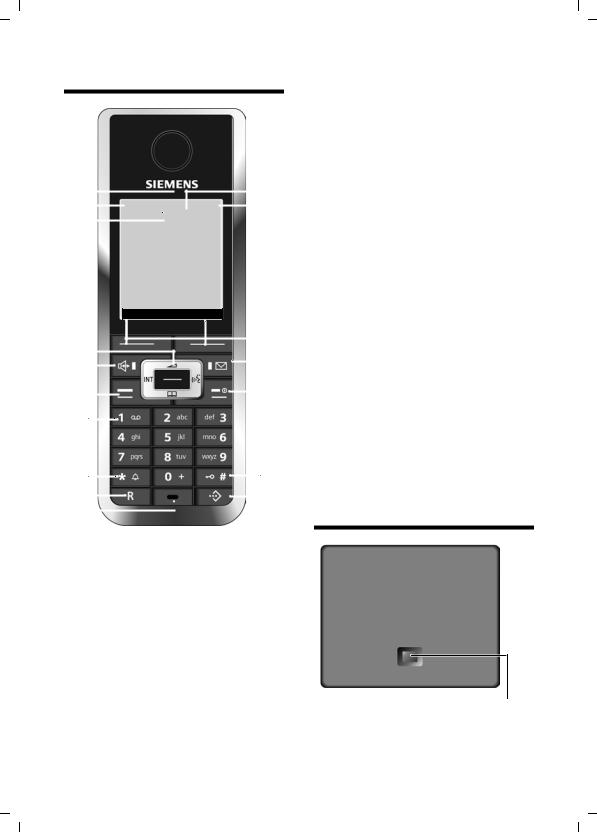
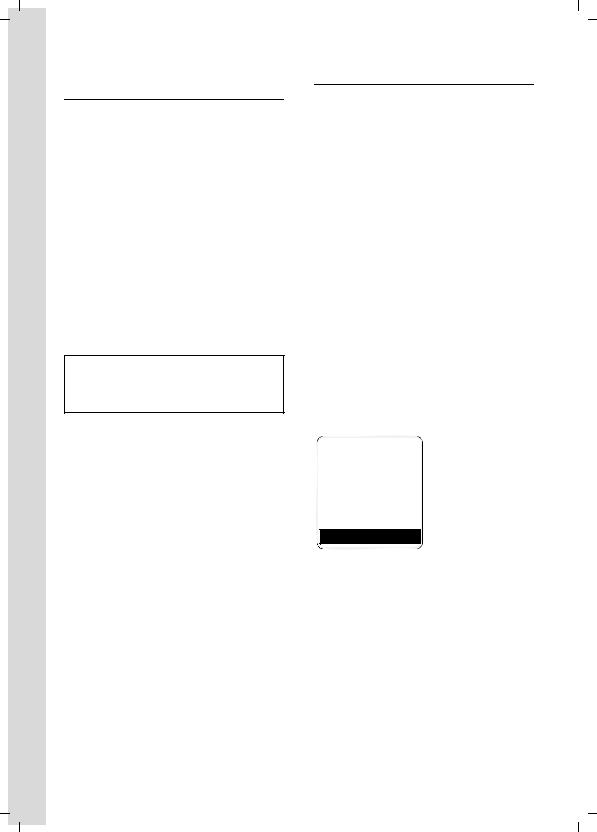
1Display in idle status
2Battery pack charge status
=eVU(flat to full)
=flashes: battery pack almost flat
eVUflashes: battery pack charging
3Display keys (page 14)
4Message key
Access to calls and message lists Flashes: new message or new call
5End call key, On/Off key
End call, cancel function, go back one menu level (press briefly), back to idle status (press and hold), activate/deactivate handset (press and hold in idle status)
Handset at a glance
6Hash key
Key lock on/off (press and hold in idle status),
Toggle between upper/lower case and digits
7Call-by-call list key
Open call-by-call list
8Connection socket for headset and PC interface
9Microphone
10 Recall key
-Confer (Flash)
-Insert a dialling pause (press and hold)
11 Star key
Ringtones on/off (press and hold), with an open connection: switching between pulse dialling/touch tone dialling (press briefly)
Open table of special characters
12 Key 1
Select network mailbox (press and hold)
13 Talk key
Answer a call, open last number redial list (press briefly), start dialling (press and hold) When writing an SMS: send SMS
14 Handsfree key
Switch between earpiece and handsfree mode;
Lights up: handsfree activated Flashes: incoming call
15 Control key (page 14)
16 Eco mode activated (page 15)
17 Signal strength
ÐiÑÒ(high to low) |flashes: no reception
18 Bluetooth activated (page 46)
Base station at a glance
Registration/ Paging key (page 35)
1

Gigaset SL560 / EN for Greece / A31008-M1710-T111-2-8U19 / SL560IVZ.fm / 22.10.08
Contents
Contents
Handset at a glance . . . . . . . . . . . 1 Base station at a glance . . . . . . . . 1 Safety precautions . . . . . . . . . . . . 4
Gigaset SL560 –
more than just a telephone . . . . . 5
First steps . . . . . . . . . . . . . . . . . . . 5
Pack contents . . . . . . . . . . . . . . . . . . . . 5 Installing the base station
and charging cradle . . . . . . . . . . . . . . . 5 Setting up the handset for use . . . . . . . 6
Menu tree . . . . . . . . . . . . . . . . . . . 9
Making calls . . . . . . . . . . . . . . . . 12
Making an external call . . . . . . . . . . . 12 Ending a call . . . . . . . . . . . . . . . . . . . . 12 Answering a call . . . . . . . . . . . . . . . . . 12 Calling Line Identification . . . . . . . . . 12 Handsfree operation . . . . . . . . . . . . . 13 Muting . . . . . . . . . . . . . . . . . . . . . . . . 13
Operating the handset . . . . . . . . 13
Control key . . . . . . . . . . . . . . . . . . . . . 14 Display keys . . . . . . . . . . . . . . . . . . . . 14 Returning to idle status . . . . . . . . . . . 15 Menu guidance . . . . . . . . . . . . . . . . . 15 Correcting incorrect entries . . . . . . . . 15
ECO DECT . . . . . . . . . . . . . . . . . . . 15 Network services . . . . . . . . . . . . 16
Setting functions for the next call . . . |
16 |
Setting functions for all |
|
subsequent calls . . . . . . . . . . . . . . . . . |
16 |
Functions during a call . . . . . . . . . . . . |
17 |
Functions after a call . . . . . . . . . . . . . |
17 |
Activating/deactivating |
|
network mailbox . . . . . . . . . . . . . . . . |
17 |
Using the directory and lists . . . 18
Directory/call-by-call list . . . . . . . . . . . 18 Last number redial list . . . . . . . . . . . . 22 Opening lists with the message key . . 23
Making cost-effective calls . . . . 24
Linking call-by-call numbers
with one number . . . . . . . . . . . . . . . . 24 Automatic network provider code (preselection) . . . . . . . . . . . . . . . . . . . 25
SMS (text messages) . . . . . . . . . 26
Writing/sending an SMS . . . . . . . . . . . 26 Receiving an SMS . . . . . . . . . . . . . . . . 28 Notification by SMS . . . . . . . . . . . . . . 30 SMS mailboxes . . . . . . . . . . . . . . . . . . 30 Setting SMS centre . . . . . . . . . . . . . . . 31 SMS info services . . . . . . . . . . . . . . . . 32 SMS to a PABX . . . . . . . . . . . . . . . . . . . 32 Activating/deactivating the
SMS function . . . . . . . . . . . . . . . . . . . . 32 SMS troubleshooting . . . . . . . . . . . . . 33
Using the network mailbox . . . . 34
Configuring the network mailbox
for fast access . . . . . . . . . . . . . . . . . . . 34 Viewing the network mailbox
message . . . . . . . . . . . . . . . . . . . . . . . 34
Using several handsets . . . . . . . 35
Registering handsets . . . . . . . . . . . . . . 35 De-registering handsets . . . . . . . . . . . 35 Locating a handset ("paging") . . . . . . 35 Changing the base station . . . . . . . . . 35 Making internal calls . . . . . . . . . . . . . . 36 Listening to an external call . . . . . . . . 37 Changing the name of a handset . . . . 37 Changing a handset's internal
number . . . . . . . . . . . . . . . . . . . . . . . . 37
Handset settings . . . . . . . . . . . . . 37
Shortcuts for functions and
2

Gigaset SL560 / EN for Greece / A31008-M1710-T111-2-8U19 / SL560IVZ.fm / 22.10.08
numbers . . . . . . . . . . . . . . . . . . . . . . . |
38 |
Setting emergency numbers . . . . . . . |
38 |
Changing the display language . . . . . |
39 |
Setting the display . . . . . . . . . . . . . . . |
39 |
Setting the screensaver . . . . . . . . . . . |
39 |
Setting backlight . . . . . . . . . . . . . . . . |
39 |
Activating/deactivating auto- |
|
answer . . . . . . . . . . . . . . . . . . . . . . . . |
40 |
Adjusting the loudspeaker volume . . |
40 |
Changing ringtones . . . . . . . . . . . . . . |
40 |
Activating/deactivating first |
|
ring muting . . . . . . . . . . . . . . . . . . . . |
41 |
Setting your own dialling code . . . . . |
41 |
My stuff . . . . . . . . . . . . . . . . . . . . . . . |
42 |
Activating/deactivating |
|
advisory tones . . . . . . . . . . . . . . . . . . |
43 |
Setting the alarm clock . . . . . . . . . . . |
43 |
Setting an appointment (Calendar) . |
44 |
Displaying missed |
|
appointments, anniversaries . . . . . . . |
45 |
Using Bluetooth devices . . . . . . . . . . . |
45 |
Restoring the handset default |
|
settings . . . . . . . . . . . . . . . . . . . . . . . . |
47 |
Base station settings . . . . . . . . . |
47 |
Protecting against unauthorised |
|
access . . . . . . . . . . . . . . . . . . . . . . . . . |
47 |
Activating/deactivating the |
|
hold music . . . . . . . . . . . . . . . . . . . . . |
48 |
Repeater support . . . . . . . . . . . . . . . . |
48 |
Restoring default settings to |
|
base station . . . . . . . . . . . . . . . . . . . . |
48 |
Connecting the base station |
|
to the PABX . . . . . . . . . . . . . . . . . |
49 |
Dialling modes and flash time . . . . . . |
49 |
Save access code . . . . . . . . . . . . . . . . |
49 |
Setting pauses . . . . . . . . . . . . . . . . . . |
50 |
Switching temporarily to |
|
tone dialling (DTMF) . . . . . . . . . . . . . |
50 |
Appendix . . . . . . . . . . . . . . . . . . . |
51 |
Contents
Care . . . . . . . . . . . . . . . . . . . . . . . . . . . 51 Contact with liquid . . . . . . . . . . . . . . . 51 Questions and answers . . . . . . . . . . . . 51 Service (Customer Care) . . . . . . . . . . . 52 Specifications . . . . . . . . . . . . . . . . . . . 53 Guarantee Certificate . . . . . . . . . . . . . 54
Notes on the
operating instructions . . . . . . . . 55
Symbols used . . . . . . . . . . . . . . . . . . . 55 Example: menu input . . . . . . . . . . . . . 55 Example: multiple line input . . . . . . . . 56 PC Interface . . . . . . . . . . . . . . . . . . . . . 56 Writing and editing a text message . . 56
Accessories . . . . . . . . . . . . . . . . . 58
Index . . . . . . . . . . . . . . . . . . . . . . 61
Mounting the base station on the wall 67
3
Gigaset SL560 / EN for Greece / A31008-M1710-T111-2-8U19 / security.fm / 22.10.08
Safety precautions
Safety precautions
Caution:
Read the safety precautions and the user guide before use.
Explain their contents to your children, and the potential hazards associated with using the telephone.
$ |
Only use the mains adapter supplied, as indicated on the underside of the base |
|
station or the back of the charging cradle. |
||
|
||
|
Fit only the approved rechargeable battery pack! Never use a conventional |
|
|
(non-rechargeable) battery pack as this could damage your health and cause |
|
|
injury. Use the battery pack as directed in this user guide (page 53). |
|
|
The operation of medical appliances may be affected. Be aware of the technical |
|
|
conditions in your particular environment, e.g. doctor's surgery. |
|
|
Do not hold the rear of the handset to your ear when it is ringing or when the |
|
|
handsfree function is activated. This can cause severe, permanent hearing |
|
|
damage. |
|
|
The handset may cause an unpleasant humming noise in hearing aids. |
|
|
Do not install the base station or charging cradle in bathrooms or shower rooms. |
|
|
The base station and the charging cradle are not splash proof (page 51). |
|
|
Do not use the phone in environments with a potential explosion hazard, |
|
|
e.g. auto paint shops. |
ƒIf you give your Gigaset to someone else, make sure you also give them the user guide.
All electrical and electronic products should be disposed of separately from the municipal waste stream via designated collection facilities appointed by the government or the local authorities.
This crossed-out wheeled bin symbol on the product means the product is covered by the European Directive 2002/96/EC.
The correct disposal and separate collection of your old appliance will help prevent potential negative consequences for the environment and human health. It is a precondition for reuse and recycling of used electrical and electronic equipment.
For more detailed information about disposal of your old appliance, please contact your city office, waste disposal service or the shop where you purchased the product.
Please remove faulty base stations from use or have them repaired by our Service, as they could interfere with other wireless services.
Note:
Not all of the functions described in this user guide are available in all countries.
4

Gigaset SL560 / EN for Greece / A31008-M1710-T111-2-8U19 / starting.fm / 22.10.08
Gigaset SL560 –
more than just a telephone
Your telephone has a clearly laid out colour display (65K colours) and not only makes it possible for you to send and receive SMS over the fixed network, but also to store up to 250 phone numbers and e-mail addresses (page 18) – it can do a whole lot more:
uYou can reduce the transmission power by activating the eco mode (page 15).
uYou can programme the keys of your phone with important numbers or frequently used functions. The number is then dialled or the function started by simply pressing a key (page 38).
uYou can designate important people as VIPs so you can tell important calls from the ringtone (page 19).
uAssign pictures to your callers. You will then know who is calling you by the picture on your handset display. Precondition: Calling Line Identification (CLIP, page 12).
uStore a voice pattern for important directory entries – the telephone will dial on voice command (page 21).
uYou can store appointments (page 44) and anniversaries (page 21) in your phone and it will remind you of them in advance.
Have fun using your new telephone!
Gigaset SL560 – more than just a telephone
First steps
Pack contents
u one Gigaset SL560 base station, u one Gigaset SL56 handset,
u one charging cradle, u one mains adapter, u one phone cord,
u one battery pack, u one battery cover, u one belt clip,
u one user guide.
Installing the base station and charging cradle
Base station and charging cradle are designed for use in closed, dry rooms with a temperature range of +5 °C to +45 °C.
Set up the base station at a central point in the apartment or house.
You can find instructions for mounting the base station on the wall at the end of this user guide.
Please note:
uNever expose the telephone to heat sources, direct sunlight, other electrical appliances.
uProtect your Gigaset from moisture, dust, corrosive liquids and vapours.
Range and reception strength
Range:
u Up to 300 m in the open u Up to 50 m in buildings
The range is reduced when eco mode is on (see page 15).
5
Gigaset SL560 / EN for Greece / A31008-M1710-T111-2-8U19 / starting.fm / 22.10.08
First steps
Reception strength:
The display shows the quality of the radio contact between the base station and handset:
u Good to poor: Ð i Ñ Ò, u No reception: |flashes.
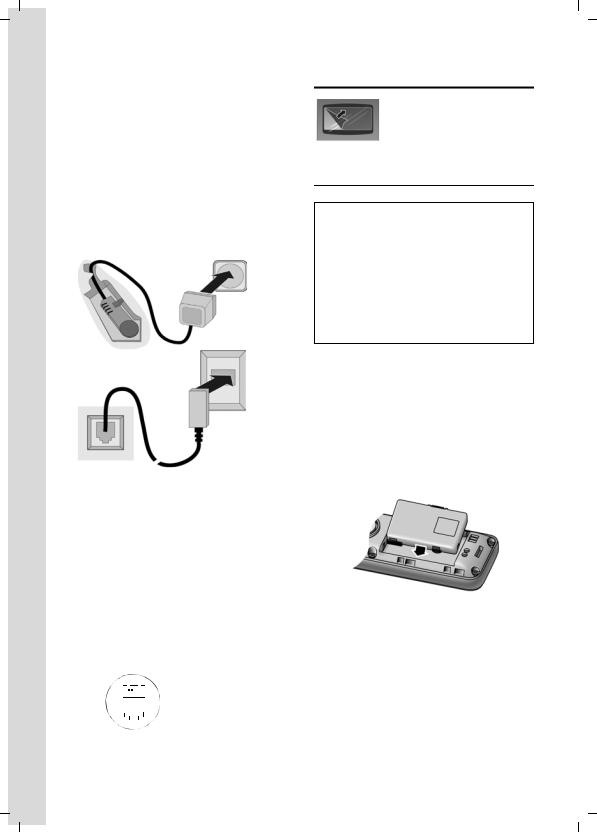
Connecting the base station
¤First connect the mains adapter and then the phone jack as shown belowand place the cables in the cable recesses.
2
1
3
1
1Underside of the base station (detailed view)
2Mains adapter 230 V
3Phone jack with phone cord
Please note:
uThe mains adapter must be always connected, as the phone will not operate without mains connection.
uIf you buy a replacement phone cord from a store, ensure that the phone jack is connected correctly.
Correct phone jack assignment
3 |
|
|
|
4 |
1 unused |
||||
2 |
|
|
|
|
|
5 |
2 unused |
||
1 |
|
|
|
|
|
|
|
6 |
3 a |
|
|
|
|
|
|
|
|||
|
|
|
|
|
|
|
4 b |
||
|
|
|
|
|
|
|
|
|
|
|
|
|
|
|
|
|
|
|
5 unused |
|
|
|
|
|
|
|
|
|
|
|
|
|
|
|
|
|
|
|
6 unused |
|
|
|
|
|
|
|
|
|
|
|
|
|
|
|
|
|
|
|
|
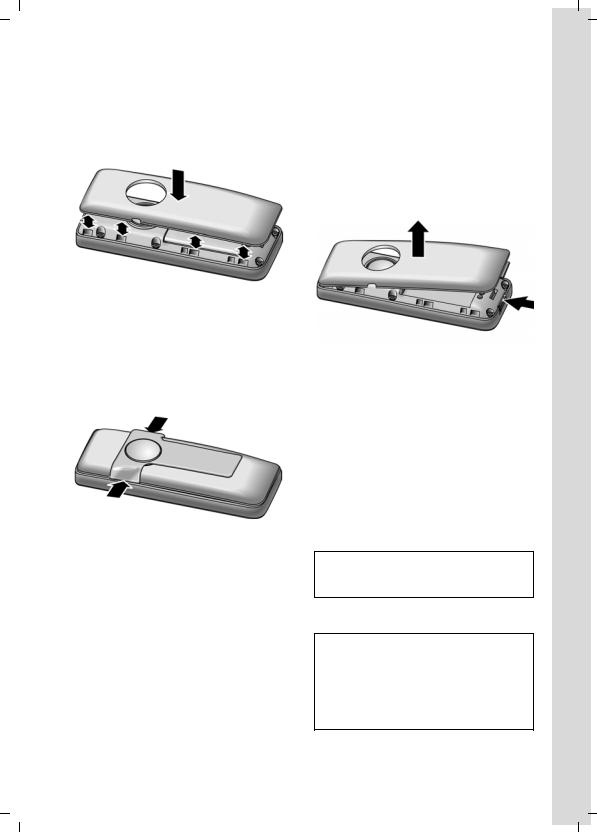
Setting up the handset for use
The display is protected by a plastic film. Please remove the protective film!
Fitting the battery pack
Caution:
Use only the rechargeable Gigaset Communications GmbH * Original battery pack
(page 53). Never use a conventional (nonrechargeable) battery pack, as this may cause significant damage to health and property. For example, the outer casing of the battery pack could be destroyed or the battery pack could explode. The phone could also malfunction or be damaged as a result of using batteries that are not of the recommended type.
*Gigaset Communications GmbH is a trademark licensee of Siemens AG.
¤Insert the battery pack at an angle from the left introducing the lugs into the cavity first.
¤Then push the casing from the top, until the retaining clip on the side of the battery pack clicks securely into place in the casing.
Please note:
You must press the retaining clips down in order to remove the battery pack.
6
Gigaset SL560 / EN for Greece / A31008-M1710-T111-2-8U19 / starting.fm / 22.10.08
Closing the battery cover
¤You must first align the notches on the side of the battery pack with the lugs on the inside of the casing.
¤Then close the cover so that it clicks into place.
Attaching belt clip
There are notches for attaching the belt clip on the side of the handset at approximately the same height as the display.
¤Press the belt clip onto the back of the handset so that the lugs on the belt clip click into the notches.
First steps
Opening the battery cover
¤Remove the belt clip if the phone is mounted.
¤Pick the device up with the keypad facing the palm of your hand.
¤Insert your forefinger into the notches on the lower edge.
¤Gently lift the cover up out of the notches.
Placing the handset in the charging cradle
¤Plug the charging cradle mains adapter into a mains power socket.
¤Place the handset in the charger with the display facing forward.
The handset is already registered with the base station at the factory. INT 1 appears in the display. You do not have to re-register. If, nonetheless, you have to register your handset with the base station, please see page 35.
Note
You can change the name of the handset (page 37).
Leave the handset in the charging cradle to charge the battery pack.
Notes:
–If the handset has switched itself off because the battery pack is flat and is then placed in the charging cradle, it will switch itself on automatically.
–The handset must only be placed in the designated charging cradle.
For questions and problems see page 51.
7
Gigaset SL560 / EN for Greece / A31008-M1710-T111-2-8U19 / starting.fm / 22.10.08
First steps
Initial charging and discharging of the battery pack
If the handset is activated, the flashing battery icon ein the top right of the display indicates that the battery pack is being charged.
During handset operation, the battery icon indicates the charge status of the battery pack (page 1). The correct charge status can only be displayed if the battery pack is first fully charged and discharged.
¤To do this, leave the handset in the charging cradle continuously for ten hours. Your handset need not be switched on for it to charge.
¤Afterwards, remove the handset from the charging cradle and do not put it back again until the battery pack is fully discharged.
Note:
After the initial charge and discharge you may replace your handset in the charging cradle after every call.
Please remember:
uAlways repeat the charging and discharging procedure if you remove the battery pack from the handset and insert it again.
uThe battery pack may warm up as it is charging. This is not dangerous.
uAfter a time the charge capacity of the battery pack will decrease for technical reasons.
Setting the date and time
You should set the date and time, in order, e.g. to ensure that the correct time is recorded for incoming calls and in order to use the alarm clock and calendar.
¤If you have not yet set the date and time, press the display key §Time§ to open the input field.
To change the time, open the input field via:
w¢Ð ¢Date/Time
¤ Change multiple line input:
Date:
Enter day, month and year in 8-digit format.
Time:
Enter hours and minutes with 4 digits, e.g. QM15for 07:15 a.m.
§Save§ Press the display key.
Once the phone is registered and the time set, the idle display looks as shown here (example):
Ð V
INT 1
15.11.05 07:15
?SMS
Your phone is now ready for use.
8

Gigaset SL560 / EN for Greece / A31008-M1710-T111-2-8U19 / menuetree.fm / 22.10.08
Menu tree
Menu tree
Instead of scrolling to locate a menu function, you can select a menu function faster by opening the menu and keying in the digit combination ("shortcut").
Example: wN211for "Set ringtone for external calls". With the telephone in idle status, press w(open main menu):
1 |
SMS î |
|
|
|
You have activated an SMS mailbox (general or private) without a PIN |
||||
|
|
|
|
|
1-1 |
New SMS |
(page 26) |
|
|
1-2 |
Incoming 0 |
(page 29) |
|
|
1-3 |
Outgoing 0 |
(page 27) |
|
|
|
|
|
|
|
You have activated an SMS mailbox with a PIN or 2-3 mailboxes |
|
|||
|
|
|
|
|
1-1 |
Mailbox |
1-1-1 |
New SMS |
(page 26) |
|
|
1-1-2 |
Incoming 0 |
(page 29) |
|
|
1-1-3 |
Outgoing 0 |
(page 27) |
1-2 |
Mailbox 1 |
1-2-1 |
New SMS |
(page 26) |
to |
Mailbox 2 |
to |
|
|
1-4 |
Mailbox 3 |
1-4-1 |
|
|
|
|
1-2-2 |
Incoming 0 |
(page 29) |
|
|
to |
|
|
|
|
1-4-2 |
|
|
|
|
1-2-3 |
Outgoing 0 |
(page 27) |
|
|
to |
|
|
|
|
1-4-3 |
|
|
1-5 |
SMS Service |
(page 32) |
|
|
|
|
|
|
|
1-6 |
Settings |
1-6-1 |
Service Centres |
(page 31) |
|
|
|
|
|
|
|
1-6-2 |
SMS Mailboxes |
(page 30) |
|
|
|
|
|
|
|
1-6-3 |
Notify Number |
(page 30) |
|
|
|
|
|
|
|
1-6-4 |
Notify Type |
(page 30) |
|
|
|
|
|
2 |
Sel. Services ê |
|
|
|
2-2 |
Network Mailbox |
(page 17) |
|
|
|
|
|
|
|
2-6 |
All Calls |
2-6-1 |
Call Divert |
(page 16) |
|
|
|
|
|
|
|
2-6-3 |
Call Waiting |
(page 16) |
|
|
|
|
|
|
|
2-6-4 |
Fixed Destin. Call |
(page 16) |
|
|
|
|
|
9
Gigaset SL560 / EN for Greece / A31008-M1710-T111-2-8U19 / menuetree.fm / 22.10.08
Menu tree
3 |
Data transfer |
ý |
|
|
|
|
|
|
|
|
|
3-2 |
Bluetooth |
|
3-2-1 |
Activation |
(page 46) |
|
|
|
|
|
|
|
|
|
3-2-2 |
Search Headset |
(page 46) |
|
|
|
|
|
|
|
|
|
3-2-3 |
Search Data Device |
(page 46) |
|
|
|
|
|
|
|
|
|
3-2-4 |
Known Devices |
(page 46) |
|
|
|
|
|
|
|
|
|
3-2-5 |
Own Device Name |
(page 47) |
|
|
|
|
|
|
|
|
|
|
|
|
3-3 |
Directory |
|
(page 20) |
|
|
|
|
|
|
|
|
4 |
Add. Features |
í |
|
|
|
|
|
|
|
|
|
4-4 |
Missed Alarms |
(page 45) |
|
|
|
|
|
|
|
|
|
5 |
Alarm Clock |
ì |
(page 43) |
|
|
6 |
Calendar ç |
|
(page 44) |
|
|
7 |
Resource Dir. Ï |
|
|
|
|
7-1 |
Screensavers |
(page 42) |
|
|
|
|
|
|
|
|
|
7-2 |
Caller Pictures |
(page 42) |
|
|
|
|
|
|
|
|
|
7-3 |
Sounds |
|
(page 42) |
|
|
|
|
|
|
|
|
7-4 |
Capacity |
|
(page 42) |
|
|
|
|
|
|
|
|
8 |
Settings Ð |
|
|
|
|
8-1 |
Date/Time |
|
(page 8) |
|
|
|
|
|
|
|
|
8-2 |
Audio Settings |
8-2-1 |
Ringer Settings |
(page 40) |
|
|
|
|
|
|
|
|
|
|
8-2-2 |
Advisory Tones |
(page 43) |
|
|
|
|
|
|
|
|
|
8-2-3 |
Silent Alert |
(page 41) |
|
|
|
|
|
|
|
|
|
|
|
|
8-3 |
Display |
|
8-3-1 |
Screen Saver |
(page 39) |
|
|
|
|
|
|
|
|
|
8-3-2 |
Colour Scheme |
(page 39) |
|
|
|
|
|
|
|
|
|
8-3-3 |
Contrast |
(page 39) |
|
|
|
|
|
|
|
|
|
8-3-4 |
Backlight |
(page 39) |
|
|
|
|
|
|
|
|
|
|
|
|
8-4 |
Handset |
|
8-4-1 |
Language |
(page 39) |
|
|
|
|
|
|
|
|
|
8-4-2 |
Area Codes |
(page 41) |
|
|
|
|
|
|
|
|
|
8-4-3 |
Auto Answer |
(page 40) |
|
|
|
|
|
|
|
|
|
8-4-4 |
Add. Emerg. No |
(page 38) |
|
|
|
|
|
|
|
|
|
8-4-5 |
Register H/Set |
(page 35) |
|
|
|
|
|
|
|
|
|
8-4-6 |
Select Base |
(page 35) |
|
|
|
|
|
|
|
|
|
8-4-7 |
Reset Handset |
(page 47) |
|
|
|
|
|
|
|
|
|
|
|
|
10

Gigaset SL560 / EN for Greece / A31008-M1710-T111-2-8U19 / menuetree.fm / 22.10.08
|
|
|
|
Menu tree |
|
|
|
|
|
8-5 |
Base |
8-5-2 |
Music on hold |
(page 48) |
|
|
|
|
|
|
|
8-5-3 |
System PIN |
(page 47) |
|
|
|
|
|
|
|
8-5-4 |
Base Reset |
(page 48) |
|
|
|
|
|
|
|
8-5-5 |
Add. Features |
(page 15, page 37, page 49) |
|
|
|
|
|
|
|
8-5-6 |
Preselection |
(page 25) |
|
|
|
|
|
|
|
8-5-7 |
Calls List Type |
(page 24) |
|
|
|
|
|
|
|
|
|
|
8-6 |
Voice Mail |
8-6-1 |
Set Key 1 |
(page 34) |
|
|
|
|
|
11
Gigaset SL560 / EN for Greece / A31008-M1710-T111-2-8U19 / telefony.fm / 22.10.08
Making calls
Making calls
Making an external call
External calls are calls using the public telephone network.
~c Enter the number and press the talk key.
Or:
c~ Press and hold the talk key cand then enter the number.
You can cancel the dialling operation with the end call key a.
You are shown the duration of the call while the call is in progress.
Notes:
Dialling using the directory, call-by-call list (page 1, page 18) or call and last number redial list (page 23) saves time re-entering numbers and network provider prefixes ("call- by-call numbers").
With voice dialling, you can dial numbers simply by saying the name (page 21).
Continuing a call on a Bluetooth headset
Precondition: Bluetooth is activated; connection has been established between Bluetooth headset and the handset (see page 46).
Press the talk key on the headset; it can take up to 5 seconds to establish a connection to the handset.
For further details on your headset, see the user guide issued with it.
Ending a call
a Press the end call key.
Answering a call
The handset indicates an incoming call in three ways: by ringing, by a display on the screen and by the flashing handsfree key d.
You can accept the call by:
¤Pressing the talk key c.
¤Pressing the §Accept§ display key.
¤Pressing the handsfree key d.
If the handset is in the charging cradle and the Auto Answer function is activated (page 40), the handset will take a call automatically when you lift it off the charging cradle.
If the ringtone is intrusive, press the display key §Silence§. You can take the call as long as it is displayed on the screen.
Answering a call on a Bluetooth headset
Precondition: Bluetooth is activated; connection has been established between Bluetooth headset and the handset (see page 46).
Press the talk key on the headset.
For further details on your headset, see the user guide issued with it.
Calling Line Identification
When you receive a call, the caller's number is displayed on the screen if the following conditions are met:
uYour network provider supports CLIP, CLI.
–CLI (Calling Line Identification): number of the caller is transmitted.
–CLIP (Calling Line Identification Presentation): number of the caller is indicated.
uYou have arranged CLIP with your network provider.
uThe caller has arranged CLI with the network provider.
12
Gigaset SL560 / EN for Greece / A31008-M1710-T111-2-8U19 / telefony.fm / 22.10.08
Call display with CLIP/CLI
If the number of the caller is stored in your directory, you will see their name, if you have assigned a CLIP picture to the caller, this willÅalso be displayed.
1
1234567890 2
Accept Silence
1Ring symbol
2Number or name of caller
The following is displayed in place of the number:
u External, if no number is transmitted.
uWithheld, if the caller has withheld Calling Line Identification (page 16).
uUnavailable, if the caller has not arranged Calling Line Identification.
Handsfree operation
In handsfree mode, instead of holding the handset to your ear you can put it down e.g. on the table in front of you to allow others to participate in the call.
Activating/deactivating handsfree
Activating while dialling
~d Enter the number and press the handsfree key.
¤ You should inform your caller before you use the handsfree function so that they know someone else is listening.
Switching between earpiece and handsfree mode
d Press the handsfree key. During a call switch handsfree on or off.
If you wish to place the handset in the charging cradle during a call:
Operating the handset
¤Press and hold the handsfree key d
while placing the handset in the base station. If handsfree key ddoes not light up, press the key again.
For how to adjust the volume, see page 40.
Muting
You can deactivate the microphone in your handset during an external call. The other party hears the hold music.
§Mute§ Press the mute key (right side of the screen), to mute the handset.
”Press the display key to reactivate the microphone.
You can switch the hold music on and off (page 48).
Operating the handset
Activating/deactivating the handset
aPress and hold the end call key in idle status (confirmation tone).
Activating/deactivating the keypad lock
#Press and hold the hash key.
You will hear the confirmation beep. The icon Øappears in the display when the keypad lock is activated.
The keypad lock is deactivated automatically if someone calls you. It is re-activated when the call is finished.
If the auto key lock is activated, you will only be able to dial the emergency numbers, see page 38.
13
Gigaset SL560 / EN for Greece / A31008-M1710-T111-2-8U19 / telefony.fm / 22.10.08
Operating the handset
Control key
In the description below, the side of the control key (up, down, right, middle left) which you have to press in the different operating situations is marked in black, e.g. vfor "press right on the control key".
The control key has a number of different functions:
When the handset is in idle status
sOpen the directory.
wOpen main menu.
uOpen list of handsets.
tSet the ringtone on the handset (page 40).
vInitiate voice dialling, press and hold (page 22);
Main menu, press briefly.
In the main menu and in input fields
You can use the control key to move the cursor up t, down s, right vor left u.
In lists and submenus
t/ sScroll up/down line by line.
wOpen submenu or confirm selection.
uGo back one menu level, or cancel.
During an external call
s Open the directory.
uInitiating internal enquiry call and muting.
tAdjust loudspeaker volume for earpiece and handsfree mode.
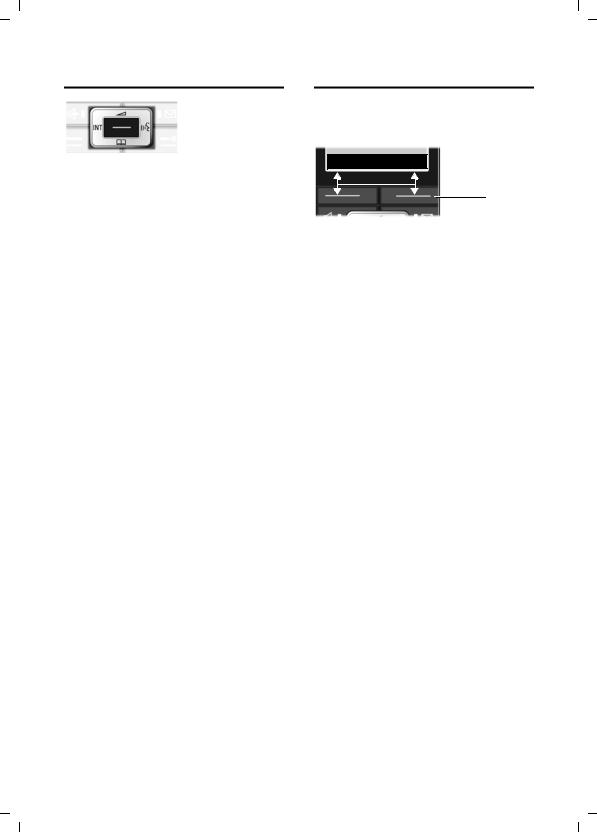
Display keys
The function of the display keys changes depending on the particular operating situation. Example:
?SMS
 1
1
2
1The display keys' current functions are shown in the bottom display line.
2Display keys
The most important display symbols are:
}Left display key, as long as it has not been assigned a function (page 38).
©Open the main menu.
§Options§ Open a context-dependent menu.
WDelete key: deletes one character at a time from right to left.
ÎGo back one menu level or cancel operation.
ŒRetrieve an e-mail address from the directory.
ÓCopy number into directory.
•Open the last number redial list.
14
Gigaset SL560 / EN for Greece / A31008-M1710-T111-2-8U19 / telefony.fm / 22.10.08
Returning to idle status
You can revert to idle status from anywhere in the menu as follows:
¤Press and hold the end call key a. Or:
¤Do not press any key: after 2 minutes the display will automatically revert to idle status.
Changes that you have not confirmed or saved by pressing §OK§, §Yes§, §Save§, §Send§ or
Save Entry §OK§ will be lost.
An example of the display in idle status is shown on page 1.
Menu guidance
Your telephone's functions are accessed using a menu that has a number of levels.
Main menu (first menu level)
¤Press wwith the handset in idle status to open the main menu.
The main menu functions are shown in the display as a list with coloured icons and names.
To access a function, i.e. open the corresponding submenu (next menu level):
¤Navigate to the function using the control key q/r. The name of the function is displayed in the display header. Press the display key §OK§.
Submenus
The functions in the submenus are displayed as lists.
To access a function:
¤Scroll to the function with the control key qand press §OK§.
Or:
¤Enter the corresponding digit combination (page 9).
Pressing briefly on the end call key a returns you to the previous menu level / cancels the operation.
ECO DECT
Correcting incorrect entries
You can correct incorrect characters in the text by navigating to the incorrect entry using the control key. You can then:
upress Xto delete the character to the left of the cursor,
uinsert characters to the left of the cursor,
uoverwrite the character (flashing) when entering the time and date etc.
You will find examples of symbols used, menu entries and multiple line input in the appendix to this user guide, page 55.
ECO DECT
ECO DECT reduces power consumption by using a power supply with low power consumption and also reduces the transmission power of the base station.
You can set this manually with your handset. It can be used by several handsets at the same time.
Your handset also reduces the transmission power depending on the distance to the base station.
Activating/deactivating eco mode:
w¢Ð ¢Base ¢Add. Features ¢Eco Mode
§OK§ |
Press the display key |
||
|
( |
‰ |
= activated). |
When eco mode is activated, the ½icon is displayed at the top of the screen.
Please note:
–Activating eco mode reduces the range of the base station.
–Eco mode and any repeater support (see page 48) cancel each other out, i.e. both functions cannot be used at the same time.
–If external handsets (GAP) and handsets from earlier Gigaset versions are used, your handset will not automatically reduce the transmission power to the base station.
15

Gigaset SL560 / EN for Greece / A31008-M1710-T111-2-8U19 / TNet_Features_SAG.fm / 22.10.08
Network services
Network services
Network services are functions that your network provider makes available to you. You have to request these services from your network provider.
¤If you require assistance, please contact your network provider.
Setting functions for the next call
You have the following options:
w¢ê¢Withhold No.
~
c
Setting functions for all subsequent calls
If you have completed one of the following procedures, a code is sent.
¤After confirmation from the telephone network, press the end call key a.
You can set the following features:
General call diversion
w¢ê¢All Calls ¢ Call Divert
¤ Change multiple line input:
When:
All Calls / No Answer / When Busy dialling.
Call No.:
Press the display key §Edit§. Enter number to which call is to be diverted, and press Save Entry §OK§.
or:
Press s. Select number from the directory and press §OK§.
Press Save to save.
Status:
Activating/deactivating call diversion. ¤ Press the display key §Send§.
aAfter the announcement, press the end call key.
Activating/deactivating call waiting w¢ê¢All Calls ¢Call Waiting Status: Activating/deactivating. §Send§ Press the display key.
Fixed destination call
w¢ê¢All Calls ¢ Fixed Destin.
Call
¤ Change multiple line input:
Number:
Press display key Edit. Enter number and press Save Entry §OK§.
Press Save
Status:
Activating/deactivating fixed destination call.
¤ Press the display key §Send§.
16

Gigaset SL560 / EN for Greece / A31008-M1710-T111-2-8U19 / TNet_Features_SAG.fm / 22.10.08
Functions during a call
Consultation
During a call:
§Ext.Call§ Press the display key.
~Enter number.
You have the following options:
uToggling:
¤Use qto toggle between the participants.
End the call with one participant:
¤Use qto switch to the caller. Then: §Options§ End Active Call.
u Conference call:
¤ Press the display key §Conf.§.
End the conference call (toggle):
¤
uEnd call with both participants: ¤ Press the end call key a.
Network services
Accepting a waiting call
§Accept§ Press the display key.
You have the option of toggling or holding a conference call.
Note:
Without CLIP a waiting call is only announced with a beep.
Accept call waiting
§Options§ £Accept waiting call
Reject call waiting
§Options§ ¢Reject waiting call
Functions after a call
Activating/deactivating network mailbox
w¢ê¢Network Mailbox Status: Activating/deactivating. §Send§ Press the display key. a Press the end call key.
17
Gigaset SL560 / EN for Greece / A31008-M1710-T111-2-8U19 / direct_charges.fm / 22.10.08
Using the directory and lists
Using the directory and lists
The options are: u Directory,
u Call-by-Call list,
u Last number redial list, u SMS list,
u Calls list.
You can store a total of 250 entries in the directory and call-by-call list.
You create the directory and call-by-call list for your own individual handset. You can also send lists/entries to other handsets (page 20).
Directory/call-by-call list
Note:
For quick access to a number from the directory or the call-by-call list (quick dial), you can assign the number to a key.
Directory
In the directory you can store
uup to three numbers and the corresponding first names and surnames,
uVIP identifier and VIP ringtone (optional),
u e-mail address (optional), u CLIP pictures (optional) u Anniversaries with signal.
¤ With the handset in idle status, open the directory by pressing the skey.
Length of entries (directory)
3 numbers: max. 32 digits
First name and surname: max. 16 characters each
E-mail address: max. 60 characters
Call-by-Call list
In the Call-by-Call list you can store prefixes for network providers ("call-by-call numbers").
¤Open the call-by-call list in idle status by pressing the Ckey.
Length of entries
Number: |
max. 32 digits |
Name: |
max. 16 characters |
Storing a number in the directory
s¢New Entry
¤ Change multiple line input:
First Name / Surname:
Enter a name in at least one of the fields.
Phone (Home) / Phone (Mobile) / Phone (Office)
Enter a number in at least one of the fields.
Enter E-mail address.
Annivers.:
Select On or Off.
With setting On:
enter Anniversary (Date) and Annivers. (Time) (page 21) and select reminder type: Annivers. (Signal).
Caller Picture
If necessary, select the picture that should appear when the user is making a call (page 42). Precondition: Calling Line Identification (CLIP).
¤ Save changes: (page 56).
18

Gigaset SL560 / EN for Greece / A31008-M1710-T111-2-8U19 / direct_charges.fm / 22.10.08
Storing a number in the call-by-call list
C¢New Entry
¤ Change multiple line input:
Name:
Enter name.
Number:
Enter number.
Selecting entries in the directory and call-by-call list
s/ COpen directory or call-by-call list.
You have the following options:
uUse sto scroll through the entries until the required name is selected.
uEnter the first character of the name (in the directory: the first character of the surname or of the first name if only the
first name is entered), if necessary use sto scroll to the entry.
Dialling with the directory/ call-by-call list
s/ C ¢s(select entry)
cPress the talk key. The number is dialled.
Managing entries in the directory/ call-by-call lists
s/ C ¢s(select entry)
Viewing an entry
§View§ Press the display key. The entry is displayed. Back with §OK§.
Editing entries
§View§ §Edit§ Press display keys one after the other.
¤ Carry out changes and save.
Using the directory and lists
Using other functions
s/ C¢s(select entry) ¢§Options§ (open menu)
The following functions can be selected with q:
Display Number
To edit or add to a saved number, or to save it as a new entry, press Ó after the number is displayed.
Edit Entry
Edit selected entry.
Delete Entry
Delete selected entry.
VIP Entry (directory only)
Mark a directory entry as VIP (Very Important Person) and assign it a specific ringtone. You will then be able to recognise VIP calls by the ringtone.
Precondition: Calling Line Identification (page 13).
Record Pattern (directory only)
Speak the name of the selected entry and store as a voice pattern (page 22).
Play Pattern (directory only)
Play voice patterns (page 22).
Delete Pattern (directory only) Delete voice patterns (page 22).
Copy Entry
Send a single entry to a handset (page 20).
Delete List
Delete all entries in the directory/call- by-call list.
Copy List
Send complete list to a handset (page 20).
Available Memory
Display the available entries in the directory and call-by-call list (page 18).
Using quick dial keys
¤Press and hold the required quick dial key (page 18).
19
Gigaset SL560 / EN for Greece / A31008-M1710-T111-2-8U19 / direct_charges.fm / 22.10.08
Using the directory and lists
Sending the directory/call-by-call list to another handset
Preconditions:
uThe sending and receiving handsets must both be registered to the same base station.
u The other handset and base station can send and receive directory entries.
s/ C ¢s(select entry) ¢§Options§ (open menu) ¢Copy
Entry / Copy List ¢to Internal
~Enter the internal number of the receiver handset. You see
Copying entry.
§Yes§ / §No§ Press the display key.
A successful transfer is confirmed by a message and confirmation tone on the receiver handset.
Note:
You can send the complete directory via the data transfer¢ ¢without opening the directory: w ý Directory.
Please remember:
uEntries with identical numbers are not overwritten on the receiver handset.
uThe transfer is cancelled if the phone rings or if the memory of the receiver handset is full.
Transferring the directory as a vCard with Bluetooth
In Bluetooth mode (see page 46) you can transfer directory entries in vCard format, e.g. to exchange entries with your mobile.
s¢s(Select entry) ¢
§Options§ (Open menu) ¢Copy Entry /
Copy List ¢vCard via Bluetooth
The list of "Known Devices" (see page 46) is displayed.
s Select device and press §OK§.
Receiving a vCard with Bluetooth
If a device from the "Known Devices" list (see page 46) sends a vCard to your handset, this occurs automatically and you are informed about it via the display.
If the sending device does not appear in the list, you will be asked on the display to enter the device PIN for the sending device:
~Enter the PIN for the sending Bluetooth device and press
§OK§.
The transferred vCard is available as a directory entry.
Adding a displayed number to the directory
Numbers that appear in a list, e.g. the calls list or the last number redial list, in a text message or displayed during a call can be added to the directory.
A number is displayed:
§Options§ ¢Copy to Directory
¤ Complete the entry, see page 18.
Selecting a number or e-mail address from the directory
There are many operating situations in which you can open the directory, e.g. to copy a number or e-mail address. Your handset need not be in idle status.
¤Depending on the operating situation, open the directory with sor
Òor ©Directory.
q Select an entry (page 19).
20
 Loading...