


 Loading...
s
Issued by
Gigaset Communications GmbH Schlavenhorst 66, D-46395 Bocholt
Gigaset Communications GmbH is a trademark licensee of Siemens AG
© Gigaset Communications GmbH 2008 All rights reserved.
Subject to availability. Rights of modifications reserved.
www.gigaset.com
Gigaset SX255isdn

Overview of the base station
Overview of the base station
Centre LED (green):
Indicates readiness for use in idle status and also acts as a Paging key (page 17) and Register key (flashes, page 11.)
 Right and left LED (red):
Indicates the assignment of the two B channels.
1

Contents
Contents
Overview of the base station . . . . . . . . . . . . . . . . . . 1 Safety precautions . . . . . . . . . . . . . . . . . . . . . . . . . . . 3
Getting started . . . . . . . . . . . . . . . . . . . . . . . . . . . . . . 4
Pack contents . . . . . . . . . . . . . . . . . . . . . . . . . . . . . . . . . . . . . . . . . . . . . . . . . . . . . . . . . 4 Notes on installation . . . . . . . . . . . . . . . . . . . . . . . . . . . . . . . . . . . . . . . . . . . . . . . . . . . 4 Use as desktop unit . . . . . . . . . . . . . . . . . . . . . . . . . . . . . . . . . . . . . . . . . . . . . . . . . . . . 5 Mounting the base as a wall unit . . . . . . . . . . . . . . . . . . . . . . . . . . . . . . . . . . . . . . . . . 5 Connecting the base . . . . . . . . . . . . . . . . . . . . . . . . . . . . . . . . . . . . . . . . . . . . . . . . . . . 6 Connecting auxiliary equipment . . . . . . . . . . . . . . . . . . . . . . . . . . . . . . . . . . . . . . . . . . 7 Setting and operating the base . . . . . . . . . . . . . . . . . . . . . . . . . . . . . . . . . . . . . . . . . . . 8 Registering handsets . . . . . . . . . . . . . . . . . . . . . . . . . . . . . . . . . . . . . . . . . . . . . . . . . . 11 De-registering handsets . . . . . . . . . . . . . . . . . . . . . . . . . . . . . . . . . . . . . . . . . . . . . . . 17 Locating a handset (paging) . . . . . . . . . . . . . . . . . . . . . . . . . . . . . . . . . . . . . . . . . . . . 17
The quick way into the world of ISDN . . . . . . . . . 18
Answering machine . . . . . . . . . . . . . . . . . . . . . . . . 19
Operation using a registered handset . . . . . . . . . . . . . . . . . . . . . . . . . . . . . . . . . . . . . 19 Remote control of answering machines . . . . . . . . . . . . . . . . . . . . . . . . . . . . . . . . . . . 21
Connecting devices . . . . . . . . . . . . . . . . . . . . . . . . |
25 |
Connecting cord-based analogue devices . . . . . . . . . . . . . . . . . . . . . . . . . . . . . . . . |
. 25 |
Making calls with devices on the analogue connection (TAE connection) . . . . . . . . |
28 |
Defining the device type . . . . . . . . . . . . . . . . . . . . . . . . . . . . . . . . . . . . . . . . . . . . . . . |
29 |
Connecting PC via USB . . . . . . . . . . . . . . . . . . . . . . . . . . . . . . . . . . . . . . . . . . . . . . . . |
30 |
Gigaset Repeater . . . . . . . . . . . . . . . . . . . . . . . . . . . . . . . . . . . . . . . . . . . . . . . . . . . . . |
30 |
Operation of entrance telephone . . . . . . . . . . . . . |
31 |
Connecting entrance telephones . . . . . . . . . . . . . . . . . . . . . . . . . . . . . . . . . . . . . . . . |
31 |
Appendix . . . . . . . . . . . . . . . . . . . . . . . . . . . . . . . . . |
33 |
Care . . . . . . . . . . . . . . . . . . . . . . . . . . . . . . . . . . . . . . . . . . . . . . . . . . . . . . . . . . . . . . . 33 Contact with liquid . . . . . . . . . . . . . . . . . . . . . . . . . . . . . . . . . . . . . . . . . . . . . . . . . . . 33 Questions and Answers . . . . . . . . . . . . . . . . . . . . . . . . . . . . . . . . . . . . . . . . . . . . . . . . 34 Service (Customer Care) . . . . . . . . . . . . . . . . . . . . . . . . . . . . . . . . . . . . . . . . . . . . . . . 35 Guarantee Certificate United Kingdom . . . . . . . . . . . . . . . . . . . . . . . . . . . . . . . . . . . . 36 Guarantee Certificate Ireland . . . . . . . . . . . . . . . . . . . . . . . . . . . . . . . . . . . . . . . . . . . 37 Specifications . . . . . . . . . . . . . . . . . . . . . . . . . . . . . . . . . . . . . . . . . . . . . . . . . . . . . . . 38
Accessories . . . . . . . . . . . . . . . . . . . . . . . . . . . . . . . 39 ISDN glossary . . . . . . . . . . . . . . . . . . . . . . . . . . . . . 42 Index . . . . . . . . . . . . . . . . . . . . . . . . . . . . . . . . . . . . 50
2

Safety precautions
Safety precautions !
Read the safety precautions and the operating instructions before
!use.
Explain their contents to your children, and the potential hazards associated with using the telephone.
$ Use only the power unit supplied, as indicated on the underside of the base station.
The operation of medical appliances may be affected. Be aware of the technical conditions within the particular environment (e. g. doctor's practice).
Do not install the base in bathrooms or shower rooms (see page 6 and page 33). The handset and base are not watertight.
Do not use the phone in environments subject to explosion hazard (e .g. auto paint shops).
ƒIf you give your Gigaset to someone else, make sure you also give them the operating instructions.
Dispose of the batteries and phone in accordance with environmental regulations.
Please note that only terminals that are operated inhouse (inside buil-
idings) may be connected to the analogue TAE connections.
Not all of the functions described in these operating instructions are available in all countries.
3

Getting started
Getting started
Pack contents
1 base
1 power supply cord with power unit
1 ISDN connection cable
1 USB cable
1 wall holder
Operating instructions
Notes on installation
The installation location must have a 220/230V~ mains outlet and an ISDN telephone connection.
For optimum radio reception, you should install the base at a central point wherever possible.
The installation location should not be in the immediate vicinity of other equipment, e. g. hi-fi, television, office or microwave equipment, in order to prevent mutual interference. Minimum distance (including to base power unit): 1.5 metres.
In case of picture and sound interference on satellite reception equipment, please contact your retailer to have your satellite reception system checked for a lack of screening.
Avoid direct contact with sources of heat (e .g. radiators).
Do not expose the base to direct sunlight.
The base can also be wall mounted, using the wall holder included in the pack.
If you are not using wall mounting, install the base on a level, non-slip surface. The feet of the device do not normally leave any marks on the installation surface. However, in view of the variety of paints and polishes available, it cannot be ruled out, that contact may cause marks on the installation surface.
The range between the base and the handsets is up to 300 m in the open air. Inside buildings, ranges of up to 50 m can be achieved.
4
Getting started
Use as desktop unit
Your telephone can be used as a space-saving desktop unit. Before connecting the base, please read the notes on installation (page 3, page 4).
Mounting the base as a wall unit
Before mounting the base, please read the notes on installation (page 3, page 4).
1.Drill two holes (Ø 5 mm) 80 mm apart next to one another in the wall.
2.Use appropriate rawlplugs.
3.Screw in two round screws (Ø 4 mm).
4.Before attaching the wall holder and tightening the screws, place the connection cable through the holder from the back to the front. Ensure that the connection cable lies freely in the back recess.
5.Now plug the connection cable into the base (see Connecting the base).
6.Using slight vertical pressure from the top centre, press the base onto the retaining catches on the wall holder.
5

Getting started
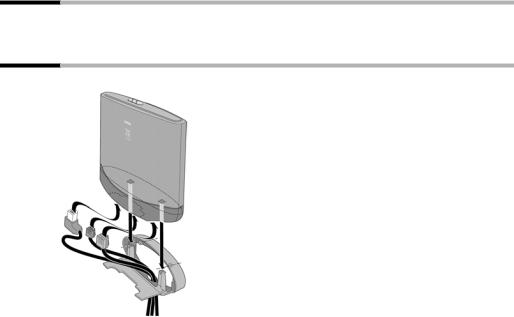
Connecting the base
1.
4.Front of unit
3.
2.
Schematic illustration
1. -S0 jack: Insert ISDN connection cable until connector clicks into place.
2.Insert ISDN connection cable into ISDN connection until connector clicks into place.
3.For NTBA with self-mounting, plug in the cable between the NTBA and the TAE (old telephone outlet) or Mini-Western connector until both connectors click into place.
4. jack: Plug in the power supply cord, until the connector clicks into place and plug into the mains outlet.
!Use only the power unit supplied, as indicated on the underside of the base station.
|
Power failure: |
i |
Your base and the handsets registered on it, as well as wire-based termi- |
nals cannot operate in case of power failure. However, all the settings |
|
|
and stored information (messages, phonebook entries etc.) are retained |
|
indefinitely. |
|
|
6
Getting started
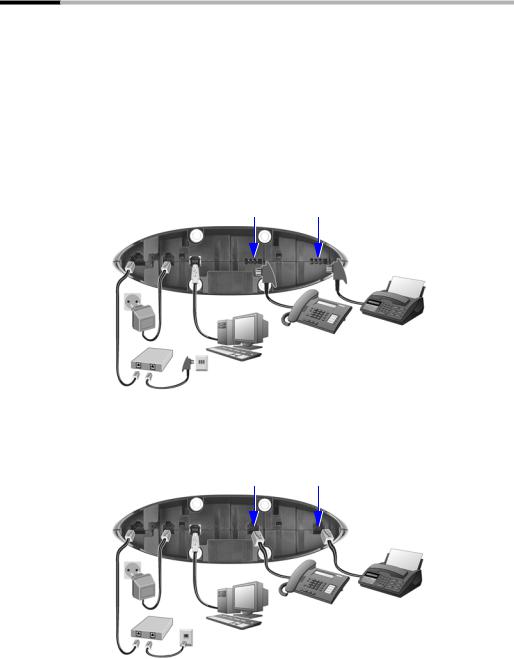
Connecting auxiliary equipment
You can connect the following auxiliary equipment to your base:
up to eight wireless devices (handsets see page 11, Gigaset data modules see page 30, Gigaset Repeater see page 30)
up to two analogue, wire-based devices (e. g. telephone, answering machine, fax machine, entrance telephone – see page 25)
a PC via USB port (USB V1.1 – see page 30)
Insert the USB cable into the base station, but do not connect it to the PC yet. Only attach the USB cable to the PC when prompted to do so by the PC program talk&surf wizard.
Connection in Germany
Connection for the wirebased terminal with internal number 22
Connection for the wirebased terminal with internal number 21
USB
ISDN
Schematic illustration
The connections are provided for the use of analogue terminals using TAE connectors.
Connection in other countries
Connection for the wirebased terminal with internal number 22
USB
ISDN
Schematic illustration
Connection for the wirebased terminal with internal number 21
The connections are provided for the use of standard terminals using Mini-Western connectors.
7

Getting started
Setting and operating the base
Preparing the base for use and making settings
In order to be able to use your base, certain settings are required, e. g. the ISDN phone number (MSN). To do this, you need a handset or a PC. More details can be found in the operating instructions for your handset or your PC software.
If you have an S44, S1 or SL1 added-feature handset, a Getting started wizard is available to assist you in making the settings. More details can be found in the operating instructions for your added-feature handset.
Operating the base from a handset
Operating instructions are enclosed for the S44 handset. You will find operating instructions for other handsets on the enclosed CD-ROM or on the Internet at www.gigaset.com
Using "Assigning an MSN a ringer melody" as an example, you are shown below how to operate the base station with the following handsets:
S44,
S1 and SL1,
C34,
C1, C2 and C32.
You will find the meaning of the symbols used and information about operating your handset in the relevant operating instructions.
Operating the base from an S44 handset
The central operator control on the S44 handset is a control key pwhich has four direction arrows with the associated symbols. Pressing the various icons (up, down, right, or left) opens a different function. The side you have to press is shown by a black triangle in the operating instructions, e. g.: vkey for right = open menu.
Example: "Assigning an MSN a ringer melody"
v |
|
|
Open the menu. |
||
s Ð |
|
Select the menu item and confirm. |
|||
OK |
|
||||
|
|
|
|
|
|
s Base |
|
Select the menu item and confirm. |
|||
OK |
|
||||
|
|
|
|
|
|
s Settings |
|
Select the menu item and confirm. |
|||
OK |
|
||||
|
|
|
|
|
|
~ |
|
|
|
|
If necessary, enter the system PIN of the base |
OK |
|
|
|||
|
|
|
|
|
(the default is 0000) and confirm. |
|
|
|
|
|
|
s ISDN settings |
|
Select the menu item and confirm. |
|||
OK |
|
||||
|
|
|
|
|
|
s Set up MSN |
|
Select the menu item and confirm. |
|||
OK |
|
||||
|
|
|
|
|
|
s MSN1: |
|
|
Select MSN, e. g. MSN1: Anna. |
||
v |
|
|
Open the submenu. |
||
r Ringer melody |
|
Select the menu item and confirm. |
|||
OK |
|
||||
|
|
|
|
|
|
r Ringer melody: 5 |
|
Select melody (1 – 10, Device ringer) and confirm, |
|||
OK |
|
||||
|
|
|
|
|
e. g. Ringer melody: 5. |
|
|
|
|
|
|
8
Getting started
Operating the base from an S1 or SL1 handset
The central operator control on the S1 and SL1 handsets is a control key p, which has four black direction arrows with the associated symbols. Pressing the various icons (up, down, right, or left) opens a different function. The side you have to press is shown by a black triangle in the operating instructions, e. g.: vkey for right = open menu.
Example: "Assigning an MSN a ringer melody"
|
|
|
|
|
|
v |
|
|
Open the menu. |
||
s Set base |
|
Select the menu item and confirm. |
|||
OK |
|
||||
|
|
|
|
|
|
s Settings |
|
Select the menu item and confirm. |
|||
OK |
|
||||
|
|
|
|
|
|
~ |
|
|
|
|
If necessary, enter the system PIN of the base |
OK |
|
|
|||
|
|
|
|
|
(the default is 0000) and confirm. |
|
|
|
|
|
|
s ISDN settings |
|
Select the menu item and confirm. |
|||
OK |
|
||||
|
|
|
|
|
|
s Set up MSN |
|
Select the menu item and confirm. |
|||
OK |
|
||||
|
|
|
|
|
|
s MSN1: |
|
|
Select MSN, e. g. MSN1: Anna. |
||
v |
|
|
Open the submenu. |
||
s Ringer Melody: |
|
|
Select the menu item and confirm. |
||
OK |
|||||
|
|
|
|
|
|
r Ringer Melody: 5 |
|
|
Select melody and confirm, e. g. Ringer Melody: 5. |
||
OK |
|||||
|
|
|
|
|
|
Operating the base from a C34 handset
The central operator control on the C34 handset is a control key pwhich, among other things, has a triangle on the top and bottom and a spot on the left and right. Pressing the various icons (up, down, right, or left) opens a different function. The side you have to press is shown by a black triangle in the operating instructions. Example: tfor "press the top of the control key".
Example: "Assigning an MSN a ringer melody".
v |
|
|
Open the menu. |
||
s Settings |
|
Select the menu item and confirm. |
|||
OK |
|
||||
|
|
|
|
|
|
s Base |
|
Select the menu item and confirm. |
|||
OK |
|
||||
|
|
|
|
|
|
s Settings |
|
Select the menu item and confirm. |
|||
OK |
|
||||
|
|
|
|
|
|
~ |
|
|
|
|
If necessary, enter the system PIN of the base |
OK |
|
|
|||
|
|
|
|
|
(the default is 0000) and confirm. |
|
|
|
|
|
|
s ISDN settings |
|
Select the menu item and confirm. |
|||
OK |
|
||||
|
|
|
|
|
|
s Set up MSN |
|
Select the menu item and confirm. |
|||
OK |
|
||||
|
|
|
|
|
|
s MSN1: |
|
|
Select MSN, e. g. MSN1: Anna. |
||
v |
|
|
Open the submenu. |
||
s Ringer melody |
|
Select the menu item and confirm. |
|||
OK |
|
||||
|
|
|
|
|
|
s Ringer melody: 5 |
|
Select melody and confirm, e. g. Ringer melody: 5. |
|||
OK |
|
||||
|
|
|
|
|
|
9
Getting started
Operating the base from a C1, C2 or C32 handset
The C1, C2 and C32 handsets each have a rocker key, which has two functions.
On the Gigaset C1, the upper half of the rocker key has the function of the Talk key c, the lower half the Phonebook key h.
On the Gigaset C2 and C32, the upper half of the rocker key has the function of the Talk key c, the lower half the Handsfree key d.
Example: "Assigning an MSN a ringer melody"
MENU |
|
Open the menu. |
|
|
|
s Set base |
OK |
Select the menu item and confirm. |
s Settings |
OK |
Select the menu item and confirm. |
~ OK |
|
If necessary, enter the system PIN of the base |
|
|
(the default is 0000) and confirm. |
|
|
|
s ISDN settings |
OK |
Select the menu item and confirm. |
s Set up MSN |
OK |
Select the menu item and confirm. |
s MSN1: |
|
Select MSN, e. g. MSN1: Anna. |
MENU |
|
Open the submenu. |
|
|
|
s Ringer melody: 5 |
OK |
Select melody and confirm, |
|
|
e. g. Ringer melody: 5 (‰= set). |
s MSN1: |
|
Select MSN, e. g. MSN1: Anna. |
10

Getting started
Registering handsets
You can register a maximum of eight wireless devices on your base (including Gigaset data modules (page 30) and Gigaset Repeater (page 30)). The internal numbers 11-18 are set aside for this purpose. Wire-based analogue devices do not have to be registered (page 25).
If the internal numbers Int.11 to Int.18 on your telephone have already been assigned, please de-register another handset you no longer require before registering a new one (see handset operating instructions).
If necessary, keep the handset operating instructions to hand with their description of the registration process.
You must initiate handset registration on the handset and on the base.
1. On the base
Press the Register/Paging key on the base for about 3 seconds. This starts the registration. The base is ready for registering for 60 seconds.
Press the lit Register/Paging key
2. On the handset (within 30 sec.)
Register your handset (see handset operating instructions).
i |
If the handset cancels base paging, e. g. because the registration time has |
been exceeded, repeat the process. |
|
|
|
11

Getting started
Manually registering a Gigaset S44 handset
v |
|
|
Open the menu. |
|||
s Ð |
|
Select the menu item and confirm. |
||||
OK |
|
|||||
|
|
|
|
|
|
|
s Handset |
|
Select the menu item and confirm. |
||||
OK |
|
|||||
|
|
|
|
|
|
|
s Register H/Set |
|
Select the menu item and confirm. |
||||
OK |
|
|||||
|
|
|
|
|
|
|
s Base 1 |
|
Select base (1–4) and confirm, e. g. Base 1. |
||||
OK |
|
|||||
|
|
|
|
|
|
|
~ |
|
|
|
|
|
Enter the system PIN of the base (the default is 0000) |
OK |
|
|
||||
|
|
|
|
|
|
and confirm. The display shows Regstr.Procedure |
|
|
|
|
|
|
and the name of the base flashes, e. g. Base 1. |
|
|
|
|
|
|
|
|
|
|
|
|
|
Press lit Register key on the base for approx. |
|
|
|
|
|
|
|
|
|
|
|
|
|
4 seconds (page 11); the key flashes. The base is |
|
|
|
|
|
|
ready for registering only when the key is flashing. |
|
|
|
|
|
|
|
s INT11: Int.11 |
|
Select internal number and confirm, |
||||
OK |
|
|||||
|
|
|
|
|
|
e. g. INT11: Int.11. |
|
|
|
|
|
|
|
After registration the handset reverts to idle status. The handset's internal number is shown in the display, e. g. Int.11.
Manually registering a Gigaset S1 / SL1 handset
|
|
|
|
|
|
|
v |
|
|
Open the menu. |
|||
s Settings |
|
Select the menu item and confirm. |
||||
OK |
|
|||||
|
|
|
|
|
|
|
s Register H/Set |
|
Select the menu item and confirm. |
||||
OK |
|
|||||
|
|
|
|
|
|
|
s Base |
|
Select base (1–4) and confirm, e. g. Base 1. |
||||
OK |
|
|||||
|
|
|
|
|
|
|
~ |
|
|
|
|
|
Enter the system PIN of the base (factory setting: |
OK |
|
|
||||
|
|
|
|
|
|
0000) and confirm. The display shows Regstr.Pro- |
|
|
|
|
|
|
cedure and the name of the base flashes, |
|
|
|
|
|
|
e. g. Base 1. |
|
|
|
|
|
|
Press lit Register key on the base for approx. |
|
|
|
|
|
|
|
|
|
|
|
|
|
4 seconds (page 11); the key flashes. The base is |
|
|
|
|
|
|
only ready for registering while the key is flashing. |
|
|
|
|
|
|
|
s INT11: Int.11 |
|
|
Select internal number and confirm, |
|||
OK |
||||||
|
|
|
|
|
|
e. g. INT11: Int.11. |
After registration the handset reverts to idle status. The handset's internal number is shown in the display, e. g. Int.11.
12

Getting started
Manually registering a C34 handset
v |
|
|
Open the menu. |
|||
s Handset Settings |
|
Select the menu item and confirm. |
||||
OK |
|
|||||
|
|
|
|
|
|
|
s Handset |
|
Select the menu item and confirm. |
||||
OK |
|
|||||
|
|
|
|
|
|
|
s Register Handset |
|
Select the menu item and confirm. |
||||
OK |
|
|||||
|
|
|
|
|
|
|
~ |
|
|
|
|
|
Enter the system PIN of the base (the default is 0000) |
OK |
|
|
||||
|
|
|
|
|
|
and confirm. The display shows Regstr.Procedure |
|
|
|
|
|
|
and the name of the base flashes, e. g. Base 1. |
|
|
|
|
|
|
|
|
|
|
|
|
|
Press lit Register key on the base for approx. |
|
|
|
|
|
|
|
|
|
|
|
|
|
4 seconds (page 11); the key flashes. The base is |
|
|
|
|
|
|
ready for registering only when the key is flashing. |
|
|
|
|
|
|
|
s INT11: Int.11 |
|
Select internal number and confirm, |
||||
OK |
|
|||||
|
|
|
|
|
|
e. g. INT11: Int.11. |
|
|
|
|
|
|
|
After registration the handset reverts to idle status. The handset's internal number is shown in the display, e. g. Int.11.
Manually registering a Gigaset C1 / C2 / C32 handset
MENU |
|
Open the menu. |
|
|
|
|
|
s Handset Settings |
OK |
Select the menu item and confirm. |
|
s Register Handset |
OK |
Select the menu item and confirm. |
|
s Base 1 |
OK |
Select base (1–4) and confirm, e. g. Base 1. |
|
~OK |
|
Enter the system PIN of the base (factory setting: |
|
|
|
|
0000) and confirm. The display shows Registering |
|
|
|
and the name of the base flashes, e. g. Base 1. |
|
|
|
Press lit Register key on the base for approx. |
|
|
|
|
|
|
|
4 seconds (page 11); the key flashes. The base is |
|
|
|
only ready for registering while the key is flashing. |
|
|
|
|
s INT11: Int.11 |
OK |
Select internal number and confirm, |
|
|
|
|
e. g. INT11: Int.11. |
After registration the handset reverts to idle status. The handset's internal number is shown in the display, e. g. Int.11.
13

Getting started
Registering a Gigaset 4000 Comfort/Micro handset
|
|
|
|
|
|
a |
|
|
Hold down, to turn on the handset. |
||
either ... |
|
|
|
||
|
|
|
|
|
|
OK |
|
|
Confirm the prompt. |
||
|
|
|
|
|
|
or ... |
|
|
|
||
|
|
|
|
|
|
G Settings |
OK |
Select the menu item and confirm. |
|||
G Register H/Set |
OK |
Select the menu item and confirm. |
|||
G Base |
|
OK |
Select base (1–4) and confirm, e. g. Base 1. |
||
... then |
|
|
|
||
|
|
|
|
|
|
~OK |
|
|
Enter the system PIN of the base (factory setting: |
||
|
|
|
|
|
0000) and confirm. |
|
|
|
|
|
Press lit Register key on the base for approx. |
|
|
|
|
|
|
|
|
|
|
|
4 seconds (page 11); the key flashes. The base is |
|
|
|
|
|
only ready for registering while the key is flashing. |
|
|
|
|
|
|
s INT11: Int.11 |
OK |
Select internal number and confirm, |
|||
|
|
|
|
|
e. g. INT11: Int.11. The successful registration |
|
|
|
|
|
is confirmed on the display. |
|
|
|
|
||
Registering a Gigaset 4000 Classic handset |
|||||
|
|
|
|
||
i |
|
You can register a maximum of four Gigaset 4000 Classic handsets. |
|||
|
Register Gigaset 4000 Classic handsets before other handsets. |
||||
|
|
|
|
|
|
|
|
|
|
||
MENU |
|
|
Open the menu. |
||
|
|
|
|||
s Register H/Set |
OK |
Select the menu item and confirm. PIN is displayed. |
|||
~OK |
|
|
Enter the system PIN of the base (the default is 0000) |
||
|
|
|
|
|
and confirm. |
|
|
|
|
|
|
|
|
|
|
|
Press lit Register key on the base for approx. |
|
|
|
|
|
|
|
|
|
|
|
4 seconds (page 11); the key flashes. The base is |
|
|
|
|
|
ready for registering only when the key is flashing. |
|
|
|
|
|
|
Once the system PIN has been entered the handset searches for a base with this PIN. While it is searching Register H/Set flashes in the display. After registration the handset reverts to idle status. Your handset is now ready for operation!
The next unassigned internal number between Int.11 and Int.18 is automatically assigned to the handset as it is registered.
14

Getting started
Registering a Gigaset 3000 Comfort/Micro handset
− |
|
Hold down, to turn on the handset. |
|
either ... |
|
|
|
|
|
|
|
YES |
|
Confirm the prompt. |
|
|
|
|
|
or ... |
|
|
|
|
|
|
|
. |
|
|
Open the menu. |
s Stations |
OK |
Select the menu item and confirm. |
|
s Station 1 |
Í |
Select the base (1-4) and open the sub-menu. |
|
s Registration |
OK |
Select the menu item and confirm. |
|
... then |
|
|
|
|
|
|
|
~OK |
|
Enter the system PIN of the base |
|
|
|
|
(factory setting: 0000) and confirm. |
|
|
|
Press lit Register key on the base for approx. |
|
|
|
|
|
|
|
|
|
|
|
4 seconds (page 11); the key flashes. The base is |
|
|
|
only ready for registering while the key is flashing. |
|
|
|
|
s INT11: Int.11 |
OK |
Select internal number and confirm, |
|
|
|
|
e. g. INT11: Int.11. The successful registration |
|
|
|
is confirmed on the display. |
|
|
|
|
The next unassigned internal number between Int.11 and Int.18 is automatically assigned to the handset as it is registered.
Registering a Gigaset 3000 Classic handset
− |
|
Hold down, to turn on the handset. |
|
¦¨« |
|
Press in turn. |
|
~OK |
|
Enter the number of the base (normally 1) and con- |
|
|
firm. The Standby symbol C flashes and then lights |
||
|
|
|
up constantly when the connection to the base has |
|
|
|
been established. |
|
|
|
|
~OK |
|
Enter the system PIN of the base |
|
|
|
|
(factory setting: 0000) and confirm. |
|
|
|
Press lit Register key on the base for approx. |
|
|
|
|
|
|
|
|
|
|
|
4 seconds (page 11); the key flashes. The base is |
|
|
|
only ready for registering while the key is flashing. |
|
|
|
|
s INT11: Int.11 |
OK |
Select internal number and confirm, |
|
|
|
|
e. g. INT11: Int.11. The successful registration |
|
|
|
is confirmed on the display. |
|
|
|
|
15
Loading...