


 has chosen ELF
For all engines |
ELF EXCELLIUM LDX 5W-40 |
ACEA A3/B4 |
|
Optimum performance and maximum protection in the most severe conditions |
|
|
All types of driving |
|
|
|
|
|
ELF EVOLUTION SXR 5W-40 |
ACEA A3/B4 |
|
Optimum performance |
|
|
All types of driving |
|
|
|
|
For all engines |
ELF COMPETITION ST 10W-40 |
ACEA A3/B4 |
|
ELF TURBO DIESEL 10W-40 |
ACEA B3/B4 |
|
Other RENAULT approved lubricants for normal use. |
|
|
|
|
5-speed manual gearbox |
Elf has developed specific lubricants for each Renault transmission: |
|
6-speed manual gearbox |
Tranself TRJ 75W80, Tranself TRT 75W80, Tranself TRP 75W80, Tranself TRX 75W80 |
|
Automatic transmission |
for manual gearboxes, Renaultmatic D3Syn and Renaultmatic D2 for automatic gearboxes |
|
|
These fluids are actively involved in the operation of your vehicle. (*) |
|
RENAULT recommends using approved ELF products when topping up or changing the oil.
(*) Refer to your vehicle's Warranty and Services booklet for information regarding which grade of oil to use. Consult your RENAULT Dealer or visit www.lubricants.elf.com
Quick overview
• Tyre pressures ......................................................................................................... |
0.04 |
• Adjusting the seats and the driver's position ......................................... |
1.16 - 1.17 |
• Child restraint devices ............................................................................. |
1.28 1.35 |
• Warning lights ........................................................................................... |
1.40 1.47 |
• Audible and visible signals ..................................................................... |
1.53 1.56 |
• Running in, driving .................................................................................. |
2.02 2.25 |
• Heating/air conditioning .......................................................................... |
3.02 3.11 |
• Opening the bonnet ............................................................................................... |
4.02 |
• Levels (engine oil, windscreen washer, etc.) ......................................... |
4.03 4.09 |
• Emergency spare wheel ............................................................................ |
5.02 5.06 |
• Practical advice (changing the bulbs, fuses, repairs, |
|
operating faults) .................................................................................... |
5.02 5.41 |
0.02
C |
O |
N |
T |
E |
N |
T |
S |
|
|
|
|
|
|
|
Sections |
Getting to know your vehicle |
............................................................ |
|
|
1 |
|||
Driving |
............................................................................................................... |
|
|
|
|
|
2 |
Your comfort ................................................................................................. |
|
|
|
|
|
3 |
|
Maintenance .................................................................................................. |
|
|
|
|
|
4 |
|
Practical advice |
........................................................................................... |
|
|
|
|
5 |
|
Technical specifications |
........................................................................ |
|
|
|
6 |
||
Alphabetical index .................................................................................... |
|
|
|
|
7 |
||
0.03

TYRE PRESSURES
(in bar or kg/cm2, when cold)
Tyre sizes |
195/65 R 16 |
215/65 R 16 |
225/65 R 16 |
205/75 R 16 |
||
(original fittings) |
||||||
|
|
|
|
|
||
|
|
|
|
|
|
|
Wheel sizes |
|
|
6 J 16 |
|
||
|
|
|
|
|
||
Front |
3.8 |
3.9 |
|
3.8 |
4.2 |
|
Rear |
3.8 |
4.3 |
|
4.4 |
4.75 |
|
Emergency spare wheel |
3.8 |
4.3 |
|
4.4 |
4.75 |
|
|
|
|
|
|
|
|
Special features of 205/75 R 16 tyres
These tyres cannot be fitted with chains. Contact your RENAULT Dealer.
0.04
Section 1: Getting to know your vehicle
Keys - Remote control units ................................................................................................................. |
1.02 - 1.03 |
Doors ..................................................................................................................................................... |
1.04 1.10 |
Dropside ................................................................................................................................................. |
1.11 - 1.12 |
Anti-intrusion alarm .............................................................................................................................. |
1.13 - 1.14 |
Engine immobiliser ........................................................................................................................................... |
1.15 |
Seats ................................................................................................................................................................... |
1.16 |
Headrests ........................................................................................................................................................... |
1.17 |
Rear view mirrors ............................................................................................................................................. |
1.18 |
Seat belts ............................................................................................................................................... |
1.19 1.22 |
Methods of restraint in addition to the front seat belts ................................................................... |
1.23 1.27 |
Airbag .................................................................................................................................................... |
1.23 1.27 |
Child safety ........................................................................................................................................... |
1.28 1.35 |
Driver's position ................................................................................................................................... |
1.36 1.39 |
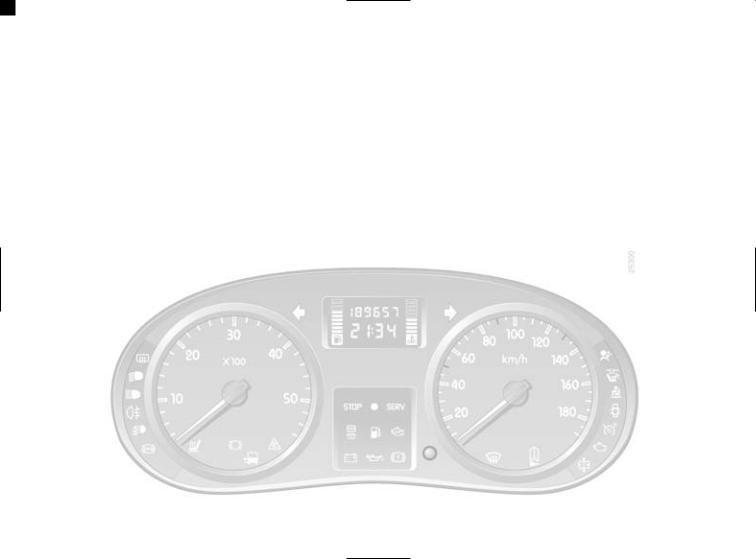
Instrument panel .................................................................................................................................. |
1.40 1.50 |
Clock .................................................................................................................................................................. |
1.51 |
Exterior temperature ......................................................................................................................................... |
1.51 |
Windscreen wipers ........................................................................................................................................... |
1.52 |
Buzzers/Lights ...................................................................................................................................... |
1.53 1.56 |
Electric beam height adjustment ..................................................................................................................... |
1.55 |
Fuel tank ................................................................................................................................................. |
1.57 - 1.58 |
1.01
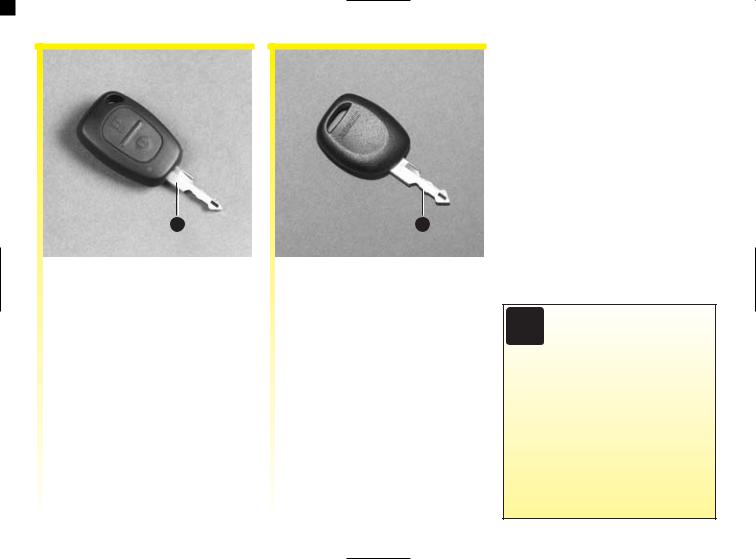
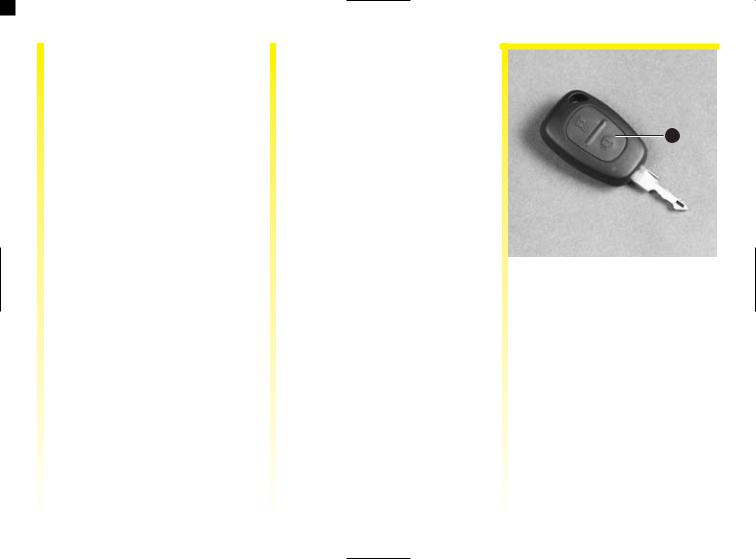
KEYS/REMOTE CONTROL UNITS
1
1Radio frequency remote control, ignition key, doors and fuel filler cap.
2
2Ignition key, doors and fuel filler cap.
Never leave the vehicle unattended with the key in the ignition if there is a child (or animal) in the
vehicle. With the key in the ignition, he or she could start the engine or operate electrical equipment such as the electric windows and there is a risk that the child may be injured by trapping his or her neck, arm, hand, etc. Risk of serious injury.
1.02
RADIO FREQUENCY REMOTE CONTROL
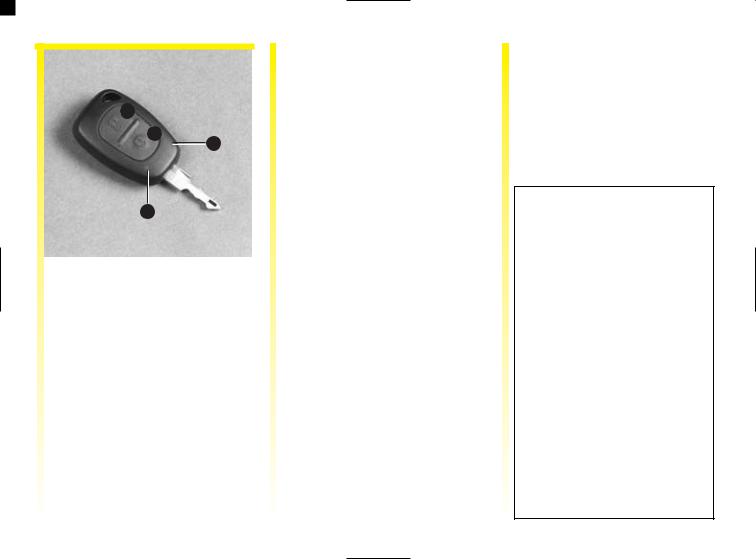
A
B
1
2
Remote control 1 locks and unlocks the doors.
It is supplied by a battery which must be replaced when battery warning light 2 no longer lights up. (Refer to the information on remote control locking: batteries).
Locking/unlocking the doors
Press the remote control unit for approximately one second (indicator light 2 lights up) to lock (side B) or to unlock (side A).
The hazard warning lights flash twice to indicate that the doors have been locked.
Note: depending on the vehicle, if either a door or the tailgate is open or not properly closed, the hazard warning lights will not flash.
The hazard warning lights flash once to indicate that the doors have been unlocked.
Remote control unit operating range
This varies according to the surroundings: therefore when handling the remote control, be careful that you do not inadvertently lock or unlock the doors.
Note: on certain vehicles, if a door is not opened within approximately 30 seconds of the door being unlocked by remote control, the doors will lock again automatically.
Interference
Operation of the remote control may be disrupted by equipment being used close to the vehicle (e.g. external equipment or the use of devices which operate on the same frequency as the remote control).
If you lose your keys or need another set of keys (or a remote control), contact your RENAULT Dealer.
•If a remote control is replaced, it will be necessary to take the vehicle and all sets of keys to your RENAULT Dealer to initialise the system.
•It is not possible to use more than two remote control units for one vehicle.
Make sure that the batteries are always in good condition - they last for approximately two years.
Refer to the Remote control door locking: batteries section of the driver's handbook for the procedure for changing the batteries.
1.03
INTERIOR ELECTRIC DOOR LOCKING CONTROL
Note: central locking is neutralised when a door is opened.
1 |
From the inside with electric control 1
This enables all the doors to be locked simultaneously.
To lock, press the switch on the opposite side to the symbol.
If you decide to keep the doors locked when you are driving, remember that it may be more
difficult for those assisting you to gain access to the passenger compartment in the event of an emergency.
NOTE
The front door mechanism cannot be locked if the door is open.
1.04
RENAULT ANTI-INTRUDER DEVICE (RAID)
You must first decide if you want to activate this function.
To activate
With the ignition on, press central door locking button 1 on the locking side (opposite the symbol) and hold for approximately 5 seconds, until you hear the operating noise (unlocking/locking).
To deactivate
With the ignition on, press central door locking button 1 on the unlocking side (symbol) and hold for approximately 5 seconds, until you hear the operating noise (locking/unlocking).
If you decide to keep the doors locked when you are driving, remember that it may be more
difficult for those assisting you to gain access to your vehicle in the event of an emergency.
1 |
Operating principle
When the vehicle moves off, the system automatically locks the doors as soon as a speed of 5 mph (8 km/h) is reached.
The door is unlocked
-if a front door is opened.
Note: if a rear door is opened, it will automatically be locked again when the car reaches a speed of approximately 5 mph (8 km/h);
-by pressing door unlocking button
1.
Operating faults
If you note that the system is not operating correctly (automatic locking does not take place), first check that all the doors have been properly closed. If they are closed correctly, consult your RENAULT Dealer.
Also make sure that locking has not accidentally been deactivated.
If this is the case, switch the ignition off and on again and reactivate the system as described above.
1.05
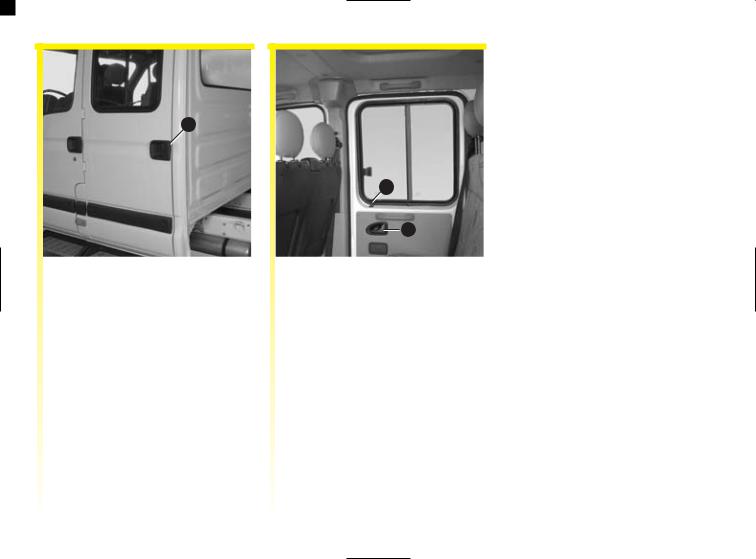
FRONT DOORS
1
2
Opening the doors from the outside
Unlock one of the front doors 2, or, depending on the vehicle, the driver's door.
Use the remote control if the vehicle is equipped with this function. Pull lever 1 towards you and open the door.
Closing from the outside
Push the door until it latches automatically. Lock it via lock 2 or use the remote control.
|
|
|
|
|
|
"Lights on" reminder buzzer |
|
|
|
|
|
|
|
|
3 |
|
|
|
|
If you have left the lights switched |
|
|
|
|
|
|
on after switching off the ignition, a |
|
|
|
|
|
|
warning buzzer will sound when a |
|
|
|
|
|
|
door is opened (to prevent the |
|
|
|
|
|
|
battery running down, etc.). |
|
|
|
|
|
|
|
|
|
|
|
|
|
|
|
|
|
4 |
|
|
|
Opening the doors from the inside
Pull handle 4 and push open the door.
Closing from the inside
Pull the door until it latches automatically.
Manual locking
With the door closed, lock the door by pressing button 3.
NOTE
The front door mechanism cannot be locked if the door is open.
As a safety precaution, the doors should only be opened or closed when the vehicle is stationary.
1.06
SIDE HINGED DOORS
1
Opening the doors from the outside
Pull handle 1 towards you after unlocking the door from the inside.
Closing from the outside
Push the door until it latches automatically.
2
3
Opening the doors from the inside
Pull handle 3 and push the door.
Closing from the inside
Pull the door until it latches automatically.
Manual locking
With the door closed, lock the door by pressing button 2.
1.07
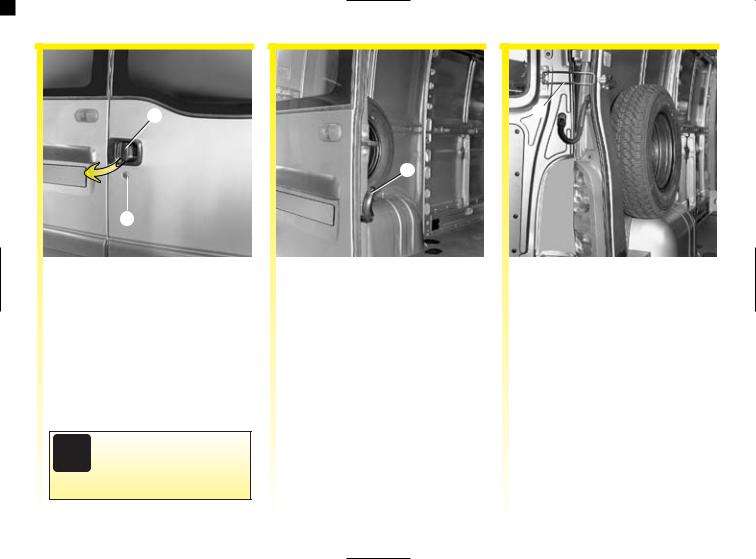
SLIDING SIDE DOORS
2 3
1
Opening from the outside
Unlock 1, with the door key, or with the remote control, if the vehicle is equipped with this function. Pull lever 3 towards you and slide the door towards the rear.
Closing from the outside
Slide the door towards the front of the vehicle holding fixed door handle 2 until the door is fully closed.
Lock it via lock 1 or use the remote control.
4
5
6
Opening from the inside
Pull handle 5 towards the rear and open the sliding door to the point where it locks into position.
Closing from the inside
Holding handle 4, slide the door until it latches automatically.
Manual locking
Use button 6.
Recommendations
concerning the sliding side door.
Care must be taken when opening or closing the sliding door, as is the case for any of the opening elements on the vehicle:
•Check that the door will not come into contact with any person, part of the body, animal or object.
•Only use the handles on the inside and outside of the door to operate it.
•Take care when opening and closing the door.
•Take particular care when the vehicle is parked on a slope: open the door with care until it is fully open and latches into its locking position.
•Before moving off, always ensure that the sliding door is properly closed.
1.08
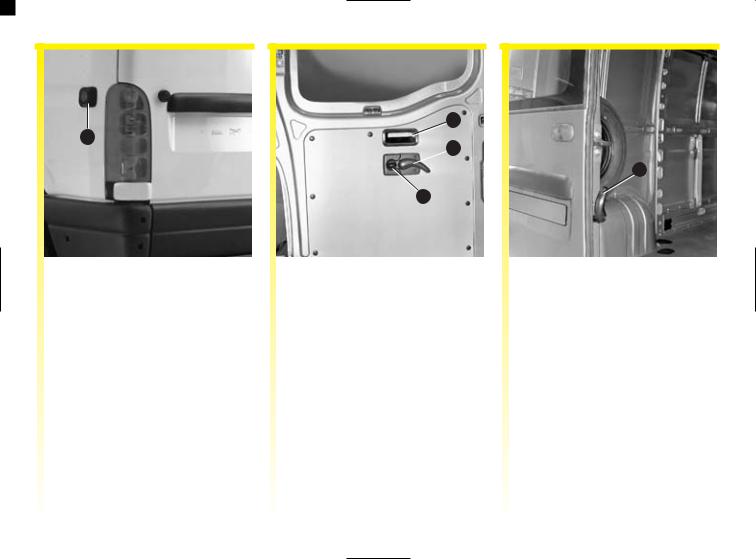
REAR DOORS
|
|
|
|
|
|
|
|
|
|
4 |
|
|
|
|
|
1 |
|
|
|
|
|||
|
|
|
|
|
|
|
|
|
|
|
|
|
|
|
|
|
|
|
|
|
|
|
|
|
|
|
|
|
|
|
3 |
|
|
|
|
|
|
|
|
|
|
|
|
|
|
|
|
|
2 |
|
|
|
|
|
|
|
|
|
|
Opening from the outside |
|
|
|
Opening the doors to 180° |
|||||||
Unlock with the door key 2, or with |
Pull handle 3 and open the |
Remove check-strap 4 from its |
|||||||||
the remote control, if the vehicle is |
left-hand door. |
housing. Open the door as far as |
|||||||||
equipped with this function. Pull |
|
|
|
possible. |
|||||||
handle 1 towards you and open the |
|
|
|
|
|
|
|||||
right-hand door. |
|
|
|
|
|
|
|||||
There is no device to restrain the doors in the wind.
1.09
REAR DOORS (continued)
6
5
 7
7
9
8
Opening the doors to 270° |
Opening from the inside |
|
Remove the check-strap from its |
Lift handle 7 and push the |
Pull down handle 9 and open the |
housing as when opening to 180°. |
right-hand door. |
left-hand door. |
Open the door fully until it stops on |
|
Closing from the inside |
the magnets 5 located on the side |
|
|
panels. |
|
First return the left-hand door to an |
|
|
almost-closed position and then |
Closing from the outside |
|
slam it shut. Use handle 6. |
|
Then do the same with the door on |
|
First return the left-hand door to an |
|
|
|
the right-hand side. |
|
almost-closed position and then |
|
|
|
|
|
slam it shut. |
|
Locking/unlocking |
Then do the same with the door on |
|
|
|
Use button 8. |
|
the right-hand side. |
|
|
Lock with the key. |
|
|
1.10
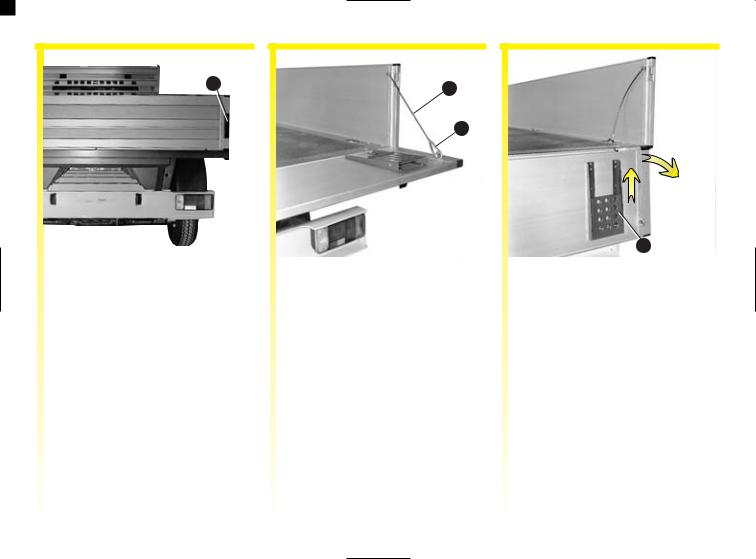
DROPSIDE
1 |
2 |
|
A
3
A
Opening rear panel A
Check that the retaining cables 2 are properly attached.
Lower levers 1 completely. Lower the rear panel.
Folding rear panel A
Release hooks 3 and lower the rear panel completely.
Removing rear panel A from its hinges
This operation can only be carried out after removing the left-hand side panel from its hinges (refer to the following page).
With the side panel in horizontal position, release hooks 3 and slide the side panel towards the left.
Closing rear panel A
Proceed in the reverse order to opening. Check that the levers are properly locked 1.
4
Footplate 4
Gently raise and lower the plate.
1.11
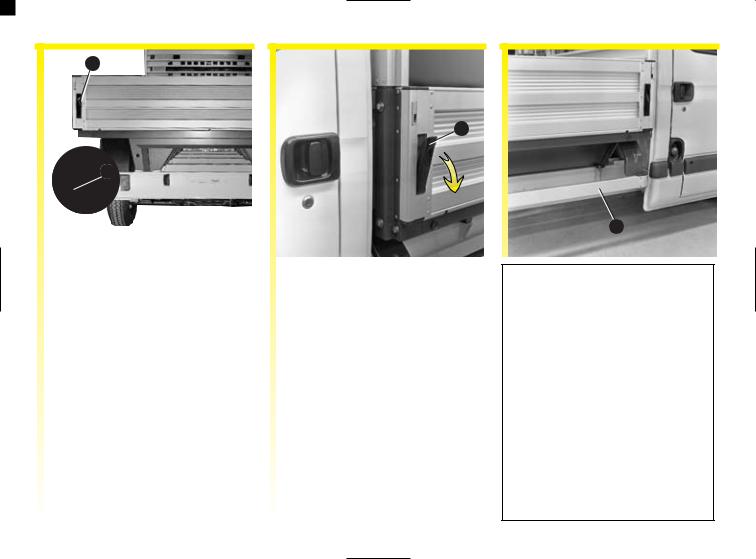
DROPSIDE (continued)
5 |
A
6
Opening side panel B
•Rear panel A is closed
Lower lever 5 completely. Hook 6 must be detached.
Lower lever 7 and side panel B completely.
•Rear panel A is hanging
Lower lever 7 completely and lower side panel B.
B
7
Removing side panel B from its hinges
With the panel in its side position, release hook 6 and slide the panel towards the rear.
Closing side panel B
Proceed in the reverse order to opening. Check that levers 5 and 7 are correctly locked.
Special note
The panels are designed so that a tonneau cover with tensioning devices can be attached.
8
The lower bars 8 cannot support a person's weight.
Whenever loading, take care to follow local laws regarding the transport of objects, e.g:
-draw attention to any object which exceeds the length of the bed;
-check that the vehicle's exterior lights and number plate are still visible;
-secure transported objects using the lashing rings on the loading bed, etc.
1.12
ANTI-INTRUSION ALARM
This protects the vehicle by performing the following functions:
-volumetric protection of the front passenger compartment using an ultrasound field;
-protection of the passenger compartment perimeter;
-protection of the rear load area and bonnet;
-monitoring in the event of an attempt to start the engine with an incorrect ignition key;
-monitoring in the event of alarm power supply cut-off.
Before activating the alarm function
Check that:
-the windows and doors are properly closed;
-there are no passengers, animals or objects inside the vehicle which could move and set off the alarm. Otherwise, it will be necessary to disable the volumetric protection promptly; refer to the section on disabling the spatial protection.
1
To disable the volumetric protection (e.g. in the event of there being a moving object or animal in the vehicle).
Press and hold locking side 1 of the remote control unit; the alarm will bleep to confirm it is disabled.
It remains disabled even if you press locking side 1 of the remote control locking unit several times.
Unlocking the doors stops the protection from being disabled.
1.13
ANTI-INTRUSION ALARM (continued)
Activating the alarm function |
Deactivating the alarm function |
The alarm is set when the doors are locked with the remote control unit.
This is signalled by the hazard warning lights flashing twice
When the alarm function is activated, any detection leads to the alarm being triggered and the hazard warning lights flashing for around 25 seconds.
After approximately 5 seconds, if the detection continues, the system will start once more for approximately 25 seconds and then again (8 to 10 times, depending on the type of detection).
Beyond that, there is no more monitoring until the doors are next unlocked/locked.
Even when triggered, the alarm stops:
-when the doors are unlocked with the remote control unit;
-when the vehicle ignition is switched on.
Deactivation is indicated by the hazard warning lights flashing once.
|
The absence of flashing |
|
|
Failure |
of |
the |
hazard |
|
|
Opening the doors with the |
|
|
hazard |
warning lights |
|
|
warning |
lights |
to flash |
|
|
key does not stop the alarm; |
|
|
when the alarm is set |
|
|
when |
the |
alarm is |
|
|
it must be stopped using |
||
|
|
|
|||||||||
|
indicates that a door or |
|
|
deactivated |
indicates |
|
|
the remote control unit or |
|||
the bonnet is open or incorrectly |
|
that the alarm was triggered |
|
by switching on the ignition. |
|||||||
closed: check. If this is not the |
|
during your absence. |
|
|
|
|
|||||
case, contact |
your RENAULT |
|
|
|
|
|
|
|
|
|
|
Dealer. |
|
|
|
|
|
|
|
|
|
|
|
|
|
|
|
|
|
|
|
|
|
|
|
1.14

ENGINE IMMOBILISER
1
Immobiliser warning light
This prevents the vehicle being driven by anyone not in possession of the vehicle's coded ignition key.
Any work on or  modification to the engine immobiliser system (computers, wiring, etc.) may be dangerous. Work must be carried out by qualified RENAULT network
personnel.
Operating principle
The vehicle is automatically protected for a few seconds after the key is removed from the ignition.
If the vehicle does not recognise the ignition key code, warning light 1 will flash continuously and the engine cannot be started.
•System operation indicator light
When the ignition is switched on, warning light 1 comes on for approximately three seconds and then goes out. The vehicle has recognised the code. You can then start the engine.
•Vehicle protection indicator light
A few seconds after the ignition has been switched off, indicator light 1 will flash continuously.
The vehicle will not be protected until the key has been taken out of the ignition.
•Operating fault warning light
After the ignition has been switched on, if warning light 1 remains continuously lit or continues to flash, this indicates an operating fault in the system.
In all cases, it is essential to contact a RENAULT Dealer. Only RENAULT Dealers are qualified to repair the engine immobiliser.
If the coded ignition key is faulty, use the second key (supplied with the vehicle). If you do not have access to this, it is essential to contact a RENAULT Dealer. Only RENAULT Dealers are authorised to repair the engine immobiliser system.
1.15
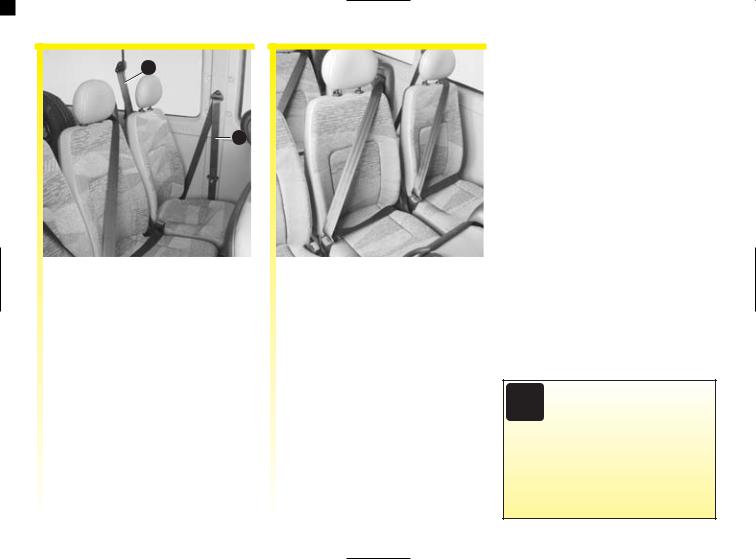
SEATS
5
4
3
2
1
Front seat adjustment
To move forwards or backwards
Lift bar 1 to release. Release the bar once the seat is in the correct position and ensure that the seat is fully locked into position.
To tilt the seatback
Use lever 4.
To adjust the height of the seat base
Adjustment is made in two stages:
For the front section of the seat, lift lever 2.
For the rear section of the seat, lift lever 3.
Heated seats
With the ignition on, move switch 5; an indicator on the instrument panel lights up.
The system, which has a thermostat, decides whether or not the heating is needed.
We would advise you not to recline the seatbacks too far back to ensure that the effectiveness of the seat
belts is not reduced.
Make sure that the seatback is locked in place correctly.
Nothing should be placed on the floor (area in front of driver) as objects could slide under the pedals during sudden braking manoeuvres and obstruct their use.
1.16
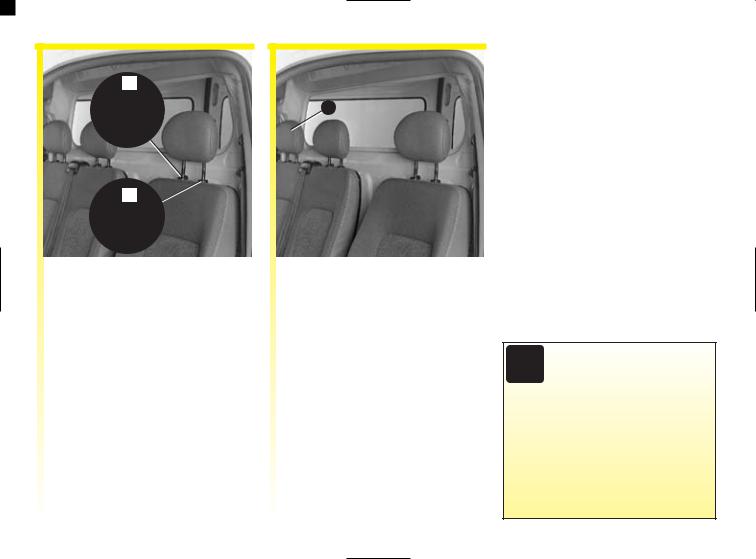
HEADREST
A
1
D
B
C
Adjustment
To raise it
Simply slide it up.
To lower it
Press tab A and lower it at the same time.
To remove the headrest
Raise the headrest and then press tabs A and B to release it.
To fit the headrest
Insert the rods into the holes, with the notches to the front, and lower the headrest to the desired height by pressing tab A.
Special case
If the vehicle is fitted with bench seat C on the passenger side and partition D, it is not possible to remove side headrest 1.
As the headrest is a safety  component, check its presence and correct positioning: the distance between your head and the headrest should be minimal, the top of the headrest should be as close as possible to the top of the
head.
1.17
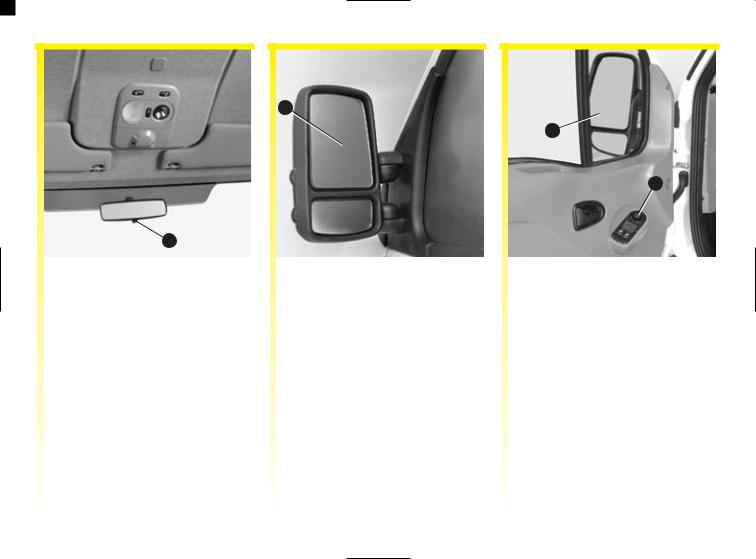
REAR-VIEW MIRRORS
1
Interior rear-view mirror
The interior rear-view mirror is adjustable. When driving at night, tilt small lever 1 to avoid being dazzled by the headlights of the vehicle behind.
2
Door mirrors
To adjust, press mirror 2.
3
4
A
B C
Electrically-adjustable door mirrors
With the ignition on, position control 4 to:
-A to adjust the left-hand door mirror,
-C to adjust the right-hand door mirror,
-B to deactivate it.
Heated door mirrors
Mirrors 3 are heated at the same time as the rear screen.
1.18
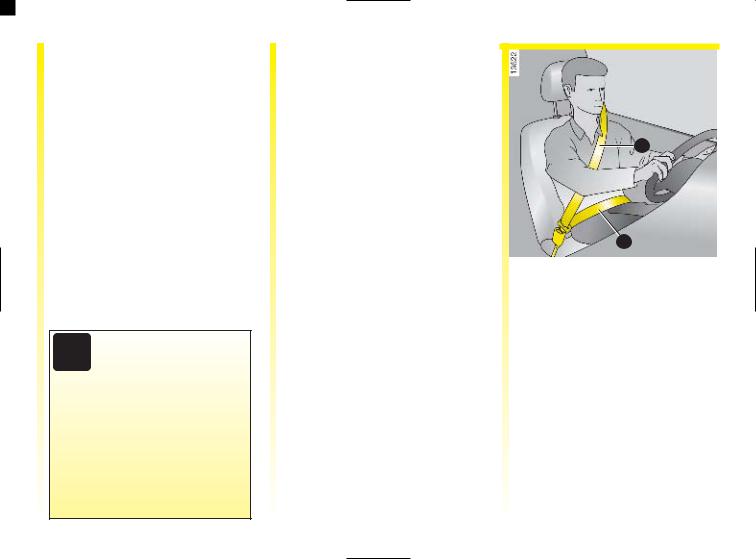
FRONT SEAT BELTS
Always wear your seat belt when travelling in your vehicle. You must also comply with the legislation of the particular country you are in.
Before starting:
-first ensure that your driving position is correct,
-then adjust your seat belt to provide the maximum possible protection.
Incorrectly adjusted seat belts may cause injuries in the event of an
accident.
Even pregnant women should wear a seat belt. In this case, ensure that the lap belt is not exerting too much pressure on the abdomen but do not allow any slack.
Adjusting your driving position
•Sit well back in your seat (having removed your coat or jacket).
This is essential to ensure your back is positioned correctly.
•Adjust the distance between the seat and the pedals.
Your seat should be as far back as possible while still allowing you to fully depress the clutch pedal. The seatback should be adjusted so that your arms are slightly bent when you hold the steering wheel.
•Adjust the position of your headrest.
For safety reasons, the top of your head should be in line with the top of the headrest.
•Adjust the height of the seat.
This adjustment allows you to select the seat position which offers you the best possible view.
1
2
Adjusting the seat belts
Sit with your back firmly against the seatback.
Shoulder strap 1 should be as close to the base of your neck as possible but not on it.
The lap belt 2 should be worn flat over your thighs and against your pelvis.
The belt should be worn so that it is as close to your body as possible, Avoid wearing heavy clothing or placing bulky objects under the belts.
1.19
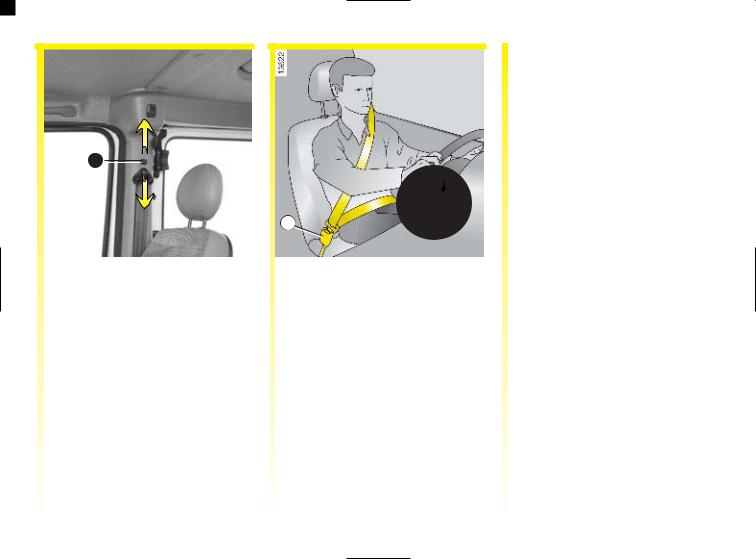
FRONT SEAT BELTS (continued)
3
Adjusting the height of the seat belt
Move button 3 to select the position you require so that shoulder strap 1 is worn as described above.
Make sure that the seat belt is locked in position correctly after you have adjusted it.
4 5
6
6
Locking
Unwind the belt slowly and smoothly and ensure that tongue 4 locks into buckle 6 (check that it is locked by pulling tongue 4). If the belt jams, allow it to run back before attempting to unwind it again.
Locking (continued)
If your belt becomes completely jammed:
-pull the belt slowly but firmly so that just over 3 cm unwinds;
-then allow the belt to rewind automatically;
-unwind it again;
-if there is still a problem, contact your RENAULT Dealer.
Unlocking
Press button 5 on buckle 6 and the seat belt will be rewound by the inertia reel.
Guide the tongue to help the operation.
1.20
REAR SEAT BELTS
1
2
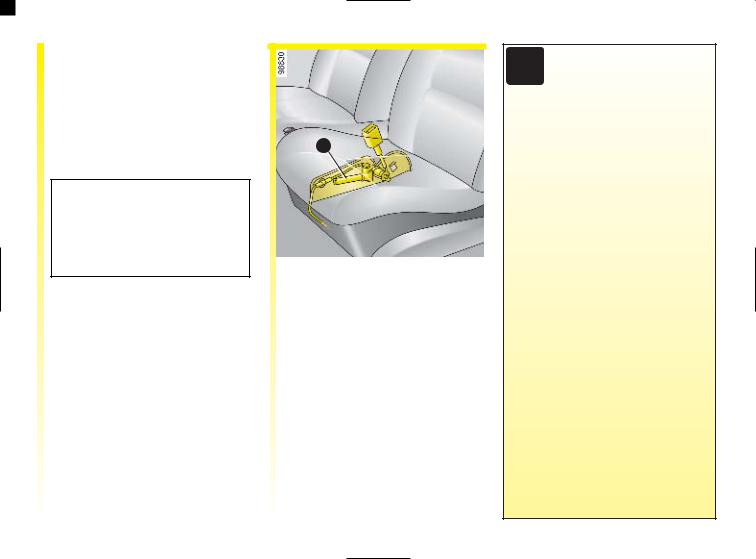
Rear side seat belts
(Vehicles fitted with rear bench seats)
The side seat belts are fitted with specific tongues so that it is not possible to lock the belt into the wrong housing: for the first housing use belt 2; for the second housing use belt 1.
Rear seat belts with inertia reel
The belts are fastened, unfastened and adjusted in the same way as the front belts.
Slowly unwind the belt.
Click the tongue into the buckle.
Make sure that the rear bench seat is locked in position correctly so that the seat belts will operate
efficiently. Refer to the information on the rear bench seat in section 3.
1.21

SEAT BELTS
The following information applies to both the vehicle's front and rear seat belts.
• No adjustments should be made to the original component parts of the restraint system (belts, seats and their mountings).
For special cases (e.g. fitting child seats) contact your RENAULT Dealer.
•Do not use devices which allow any play in the belts (e.g. clothes pegs, clips, etc.): a seat belt which is worn too loosely risks causing injuries in the event of an accident.
•Never wear the shoulder strap under your arm or behind your back.
•Never use the same belt for more than one person and never hold a baby or child on your lap with your seat belt around them.
•The belt should never be twisted.
•Seat belts should be replaced after a serious accident. Always replace your seat belts as soon as they show any signs of wear.
•When refitting the rear bench seat, take care that the seat belts are correctly positioned so that they can be used properly.
•If necessary, readjust the position and tightness of the belt while travelling.
1.22
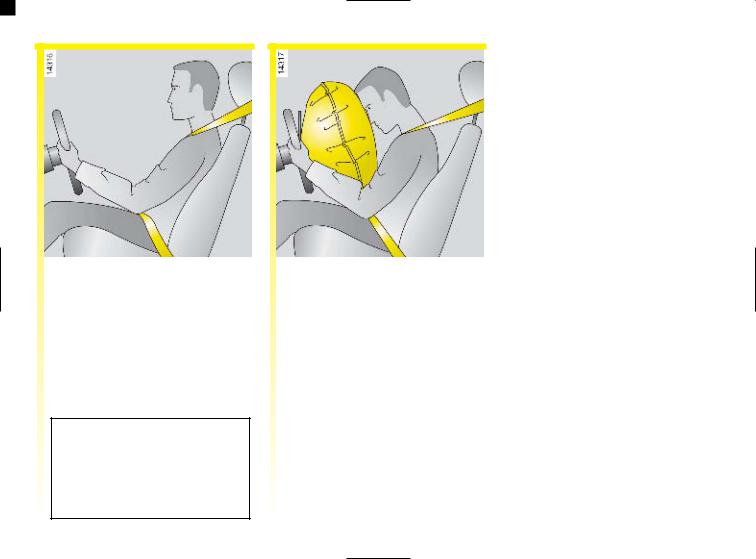
METHODS OF RESTRAINT IN ADDITION TO THE FRONT SEAT BELTS
Depending on the model, these include:
■Pretensioners
(described below).
■Driver and front passenger airbags (described on the following pages).
The passenger airbag protects the front passenger(s) (according to whether there is a conventional seat or a bench seat in the front).
These systems are designed to act independently or together when the vehicle is subjected to a frontal impact.
There are three possibilities, depending on the force of the impact:
-protection is provided by the belt only;
-the pretensioner is triggered to rectify belt position and take up play in the belt;
-the airbag will inflate in the most severe cases.
1 |
Pretensioners
With the ignition on, if the vehicle is subjected to a severe frontal impact, piston 1 immediately retracts the seat belt buckle, pulling the seat belt against the body and thereby increasing its efficiency.
• Following an accident, have the entire restraint system checked.
•No operation whatsoever is permitted on any part of the system (pretensioners, airbags, computers, wiring) and the system components must not be reused on any other vehicle, even if identical.
•To avoid accidental triggering of the system which may cause injury, only qualified Renault Network personnel may work on the pretensioner and airbag system.
•Testing of the electrical trigger system may only be carried out by a specially trained technician using suitable equipment.
•When the vehicle is scrapped, contact your RENAULT Dealer for disposal of the pretensioners and airbag gas generators.
1.23
METHODS OF RESTRAINT IN ADDITION TO THE FRONT SEAT BELTS (continued)
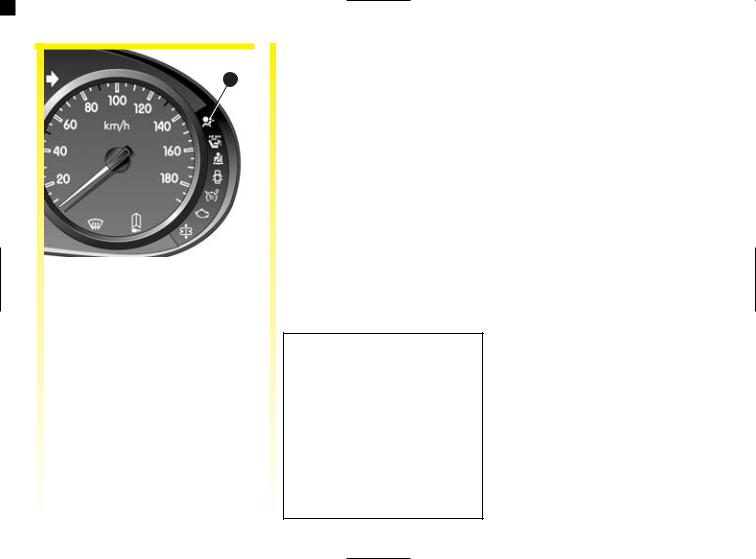
Driver and passenger airbags
An airbag may be provided for both the driver and the front passenger.
Airbag inscriptions on the steering wheel and dashboard together with a label on the lower part of the windscreen indicate that the vehicle is equipped with an airbag.
The passenger airbag protects the front passenger(s) (according to whether there is a conventional seat or a bench seat in the front).
Each airbag system consists of:
-an airbag and gas generator fitted on the steering wheel for the driver and in the dashboard for the front passenger;
-a computer for both systems, which includes the impact sensor and a monitor controlling the electrical trigger system for the gas generator;
-a single  warning light on
the instrument panel.
1.24
METHODS OF RESTRAINT IN ADDITION TO THE FRONT SEAT BELTS (continued)
1
Driver and passenger airbags
(continued) Operation
This system is only operational when the ignition is switched on.
If a severe frontal impact occurs, the airbag(s) inflate(s) rapidly, cushioning the impact of the driver's head and chest against the steering wheel and the front passenger's head against the dashboard. The airbag then deflates immediately so that the passengers are not impeded in any way when they get out of the vehicle.
Operating faults
Warning light 1 will light up on the instrument panel when the ignition is switched on and then will go out after a few seconds.
If it does not light up when the ignition is switched on, or comes on when the engine is running, there is a fault in the system.
Consult your RENAULT Dealer as soon as possible. Your protection will be reduced until this fault is rectified.
The airbag system uses the principles of pyrotechnics. This explains why, when the airbag inflates, it will generate heat, produce smoke (this does not mean that a fire is about to start) and make a noise upon detonation. In a situation where an airbag is required, it will inflate immediately and this may cause some minor, superficial grazing to the skin or other problems.
1.25
 Loading...