


RENA ULT recom m ends
Brief overview
• Tyre pressures .............................................................................................. |
0.04 - 0.05 |
|
• Renault Card: use ...................................................................................... |
1.02 ¬ 1.09 |
|
• Child restraints .......................................................................................... |
1.34 |
¬ 1.45 |
• Warning lights (instrument panel) .......................................................... |
1.50 ¬ 1.75 |
|
• Starting/stopping the engine ...................................................................... |
2.02 - 2.03 |
|
• Driving ........................................................................................................ |
2.02 |
¬ 2.34 |
Tyre pressure monitor .......................................................................... |
2.12 |
¬ 2.17 |
Electronic Stability Program: ESP ........................................................ |
2.18 - 2.19 |
|
Traction control system ......................................................................... |
2.20 - 2.21 |
|
Emergency brake assistance ............................................................................. |
|
2.24 |
Cruise control/speed limiter ................................................................ |
2.25 |
¬ 2.30 |
Parking aid ......................................................................................................... |
|
2.31 |
• Heating/air conditioning ........................................................................... |
3.02 |
¬ 3.19 |
• Bonnet/maintenance .................................................................................. |
4.02 |
¬ 4.15 |
• Practical advice (replacing bulbs, fuses, breakdown, faults) ............... |
5.02 ¬ 5.42 |
|
0.02
C |
O |
N |
T |
E |
N |
T |
S |
|
|
|
|
|
|
|
Sections |
Getting to know your car ..................................................................... |
|
|
|
1 |
|||
Driving |
............................................................................................................... |
|
|
|
|
|
2 |
Your comfort ................................................................................................. |
|
|
|
|
|
3 |
|
Maintenance .................................................................................................. |
|
|
|
|
|
4 |
|
Practical advice |
........................................................................................... |
|
|
|
|
5 |
|
Technical specifications |
........................................................................ |
|
|
|
6 |
||
Alphabetical index .................................................................................... |
|
|
|
|
7 |
||
0.03

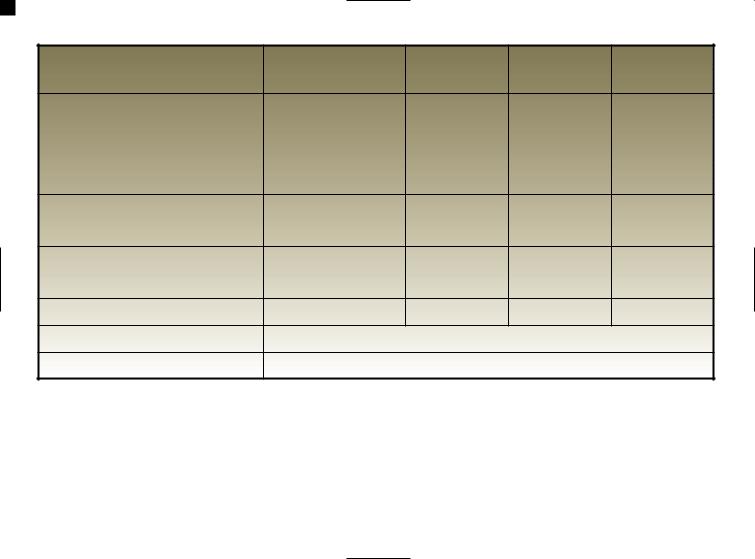
TYRE PRESSURES (in bar or kg/cm² when cold)
Saloon versions |
1.6 16V - 1.8 16V |
|
|
|
|
2.0 16V |
3.0 V6 |
1.9 dCi |
2.2 dCi |
||
|
|||||
|
2.0 IDE - 1.9 dCi |
|
|
|
|
Type |
BG0A - BG0B - BG0C |
BG0D - BG0Y |
BG0G - BG0R |
BG0F - BG09 |
|
(see vehicle identification plate) |
BG0E - BG0H - BG0J |
BG01 - BG02 |
BG07 |
|
|
|
BG0K - BG0L - BG0M |
|
|
|
|
|
BG0N - BG0P - BG0S |
|
|
|
|
|
BG0U - BG0V - BG0W |
|
|
|
|
|
BG00 - BG03 - BG04 |
|
|
|
|
|
BG05 - BG06 - BG08 |
|
|
|
|
Non-motorway use |
|
|
|
|
|
• Front |
2.0 (1) |
2.3 |
2.2 |
2.3 (1) |
|
• Rear |
2.0 |
2.1 |
2.1 |
2.1 |
|
Motorway use (2) |
|
|
|
|
|
• Front |
2.3 (1) |
2.7 |
2.5 |
2.7 (1) |
|
• Rear |
2.2 |
2.2 |
2.2 |
2.2 |
|
Spare wheel |
2.3 |
2.7 |
2.5 |
2.7 |
|
Wheel sizes (3) |
|
6.5 J 15 - 6.5 J 16 - 7 J 17 |
|
||
Tyre sizes (3) |
195/65 R 15 H - 205/55 R 16 V - 205/60 R 16 V - 225/45 R 17 V |
||||
Tyre safety and use of chains
Refer to the Tyres paragraph in section 5 for information on maintenance and, depending on the version, the conditions under which chains may be fitted to the vehicle.
(1)Vehicles with automatic gearbox: add 0.1 bar at the front.
(2)Special note concerning vehicles used at full load (maximum permissible all-up weight) and towing a trailer.
The maximum speed must be limited to 60 mph (100 km/h) and the tyre pressure increased by 0.2 bar. Refer to the Weights paragraph in section 6 for more details.
(3)The wheel rim and tyre sizes depend on the version and country in which it is sold.
0.04
TYRE PRESSURES (in PSI when cold)
Saloon versions |
1.6 16V - 1.8 16V |
|
|
|
|
2.0 16V |
3.0 V6 |
1.9 dCi |
2.2 dCi |
||
|
|||||
|
2.0 IDE - 1.9 dCi |
|
|
|
|
Type |
BG0A - BG0B - BG0C |
BG0D - BG0Y |
BG0G - BG0R |
BG0F - BG09 |
|
(see vehicle identification plate) |
BG0E - BG0H - BG0J |
BG01 - BG02 |
BG07 |
|
|
|
BG0K - BG0L - BG0M |
|
|
|
|
|
BG0N - BG0P - BG0S |
|
|
|
|
|
BG0U - BG0V - BG0W |
|
|
|
|
|
BG00 - BG03 - BG04 |
|
|
|
|
|
BG05 - BG06 - BG08 |
|
|
|
|
Non-motorway use |
|
|
|
|
|
• Front |
29 (1) |
33 |
32 |
33 (1) |
|
• Rear |
29 |
30 |
30 |
30 |
|
Motorway use (2) |
|
|
|
|
|
• Front |
33 (1) |
39 |
36 |
39 (1) |
|
• Rear |
32 |
32 |
32 |
32 |
|
Spare wheel |
33 |
39 |
36 |
39 |
|
Wheel sizes (3) |
|
6,5 J 15 - 6,5 J 16 - 7 J 17 |
|
||
Tyre sizes (3) |
195/65 R 15 H - 205/55 R 16 V - 205/60 R 16 V - 225/45 R 17 V |
||||
Tyre safety and use of chains
Refer to the Tyres paragraph in section 5 for information on maintenance and, depending on the version, the conditions under which chains may be fitted to the vehicle.
(1)Vehicles with automatic gearbox: add 0.1 bar at the front.
(2)Special note concerning vehicles used at full load (maximum permissible all-up weight) and towing a trailer.
The maximum speed must be limited to 60 mph (100 km/h) and the tyre pressure increased by 0.2 bar. Refer to the Weights paragraph in section 6 for more details.
(3)The wheel rim and tyre sizes depend on the version and country in which it is sold.
0.05

0.06

Section 1: Getting to know your vehicle
RENAULT Card: general information, use, deadlocking .................................................................. |
1.02 |
¬ 1.09 |
Doors ..................................................................................................................................................... |
1.10 |
¬ 1.14 |
Engine immobiliser system ................................................................................................................... |
1.15 - 1.16 |
|
Head rests - Seats ................................................................................................................................. |
1.17 |
¬ 1.22 |
Seat belts ............................................................................................................................................... |
1.23 |
¬ 1.26 |
Additional methods of restraint ......................................................................................................... |
1.27 |
¬ 1.33 |
front seat belts .................................................................................................................................. |
1.27 |
¬ 1.30 |
rear seat belts ................................................................................................................................................ |
|
1.31 |
lateral ............................................................................................................................................................. |
|
1.32 |
Child safety ........................................................................................................................................... |
1.34 |
¬ 1.45 |
Deactivating front passenger airbag ................................................................................................. |
1.40 - 1.41 |
|
Driver’s position ................................................................................................................................... |
1.46 |
¬ 1.49 |
Instruments ........................................................................................................................................... |
1.50 |
¬ 1.75 |
Information display ......................................................................................................................... |
1.66 |
¬ 1.71 |
Trip computer ................................................................................................................................... |
1.72 ¬ 1.75 |
|
Voice synthesiser ................................................................................................................................... |
1.76 - 1.77 |
|
Clock and external temperature ...................................................................................................................... |
|
1.78 |
Steering wheel .................................................................................................................................................. |
|
1.79 |
Rear-view mirrors .................................................................................................................................. |
1.80 - 1.81 |
|
Audible and visible signals ............................................................................................................................. |
|
1.82 |
Lighting and external signals .............................................................................................................. |
1.83 |
¬ 1.85 |
Headlight beam adjustment ............................................................................................................................. |
|
1.85 |
Wipers / washers ................................................................................................................................. |
1.86 ¬ 1.88 |
|
Fuel tank (filling with fuel) .................................................................................................................. |
1.89 - 1.90 |
|
1.01

Renault Card: general information
18249
A
1
2
Plip remote control Renault Card A
This can be recognised by the presence of buttons 1 and 2.
It allows:
-openings (doors, tailgate) and the fuel filler flap to be locked or unlocked (see the following pages);
-depending on the vehicle, automatic closure of windows and the sunroof (see “Electric window with automatic closing” and “Sunroof” paragraphs in section 3);
-operation of certain devices (e.g.: radio, electrically controlled seats...);
-the engine to be started (see section 2, “Starting the engine” paragraph).
1.02

Renault Card: general information (continued)
18249.1
3
B
1
2
Renault Card in hands free mode B
This can be recognised by the presence of buttons 1, 2 and 3
It allows:
-the openings (doors, tailgate) and fuel filler flap to be locked or unlocked automatically if required;
-openings and the fuel filler flap to be locked or unlocked intentionally (see the following pages);
-depending on the vehicle, automatic closure of windows and the sunroof (see “Electric window with automatic closing” and “Sunroof” paragraphs in section 3);
-operation of certain devices (e.g.: radio, electrically controlled seats...);
-starting the engine (see section 2, “Starting the engine” paragraph).
18249.2
LOCK+
AUTO
4
 Emergency key 4
This is only used in exceptional circumstances: it can only be used to unlock the left-hand side door (if the Renault Card battery is flat, the car battery is discharged,...).
It is inserted in the Renault Card. To remove it from its mounting, pull firmly on the key.
See the “Locking/unlocking the doors” paragraph in section 1 for how to use the key.
1.03
Renault Card: general information (continued)
18249 |
18249.1 |
|
LOCK+ |
|
AUTO |
|
A |
5 |
5 |
|
 Plip remote control range
This varies according to the environment. It is therefore important to take care when handling the Renault Card that you do not inadvertently lock or unlock the doors.
Renault Cards A and B are supplied by a battery which should be replaced when the battery warning light 5 no longer lights up (see “Renault Card: battery” paragraph in section 5)
Special note: for some vehicles, the Renault Card records settings selected by the card user: certain radio pre-sets, electrical seat adjustments (if stored), the position of the rear view mirrors, automatic air conditioning settings, etc. It is therefore recommended that you keep the same Renault Card at all times so that you can recall your personal settings.
This could lead to the
engine being started or
the electrical equipment
being operated, for exam
ple the electric windows could
trap part of the body (neck, arms,
hands, etc.). Risk of serious
injury.
1.04

RENAULT CARD: general information (continued)
18249.2
LOCK+ |
4 |
AUTO |
|
|
Special circumstances
Interference may be caused by the operation of the RENAULT Card by factors in the immediate vicinity (external installations or the use of equipment operating on the same frequency as the RENAULT Card).
In this case, use the emergency key 4 to open the vehicle (see the “Locking/unlocking the doors” paragraph).
Replacement, need for an additional RENAULT Card
If you lose your RENAULT Card or require another, you can obtain one from your Dealer.
-If a RENAULT Card is replaced, it will be necessary to take the vehicle to your RENAULT Dealer because both the vehicle and all the RENAULT Cards are needed to initialise the system.
-You can use up to four RENAULT cards per vehicle.
-A vehicle can only have one hands-free RENAULT Card. The other RENAULT Cards are remote control cards.
Faulty RENAULT Card.
Make sure that the batteries are always in good condition: they have a service life of approximately two years.
See the RENAULT Card: batteries paragraph in Section 5.
1.05

PLIP REMOTE CONTROL RENAULT Card: use
|
|
18249 |
Locking the doors |
|
|
Press the locking button 2. |
|
|
|
|
|
|
|
|
The hazard warning lights flash |
|
|
|
twice to indicate that the doors have |
|
|
|
been locked. |
|
|
|
- If the driver's door is open or not |
|
|
|
closed properly, the doors and |
|
|
|
tailgate will not be locked and the |
|
|
|
hazard warning lights will not |
1 |
|
|
flash. |
|
2 |
|
- If one of the doors or the tailgate is |
|
|
open or not closed properly, the |
|
|
|
|
|
|
|
|
hazard warning lights will not |
|
|
|
flash. |
Unlocking the doors
Press the unlocking button 1.
The hazard warning lights flash once to indicate that the doors have been unlocked.
Special note (for some countries):
-The driver's door only can be opened by pressing button 1,
-All the doors can be opened by pressing button 1 a second time.
Advice
Do not keep your RENAULT Card in a place where it could be bent or damaged accidentally; such as in a back pocket where you might sit on it.
1.06

RENAULT CARD IN HANDS-FREE MODE: use
18249.1
LOCK |
3 |
|
1
2
Hands-free mode
Unlocking the doors
Walk up to your vehicle carrying your Renault Card.
As soon as you touch one of the handles (doors or tailgate) with your hand, the locks will open automatically.
The hazard warning lights flash once to indicate that the doors have been unlocked.
Locking the doors
With the doors closed and carrying your Renault Card walk away from your vehicle: the doors will lock automatically.
Note: the locking distance for your vehicle depends on the environment.
The hazard warning lights flash twice and the side repeaters light up (for approximately ten seconds) to indicate that the doors have been locked. A beep also sounds.
You can select the beep from a list of different tones or you can suppress it: consult your Renault Dealer.
Special note: for vehicles not equipped with the automatic plip remote control unit door locking function (for some countries), press button 3 to lock the doors.
Voluntary locking using the hands-free mode
The doors and tailgate can be locked instantly by pressing button 3 and, you can check that they are locked by pulling one of the handles.
Automatic mode is functional again after approximately 3 seconds.
Note:
-if the Renault Card is still close to the vehicle, use button 2 to lock it;
-it is recommended that you use button 2 to lock the vehicle to save the battery charge if you will not be using it for some time (more than 3 weeks).
Never leave your vehicle
with the Renault Card
still inside it.
1.07

RENAULT CARD IN HANDS-FREE MODE: use (continued)
|
|
|
|
Returning to hands-free mode |
|
18249.1 |
|
|
hands-free mode. |
|
|
|
|
Press button 3 to return to |
|
|
|
|
|
|
|
|
|
|
|
|
|
|
|
|
|
|
|
|
LOCK+
AUTO
1
2
Interference
3
When held close to the card, some objects can cause interference and hinder the operation of the system.
Operation in manual mode
If you wish you can exit the hands free mode by pressing key 1 or 2: you will then be in manual mode and the Renault Card can be used following the method described in the “Plip remote control unit Renault Card: use” section.
Advice
Do not keep your RENAULT Card in a place where it could be bent or damaged accidentally; such as in a back pocket where you might sit on it.
1.08

DEADLOCKING
18249 |
|
18249.1 |
|
LOCK |
3 |
|
|
2 |
2 |
Deadlocking the doors and tailgate
(for some countries)
This allows you to lock the doors and tailgate and to prevent the doors from being unlocked using the interior handles (for example, by breaking the window and then trying to open the door from the inside).
To activate deadlocking:
-press button 2 or 3 twice briefly;
-press button 2 or 3 once continuously;
The hazard warning lights flash four times to indicate that the doors have been locked.
Special note: deadlocking is not possible if the hazard warning lights or the side lights are lit.
Never use deadlocking if
someone is still inside the
vehicle.
1.09

OPENING AND CLOSING THE DOORS
1
Opening the doors from the outside
Once the doors have been unlocked using the RENAULT Card, grasp the handle 1 and pull it towards you to open the door.
2
Opening the doors from the inside
Pull handle 2.
Lights on warning buzzer
A warning buzzer will sound when a door is opened if you have left the lights switched on after turning off the ignition (to prevent discharge of the battery, etc).
1.10

OPENING AND CLOSING THE DOORS (continued)
3
Child safety
Vehicles fitted with switch 3 with integral indicator light
Press switch 3 to prevent operation of the rear electric windows and opening of the rear doors.
The indicator light built into the switch lights up to confirm that the doors are locked.
If there is a fault, you will
hear a beep and the
indicator light will not
light up.
4
Other cases
Move lever 4 on each door and check from the inside that both doors are securely locked, to make it impossible for the rear doors to be opened from inside.
1.11

LOCKING / UNLOCKING THE DOORS
3
A
Locking/unlocking from the outside
This is done using the Renault Card: see the “Renault Card” information in section 1.
Special circumstance: using the emergency key 2
Remove cover A at the notch 1 (using the end of the emergency key).
Insert the spare key 2 in the lock and unlock.
Open the door.
Faults
The doors can be locked manually if there is an electrical fault.
Turn screw 3 when the door is open (using a tool such as a flat screwdriver) and close the door again. This is, however, locked from the exterior.
It can only be opened from the inside.
1.12

LOCKING / UNLOCKING THE DOORS (continued)
4
5
Locking/unlocking from the interior
Electric central locking
This allows all the openings (doors, tailgate, fuel filler trap, etc.) to be controlled simultaneously.
Lock them by pressing switch 4 (padlock side).
The front door mechanism cannot be locked if the door is open.
6
Opening element status indicator light
With the ignition on, indicator light
5 built into switch 4 and indicator light 6 show the locking status of the opening elements:
-When the opening elements are locked, indicator lights 5 and 6 are lit up;
-When the opening elements are open or not properly closed, indicator lights 5 and 6 are not lit up;
With the ignition switched off, indicator light 5 remains lit up for approximately one minute and then goes out when you lock the doors using the card.
If you decide to keep the
doors locked when you
are driving, remember
that it may be more
difficult for those assisting you
to gain access to your vehicle in
the event of an emergency.
1.13
AUTOMATIC DOOR LOCKING WHEN DRIVING
You can decide to activate this function if you wish.
To activate it
With the ignition on, press the central door locking button 1 on the locking side (padlock side) for approx. 5 seconds, until you hear the beep.
To deactivate it
With the ignition on, press the central door locking button 1 on the unlocking side (opposite the padlock) for approx. 5 seconds, until you hear the beep.
If you decide to keep the
doors locked when you
are driving, remember
that it may be more
difficult for those assisting you
to gain access to your vehicle in
the event of an emergency.
1
2
Operating principle
When the vehicle moves off, the system automatically locks the doors as soon as a speed of 6 mph (10 km/h) is attained.
The door is unlocked
-when the vehicle is stationary by opening a front door.
Note: A door that is opened will automatically be locked again when the vehicle reaches a speed of approx. 6 mph (10 km/h).
-by pressing the door unlocking button 1.
3
Faults
If you note a fault (no automatic locking, warning light 2 incorporated in the button 1 and warning light 3 do not light up when the doors are locked...) first check that that all the doors are closed properly. If they are closed correctly, consult your Renault Dealer.
1.14

ENGINE IMMOBILISER
This prevents the vehicle being driven by anyone not in possession of the vehicle's Renault Card.
The vehicle is automatically protected a few seconds after the Renault Card is removed from the card reader.
Any work or modification
to the engine immobiliser
(computer, wiring, etc.)
may be dangerous. It
must be carried out by trained
Renault network personnel.
1
1
Operating principle
When the ignition is switched on, (Renault Card inserted fully in the reader) indicator light 1 lights up for a few seconds and then goes out.
The vehicle has recognised the code and the engine can be started.
If the vehicle does not recognise the code, indicator light 1 and the reader will flash continuously (rapid flashing) and the vehicle cannot be started.
Indicator lights
Vehicle protection indicator light
A few seconds after the ignition has been switched off, indicator light 1 will flash continuously.
The vehicle will not be protected until the Renault Card has been taken out of the card reader.
Indicator light to indicate the engine immobiliser is operating
When the ignition is switched on (Renault Card inserted fully), you can start the engine. Indicator light 1 lights up for a few seconds and then goes out.
1.15

ENGINE IMMOBILISER (continued)
1
Indicator light to indicate that the system is not operating correctly
After the ignition has been switched on (Renault Card inserted fully), if indicator light 1 continues to flash or remains lit, this indicates that the system is not operating correctly.
If the Renault Card is faulty (rapid flashing of indicator light 1 and the card reader), use the second Renault Card (delivered with the vehicle) if possible.
In all cases, it is essential to consult a Renault Dealer as only he is qualified to repair the engine immobiliser.
1.16

FRONT HEAD RESTRAINTS
2 |
A |
|
2
1
To adjust the height
While sitting on the seat, pull the head restraint towards you and slide it up or down at the same time.
Never lower the head restraint so far that it touches the seatback: position 2 (which acts as a stop) is the lowest permitted height.
To remove the head restraint
With the head restraint in the up position, press on the tab 1 to release it and pull.
To adjust the angle of the head restraint
After setting the height on certain vehicles the angle of the head restraint can be adjusted. To do this, move the front section A of the head restraint forwards or backwards until it feels comfortable.
To put back the head restraint
Insert the rods into the sleeves, with the notches facing the front.
Lower the head restraint until it locks in position.
The |
head |
restraint |
is |
|
important for safety. Ensure |
||||
that it is in place and in the |
||||
correct |
position. |
The |
||
distance between your head and |
||||
the head restraint should be as |
||||
small as possible. The top of the |
||||
head should be in line with the top |
||||
of the head restraint. |
|
|
||
1.17

REAR HEAD RESTRAINTS
1 |
To adjust the height
Pull the head rest towards you and slide it at the same time.
To remove it
Press tab 1.
To refit the head rest
Insert the rods into the sleeves, with the notches to the front, and lower the head rest to the desired height.
Storage position for the rear head rests
Press tab 1 and lower the head rest completely.
The fully lowered position of the head rest is a storage position: it should not be used when the seat is occupied.
The |
head |
restraint |
is |
important for safety. Ensure |
|||
that it is in place and in the |
|||
correct position. |
|
||
The distance between your head |
|||
and the head restraint should be as |
|||
small as possible. The top of the |
|||
head should be in line with the top |
|||
of the head restraint. |
|
|
|
1.18

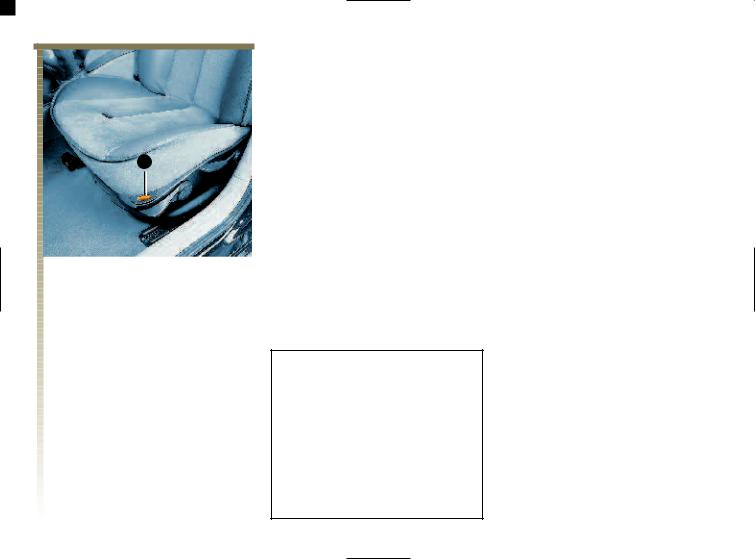
FRONT SEATS WITH MANUAL CONTROL
3
1
2
To move forwards or backwards
Lift lever 1 to unlock the seat. Release the lever in the required position and ensure that the seat is locked in place.
To tilt the seatback
Raise lever 2 and tilt the seatback until it is in the required position.
To adjust the lumbar support of the driver’s seat
Move handle 4.
1
3
4
2
To adjust the height of the driver’s seat:
Move lever 3 as often as necessary:
-upwards to raise the seat;
-downwards to lower the seat.
For safety reasons, only
adjust the seats when the
vehicle is stationary.
|
We would advise you not to |
||||||
|
recline |
|
the |
seatbacks |
|||
|
excessively to |
ensure |
that |
||||
|
the |
|
effectiveness |
of |
|||
the seat belts is not reduced. |
|
||||||
Make sure the seatback is locked in |
|||||||
place correctly. |
|
|
|
|
|
||
Nothing should be placed on the |
|||||||
floor |
(area |
in |
front |
of |
driver) |
||
as such objects may slide under the |
|||||||
pedal during braking manoeuvres, |
|||||||
thus obstructing its use. |
|
|
|||||
|
|
|
|
|
|
|
1.19 |
HEATED SEATS
1
With the ignition on, press switch 1. A light lights up on the instrument panel.
Even if the indicator light is lit up, the system is not necessarily activated. The system has a thermostat and only operates when the passenger compartment temperature is less than 12°C (with a tolerance of plus or minus 4°C).
1.20

FRONT SEATS WITH ELECTRIC CONTROLS
Switches 1 and 3 recall the stored seat positions: switch 1 is used to adjust the seat cushion and switch 3 is used to adjust the seatback.
For vehicles fitted with button 2, this is used to store the chosen driving position. In this case it is possible to store a driving position using the RENAULT Card.
The system operates:
-with the Renault Card at accessories position (first notch);
-for vehicles fitted with button 2, this system also operates whenever the driver's door is opened, for up to 40 minutes after the ignition is switched off.
For safety reasons, only
adjust the seats when the
vehicle is stationary.
2
3
1
Adjusting the seat: switch 1
•To move forwards
Move the switch forwards.
•To move backwards
Move the switch backwards.
•To raise
Move the rear part of the switch up.
•To lower
Move the rear part of the switch down.
Adjusting the seatback: switch 3
•To incline the seatback
Move the switch to the front or rear.
We would advise you not
to recline the seatbacks
excessively to ensure
that the effectiveness of
the seat belts is not reduced.
Make sure the seatback is locked
in place correctly.
Nothing should be placed on the
floor (area in front of driver) as
such objects may slide under the pedal during braking
manoeuvres, thus obstructing its
use.
1.21

DRIVER'S SEAT POSITION MEMORY
It is possible to store a driving position using the Renault Card.
A driving position groups together the driver’s seat adjustments and the external rear view mirror adjustments.
When a driving position is stored, the seat and external rear view mirror adjustments linked to the Renault Card used are automatically recalled when the doors are unlocked and opened using the Renault Card.
The system operates:
-with the Renault Card at “accessories” position (first notch);
-when opening the driver’s door, ignition switched off, for approximately 40 minutes.
2
3
1
Driver’s seat memory procedure
With the Renault Card fully inserted in the card reader, adjust the seat using switches 1 and 3 (see paragraph “front seats with electric control” in section 1).
Press button 2 until you hear the beep: the driving position is stored.
Repeat this procedure for every Renault Card.
Recalling a stored position
With the vehicle stopped, press briefly on button 2.
Note: stored position recall is interrupted if one of the seat adjustment buttons is pressed during recall.
When driving, it is possible to adjust the driving position but not to proceed to driving position recall.
1.22

SEAT BELTS
Always wear your seat belt when travelling in your car. You must also comply with the local legislation in the particular country you are in.
Before driving off:
- First ensure that your driving position is correct.
- Then adjust your seat belt to provide maximum protection.
Incorrectly adjusted seat
belts may cause injuries
in the event of an
accident.
Even pregnant women should
wear a seat belt. In this case,
ensure that the pressure of the
lap belt on the abdomen is not
excessive.
Adjusting your driving position
•Sit with your back firmly against the seatback. This is essential to ensure that your lumbar vertebrae are in the correct position.
•Adjust the distance between the seat and the pedals. Your seat should be as far back as possible for you to be able to press in the clutch pedal fully. The seatback should be adjusted so that your arms are slightly bent when you hold the steering wheel.
•Adjust the position of your head restraint. For maximum safety your head should be as near as possible to the head restraint.
•Adjust the height of the seat. This adjustment allows you to select the seat position which offers you the best possible vision.
•Adjust the position of the steering wheel.
1
2
Adjusting the seat belts
Sit with your back firmly against the seatback.
The shoulder strap 1 should be as close to the base of the neck as possible but not on it.
The lap strap 2 should be held firmly over the thighs and against the pelvis.
The belt should be worn so that it is as close to the body as possible, i.e. avoid wearing heavy clothing or having bulky objects under the belts.
1.23
 Loading...