


Welcome aboard your vehicle
This Owner’s Manual contains the information necessary:
–for you to familiarise yourself with your vehicle, to use it to its best advantage and to benefit fully from the all the functions and the technical developments it incorporates.
–to ensure that it always gives the best performance by following the simple, but comprehensive advice concerning regular maintenance.
–to enable you to deal quickly with minor faults not requiring specialist attention.
It is well worth taking a few minutes to read this manual to familiarise yourself with the information and guidelines it contains about the vehicle and its functions and new features. If certain points are still unclear, our Network technicians will be only too pleased to provide you with any additional information.
The following symbol will help you when reading this manual:
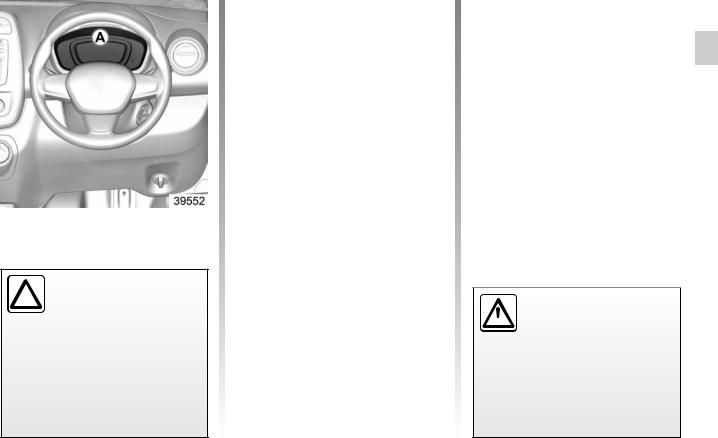
To indicate a hazard, danger or safety recommendation.
The descriptions of the models given in this manual are based on the technical specifications at the time of writing. This manual covers all items of equipment (both standard and optional) available for these models, but whether or not these are fitted to the vehicle depends on the version, options selected and the country where the vehicle is sold.
This manual may also contain information about items of equipment to be introduced later in the model year. Throughout the manual, the “approved dealer” is your RENAULT dealer.
Enjoy driving your new vehicle.
Translated from English. Copying or translation, in part or in full, is forbidden unless prior written permission has been obtained from the vehicle manufacturer.
0.1
0.2

C O N T E N T S
Getting to know your vehicle ...............................
Driving ...................................................................
Your comfort .........................................................
Maintenance ..........................................................
Practical advice .....................................................
Technical specifications ......................................
Alphabetical index ..............................................
Radio ......................................................................
Sections
1
2
3
4
5
6
7
8
0.3
0.4
Section 1: Getting to know your vehicle
Keys, radio frequency remote control: general information. . . . . . . . . . . . . . . . . . . . . . . . . . . . . . . |
1.2 |
|
|
|
|||
Locking and unlocking the doors. . . . . . . . . . . . . . . . . . . . . . . . . . . . . . . . . . . . . . . . . . . . . . . . . . . |
1.4 |
|
|
Opening and closing the doors. . . . . . . . . . . . . . . . . . . . . . . . . . . . . . . . . . . . . . . . . . . . . . . . . . . . |
1.5 |
|
|
Engine Immobiliser. . . . . . . . . . . . . . . . . . . . . . . . . . . . . . . . . . . . . . . . . . . . . . . . . . . . . . . . . . . . . |
1.8 |
|
|
Front seats. . . . . . . . . . . . . . . |
. . . . . . . . . . . . . . . . . . . . . . . . . . . . . . . . . . . . . . . . . . . . . . . . . . . . . . |
1.9 |
|
Seat belts. . . . . . . . . . . . . . . . |
. . . . . . . . . . . . . . . . . . . . . . . . . . . . . . . . . . . . . . . . . . . . . . . . . . . . . . |
1.8 |
|
Safety systems in addition to the seat belts . . . . . . . . . . . . . . . . . . . . . . . . . . . . . . . . . . . . . . . . . . |
1.12 |
|
|
Child safety. . . . . . . . . . . . . . . . . . . . . . . . . . . . . . . . . . . . . . . . . . . . . . . . . . . . . . . . . . . . . . . . . . . |
1.14 |
|
|
Driving Positon - Right Hand Drive. . . . . . . . . . . . . . . . . . . . . . . . . . . . . . . . . . . . . . . . . . . . . . . . . |
1.21 |
|
|
Warning lights. . . . . . . . . . . . . . . . . . . . . . . . . . . . . . . . . . . . . . . . . . . . . . . . . . . . . . . . . . . . . . . . . |
1.23 |
|
|
On-board computer. . . . . . . . . . . . . . . . . . . . . . . . . . . . . . . . . . . . . . . . . . . . . . . . . . . . . . . . . . . . . |
1.26 |
|
|
Exterior lighting and signals. . |
. . . . . . . . . . . . . . . . . . . . . . . . . . . . . . . . . . . . . . . . . . . . . . . . . . . . . . |
1.28 |
|
Headlight height adjustment. . . . . . . . . . . . . . . . . . . . . . . . . . . . . . . . . . . . . . . . . . . . . . . . . . . . . . |
1.29 |
|
|
Audible and visual signals. . |
. . . . . . . . . . . . . . . . . . . . . . . . . . . . . . . . . . . . . . . . . . . . . . . . . . . . . . |
1.30 |
|
Mirrors. . . . . . . . . . . . . . . . . . . . . . . . . . . . . . . . . . . . . . . . . . . . . . . . . . . . . . . . . . . . . . . . . . . . . . . . |
1.31 |
|
|
Screen washer/wiper. . . . . . . . . . . . . . . . . . . . . . . . . . . . . . . . . . . . . . . . . . . . . . . . . . . . . . . . . . . . |
1.32 |
|
|
Fuel tank (filling with fuel). . . . . . . . . . . . . . . . . . . . . . . . . . . . . . . . . . . . . . . . . . . . . . . . . . . . . . . . |
1.33 |
|
|
1.1
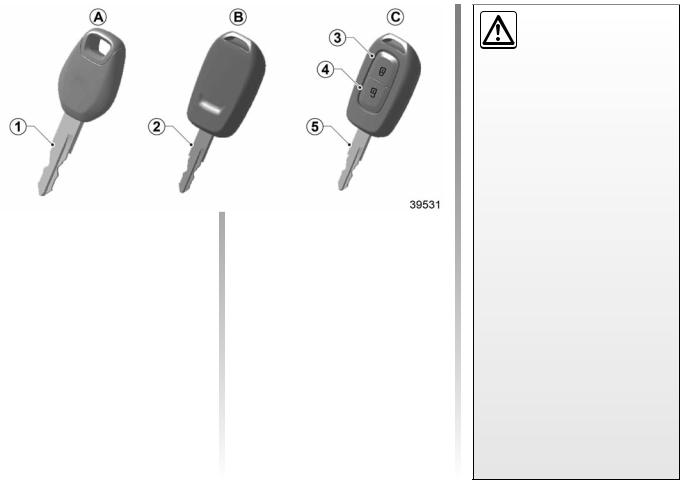
KEYS, RADIO FREQUENCY REMOTE CONTROL: general information(1/2)
|
Key A |
Radio frequency remote |
||
|
||||
1 |
Mechanical Key |
control C |
||
|
Key B |
3 |
Locks all doors |
|
|
4 |
Unlocks all doors |
||
2 |
Coded key for ignition switch. |
5 |
Coded key for ignition switch |
|
Driver’s responsibility: Never leave your vehicle with the keys inside
when leaving a child (or animal) in the car, even for a short period. The reason for this is that the child may endanger himself or others by starting the engine, activating equipment such as the window winders for example, or locking the doors.
The key must not be used for any function other than those described in the handbook (removing the cap from a bottle, etc.).
Advice : Avoid leaving the remote control in hot, cold or humid areas.
1.2

KEYS, RADIO FREQUENCY REMOTE CONTROL: general information(2/2)
The remote control unit operating range
This varies according to the environment. It is therefore important when handling the remote control to ensure that you do not lock or unlock the vehicle by inadvertently pressing the buttons.
Interference
The presence of certain objects (metal objects, mobile telephones, or an area with strong electromagnetic radiation, etc.) close to the key may create interference and affect the operation of the system.
Replacement and additional keys or remote controls
If you lose your remote control key or require another, you can obtain one from an approved dealer.
If a remote control or key is replaced, it will be necessary to take the vehicle and all of its remote control keys to an authorised dealer to reset them.
You may use up to four remote control keys per vehicle.
1.3
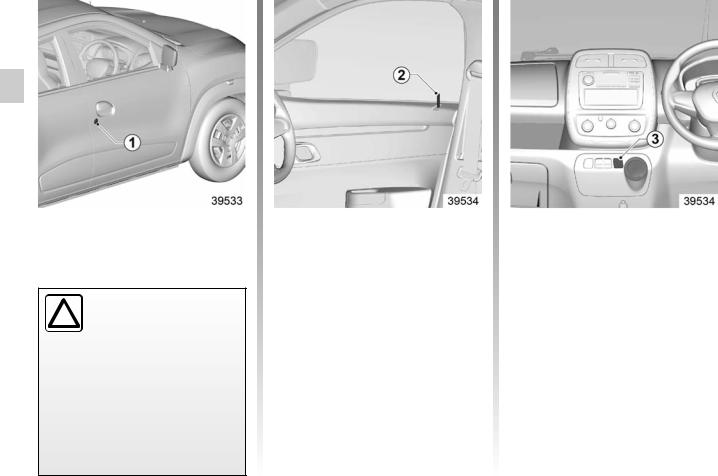
LOCKING AND UNLOCKING THE DOORS
Manual control
From the outside
Unlock the driver door using the key in door lock 1.
Driver’s responsibility
 Never leave an animal, child or adult who is not self-sufficient alone on your vehicle, even for a short time.They may pose a risk to themselves or to others by starting the engine, acti-
vating equipment.
RISK OF DEATH OR SERIOUS INJURY.
From the inside
Push in button 2 to lock and lift button 2 to unlock. It is impossible to open the door if 2 is pushed in.
Electric central locking
If equipped, It simultaneously locks or unlocks the doors.
Lock or unlock the doors by pressing switch 3.
While locking the doors with remote, indicator lights will blink twice to confirm the locking. They will blink only once while unlocking the doors.
Locking the doors without the radio frequency remote control
Forexample,intheeventofadischarged battery or the radio frequency remote control temporarily not working.
With engine switched off and
any |
door |
open, |
press |
and |
hold |
the |
switch |
3 for |
more |
than five seconds. When the door is closed, all the doors will be locked.
The vehicle can only be locked from the outside using the radio frequency remote control.
1.4
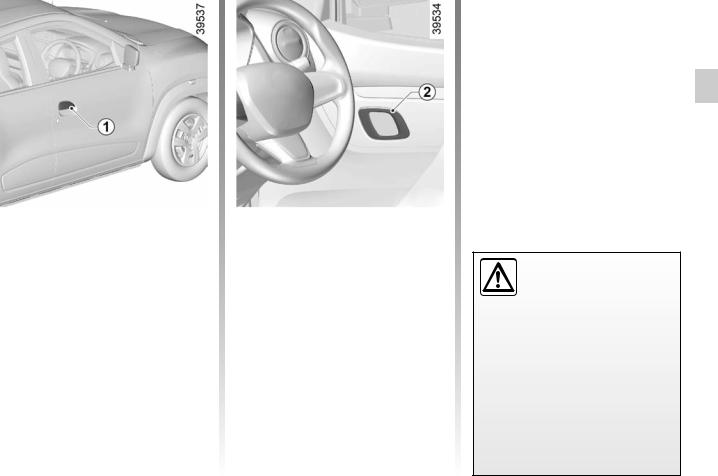
OPENING AND CLOSING THE DOORS(1/2)
Opening the doors from the outside
With the doors unlocked (refer to the information on “Locking/unlocking the doors” in Section 1), place your hand on the handle 1 and pull towards you.
Special note
Depending on the vehicle, accessories (e.g. radio) stop working either when the engine is switched off or when the doors are locked.
Opening from the inside
Pull handle 2.
As a safety precaution, the doors should only be opened or closed when the vehicle is stationary.
1.5
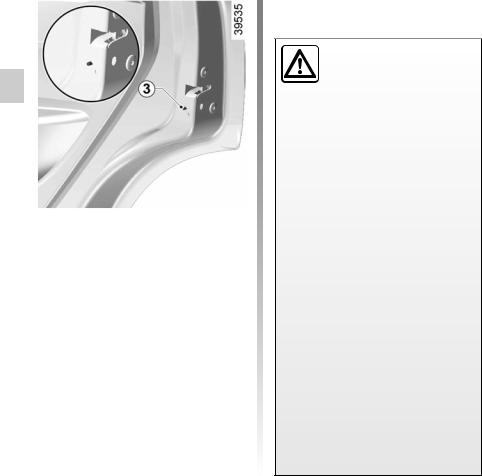
OPENING AND CLOSING THE DOORS(2/2)
Child safety
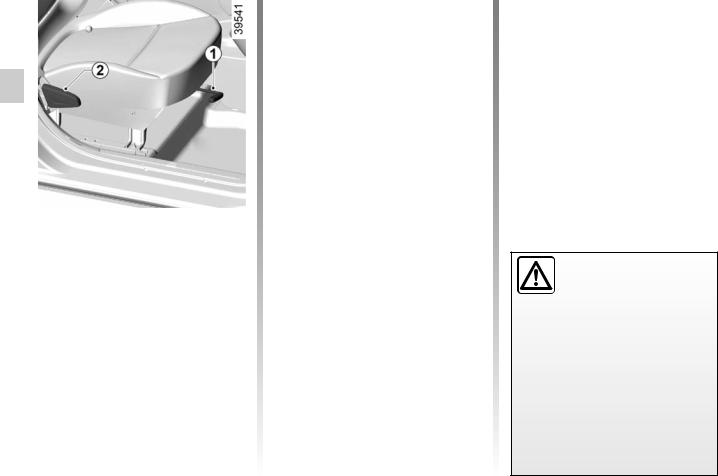
If equipped, this feature is to make it impossible for the rear doors to be opened from the inside, move lever 3 on each rear door and check from the inside that the doors are securely locked.
Driver’s responsibility
when parking or stopping
the vehicle
Neverleaveananimal,child or adult who is not self-sufficient alone on your vehicle, even for a short time.
They may pose a risk to themselves or to others by starting the engine, activating equipment such as the electric windows or by locking the doors.
Also, in hot and/or sunny weather, please remember that the temperature inside the passenger compartmentincreasesveryquickly.
RISK OF DEATH OR SERIOUS INJURY.
1.6
ENGINE IMMOBILISER
(Depends on vehicle)
Engine Immobiliser prevents the vehicle being driven by anyone not in possession of the vehicle’s coded ignition key.
Operating principle
The vehicle is automatically protected a few seconds after the ignition is switched off.
If the vehicle does not recognise the coded ignition key or wrong key is used, the engine cannot be started.
System operation
When the ignition is switched on, the vehicle has recognised the code. You can then start the engine.
Vehicle protection
The vehicle will only be protected after the ignition has been switched off.
Any unauthorised work  carried out on the engine
  immobiliser (computers, wiring, etc.) could be dangerous. Work must be carried out by
qualified personnel.
1
Operating faults
After the ignition has been switched on, if warning light 1 continues to flash or remains continuously lit, there is a system operating fault.
In all cases, itis essential tocontactan approved dealer as only they are qualified to repair the engine immobiliser.
If the coded ignition key is faulty, use the second key (supplied with the vehicle).
Driver’s responsibility
when parking or stopping
the vehicle
Neverleaveananimal,child or adult who is not self-sufficient alone on your vehicle, even for a short time.
They may pose a risk to themselves or to others by starting the engine, activating equipment such as the electric windows or by locking the doors.
Also, in hot and/or sunny weather, please remember that the temperature inside the passenger compartmentincreasesveryquickly.
RISK OF DEATH OR SERIOUS INJURY.
1.7
Front SEATS
Move forward or backward
Lift the lever 1 to release and move the seat forward or backward.Release the lever 1 in desired position of seat and ensure that the seat is fully locked into place.
To tilt the seatback
Lift knob 2 upward to unlock recliner mechanism.Tilt the seat back to desired position and release knob. Ensure seat back is locked properly after release.
For safety reasons, carry out any adjustments when the vehicle is not being
driven.
We would advise you not to recline the seatbacks too far to ensure that the effectiveness of the seat belts is not reduced.Nothing should be placed on the floor (area in front of driver) as such objects may slide under the pedal during braking manoeuvres, thus obstructing its use.
1.8
SEAT BELTS (1/3)
1 |
2 |
Adjusting the seat belts
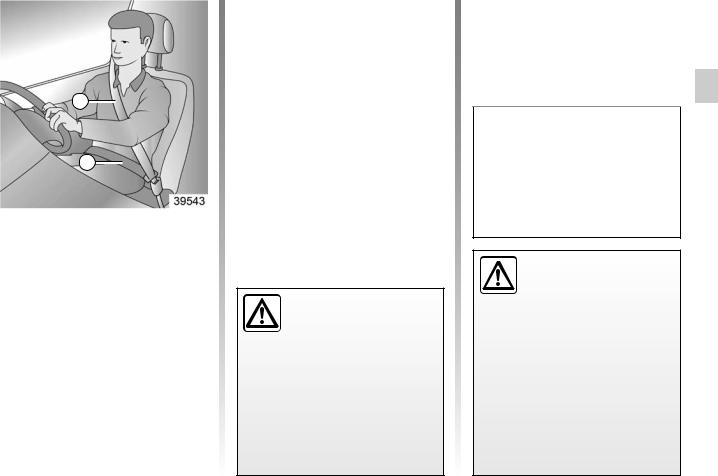
Sit with your back firmly against the seatback.
The shoulder strap 1 should be as close as possible to the base of the neck but not on it.
Lap belt 2 must be worn flat over the thighs and against the pelvis. The seat belt must be worn as close to the body as possible. i.e.: avoid wearing heavy clothing or keeping bulky objects under the belts, etc.
Before starting, first adjust your driving position, then ask all occupants to adjust their seat belts to ensure optimum protection.
Adjusting your driving position
(depending on the vehicle)
–Sit well back in your seat (having removed your coat or jacket etc.). This is essential to ensure your back is positioned correctly;
–adjust the distance between the seat and the pedals. Your seat should be as far back as possible while still allowing you to depress the clutch pedal fully. The seatback should be adjusted so that your arms are slightly bent when you hold the steering wheel.
– Ensure that no objects are placed in the area around the seat belt latch as they could prevent it from being
properly secured.
–Make sure the seat belt latch is properly positioned (it should not be hidden away, crushed or flattened by people or objects).
Always wear your seat belt when travelling in your vehicle. You must also comply with the legislation of the particular country you are in.
Make sure that the rear bench seat is locked in correct position so that the rear seat belts will operate efficiently. Refer to the information on the Seats in Section 1.
Incorrectly adjusted or twisted seat belts may cause injuries in the event
of an accident.
Use one seat belt per person, whether child or adult.
Even pregnant women should wear a seat belt. In this case, ensure that the lap belt is not exerting too much pressure on the abdomen, but do not allow any slack.
1.9
SEAT BELTS (2/3)
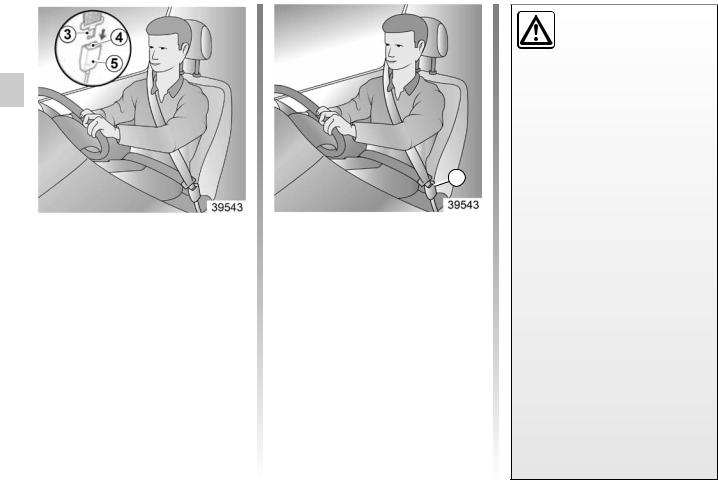
To fasten
Unwind the belt slowly and smoothly and ensure that buckle 3 locks into latch 5 (check that it is locked by pulling on buckle 3).
If the belt jams, allow it to return slightly before attempting to unwind it again.
If your seat belt is completely jammed, pull slowly, but firmly, so that just over 3 cm unwinds. Allow it to return slightly before attempting to unwind it again.
If there is still a problem, contact an approved dealer.
4 |
Unlocking
Press the button 4 on latch 5 and the seat belt will be rewound by the inertia reel. Hold by the buckle to make this easier.
– |
No |
modification |
||
may be made to the |
||||
component parts of |
the |
|||
originally |
fitted |
restraint |
||
system:seat belts,seats |
and |
|||
their mountings. |
For |
special |
||
operations (e.g. fitting child seats), contact an authorised dealer.
–Do not use devices which allow any slack in the belts (e.g. clothes pegs, clips, etc.): a seat belt which is worn too loosely may cause injury in the event of an accident.
–Never wear the shoulder strap under your arm or behind your back.
–Never use the same belt for more than one person and never hold a baby or child on your lap with your seat belt around them.
–The belt should never be twisted.
–Following an accident, have the seat belts checked and replaced if necessary. Always replace your seat belts as soon as they show any signs of wear.
–Make sure that the buckle is inserted into the appropriate latch.
1.10

SEAT BELTS (3/3)
Adjusting the rear seat belts
Follow the same intstructions of front seat belts to adjust/fasten/unolcking the rear seat belts.
Adjust the seat belt strap as indicated in the image for height adjustment.
1.11
Safety systems in addition to the seat belts (1/2)
Depending on the vehicle, they are composed of :
–seat belt locking ;
–front airbag for driver 1.
These systems are designed to act independently or together when the vehicle is subjected to a frontal impact.
Depending on the severity of the impact, the system can trigger :
–seat belt locking;
–airbag
–Have the entire restraint system checked following an accident.
–No operation whatsoever is permitted on any part of the system (air bags, electronic control units, wiring) and the system components must not be reused on any other vehicle, even if identical.
–To avoid premature triggering of the system which may cause injury, only qualified Network personnel are authorised to work on the methods of restraint in addition to the front seat belt.
–The electric trigger system may only be tested by a specially trained technician using special equipment.
–When the vehicle is scrapped, contact an approved dealer for disposal of the pretensioner and airbag gas generators.
Warnings concerning the driver’s air bag
–Do not modify the steering wheel or the steering wheel
boss.
–Do not cover the steering wheel boss under any circumstances.
–Do not attach any objects (badge, logo, clock, telephone holder, etc.) to the steering wheel boss.
–You must not remove the steering wheel (such work must only be performed by trained personnel from our Network).
–When driving, do not sit too close to the steering wheel. Sit with your arms slightly bent (see the information on “Adjusting your driving position” in Section 1). This will allow sufficient space for the air bag to inflate properly and be fully effective.
–Always use seat belts for a better and effective use of the Airbag.
1.12
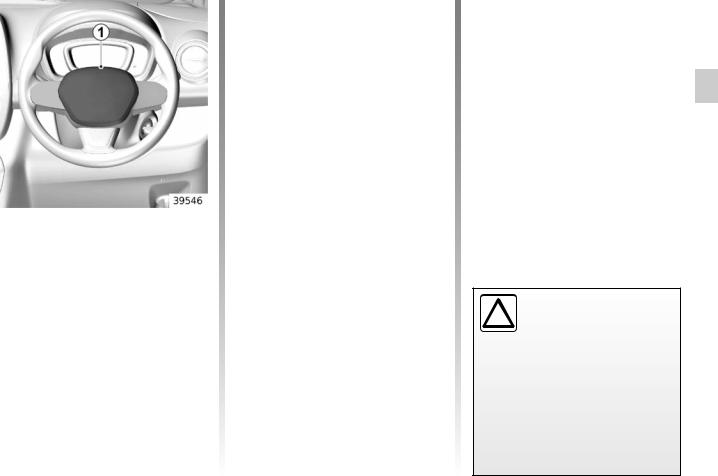
Safety systems in addition to the seat belts (2/2)
Air bag system consists of :
– an airbag and gas generator fitted on the steering wheel for the driver ;
– an electronic unit for system monitoring which controls the gas generator electrical trigger system ;
– a single warning light Å;
– sensors.
Operation
This system is only operational when the ignition is switched on.
If a severe frontal impact occurs, the air bag inflates rapidly, cushioning the impact of the driver’s head and chest against the steering wheel. The air bag then deflates immediately so that the driver is not impeded in any way when they get out of the vehicle.
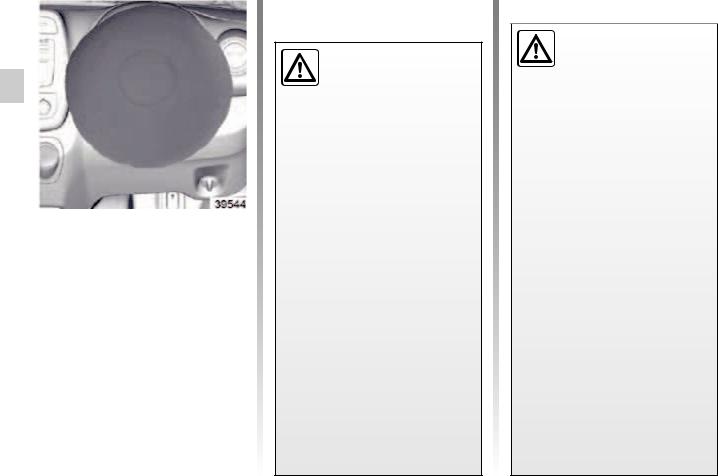
Driver’s air bag 1
It is fitted on the driver’s side on the steering wheel.
The airbag is of best use when it is
used along with the seat belt.
The air bag system uses  pyrotechnic principles. This
  explains why, when the air bag inflates, it will generate heat, produce smoke (this does
not mean that a fire is about to start) and make a noise upon detonation. An air bag may inflate immediately, causing some minor, superficial grazing to the skin or other discomfort.
1.13
child safety: general information (1/2)
Carrying children
Children, and adults, must be correctly seated and strapped in for all journeys. The children being carried in your vehicle are your responsibility.
Achild is not a miniature adult. Children are at risk of specific injuries as their muscles and bones have not yet finished growing. The seat belt alone would not provide suitable protection. Use an approved child seat and ensure you use it correctly.
CHILD RESTRAINT SEAT provision is given in Rear Left seat belt.
To prevent the doors being opened, use the childproof locks (refer to the information on “Locking/unlocking
the doors” in Section 1).
A collision at 50 km/h is the  same as falling a distance
  of 10 metres. Transporting a child without a restraint is the equivalent of allowing him or her
to play on a fourthfloor balcony without railings.
Never travel with a child held in your arms. In the event of an accident, you will not be able to keep hold of the child, even if you yourself are wearing a seat belt.
If your vehicle has been involved in a road accident, replace the child seat and have the seat belts and fittings checked.
It is recommended that children and infants are seated in child restraint. You choose a child restraint that fits your vehicle. Always follow the manufacturer’s instruction for installation and use. In addition there are many types of child restraint avaialble for larger children that should be used for maximum protection.
1.14
child safety: general information (2/2)
Using a child seat
The level of protection offered by the child seat depends on ability to restrain child and on its installation. Incorrect installation risks the protection of the child in the event of harsh braking or an impact.
Before purchasing a child seat, check that it complies with the regulations and that it can be fitted in your vehicle. Consult an approved dealer to find out which seats are recommended for your vehicle. Before fitting a child seat, read the manual and respect its instructions. If you experience any difficulties during installation, contact the manufacturer of the equipment. Keep the instructions with the seat.
Set a good example by always fastening your seat belt and teaching your child:
–to strap themselves in correctly;
–to always get in and out of the car at the kerb, away from busy traffic.
Do not use a second-hand child seat or one without an instruction manual.
Check that there are no objects in the vicinity of the child seat which could impede its operation.
Never leave a child un-  attended in the vehicle.
  Check that your child is always strapped in and that the belt or safety harness used is
correctly set and adjusted. Avoid wearing bulky clothing which could cause the belts to slacken.
Never let your child put their head or arms out of the window.
Check that the child is in the correct position for the entire journey, especially if asleep.
1.15
child safety: fitting a child seat (1/5)
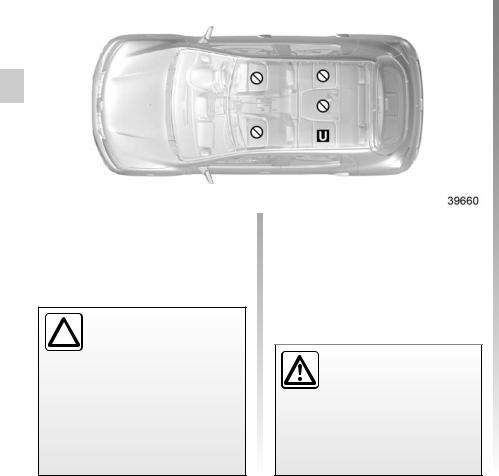
Some seats are not suitable for fitting child seats. The diagram on the following page shows you how to attach a child seat.
The types of child seats indicated may notbeavailable.Beforeusingadifferent child seat, check with the manufacturer that it can be fitted.
Fit the child seat in rear seat Left Side.
Check that when installing the child seat in the vehicle it is not at risk of coming loose from
its base.
If you have to remove the headrest, check that it is correctly stored so that it does not come loose under harsh braking or impact.
Always attach the child seat to the vehicle even if it is not in use so that it does not come loose under harsh braking or impact.
In the front seat
The laws concerning children travelling in the front passenger seat differ in every country. Consult the legislation in force and follow the indications on the diagram on the following page.
Before fitting a child seat in this seat (if authorised):
–deactivate the front passenger air bag;
–lower the seat belt as far as possible;
–move the seat as far back as possible;
–gently tilt the seatback away from vertical (approximately 25°);
–on equipped vehicles, raise the seat base as far as possible.
Do not change these settings after the child seat is installed.
RISK OF DEATH OR  SERIOUS INJURY: before
  fitting a rear-facing child seat in this seat, check that the air bag has been deacti-
vated (refer to the information on “Deactivating the front passenger air bags” in Section 1).
1.16
child safety: fitting a child seat (2/5)
In the rear side seat
A carrycot can be installed across the vehicle and will take up at least two seats. Position the child with his or her feet nearest the door.
Before fitting a child seat to the ISOFIX anchorages on the rear side seat, ensure that the seat belt buckles are not positioned between the two ISOFIX anchorages on this seat. If necessary, move the buckle from the seat in question towards the centre of the vehicle.
Move the front seat as far forward as possible to install a rear-facing child seat, then move back the seat in front as far as it will go, although without allowing it to come into contact with the child seat.
For the safety of the child in the forward-facing seat, do not move the seat in front back past the middle of the runner, do not tilt the seatback too far (maximum of 25° ) and raise the seat as much as possible.
Ensure that the child seat or the child’s feet do not prevent the front seat from
locking correctly.
Refer to the information on the “Front seats” in Section 1.
1.17
child safety: fitting a child seat (3/5)
RISK OF DEATH OR  SERIOUS INJURY: before
  fitting a rear-facing child seat on the front passenger seat, check that the airbag has been
deactivated (please refer to the information on “Child safety: front passenger airbag deactivation, activation” in Section 1)
Using a child safety system which is not approved for this vehicle will not correctly protect the baby or child.
They risk serious or even fatal injury.
Child seat attached using the belt
¬Seatwhichallowsachildseatwith “Universal” approval to be attached by a seat belt.
²Seat not suitable for fitting child seats.
1.18
child safety: fitting a child seat (4/5)
The table below summarises the information already shown in the diagram on the following pages, to ensure the applicable regulations are respected.
Seating Position
Mass Group |
Weight of |
Front passenger |
Rear Outboard |
Rear |
Intermediate |
Intermediate |
|
|
|
|
|||||||||
|
|
|
|||||||
the child |
seat |
LEFT |
RIGHT |
Centre |
Board |
Centre |
|
||
|
|
||||||||
|
|
|
|
|
|
|
|
||
|
|
|
|
|
|
|
|
|
|
Group 0 |
Upto 10 kg |
X |
U |
X |
X |
X |
X |
|
|
|
|
|
|
|
|
|
|
|
|
Group 0+ |
Upto 13 kg |
X |
U |
X |
X |
X |
X |
|
|
|
|
|
|
|
|
|
|
|
|
Group I |
9 to 18 kg |
X |
U |
X |
X |
X |
X |
|
|
|
|
|
|
|
|
|
|
|
|
Group II |
15 kg to 25 kg |
X |
U |
X |
X |
X |
X |
|
|
|
|
|
|
|
|
|
|
|
|
Group III |
22 kg to 36 kg |
X |
U |
X |
X |
X |
X |
|
|
|
|
|
|
|
|
|
|
|
|
(1) RISK OF DEATH OR SERIOUS INJURY: never fit a child seat on the front seat if the vehicle has a passenger airbag which cannot be deactivated.
(2) RISK OF DEATH OR SERIOUS INJURY: before fitting a rear-facing child seat on the front passenger seat, check that the airbag has been deactivated (please refer to the information on “Child safety: front passenger airbag deactiva-
tion, activation” in Section 1).
1.19

child safety: fitting a child seat (5/5)
Refer to the “Child safety equipment” booklet available from the network to choose the seat suited to your child and recommended for your vehicle.
X = Seat not suitable for fitting child seats.
U = Seat which allows a child seat with “Universal” approval to be installed using a seat belt; check that it can be fitted.
1.20

DRIVING POSITION, RIGHT-HAND DRIVE (1/2)
1.21

DRIVING POSITION, RIGHT-HAND DRIVE (2/2)
The presence of the equipment DEPENDS ON THE VEHICLE VERSION AND COUNTRY.
1 Side air vent.
2 Upper Glove Box
3 Centre air vents.
4Steering column stalk for windscreen wash/wiper.
5 Instrument panel.
6 Location for driver’s airbag.
7 Trip switch
8Stalk
–direction indicator lights,
–exterior lights,
–front fog lights,
9 Side air vent.
10 Beam height adjustment control.
11Horn
12Heating and ventilation controls.
13Electric central locking switch.
14Electric power window control(driver side).
15Gear lever.
16Handbrake.
17Cigarette lighter or accessories socket.
18Location for ashtray or cup holder.
19Electric power window control (passenger side).
20Hazard warning lights switch.
21Location for radio/ Navigation System
22Lower Glove Box
1.22
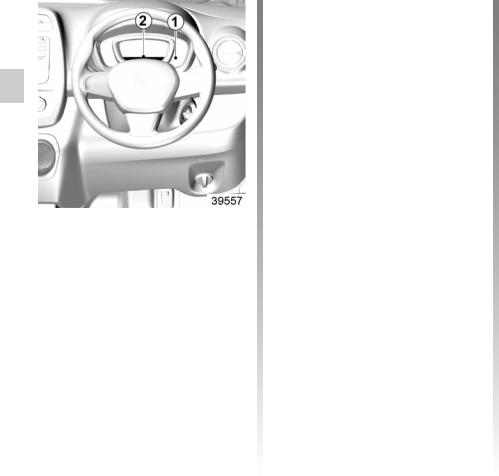
Warning lights (1/3)
The presence and operation of the warning lights DEPEND ON THE EQUIPMENT AND COUNTRY.
Instrument panel A
If no lights or sounds are  apparent, this indicates
  a fault in the instrument panel. This indicates that it is essential to stop immediately
(as soon as traffic conditions allow). Ensure that the vehicle is correctly immobilised and contact an approved Dealer.
Á Mainlight beam headlight tell-tale K Dippedtelltale beam headlight G Front fog light tell-tale light*
C Left-hand direction indicator |
|
tell-tale |
|
B Right-hand |
direction |
indicator tell-tale |
|
Gear Shift Indicator
This symbol advises you to change to a higher gear (up arrow) or to a lower gear (down arrow) in order to help you to reduce the fuel consumption.
Orange warning light Òcomes on while you are driving, drive carefully to an authorised dealer as soon as possible. Failure to follow this recommendation risks damaging your vehicle.
The red warning light
 Òrequires you to stop immediately, for your own safety, as soon as traffic conditions allow. Switch off the engine and do not restart it. Contact an Authorised
Dealer.
1.23

Warning lights (2/3)
The presence and operation of the warning lights DEPEND ON THE EQUIPMENT AND COUNTRY.
D Handbrake “on” warning light and brake circuit
incident warning light
This comes on when the ignition is switched on and goes out when parking brake is dis-engaged. If it comes on during braking and is accompanied by a beep, it indicates that fluid level in circuit is low. It may be dangerous to continue driving.Contact approved dealer.
ÚBattery charge warning light
If it comes on when you are
driving, it indicates that the circuit has discharged. Consult an approved Dealer as soon as possible.
ÒWarning light malfunction (red or orange)
Warning light (orange)
This lights up when the ignition is switched on and goes out as soon as the engine is started. It may comes on in conjunction with other warning lights on the instrument panel. It means you should drive very carefully to an authorised dealer as soon as possible. If you fail to follow this recommendation, you risk damaging your vehicle.
Urgent stop warning light (red)
This lights up when the ignition is switched on and goes out as soon as the engine is started. It lights up at the same time as other warning lights, and is accompanied by a beep. It requires you to stop immediately, for your own safety, as soon as traffic conditions allow. Switch off the engine and do not restart it. Contact an approved Dealer.
1.24
Warning lights (3/3)
The presence and operation of the warning lights DEPEND ON THE EQUIPMENT AND COUNTRY.
Coolant temperature and Oil Pressure Warning Light
Itcomesonwhentheignitionisswitched on and then goes out. If this remains lit/ comes ON while driving, accompanied by a continuous beep, this means the engine is overheating/engine oil is low. It is essential to stop the vehicle.Allow the engine to cool at idle speed for a minute or two. The temperature should drop. If not, stop the engine. Let it cool down before checking the coolant level. Check the oil level (refer to “Engine oil level: general information” in Section 4). If the level is normal, the light has come on for another reason: Consult an approved dealer straight away.
ÄWarningexhaust gaslight for monitoring
It comes on when the ignition is switched on and then goes out.
–If it lights up continuously, consult an approved dealer as soon as possible;
–If it flashes, reduce the engine speed
until the light stops flashing. Contact your approved Dealer as soon as possible.
Refer to the information on “Advice: antipollution, fuel economy, driving" in Section 2.
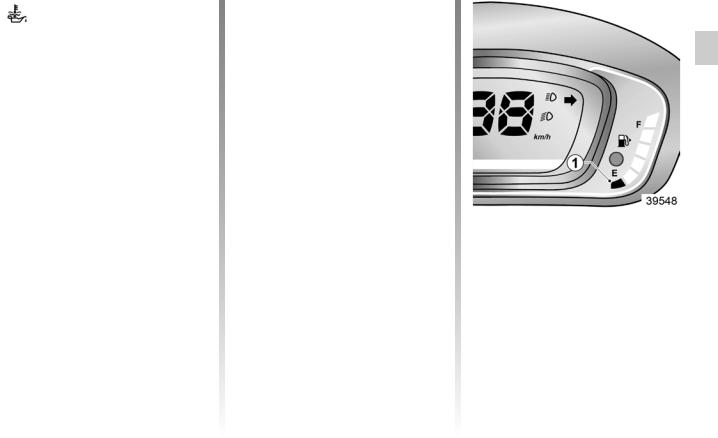
Fuel gauge warning light
The number of bars lit shows the fuel level.when all the bars disappears and only red bar 1 is lit,we advise you to visit the nearest fuel outlet. Once the fuel gauge light starts blinking accompanied by a beep sound, fill with fuel immediately, as the vehicle can stop anytime.
1.25
ON-BOARD COMPUTER (1/2)
Display selection key 1
On-board computer 2
The display depends on the vehicle and the country.
Scroll through the following information by pressing the button 1
a)Total mileage recorder ;
b)Trip mileage recorder ;
c)Fuel Used in Litre (from last reset) ;
d)Average Fuel Consumption (from last reset) ;
e)Current Fuel Consumption ;
f)Estimated Fuel range (DTE - distance to empty) ;
g)Distance travelled from Last reset ;
h)Average speed from the Last Reset ;
Resetting the trip mileage
To reset the trip mileage recorder, the display must show the Tripmeter function.
Press and hold button 1.
Interpreting some of the values displayed after resetting
The values showing average fuel consumption, range and average speed will become more stable and reliable the further you travel after pressing the reset button.
For the first few kilometres after pressing the reset key you will notice that the range increases as you travel. This range takes into account the average fuel consumption since the last time the reset button was pressed.
Refer to the table on the following pages showing display examples.
The current fuel consumption may decrease when:
–the vehicle stops accelerating;
–the engine reaches its operating temperature (if the engine was cold when the reset key was pressed);
–when driving from an urban area onto the open road.
Resetting is automatic when the maximum capacity of any of the memories is exceeded.
1.26
 Loading...