


 has chosen ELF
For all |
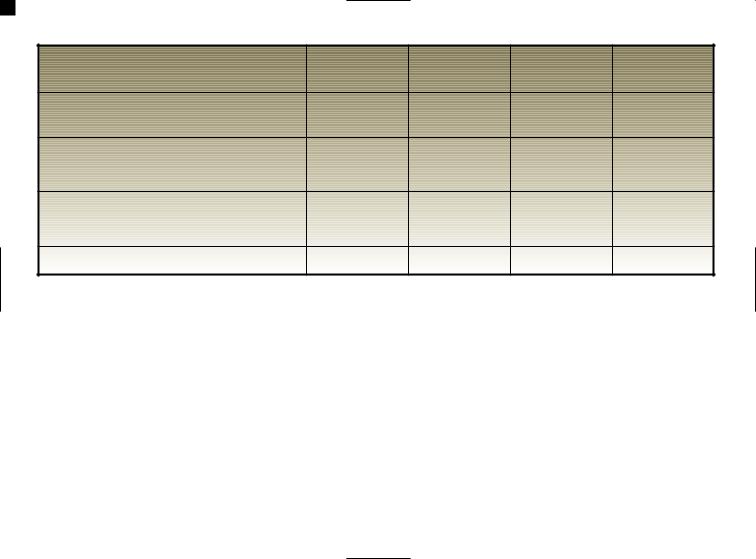
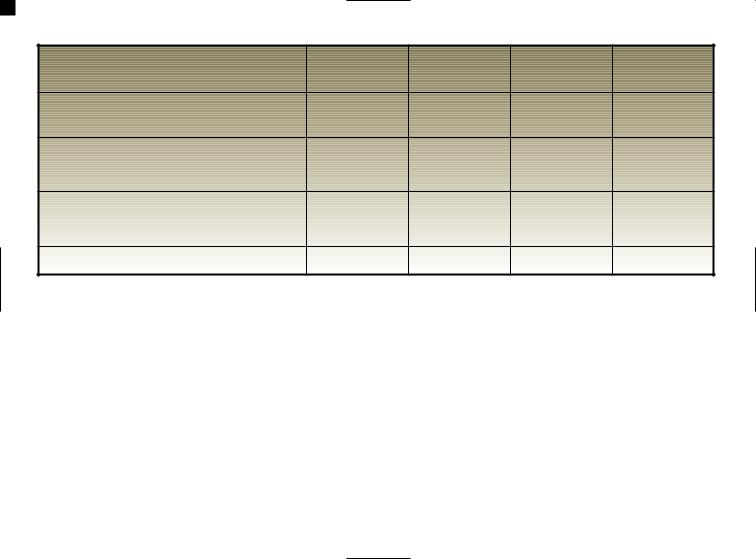
ELF EXCELLIUM LDX 5W-40 |
ACEA A3 / B4 |
engines |
Optimum performance and maximum protection in the most severe conditions |
|
|
All types of driving |
|
|
|
|
|
ELF EVOLUTION SXR 5W-40 |
ACEA A3 / B4 |
|
Optimum performance |
|
|
All types of driving |
|
For all
petrol engines
For all engines
ELF EVOLUTION SXR 5W-30 |
ACEA A5 / B5 |
Fuel economy, engine protection and respect for the environment |
|
All types of driving |
|
|
|
ELF COMPETITION ST 10W-40 |
ACEA A3 / B4 |
ELF TURBO DIESEL 10W-40 |
ACEA B3 / B4 |
Other RENAULT approved lubricants for normal use |
|
5-speed manual gearbox
6-speed manual gearbox Automatic gearbox
Elf has developed special lubricants for each Renault gearbox:
Tranself TRJ 75W80, Tranself TRT 75W80, Tranself TRP 75W80, Tranself TRX 75W80 for manual gearboxes, Renaultmatic D3Syn and Renaultmatic D2 for automatic gearboxes.
These fluids actively contribute to your vehicle's performance. (*)
RENAULT recommends using approved ELF products when topping up or changing the oil.
(*) Refer to your vehicle's Maintenance Service Booklet for information regarding which grade of oil to use. Consult your RENAULT Dealer or visit www.lubricants.elf.com

Brief overview
• Tyre pressures .............................................................................................. |
0.04 - 0.05 |
• Adjusting the seats and driving position ............................................... |
1.11 1.17 |
• Child restraint systems ............................................................................. |
1.25 1.37 |
• Warning lights (instrument panel) ........................................................... |
1.42 1.72 |
• Starting/stopping the engine ...................................................................... |
2.03 - 2.04 |
• Driving ........................................................................................................ |
2.02 2.40 |
Tyre Pressure Monitor .......................................................................... |
2.13 2.16 |
Electronic Stability Program: ESP ................................................................... |
2.17 |
Traction control: ..................................................................................... |
2.18 - 2.19 |
Emergency brake assist ..................................................................................... |
2.22 |
Cruise control/speed limiter ................................................................ |
2.23 2.29 |
• Heating/air conditioning ........................................................................... |
3.02 3.16 |
• Bonnet/maintenance .................................................................................. |
4.02 4.14 |
• Practical advice (changing bulbs, fuses, breakdown, |
|
operating faults) ......................................................................................... |
5.02 5.35 |
• Emergency spare wheel ............................................................................ |
5.02 5.05 |
0.02
C |
O |
N |
T |
E |
N |
T |
S |
|
|
|
|
|
|
|
Sections |
Getting to know your vehicle |
............................................................ |
|
|
1 |
|||
Driving |
............................................................................................................... |
|
|
|
|
|
2 |
Your comfort ................................................................................................. |
|
|
|
|
|
3 |
|
Maintenance .................................................................................................. |
|
|
|
|
|
4 |
|
Practical advice |
........................................................................................... |
|
|
|
|
5 |
|
Technical specifications |
........................................................................ |
|
|
|
6 |
||
Alphabetical index .................................................................................... |
|
|
|
|
7 |
||
0.03
TYRE PRESSURES (in bar or kg/cm2 when cold)
Tyre sizes |
165/65 R15 81 T |
185/55 R16 87 H |
185/60 R15 88 H |
175/65 R15 88 H |
|
185/60 R15 84 H |
|
|
|
Wheel sizes |
5,5 J 15 |
6 J 16 |
6 J 15 |
6 J 15 |
|
6 J 15 |
|
|
|
Non-motorway use |
|
|
|
|
• Front |
2,2 |
2,4 |
2,3 |
2,3 |
• Rear |
2 |
2 |
2 |
2,1 |
Motorway use (1) |
|
|
|
|
• Front |
2,3 |
2,5 |
2,4 |
2,4 |
• Rear |
2 |
2 |
2 |
2,2 |
Emergency spare wheel |
2,3 |
2,5 |
2,4 |
2,4 |
Vehicles fitted with Tyre Pressure Monitor
All tyre pressures need to be increased by 0.2 bar.
Tyre safety and use of chains
Refer to the information on tyres in Section 5 for maintenance information and, depending on the version, the conditions under which snow chains may be fitted to the vehicle.
(1)Special note concerning vehicles used when fully laden (maximum permissible all-up weight) and towing a trailer.
The maximum speed must be limited to 60 mph (100 km/h) and the tyre pressures increased by 0.2 bar. Refer to the information on Weights in Section 6.
0.04
TYRE PRESSURES (in psi. when cold)
Tyre sizes |
165/65 R15 81 T |
185/55 R16 87 H |
185/60 R15 88 H |
175/65 R15 88 H |
|
185/60 R15 84 H |
|
|
|
Wheel sizes |
5,5 J 15 |
6 J 16 |
6 J 15 |
6 J 15 |
|
6 J 15 |
|
|
|
Non-motorway use |
|
|
|
|
• Front |
32 |
35 |
33 |
33 |
• Rear |
29 |
29 |
29 |
30 |
Motorway use (1) |
|
|
|
|
• Front |
33 |
36 |
35 |
35 |
• Rear |
29 |
29 |
29 |
32 |
Emergency spare wheel |
33 |
36 |
35 |
35 |
Vehicles fitted with Tyre Pressure Monitor
All tyre pressures need to be increased by 3 PSI.
Tyre safety and use of chains
Refer to the information on tyres in Section 5 for maintenance information and, depending on the version, the conditions under which snow chains may be fitted to the vehicle.
(1)Special note concerning vehicles used when fully laden (maximum permissible all-up weight) and towing a trailer.
The maximum speed must be limited to 60 mph (100 km/h) and the tyre pressures increased by 3 psi. Refer to the information on Weights in Section 6.
0.05

0.06
Section 1: Getting to know your vehicle
Key/Radio frequency remote control unit: general information, use, deadlocking |
........................1.02 1.04 |
Doors ...................................................................................................................................................... |
1.05 1.08 |
RAID (Renault Anti-Intruder Device) ............................................................................................................... |
1.09 |
Engine immobiliser ............................................................................................................................................ |
1.10 |
Headrests/seats ...................................................................................................................................... |
1.11 1.13 |
Seat belts ................................................................................................................................................ |
1.14 1.17 |
Methods of restraint .............................................................................................................................. |
1.18 1.24 |
in addition to front seat belts ............................................................................................... |
1.18 1.21 |
in addition to rear seat belts ............................................................................................................. |
1.22 |
side protection .................................................................................................................................... |
1.23 |
Child safety ............................................................................................................................................ |
1.25 1.37 |
Driver's position .................................................................................................................................... |
1.38 1.41 |
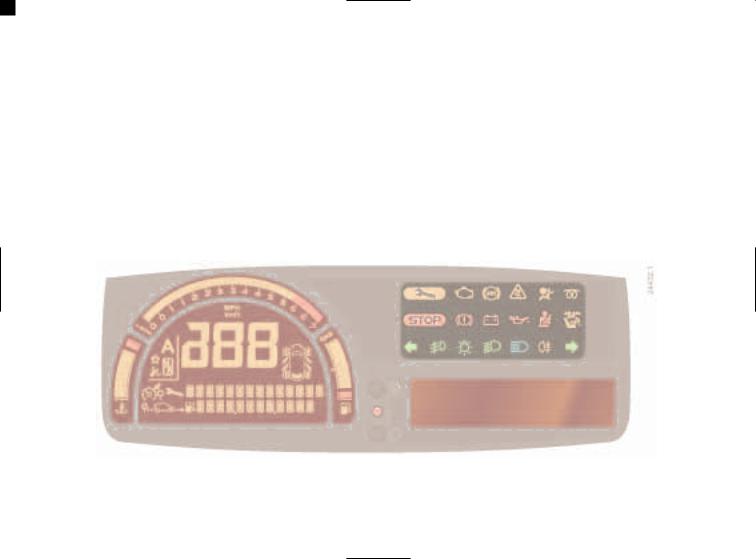
Instrument panel ................................................................................................................................... |
1.42 1.72 |
Trip computer and warning system ................................................................................................. |
1.58 1.72 |
Information displays .......................................................................................................................................... |
1.70 |
Clock ................................................................................................................................................................... |
1.71 |
Exterior temperature .......................................................................................................................................... |
1.72 |
Steering wheel .................................................................................................................................................... |
1.73 |
Mirrors ..................................................................................................................................................... |
1.74 - 1.75 |
Audible and visible signals ............................................................................................................................... |
1.76 |
Lighting and exterior signals ................................................................................................................ |
1.77 1.81 |
Headlight beam adjustment .............................................................................................................................. |
1.82 |
Wipers/washers ..................................................................................................................................... |
1.83 1.85 |
Fuel tank (filling with fuel) ................................................................................................................... |
1.86 - 1.87 |
1.01
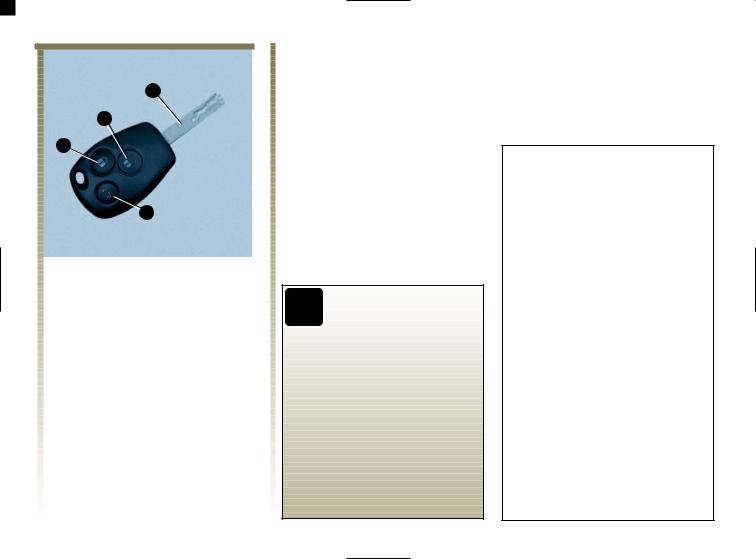
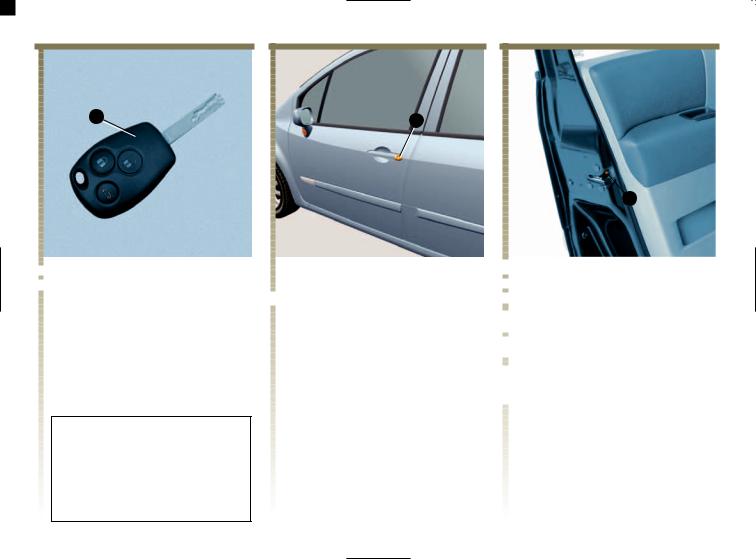
KEY / RADIO FREQUENCY REMOTE CONTROL: general information
3 |
2
1 |
4
Radio frequency remote control unit
1 - Locking all doors and the tailgate.
2 - Unlocking all doors and the tailgate.
3 - Driver's door and ignition key.
4 - Locking / Unlocking the tailgate only (for remote control units with three buttons).
Radio frequency remote control range
This varies according to the environment. It is therefore important when handling the remote control to ensure that you do not lock or unlock the vehicle by inadvertently pressing the buttons.
Interference
The presence of certain objects (metal objects, mobile telephones, or an area with strong electromagnetic radiation, etc.), close to the key may create interference and affect the operation of the system.
Driver's responsibility
Never leave the vehicle
unattended with the key
in the ignition if there is a child (or animal) in the vehicle.
They might start the engine or
operate electrical equipment
such as the electric windows,
and there is a risk that they may
trap part of their body (neck,
arms, hands, etc.).
Risk of serious injury.
If you lose your keys or need another set of keys (or a remote control unit), contact your RENAULT Dealer.
•It will be necessary to take the vehicle to your RENAULT Dealer if you need to replace a key because both the vehicle and all the keys are needed to initialise the system.
•No more than four remote control units may be used for one vehicle.
If the remote control unit will not operate:
Make sure that the batteries are always in good condition, they last for approximately two years.
In this case, refer to the information on the radio frequency remote control batteries in Section 5
1.02
KEY / RADIOFREQUENCY REMOTE CONTROL: use
2 |
2 |
|
1 |
1 |
4
 Unlocking / Locking the tailgate
 only (for certain countries)
 Press button 4 to unlock or lock the
 luggage compartment.
 The hazard warning lights and
 indicator lights flash once to
 indicate unlocking if the vehicle
 doors are locked.
 The hazard warning lights and
 indicator lights flash twice to
 indicate that the tailgate is locked if
 the vehicle doors are locked.
Unlocking the doors
Press unlocking button 2.
Unlocking is indicated by one flash of the hazard warning lights and the indicator lights.
Special notes (for some countries):
-pressing button 2 once opens only the driver's door,
-pressing button 2 twice in succession unlocks the other doors.
Locking the doors
Press locking button 1.
The indicator lights and hazard warning lights flash twice to indicate that the doors have been locked:
If an opening element (door, tailgate or tailgate hatch is opened or not properly closed, the opening elements will quickly lock then unlock without the hazard warning lights or indicator lights flashing.
1.03
DEADLOCKING
1 |
Deadlocking the doors and tailgate (for some countries)
This allows you to lock the doors and luggage compartment and to prevent the doors from being opened with the interior handles (by breaking the window and then trying to open the doors from the inside).
To activate deadlocking
Press button 1 twice in quick succession.
The indicator lights and hazard warning lights flash five times to indicate that the doors have been locked.
Never use deadlocking if
someone is still inside the
vehicle.
1.04
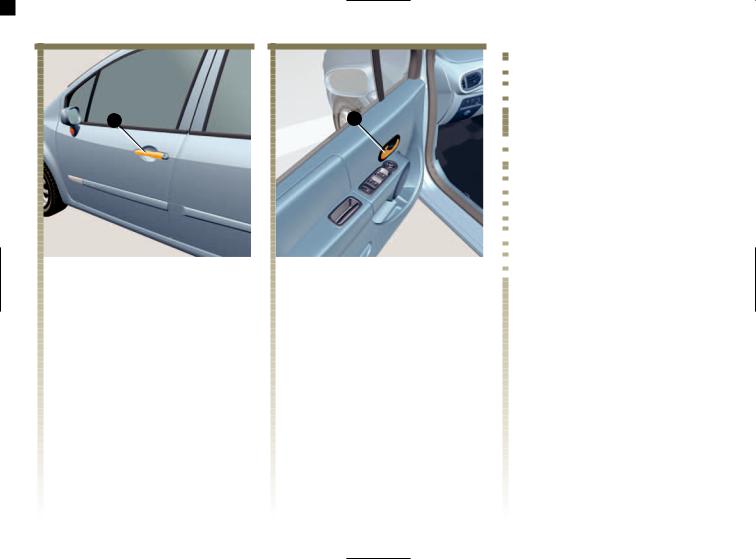
OPENING AND CLOSING THE DOORS
1 |
2 |
Opening the doors from the outside
After the vehicle has been locked using the remote control or the key, pull handle 1.
Opening the doors from the inside
Pull handle 2.
 Lights on warning buzzer
 If you have turned off the ignition
 and left the lights switched on an
 alarm will sound when a door is
 opened.
 Door/tailgate/tailgate hatch open
 reminder
 If an opening element (door, tailgate
 hatch or tailgate) is open or not
 closed properly, the “tailgate open”
 or “door open” message (depending
 on opening element) will be
 displayed on the instrument panel
 with a warning light when the
 vehicle reaches a speed of
 approximately 6 mph (20 km/h).
1.05
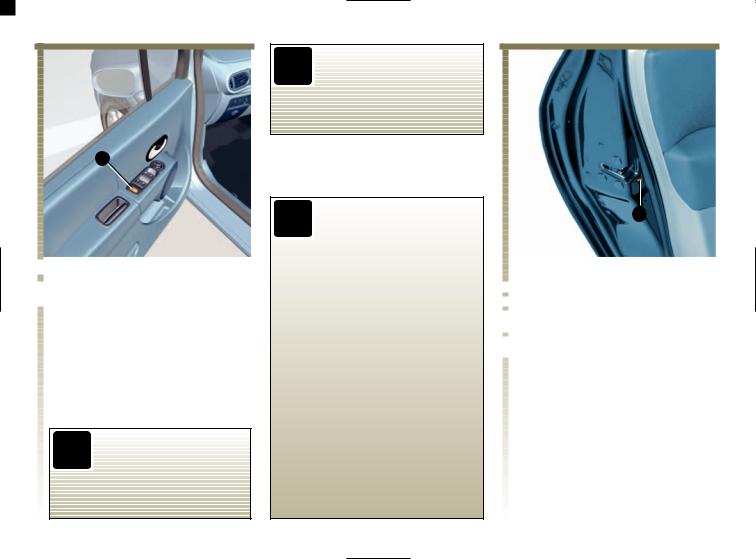
OPENING AND CLOSING THE DOORS (continued)
Rear door locking must be |
|||
reactivated |
|
following |
|
disconnection |
of |
the |
|
battery |
by |
pressing |
|
switch 3. |
|
|
|
3
 Child safety
 Vehicles fitted with switch 3 with
 integrated indicator light
Press switch 3 to lock the rear doors
and prevent operation of the rear
electric windows.
The indicator light built into the switch lights up to confirm that the doors are locked.
If there is a fault, you will hear a beep and the
integrated indicator light
will not light up.
Safety of rear occupants
The driver can inhibit operation of the rear
electric windows and doors by pressing switch 3 on the
side with the symbol.
Driver's responsibility
If there is a child (or a pet) in the vehicle, never leave him/her
unattended with the key in the
ignition. With the key in the ignition it would be possible to
operate the electric windows and there is a risk that a child or
animal may be seriously injured
(by trapping his or her neck, arm,
hand, etc.). If something gets
trapped, reverse the direction of travel as soon as possible by
pressing the relevant switch.
Risk of injury.
4
 Other cases
 To make it impossible for the rear
 doors to be opened from the inside,
  move lever 4 on each door and
 check from the inside that the doors
  are securely locked.
1.06
LOCKING/UNLOCKING THE DOORS
1 |
2 |
 3
3
 Locking/unlocking from the
 outside
This is done using the RENAULT remote control 1: refer to Key/Radio frequency remote control: general information in Section 1.
In certain cases (when the vehicle is located in a zone of high electromagnetic radiation, etc.) use remote control 1 close to the front left-hand door mirror.
 Special circumstance: using the key
Insert the key into lock 2 then
unlock by turning upwards or lock
by turning downwards, then return
the key to its original position.
Remove the key. Open the door.
 Operating faults
 Each door can be locked manually if
 there is an electrical fault.
 With the door open, turn screw 3
  with the key and close the door
 again. This means that the door is
  now locked from the outside.
 The front left-hand door may only
 be opened from the inside or by
  using the key.
1.07
LOCKING/UNLOCKING THE DOORS (continued)
4
Locking/unlocking from the inside: button 4
It simultaneously controls the opening elements (doors, tailgate or tailgate hatch) and the fuel filler flap.
If a door is open or not properly closed, the doors lock and then quickly unlock.
To lock the vehicle leaving an opening element open (for example when transporting something in the luggage compartment which prevents it from being closed), or when the vehicle is located in a zone of high electromagnetic radiation: with the engine switched off, press and hold button 4 for more than five seconds.
Doors and luggage compartment status indicator
The indicator light integrated in switch 4 shows whether or not the opening elements are locked:
- the light is on when the doors are locked;
- the light goes out when the doors are unlocked.
When you lock the doors, the indicator light remains lit for approximately one minute then goes out.
Driver’s responsibility
Never leave your vehicle
with the key in the
ignition.
If you decide to keep the doors
locked whilst driving,
remember that it may be more
difficult for those assisting you
to gain access to your vehicle in
the event of an emergency.
Risk of injury.
1.08
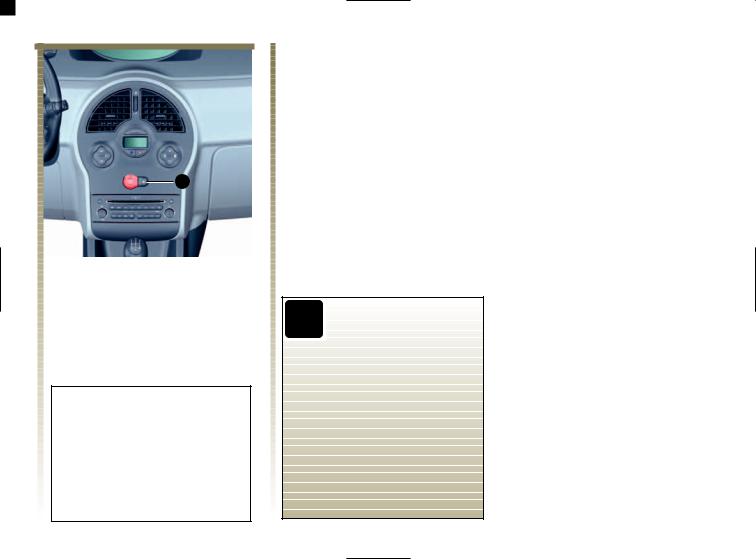
RAID (RENAULT ANTI-INTRUDER DEVICE)
You can decide to activate this function if you wish.
To activate
With the ignition on, press central door locking button 1 for about five seconds, until one beep is heard.
To deactivate
With the ignition on, press central door locking button 1 for about five seconds, until one beep is heard.
If you decide to keep the
doors locked whilst
driving, remember that it
may be more difficult for
those assisting you to gain access
to your vehicle in the event of an
emergency.
1
Operating principle
When the vehicle moves off, the system locks the doors automatically as soon as you reach a speed of 6 mph (10 km/h).
The door is unlocked:
-by pressing door unlocking button 1.
-by opening a door when stationary.
Note: If a door is opened, it will automatically be locked again when the vehicle reaches a speed of approximately 6 mph (10 km/h).
 Operating faults
 If you notice a fault (automatic
 locking does not work, warning
 light incorporated in button 1 does
 not light up when the doors are
 locked, etc.) first check that that all
 the doors are properly closed. If
 they are closed correctly, contact
 your RENAULT Dealer.
1.09
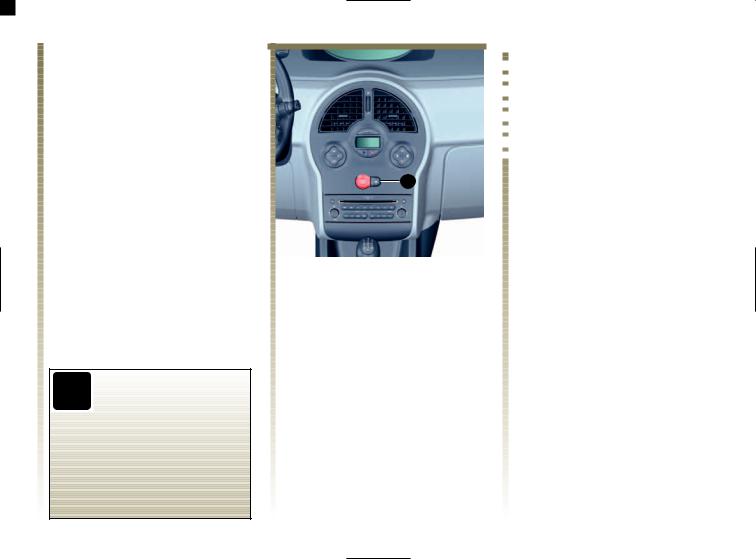
ENGINE IMMOBILISER
This prevents the vehicle being driven by anyone not in possession of the vehicle's coded ignition key.
The vehicle is automatically protected a few seconds after the engine is switched off.
1
|
Any unauthorised work |
|
carried out on the engine |
|
immobiliser (computers, |
|
wiring, etc.) could be |
dangerous. It must be carried out |
|
by |
trained RENAULT network |
personnel. |
|
1.10 |
|
Operating principle |
When the engine is started, warning light 1 remains lit for a few seconds then goes out (refer to the information on Starting the engine in Section 2).
If the code is not recognised, the warning light flashes rapidly and the vehicle will not start.
1
Indicator lights |
Vehicle protection indicator light |
After the ignition has been switched |
off, warning light 1 flashes and the |
vehicle is protected. |
Operating fault warning light |
If the warning light continues to |
||||||
flash or stays lit up permanently |
||||||
following an attempt to start the |
||||||
engine, this indicates a fault in the |
||||||
system. |
|
|
|
|
|
|
In |
this |
case, |
use |
the |
second |
|
key (supplied with the vehicle). If |
||||||
the fault is still present, contact a |
||||||
RENAULT Dealer as only a |
||||||
RENAULT Dealer is qualified to |
||||||
repair |
the |
engine |
immobiliser |
|||
system. |
|
|
|
|
|
|
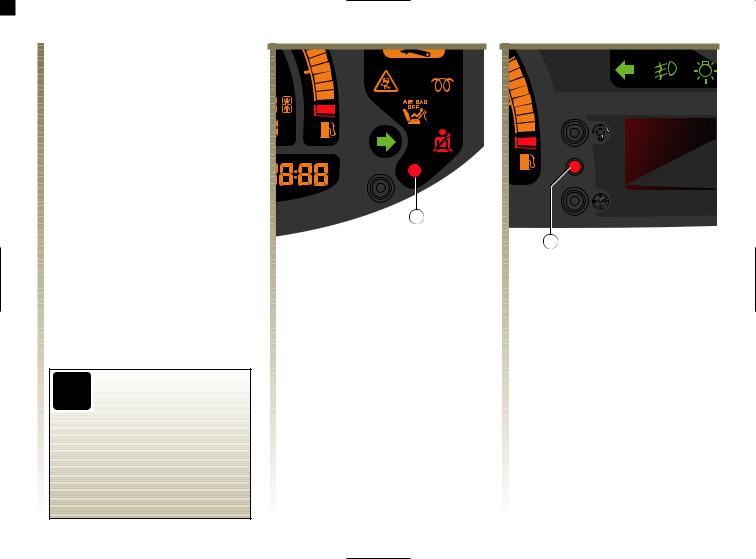
FRONT HEADREST
 2 1
2 1 
To adjust the headrest
Slide it upwards to the required height.
To lower the headrest
Gently lift the headrest, move tab 1 forwards and lower the headrest to the required height.
 To remove the headrest
Press button 2 and lift the headrest to release it.
 To refit the headrest
Insert the headrest rods into the
sleeves, with the notch facing the
front.
Move tab 1 forwards and lower the headrest to the required height.
The headrest is a safety |
component. Ensure that it |
is fitted and in the correct |
position: the top of your |
head should be in line with the top |
of the headrest. |
1.11 |
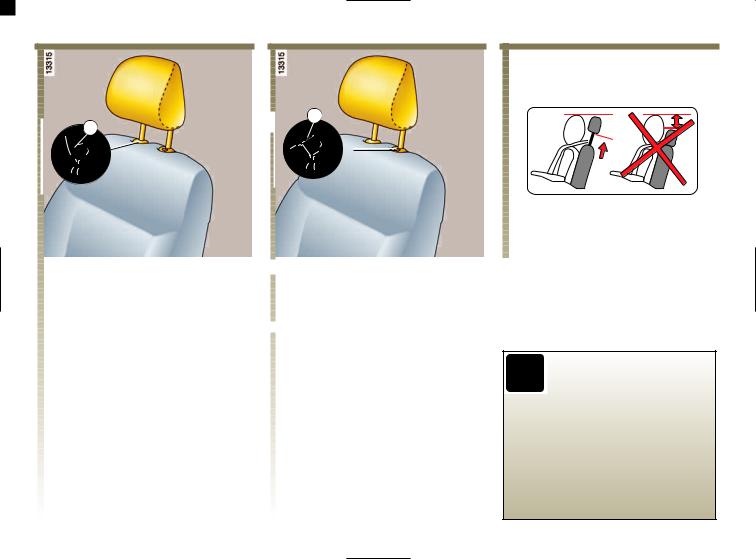
REAR HEADREST
A
1 |
2 |
Positions for use
Press tab A of lock 1 and raise the headrest to maximum height to use it in the high position. Lower it until it locks to use it in the low position.
To remove the headrest
Press tab A on locks 1 and 2 then take out the headrest.
To refit the headrest
Insert the rods into the sleeves, press the tabs on both rods and lower the headrest.
Storage position
Press lock 2 and lower the headrest completely.
The fully-lowered position of the headrest is a storage position: it should not be used when the seat is occupied.
The headrest is important
for safety. Ensure that it is
fitted and in the correct
position.
1.12

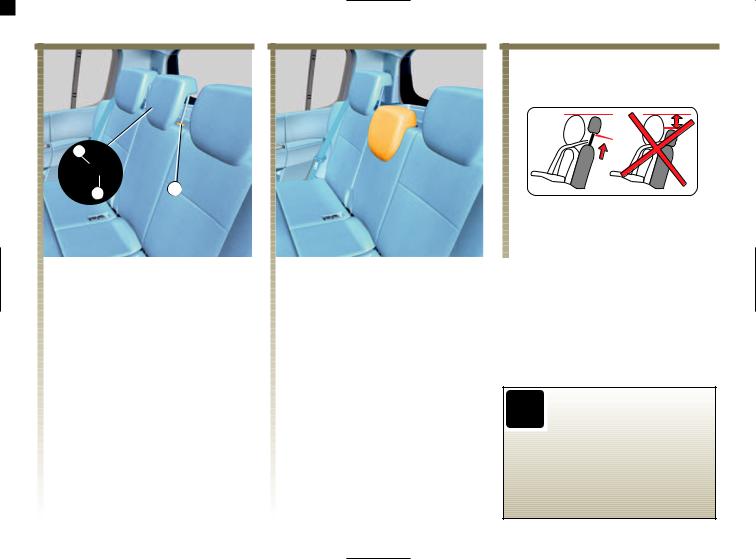
FRONT SEATS
2
3

 4 1
4 1 


To move a seat forwards or backwards
Lift lever 1 underneath the seat to release. Once in the desired position, release the lever and check that the seat is correctly locked.
For safety reasons, only
adjust the seats when the
vehicle is stationary.
To adjust the driver's seat height:
Move lever 2 as many times as necessary:
-upwards to raise it,
-downwards to lower it.
Heated seats
With the ignition switched on, press switch 3 on the required seat. The indicator light in the switch comes on.
The system has a thermostat and determines whether or not heating is necessary.
 To tilt the seatback
 Turn tumblewheel 4 and tilt the
 seatback to the desired position.
So that the effectiveness
of the seat belts is not
reduced, we would
advise you to wear the
seat belt against your shoulder.
Nothing should be placed on the
floor (area in front of driver), as
such objects may slide under the
pedals during sudden braking
manoeuvres and obstruct their
use.
1.13
SEAT BELTS
Always wear your seat belt when travelling in your vehicle. You must also comply with the local legislation of the particular country you are in.
Before driving off:
- First ensure that your driving position is correct,
- Then adjust your seat belt to provide maximum protection.
Incorrectly adjusted seat
belts may cause injuries
in the event of an
accident.
Even pregnant women should
wear a seat belt. In this instance,
ensure that the lap belt is not
exerting too much pressure on
the abdomen but do not allow
any slack.
Adjusting your driving position
•Sit well back in your seat (having removed your coat or jacket). This is essential to ensure that your back is positioned correctly.
•Adjusting the distance between the seat and the pedals. Your seat should be as far back as possible while still allowing you to be able to fully depress the clutch pedal. The seatback should be adjusted so that your arms are slightly bent when you hold the steering wheel.
•Adjusting the position of your headrest. For maximum safety, the top of your head should be in line with the top of the headrest.
•Adjusting the height of the seat base. This adjustment allows you to select the seat position which offers you the best possible vision.
•Adjust the position of the steering wheel.
1
2
 Adjusting the seat belts
 Sit with your back firmly against the
 seatback.
 The shoulder strap 1 should be as
 close to the base of the neck as
 possible but not on it.
 The lap strap 2 should be worn flat
 over your thighs and against your
  pelvis.
 The belt should be worn so that it is
 as close to your body as possible, i.e.
 avoid wearing heavy clothing or
 keeping bulky objects under the
 belts.
1.14

SEAT BELTS (continued)
3
1
4 
 5
5
6 |
6 |
|
 Adjusting the height of the seat
 belt
belt
Move button 3 to select the position
you require so that shoulder strap 1
is worn as described above.
Once you have adjusted the seat belt, make sure it is correctly locked into position.
 To fasten
Unwind the belt slowly and smoothly and ensure that tongue 4 locks into buckle 6 (check that it is locked by pulling tongue 4). If the belt jams before it is latched, allow it to return before attempting to unwind it again.
Locking (continued)
If your belt becomes completely jammed:
-pull the belt slowly but firmly so that just over 3 cm unwinds;
-then allow the belt to rewind automatically,
-unwind it again,
-if there is still a problem, contact your RENAULT Dealer.
çThis indicator light on the instrument panel or on the dashboard shows
whether or not the seat belt is correctly fastened.
Unlocking
Press button 5 on buckle 6 and the seat belt will be rewound by the inertia reel.
Guide the buckle to help the operation.
1.15
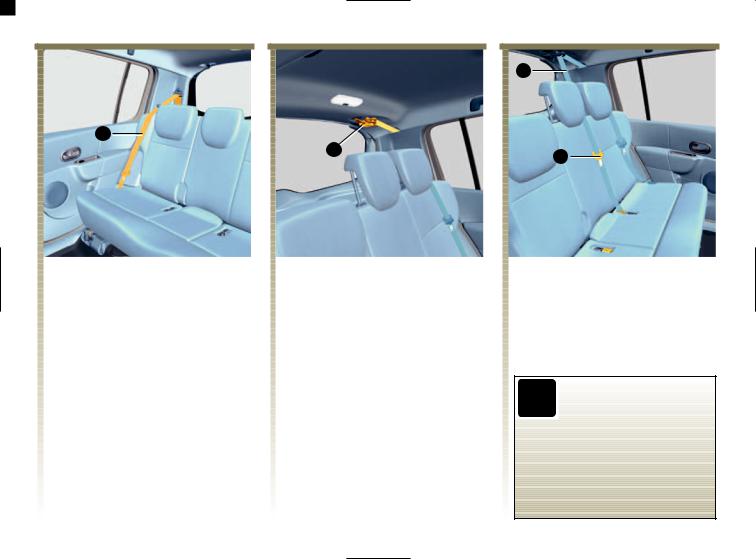
SEAT BELTS (continued)
3
1
2 |
4 |
|
Rear lateral seat belts 1
The belts are locked, unlocked and adjusted in the same way as the front belts.
Rear centre belt
Unwind belt 3 slowly from its |
Fasten sliding tongue 4 into the |
housing, then fasten tongue 2 into |
corresponding red buckle. |
the corresponding black buckle. |
|
Check that the rear seat |
belts are positioned and |
operating correctly each |
time the rear bench seat |
is moved. |
1.16

SEAT BELTS (continued)
The following information applies to both the vehicle's front and rear seat belts.
• No adjustments may be made to the component parts of the restraint system (belts, seats and their mountings) originally fitted.
For special applications (e.g. fitting child seats) contact your RENAULT Dealer.
•Do not use devices which produce any slack in the belts (e.g. clothes pegs, clips, etc.): a seat belt which is worn too loosely risks causing injury in the event of an accident.
•Never wear the shoulder strap under your arm or behind your back.
•Never use the same belt for more than one person and never hold a baby or child on your lap with your seat belt around them.
•The belt should never be twisted.
•Seat belts should be replaced after a serious accident. Likewise, replace your seat belts as soon as they show any signs of wear.
•When refitting the rear bench seat, take care that the seat belts are correctly positioned so that they can be used properly.
•If necessary, readjust the position and tightness of the belt.
•Make sure that the tongue is inserted into the correct buckle.
1.17
METHODS OF RESTRAINT IN ADDITION TO FRONT SEAT BELTS
These are:
■pretensioners,
■chest and lap belt force limiters,
■driver and passenger airbags.
These systems are designed to operate independently or together in the event of a front, side, or rear impact.
Depending on the force of the impact the system may activate:
-seat belt locking;
-the lap belt pretensioner to keep the occupant in their seat, the low volume front airbag and the force limiter,
-the large volume airbag.
1
Pretensioners
With the ignition switched on, if the vehicle is subjected to a significant frontal impact the system may, depending on the severity of impact, trigger piston 1 which instantly retracts the belt.
The pretensioners hold the seat belt against the occupant's body, holding the occupant more securely against the seat, thus increasing the seat belt's efficiency.
• After an accident, have the entire restraint
system checked
•No operation whatsoever is permitted on any part of the system (pretensioners, airbags, computers, wiring) and the system components must not be reused on any other vehicle, even if identical.
•To avoid premature triggering of the system which may cause injury, only qualified RENAULT Network personnel may work on the pretensioner and airbag system.
•Testing of the electric trigger system may only be carried out by a specially trained technician using special equipment.
•When the vehicle is scrapped, contact your RENAULT Dealer for disposal of the pretensioner and airbag gas generators.
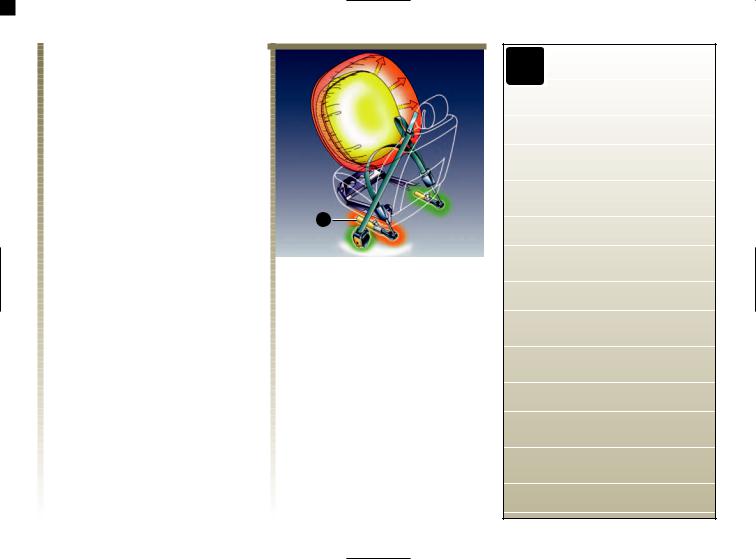
1.18
METHODS OF RESTRAINT IN ADDITION TO FRONT SEAT BELTS (continued)
Chest and lap belt force limiters
Above a certain severity of impact, this mechanism is used to limit the force of the belt against the body so that it is at an acceptable level.
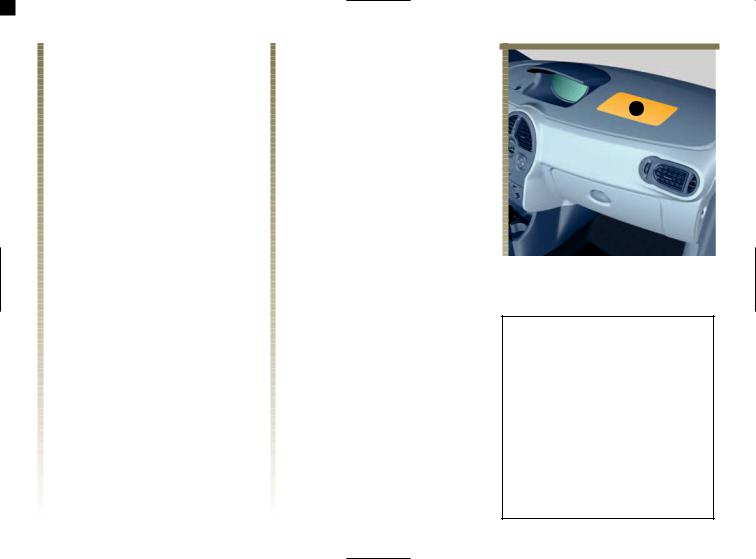
Driver and passenger airbags
Fitted to the driver's and passenger side.
The presence of this equipment is indicated by the word “Airbag” on the steering wheel and the dashboard (airbag zone A) and a label on the lower part of the windscreen or on the sun visor.
Each airbag system consists of:
-an airbag and gas generator fitted to the steering wheel for the driver and in the dashboard for the front passenger;
-an intelligent computer for both systems, which includes an impact sensor and a monitor controlling the electrical trigger system for the gas generator.
- A single warning light |
on |
the instrument panel. |
|
A
The airbag system uses the principles of pyrotechnics. This explains why, when the airbag inflates, it will generate heat, produce smoke (this does not mean that a fire is about to start) and make a noise upon detonation. In a situation where an airbag is required, it will inflate immediately and this may cause some minor, superficial grazing to the skin or other problems.
1.19
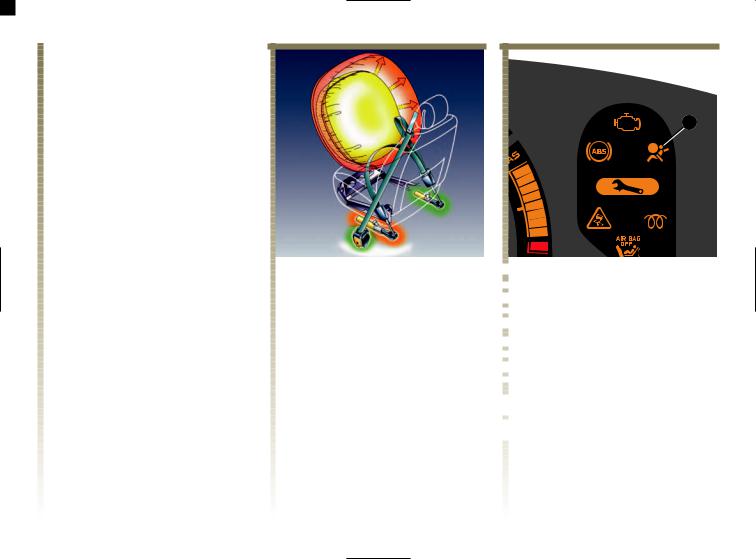
METHODS OF RESTRAINT IN ADDITION TO THE FRONT SEAT BELTS (continued)
Operation
This system is only operational when the ignition is switched on.
In a severe frontal impact, the |
|
airbags inflate rapidly, cushioning |
|
the impact of the driver's head and |
1 |
chest against the steering wheel and the front passenger's head against the dashboard. The airbags then deflate immediately so that the passengers are not hindered in any way from leaving the vehicle.
Special feature of the front airbag
The airbag can be triggered in two different ways, depending on the force of the impact:
-small volume airbag, this is the first stage of operation;
-large volume airbag, the straps are torn in order to allow the airbag to inflate to a higher volume (in the event of more severe impacts).
 Operating faults
 Warning light 1 lights up on the
 instrument panel when the ignition
 is turned on and then goes out after
 a few seconds.
 If it does not light up when the
 ignition is switched on, or comes on
 when the engine is running, there is
 a fault in the system.
 Consult your RENAULT Dealer as
  soon as possible. Your protection
 will be reduced until this fault is
  rectified.
1.20

METHODS OF RESTRAINT IN ADDITION TO THE FRONT SEAT BELTS (continued)
All of the warnings below are given so that the airbag is not obstructed in any way when it is inflated and also to prevent the risk of serious injuries caused by items which may be dislodged when the airbag inflates.
Warnings concerning the driver’s airbag
• Do not modify the steering wheel or the steering wheel cushion.
•Do not cover the steering wheel cushion.
•Do not attach any objects (badge, logo, clock, telephone holder, etc.) to the steering wheel boss.
•The steering wheel must not be removed (except by qualified personnel from the RENAULT Network).
•When driving, do not sit too close to the steering wheel. Sit with your arms slightly bent (see the information on “Adjusting your driving position” in Section 1). This will allow sufficient space for the airbag to deploy correctly and be fully effective.
Warnings concerning the passenger airbag
•Do not attach or glue any objects (badge, logo, clock, telephone holder, etc.) to the dashboard in the proximity of the airbag housing.
•Do not place anything between the dashboard and the passenger (pet, umbrella, walking stick, parcels, etc.).
•The passenger must not put his or her feet on the dashboard or seat as there is a risk that serious injuries may be sustained. In general, parts of the body should be kept away from the dashboard (knees, hands, head etc.)
•The passenger airbags should be reactivated as soon as the child seat is removed, to ensure the protection of the front passenger in the event of an impact.
A REAR-FACING CHILD/BABY SEAT MUST NOT BE FITTED TO THE FRONT PASSENGER SEAT UNLESS THE ADDITIONAL RESTRAINT SYSTEMS, I.E. THE PASSENGER AIRBAG, ARE DEACTIVATED. (Refer to the information on “Deactivation of passenger airbags” in Section 1).
1.21

RESTRAINT DEVICES IN ADDITION TO THE REAR SEAT BELTS
Depending on the vehicle, these include:
■Seat belt pretensioners integrated into the inertia reels.
■Force limiter.
These systems are designed to act independently or together when the vehicle is subjected to a frontal impact.
There are two scenarios, depending on the force of the impact:
-protection is provided by the belt only;
-the pretensioner is triggered to take up the slack in the seat belt.
Rear seat belt pretensioners
This system is only operational when the ignition is switched on.
If the vehicle is subjected to a severe frontal impact, a device retracts the seat belt, pulling the seat belt tight against the body and thus improving its effectiveness.
• Have the entire restraint system checked following
an accident.
•No operation whatsoever is permitted on any part of the system (pretensioners, airbags, computers, wiring) and the system components must not be reused on any other vehicle, even an identical vehicle.
•To avoid premature triggering of the system which may cause injury, only qualified RENAULT Network personnel may work on the pretensioner and airbag system.
•Testing of the electric trigger system may only be carried out by a specially trained technician using special equipment.
•When the vehicle is scrapped, contact your RENAULT Dealer for disposal of the pretensioner and airbag gas generators.
 Force limiter
 Above a certain severity of impact,
 this mechanism is used to limit the
 force of the belt against the body so
 that it is at an acceptable level.
1.22
SIDE PROTECTION DEVICES
Side airbags
This airbag may be fitted to each of the front seats and is activated at the sides of the seats (door side) to protect the occupants in the event of a severe side impact.
Curtain airbags
These are airbags may be fitted along the top of each side of the vehicle and which are triggered along the front and rear side windows to protect the passengers in the event of a severe side impact.
These |
airbags |
operate |
|
through slits in the front |
|||
seatbacks |
(door |
side): |
|
never insert any objects |
|||
in these slits. |
|
|
|
A marking on the windscreen informs you of the presence of additional means of restraint (airbags, pretensioners, etc.) in the passenger compartment.
Warnings concerning the lateral airbag
•Fitting seat covers: seats equipped with an airbag
require covers specifically
designed for your vehicle. Contact your RENAULT Dealer to find out if these covers may be
purchased from RENAULT
outlets. The use of any covers other than those designed for your vehicle (and including those designed for another
vehicle) may affect the operation
of the airbags and reduce your protection.
•Do not place any accessories, objects or even pets between the seatback, the door and the internal fittings. Do not cover the seatback with any items such as clothes or accessories. This may prevent the airbag from operating correctly or cause injury when the airbag is deployed.
•No work or modification whatsoever may be carried out on the internal fittings, except by qualified RENAULT Network personnel.
1.23
 Loading...