


Digital Calliper
Digital Calliper
Operation and Safety Notes
Digitaalinen työntömitta
Käyttö - ja turvallisuusohjeet
Digitalt skjutmått
Bruksanvisning och säkerhetsanvisningar
Digital skydelære
Betjenings - og sikkerhetshenvisninger
Pied à coulisse digital
Instructions d‘utilisation et consignes de sécurité
Digitale schuifmaat
Bedienings - en veiligheidsinstructies
Digitaler Messschieber
Bedienungs - und Sicherheitshinweise
IAN 40115
GB / IE |
Operation and Safety Notes |
Page |
5 |
|
|
|
|
FI |
Käyttöja turvallisuusohjeet |
Sivu |
14 |
|
|
|
|
SE |
Bruksanvisning och säkerhetsanvisningar |
Sidan |
22 |
|
|
|
|
DK |
Brugsog sikkerhedsanvisninger |
Side |
31 |
|
|
|
|
FR / BE |
Instructions d‘utilisation et consignes de sécurité |
Page |
40 |
|
|
|
|
NL / BE |
Bedieningsen veiligheidsinstructies |
Pagina |
49 |
|
|
|
|
DE / AT / CH |
Bedienungsund Sicherheitshinweise |
Seite |
58 |
|
|
|
|

A |
1 |
|
2 |
|
|
|
4 |
|
|
|
|
|
||||
|
|
|
|
|
|
|
|
|
|
|
|
|
|
||
|
|
|
|
|
3 |
|
|
5 |
|
|
|
||||
|
|
|
|
|
|
|
|
|
|
|
|
|
|
6 |
|
|
|
|
|
|
|
|
|
|
|
|
|
|
|
|
|
|
|
|
|
|
|
|
|
|
|
|
|
|
|
|
|
|
|
|
|
|
|
|
|
|
|
|
|
|
|
|
|
|
|
|
|
|
|
|
|
|
|
|
|
|
|
|
|
|
|
|
|
|
|
|
|
|
|
|
|
|
|
|
|
|
|
|
|
|
|
|
|
|
|
|
|
|
|
|
|
|
|
|
|
|
|
|
|
|
|
11 |
|
10 |
|
9 |
|
8 |
|
7 |
|||||
B |
3

C 

D 

E

F

4

Introduction |
|
|
Intended use................................................................ |
Page |
6 |
Scope of delivery........................................................ |
Page |
6 |
Description of parts..................................................... |
Page |
6 |
Technical data............................................................. |
Page |
6 |
Safety instructions.......................................... |
Page |
7 |
Safety instructions for batteries.................................. |
Page |
8 |
Before start of operation |
|
|
Insert / replace battery............................................... |
Page |
9 |
Preparing the calliper................................................. |
Page |
9 |
Starting up the device |
|
|
Using the calliper........................................................ |
Page |
9 |
Examples of use.......................................................... |
Page 10 |
|
Troubleshooting........................................................... |
Page |
11 |
Cleaning and maintenance...................... |
Page 12 |
|
Disposal.................................................................... |
Page 12 |
|
Warranty................................................................. |
Page 13 |
|
GB/IE 5

Digital Calliper
Q Introduction
Q Intended use
Only for private use.
Not for commercial use.
Q Scope of delivery
1 x digital calliper 1 x battery
1 x storage box
1 x instruction for use
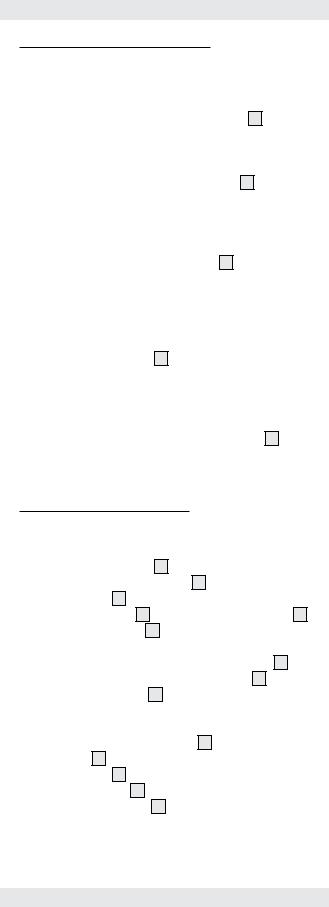
Q Description of parts
1measuring surfaces
2internal measuring jaws
3Inch / mm key
4locking screw
5LCD display
6depth-measuring blade
7handwheel for measuring jaws
8battery compartment lid
9key for zero setting (ZERO) 10 ON / OFF key (ON / OFF) 11 external measuring jaws
Q Technical data
Measurement unit: |
mm |
|
||
Measuring range: |
0 -150 mm / 0-6” |
|||
Resolution: |
0.01 mm / 0.0005” |
|||
Accuracy: |
0-100 mm ± 0.02 mm / 0.001” |
|||
|
100-150 mm ± 0.03 mm / |
|||
|
0.001” |
|
||
Maximum measuring speed: |
1.5 m/s, 60”/s |
|||
Measuring system: |
Liner capacitive measuring system |
|||
Display: |
LCD display |
|||
Operating temperature: |
+5 °C - +40 °C |
|||
Influence of humidity: |
within a range from 0 % to 80 % |
|||
|
relative humidity irrelevant |
|||
Battery: |
3 V |
|
|
CR2032 (included) |
|
||||
6 GB/IE

Safety instructions
BEFORE USING THIS DEVICE, PLEASE READ THE DIRECTIONS FOR USE! PLEASE KEEP THE DIRECTIONS FOR USE IN A SAFE PLACE!
CAUTION! RISK OF INJURY!
J KEEP THE PRODUCT OUT
OF THE REACH OF
CHILDREN. THIS PRODUCT
IS NOT A TOY! This product should never be used by children unsupervised.
DANGER TO LIFE AND RISK OF ACCIDENT FOR TODDLERS AND CHILDREN! Never leave children alone and unsupervised with the packaging material.
J There is a risk of suffocation from the packaging material. Children often underestimate risks. Always keep children away from the product.
DANGER TO LIFE! Batteries could be swallowed and pose a lethal hazard. Consult a doctor immediately if anyone swallows a battery.
J This appliance can be used by children aged from 8 years and above and persons with reduced physical, sensory or mental capabilities or lack of experience and knowledge if they have been given supervision or instruction concerning use of the appliance in a safe way and understand the hazards involved. Children shall not play with the appliance. Cleaning and user maintenance shall not be made by children without supervision.
J Never expose the product to high temperatures, water or moisture as this may damage the product.
J Do not put the calliper under any strain. This may damage the chip in the calliper.
J Keep the calliper clean and dry. Fluids could damage the calliper.
GB/IE 7

Safety instructions for batteries
J CAUTION! RISK OF EXPLOSION! Never recharge the batteries!
J Batteries must not be short-circuited. This could result in over-heating and risk of fire or explosion.
J Remove a depleted battery from the product immediately; otherwise there is an increased risk of leakage!
J Keep batteries out of the reach of children; do not throw them into fire; do not short-circuit them; and do not take them apart.
J Ensure polarity is correct (+ and -). J Only use the recommended battery. J If these instructions are not complied
with, the battery may be discharged beyond its cut-off voltage. There is then a risk of leakage. If the battery has leaked into your device, please remove it immediately in order to prevent any damage to the product!
J Wear protective gloves! If they come into contact with skin, leaked or damaged batteries could cause chemical burns; you should therefore wear suitable protective gloves at all times if such an event occurs.
J Avoid contact with skin, eyes, and mucous membranes. If you come into contact with battery acid, rinse the affected spot with plenty of water and / or consult a doctor immediately!
J Warning! Switch the product OFF before inserting the battery (LCD display 5 is off.)
J Remove the battery from the device if it is not in use for a long period of time.
J Do not, on any account, short-circuit the terminals.
8 GB/IE
Q Before start of operation
Q Insert / replace battery
Tip: Flashing numbers indicate a discharged / flat battery. Tip: When changing the battery, the LCD display 5 may experience faults. Remove the battery and insert it again after waiting more then 30 seconds.
j Push open the lid to the battery compartment 8 (see Fig. B). j Remove the old battery.
jInsert the new battery into the battery compartment and ensure correct polarity (+ and -). Make sure that the plus terminal points outwards.
jPush the lid to the battery compartment 8 shut again (see Fig. B).
Q Preparing the calliper
jLoosen the locking screw 4 so that you can move the calliper.
jClean all measuring surfaces and the calliper rod. Otherwise, faulty measuring results may occur due to, for example, humidity.
jCheck that all keys, switches and the LCD display 5 work correctly.
Q Starting up the device
Q Using the calliper
j Loosen the locking screw 4 by turning it anti-clockwise.
jPush the external measuring jaws 11 and the internal measuring jaws 2 together.
j Switch the LCD display 5 on by pressing the ON / OFF key 10 .
jPress the inch / mm key 3 to set the unit of measurement (inch or mm) you wish to use. Either “mm” or “inch” will appear to the right of the figures in the LCD display 5 .
jPress the key to obtain the zero setting (ZERO) 9 in order to reset the LCD display 5 to zero.
Measuring an object from the outside:
jMove the external measuring jaws 11 apart by turning the handwheel 7 outwards anti-clockwise. Place the external measuring jaws 11 against the object to be measured.
jTurn the handwheel 7 inwards clockwise. Move the external measuring jaws 11 together until they touch both sides of the object you want to measure. Please ensure that you do not damage the object you want to measure by subjecting it to too much pressure.
GB/IE 9

Measuring an object from the inside:
jPlace the internal measuring jaws 2 against the object you want to measure.
jTurn the handwheel 7 outwards anti-clockwise. Move the internal measuring jaws 2 apart until they touch the object on both its inner sides. Please ensure that you do not damage the object you want to measure by subjecting it to too much pressure.
Measuring the depth of an object:
j Move the depth-measuring blade 6 out of the calliper.
jPut the depth-measuring blade 6 in position until it touches the surface (e.g. inside a hole).
jSlide the body of the calliper downward until you feel resistance.
j Ensure that you do not damage the depth-measuring blade
|
|
or the object you want to measure by exerting too much |
||||||||||||||
|
6 |
|||||||||||||||
j |
pressure on them. |
|
|
|
|
|
|
|
||||||||
The LCD display |
|
|
|
now displays the dimensions. |
||||||||||||
5 |
|
|||||||||||||||
j After carrying out the measurement, move the external |
||||||||||||||||
|
measuring jaws |
11 |
/ internal measuring jaws |
2 |
together |
|||||||||||
|
again by turning the handwheel |
|
inwards clockwise. |
|||||||||||||
|
7 |
|||||||||||||||
j |
Switch the LCD display |
|
|
off again by pressing the |
||||||||||||
5 |
||||||||||||||||
|
ON / OFF key |
|
. |
|
|
|
|
|
|
|
|
|||||
|
10 |
|
|
|
|
|
|
|
||||||||
|
Tip: The LCD display |
|
|
automatically switches itself off |
||||||||||||
|
5 |
|
||||||||||||||
|
after approx. 3 minutes. |
|
|
|
|
|
|
|
||||||||
jTighten the locking screw 4 again by turning it clockwise until you feel some resistance.
Q Examples of use
Tip: When measuring, always proceed as described in the chapter on using the calliper.
Comparison of plug and socket (see fig. C): j First measure the dimensions of the plug.
j You may wish to make a note of the measurement. j Then measure the socket.
Deviation from a reference value (see fig. D): j Measure a reference object (in this case A).
jLeave the measuring jaws 2 / 11 in this position and press the key to obtain the zero setting (ZERO) 9 .
jThen measure the second object. The LCD display 5 now shows the deviation of the measurement of the second object to that of the reference object (A).
Measuring the thickness of the floor of an object (see fig. E):
j First measure the depth of the object.
j Leave the depth blade 6 in this position and press the key
10 GB/IE
to obtain the zero position (ZERO) 9 .
jNow measure the entire object. The LCD display 5 now shows the thickness of the floor of the object.
Measuring the distance between two identical holes (see fig. F):
j First measure one of the two, equally sized holes.
jLeave the measuring jaws 2 / 11 in this position and press the key to obtain the zero position (ZERO) 9 .
jNow measure the total dimension. The LCD display 5 now shows the average distance.
Characteristics of metric ISO screw threads:
Nominal diameter: |
Increase: |
Core diameter: |
Drill |
[mm] |
[mm -1] |
[mm] |
diameter: |
|
|
|
[mm] |
3 |
0.5 |
2.46 |
2.5 |
4 |
0.7 |
3.24 |
3.3 |
5 |
0.8 |
4.13 |
4.2 |
6 |
1 |
4.92 |
5 |
8 |
1.25 |
6.65 |
6.8 |
10 |
1.5 |
8.38 |
8.5 |
12 |
1.75 |
10.11 |
10.2 |
16 |
2 |
13.84 |
14 |
20 |
2.5 |
17.29 |
17.5 |
Q Troubleshooting
The device contains sensitive electronic components. That is why it experiences interference when in close proximity to radio transmission devices. If any indication errors appear in the display, remove such devices out of the proximity of the calliper. Electrostatic discharge could result in malfunctions.
jWhen such malfunctions occur, remove the battery for a short while and re-insert.
Failure |
Cause |
Solution |
||
|
|
|
|
|
Five digits flash |
The battery voltage is |
Replace the battery |
||
simultaneously |
lower than 2.75 V. |
in line with the chap- |
||
every second. |
|
ter on “Inserting / |
||
|
|
|
|
replacing battery”. |
|
|
|
|
|
The LCD dis- |
Faulty wiring or |
Remove battery |
||
play |
5 |
does |
circuit |
and re-insert after |
not |
continue to |
|
30 seconds. |
|
count. |
|
|
||
|
|
|
|
|
GB/IE 11

|
|
|
|
|
|
|
|
|
|
|
|
|
|
|
|
|
|
|
Failure |
Cause |
Solution |
|
||||
|
|
|
|
|
|
|
|
|
|
Nothing is dis- |
1. LCD display is |
1. Switch the LCD |
|
||||
|
played on the |
switched off. |
display on by |
|
||||
|
LCD display |
5 |
. |
2. Battery is the wrong |
pressing the ON / |
|
||
|
|
|
|
way round or the |
OFF key |
|
. |
|
|
|
|
|
10 |
|
|||
|
|
|
|
battery contact is |
2. Remove the bat- |
|
||
|
|
|
|
poor. |
tery and insert / |
|
||
|
|
|
|
3. The battery voltage |
replace it in line |
|
||
|
|
|
|
is lower than 2.4 V. |
with the terminals |
|
||
|
|
|
|
|
and the chapter |
|
||
|
|
|
|
|
“Inserting / replac- |
|
||
|
|
|
|
|
ing the battery” |
|
||
|
|
|
|
|
so that it touches |
|
||
|
|
|
|
|
all contacts. |
|
||
|
|
|
|
|
3. Replace the bat- |
|
||
|
|
|
|
|
tery in line with |
|
||
|
|
|
|
|
the chapter “In- |
|
||
|
|
|
|
|
serting / replac- |
|
||
|
|
|
|
|
ing the battery”. |
|
||
|
|
|
|
|
|
|
|
|
Q Cleaning and maintenance
j Clean the calliper before and after using it.
jDo not immerse the calliper into water. Liquids can damage the calliper.
jUse a dry cloth to clean the casing; never use petrol, solvents or cleaning agents
jAlways switch the LCD display off when not using the calliper. This will extend the life of the battery.
jKeep away from electrical current and electrically charged pens to prevent damage to the chip.
Q Disposal
The packaging is made entirely of recyclable materials, which you may dispose of at local recycling facilities.
Contact your local refuse disposal authority for more details of how to dispose of your worn-out product.
To help protect the environment, please dispose of the product properly when it has reached the end of its useful life and not in the household waste. Information on collection points and their opening hours can be obtained from your local authority.
Faulty or used batteries must be recycled in accordance with Directive 2006 / 66 / EC. Please return the batteries and / or the device to the available collection points.
12 GB/IE

Environmental damage through incorrect disposal of the batteries!
Batteries may not be disposed of with the usual domestic waste. They may contain toxic heavy metals and are subject to hazardous waste treatment rules and regulations. The chemical symbols for heavy metals are as follows: Cd = cadmium, Hg= mercury, Pb = lead. That is why you should dispose of used batteries at a local collection point.
Q Warranty
The device has been manufactured to strict quality guidelines and meticulously examined before delivery. In the event of product defects you have legal rights against the retailer of this product. Your legal rights are not limited in any way by our warranty detailed below.
The warranty for this device is 3 years from the date of purchase. Should this device show any fault in materials or manufacture within three years from the date of purchase, we will repair or replace it - at our choice - free of charge to you. The warranty period begins on the date of purchase. Please keep the original sales receipt in a safe location. This document is required as your proof of purchase. This warranty becomes void if the device has been damaged or improperly used or maintained.
The warranty applies to faults in material or manufacture. This warranty does not cover product parts subject to normal wear, thus possibly considered consumables (e.g. batteries) or for damage to fragile parts, e.g. switches, rechargeable batteries or glass parts.
GB/IE 13

Johdanto |
|
|
Käyttötarkoitus........................................................... |
Sivu |
15 |
Toimitus....................................................................... |
Sivu |
15 |
Osaluettelo................................................................ |
Sivu |
15 |
Tekniset tiedot............................................................ |
Sivu |
15 |
Turvallisuusohjeet.......................................... |
Sivu |
16 |
Paristojen turvaohje................................................... |
Sivu |
16 |
Ennen käyttöönottoa |
|
|
Pariston vaihto / asetus.............................................. |
Sivu |
17 |
Työntömitan valmistelu.............................................. |
Sivu |
18 |
Käyttöönotto |
|
|
Työntömitan käyttö.................................................... |
Sivu |
18 |
Käyttöesimerkkejä..................................................... |
Sivu |
19 |
Virheiden korjaus....................................................... |
Sivu |
20 |
Huolto ja puhdistus...................................... |
Sivu |
20 |
Jätehuolto............................................................. |
Sivu |
21 |
Takuu......................................................................... |
Sivu |
21 |
14 FI

Digitaalinen työntömitta
Q Johdanto
Q Käyttötarkoitus
Vain yksityiskäyttöön.
Ei ammattimaiseen käyttöön.
Q Toimitus
1 x Digitaalinen työntömitta 1 x Paristo
1 x Säilytyslaatikko 1 x Käyttöohje
Q Osaluettelo
1Mittauspinnat
2Sisäinen mittausnokka
3Inch / mm-näppäin
4Varmistusruuvi
5LCD-näyttö
6Syvyysmittausosa
7Mittausnokan säätöpyörä
8Paristokotelonkansi
9Painike nolla-asemaan (ZERO)
10PÄÄLLE / POIS-painike (ON / OFF)
11Ulkoinen mittausnokka
Q Tekniset tiedot
Mittausyksikkö: |
mm |
|
|
Mittausalue: |
0 - 150 mm / 0-6” |
||
Tarkkuus: |
0,01 mm / 0,0005” |
||
Täsmällisyys: |
0 - 100 mm ± 0,02 mm / 0,001” |
||
|
100 - 150 mm ± 0,03 mm / 0,001” |
||
Maximi |
|
|
|
Mittausnopeus: |
1,5 m / s, 60”/s |
||
Mittaussysteemi: |
lineaarinen, kosketukseton |
||
|
CAP-mittaussysteemi |
||
Näyttö: |
LCD-näyttö |
||
Käyttölämpötila: |
+5 °C - +40 °C |
||
Ilmankosteuden vaikutus: |
0 % bis 80 % |
||
|
Suhteellinen ilmankosteus |
||
|
on merkityksetön |
||
Paristo: |
3V |
|
CR2032 (sisältyy |
|
|||
|
toimitukseen) |
||
FI 15

Turvallisuusohjeet
LUE KÄYTTÖOHJEET ENNEN ENSIMMÄISTÄ KÄYTTÖÄ! SÄILYTÄ KÄYTTÖOHJEET HUOLELLISESTI!
VAROITUS!
LOUKKAANTUMISVAARA!
J EI LASTEN KÄSIIN! TÄMÄ EI
OLE LEIKKIKALU! Lapset eivät saa käyttää tuotetta ilman
aikuisten valvontaa.
LAPSILLE HENGENJA LOUKKAANTUMISVAARA! Älä jätä lapsia koskaan pakkausmateriaalin lähettyville ilman valvontaa!
J Pakkausmateriaali merkitsee tukehtumisvaaraa! Lapset aliarvioivat usein vaarat. Pidä lapset aina pois tuotteen ulottuvilta.
HENGENVAARA! Lapset voivat niellä paristoja, mikä merkitsee hengenvaaraa. Ota yhteys lääkäriin heti, jos lapsi nielee pariston.
J Laitetta voivat käyttää 8 vuotta täyttäneet lapset ja henkilöt, jotka ovat fyysisiltä tai psyykkisiltä kyvyiltääntai aisteiltaan rajoittuneita tai joilla ei ole kokemusta tai tietoa laitteen käytöstä, jos he käyttävät laitettavalvonnan alaisina tai heitä on opastettu laitteen turvallisessa käytössä ja he ovat tietoisia laitteeseen liittyvistä vaaroista. Lapset eivät saa leikkiä laitteella. Lapset eivät saa puhdistaa tai huoltaa laitetta ilman valvontaa.
J Vältä liikaa kuumuutta tai kosteutta, sillä tuote saattaa vahingoittua.
J Työntömitassa ei saa vallita liian suuri jännnite. Siru voi muuten vahingoittua.
J Pidä tuote kuivana ja puhtaana. Neste voi vahingoittaa tuotteen.
Paristojen turvaohje
JVAROITUS! RÄJÄHDYSVAARA! Paristoja ei saa koskaan ladata uudelleen!
16 FI

J Paristoja ei saa oikosulkea. Kuumentuminen, palovaara ja räjähdys saattaa olla seurauksena.
J Poista käytetty paristo heti tuotteesta. Vuotovaara!
J Paristoja ei lasten käsiin, niitä ei saa heittää tuleen, ei saa yhdistää toisiinsa eikä purkaa.
J Katso oikea napaisuus: (+ ja -).
J Käytä vain suositeltua paristotyyppiä. J Virheellinen käyttö saattaa johtaa
pariston purkautumiseen. Vuotovaara. Jos laitteen paristo on vuotanut, poista se heti välttääksesi tuotteen vahinkoitumista!
J Käytä suojakäsineitä! Tyhjät tai vialliset paristot voivat syövyttää ihoa. Pidä aina ehdottomasti sopivia suojakäsineitä, kun käsittelet paristoja.
J Vältä kosketusta ihoon, silmiin, limakalvoihin. Paristohappo on huuhdeltava heti pois runsaalla vedellä ja / tai otettava yhteys lääkäriin. Varoltus! Sulje laite POIS päältä, kun
asetatat pariston paikoilleen (LCD-näyttö 5 pois päältä).
J Kun laitetta ei käytetä pitempään aikaan, poista paristo laitteesta.
J Älä koskaan tee oikosulkua napojen välillä.
Q Ennen käyttöönottoa
Q Pariston vaihto / asetus
Ohje: Vilkkumerkkivalo ilmoittaa tyhjästä paristosta. Ohje: Pariston vaihdossa saattaa LCD-näytössä esiintyä 5 häiriö.
Ota paristo pois ja aseta se yli 30 sekunnin päästä taas paikoilleen.
j Työnnä paristokotelon kansi kiinni 8 (kts. kuva B). j Ota käytettu paristo pois.
jLaita uusi paristo paristokoteloon huomioimalla navat: (+ ja -). Plussanapa näkyy ulospäin.
j Työnnä paristokotelon kansi 8 taas kiinni (kts. kuva B).
FI 17

Q Työntömitan valmistelu
j Irrota varmuusruuvi niin, 4 että voit liikuttaa työntömittaa.
jPuhdista kaikki mittauspinnat ja mittalista kuivalla puuvillakankaalla. Muuten saattaa esimerkiksi ilmankosteus vääristää mittaustuloksia.
jTarkista, että kaikki painikkeet, kytkimet ja LCD-näyttö 5 toimivat moitteettomasti.
Q |
Käyttöönotto |
|
||||||
Q |
Työntömitan käyttö |
|||||||
j |
Irrota varmuusruuvi |
|
kääntämällä vastapäivään. |
|||||
4 |
||||||||
j |
Vedä ulkoiset mittausnokat |
|
/ sisäiset mittausnokat |
|
yhteen. |
|||
11 |
2 |
|||||||
jKytke LCD-näyttö päälle 5 painamalla PÄÄLLE / POISpainiketta 10 .
jPaina inch / mm-näppäintä 3 määrätäksesi mittausyksikön (inch tai mm), jota haluat käyttää. LCD-näyttöön 5 tulee joko „mm“ tai „inch“.
jPaina nolla-asentoon (ZERO) niin, 9 että LCD-näyttö 5 nollaantuu.
Kohteen mittaus ulkoa:
jVedä ulkoiset mittausnokat 11 toisistaan irti: 7 käännä pyörösäätöä vastapäivään ulospäin. Aseta nyt ulkoiset
mittausnokat 11 mitattavaan kohteeseen.
jKäännä säätöpyörää 7 myötäpäivään sisäänpäin. Työnnä ulkoiset mittanokat niin kauan yhteen, 11 kunnes ne koskettavat mitattavaa kohdetta molemmin puolin. Kun
kohdetta mitataan, siihen ei saa kohdistaa liikaa painetta laitteella.
Kohteen mittaus sisältä:
jAseta sisäiset mittanokat 2 sisäpuolelta mitattavaan kohteeseen.
jKäännä säätöpyörää 7 vastapäivään ulospäin. Työnnä sisäiset mittanokat 2 niin pitkälle kunnes ne koskettavat kohteen sisäreunoja. Liiallinen paine ei saa vahingoittaa mitattavaa kohdetta.
Kohteen syvyyden mittaus:
j Ota syvyysmittausosa esiin 6 työntömitasta.
jLaita syvyysmittausosa 6 mitattavaan kohteeseen kunnes se koskettaa pintaa (Esim. reijän sisäpuolta).
jVedä työntömitan runkoa niin kauan alaspäin, että syvyysmittari tuntee vastuksen.
j |
Pidä huoli siitä, että syvyysmittausosa tai mitattava kohde ei |
|||
|
vahingoidu |
6 |
liian suuren paineen vuoksi. |
|
j |
LCD-näyttö |
|
|
näyttää nyt mitat. |
|
5 |
|||
jMittauksen jälkeen ulkoiset 11 sisäiset mittausnokat 7 vedetään taas yhteen 2 kääntämällä säätöpyörää myötäpäivään sisäänpäin.
18 FI

jKytke LCD-näyttö pois päältä 5 painamalla PÄÄLLE / POIS-painiketta 10 .
Ohje: Noin 3 minuutin jälkeen LCD-näyttö menee 5 automaattisesti pois päältä.
jKäännä varmistusruuvi 4 kiinni myötäpäivään kunnes tunnet vastuksen.
Q Käyttöesimerkkejä
Ohje: Toimi aina työntömitan käyttöohjeiden mukaan.
Vertailu pistokkeen ja reijän välillä (kts. kuva C): j Mittaa pistokkeen mitat.
j Laita mittaustulos muistiin. j Mittaa reiän mitat.
Viitemitan poikkeus (kts. kuva D): j Mittaa viitekohde (tässä A).
jJätä mittausnokka 2 / 11 tähän asentoon ja paina nollaus (ZERO) 9 .
jMittaa toinen kohde. LCD-näyttö 5 näyttää poikkeaman kohteiden välillä: viite / toinen kohde (A).
Kohteen pohjan paksuuden mittaus (kts. kuva E): j Mittaa ensin kohteen syvyys.
jJätä syvyysmittari 6 tähän asentoon ja paina nollaus (ZERO) 9 .
jMittaa koko kohteen mitta. LCD-näyttö 5 näyttää pohjan paksuuden.
Kahden identtisen reiän välisen etäisyyden mittaus (katso kuva F):
j Mittaa ensin toinen samankokoinen reikä.
jJätä mittausnokka 2 / 11 tähän asentoon ja paina nollaus (ZERO) 9 .
jOta sitten kokonaismitat. LCD-näyttö 5 näyttää nyt keskivälimatkan.
Metristen ISO-kierteiden / ruuvien ominaistiedot:
Nimellisläpi- |
Nousu: |
Ydinläpimitta: |
Porausläpimitta: |
mitta: |
[mm -1] |
[mm] |
[mm] |
[mm] |
|
|
|
3 |
0,5 |
2,46 |
2,5 |
4 |
0,7 |
3,24 |
3,3 |
5 |
0,8 |
4,13 |
4,2 |
6 |
1 |
4,92 |
5 |
8 |
1,25 |
6,65 |
6,8 |
10 |
1,5 |
8,38 |
8,5 |
12 |
1,75 |
10,11 |
10,2 |
16 |
2 |
13,84 |
14 |
20 |
2,5 |
17,29 |
17,5 |
FI 19

Q Virheiden korjaus
Laitteessa on herkkiä sähköosia. Radiolaitteet lähistöllä voivat vaikuttaa laitteeseen. Jos näyttöön ilmestyy vikailmoitus, poista kaikki sellaiset laitteet lähistöltä.
Elektrostaattiset lataukset voivat aiheuttaa häiriöitä.
jJos sellaisia häiriöitä esiintyy, ota paristot hetkeksi pois ja laita ne uudelleen paikoilleen.
Virhe |
Syy |
Apu |
||||||
Viisi numeroa |
Paristojännite alle |
Vaihda paristo seuraa- |
||||||
hyppää yli sa- |
2,75 V. |
malla ohjeita kappa- |
||||||
maan aikaan |
|
leen „Pariston |
||||||
sekunnissa. |
|
asetus / vaihto“. |
||||||
LCD-näyttö |
|
ei |
Viallinen kytkentä. |
Ota paristo ulos ja laita |
||||
5 |
||||||||
laske enää |
eteen- |
|
se 30 sek. päästä |
|||||
päin. |
|
takaisin paikoilleen. |
||||||
LCD-näyttö ei toi- |
1. LCD-näyttö on |
1. Laita LCD-näyttö |
||||||
mi. |
5 |
. |
pois päältä. |
päälle painamalla |
||||
|
|
|
|
|
2. Paristo ei saa |
PÄÄLLE / POIS- |
|
|
|
|
|
|
|
10 |
|
||
|
|
|
|
|
kontaktia tai on |
painiketta. |
|
|
|
|
|
|
|
väärinpäin. |
2. Ota paristo pois ja |
||
|
|
|
|
|
3. Paristojännite |
laita se paikoilleen |
||
|
|
|
|
|
alle 2,4 V. |
napaisuudet huomi- |
||
|
|
|
|
|
|
oimalla ja kappaleen |
||
|
|
|
|
|
|
„Pariston asetus / |
||
|
|
|
|
|
|
vaihto“mukaan niin, |
||
|
|
|
|
|
|
että kaikki vastukset |
||
|
|
|
|
|
|
ovat kosketuksissa. |
||
|
|
|
|
|
|
3. Vaihda paristo |
||
|
|
|
|
|
|
kappaleen „Paris- |
||
|
|
|
|
|
|
ton asetus / vaihto“ |
||
|
|
|
|
|
|
mukaan. |
||
Q Huolto ja puhdistus
j Puhdista työntömitta ennen ja jälkeen jokaista käyttöä.
jTyöntömittaa ei saa laittaa veteen. Neste voi vahingoittaa tuotteen.
jPuhdista laite kuivalla kankaalla, ei missään tapauksessa esim. bensiinillä, liuotteella tai puhdistusaineella.
jLCD-näytön on oltava aina olla pois päältä, kun tuotetta ei käytetä. Se pidentää paristojen käyttökestoa.
jTuote ei saa olla jännitteen kohteena eikä se saa olla sähköisten pistikkeiden lähellä. Muuten työntömitan siru voi vahingoittua.
20 FI
Q Jätehuolto
Pakkaus on ympäristöystävällistä materiaalia, joka voidaan kierrättää paikallisessa kierrätyskeskuksessa.
Saat lisätietoa käytettyjen tuotteiden jätehuoltomahdollisuuksista kunnantai kaupungintoimistosta.
Älä heitä käytettyä tuotetta talousjätteisiin. Toimi ympäristöystäväl-lisesti toimittamalla se asianmukaiseen jätehuoltoon. Paikallisesta kunnantai kaupungintoimistosta saat lisätietoa kierrätyspisteistä ja aukioloajoista.
Vialliset ja käytetyt paristot on toimitettava kierrätykseen direktiivin 2006 / 66 / EC mukaisesti. Palauta paristot ja / tai laite tarjolla olevaan keräyslaitokseen.
Paristojen väärä hävittäminen aiheuttaa ympäristövahinkoja!
Paristoja ei saa hävittää talousjätteenä. Ne voivat sisältää myrkyllisiä raskasmetalleja ja ne kuuluvat ongelmajätekäsittelyyn. Raskasmetallien kemialliset merkit ovat seuraavat: Cd = kadmium, Hg = elohopea, Pb = lyijy. Toimita tästä syystä vanhat paristot kunnalliseen keräyspisteeseen.
Q Takuu
Laite on valmistettu huolellisesti tiukkojen laatudirektiivien mukaan ja tarkistettu huolella ennen toimitusta. Jos tuote on virheellinen, sinulla on ostajana lakisääteiset oikeudet esittää vaatimuksia tuotteen myyjää kohtaan. Seuraavassa esitetty takuu ei rajoita lakisääteisiä oikeuksiasi.
Laitteelle myönnetty takuu on voimassa 3 vuotta ostopäivästä lukien. Takuun voimassaolo alkaa tuotteen ostopäivästä. Säilytä aina alkuperäinen kassakuitti. Se toimii todisteena tehdystä ostoksesta.
Jos kolmen vuoden sisällä tuotteen ostopäivästä alkaen tuotteesta löytyy materiaalitai valmistusvirhe, korjaamme tuotteen ilmaiseksi tai toimitamme tilalle uuden tuotteen harkintamme mukaan. Takuu raukeaa, jos tuote on vioittunut asiattoman käytön tai huollon vuoksi.
Takuu koskee materiaalija valmistusvirheitä. Takuu ei kata tuotteen osia, jotka kuluvat normaalissa käytössä ja siitä syystä pidetään kuluvina osina (esim. paristot) tai vaurioita särkyvissä osissa esim. kytkimessä, akuissa tai lasista valmistetuissa osissa.
FI 21
 Loading...