


INFRARED TEMPERATURE PROBE PTSI 9 A1
INFRARED TEMPERATURE |
INFRAPUNALÄMPÖMITTARI |
PROBE |
Käyttöohje |
Operating instructions |
|
INFRARÖD TERMOMETER |
INFRARØD-TERMOMETER |
Bruksanvisning |
Betjeningsvejledning |
APPAREIL DE MESURE DE |
INFRAROOD TEMPERATUUR- |
TEMPÉRATURE À INFRAROUGE |
MEETAPPARAAT |
Mode d’emploi |
Gebruiksaanwijzing |
INFRAROT-TEMPERATUR- |
|
MESSGERÄT |
|
Bedienungsanleitung |
|
|
|
|
|
|
|
|
IAN 90572 |
3 |
|
|
|
|
|
|
|
||
|
|
|
|
|
|
Before reading, unfold the page containing the illustrations and familiarise yourself with all functions of the device.
Käännä ennen lukemista kuvallinen sivu esiin ja tutustu seuraavaksi laitteen kaikkiin toimintoihin.
Vik ut bildsidan och ha den till hands när du läser igenom anvisningarna och gör dig bekant med apparatens / maskinens funktioner.
Før du læser, vend siden med billeder frem og bliv bekendt med alle apparatets funktioner.
Avant de lire le mode d‘emploi, ouvrez la page contenant les illustrations et familia- risez-vous ensuite avec toutes les fonctions de l‘appareil.
Vouw vóór het lezen de pagina met de afbeeldingen open en maak u vertrouwd met alle functies van het apparaat.
Klappen Sie vor dem Lesen die Seite mit den Abbildungen aus und machen Sie sich anschließend mit allen Funktionen des Gerätes vertraut.
GB / IE |
Operating instructions |
Page |
1 |
FI |
Käyttöohje |
Sivu |
17 |
SE |
Bruksanvisning |
Sidan |
33 |
DK |
Betjeningsvejledning |
Side |
49 |
FR / BE |
Mode d’emploi |
Page |
65 |
NL / BE |
Gebruiksaanwijzing |
Pagina |
81 |
DE / AT / CH |
Bedienungsanleitung |
Seite |
97 |


Index
Introduction . . . . . . . . . . . . . . . . . . . . . . . . . . . . . . . . . . . 2
Copyright. . . . . . . . . . . . . . . . . . . . . . . . . . . . . . . . . . . . . . . . . . . . . 2 Limited liability . . . . . . . . . . . . . . . . . . . . . . . . . . . . . . . . . . . . . . . . . 2 Intended use . . . . . . . . . . . . . . . . . . . . . . . . . . . . . . . . . . . . . . . . . . 2 Warnings used. . . . . . . . . . . . . . . . . . . . . . . . . . . . . . . . . . . . . . . . . 3
Safety. . . . . . . . . . . . . . . . . . . . . . . . . . . . . . . . . . . . . . . . 4
Interaction with batteries . . . . . . . . . . . . . . . . . . . . . . . . . . . . . . . . . 5 Basic Safety Instructions. . . . . . . . . . . . . . . . . . . . . . . . . . . . . . . . . . 5
Initial use . . . . . . . . . . . . . . . . . . . . . . . . . . . . . . . . . . . . . 6
Items supplied and transport inspection. . . . . . . . . . . . . . . . . . . . . . 6 Disposal of the packaging . . . . . . . . . . . . . . . . . . . . . . . . . . . . . . . . 7 Inserting / Replacing the battery . . . . . . . . . . . . . . . . . . . . . . . . . . . 7
Operating components. . . . . . . . . . . . . . . . . . . . . . . . . . 8
Handling and operation . . . . . . . . . . . . . . . . . . . . . . . . . 8
Preparing the appliance . . . . . . . . . . . . . . . . . . . . . . . . . . . . . . . . . 8 Switching the appliance on / o . . . . . . . . . . . . . . . . . . . . . . . . . . . 8 Selection of the Temperature Unit . . . . . . . . . . . . . . . . . . . . . . . . . . 9 Measuring the temperature . . . . . . . . . . . . . . . . . . . . . . . . . . . . . . . 9 Indicating a temperature deviation . . . . . . . . . . . . . . . . . . . . . . . . 10 Setting reference values. . . . . . . . . . . . . . . . . . . . . . . . . . . . . . . . . 10 Selection of the size of di erence . . . . . . . . . . . . . . . . . . . . . . . . . 10 Scanning a temperature deviation . . . . . . . . . . . . . . . . . . . . . . . . . 11 Example of application . . . . . . . . . . . . . . . . . . . . . . . . . . . . . . . . . 11 Battery indicator . . . . . . . . . . . . . . . . . . . . . . . . . . . . . . . . . . . . . . 11
Troubleshooting . . . . . . . . . . . . . . . . . . . . . . . . . . . . . . 12
Malfunction causes and remedies . . . . . . . . . . . . . . . . . . . . . . . . . 12
Cleaning. . . . . . . . . . . . . . . . . . . . . . . . . . . . . . . . . . . . . 13
Storage . . . . . . . . . . . . . . . . . . . . . . . . . . . . . . . . . . . . . 13
Disposal . . . . . . . . . . . . . . . . . . . . . . . . . . . . . . . . . . . . . 13
Disposal of the appliance . . . . . . . . . . . . . . . . . . . . . . . . . . . . . . . 13 Disposing of the batteries . . . . . . . . . . . . . . . . . . . . . . . . . . . . . . . 14
Appendix . . . . . . . . . . . . . . . . . . . . . . . . . . . . . . . . . . . . 14
Technical data . . . . . . . . . . . . . . . . . . . . . . . . . . . . . . . . . . . . . . . . 14 Information regarding the EG Declaration of Conformity . . . . . . . 15 Service . . . . . . . . . . . . . . . . . . . . . . . . . . . . . . . . . . . . . . . . . . . . . . 15 Importer . . . . . . . . . . . . . . . . . . . . . . . . . . . . . . . . . . . . . . . . . . . . . 15
GB
IE
PTSI 9 A1 |
1 |

GB
IE
Introduction
Congratulations on the purchase of your new appliance!
You have clearly decided in favour of a quality product. This operating manual is a component of this product. It contains important information in regard to safety, use and disposal. Before using the product, familiarise yourself with all of these operating and safety instructions. Use the product only as described and only for the specified areas of application. Retain these instructions for future reference. In addition, pass these documents on, together with the product, to any future owner.
Copyright
This documentation is copyright protected.
Any copying or reproduction, including as extracts, as well as the reproduction of images, also in an altered state, is only permitted with the written authorisation of the manufacturer.
Limited liability
All technical information, data and instructions for connection and operation contained in these operating instructions correspond to the latest available at the time of printing and, to the best of our knowledge, take into account our previous experience and know-how. No claims can be derived from the details, illustrations and descriptions in these operating instructions. The manufacturer assumes no responsibility for damage caused by failure to comply with these operating instructions, improper use, incompetent repairs, making unauthorised modifications or for using unauthorised replacement parts.
Intended use
This infrared temperature probe is used for the contact-less measurement of surface temperatures in the range of -40°C to +220°C (- 40°F – 428°F) and comparison of the measured temperatures with a previously acquired reference value.
2 |
PTSI 9 A1 |

|
|
|
|
|
|
|
|
|
|
|
|
|
|
|
|
|
|
|
|
|
|
|
|
The measurement is possible in either °C or °F. The measure- |
|
|
|
||||
|
GB |
|
|||||
ment is made by means of infrared technology. Thereby, the |
|
|
|||||
surfaces of objects can be continuously measured and the tem- |
|
IE |
|
||||
perature variations are displayed optically, acoustically and in |
|
|
|
||||
|
|
|
|||||
colour. The integrated laser-beam pointer may only be used for |
|
|
|
||||
locating the measurement point within the scope of temperature |
|
|
|
||||
measurement. The appliance is intended exclusively for domestic |
|
|
|
||||
use. Do not use the appliance for commercial or industrial appli- |
|
|
|
||||
cations. Use the appliance only in a dry environment or indoors. |
|
|
|
||||
This appliance is not intended for any other use or for uses beyond |
|
|
|
||||
those detailed. Claims of any kind for damage resulting from |
|
|
|
||||
unintended use will not be accepted. The operator alone bears |
|
|
|
||||
the liability. |
|
|
|
||||
Warnings used
In these extant operating instructions the following warning notices are used:
 DANGER
A warning at this risk level indicates a threateningly dangerous situation.
In the event that the dangerous situation is not avoided it could lead to death or serious physical injury.
►Comply with the directives in this warning to avoid the risks of death or serious physical injury.
 WARNING
A warning at this risk level indicates a potentially dangerous situation.
If the dangerous situation is not avoided it could lead to personal injuries.
►Comply with the directives in this warning to avoid personal injuries.
PTSI 9 A1 |
3 |

GB
IE
IMPORTANT
A warning at this risk level indicates potential property damage.
If the situation is not avoided it could lead to property damage.
►Comply with the directives in this warning to avoid property damage.
NOTICE
►A notice indicates additional information that may assist you in the handling of the appliance.
Safety
In this section you will receive important safety information regarding the handling of the appliance. This appliance complies with the statutory safety regulations. Incorrect usage can lead to injuries and property damage.
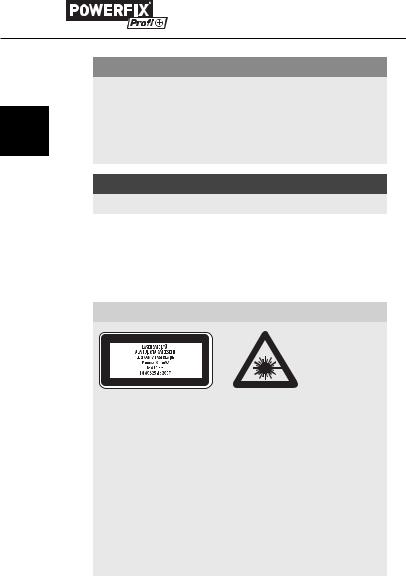
 WARNING
This appliance contains a Class 2 laser.
NEVER direct the laser beam at people or animals.
NEVER look directly into the laser. The laser can cause serious eye damage.
►Do NOT direct the laser beam at strongly reflective materials. Reflected laser beams are also dangerous.
►All adjustments intended to increase the laser power are forbidden. There is also a risk of personal injury!
►No liability will be accepted for damage resulting from manipulation of the laser equipment or from noncompliance with this safety information.
4 |
PTSI 9 A1 |

|
|
|
|
|
|
|
|
|
|
|
|
|
|
|
|
|
|
|
|
|
|
|
|
|
|
|
|
|
|
|
|
|
|
|
|
|
|
|
|
|
DANGER |
|
|
|
GB |
|
|||
|
► Do not use the appliance at locations with a risk of fire |
|
|
|
IE |
|
|||
|
or explosion, e.g. close to flammable fluids or gases. |
|
|
|
|
|
|||
|
|
|
|
|
|
|
|
|
|
Interaction with batteries
 WARNING
Risks from improper use!
The risk of explosions and leakages exists!
For the safe handling of batteries, comply with the following safety instructions:
►Do not throw batteries into a fire.
►Never short-circuit batteries.
►Do not attempt to recharge batteries.
►Regularly check the condition of the batteries. Leaking battery acid can cause permanent damage to the appliance. Special caution should prevail when handling damaged or leaking batteries. There is also a risk of personal injury! Wear protective gloves.
►Store batteries in a place inaccessible to children. If a battery is swallowed, seek medical attention IMMEDIATELY.
►If you do not intend to use the appliance for an extended period, remove the batteries.
Basic Safety Instructions
For safe handling of the appliance comply with the following safety instructions:
■Before use check the appliance for visible external damage. Do not take into operation an appliance that is damaged or has been dropped.
■Do not make any changes or modifications to the appliance yourself.
PTSI 9 A1 |
5 |

|
|
|
|
|
|
|
|
|
|
|
|
|
|
|
|
|
|
|
|
|
|
|
|
|
|
|
|
|
|
|
■ This appliance is not intended for use by individuals (including |
||||
|
GB |
|
|
|||||
|
|
|
children) with restricted physical, physiological or intellectual |
|||||
|
IE |
|
|
abilities or deficiencies in experience and / or knowledge |
||||
|
|
|
|
|
unless they are supervised by a person responsible for their |
|||
|
|
|
|
|
||||
|
|
|
|
|
safety or receive from this person instruction in how the appli- |
|||
|
|
|
|
|
ance is to be used. |
|||
|
|
|
|
■ Children should be supervised to ensure that they do not |
||||
|
|
|
|
|
play with the appliance. |
|||
|
|
|
|
■ Protect the appliance against moisture and the penetration |
||||
|
|
|
|
|
of liquids. |
|||
|
|
|
|
■ Do not operate the appliance in the vicinity of open flames |
||||
|
|
|
|
|
(e.g. candles). |
|||
|
|
|
|
■ |
Avoid direct sunlight. |
|||
Initial use
 DANGER
Damage to property and injuries to people may occur when taking the appliance into use!
►Packaging material should not be used as a play thing. There is a risk of su ocation!
Items supplied and transport inspection
The appliance is delivered with the following components as standard:
Infrared Temperature Probe
9 V Block battery
This operating manual
6 |
PTSI 9 A1 |

NOTICE
►Check the contents to ensure everything is available and for signs of visible damage.
►If the items supplied are incomplete, or damaged due to defective packaging or transportation, contact the Service Hotline (see section Service).
Disposal of the packaging
The packaging protects the appliance against transport damage. The packaging materials are selected from the point of view of their environmental friendliness and disposal technology and are therefore recyclable.
The recirculation of packaging into the material circuit saves on raw material and reduces the amount of waste generated. Dispose of packaging material that is no longer needed as per the regionally established regulations.
Inserting / Replacing the battery
The appliance needs a 9 V battery to operate.
♦Open the battery compartment  on the underside of the handle.
♦Insert the battery, complying with the specified polarities given on the battery compartment cover, into the battery compartment  .
.
♦Close the battery compartment cover. The battery compartment lid must audibly engage.
GB
IE
PTSI 9 A1 |
7 |
GB
IE
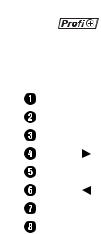
Operating components
Laser-beam exit opening
Infrared sensor
Display
Button 
Button °C/°F/SET
Button 
Battery compartment
Measuring button
Handling and operation
In this chapter you will receive important information for the handling and operation of the appliance.
Preparing the appliance
The appliance is ready for use after inserting the battery.
Grasp the handle of the appliance so that the index finger can operate the measuring button  and the thumb can operate the buttons
  -
- . The appliance is suitable for left and right handers.
Switching the appliance on / o
♦Press the measuring button  to switch the appliance on. The display
  lights up and a brief signal tone is heard.
♦Press and hold the button ° C /° F/SET for approx. 3 seconds to switch the appliance o . Two brief signal tones will be heard.
♦If the appliance is not currently in use, the back light of the
display  switches o after approx. 15 seconds. After approx. 60 seconds the appliance switches o automatically, two short signal tones notify this.
8 |
PTSI 9 A1 |
Selection of the Temperature Unit
After switching on, the default temperature unit is shown as degrees Celsius (°C).
♦Briefly press the button °C/°F/SET  to switch to the unit of degrees Fahrenheit (°F).
♦Briefly press the button °C/°F/SET  again to switch back to the unit of degrees Celsius (°C).
Measuring the temperature
♦Press the measuring button  and point the laser dot on the spot to be measured.
Whilst the measuring button  is pressed, the temperature is measured and in the display
  “SCAN” is shown.
After releasing the measuring button  the last measured temperature is indicated on the display
  and the laser dot is switched o .
To obtain the most accurate measurement, please note the following:
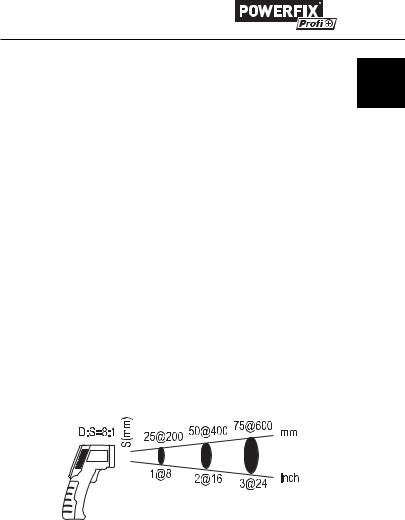
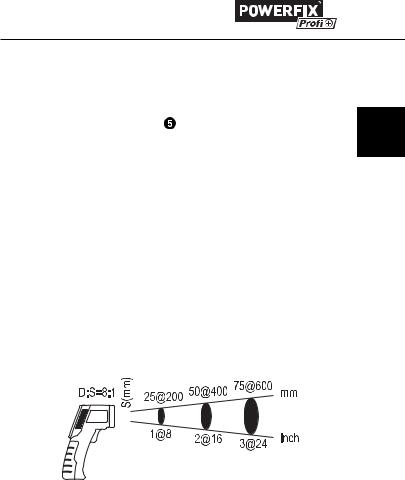
■The determined temperature is the average temperature of the measured area. These increases in the ratio of 8:1, the further away the appliance is from the object being measured.
GB
IE
D = Distance, S = Surface
■The target object must be greater than the measuring surface of the appliance. The smaller the target object is, the less the distance between appliance and target object must be.
■Select the smallest possible distance to the surface being measured.
PTSI 9 A1 |
9 |

GB
IE
■Aim the appliance as perpendicularly as possible to the surface being measured.
■Do not measure in dusty, smoky or steamy atmospheres.
Do not measure through transparent materials, such as glass or plastics.
■In the event of extreme temperature fluctuations allow the appliance to adjust to the ambient climatic conditions for about 30 minutes before measuring.
Indicating a temperature deviation
A temperature deviation is the di erence between a predetermined reference value and a measured temperature. The deviations are shown as figures and by using coloured indicator on the display. In addition, they will also be pointed out by an acoustic signal.
Setting reference values
♦Press the measuring button  and point the laser dot on the spot to be referenced. The temperature is shown in the display
  .
.
♦Now press, while holding the measuring button  , the button °C/°F/SET
  to accept the temperature value as a reference value. The reference temperature is shown in the display
  next to the indicator REF.
Selection of the size of di erence
On the appliance you can now set at which temperature difference (ΔT) the colour display and the acoustic signal should respond.
♦Press, while the reference value is being shown in the dis-
play  , the button
 or the button
 to set the desired temperature di erence (ΔT).
OFF |
0.5°C |
3°C |
5.5°C |
|
1°F |
5°F |
10°F |
||
|
Lower temperature threshold = Reference temperature – ΔT Upper temperature threshold = Reference temperature + ΔT
10 |
PTSI 9 A1 |
Scanning a temperature deviation
♦ Press the measuring button  and point the laser dot on the spot to be measured. The temperature is shown in the display .
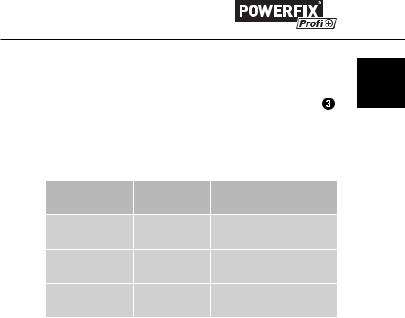
♦While scanning, hold the measuring button  down and move the laser dot slowly and continuously over the surface to be measured. The temperature deviations between the reference and measurement values are presented as follows:
Colour |
Signal tone Result |
||
display |
|||
|
|
||
Red |
fast |
Upper temperature |
|
threshold exceeded |
|||
|
|
||
Green |
not available |
Within the temperature |
|
threshold |
|||
|
|
||
Blue |
slow |
Lower temperature |
|
threshold not reached |
|||
|
|
||
Example of application
For example, to check the penetration of cold air into an interior through a window, first scan the temperature around the frame immediately adjacent to the closed window. Select the warmest part of the frame as a reference temperature and then, for example, a temperature di erence of 3°C/5°F.
Now scan again, evenly, all around the frame directly next to the window. A possible ingress of cold air of more than 3°K di erence is indicated by the blue colour display and by a slow signal tone sequence.
Battery indicator
A battery icon appears in the display when the battery voltage is too low.
♦Insert a new battery as described in the section “Inserting/ Replacing the battery”.
GB
IE
PTSI 9 A1 |
11 |
GB
IE
NOTICE
►With a low battery the accuracy of the temperature display is limited.
Troubleshooting
In this section you will receive important information for the localisation and remedying of malfunctions.
Malfunction causes and remedies
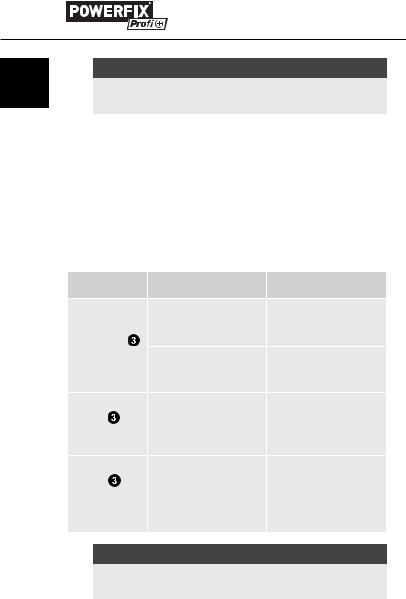
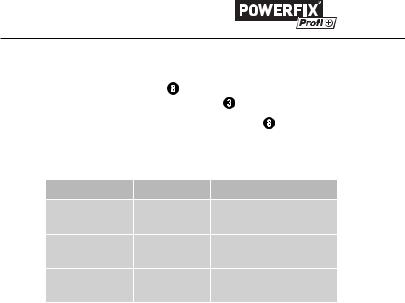
The following table will help with localising and remedying minor malfunctions:
Defect |
Possible cause |
Solution |
The battery is in-
Insert the battery as
correctly inserted.
per the markings on
The display the battery cover.
is blank.
The battery is
Insert a new battery.
discharged.
In the |
|
Repeat the measure- |
|
display |
The measured tempera- |
||
ment at a di erent |
|||
appears the |
ture is too low. |
||
location. |
|||
Indicator „ErOL“. |
|
||
|
|
||
In the |
|
|
|
display |
The measured tempera- |
Repeat the measure- |
|
appears |
ment at a di erent |
||
ture is too high |
|||
the Indicator |
location. |
||
|
|||
„ErOH“. |
|
|
NOTICE
►If you cannot resolve the problem with the above steps, please contact Customer Support (see section Service).
12 |
PTSI 9 A1 |

Cleaning
IMPORTANT
Damage to the appliance
►When you are cleaning the appliance ensure that no moisture gets inside it, so as to avoid irreparable damage.
►Do not use chemical or abrasive cleaning materials. They could damage the housing.
♦Clean the appliance with a soft dry cloth.
♦Clean the laser exit opening and the infrared sensor with a gentle flow of air. For heavier soiling, remove it with a slightly damp cotton swab. Do not exert any excessive pressure!
Storage
If you do not intend to use the appliance for an extended period, remove the battery and store it in a clean, dry place away from direct sunlight.
Disposal
Disposal of the appliance
Do not dispose of the appliance in your normal domestic waste. This product is subject to the provisions of the European Directive 2012/19/EU WEEE (Waste Electrical and Electronic Equipment).
Dispose of the appliance through an approved disposal centre or at your community waste facility.
Pay heed to the currently applicable regulations. In case of doubt, please contact your waste disposal centre.
GB
IE
PTSI 9 A1 |
13 |
GB
IE
Disposing of the batteries
Batteries may not be disposed of with household waste. All consumers are statutorily obliged to dispose of batteries at a collection site in their community / city district or at a retail store. This obligation is intended to ensure that batteries are disposed of in an environmentally safe manner. Only hand in batteries that are fully discharged.
Appendix
Technical data
Power supply |
1 x 9 V Block battery |
|
(6F22/6LR61) |
||
|
||
Temperature measurement range |
-40°C up to +220°C |
|
|
± 2°C respectively |
|
Measurement accuracy for T > 0°C |
± 2 % of measured |
|
|
value |
|
|
± 3°C respectively |
|
Measurement accuracy for T < 0°C |
± 3 % of measured |
|
|
value |
|
Laser class |
2 |
|
Wave length (λ) |
650 nm |
|
Output power (Pmax) |
< 1 mW |
|
Operating temperature |
0°C up to 40°C |
|
Air humidity |
≤ 75 % |
|
(no condensation) |
||
|
||
Dimensions : |
approx. |
|
18 x 12 x 4.2 cm |
||
|
||
Weight without battery |
approx. 167 g |
14 |
PTSI 9 A1 |
Information regarding
the EG Declaration of Conformity
With regard to conformity with essential requirements and other relevant provisions, this device complies with the guidelines of EN 61326-1, EN 61326-2-2, EN 61010-1 as well as
EN 60825-1.
The complete original Declaration of Conformity can be obtained from the importer.
Service
 Service Great Britain
Tel.: 0871 5000 720 (£ 0.10/Min.)
E-Mail: kompernass@lidl.co.uk
IAN 90572
 Service Ireland
Tel.: 1890 930 034 (0,08 EUR/Min., (peak))
(0,06 EUR/Min., (o peak)) E-Mail: kompernass@lidl.ie
IAN 90572
Hotline availability: Monday to Friday 08:00 - 20:00 (CET)
Importer
KOMPERNASS HANDELS GMBH
BURGSTRASSE 21
44867 BOCHUM
GERMANY
www.kompernass.com
GB
IE
PTSI 9 A1 |
15 |

|
|
|
|
|
|
|
|
|
|
|
|
|
|
|
16 |
|
|
|
PTSI 9 A1 |

Sisällysluettelo
Johdanto . . . . . . . . . . . . . . . . . . . . . . . . . . . . . . . . . . . . 18
Tekijänoikeudet . . . . . . . . . . . . . . . . . . . . . . . . . . . . . . . . . . . . . . . |
18 |
|
Vastuurajoitus. . . . . . . . . . . . . . . . . . . . . . . . . . . . . . . . . . . . . . . . . |
18 |
|
Määräystenmukainen käyttö . . . . . . . . . . . . . . . . . . . . . . . . . . . . . |
18 |
FI |
Käytetyt varoitukset . . . . . . . . . . . . . . . . . . . . . . . . . . . . . . . . . . . . |
19 |
Turvallisuus . . . . . . . . . . . . . . . . . . . . . . . . . . . . . . . . . . 20
Paristojen käsittely . . . . . . . . . . . . . . . . . . . . . . . . . . . . . . . . . . . . . 21 Tärkeitä turvallisuusohjeita . . . . . . . . . . . . . . . . . . . . . . . . . . . . . . . 21
Käyttöönotto . . . . . . . . . . . . . . . . . . . . . . . . . . . . . . . . . 22
Toimitussisältö ja laitteen kuljetuksen jälkeinen tarkistaminen. . . . . 22 Pakkauksen hävittäminen . . . . . . . . . . . . . . . . . . . . . . . . . . . . . . . . 23 Paristojen asentaminen / vaihtaminen . . . . . . . . . . . . . . . . . . . . . . 23
Käyttöelementit . . . . . . . . . . . . . . . . . . . . . . . . . . . . . . 24
Käyttö . . . . . . . . . . . . . . . . . . . . . . . . . . . . . . . . . . . . . . 24
Laitteen käytön valmistelut . . . . . . . . . . . . . . . . . . . . . . . . . . . . . . . 24 Laitteen kytkeminen päälle / pois päältä . . . . . . . . . . . . . . . . . . . . 24 Lämpötilayksikön valitseminen . . . . . . . . . . . . . . . . . . . . . . . . . . . . 25 Lämpötilan mittaaminen . . . . . . . . . . . . . . . . . . . . . . . . . . . . . . . . . 25 Lämpötilaerojen näyttö . . . . . . . . . . . . . . . . . . . . . . . . . . . . . . . . . 26 Viitearvon asettaminen. . . . . . . . . . . . . . . . . . . . . . . . . . . . . . . . . . 26 Lämpötilaeron suuruuden määrittäminen . . . . . . . . . . . . . . . . . . . . 26 Lämpötilaeron skannaaminen . . . . . . . . . . . . . . . . . . . . . . . . . . . . 27 Käyttöesimerkki . . . . . . . . . . . . . . . . . . . . . . . . . . . . . . . . . . . . . . . 27 Pariston kapasiteetti . . . . . . . . . . . . . . . . . . . . . . . . . . . . . . . . . . . . 27
Vian määritys . . . . . . . . . . . . . . . . . . . . . . . . . . . . . . . . 28
Vikojen syyt ja korjaaminen . . . . . . . . . . . . . . . . . . . . . . . . . . . . . . 28
Puhdistaminen . . . . . . . . . . . . . . . . . . . . . . . . . . . . . . . 29
Varastointi . . . . . . . . . . . . . . . . . . . . . . . . . . . . . . . . . . . 29
Hävittäminen. . . . . . . . . . . . . . . . . . . . . . . . . . . . . . . . . 29
Laitteen hävittäminen . . . . . . . . . . . . . . . . . . . . . . . . . . . . . . . . . . . 29 Paristojen hävittäminen . . . . . . . . . . . . . . . . . . . . . . . . . . . . . . . . . 30
Liite. . . . . . . . . . . . . . . . . . . . . . . . . . . . . . . . . . . . . . . . . 30
Tekniset tiedot . . . . . . . . . . . . . . . . . . . . . . . . . . . . . . . . . . . . . . . . 30 EY-vaatimustenmukaisuusvakuutusta koskevia huomautuksia . . . . . 31 Huolto . . . . . . . . . . . . . . . . . . . . . . . . . . . . . . . . . . . . . . . . . . . . . . 31 Maahantuoja. . . . . . . . . . . . . . . . . . . . . . . . . . . . . . . . . . . . . . . . . 31
PTSI 9 A1 |
17 |
Johdanto
Onnittelut uuden laitteen hankinnasta.
Olet valinnut laadukkaan tuotteen. Käyttöohje on osa tätä
FI tuotetta. Se sisältää tärkeitä turvallisuutta, käyttöä ja hävittämistä koskevia ohjeita. Tutustu kaikkiin käyttöja turvallisuusohjeisiin ennen tuotteen käyttöä. Käytä tuotetta vain kuvatulla tavalla ja vain mainittuihin käyttötarkoituksiin. Säilytä käyttöohje huolellisesti. Jos myyt tuotteen tai luovutat sen eteenpäin, liitä mukaan kaikki asiakirjat.
Tekijänoikeudet
Nämä asiakirjat on suojattu tekijänoikeudellisesti.
Kaikenlainen, myös osittainen, monistaminen tai uusintapainosten teettäminen sekä kuvien kopiointi sellaisenaan tai muokattuna on sallittua ainoastaan valmistajan kirjallisella luvalla.
Vastuurajoitus
Kaikki tämän käyttöohjeen sisältämät tekniset tiedot, luvut ja liitäntää ja käyttöä koskevat ohjeet vastaavat painohetkellä viimeisintä tasoa, ja ne on annettu tähänastisten kokemustemme ja tulostemme pohjalta parhaan tietomme mukaisesti. Tämän käyttöohjeen tietojen, kuvien ja kuvausten perusteella ei voida esittää minkäänlaisia korvausvaatimuksia. Valmistaja ei vastaa minkäänlaisista vahingoista, joiden syynä on käyttöohjeen noudattamatta jättäminen, määräystenvastainen käyttö, asiattomasti suoritetut korjaukset, luvattomasti suoritetut muutokset tai muiden kuin hyväksyttyjen varaosien käyttö.
Määräystenmukainen käyttö
Infrapunalämpömittari on tarkoitettu pintalämpötilojen mittaamiseen pintaa koskettamatta ja mitatun lämpötilan vertaamiseen aiemmin määritetyn viitearvon kanssa. Mittausalue on - 40–(+ 220)°C
(- 40 – 428°F).
18 |
PTSI 9 A1 |

Mittayksiköksi voidaan valita joko Celsius (°C) tai Fahrenheit (°F). Mittaamisessa hyödynnetään infrapunateknologiaa. Kohteiden pintalämpötiloja voidaan mitata yhtäjaksoisesti, jolloin lämpötilamuutokset ilmoitetaan optisesti, väreinä ja akustisesti. Laitteeseen integroitua laserosoitinta saa käyttää vain lämpötilan mittauksen
yhteydessä mittakohdan paikantamiseen. Laite on tarkoitettu FI ainoastaan yksityiskäyttöön. Laitetta ei ole tarkoitettu kaupalliseen,
eikä teolliseen käyttöön. Käytä laitetta vain kuivissa tiloissa / sisätiloissa. Muu tai laajempi käyttö katsotaan määräystenvastaiseksi. Emme vastaa minkäänlaisista määräysten vastaisesta käytöstä aiheutuvista vahingoista. Vastuu on yksinomaan käyttäjällä.
Käytetyt varoitukset
Seuraavassa käyttöohjeessa käytetään seuraavia varoituksia:
 VAARA
VAARA
Tämän vaara-asteen varoitus on merkkinä uhkaavasta vaarallisesta tilanteesta.
Mikäli vaarallista tilannetta ei estetä, se voi aiheuttaa kuoleman tai vakavia loukkaantumisia.
►Tämän varoituksen ohjeita on noudatettava kuoleman tai vakavien loukkaantumisten estämiseksi.
 VAROITUS
Tämän vaaratason varoitus on merkkinä mahdollisesti vaarallisesta tilanteesta.
Mikäli vaarallista tilannetta ei estetä, se voi aiheuttaa loukkaantumisia.
►Noudata tämän varoituksen ohjeita henkilövahinkojen välttämiseksi.
PTSI 9 A1 |
19 |
HUOMIO
Tämän vaaratason varoitus varoittaa mahdollisesta esinevahingosta.
FI
Mikäli tilannetta ei estetä, se voi aiheuttaa esinevahinkoja.
► Noudata tämän varoituksen ohjeita esinevahinkojen välttämiseksi.
OHJE
► Ohje sisältää lisätietoja, jotka helpottavat laitteen käsittelyä.
Turvallisuus
Tämä luku sisältää tärkeitä laitteen käsittelyä koskevia turvallisuusohjeita. Tämä laite on säädettyjen turvallisuusmääräysten mukainen. Asiaton käsittely voi aiheuttaa henkilöja esinevahinkoja.
 VAROITUS
Laite sisältää 2-luokan laserin.
Älä koskaan suuntaa laseria ihmisiä tai eläimiä kohti.
Älä koskaan katso suoraan laservaloon. Laser saattaa vahingoittaa silmiä.
►Älä suuntaa lasersädettä voimakkaasti heijastaville pinnoille. Heijastavan valon aiheuttama vaara.
►Lasersäteen voimakkuuden lisääminen on kielletty. On olemassa loukkaantumisvaara!
►Valmistaja ei vastaa lasersäteen suunnan manipuloinnista ja turvallisuusohjeiden noudattamatta jättämisestä aiheutuvista vahingoista.
20 |
PTSI 9 A1 |

 VAARA
VAARA
►Älä käytä laitetta paikoissa, joissa on olemassa tulipalotai räjähdysvaara, kuten palavien nesteiden tai kaasujen lähettyvillä.
FI
Paristojen käsittely
 VAROITUS
Asiattomasta käytöstä aiheutuva vaara! Paristojen käyttöön liittyy räjähdysja vuotovaara!
Noudata paristojen käsittelyssä seuraavia turvallisuusohjeita:
►Älä heitä paristoja tuleen.
►Älä oikosulje paristoja.
►Älä yritä ladata paristoja uudelleen.
►Tarkasta paristot säännöllisesti. Ulos valuva paristohappo voi aiheuttaa laitteeseen pysyviä vaurioita. Ole erityisen varovainen käsitellessäsi vaurioituneita tai vuotaneita paristoja. Loukkaantumisvaara! Käytä suojakäsineitä.
►Säilytä paristot lasten ulottumattomissa. Jos paristo on joutunut nieluun, hakeudu välittömästi lääkärin hoitoon.
►Poista paristot laitteesta, jos laite on pitkään käyttämättömänä.
Tärkeitä turvallisuusohjeita
Laitteen turvallisessa käsittelyssä on noudatettava seuraavia turvallisuusohjeita:
■Tarkista laite ennen käyttöä mahdollisten ulkoisten vaurioiden varalta. Älä ota viallista tai pudonnutta laitetta käyttöön.
■Älä tee omatoimisesti laitteeseen muutoksia.
PTSI 9 A1 |
21 |

■Älä anna laitetta sellaisten henkilöiden (mukaan lukien lapset) käyttöön, joiden fyysiset, sensoriset tai henkiset kyvyt tai kokemuksen ja tiedon puute estävät heitä käyttämästä laitetta turvallisesti, elleivät he käytä laitetta valvonnan alaisena, tai ellei heitä ole opastettu laitteen käytössä.
FI
■ Lapsia on valvottava ja varmistettava, etteivät he pääse leikkimään laitteella.
■ Suojaa laite kosteudelta ja varo, ettei laitteen sisään pääse nestettä.
■ Älä käytä laitetta avoimen tulen (esim. kynttilöiden) läheisyydessä. ■ Vältä suoraa auringonpaistetta.
Käyttöönotto
 VAARA
VAARA
Varo henkilöja omaisuusvahinkoja laitteen käytön yhteydessä!
►Pakkausmateriaaleilla ei saa leikkiä. Ne voivat aiheuttaa tukehtumisvaaran.
Toimitussisältö ja laitteen kuljetuksen jälkeinen tarkistaminen
Laitteen toimitussisältöön kuuluvat vakiona seuraavat komponentit:
Infrapunalämpömittari
9 V:n paristo
Tämä käyttöohje
22 |
PTSI 9 A1 |

|
|
|
|
|
|
|
|
|
|
|
|
|
|
|
|
|
|
|
|
|
|
|
|
|
|
|
|
|
|
|
|
|
|
|
|
|
|
|
|
|
OHJE |
|
|
|
|
||||
|
► Tarkasta toimituksen täydellisyys ja mahdolliset näkyvät |
|
|
|
|
||||
|
vauriot. |
|
|
|
|
||||
|
► Mikäli toimitus on puutteellinen, tai laite on vaurioitunut |
|
|
FI |
|
||||
|
huolimattomasta / riittämättömästä pakkauksesta johtuen |
|
|
|
|||||
|
tai kuljetuksen aikana, ota yhteyttä palvelunumeroomme |
|
|
|
|
||||
|
(ks. kappale Huolto). |
|
|
|
|
||||
|
|
|
|
|
|
|
|
|
|
Pakkauksen hävittäminen
Pakkaus suojaa laitetta kuljetusvaurioilta. Pakkausmateriaalit on valittu ympäristöystävällisyys ja jätehuoltotekniset näkökohdat huomioon ottaen ja voidaan kierrättää.
Pakkauksen palauttaminen materiaalikiertoon säästää raakaaineita ja vähentää syntyvien jätteiden määrää. Hävitä tarpeettomat pakkausmateriaalit paikallisten voimassa olevien määräysten mukaisesti.
Paristojen asentaminen / vaihtaminen
Laite toimii 9 V:n paristolla.
♦Avaa kahvan alapuolella oleva paristokotelo  .
.
♦Aseta paristo paristokotelon kannessa ilmoitetun napaisuuden mukaisesti paristokoteloon  .
.
♦Sulje sen jälkeen paristokotelon kansi. Paristokotelon kannen täytyy lukittua kuuluvasti paikalleen.
PTSI 9 A1 |
23 |
|
|
|
|
|
|
|
|
|
|
|
|
|
|
|
|
|
|
|
|
|
|
|
|
|
|
|
|
Käyttöelementit |
|||
|
|
|
|
Lasersäteen ulostuloaukko |
|||
|
|
|
|
Infrapuna-anturi |
|||
|
FI |
|
|
||||
|
|
|
Näyttö |
||||
|
|
|
|
Painike |
|||
|
|
|
|
||||
|
|
|
|
Painike °C/°F/SET |
|||
|
|
|
|
Painike |
|||
|
|
|
|
Paristokotelo |
|||
|
|
|
|
Mittauspainike |
|||
Käyttö
Tässä kappaleessa on annettu tärkeitä laitteen käyttöä koskevia ohjeita.
Laitteen käytön valmistelut
Laite on käyttövalmis, kun paristo on asetettu laitteeseen.
Tartu laitteen kahvasta niin, että etusormesi ylettyy mittauspainikkeelle  ja peukalo painikkeille
  -
- . Laite soveltuu sekä vasenettä oikeakätisille.
Laitteen kytkeminen päälle / pois päältä
♦Käynnistä laite painamalla mittauspainiketta  . Näytön
  valo syttyy ja kuulet lyhyen merkkiäänen.
♦Kun haluat kytkeä laitteen pois päältä, paina painiketta
°C/°F/SET  ja pidä sitä alhaalla n. 3 sekuntia. Kuulet kaksi lyhyttä merkkiääntä.
♦Jos laitetta ei käytetä, näytön  taustavalo sammuu n. 15 sekunnin kuluttua. Laite sammuu automaattisesti
n. 60 sekunnin jälkeen. Laite ilmoittaa tästä kahdella lyhyellä merkkiäänellä.
24 |
PTSI 9 A1 |
Lämpötilayksikön valitseminen
Päällekytkettäessä laitteen lämpötilayksikkö on Celsius (°C). |
|
♦ Jos haluat muuttaa yksikön Fahrenheitiksi (°F), paina lyhyesti |
|
°C/°F/SET-painiketta . |
FI |
|
♦Voit vaihtaa yksikön takaisin Celsiukseksi (°C) painamalla °C/°F/SET-painiketta  uudelleen.
Lämpötilan mittaaminen
♦Paina mittauspainiketta  ja suuntaa lasersäde mitattavaan kohtaan.
Mittauspainikkeen  ollessa alaspainettuna laite mittaa lämpötilan, ja näytöllä
  näkyy teksti "SCAN".
Kun vapautat mittauspainikkeen  , näytöllä
  näkyy viimeksi mitattu lämpötila, ja lasersäde sammuu.
Jotta mittaustulos olisi mahdollisimman tarkka, huomioi seuraavaa:
■Laitteen ilmoittama lämpötila on mitatun pinnan keskilämpötila. Mitattava pinta-ala suurenee mittauskohteesta etäännyttäessä suhteessa 8:1.
D = Distance (etäisyys), S = Surface (pinta-ala)
■Mitattavan kohteen on oltava laitteen mittausaluetta suurempi. Mittaus on tehtävä sitä lähempänä mitattavaa kohdetta, mitä pienempi mitattava kohde on.
■Mittaa mahdollisimman lähellä mitattavaa pintaa.
PTSI 9 A1 |
25 |

■Suuntaa laite niin pystysuoraan mitattavaa pintaa kohden kuin mahdollista.
■Älä mittaa pölyisissä, äläkä höyryisissä tai savuisissa tiloissa. Älä mittaa läpinäkyvien materiaalien kuten lasin tai muovin läpi.
FI |
■ Jos lämpötila vaihtelee suuresti, laitteen on annettava mukautua |
|
ympäristön olosuhteisiin n. 30 minuuttia ennen mittauksen |
|
aloittamista. |
Lämpötilaerojen näyttö
Lämpötilaerolla tarkoitetaan aiemmin määritellyn viitearvon ja mitatun lämpötilan eroa. Lämpötilaerot esitetään näytöllä luvuin ja värein. Laite huomauttaa lämpötilaeroista myös merkkiäänen avulla.
Viitearvon asettaminen
♦Paina mittauspainiketta  ja suuntaa lasersäde mitattavaan kohtaan. Lämpötila näkyy näytössä
  .
.
♦Aseta lämpötila-arvo viitearvoksi pitämällä mittauspainiketta  alhaalla ja painamalla samanaikaisesti °C/°F/SET-painiket- ta
  . Viitelämpötila näkyy näytössä
  tekstin REF vieressä.
Lämpötilaeron suuruuden määrittäminen
Voit määrittää pienimmän lämpötilaeron (ΔT), josta laite ilmoittaa värein ja akustisen signaalin avulla.
♦Kun viitearvo näkyy näytössä  , aseta haluamasi lämpötilaero (ΔT) painamalla joko painiketta
 tai painiketta
 .
.
OFF |
0,5 °C |
3 |
°C |
5,5 °C |
|
1 °F |
5 |
°F |
10 °F |
||
|
Alin lämpötilaraja-arvo = viitelämpötila – ΔT
Ylin lämpötilaraja-arvo = viitelämpötila + ΔT
26 |
PTSI 9 A1 |
Lämpötilaeron skannaaminen
♦ Paina mittauspainiketta |
ja suuntaa lasersäde mitattavaan |
|
|
|
|||
kohtaan. Lämpötila näkyy näytössä . |
|
|
|
|
|||
♦ Pidä skannaamisen aikana mittauspainiketta |
alhaalla ja |
|
FI |
|
|||
liikuta lasersädettä hitaasti ja tasaisesti mitattavan pinnan |
|
|
|||||
|
|
|
|||||
yli. Viiteja mittausarvon väliset lämpötilaerot esitetään |
|
|
|
||||
seuraavasti: |
|
|
|
|
|
|
|
Värinäyttö |
Merkkiääni |
Tulos |
|
|
|
|
|
punainen |
nopea |
|
ylin lämpötilaraja-arvo |
|
|
|
|
|
ylitetty |
|
|
|
|
||
|
|
|
|
|
|
|
|
vihreä |
ei merkki- |
|
lämpötilaraja-arvojen |
|
|
|
|
ääntä |
|
sisäpuolella |
|
|
|
|
|
|
|
|
|
|
|
||
sininen |
hidas |
|
alin lämpötilaraja-arvo |
|
|
|
|
|
alitettu |
|
|
|
|
||
|
|
|
|
|
|
|
|
Käyttöesimerkki
Jos esimerkiksi haluat tarkistaa ikkunoiden lämpöhukan, skannaa ensin lämpötila suljetun ikkunan ympäriltä aivan lähellä ikkunaa. Valitse ikkunankarmien lämpimin kohta viitelämpötilaksi ja määritä sen jälkeen lämpötilaeroksi esimerkiksi 3°C / 5 °F.
Skannaa sitten uudelleen tasaisesti ikkunan ympäri aivan lähellä ikkunaa. Jos mitattu lämpötila on 3°K astetta viitearvoa alhaisempi, laite ilmoittaa tästä sinisellä värinäytöllä ja hitailla merkkiäänillä.
Pariston kapasiteetti
Jos paristojen jännite on liian alhainen, näyttöön ilmestyy paristokuvake.
♦Aseta laitteeseen uusi paristo kappaleessa "Paristojen asentaminen / vaihtaminen" annettujen ohjeiden mukaisesti.
PTSI 9 A1 |
27 |
 Loading...