


PAINT PUMP ROLLER PPR 1 A1
PAINT PUMP ROLLER |
MALÍŘSKÝ VÁLEČEK |
Operating instructions |
Návod k obsluze |
MALIARSKY VALČEK |
PUMPROLLER |
Návod na obsluhu |
Bedienungsanleitung |
IAN 104464

Before reading, unfold the page containing the illustrations and familiarise yourself with all functions of the device.
Před čtením si otevřete stranu s obrázky a potom se seznamte se všemi funkcemi přístroje.
Pred čítaním si odklopte stranu s obrázkami a potom sa oboznámte so všetkými funkciami prístroja.
Klappen Sie vor dem Lesen die Seite mit den Abbildungen aus und machen Sie sich anschließend mit allen Funktionen des Gerätes vertraut.
GB |
Operating instructions |
Page |
1 |
CZ |
Návod k obsluze |
Strana |
11 |
SK |
Návod na obsluhu |
Strana |
21 |
DE / AT / CH |
Bedienungsanleitung |
Seite |
31 |
2 x

Contents
GB
Introduction . . . . . . . . . . . . . . . . . . . . . . . . . . . . . . . . . . . . . . . . . . . . . . . . . . . 2
Intended use . . . . . . . . . . . . . . . . . . . . . . . . . . . . . . . . . . . . . . . . . . . . . . . . . . . . . . . . . . . . 2
Safety. . . . . . . . . . . . . . . . . . . . . . . . . . . . . . . . . . . . . . . . . . . . . . . . . . . . . . . . 2
Basic safety guidelines. . . . . . . . . . . . . . . . . . . . . . . . . . . . . . . . . . . . . . . . . . . . . . . . . . . . . 2
Components. . . . . . . . . . . . . . . . . . . . . . . . . . . . . . . . . . . . . . . . . . . . . . . . . . . 3
Package contents and transport inspection . . . . . . . . . . . . . . . . . . . . . . . . . 3
Assembly . . . . . . . . . . . . . . . . . . . . . . . . . . . . . . . . . . . . . . . . . . . . . . . . . . . . . 4
Use of the appliance . . . . . . . . . . . . . . . . . . . . . . . . . . . . . . . . . . . . . . . . . . . . 6
Technical data . . . . . . . . . . . . . . . . . . . . . . . . . . . . . . . . . . . . . . . . . . . . . . . . . 8
Cleaning . . . . . . . . . . . . . . . . . . . . . . . . . . . . . . . . . . . . . . . . . . . . . . . . . . . . . . 8
Cleaning the filling valve . . . . . . . . . . . . . . . . . . . . . . . . . . . . . . . . . . . . . . . . . . . . . . . . . . . 9
Disposal . . . . . . . . . . . . . . . . . . . . . . . . . . . . . . . . . . . . . . . . . . . . . . . . . . . . . 10
Service . . . . . . . . . . . . . . . . . . . . . . . . . . . . . . . . . . . . . . . . . . . . . . . . . . . . . . 10
Importer. . . . . . . . . . . . . . . . . . . . . . . . . . . . . . . . . . . . . . . . . . . . . . . . . . . . . 10
PPR 1 A1 |
1 |

Introduction
GB
Congratulations!
You have purchased a high-quality product. Familiarise yourself with the product before taking it into use. To do this, read the following operating instructions carefully. Use the product only as described and for the range of applications specified. Keep these operating instructions in a safe place. Please also pass these operating instructions on to any future owner(s).
Intended use
This pump roller is exclusively intended for non-commercial use for the application of watery liquids and water-based paints such as latex, emulsion and acrylic paints. It is not intended for any other use or use beyond that specified. Claims of any kind for damage arising as a result of incorrect use will not be accepted.
The risk shall be borne solely by the user.
Safety
This section contains important safety instructions for using the appliance.
This appliance complies with the statutory safety regulations. Improper use may result in personal injury and property damage.
Basic safety guidelines
To ensure safe operation of the appliance, follow the safety guidelines set out below:
■This appliance may be used by children aged 8 years and above and by persons with limited physical, sensory or mental capabilities or lack of experience and knowledge, provided that they are under supervision or have been told how to use the appliance safely and are aware of the potential risks. Children must not use the appliance as a plaything. Cleaning and user maintenance tasks may not be carried out by children unless they are supervised.
■Do not make any unauthorised modifications or alterations to the appliance.
2 |
PPR 1 A1 |
Components
GB
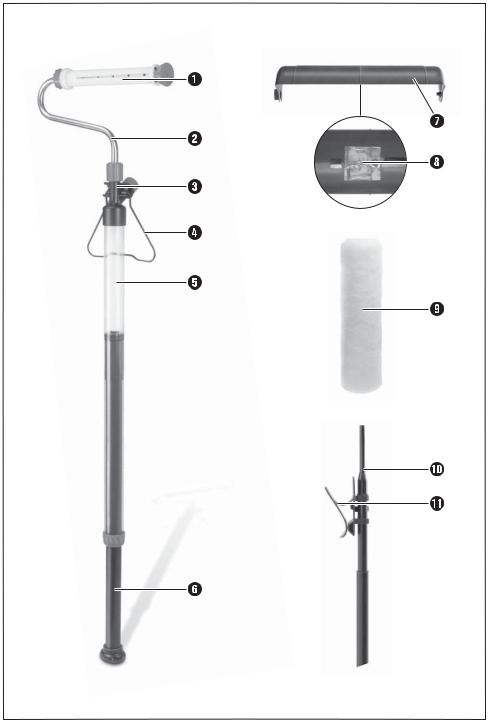
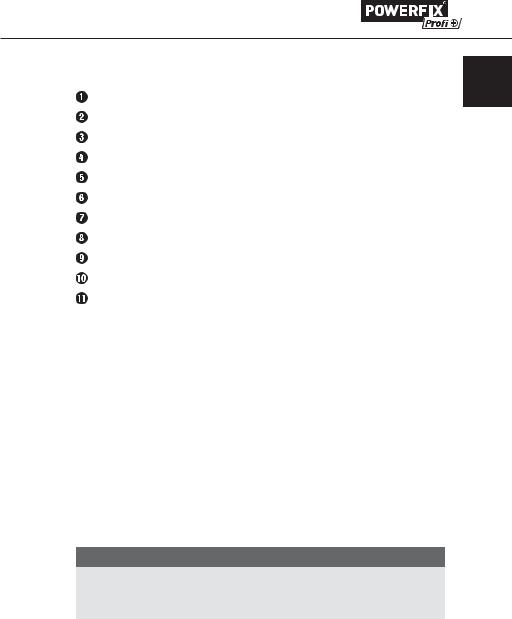
Paint roller core Paint roller bracket Filling valve
Stand
Paint cylinder
Plunger
Spray guard
Petroleum jelly
Paint roller
Intake pipe
Attachment clip
Package contents and transport inspection
The pump roller is delivered with the following components as standard:
Paint cylinder with filling valve and piston rod
Paint roller bracket with paint roller core and cap
Support bracket
Plunger with attachment clip
Spray guard
2 x paint rollers
Petroleum jelly
These operating instructions
NOTE
►Check the package for completeness and signs of visible damage.
►If the consignment is incomplete or damaged due to defective packaging or carriage, contact the Service hotline (see the chapter Service).
PPR 1 A1 |
3 |

Assembly
GB
♦Remove the cardboard from the plunger  and place it on the floor with the knob facing upwards.
♦To free the plunger  , press the knob downwards firmly with the flat of your hand. Caution! Take care not to trap your fingers!
♦Undo the cap nut A of the paint roller bracket  and detach the paint roller core
  from the paint roller bracket
  . Now remove the stopper B of the paint roller core
  .
.
A  B
B
♦Push one of the two provided paint rollers  onto the paint roller core
  and replace the stopper B .
♦Push the entire paint roller onto the paint roller bracket  and secure it with the cap nut A of the paint roller bracket
  .
.
A 
 B
B
4 |
PPR 1 A1 |
|
|
|
|
|
|
|
|
|
|
|
|
|
|
|
|
|
|
|
|
|
|
|
|
|
|
|
|
|
|
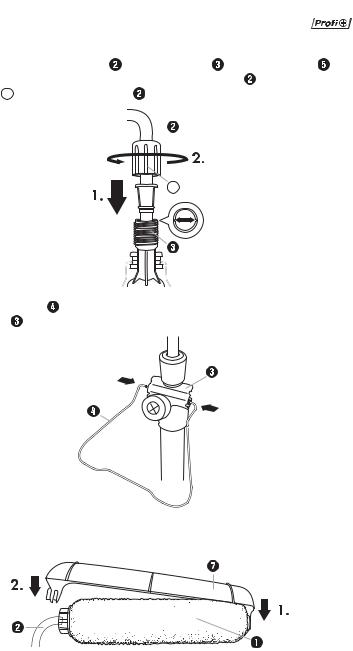
♦ Push the paint roller bracket |
into the filling valve |
of the paint cylinder . |
|
||||||
|
|||||||||
Pay attention to the catch. Secure the paint roller bracket |
using the cap |
GB |
|||||||
nut C of the paint roller bracket . |
|
|
|
|
|
|
|||
|
|
|
|
|
|
|
|
|
|
C
♦ Pull the stand |
apart slightly and plug it into the side openings of the filling |
valve . |
|
♦First attach the spray guard  to the paint roller core
  , then to the paint roller bracket
  .
.
PPR 1 A1 |
5 |

Use of the appliance
GB
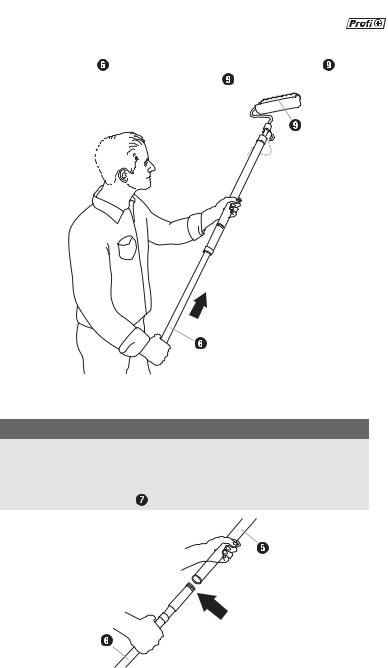
♦Press together the top end of the attachment clip  of the intake pipe
  and clamp it onto the edge of the paint bucket.
♦Slide the intake pipe  into the paint bucket.
♦Push the filling valve  of the paint cylinder
  firmly onto the the intake pipe
  .
.
♦Pull the plunger  back to draw paint into the paint cylinder
  .
.
6 |
PPR 1 A1 |
|
|
|
|
|
|
|
|
|
|
|
|
|
|
|
|
|
|
|
|
|
♦ Push the plunger |
forward until paint is visible on the paint roller . |
|
||||
|
||||||
Take care not to oversaturate the paint roller . |
GB |
|||||
|
|
|
|
|
|
|
♦Push the plunger  a little more if the paint roller
  is no longer delivering enough paint.
NOTE
►If the plunger  is sti when filling the paint cylinder
  apply plenty of petroleum jelly to the O-rings at the front end of the plunger
  .
.
►A sachet of petroleum jelly found in the spray guard
 is supplied with the product, and can be upon delivery.
PPR 1 A1 |
7 |
Technical data
GB
Paint cylinder capacity |
approx. 520 ml |
Weight (without paint) |
approx. 840 g |
Cleaning
CAUTION
►Only use water for cleaning. Preferably lukewarm water with a little washing-up liquid.
♦Pull the plunger back to transport excess paint from the paint roller
core |
back into the paint cylinder . |
♦Push the filling valve  of the paint cylinder
  onto the intake pipe
  and slide the plunger
 all the way forward. In this way, you can deposit the remaining paint back into the paint bucket.
♦Undo the cap nut A of the paint roller bracket  and pull the entire paint
roller o the paint roller bracket |
. |
♦Pull o the stopper B of the paint roller core  and push the paint roller core
  out of the paint roller
  at the other side.
A 
 B
B
♦ Clean all parts with water.
8 |
PPR 1 A1 |
|
|
|
|
|
|
|
|
|
|
|
|
|
|
|
|
|
|
|
|
|
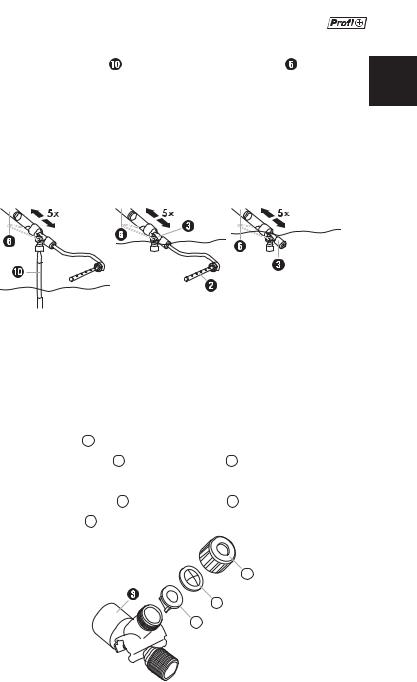
♦ Immerse the intake pipe |
in water and pull/push the plunger |
back and |
||||
forth about five times. |
|
|
|
|
|
GB |
♦Now remove the intake pipe  from the filling valve
  .
.
♦Immerse the filling valve  and the paint roller bracket
  in water and pull/push the plunger
  back and forth again about five times.
♦Then remove the paint roller bracket  .
.
♦Immerse the filling valve  completely in water and pull/push the plunger
  back and forth again about five times.
♦Undo the large cap nut from the knob and pull the plunger  out of the paint cylinder
  . Clean all parts with water.
♦For long-term storage, please grease the O-rings on the front of the plunger  and the seals on the paint roller bracket
  evenly with petroleum jelly, for example.
Cleaning the filling valve
♦ Undo the cap nut D on the filling valve  by turning it anticlockwise.
♦ Remove the lock washer E and the rubber valve F from the valve housing.
♦ Clean the individual parts with water.
♦ Replace the rubber valve F and the lock washer E .
♦ Screw the cap nut D firmly onto the valve housing again.
D
E
F
PPR 1 A1 |
9 |
Disposal
GB
Dispose of the appliance via an approved waste disposal company or your municipal waste disposal facility. Please observe the currently applicable regulations. Please contact your waste disposal facility if you are in any doubt.
Dispose of all packaging materials in an environmentally friendly manner.
Service
 Service Great Britain
Tel.: 0871 5000 720 (£ 0.10/Min.)
E-Mail: kompernass@lidl.co.uk
IAN 104464
Hotline availability: Monday to Friday 08:00 - 20:00 (CET)
Importer
KOMPERNASS HANDELS GMBH
BURGSTRASSE 21
44867 BOCHUM
GERMANY
www.kompernass.com
10 |
PPR 1 A1 |

Obsah
Úvod. . . . . . . . . . . . . . . . . . . . . . . . . . . . . . . . . . . . . . . . . . . . . . . . . . . . . . . . 12
Použití v souladu s určením . . . . . . . . . . . . . . . . . . . . . . . . . . . . . . . . . . . . . . . . . . . . . . . . 12
CZ
Bezpečnost . . . . . . . . . . . . . . . . . . . . . . . . . . . . . . . . . . . . . . . . . . . . . . . . . . 12
Základní bezpečnostní pokyny . . . . . . . . . . . . . . . . . . . . . . . . . . . . . . . . . . . . . . . . . . . . . 12
Popis dílů . . . . . . . . . . . . . . . . . . . . . . . . . . . . . . . . . . . . . . . . . . . . . . . . . . . . 13
Rozsah dodávky a kontrola po přepravě . . . . . . . . . . . . . . . . . . . . . . . . . 13
Sestavení . . . . . . . . . . . . . . . . . . . . . . . . . . . . . . . . . . . . . . . . . . . . . . . . . . . . 14
Použití . . . . . . . . . . . . . . . . . . . . . . . . . . . . . . . . . . . . . . . . . . . . . . . . . . . . . . 16
Technické údaje. . . . . . . . . . . . . . . . . . . . . . . . . . . . . . . . . . . . . . . . . . . . . . . 18
Čištění. . . . . . . . . . . . . . . . . . . . . . . . . . . . . . . . . . . . . . . . . . . . . . . . . . . . . . . 18
Čištění plnicího ventilu . . . . . . . . . . . . . . . . . . . . . . . . . . . . . . . . . . . . . . . . . . . . . . . . . . . . 19
Likvidace . . . . . . . . . . . . . . . . . . . . . . . . . . . . . . . . . . . . . . . . . . . . . . . . . . . . 20
Servis . . . . . . . . . . . . . . . . . . . . . . . . . . . . . . . . . . . . . . . . . . . . . . . . . . . . . . . 20
Dovozce . . . . . . . . . . . . . . . . . . . . . . . . . . . . . . . . . . . . . . . . . . . . . . . . . . . . . 20
PPR 1 A1 |
11 |
 Loading...