


Ultrasonic Distance Meter
Ultrasonic Distance Meter
Operation and Safety Notes
Odległościomierz ultradźwiękowy
Wskazówki dotyczące obsługi i bezpieczeństwa
Ultrahangos távolságmérő
Kezelési és biztonsági utalások
Ultrazvočni merilnik razdalje
Navodila za upravljanje in varnostna opozorila
Ultrazvukový měřič vzdáleností
Pokyny pro obsluhu a bezpečnostní pokyny
Ultrazvukový prístroj na meranie vzdialenosti
Pokyny pre obsluhu a bezpečnostné pokyny
Ultraschall-Entfernungsmesser
Bedienungs - und Sicherheitshinweise
IAN 91218
GB |
Operation and Safety Notes |
Page |
5 |
|
|
|
|
PL |
Wskazówki dotyczące obsługi i bezpieczeństwa |
Strona |
19 |
|
|
|
|
HU |
Kezelési és biztonsági utalások |
Oldal |
34 |
|
|
|
|
SI |
Navodila za upravljanje in varnostna opozorila |
Stran |
48 |
CZ |
Pokyny pro obsluhu a bezpečnostní pokyny |
Strana 63 |
|
|
|
|
|
SK |
Pokyny pre obsluhu a bezpečnostné pokyny |
Strana |
76 |
|
|
|
|
DE / AT / CH |
Bedienungsund Sicherheitshinweise |
Seite |
90 |

|
|
|
1 |
|
|
2 |
11 |
|
|
|
|
|
|
10 |
|
|
|
|
|
|
9 |
|
|
F |
FT |
|
3 |
|
F |
|
||||
|
/O |
|
/ |
|||
|
|
M |
||||
O |
N |
|
|
|
||
|
M |
|
|
L |
4 |
|
8 |
O |
|
A |
L |
||
|
D |
|
|
|
||
|
E |
EC |
|
|
||
|
R |
|
5 |
|||
|
|
|
|
|
||
|
|
|
|
|
|
|
7 |
|
|
|
|
|
|
|
|
|
6 |
|
|
|
|
|
|
|
|
|
12 |
|
|
|
|
|
|
3 |
A |
B |
MIN. 0.6 m |
Max. 16 m
A


 B
B
7
4

Intended use................................... |
Page |
6 |
Parts description.......................... |
Page |
6 |
Technical Data................................ |
Page |
6 |
Scope of delivery........................ |
Page |
7 |
General safety |
|
|
instructions....................................... |
Page |
7 |
Safety Instructions |
|
|
for Batteries..................................... |
Page |
8 |
Before using |
|
|
Inserting / changing the battery............ |
Page |
9 |
Start-up |
|
|
Measuring length................................... |
Page 10 |
|
Avoiding measuring errors.................... |
Page 11 |
|
Adding lengths together........................ |
Page 12 |
|
Measuring surface area........................ |
Page 13 |
|
Measuring volume................................. |
Page 13 |
|
Adding surface areas or |
|
|
volumes together.................................... |
Page 14 |
|
Displaying the last measured values.... |
Page 15 |
|
Temperature display.............................. |
Page 16 |
|
Changing the unit of measurement....... |
Page 16 |
|
Battery state display.............................. |
Page 16 |
|
Switching off / Automatic shut-down.... |
Page 16 |
|
Cleaning and Care...................... |
Page 17 |
|
Disposal............................................... |
Page 17 |
|
Warranty........................................... |
Page 17 |
|
GB 5
Ultrasonic Distance Meter
Intended use
This ultrasonic rangefinder is intended for measuring lengths and for calculating surface areas and volumes. The device also has a temperature measuring facility. This device is solely intended for private use.
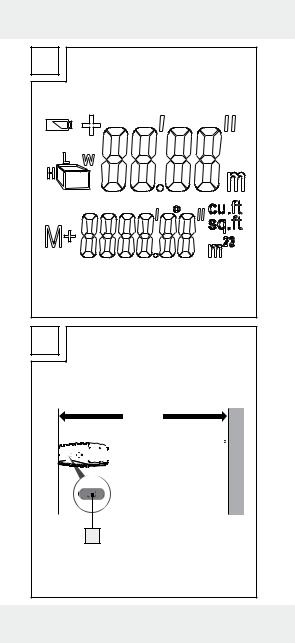
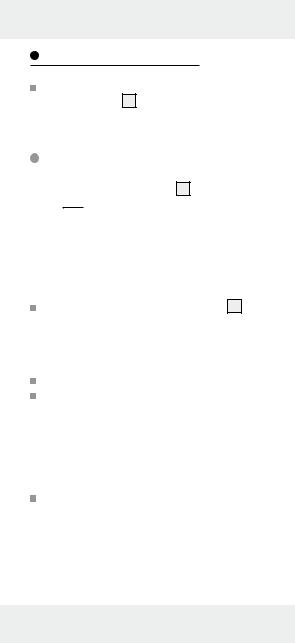
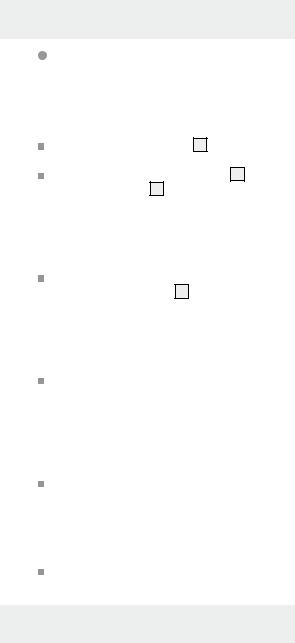
Parts description
1Ultrasonic transmitter/receiver
2Temperature sensor
3FT/M button
4READ button
5RECALL button
6Reference area
7Level indicator
8MODE button
9ON / OFF button
10Display
11Laser diode
12Battery compartment cover
Technical Data
Operating voltage: |
max. 9 V |
|
|
|
|||
Battery type: |
6LR61 (9 V block) |
||
Measuring range: |
0.6 m – 16 m |
||
Measuring accuracy: |
+/- 1% |
||
Capacity display: |
up to 9999.99 |
||
Laser wave length: |
635–660 nm, 1 mW |
||
Laser class: |
2 |
|
|
6 GB
|
|
Ultrasonic frequency: |
40kHz |
Thermometer |
|
measuring range: |
-10°C – +40°C |
|
(14°F – 104°F) |
Scope of delivery
1 Ultrasonic Distance Meter
1 9 V block battery
1 Set of operating instructions
General safety instructions
Before using the product, please familiarise yourself with all of the safety information and instructions for use! When passing this product on to others, please also include all the documents!
Check the product for damage before use! Never use a damaged product!
Do not expose the device to moisture! This may damage it.
This appliance can be used by children aged from 8 years and above and persons with reduced physical, sensory or mental capabilities or lack of experience and knowledge if they have been given supervision or instruction concerning use of the appliance in a safe way and understand the hazards involved. Children shall not play with the appliance. Cleaning and user maintenance shall not be made by children without supervision.
GB 7
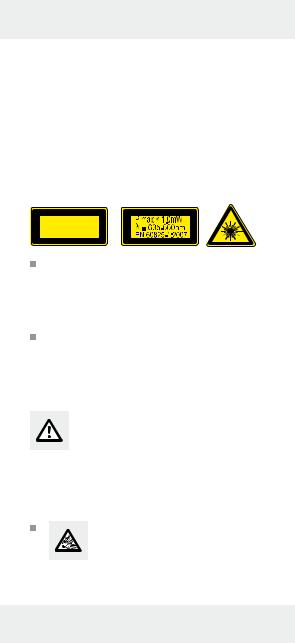
Danger from laser radiation
LASERRADIATION
DONOTSTAREINTOBEAM
CLASS2LASERPRODUCT
The device contains a Class 2 laser. Never point the laser beam at persons or animals. Never look directly into the beam. Even a weak laser beam can cause eye damage. Never point the laser beam at reflective surfaces or materials. Even a reflected laser beam can cause eye damage.
Safety Instructions for Batteries

 DANGER TO LIFE! Batteries are not intended for children. If accidentally swallowed seek immediate medical attention!
CAUTION! EXPLOSION HAZARD! Never recharge nonrechargeable batteries, do not
short-circuit and / or open batteries!
Never throw batteries into fire or water! Do not subject batteries to any mechanical load!
Risk of battery leakage
In the event of a battery leak, immediately remove it from the device to prevent damage! Avoid contact with the skin, eyes and mucous membranes! In the event of contact with battery acid, thoroughly flush the affected area with plenty of clean water and seek immediate medical attention!
8 GB

Only use the same type of batteries! Do not mix used and new batteries!
Avoid extreme environmental conditions and temperatures, which could affect batteries, e.g. above radiators/in direct sunlight. Remove the batteries from the device if they have not been used for a long period!
Risk of equipment damage
Only use the specified battery type!
When inserting the battery ensure that it is inserted the right way round! This is shown in the battery compartment!
If necessary, clean the battery and device contacts before inserting the battery! Remove dead batteries from the device immediately!
Before using
Before initial use, remove the protective film from the device display 10 and insert the enclosed battery.
Inserting / changing the battery
If the battery symbol

 appears in the display 10 , the inserted battery is almost drained and must be replaced. Empty batteries can falsify the measured result.
To insert the battery proceed as follows:
Open the battery compartment cover 12 on the back of the device. You can remove the
GB 9
used battery more easily with the aid of the material strip, which is inside the battery compartment. Just pull on the material strip. Remove the used battery.
Plug the contacts of the 9 V block battery on the contacts of the profiled plug. Make sure you fit the batteries the right way round. This is specified by the profiled shape of the contacts. Also ensure without fail that the material strip is underneath the battery.
Insert the battery in the battery compartment and close the cover again, so that it audibly latches into place.
Start-up
Measuring length
Press the ON/OFF button 9 to switch the device on. If you do not press any button for 60 s, the display 10 shuts down.
To switch the device off manually, hold the ON/OFF button pressed down for 3 seconds, until the display goes out and a double tone signal sounds.
Press the MODE button 8 repeatedly, until the display shows the symbol for length measurement „ “ as well as the length designation 0.00m (or 0‘00“).
Hold the reference area 6 of the ultrasonic rangefinder at the start point of your measurement. Hold the device in such a way, that the reference area is aligned parallel to the target area of the measurement.
If necessary use the level indicator 7 to align the ultrasonic rangefinder horizontally.
10 GB
The air bubble of the level indicator should be between the two markings  if the alignment is horizontal.
Press the READ button 4 . The laser diode 11 projects a dot of light onto the end point of the measurement. This dot of light will help you to correctly align the ultrasonic rangefinder. After successful measuring, the length will appear in the display.
Avoiding measuring errors
In order to avoid measuring errors, please note the following information:
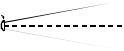
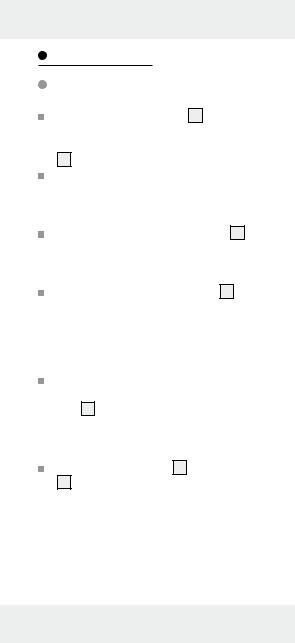
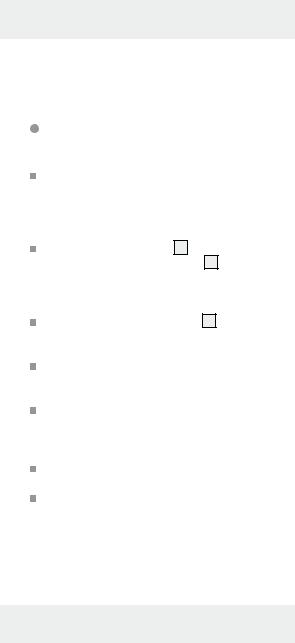
The measurement is performed by ultrasound, which travels from the ultrasonic transmitter 1 in a conical manner. The ultrasound is reflected from the target area and received by the ultrasonic receiver. The ultrasonic rangefinder calculates the measured length (Fig. B) from the travel time of the signal.
In order to guarantee an exact measurement, the following conditions must be maintained (Fig. B):
The reference area (A) must be parallel to the target area (B).
The distance to be measured must be between 0.6 m and 16 m long.
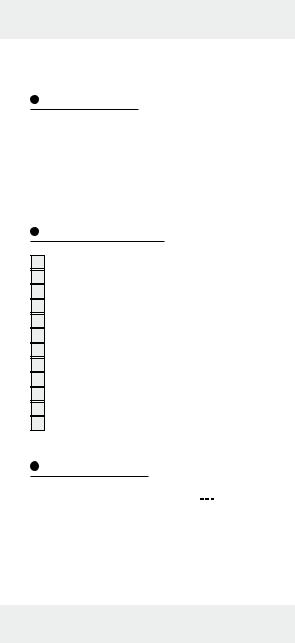
There must be no objects in the conical path of the ultrasound, which could reflect the ultrasound prematurely. The conical path of the ultrasound has a width of about 5 m at a length of 16m.
The target area must have a smooth surface, so that the ultrasound can be well reflected.
GB 11
Transparent surfaces, such as glass, generally reflect the ultrasound.
The battery must not be empty. An empty battery is shown in the display 10 by the battery symbol

 .
.
If a definitive measurement is not possible, the display shows the „Err“ information. The measurement must then be repeated.
 Adding lengths together
Measure a length as described in the section „Measuring length“. The length appears in the top line of the display 10 .
Now press the RECALL button 5 . The length is transferred to the bottom line. This means that it has been saved in the aggregate memory.
The character „+“ appears at the top of the display. The device displays in this way, that it is ready for a new length measurement. Press the READ button 4 . The length, which has now been measured, appears at the top of the display.
Press the RECALL button. The measured value is then transferred to the aggregate memory, and the aggregate of the two measured lengths appears at the bottom of the display. If the measurement is an incorrect measurement, do not press the RECALL button but press the READ button again. The measured value, which is displayed at the top, is overwritten. Press the RECALL button to adopt the value into the aggregate memory.
You can repeat this procedure as often as you wish, as long as the length of 9999.99 m is not exceeded.
12 GB
Measuring surface area
Note: In order to avoid errors in the measuring method, please familiarize yourself first with the information about measuring lengths.
Press the ON/OFF button 9 to switch the device on.
Press the MODE button 8 repeatedly until the symbol for surface area measurement „ “, as well as the designation 0.00 m (or 0‘00“), appear in the display 10 . The
symbol „ “ for length measurement flashes. The device displays in this way, that it is ready for the first measurement.
Align the device and press the READ button 4 . If the measurement is successful, the length will appear at the top of the display. The symbol for width measurement „ “ also flashes. The device displays in this way, that it is ready for the measurement of the width. Align the device and press the READ button again. If the measurement is successful, the width appears at the top of the display, and at the bottom appears the surface area in the m2 unit of measurement (or sq.ft = square feet). Press the MODE button briefly, if a further surface area measurement is required. The figures in the display are reset, and the device is ready for a new surface area measurement.
Measuring volume
Note: In order to avoid errors in the measuring method, please familiarize yourself first with the information about measuring lengths.
GB 13
Press the ON/OFF button 9 to switch the device on.
Press the MODE button 8 repeatedly until the symbol „ “ for volume measurement, as well as the designation 0.00m (or 0‘00“), appear in the display 10 . The symbol „
 “ for length measurement flashes. The device displays in this way, that it is ready for the first measurement.
Align the device and press the READ button 4 . If the measurement is successful, the length will appear at the top of the display. The symbol for width measurement „ “ also flashes. The device displays in this way, that it is ready for the measurement of the width. Align the device and press the READ button. If the measurement is successful, the width will appear at the top of the display. The symbol for height measurement „
 “ also flashes. The device displays in this way, that it is ready for the measurement of the height. Align the device and press the READ button again. If the measurement is successful, the height appears at the top of the display, and at the bottom appears the volume in the m3 unit of measurement (or cu.ft = cubic feet). Press the MODE button briefly, if a further volume measurement is required. The figures in the display are reset, and the device is ready for a new volume measurement.
Adding surface areas or volumes together
Measure a surface area or volume as described in the section „Measuring surface
14 GB
area“ or „Measuring volume“. The surface area/volume appears in the bottom line of the display.
Press the RECALL button 5 to save the measured result. The symbol M+ appears in the display and this indicates that the measured result, which is shown at the bottom of the display, is saved in the device 10 .
Press the MODE button 8 briefly. The device is now ready to measure the next surface area or volume.
Measure the next surface area or volume in the same way as you performed the first measurement.
Now press the RECALL button again to adopt the new result into the aggregate memory. The result of the addition is shown in the bottom line of the display.
If you would like to add further surface areas or volumes, repeat steps 3 to 5.
Hold the MODE button pressed down for 3 seconds in order to leave the Addition mode.
Displaying the last measured values
After you have measured a surface area or a volume, press the READ button 4 repeatedly in order to display the individual values of the measurement.
The symbol of the corresponding measured value flashes, and the measured result is shown in the top line of the display.
GB 15
Temperature display
Hold the FT/M button 3 pressed down for approx. 3 seconds. The current room temperature, in the official °C temperature unit, is shown in the display 10 .
In order to switch over to the °F temperature unit, press the FT/M button briefly.
Press the MODE button 8 briefly in order to leave the temperature display mode.
Changing the unit of measurement
Press the FT/M button 3 in order to switch over from the official metric unit of measurement to the imperial unit of measurement (display in feet‘ and inches“).
Battery state display
If the battery charge status is low, the battery symbol

 appears in the display 10 . Replace the battery as quickly as possible, if this symbol appears. Empty batteries can falsify the measured result. The battery change is described in the section „Inserting/changing the battery“.
Switching off /
Automatic shut-down
Switch the device off by holding the ON/ OFF button 9 pressed down for 3 seconds.
16 GB

Cleaning and Care
The device should only be cleaned on the outside with a soft dry cloth.
Disposal
Pb
The packaging is made of environmentally friendly materials, which may
be disposed of through your local recycling facilities.
Contact your local or municipal authority for information on how to dispose of the device at the end of its operational life.
Never dispose of batteries in your household waste. They may contain toxic heavy metals and are subject to hazardous waste regulations. The chemical symbols of the heavy metals are: Cd = cadmium, Hg = mercury, Pb = lead. Therefore dispose of used batteries through your municipal collection site.
Warranty
The device has been manufactured to strict quality guidelines and meticulously examined before delivery. In the event of product defects you have legal rights against the retailer of this product. Your legal rights are not limited in any way by our warranty detailed below.
GB 17

The warranty for this device is 3 years from the date of purchase. Should this device show any fault in materials or manufacture within three years from the date of purchase, we will repair or replace it - at our choice - free of charge to you. The warranty period begins on the date of purchase. Please keep the original sales receipt in a safe location. This document is required as your proof of purchase. This warranty becomes void if the device has been damaged or improperly used or maintained.
The warranty applies to faults in material or manufacture. This warranty does not cover product parts subject to normal wear, thus possibly considered consumables (e.g. batteries) or for damage to fragile parts, e.g. switches, rechargeable batteries or glass parts.
EMC 

18 GB

|
|
Zastosowanie zgodne z |
|
przeznaczeniem........................ |
Strona 20 |
Opis części...................................... |
Strona 20 |
Dane techniczne........................ |
Strona 20 |
Zawartość...................................... |
Strona 21 |
Ogólne wskazówki dot. |
|
bezpieczeństwa........................ |
Strona 21 |
Wskazówki dot. |
|
bezpieczeństwa – |
|
baterie............................................... |
Strona 22 |
Przed uruchomieniem |
|
Wkładanie / wymiana baterii............ |
Strona 24 |
Uruchomienie |
|
Pomiar długości.................................. |
Strona 25 |
Unikanie błędów pomiaru................. |
Strona 26 |
Dodawanie długości.......................... |
Strona 27 |
Pomiar powierzchni............................ |
Strona 28 |
Pomiar objętości................................. |
Strona 29 |
Dodawanie powierzchni |
|
wzgl. objętości.................................... |
Strona 30 |
Wyświetlanie ostatnich |
|
wyników pomiaru............................... |
Strona 31 |
Wskazanie temperatury..................... |
Strona 31 |
Zmiana jednostki masy....................... |
Strona 31 |
Wskaźnik poziomu |
|
naładowania baterii........................... |
Strona 31 |
Wyłączenie / wyłączenie |
|
automatyczne..................................... |
Strona 32 |
Czyszczenie i pielęgnacja.... |
Strona 32 |
Utylizacja........................................ |
Strona 32 |
Gwarancja..................................... |
Strona 33 |
PL 19

Odległościomierz
ultradźwiękowy
Zastosowanie zgodne z przeznaczeniem
Odległościomierz ultradźwiękowy przeznaczony jest do pomiaru odległości, jak również do obliczania powierzchni i objętości. Dodatkowo urządzenie to posiada funkcję pomiaru temperatury. Urządzenie jest przewidziane wyłącznie do zastosowania prywatnego.
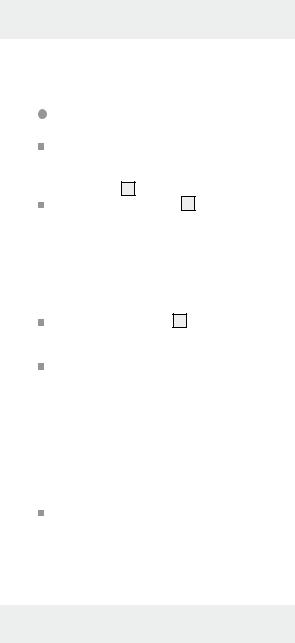
Opis części
1Nadajnik/ –odbiornik ultradźwiękowy
2Czujnik temperatury
3Przycisk FT/M
4Przycisk READ
5Przycisk RECALL
6Powierzchnia odniesienia
7Poziomica
8Przycisk MODE
9Przycisk ON-/ OFF (WŁĄCZ/ WYŁĄCZ) 10 Wyświetlacz
11 Dioda laserowa
12 Pokrywa komory na baterie
Dane techniczne
Napięcie robocze: |
maks. 9 V |
|
|
|
|||
Typ baterii: |
6LR61 |
||
|
(blokowa 9 V) |
||
Zakres pomiarowy: |
0,6 m – 16 m |
||
20 PL
|
|
Dokładność pomiaru: |
+/- 1% |
Maks. wartość |
|
na wyświetlaczu: |
9999,99 |
Długość fal lasera: |
635–660 nm, |
|
1 mW |
Klasa lasera: |
2 |
Częstotliwość ultradźwięków: |
40 kHz |
Zakres pomiarowy termometru: –10 °C – +40 °C (14 °F – 104 °F)
Zawartość
1 odległościomierz ultradźwiękowy
1 bateria blokowa 9 V
1 instrukcja obsługi
Ogólne wskazówki dot. bezpieczeństwa
Przed pierwszym użyciem produktu należy zapoznać się z wszystkimi wskazówkami dotyczącymi obsługi i bezpieczeństwa! W przypadku przekazania produktu innej osobie należy dołączyć do niego całą jego dokumentację!
Przed użyciem skontrolować produkt pod kątem uszkodzeń! Nie uruchamiać uszkodzonego produktu!
Urządzenia nie należy narażać na działanie wilgoci! W przeciwnym wypadku istnieje ryzyko jego uszkodzenia.
Niniejsze urządzenie może być używane przez dzieci od lat 8 oraz przez osoby z obniżonymi zdolnościami fizycznymi, sensorycznymi lub mentalnymi lub brakiem doświadczenia i/lub
PL 21
wiedzy, jeśli pozostają pod nadzorem lub zostały pouczone w kwestii bezpiecznego użycia urządzenia i rozumieją wynikające z niego zagrożenia. Dzieci nie mogą bawić się urządzeniem. Czyszczenie i konserwacja przez użytkownika nie mogą być bez nadzoru przeprowadzane przez dzieci.
Niebezpieczeństwo spowodowane przez promieniowania laserowe
PROMIENIOWANIELASERA
NIENALEŻYPATRZEĆWPROMIENIE
LASERKLASY2
Urządzenie posiada laser klasy 2. Nigdy nie należy kierować go w stronę ludzi lub zwierząt. Nie kierować wzroku bezpośrednio na promień. Nawet słaby promień lasera może spowodować uszkodzenie oczu.
Nigdy nie należy kierować lasera w stronę odbijających powierzchni lub materiałów. Również odbity promień lasera może spowodować uszkodzenia wzroku.
Wskazówki dot. bezpieczeństwa – baterie

 ZAGROŻENIE ŻYCIA!
Baterie nie powinny dostać się w ręce dzieci. W przypadku połknięcia należy natychmiast udać się do lekarza!
OSTROŻNIE! NIEBEZPIECZEŃSTWO WYBUCHU! Nie należy ładować baterii jednorazo-
wych, zwierać biegunów baterii i / lub otwierać ich!
22 PL

Nigdy nie należy wrzucać baterii do ognia lub wody!
Nigdy nie należy narażać baterii na obciążenia mechaniczne!
Niebezpieczeństwo wycieku kwasu z baterii
W przypadku wycieku kwasu z baterii należy je natychmiast wyjąć z urządzenia, aby uniknąć uszkodzeń!
Unikać kontaktu ze skórą, oczami i błonami śluzowymi! W razie kontaktu z kwasem akumulatorowym należy natychmiast przepłukać dane miejsce czystą wodą i niezwłocznie udać się do lekarza!
Używać wyłącznie baterii tego samego typu. Nie zakładać rόwnocześnie nowych oraz zużytych baterii!
Należy unikać ekstremalnych warunków i temperatur, które mogą oddziaływać na baterie, np. kaloryferów/ bezpośredniego działania promieniowania słonecznego.
W przypadku nieużywania baterii przez dłuższy czas należy je wyjąć z urządzenia!
Niebezpieczeństwo uszkodzenia urządzenia.
Używać wyłącznie zalecanego rodzaju baterii!
Umieszczając baterie w urządzeniu, należy zwrócić uwagę na odpowiednie ułożenie biegunów! Prawidłowe ułożenie jest przedstawione w komorze baterie!
W razie potrzeby przed włożeniem baterii oczyścić jej styki i styki urządzenia. Zużyte baterie należy niezwłocznie wyjąć z urządzenia!
PL 23
Przed uruchomieniem
Przed uruchomieniem usunąć folię ochronną z wyświetlacza 10 urządzenia oraz założyć dołączoną baterię.
Wkładanie/ wymiana baterii
Pojawienie się na wyświetlaczu 10 symbolu baterii

 oznacza, że bateria jest bliska wyczerpania i konieczna jest jej wymiana. Zastosowanie wyczerpanych baterii może spowodować zafałszowanie wyników pomiarów.
W celu założenia baterii postępować w sposób następujący:
Otworzyć pokrywę komory na baterie 12
z tyłu urządzenia. Pasek materiału znajdujący się wewnątrz komory na baterie ułatwia wyjmowanie zużytej baterii. W tym celu wystarczy pociągnąć za pasek materiału. Ew. wyjąć zużytą baterię.
Połączyć styki baterii blokowej 9 V z odpowiednimi stykamii profilowanego złącza wtykowego. Wykonując tę czynność, należy zwrócić uwagę na prawidłową biegunowość. Zapewnia ją profilowany kształt styków. Należy również koniecznie upewnić się, że pod baterią znajduje się pasek materiału. Włożyć baterię do komory na baterie, po czym zamknąć z powrotem pokrywę w taki sposób, aby zatrzasnęła się w słyszalny sposób.
24 PL
Uruchomienie
Pomiar długości
Nacisnąć przycisk ON / OFF 9 , aby włączyć urządzenie. Jeżeli w ciągu 60 sekund nie zostanie naciśnięty żaden przycisk, wyświetlacz 10 wyłączy się.
Aby wyłączyć urządzenie ręcznie, przytrzymać przez 3 sekundy wciśnięty przycisk ON / OFF, aż wyświetlacz zgaśnie i pojawi się dwukrotny sygnał dźwiękowy. Kilkakrotnie naciskać przycisk MODE 8 , aż na wyświetlaczu pojawi się symbol pomiaru długości „ ” oraz wartość długości 0.00 m (wzgl. 0‘00‘‘).
Umieścić powierzchnię odniesienia 6 odległościomierza ultradźwiękowego w punkcie początkowym pomiaru. Urządzenie trzymać w taki sposób, aby powierzchnia odniesienia była ustawiona równolegle do powierzchni docelowej pomiaru.
W celu wyrównania odległościomierza ultradźwiękowego w poziomie ew. użyć poziomicy 7 . Przy równym ustawieniu
w poziomie pęcherzyk powietrza poziomicy znajduje się dokładnie pomiędzy dwoma oznaczeniami  .
.
Nacisnąć przycisk READ 4 . Dioda laserowa 11 generuje punkt świetlny na powierzchni punktu końcowego pomiaru. Ten punkt świetlny jest pomocny przy prawidłowym ustawieniu odległościomierza ultradźwiękowego. Po pomyślnym zakończeniu pomiaru zmierzona długość wskazywana jest na wyświetlaczu.
PL 25
Unikanie błędów pomiaru
Aby uniknąć błędów pomiaru, należy przestrzegać poniższych wskazówek:
Pomiar odbywa się przy użyciu ultradźwięku, który rozchodzi się od nadajnika ultradźwięku 1 w postaci stożkowej. Dźwięk jest odbijany od powierzchni docelowej i odbierany przez odbiornik ultradźwięku. Na podstawie czasu przebiegu sygnału odległościomierz ultradźwiękowy oblicza odległość (rys. B).
Aby zapewnić dokładny pomiar, muszą zostać spełnione następujące warunki (rys. B):
Powierzchnia odniesienia (A) musi być ustawiona równolegle do powierzchni docelowej (B).
Mierzony odcinek musi mieć długość od 0,6 m do 16 m.
W stożkowym obszarze rozchodzenia się dźwięku nie mogą znajdować się żadne przedmioty, które mogłyby przedwcześnie odbić dźwięk. Przy długości 16 m stożkowy obszar rozchodzenia się dźwięku ma szerokość 5 m.
Powierzchnia docelowa musi być gładka, aby możliwe było prawidłowe odbicie dźwięku.
Przezroczyste powierzchnie, takie jak szkło, zazwyczaj dobrze odbijają dźwięk.
Bateria nie może być rozładowana. Rozładowanie baterii sygnalizowane jest na wyświe-
tlaczu |
10 |
symbolem baterii |
|
|
|
|
|
. |
|
|
|
|
|
|
|
|
|
Gdy jednoznaczny pomiar nie jest możliwy, na wyświetlaczu pojawia się wskazanie
26 PL
„Err”. Konieczne jest wówczas powtórzenie pomiaru.
Dodawanie długości
Dokonać pomiaru długości w sposób opisany w rozdziale „Pomiar długości”. Wartość długości wyświetlana jest w górnym wierszu wyświetlacza 10 .
Nacisnąć przycisk RECALL 5 . Wartość długości zostanie przeniesiona do dolnego wiersza. Oznacza to, że wartość została zapisana w pamięci sumarycznej.
W górnej części wyświetlacza pojawia się znak „+”. W ten sposób urządzenie sygnalizuje, że jest gotowe do nowego pomiaru długości.
Nacisnąć przycisk READ 4 . Wartość zmierzonej teraz długości pojawia się w górnej części wyświetlacza.
Nacisnąć przycisk RECALL. Zmierzona wartość zostanie zapisana w pamięci sumarycznej, a na dole wyświetlona zostanie suma obu zmierzonych długości. Jeżeli pomiar zakończy się niepowodzeniem, nie należy naciskać przycisku RECALL, lecz ponownie nacisnąć przycisk READ. Wyświetlana na górze wartość zostanie nadpisana. Nacisnąć przycisk RECALL, aby zapisać wartość w pamięci sumarycznej.
Proces ten można powtarzać, dopóki nie zostanie przekroczona długość 9999,99 m.
PL 27

Pomiar powierzchni
Wskazówka: Aby uniknąć metodycznych błędów pomiaru, należy najpierw zapoznać się ze wskazówkami dotyczącymi pomiaru długości.
Nacisnąć przycisk ON / OFF 9 , aby włączyć urządzenie.
Kilkakrotnie naciskać przycisk MODE 8 , aż na wyświetlaczu 10 pojawi się symbol pomiaru powierzchni „ ” oraz wskazanie 0.00 m (wzgl. 0‘00‘‘). Symbol pomiaru długości „
 ” miga. W ten sposób urządzenie sygnalizuje, że jest gotowe do pierwszego pomiaru.
Ustawić urządzenie w odpowiedniej pozycji i nacisnąć przycisk READ 4 . Po pomyślnym zakończeniu pomiaru zmierzona długość wskazywana jest w górnej części wyświetlacza. Ponadto miga symbol pomiaru szerokości „ “. W ten sposób urządzenie sygnalizuje, że jest gotowe do pomiaru szerokości. Ustawić urządzenie w odpowiedniej pozycji i nacisnąć ponownie przycisk READ. Po pomyślnym zakończeniu pomiaru w górnej części wyświetlacza wskazywana jest zmierzona szerokość, zaś w dolnej części powierzchnia w m2 (wzgl. sq.ft = stopa kwadratowa).
W celu wykonania ponownego pomiaru powierzchni nacisnąć przycisk MODE. Wskazania na wyświetlaczu zostają wyzerowane i urządzenie jest gotowe do nowego pomiaru powierzchni.
28 PL
Pomiar objętości
Wskazówka: Aby uniknąć metodycznych błędów pomiaru, należy najpierw zapoznać się ze wskazówkami dotyczącymi pomiaru długości.
Nacisnąć przycisk ON / OFF 9 , aby włączyć urządzenie.
Kilkakrotnie naciskać przycisk MODE 8 , aż na wyświetlaczu 10 pojawi się symbol pomiaru objętości „ ” oraz wskazanie 0.00 m (wzgl. 0‘00‘‘). Symbol pomiaru długości „
 ” miga. W ten sposób urządzenie sygnalizuje, że jest gotowe do pierwszego pomiaru.
Ustawić urządzenie w odpowiedniej pozycji i nacisnąć przycisk READ 4 . Po pomyślnym zakończeniu pomiaru zmierzona długość wskazywana jest w górnej części wyświetlacza. Ponadto miga symbol pomiaru szerokości
„ “. W ten sposób urządzenie sygnalizuje, że jest gotowe do pomiaru szerokości. Ustawić urządzenie w odpowiedniej pozycji i nacisnąć przycisk READ. Po pomyślnym zakończeniu pomiaru zmierzona szerokość wskazywana jest w górnej części wyświetlacza. Ponadto miga symbol pomiaru wysokości
„ ”. W ten sposób urządzenie sygnalizuje, że jest gotowe do pomiaru wysokości. Ustawić urządzenie w odpowiedniej pozycji i nacisnąć ponownie przycisk READ. Po pomyślnym zakończeniu pomiaru w górnej części wyświetlacza wskazywana jest zmierzona wysokość, zaś w dolnej części objętość w m3 (wzgl. cu.ft = stopa sześcienna).
W celu wykonania ponownego pomiaru objętości nacisnąć przycisk MODE. Wskazania
PL 29
na wyświetlaczu zostają wyzerowane i urządzenie jest gotowe do nowego pomiaru objętości.
Dodawanie powierzchni wzgl. objętości
Dokonać pomiaru powierzchni wzgl. objętości w sposób opisany w rozdziale „Pomiar powierzchni” wzgl. „Pomiar objętości“. Wartość powierzchni/objętości wyświetlana jest w dolnym wierszu wyświetlacza. Nacisnąć przycisk RECALL 5 , aby zapisać wynik pomiaru. Na wyświetlaczu 10 pojawia się symbol M+ informujący, że wynik pomiaru wskazywany w dolnej części wyświetlacza został zapisany w urządzeniu. Nacisnąć krótko przycisk MODE 8 . Urządzenie jest teraz gotowe do pomiaru kolejnej powierzchni/kolejnej objętości.
Dokonać pomiaru kolejnej powierzchni/ kolejnej objętości w sposób identyczny jak w przypadku pierwszego pomiaru. Nacisnąć przycisk RECALL, aby również nowy wynik zapisać w pamięci sumarycznej. W dolnym wierszu wyświetlacza wskazywany jest wynik dodawania.
Aby dodać kolejne powierzchnie/objętości, powtórzyć kroki od 3 do 5.
Przytrzymać wciśnięty przycisk MODE przez 3 sekundy, aby wyjść z trybu dodawania.
30 PL
 Loading...