


DRAIN CLEANER PPR 4 B2
DRAIN CLEANER
Operating instructions
ČISTILEC CEVI NA KOMPRIMIRAN
ZRAK
Navodila za uporabo
TLAKOVZDUŠNÝ ČISTIČ POTRUBIA
Návod na obsluhu
ZESTAW CIŚNIENIOWY
DO UDRAŻNIANIA RUR
Instrukcja obsługi
TLAKOVÝ ČISTIČ TRUBEK
Návod k obsluze
PRESSLUFT-ROHRREINIGER
Bedienungsanleitung
IAN 96891

Before reading, unfold the page containing the illustrations and familiarise yourself with all functions of the device.
Przed przeczytaniem proszę rozłożyć stronę z ilustracjami, a następnie proszę zapoznać się z wszystkimi funkcjami urządzenia.
Pred branjem odprite stran s slikami in se nato seznanite z vsemi funkcijami naprave.
Před čtením si otevřete stranu s obrázky a potom se seznamte se všemi funkcemi přístroje.
Pred čítaním si odklopte stranu s obrázkami a potom sa oboznámte so všetkými funkciami prístroja.
Klappen Sie vor dem Lesen die Seite mit den Abbildungen aus und machen Sie sich anschließend mit allen Funktionen des Gerätes vertraut.
GB |
Operating instructions |
Page |
1 |
PL |
Instrukcja obsługi |
Strona |
7 |
SI |
Navodila za uporabo |
Stran |
13 |
CZ |
Návod k obsluze |
Strana |
19 |
SK |
Návod na obsluhu |
Strana |
25 |
DE / AT / CH |
Bedienungsanleitung |
Seite |
31 |

A
B

Content |
Page |
|
|
Intended Usage |
2 |
|
|
Safety instructions |
2 |
|
|
Items supplied |
2 |
|
|
Description of the appliance |
2 |
|
|
Technical Data |
3 |
|
|
Utilisation |
3 |
|
|
Cleaning and care |
4 |
|
|
Disposal |
5 |
|
|
Service |
5 |
|
|
Importer |
5 |
- 1 -

Drain Cleaner
Congratulations!
With your purchase you have decided in favour of a quality product. Familiarise yourself with the product before taking it into use. To do this, read the following operating instructions attentively. Use the product only as described and only for the specified areas of application. Retain these instructions for future reference. In addition, pass these documents on, together with the product, to any future owner.
Intended Usage
This Drain cleaner is intended for the environmentally friendly and chemical-free cleaning of drainpipes, pipes and other difficult to reach places, using air pressure.
This appliance is intended for domestic use only, do not use it for commercial or industrial applications.
Safety instructions
Risk of personal injury!
•Never direct the appliance at people or other living creatures.
•This appliance may be used by children aged 8 over and by persons with reduced physical, sensory or mental capabilities or lack of experience and knowledge, provided that they are under supervision or have been told how to use of the appliance safely and are aware of the potential risks. Children must not play with the appliance. Cleaning and user maintenance tasks must not be carried out by children unless they are supervised.
•To avoid potentionally noxious fumes, do not use solvents, alcohols, carbon-based detergents or similar agents. This appliance works exclusively with compressed air and without the addition of chemicals.
Warning in regard to property damage!
•Remove all loose parts, for example particle sieves, from the bowl and seal all openings on the same pipe, for example overflows, with a wet cloth or something similar. This will avoid soiling from the sprays which may be generated by the compressive splice.
•Use this appliance only on drains able to withstand pressure. Screwed pipes are able to bear more pressure than inserted pipes. Support poorly seated pipes against the floor! If you do not, the compressive splice could damage the pipe.
Items supplied
Drain Cleaner
WC attachment
Shower attachment
Attachments Ø 6 cm and Ø 5 cm
Overflow seal
Operating instructions
Description of the appliance
Figure A:
1 Air release valve
2 Sealing cap
3 Pump
4 Compressive splice actuator
5 Air exit opening
Figure B:
6 WC attachment
7 Shower attachment
8 Attachment Ø 6 cm
9 Attachment Ø 5 cm
0 Overflow seal
- 2 -
Technical Data
Max. operating pressure: 4 bar
Attachments: |
Attachment Ø 6 cm |
|
Attachment Ø 5 cm |
|
WC Attachment |
|
Shower attachment |
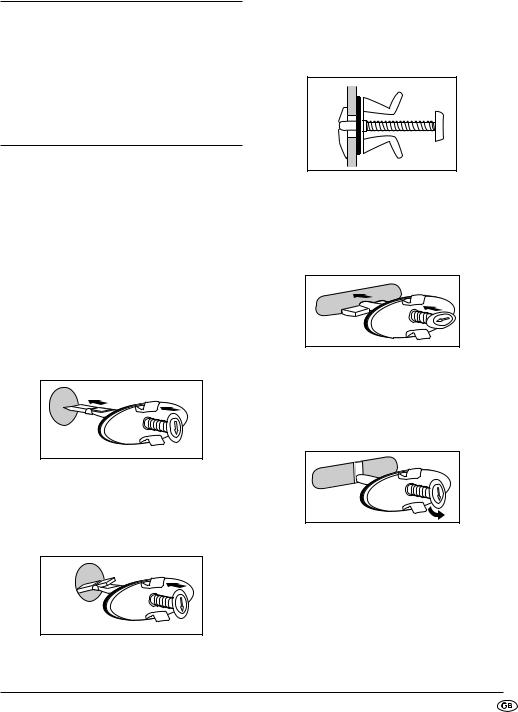
•Slowly release the roll pin and check to ensure that the overflow is completely closed. The edges of the overflow seal 0 must close as uniformly as possible around the overflow, otherwise residual soiling could be pressed out.
Utilisation
1.Select the most suitable attachment 6/7/8/9 for the blocked pipe and place it on the air exit opening 5. Ensure that it is firmly secured.
2.Remove the sieve or any other inserts from the pipe.
3.Close and seal all openings, for example overflows, on the pipe to be cleared. Use the overflow seal for the overflows 0:
•With round overflows, press and hold the roll pin so that the locking lever can be flapped in such a way that it stands in extension with the roll pin (Fig. 1).
Fig. 1
•Guide it into the overflow. As soon as the locking lever hits against the rear wall, it opens itself out (Fig. 2).
Fig. 2
Fig. 3: Correctly inserted overflow seal 0
•For elongated overflows, press the roll pin and tip the locking lever so that it stands at right angles to the roll pin (Fig. 4).
Fig. 4
•Guide it into the overflow.
•Turn the roll pin through 90° and slowly release it (Fig. 5).
Fig. 5
•Check to ensure that the overflow is completely closed. The edges of the overflow seal 0 must close as uniformly as possible around the overflow, otherwise residual soiling could be pressed out.
- 3 -

Note:
The overflow seal 0 does not fit in all overflows. If the overflow seal 0 cannot close the overflow, use a cloth or something similar to seal it.
Warning in regard to property damage!
Use this appliance only on drains and pipeworks able to withstand pressure. Support poorly seated pipes against the floor! If you do not, the pressure surge could damage the pipe.
4.Close the plughole with a stopper and and pour some warm water into the bowl (up to about 7 cm above the plughole). The best possible pressure effect is achieved only when the blocked pipe is completely filled with water. Without water in the pipe the pressure effect is strongly reduced.
5.Build up a little pressure, in that you activate the pump 3 quickly about 3 - 4 times. If you pump too slowly, the air could escape from the appliance.
6.Remove the stopper and place the appliance, as shown in Fig. 6, on the plughole .
7.Then release the pressure surge. When doing this, press the appliance firmly against the plughole.
8.If the blockage is not released, and you are sure that the pipe can withstand the pressure, increase the pressure for the next pressure surge.
9.Take the appliance out of the water and activate the pump 3 rapidly about 10 times.
10.Should you wish to release some pressure from the appliance, unscrew the air release valve 1. Afterwards, screw it back down firmly.
11.Place the appliance back onto the plughole and activate the pressure surge.
Important:
Repeat these pressure surges only for as long as the water level is above the plughole. If necessary, refill with water.
12.Repeat the pressure surge until the blockage is cleared.
Note:
Should you not be able to build up pressure, check the air release valve 1. Ensure that it is firmly screwed onto the appliance.
Cleaning and care
• Clean the attachments 6/7/8/9 and the housing with a moist cloth. For stubborn soiling use a mild detergent on the cloth.
Attention! Appliance Damage!
Do not use aggressive, abrasive or chemical cleaning agents to clean the appliance or its attachments 6/7/8/9. These could damage the upper surfaces.
Fig. 6
- 4 -
Note: |
Service |
|||
The white powder on the pump 3 is not soiling. |
Service Great Britain |
|||
It is a talcum powder that was used in the factory |
||||
for the first pump lubrication. |
Tel.: 0871 5000 720 (£ 0.10/Min.) |
|||
|
|
|
E-Mail: kompernass@lidl.co.uk |
|
After frequent usage it could happen that the pump 3 |
|
|
||
IAN 96891 |
||||
may require lubrication: |
|
|
||
1. Unscrew the sealing cap 2. |
Hotline availability: |
|||
2. Insert a few drops of silicon oil into the handgrip. |
Monday to Friday 08:00 - 20:00 (CET) |
|||
Other oils could damage the seals or the plastic. |
|
|
||
|
|
|
Importer |
|
|
|
|
||
|
|
|
KOMPERNASS HANDELS GMBH |
|
|
|
|
BURGSTRASSE 21 |
|
|
|
|
44867 BOCHUM |
|
|
|
|
GERMANY |
|
|
|
|
www.kompernass.com |
|
|
|
|
|
|
Fig. 7
3. Screw the sealing cap 2 back on hand-tight.
Disposal
Dispose of the appliance in an environmentallyfriendly manner.
Observe the currently applicable regulations.
In case of doubt, please contact your waste disposal centre.
Dispose of all packaging materials in an environmentally friendly manner.
- 5 -

- 6 -

Spis treści |
Strona |
|
|
Zastosowanie zgodnie z przeznaczeniem |
8 |
|
|
Wskazówki dotyczące bezpieczeństwa |
8 |
|
|
Zakres dostawy |
8 |
|
|
Opis urządzenia |
8 |
|
|
Dane techniczne |
9 |
|
|
Zastosowanie |
9 |
|
|
Czyszczenie i konserwacja |
10 |
|
|
Utylizacja |
11 |
|
|
Serwis |
11 |
|
|
Importer |
11 |
- 7 -
Zestaw ciśnieniowy do udrażniania rur
Gratulacje!
Dziękujemy ci za zakup naszego produktu o wysokiej jakości. Przed przystąpieniem do pierwszego uruchomienia zapoznaj się z obsługą produktu. W tym celu przeczytaj niniejszą instrukcję obsługi. Używaj produkt zgodnie z opisem i w podanych obszarach użytkowania. Instrukcję obsługi przechowuj zawsze w bezpiecznym miejscu. W razie przekazania produktu następnej osobie, nie zapomnij dołączyć również instrukcji obsługi.
Zastosowanie zgodnie z przeznaczeniem
Urządzenie służy do ekologicznego czyszczenia, bez użycia środków chemicznych, odpływów ściekowych, rur i innych trudnodostępnych miejsc sprężonym powietrzem.
Urządzenie jest przeznaczone wyłącznie do użytku prywatnego z wyłączeniem celów komercyjnych i przemysłowych.
Wskazówki dotyczące bezpieczeństwa
•Nie używaj benzyny, alkoholi, środków czyszczących zawierających węgiel lub podobnych, wydzielających szkodliwe opary. To urządzenie wykorzystuje do czyszczenia wyłącznie sprężone powietrze, bez dodatku chemii.
Ostrzeżenie przed szkodami materialnymi!
•Wyjmij wszystkie luźne elementy, takie jak na przykład sitka, z umywalki i wilgotną szmatką lub podobnym przedmiotem uszczelnij wszystkie otwory w tej samej rurze, np. otwór przelewowy. W ten sposób unikniesz odprysków zanieczyszczeń wyrzucanych przez sprężone powietrze.
•Używaj urządzenia wyłącznie w odpływach ściekowych przystosowanych do podwyższonego ciśnienia. Rury skręcane wytrzymują większe ciśnienie, niż rury wsadzane. Źle zamocowane syfony podeprzyj o podłogę! W przeciwnym razie sprężone powietrza może uszkodzić syfon.
Zakres dostawy
Zestaw ciśnieniowy do udrażniania rur
Końcówka do WC
Końcówka do prysznica
Końcówki Ø 6 cm i Ø 5 cm
Korek przelewowy
Instrukcja obsługi
Zagrożenie odniesieniem obrażeń! |
|
Opis urządzenia |
|
• Nigdy nie kieruj urządzenia w stronę zwierząt |
|
Ilustracja A: |
|
lub inne osoby. |
|
||
|
1 Zawór spustowy |
||
• To urządzenie może być używane przez dzieci |
|
||
|
2 Zatyczka |
||
od 8 roku życia oraz przez osoby o zmniejszo- |
|
||
|
3 Pumpka |
||
nych zdolnościach fizycznych, sensorycznych |
|
||
|
4 Spust |
||
lub umysłowych lub też osoby nieposiadające |
|
||
|
5 Otwór wylotowy |
||
odpowiedniego doświadczenia i/lub wiedzy, |
|
||
|
|
||
wyłącznie pod nadzorem lub po przeszkoleniu |
|
Ilustracja B: |
|
w zakresie bezpiecznego używania urządzenia |
|
||
|
6 Końcówka WC |
||
oraz wynikających z niego zagrożeń. Dzieci nie |
|
||
|
7 Końcówka do prysznica |
||
mogą bawić się urządzeniem. Czyszczenie i |
|
||
|
8 Końcówka Ø 6 cm |
||
konserwacja przez użytkownika nie mogą być |
|
||
|
9 Końcówka Ø 5 cm |
||
wykonywane przez dzieci bez nadzoru. |
|
||
0 Korek przelewowy |
|||
|
|||
|
|
|
|
|
- 8 - |
|
|
Dane techniczne |
|
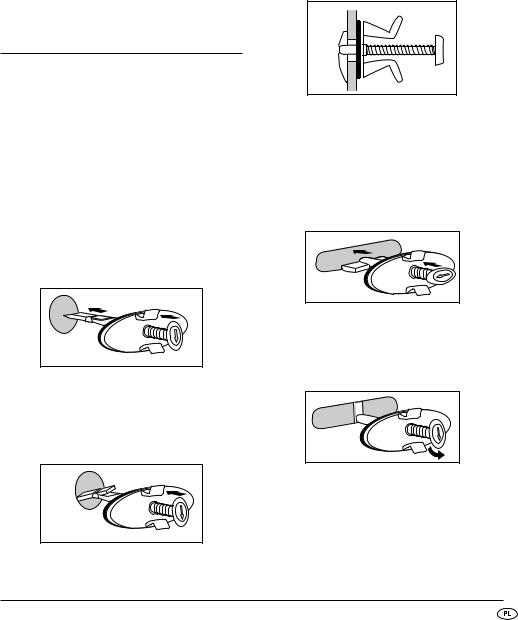
• Powoli puść trzpień i upewnij się, czy przelew |
|
|
został całkowicie zatkany. Krawędzie zamknię- |
Maks. ciśn. robocze: |
4 bar |
cia przelewowego 0 muszą otaczać szczelnie |
Końcówki: |
Końcówka Ø 6 cm |
przelew, gdyż w przeciwnym wypadku zaniec- |
|
Końcówka Ø 5 cm |
zyszczenia mogłyby przedostać się na zew- |
|
Końcówka do WC |
nątrz. |
|
Końcówka do prysznica |
|
Zastosowanie
1.Wybierz odpowiednią końcówkę 6/7/8/9 do niedrożnego odpływu ściekowego i załóż ją na otwór wylotowy 5. Sprawdź, czy końcówka jest mocno osadzona.
2.Wyjmij sitka i inne elementy z syfonu.
3.Zatkaj wszystkie otwory, jak na przykład otwory przelewowe, w czyszczonej rurze. Do przelewów użyj korka przelewowego 0:
•W przypadku okrągłych przelewów, naciśnij
i przytrzymaj trzpień tak, by dźwignię ryglującą można było wyprostować i powstało przed-łuże- nie z trzpieniem (ilustracja 1.).
Ilustr. 1
•Włóż go do przelewu. Gdy dźwignia ryglująca dojdzie do tylnej ściany, dźwignia złoży się (ilustr. 2).
Ilustr. 2
Ilustr. 3: Prawidłowo założony korek przelewowy 0
•W przypadku podłużnych przelewów, naciśnij
i przytrzymaj trzpień tak, by dźwignię ryglującą można było wyprostować i powstało przed-łuże- nie (ilustr. 4).
Ilustr. 4
•Włóż go do przelewu.
•Trzpień obróć o 90° i powoli go puść (ilustr. 5).
Ilustr. 5
•Upewnij się, czy przelew został całkowicie zatkany. Krawędzie zamknięcia przelewowego 0 muszą otaczać szczelnie przelew, gdyż w przeciwnym wypadku zanieczyszczenia mogłyby przedostać się na zewnątrz.
- 9 -
 Loading...