


PRECISION LED MAGNIFYING GLASS
PRECISION LED |
HIENOMEKAANIKON LED- |
MAGNIFYING GLASS |
VALAISTU SUURENNUSLASI |
Operation and Safety Notes |
Käyttö - ja turvallisuusohjeet |
FINMEKANIKERLUPP, LED |
FINMEKANIKER-LED-LUP |
Bruksanvisning och säkerhetsanvisningar |
Brugs - og sikkerhedsanvisninger |
LOUPE À LED POUR |
MECHANICA LED-LOEP |
TRAVAUX DE PRÉCISION |
Bedienings - en veiligheidsinstructies |
Instructions d‘utilisation et consignes de |
|
sécurité |
|
FEINMECHANIKER- |
|
LED -LUPE |
|
Bedienungs - und Sicherheitshinweise |
|
IAN 60114
GB / IE |
Operation and Safety Notes |
Page |
5 |
FI |
Käyttöja turvallisuusohjeet |
Sivu |
16 |
SE |
Bruksanvisning och säkerhetsanvisningar |
Sidan |
27 |
DK |
Brugsog sikkerhedsanvisninger |
Side |
38 |
FR / BE |
Instructions d‘utilisation et consignes de sécurité |
Page |
49 |
NL / BE |
Bedieningsen veiligheidsinstructies |
Pagina |
61 |
DE / AT / CH |
Bedienungsund Sicherheitshinweise |
Seite |
73 |

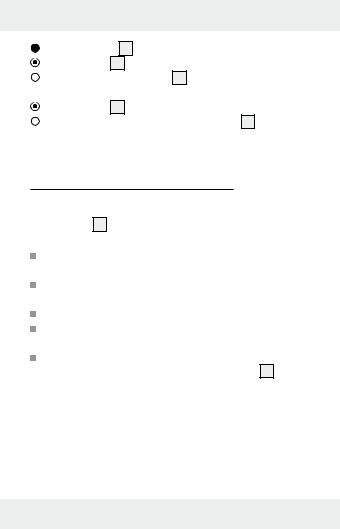
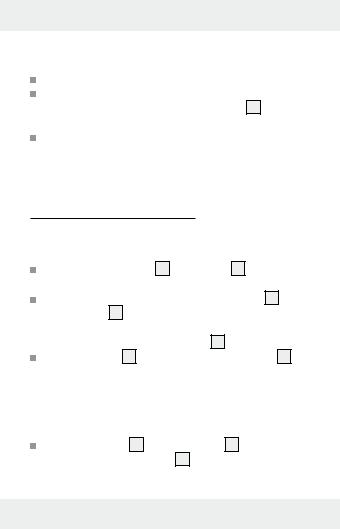
A
|
1 |
2 |
3 |
4 |
5 |
6 |
7 |
|
|
|
|
|
|
|
8 |
|
|
|
|
|
|
|
9 |
|
|
|
|
|
|
16 |
10 |
|
|
|
|
|
|
11 |
|
|
|
|
|
|
|
|
|
|
|
|
|
|
|
|
12 |
20 |
19 |
|
|
17 |
|
|
|
|
15 |
|
|
|
|
||
|
|
|
|
|
|
|
|
|
|
18 |
|
|
|
|
13 |
|
|
|
|
|
|
|
|
|
|
|
|
|
|
|
14 |
3

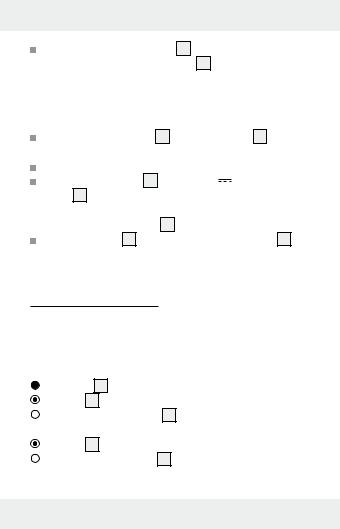
B
20
C
21
4

Table of Contents
Introduction |
|
|
Intended Use............................................................. |
Page |
6 |
Description of parts.................................................. |
Page |
7 |
Technical Data.......................................................... |
Page |
7 |
Includes..................................................................... |
Page |
8 |
Safety |
|
|
General Safety Information..................................... |
Page |
8 |
Battery Safety Instructions........................................ |
Page 10 |
|
Before Initial Use |
|
|
Inserting the Batteries............................................... |
Page 11 |
|
Attaching the repair device...................................... |
Page 12 |
|
Mounting the magnifying glass............................... |
Page 12 |
|
Use |
|
|
Using the Precision Engineer’s |
|
|
LED Magnifying Glass.............................................. |
Page 12 |
|
Changing the Batteries............................................. |
Page 13 |
|
Troubleshooting.............................................. |
Page 13 |
|
Cleaning and Maintenance.................... |
Page 14 |
|
Disposal.................................................................. |
Page 15 |
|
GB/IE 5
Introduction
Precision LED Magnifying Glass
 Introduction
The instructions for use are to be considered as part of the product. They contain important information concerning safety, use and disposal. Before using
the product, please familiarise yourself with all of the safety information and instructions for use. The product must only be used as described and for the stated fields of application. If you pass the product on to third parties, please give them all of the documentation as well.
Intended Use
The product is intended for the optical magnification of objects and is equipped with LED lamps. In addition, the product has 2 fixing clamps and a soldering iron holder. Other uses or changes to the product are considered to be contrary to the intended use and may harbour risks of injury and damage. The manufacturer does not accept any liability for injury or damage resulting from use of this product contrary to its intended use. The product is not intended to be used for commercial purposes.
Not suitable for ordinary lighting in household room illumination.
6 GB/IE

Introduction
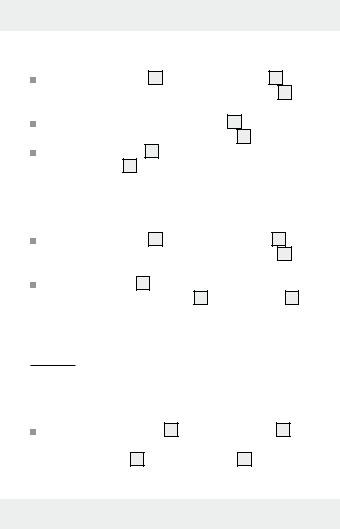
 Description of parts
1Precision engineer’s LED magnifying glass
2Lens (magnification 2.5 / 5 times)
3Battery compartment cover
4Battery compartment
5Ball joint
6Retaining screw (lens ball joint)
7Magnifying glass fixing clamp
8Retaining screw (magnifying glass height adjustment)
9On / off switch
10Supporting rod (height adjustment)
11Fixing clamp (repair device)
12Retaining screw (repair device height adjustment)
13Soldering iron holder
14Base
15Repair device
16Retaining screw (repair device ball joint)
17Retaining screw (repair device)
18Alligator clips
19Retaining screws (alligator clips)
20LED lamps (Fig. B)
21Batteries (Fig. C)
 Technical Data
Operating voltage: |
4.5 volts |
|
|
|
|
|
|
||||
Batteries: |
3 x 1.5 V |
|
, AAA type |
||
|
|||||
Max. power rating: |
2 x 0.06 W |
||||
GB/IE 7

Introduction / Safety
Bulbs: |
2 x LED (not replaceable) |
Magnification / |
|
magnifying glass: |
2.5 / 5 times |
Dimensions: |
approx. 20.5 x 12 x 17 cm (W x H x D) |
 Includes
Immediately after unpacking please check the package contents for completeness and if all parts and the product are in good condition. Do not under any circumstances use the product if the delivery is incomplete.
1 Precision engineer’s LED magnifying glass
3 Batteries, 1.5 V 

 , AAA
, AAA
1 Operating Instructions

 Safety
Q General Safety Information
KEEP ALL THE SAFETY ADVICE AND INSTRUCTIONS IN A SAFE PLACE FOR FUTURE REFERENCE!

 DANGER OF DEATH
AND ACCIDENTS FOR TODDLERS AND CHILDREN! Never leave children unsupervised
with the packaging material. The packaging material
8 GB/IE
Safety
represents a danger of suffocation. Children frequently underestimate the dangers. Always keep children away from the packaging material. This is not a toy.
This appliance can be used by children aged from 8 years and above and persons with reduced physical, sensory or mental capabilities or lack of experience and knowledge if they have been given supervision or instruction concerning use of the appliance in a safe way and understand the hazards involved. Children shall not play with the appliance. Cleaning and user maintenance shall not be made by children without supervision.
 CAUTION! RISK OF INJURY! Please do not use this device if you find that it is damaged in any way.
Check whether all of the parts are correctly fitted. If the device is not correctly assembled there is a danger of injury.
Keep the product away from humidity.
 CAUTION! RISK OF EYE INJURIES! Never look through the precision engineer’s LED magnifying glass into the sun or other sources of light. Severe eye injuries may be the result.
CAUTION! DANGER OF FIRE! Never expose the precision engineer’s LED magnifying glass to direct sunlight or other sources of
light. Never leave the product unattended. Otherwise there is a danger of fire resulting from concentrated rays of light and concentrated heat.
The product must be stored in a dark environment.
GB/IE 9
Safety
Do not subject the device to any extreme temperatures or severe mechanical stress. Otherwise this may result in deformation of the product.
Make sure that the lens 2 does not come into contact with sharp or pointed objects. Otherwise this may result in damage to the product.
Do not leave the soldering iron unattended if the device is switched on. The soldering iron holder 13 is only suitable for holding the soldering iron for a limited time.
Battery Safety Instructions

 DANGER TO LIFE! Keep batteries out of the reach of children. Do not leave batteries lying around. There is a risk of children or animals swallowing them. Consult a doctor immediately if a battery is swallowed.
EXPLOSION HAZARD! Never recharge nonrechargeable batteries, short-circuit and / or open batteries. This can cause them
to overheat, burn or burst. Never throw batteries into fire or water. The batteries may explode.
Remove spent batteries from the product immediately. Otherwise there is an increased risk of leakage.
Always replace the three batteries at the same time and only use batteries of the same type.
Do not use different types of batteries or mix used and new batteries together.
10 GB/IE
Safety / Before Initial Use
Check regularly that the batteries are not leaking. Leaked or damaged batteries can cause
chemical burns if they come into contact with the skin; in such cases you must wear suitable
protective gloves.
Remove the batteries from the product if it is not in use for any length of time.
Make sure that the polarity is correct when you insert the batteries. This is indicated in the battery compartment 4 . The batteries can otherwise explode.
Remove used batteries from the device. Very old or used batteries may leak. The chemical fluid can damage the product.
 Before Initial Use
 Inserting the Batteries (Figure C)
Remove the battery compartment cover 3 from the battery compartment 4 by pulling in the direction of the arrow.
Insert the three batteries supplied 21 into the battery compartment 4 .
Note: Ensure the correct polarity. This is shown in the battery compartment 4 .
Push the battery compartment cover 3 in the opposite direction to the arrow back to its original position in order to close the battery compartment 4 .
GB/IE 11
Before Initial Use / Use
 Attaching the repair device
Push the fixing clamp 11 onto the mounting rod 10 , set the desired height and tighten the fastening screw 12 clockwise.
Insert the ball joint of the repair device 15 into the corresponding recess of the fixing clamp 11 .
Fix the repair device 15 in place by tightening the fastening screw 16 clockwise.
 Mounting the magnifying glass
Push the fixing clamp 7 on to the mounting rod 10 and set the desired height. Tighten the fastening screw 8 by turning it clockwise.
Insert the ball joint 5 into the corresponding recess and tighten the fastening screw 6 for the ball joint 5 clockwise (Fig. A).
 Use
Use
 Using the Precision Engineer’s LED
Magnifying Glass
Turn the retaining screws 19 on the alligator clips 18 in a clockwise direction. Clamp the item to be repaired with the alligator clips 18 in the repair device 15 .
12 GB/IE

Use / Troubleshooting
Move the On / Off switch 9 into position “ON” to switch on the LEDs 20 .
Note: The LED bulbs 20 are non-replaceable.
Point the precision engineer’s LED magnifying glass 1 with the LED lamps 20 at the clamped work piece. Release the alligator clips 18 in order to remove the work piece.
Move the On / Off switch 9 into position “OFF” to switch off the LEDs 20 .
 Changing the Batteries
Pull the battery compartment cover 3 in the direction of the arrow to remove it from the battery compartment 4 . Take out the old batteries.
Place the new batteries 21 of type 1.5 V 

 , AAA into the battery compartment 4 .
Note: Ensure the correct polarity. This is shown in the battery compartment 4 .
Push the battery compartment cover 3 back in the opposite direction to the arrow in order to close the battery compartment 4 .
Q Troubleshooting
 = Problem
 = Cause
 = Solution
GB/IE 13
Troubleshooting / Cleaning and Maintenance
The LED lamps 20 do not light up.
The batteries 21 are flat.
Replace the used batteries 21 with new ones (see: “Changing the Batteries”).
The batteries 21 have been inserted incorrectly.
Check the correct polarity of the batteries 21 (see: “Inserting the Batteries”).
 Cleaning and Maintenance
 CAUTION! Clean the precision engineer’s LED magnifying glass 1 very carefully in order to avoid scratches.
Do not use corrosive or abrasive cleaners under any circumstances.
Use a cleaning cloth for cleaning the device. Moisten it a little if necessary.
Use a dry, fluff-free cloth for cleaning the lens.
Never immerse the product in water or other liquids under any circumstances.
If you are not using the device, store it in such a way that the precision engineer’s LED magnifying glass 1 is not scratched. Wrap the product in a soft cloth.
14 GB/IE
Disposal
 Disposal
The packaging is made entirely of recyclable materials, which you may dispose of at local recycling facilities.
Contact your local refuse disposal authority for more details of how to dispose of your worn-out product.
To help protect the environment, please dispose of the product properly when it has reached the end of its useful life and not in the household waste.
Information on collection points and their opening hours can be obtained from your local authority.
Faulty or used batteries must be recycled in accordance with Directive 2006 / 66 / EC. Please return the batteries and / or the device to the available collection points.
Pb
Environmental damage through incorrect disposal of the batteries!
Batteries may not be disposed of with the usual domestic waste. They may contain toxic heavy metals and are subject to hazardous waste treatment rules and regulations. The chemical symbols for heavy metals are as follows: Cd = cadmium,
Hg = mercury, Pb = lead. That is why you should dispose of used rechargeable batteries at a local collection point.
GB/IE 15

Sisällysluettelo
Johdanto |
|
|
Tarkoituksenmukainen käyttö.................................... |
Sivu |
17 |
Osien kuvaus............................................................. |
Sivu 18 |
|
Tekniset tiedot............................................................ |
Sivu |
18 |
Toimituksen sisältö..................................................... |
Sivu |
19 |
Turvallisuus |
|
|
Yleiset turvallisuusohjeet............................................ |
Sivu |
19 |
Paristojen turvallisuusohjeet....................................... |
Sivu |
21 |
Ennen käyttöönottoa |
|
|
Paristojen paikoilleeenasetus.................................... |
Sivu |
22 |
Korjauslaitteen asentaminen..................................... |
Sivu |
22 |
Luupin asennus........................................................... |
Sivu |
23 |
Käyttö |
|
|
Hienomekaanikko-LED-suurennuslasin käyttö.......... |
Sivu |
23 |
Paristojen vaihto......................................................... |
Sivu |
24 |
Vikojen korjaus................................................ |
Sivu 24 |
|
Puhdistus ja hoito........................................... |
Sivu 25 |
|
Jätehuolto............................................................. |
Sivu 25 |
|
16 FI
Johdanto
Hienomekaanikon
LED-valaistu suurennuslasi
Q Johdanto
Käyttöohje on osa tätä tuotetta. Se sisältää tärkeitä turvallisuusohjeita sekä käyttöä ja hävitystä koskevia ohjeita. Tutustu ennen tuotteen käyttöä
huolellisesti kaikkiin käyttöja turvallisuusohjeisiin. Käytä tuotetta vain kuvatulla tavalla ja ilmoitetulla käyttöalalla. Anna kaikki ohjeet mukaan, jos luovutat tuotteen edelleen.
Q Tarkoituksenmukainen käyttö
Tuote on tarkoitettu esineiden optiseen suurentamiseen ja se on varustettu LED-valoilla. Lisäksi tuotteessa on 2 kiinnitinliitintä ja yksi juotoskolvin pidike. Tuotteen käyttö tai sen muuttaminen muuhun kuin tässä mainittuun tarkoitukseen voi aiheuttaa loukkaantumisja vaurioitumisvaaran. Valmistaja ei vastaa virheellisestä käytöstä johtuneista vahingoista. Tuote ei ole tarkoitettu ammattimaiseen käyttöön.
Tämä tuote ei sovellu kodin normaaliin huonevalaistukseen.
FI 17
Johdanto
Q Osien kuvaus
1Hienomekaanikko-LED-suurennuslasi
2Linssi (2,5- / 5 -kertainen suurennus)
3Paristotilan kansi
4Paristotila
5Pallonivel
6Säätöruuvi (pallonivel suurennuslasi)
7Kiinnitinliitin suurennuslasi
8Säätöruuvi (korkeussäätö suurennuslasi)
9Päälle- / Pois -kytkin
10Pitotanko (korkeussäätö)
11Kiinnitinliitin (korjauslaite)
12Säätöruuvi (korkeussäätö korjauslaite)
13Juotoskolvin pidike
14Jalusta
15Korjauslaite
16Säätöruuvi (pallonivel korjauslaite)
17Säätöruuvi (korjauslaite)
18Krokotiililiittimet
19Säätöruuvit (krokotiililiittimet)
20LED-valot (kuva B)
21Paristot (kuva C)
Q Tekniset tiedot
Käyttöjännite: |
4,5 volttia |
|
|
|
|
|
|
|
|||
Paristot: |
3 x 1,5 V |
|
, AAA tyyppi |
||
|
|||||
Max nimellisteho: |
2 x 0,06 W |
|
|
||
18 FI
|
Johdanto / Turvallisuus |
Valonlähde: |
2 x LED (ei voida vaihtaa) |
Suurennus / |
|
suurennuslasi: |
2,5- / 5 -kertainen |
Mitat: |
n. 20,5 x 12 x 17 cm (p x l x k) |
Q Toimituksen sisältö
Tarkista heti avattuasi pakkaukset toimituksen täydellisyys sekä tuotteen ja osien moitteeton kunto. Älä missään tapauksessa asenna tuotetta, jos toimitus ei ole täydellinen.
1 hienomekanikko-LED-suurennuslasi
3 paristoa1,5 V 

 , AAA
, AAA
1 käyttöohje

 Turvallisuus
Q Yleiset turvallisuusohjeet
SÄILYTÄ KAIKKI TURVAJA MUUT OHJEET TULEVAA TARVETTA VARTEN!

 HENGENJA TAPA-
TURMANVAARA PIKKULAPSILLE JA LAPSILLE! Älä koskaan jätä lapsia pakkaus-
materiaalien läheisyyteen ilman valvontaa. Pakkausmateriaaleihin liittyy tukehtumisvaara. Lapset aliarvioivat usein
FI 19
Turvallisuus
tuotteeseen liittyvät vaarat. Pidä lapset aina loitolla pakkausmateriaaleista.
Laitetta voivat käyttää 8 vuotta täyttäneet lapset ja henkilöt, jotka ovat fyysisiltä tai psyykkisiltä kyvyiltääntai aisteiltaan rajoittuneita tai joilla ei ole kokemusta tai tietoa laitteen käytöstä, jos he käyttävät laitettavalvonnan alaisina tai heitä on opastettu laitteen turvallisessa käytössä ja he ovat tietoisia laitteeseen liittyvistä vaaroista. Lapset eivät saa leikkiä laitteella. Lapset eivät saa puhdistaa tai huoltaa laitetta ilman valvontaa.
 VAROITUS! LOUKKAANTUMISVAARA! Älä käytä laitetta, jos huomaat joitakin vaurioita.
Tarkista, että kaikki osat on asennettu asianmukaisesti. Ellei tuotetta ole asennettu asianmukaisesti, on olemassa loukkaantumisvaara.
Pidä tuote loitolla kosteudesta.
 VARO! SILMIEN LOUKKAANTUMISVAARA! Älä koskaan katso hienomekaanikko-LED -suurennuslasin läpi aurinkoon tai muihin valolähteisiin. Tästä voi olla seurauksena vakavia silmävammoja.
VARO! TULIPALOVAARA! Älä koskaan altista hienomekaanikko-LED -suurennuslasia suoralle auringonvalolle äläkä muille valoläh-
teille. Älä koskaan jätä laitetta ilman valvontaa. Keskitetyt valonsäteet ja tiivistynyt kuumuus voivat aiheuttaa tulipalovaaran.
Tuote tulisi säylyttää pimeässä.
Älä koskaan altista laitetta äärimmäisille lämpötiloille tai voimakkaalle mekaaniselle kuormitukselle. Koska tämä voi aiheuttaa muodonmuutoksia tuotteessa.
20 FI
Turvallisuus
Huolehdi aina siitä, ettei linssi 2 joudu kosketuksiin terävien tai teräväkärkisten esineiden kanssa. Koska tämä voi vaurioittaa tuotetta.
Älä jätä juotoskolvia ilman valvontaa, kun laite on kytketty päälle. Juotoskolvin pidike 13 soveltuu vain juotoskolvin ajottaiseen kiinnitykseen.
Paristojen turvallisuusohjeet

 HENGENVAARA! Paristot eivät kuulu lasten käsiin. Älä unohda paristoja mihinkään ilman valvontaa. On olemassa vaara, että lapset tai lemmikkieläimet voivat niellä paristot. Käänny heti lääkärin puoleen, jos joku on niellyt pariston.
RÄJÄHDYSVAARA! Älä koskaan lataa ei ladattavia paristoja uudelleen, äläkä oikosulje ja / tai avaa niitä. Siitä voi olla seurauksena
ylikuumentuminen, palovaara tai halkeaminen. Älä koskaan heitä paristoja tuleen tai veteen. Paristot voivat räjähtää.
Poista käytetyt paristot välittömästi pois tuotteesta. Ne voivat aiheuttaa vuotoriskin.
Vaihda aina kaikki paristot samanaikaisesti ja käytä ainoastaan samantyyppisiä paristoja.
Älä käytä erilaisia paristotyyppejä tai käytettyjä ja uusia paristoja yhdessä.
Tarkista säännöllisesti paristojen tiiviys.
Vuotaneet tai vaurioituneet paristot voivat ihokosketuksessa syövyttää ihoa; käytä siksi
FI 21
Turvallisuus / Ennen käyttöönottoa
tässä tapauksessa ehdottomasti aina sopivia suojakäsineitä!
Poista paristot, jos tuote on pitemmän ajan pois käytöstä. Noudata paristoja paikoilleen asentaessasi napaisuusmerkintöjä! Nämä näytetään paristotilassa 4 . Muussa tapauksessa paristot voivat räjähtää.
Poista käytetyt paristot laitteesta. Hyvin vanhat tai käytetyt paristot voivat vuotaa. Vuotava kemiallinen neste vaurioittaa tuotetta.
QEnnen käyttöönottoa
QParistojen paikoilleeenasetus (kuva C)
Vedä paristotilan kansi 3 paristotilalta 4 nuolen suuntaan.
Aseta kummatkin toimitukseen kuuluvat paristot 21 paristotilaan 4 .
Huomautus: Tarkista samalla, että napaisuus on oikea. Tämä näytetään paristotilassa 4 .
Sulje paristotila 4 painamalla paristotilan kantta 3 nuolensuuntaa vastaan alkuperäiseen asentoonsa.
Q Korjauslaitteen asentaminen
Pistä kiinnitysliitin 11 kannatintankoon 10 , säädä haluttu korkeus ja kiristä lukitusruuvi 12 myötäpäivään kiertämällä.
22 FI

Ennen käyttöönottoa / Käyttö
Pistä korjauslaitteen 15 pallonivel kiinnitysliittimeen 11 sille varattuun aukkoon.
Kiinnitä korjauslaite 15 kiertämällä ensin lukitusruuvia 16 myötäpäivään.
Q Luupin asennus
Pistä kiinnitysliitin 7 kannatintankoon 10 ja säädä haluttu korkeus. Kiristä lukitusruuvi 8 myötäpäivään kiertämällä.
Pistä pallonivel 5 siihen varattuun aukkoon ja kiristä pallonivelen 5 lukitusruuvi 6 myötäpäivään kiertämällä (kuva A).
QKäyttö
QHienomekaanikko-LED- suurennuslasin käyttö
Kirstä krokotiililiittimillä 18 olevat säätöruuvit 19 myötäpäivään kiertämällä. Kiinnitä työstettävä työkappale krokotiililiittimillä 18 korjauslaitteeseen 15 .
Työnnä päälle- / pois -kytkin 9 asentoon “PÄÄLLE“ (ON), kun haluat sytyttää LED-valot 20 .
Huomio: LED-valoja 20 ei voida vaihtaa. Ojenna hienomekaanikko-LED -suurennusslasi 1 LED-valojen 20 kanssa kiinnitetylle työkappaleelle. Poista työkappale irrottamalla krokotiililiittimet 18 .
FI 23
Käyttö / Vikojen korjaus
Työnnä Päälle / Pois - kytkin 9 asentoon “POIS“ (OFF), kun haluat sammuttaa LED-valot 20 .
Q Paristojen vaihto
Vedä paristotilan kansi 3 pois paristotilalta 4 nuolen suuntaan.
Poista käytetyt paristot. |
|
Aseta uudet paristot 21 tyyppi 1,5 V |
AAA paristoti- |
laan 4 .
Huomautus: Tarkista, että napaisuus on oikea. Tämä näytetään paristotilassa 4 .
Sulje paristotila 4 painamalla paristotilan kantta 3 nuolensuuntaa vastaan.
Q Vikojen korjaus
 = ongelma
 = syy
= syy
 = ratkaisu
LED-valot 20 eivät pala.
Paristot 21 ovat kuluneet.
Vaihda kuluneet paristot 21 uusiin (katso: “Paristojen vaihto“).
Paristot 21 asetettu väärin paikoilleen.
Tarkista, että paristojen 21 napaisuus on oikea (katso: ”Paristojen paikoilleen asetus”).
24 FI
Puhdistus ja hoito / Jätehuolto
Q Puhdistus ja hoito
 VARO! Ole erittäin varovainen hienomekaanikko-LED -suurennuslasia 1 puhdistaessasi, ettei se naarmuunnu.
Älä missään tapauksessa käytä syövyttävää tai voimakasta puhdistusainetta.
Käytä puhdistukseen puhdistusliinaa. Kostuta sitä hieman tarvittaessa.
Käytä linssin puhdistukseen kuivaa, nukkautumatonta liinaa. Älä koskaan upota tuotetta veteen tai muihin nesteisiin. Ellet käytä laitetta, säilytä hienomekaniikka-LED-luuppi 1 niin, ettei se naarmuunnu. Kääri tuote pehmeään liinaan.
Q Jätehuolto
Pakkaus on ympäristöystävällista materiaalia, Ojonka voit viedä paikalliseen kierrätyspisteeseen.
Saat lisätietoa käytettyjen tuotteiden jätehuoltomahdollisuuksista kunnantai kaupungintoimistosta.
Älä hävitä käytöstä poistettua tuotetta kotitalousjätteenä, vaan vie se keräyspisteeseen. Suojelet näin luontoa. Kuntasi / kaupunkisi ympäristöviranomaiset antavat lisätietoja keräyspisteistä ja niiden aukioloajoista.
FI 25

Jätehuolto
Vialliset ja käytetyt paristot on toimitettava kierrätykseen direktiivin 2006 / 66 / EC mukaisesti. Palauta paristot ja / tai laite tarjolla olevaan keräyslaitokseen.
Pb
Akkujen väärä hävittäminen aiheuttaa ympäristövahinkoja!
Paristoja ei saa hävittää talousjätteenä. Ne voivat sisältää myrkyllisiä raskasmetalleja ja ne kuuluvat ongelmajätekäsittelyyn. Raskasmetallien kemialliset merkit ovat seuraavat:
Cd = kadmium, Hg = elohopea, Pb = lyijy. Toimita tästä syystä vanhat paristot kunnalliseen keräyspisteeseen.
26 FI
 Loading...