


Z22855
4
Z22855
Digital Calliper
Operation and Safety Notes
Digitális tolómérő
Kezelési és biztonsági utalások
Digitální posuvné měřítko
Pokyny pro obsluhu a bezpečnostní pokyny
miarka Cyfrowa
Wskazówki dotyczące obsługi i bezpieczeństwa
Digitalno kljunasto merilo
Navodila za upravljanje in varnostna opozorila
Digitálne posuvné meraDlo
Pokyny pre obsluhu a bezpečnostné pokyny
4
GB Operation and Safety Notes Page 5
PL Wskazówki dotyczące obsługi i bezpieczeństwa Strona 13
HU Kezelési és biztonsági utalások Oldal 21
SI Navodila za upravljanje in varnostna opozorila Stran 29
CZ Pokyny pro obsluhu a bezpečnostní pokyny Strana 37
SK Pokyny pre obsluhu a bezpečnostné pokyny Strana 45

3
B
A
2
6
5
41
11 10 9 8
3
7
4
C
D
E
F
GB 5
Introduction
Intended use ................................................................Page 6
Scope of delivery .......................................................Page 6
Description of parts ....................................................Page 6
Technical data .............................................................Page 6
Safety instructions
Safety instructions for batteries ................................. Page 7
Before start of operation
Insert / replace battery ...............................................Page 8
Preparing the caliper .................................................. Page 8
Starting up the device
Using the caliper .........................................................Page 8
Examples of use ..........................................................Page 9
Troubleshooting ..........................................................Page 10
Cleaning and maintenance ..................... Pa ge 11
Disposal ....................................................................P ag e 11
GB6
Digital Calliper
Q
Introduction
Q
Intended use
Only for private use.
Not for commercial use.
Q
Scope of delivery
1 x digital caliper
1 x battery
1 x storage box
1 x instruction for use
Q
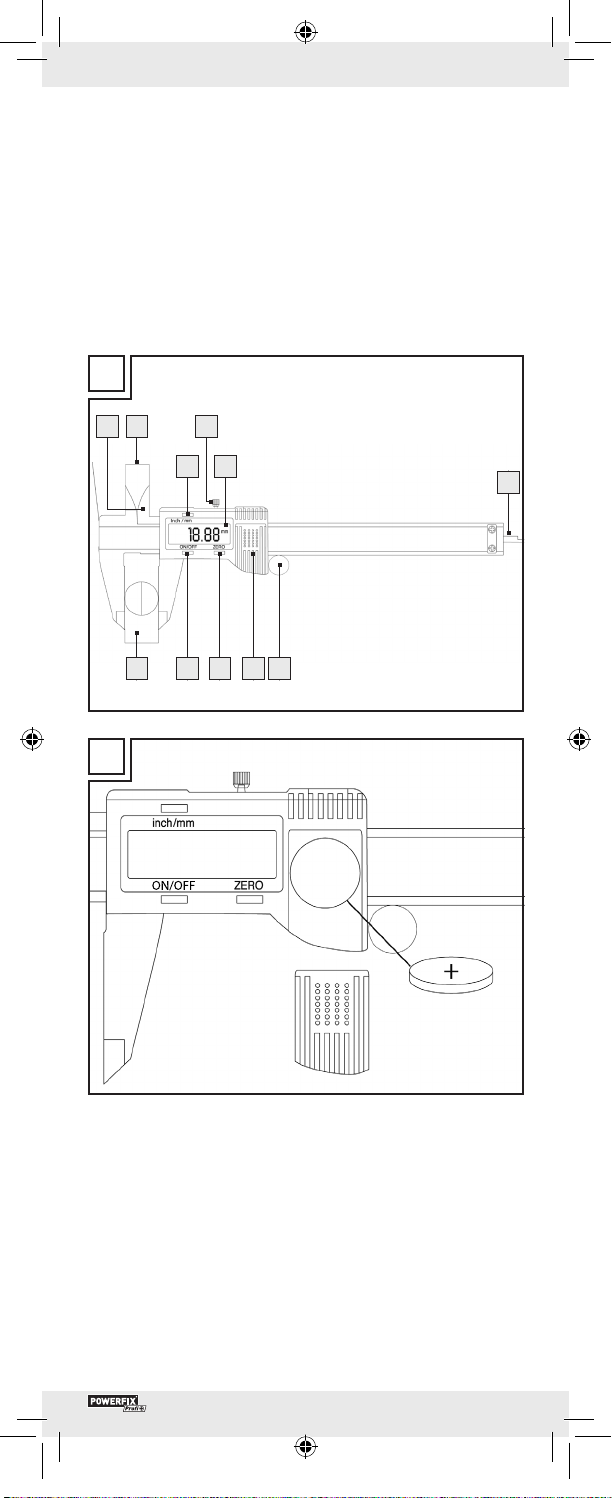
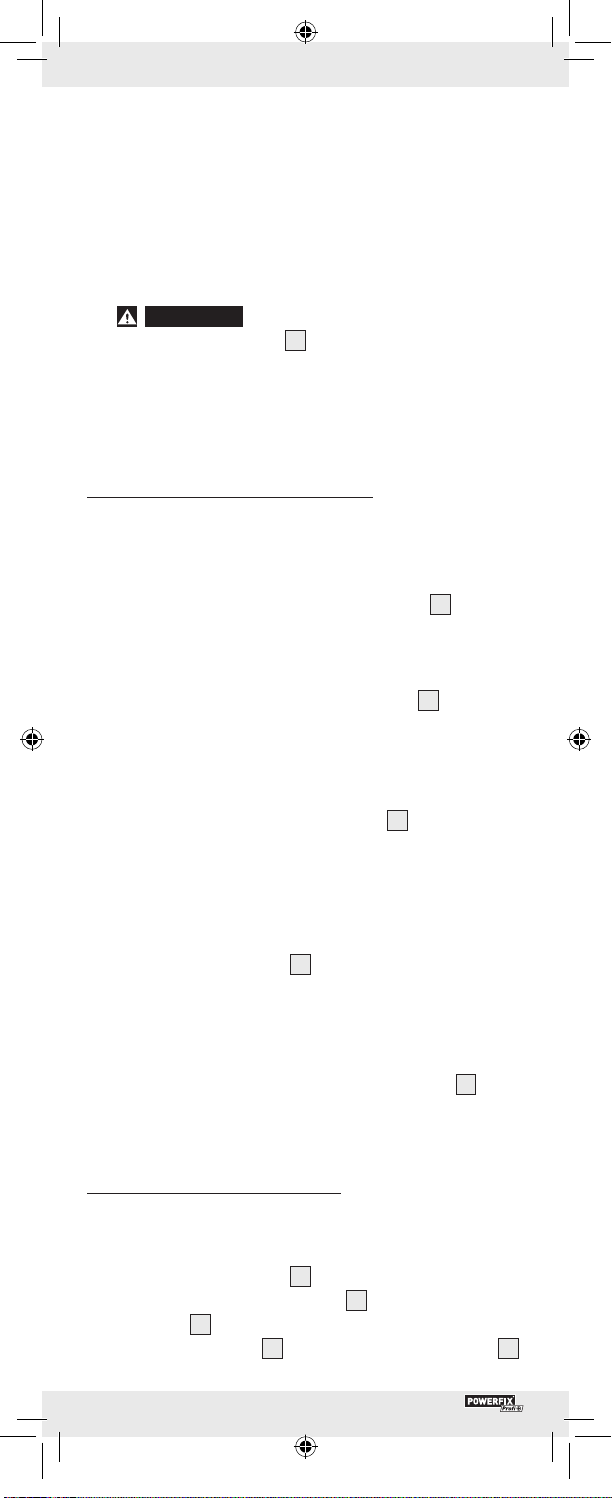
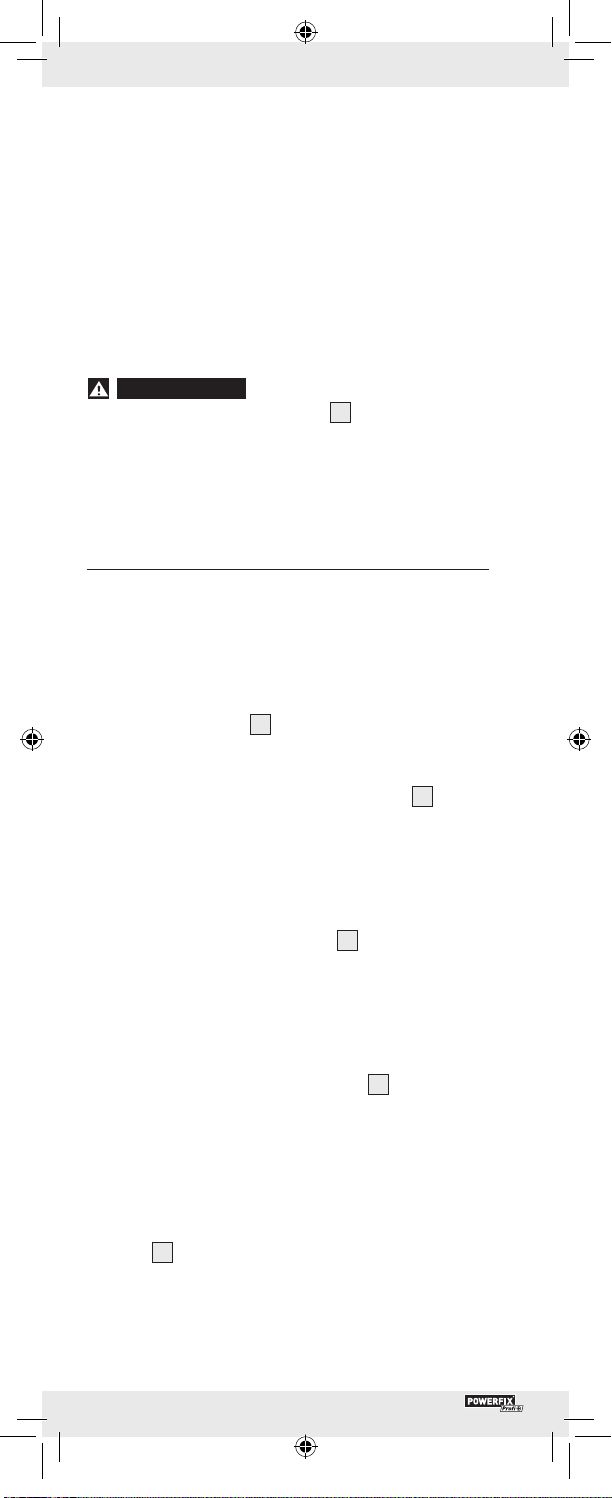
Description of parts
1
measuring surfaces
2
internal measuring jaws
3
Inch / mm key
4
locking screw
5
LCD display
6
depth-measuring blade
7
handwheel for measuring jaws
8
battery compartment lid
9
key for zero setting (ZERO)
10
ON / OFF key (ON / OFF)
11
external measuring jaws
Q
Technical data
Measurement unit: mm
Measuring range: 0 -150 mm / 0-6”
Resolution: 0.01 mm / 0.0005”
Accuracy: 0-100 mm ± 0.02 mm / 0.001”
100-150 mm ± 0.03 mm /
0.001”
Maximum measuring speed: 1.5 m/s, 60”/s
Measuring system: Liner capacitive measuring system
Display: LCD display
Operating temperature: +5 °C - +40 °C
Influence of humidity: within a range from 0 % to 80 %
relative humidity irrelevant
Battery: 3 V
CR2032 (included)
GB 7
Safety instructions
BEFORE USING THIS DEVICE, PLEASE READ THE DIREC-
TIONS FOR USE! PLEASE KEEP THE DIRECTIONS FOR USE
IN A SAFE PLACE!
CAUTION! RISK OF INJURY!
J KEEP THE PRODUCT OUT OF THE REACH
OF CHILDREN. THIS PRODUCT IS NOT A
TOY! This product should never be used by
children unsupervised.
DANGER TO LIFE AND RISK OF ACCIDENT FOR
TODDLERS AND CHILDREN! Never leave children
alone and unsupervised with the packaging material.
J There is a risk of suffocation from the packaging material.
Children often underestimate risks. Always keep children
away from the product.
DANGER TO LIFE! Batteries could be swallowed and
pose a lethal hazard. Consult a doctor immediately if any-
one swallows a battery.
J This device is not intended to be used by people (including
children) with limited physical, sensory or mental abilities or
by people with a lack of experience and / or knowledge
unless they are supervised by a person responsible for their
safety or have received instruction as to how to use the
product from such a person.
J Never expose the product to high temperatures, water or
moisture as this may damage the product.
J Do not put the caliper under any strain. This may damage
the chip in the caliper.
J Keep the caliper clean and dry. Fluids could damage the
caliper.
Safety instructions for batteries
J CAUTION! RISK OF EXPLOSION!
Never recharge the batteries!
J Batteries must not be short-circuited. This could result in
over-heating and risk of fire or explosion.
J Remove a depleted battery from the product immediately;
otherwise there is an increased risk of leakage!
J Keep batteries out of the reach of children; do not throw
them into fire; do not short-circuit them; and do not take
them apart.
J Ensure polarity is correct (+ and -).
J Only use the recommended battery.
J If these instructions are not complied with, the battery may
be discharged beyond its cut-off voltage. There is then a risk
of leakage. If the battery has leaked into your device,
please remove it immediately in order to prevent any dam-
age to the product!
GB8
J Wear protective gloves! If they come into contact
with skin, leaked or damaged batteries could cause chemi-
cal burns; you should therefore wear suitable protective
gloves at all times if such an event occurs.
J Avoid contact with skin, eyes, and mucous membranes. If
you come into contact with battery acid, rinse the affected
spot with plenty of water and / or consult a doctor immedi-
ately!
J
WARNING!
Switch the product OFF before inserting
the battery (LCD display
5
is off.)
J Remove the battery from the device if it is not in use for a
long period of time.
J Do not, on any account, short-circuit the terminals.
Q
Before start of operation
Q
Insert / replace battery
Tip: Flashing numbers indicate a discharged / flat battery.
Tip: When changing the battery, the LCD display
5
may
experience faults. Remove the battery and insert it again after
waiting more then 30 seconds.
j
Push open the lid to the battery compartment
8
(see Fig. B).
j
Remove the old battery.
j
Insert the new battery into the battery compartment and
ensure correct polarity (+ and -). Make sure that the plus
terminal points outwards.
j
Push the lid to the battery compartment
8
shut again
(see Fig. B).
Q
Preparing the caliper
j
Loosen the locking screw
4
so that you can move the
caliper.
j
Clean all measuring surfaces and the caliper rod. Otherwise,
faulty measuring results may occur due to, for example,
humidity.
j
Check that all keys, switches and the LCD display
5
work
correctly.
Q
Starting up the device
Q
Using the caliper
j
Loosen the locking screw
4
by turning it anti-clockwise.
j
Push the external measuring jaws
11
and the internal meas-
uring jaws
2
together.
j
Switch the LCD display
5
on by pressing the ON / OFF key
10
.
GB 9
j
Press the inch / mm key
3
to set the unit of measurement
(inch or mm) you wish to use. Either “mm” or “inch” will
appear to the right of the figures in the LCD display
5
.
j
Press the key to obtain the zero setting (ZERO)
9
in order
to reset the LCD display
5
to zero.
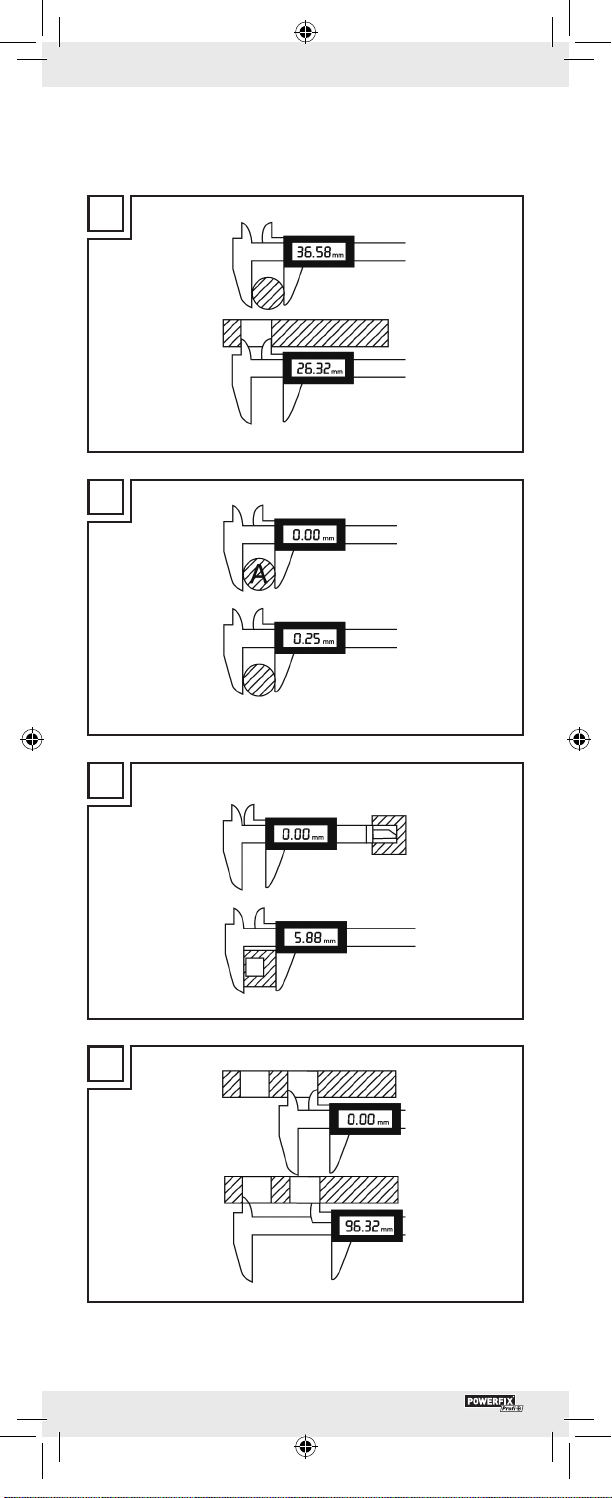
Measuring an object from the outside:
j
Move the external measuring jaws
11
apart by turning the
handwheel
7
outwards anti-clockwise.
Place the external measuring jaws
11
against the object to
be measured.
j
Turn the handwheel
7
inwards clockwise.
Move the external measuring jaws
11
together until they
touch both sides of the object you want to measure. Please
ensure that you do not damage the object you want to
measure by subjecting it to too much pressure.
Measuring an object from the inside:
j
Place the internal measuring jaws
2
against the object
you want to measure.
j
Turn the handwheel
7
outwards anti-clockwise. Move the
internal measuring jaws
2
apart until they touch the object
on both its inner sides. Please ensure that you do not dam-
age the object you want to measure by subjecting it to too
much pressure.
Measuring the depth of an object:
j
Move the depth-measuring blade
6
out of the caliper.
j
Put the depth-measuring blade
6
in position until it touches
the surface (e.g. inside a hole).
j
Slide the body of the caliper downward until you feel
resistance.
j
Ensure that you do not damage the depth-measuring blade
6
or the object you want to measure by exerting too much
pressure on them.
j
The LCD display
5
now displays the dimensions.
j
After carrying out the measurement, move the external
measuring jaws
11
/ internal measuring jaws
2
together
again by turning the handwheel
7
inwards clockwise.
j
Switch the LCD display
5
off again by pressing the
ON / OFF key
10
.
Tip: The LCD display
5
automatically switches itself off
after approx. 3 minutes.
j
Tighten the locking screw
4
again by turning it clockwise
until you feel some resistance.
Q
Examples of use
Tip: When measuring, always proceed as described in the
chapter on using the caliper.
GB10
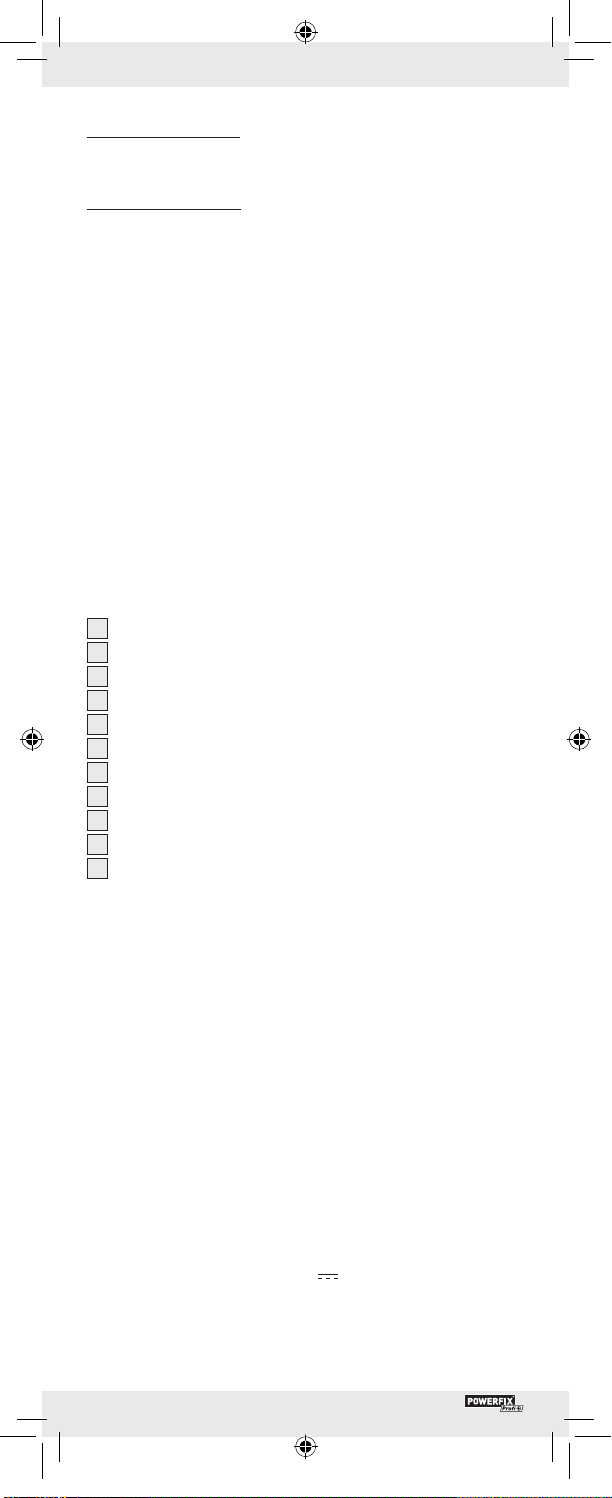
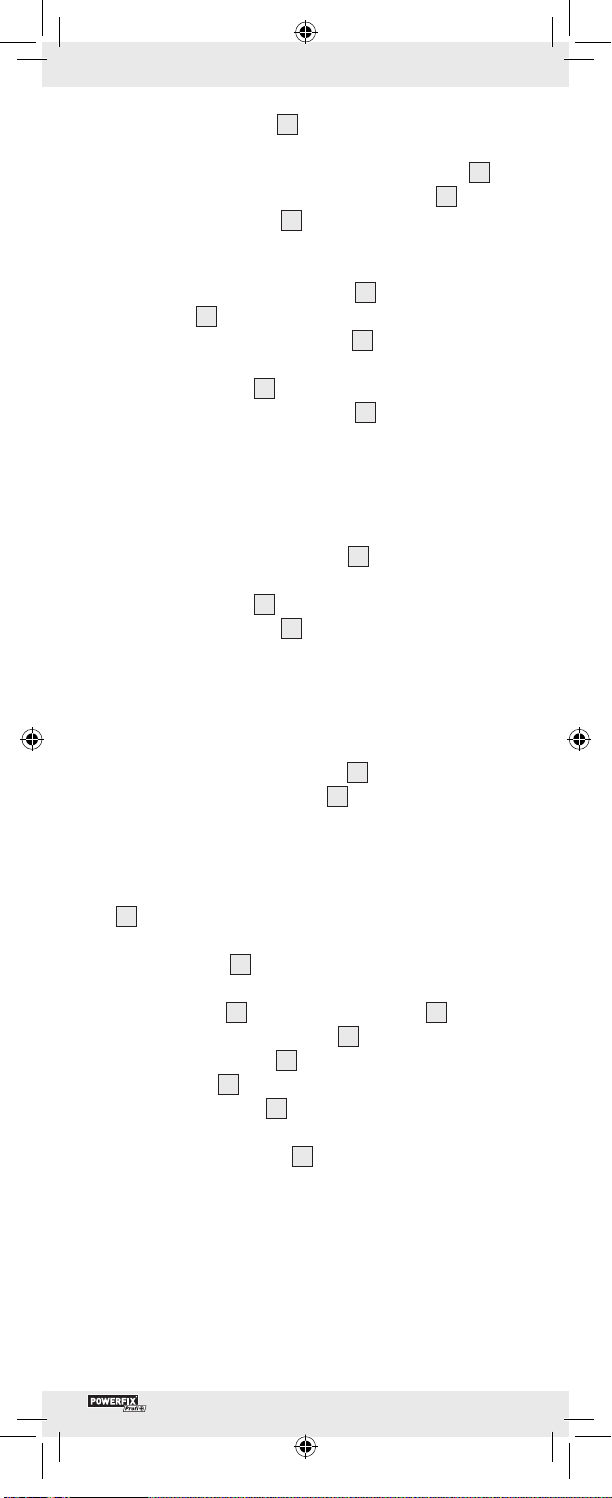
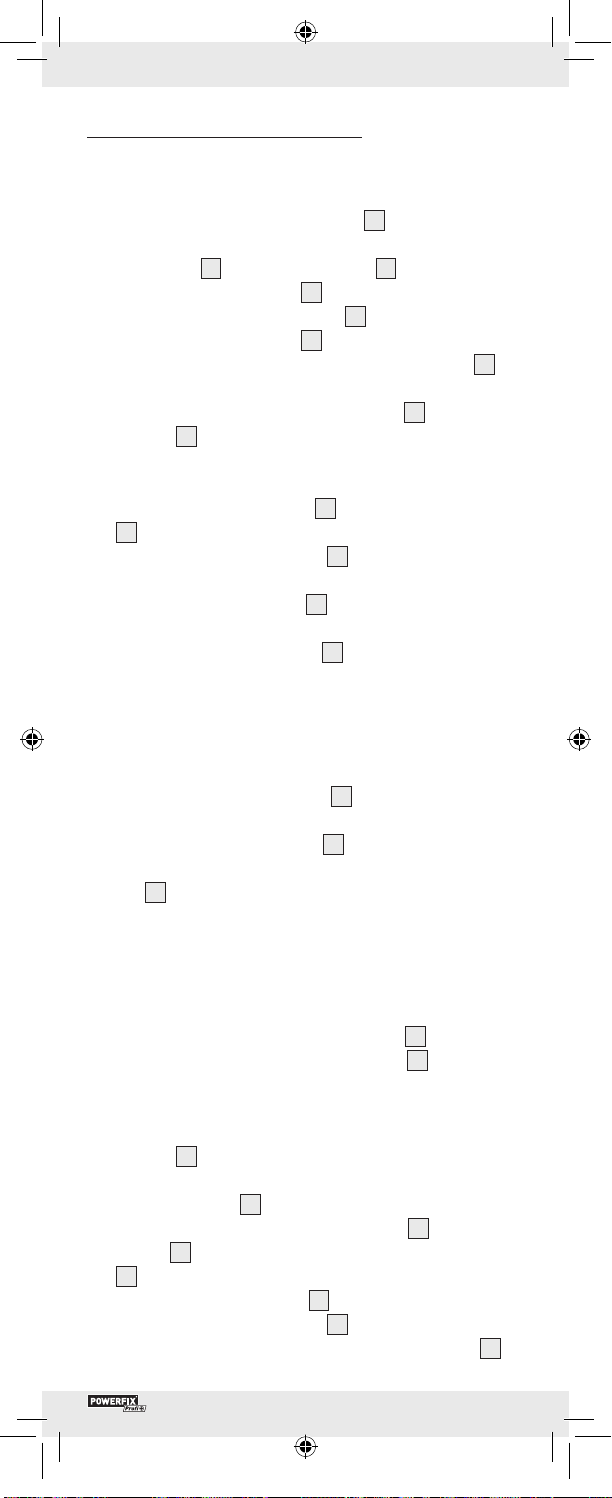
Comparison of plug and socket (see fig. C):
j
First measure the dimensions of the plug.
j
You may wish to make a note of the measurement.
j
Then measure the socket.
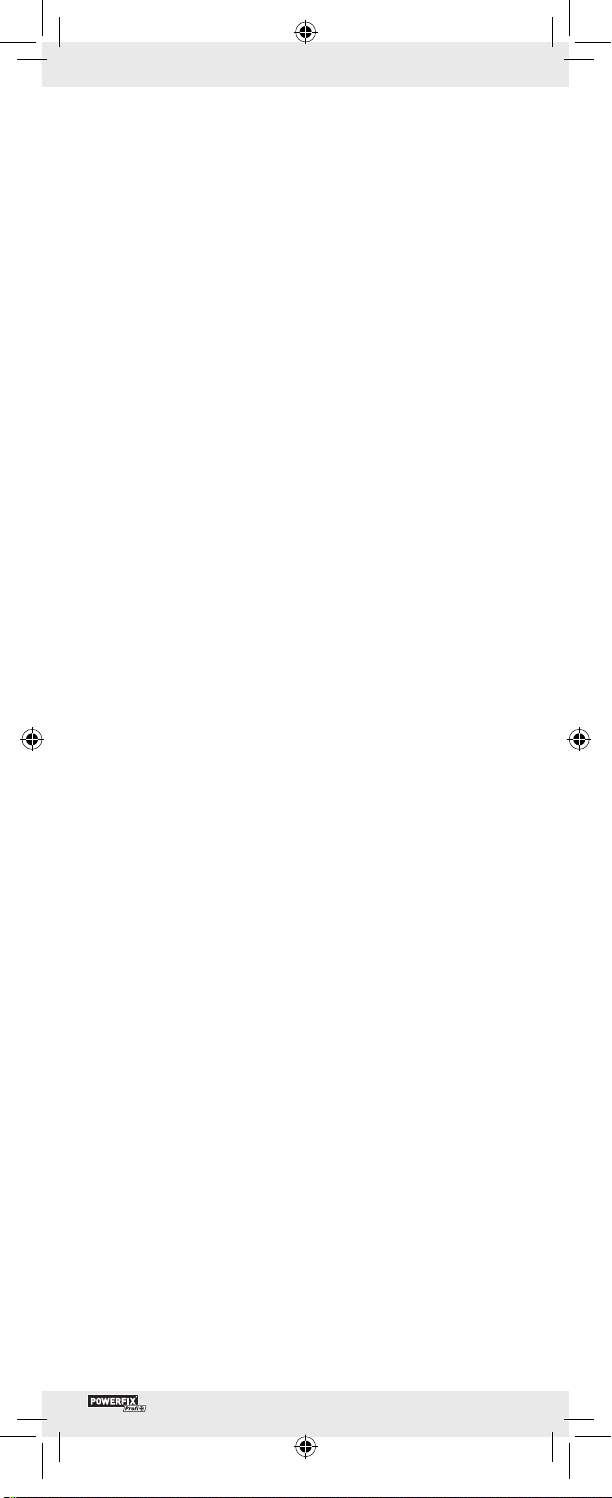
Deviation from a reference value (see fig. D):
j
Measure a reference object (in this case A).
j
Leave the measuring jaws
2
/
11
in this position
and press the key to obtain the zero setting (ZERO)
9
.
j
Then measure the second object.
The LCD display
5
now shows the deviation of the measure-
ment of the second object to that of the reference object (A).
Measuring the thickness of the floor of an object
(see fig. E):
j
First measure the depth of the object.
j
Leave the depth blade
6
in this position and press the key
to obtain the zero position (ZERO)
9
.
j
Now measure the entire object.
The LCD display
5
now shows the thickness of the floor of
the object.
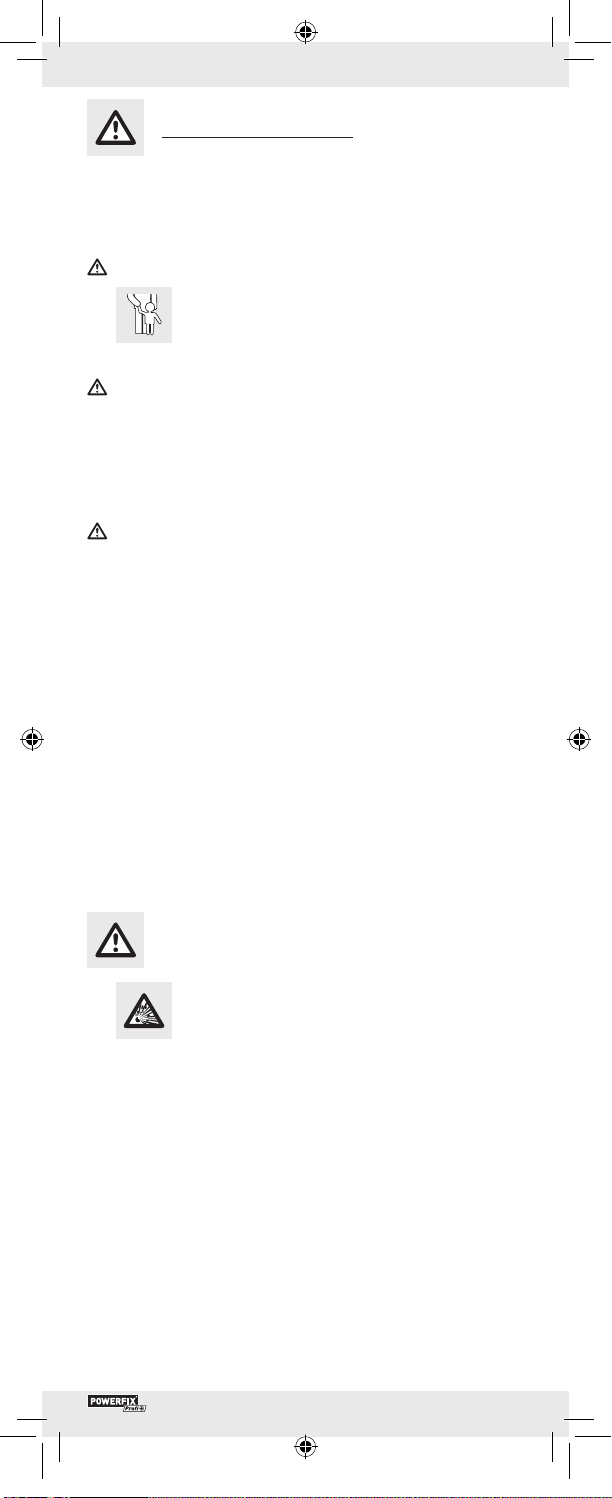
Measuring the distance between two identical
holes (see fig. F):
j
First measure one of the two, equally sized holes.
j
Leave the measuring jaws
2
/
11
in this position and press
the key to obtain the zero position (ZERO)
9
.
j
Now measure the total dimension.
The LCD display
5
now shows the average distance.
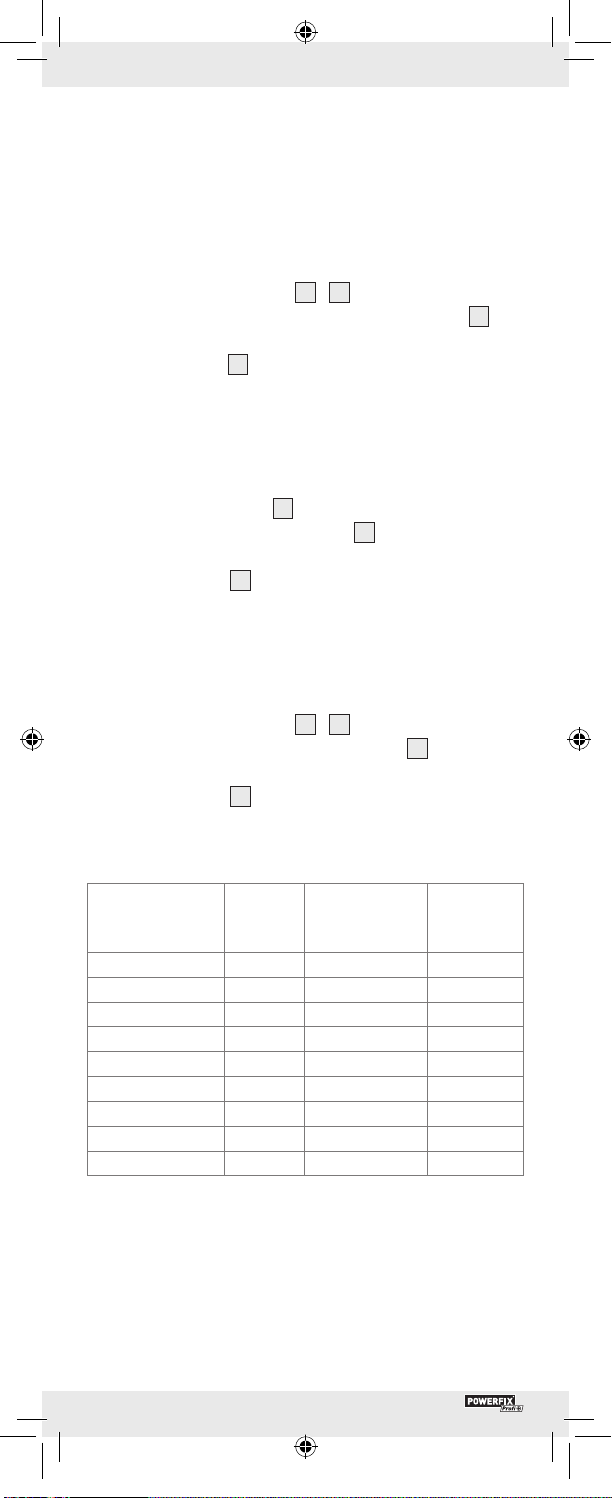
Characteristics of metric ISO screw threads:
Nominal diameter:
[mm]
Increase:
[mm
-1
]
Core diameter:
[mm]
Drill
diameter:
[mm]
3 0.5 2.46 2.5
4 0.7 3.24 3.3
5 0.8 4.13 4.2
6 1 4.92 5
8 1.25 6.65 6.8
10 1.5 8.38 8.5
12 1.75 10.11 10.2
16 2 13.84 14
20 2.5 17.29 17.5
Q
Troubleshooting
The device contains sensitive electronic components. That is why
it experiences interference when in close proximity to radio trans-
mission devices. These include, for example, mobile phones, two-
way radios, CB radios, radio controls or other remote controls
GB 11
and microwave devices. If any indication errors appear in the
display, remove such devices out of the proximity of the caliper.
Electrostatic discharge could result in malfunctions.
j
When such malfunctions occur, remove the battery for a
short while and re-insert.
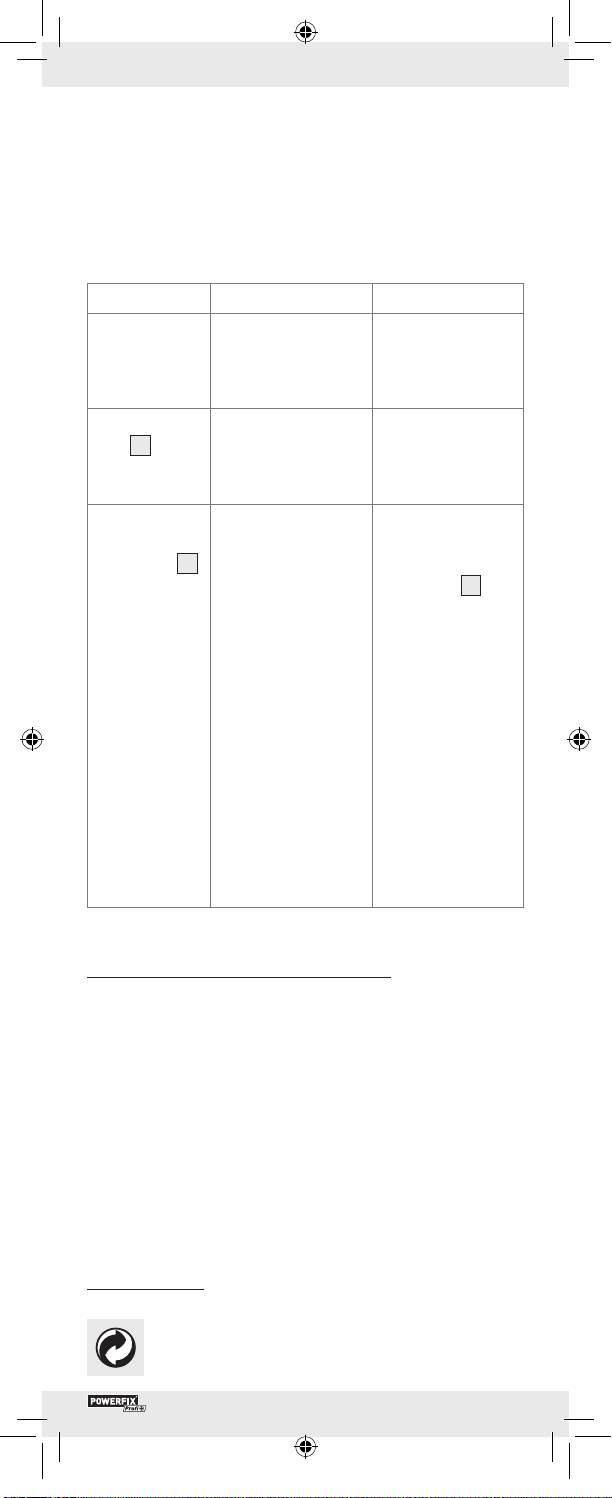
Failure Cause Solution
Five digits flash
simultaneously
every second.
The battery voltage is
lower than 2.75 V.
Replace the battery
in line with the chap-
ter on “Inserting /
replacing battery”.
The LCD dis-
play
5
does
not continue to
count.
Faulty wiring or
circuit
Remove battery
and re-insert after
30 seconds.
Nothing is dis-
played on the
LCD display
5
.
1. LCD display is
switched off.
2. Battery is the wrong
way round or the
battery contact is
poor.
3. The battery voltage
is lower than 2.4 V.
1. Switch the LCD
display on by
pressing the ON /
OFF key
10
.
2. Remove the bat-
tery and insert /
replace it in line
with the terminals
and the chapter
“Inserting / replac-
ing the battery”
so that it touches
all contacts.
3. Replace the bat-
tery in line with
the chapter “In-
serting / replac-
ing the battery”.
Q
Cleaning and maintenance
j
Clean the caliper before and after using it.
j
Do not immerse the caliper into water. Liquids can damage
the caliper.
j
Use a dry cloth to clean the casing; never use petrol,
solvents or cleaning agents
j
Always switch the LCD display off when not using the caliper.
This will extend the life of the battery.
j
Keep away from electrical current and electrically charged
pens to prevent damage to the chip.
Q
Disposal
The packaging is made entirely of recyclable
materials, which you may dispose of at local
recycling facilities.
GB12
Contact your local refuse disposal authority for more details of
how to dispose of your worn-out product.
To help protect the environment, please dispose of the
product properly when it has reached the end of its
useful life and not in the household waste. Information
on collection points and their opening hours can be
obtained from your local authority.
Faulty or used batteries must be recycled in accordance with
Directive 2006 / 66 / EC. Please return the batteries and / or
the device to the available collection points.
Environmental damage through incorrect
disposal of the batteries!
Batteries may not be disposed of with the usual domestic waste.
They may contain toxic heavy metals and are subject to hazard-
ous waste treatment rules and regulations. The chemical symbols
for heavy metals are as follows: Cd = cadmium, Hg= mercury,
Pb = lead. That is why you should dispose of used batteries at a
local collection point.

PL 13
Wstęp
Przeznaczenie produktu .........................................Strona 14
Zawartość kompletu ................................................ Strona 14
Opis części ...............................................................Strona 14
Dane techniczne ...................................................... Strona 14
Wskazówki dot. bezpieczeństwa
Wskazówki dot. bezpieczeństwa
związanego z użyciem baterii ............................... Strona 15
Przed pierwszym użyciem produktu
Wkłada nie / wymiana ba terii.................................Strona 16
Przygotowanie suwmiarki ....................................... Strona 16
Uruchomienie produktu
Użycie suwmiarki .....................................................Strona 17
Przykłady zastosowania ......................................... Strona 18
Usuwanie błędów ....................................................Strona 19
Pielęgnacja i czyszczenie ....................... Strona 19
Usuwanie .............................................................Strona 20

PL14
Miarka cyfrowa
Q
Wstęp
Q
Przeznaczenie produktu
Tylko do użytku prywatnego.
Produkt nie jest przeznaczony do użytku komercyjnego.
Q
Zawartość kompletu
1 x cyfrowa suwmiarka
1 x bateria
1 x pudełko do przechowywania
1 x instrukcja obsługi
Q
Opis części
1
Powierzchnie pomiarowe
2
Wewnętrzne szczęki pomiarowe
3
Przycisk cal / mm
4
Śruba zabezpieczająca
5
Wyświetlacz LCD
6
Łopatka pomiaru głębokości
7
Kółko do ustawiania szczęk pomiarowych
8
Przykrywka schowka na baterie
9
Przycisk wyzerowania (ZERO)
10
WŁĄCZNIK / WYŁĄCZNIK (ON / OFF)
11
Zewnętrzne szczęki pomiarowe
Q
Dane techniczne
Jednostka miary wielkości: mm
Przedział pomiarowy: 0 - 150 mm / 0-6”
Podziałka: 0,01 mm / 0,0005”
Dokład ność pom iarów: 0 - 100 mm ± 0,02 mm / 0,001”
100 - 150 mm ± 0,03 mm /
0,001”
Maksymalna
prędkość pomiaru: 1,5 m / s, 60”/s
System pomiaru: linearny, bezkontaktowy
System CAP
Rodzaj wyświetlacza: Wyświetlacz LCD
Temperatura pracy urządzenia: +5 °C - +40 °C
Wpływ wilgotności powietrza: w obrębie od 0 % do 80 %
relatywna wilgotność powie-
trza mało znacząca
Bateria: 3 V
CR2032 (dołączona)
PL 15
Wskazówki dot. bezpieczeństwa
PRZED UŻYCIEM PRZECZYTAĆ INSTRUKCJĘ OBSŁUGI!
PROSIMY O ZACHOWANIE INSTRUKCJI OBSŁUGI!
UWAGA! NIEBEZPIECZEŃSTWO ZRANIENIA SIĘ!
J PRODUKTU NIE UDOSTĘPNIAĆ DZIE-
CIOM BEZ NADZORU. PRODUKT NIE JEST
ZABAWKĄ! Produkt nie może być używany
przez dzieci bez nadzoru dorosłych.
NIEBEZPIECZEŃSTWO ZRANIENIA SIĘ I ZAGRO-
ŻENIE ŻYCIA DLA MAŁYCH DZIECI! Nie zostawiać
dzieci bez nadzoru z materiałem pakunkowym.
J Niebezpieczeństwo uduszenia się materiałem pakunkowym.
Dzieci często nie zdają sobie sprawy z niebezpieczeństwa
sytuacji. Produkt przechowywać z dala od dzieci.
ZAGROŻENIE ŻYCIA! Ewentualne połknięcie baterii
może zagrażać życiu! W przypadku połknięcia baterii
natychmiast skontaktować się z lekarzem.
J Urządzenie nie jest przeznaczone dla osób - w tym dzieci -
o ograniczonej sprawności fizycznej, sensorycznej lub umy-
słowej, ani też osób nieposiadających wystarczającego
doświadczenia i / lub wiedzy, chyba że są one nadzorowane
przez osobę odpowiadającą za ich bezpieczeństwo lub
zostaną pouczone na temat obsługi urządzenia.
J Produkt nie powinien być poddawany działaniu wysokich
temperatur, ani też działaniu wilgoci, gdyż mogą one go
uszkodzić.
J Unikać zwierania suwmiarki ze źródłami napięcia elek-
trycznego. Mogłoby to uszkodzić chip suwmiarki.
J Suwmiarkę przechowywać w suchym i czystym stanie.
Kontakt z substancjami ciekłymi może spowodować jej
uszkodzenie.
Wskazówki dot. bezpieczeństwa
związanego z użyciem baterii
J UWAGA! NIEBEZPIECZEŃSTWO
WYBUCHU! Baterii nie ładować!
J Nie należy dopuścić do zwarcia biegunów baterii. Zwarcie
biegunów baterii może doprowadzić do jej przegrzania,
powstania niebezpieczeństwa wywołania pożaru lub pęk-
nięcia baterii.
J Ze względu na zagrożenie wydobycia się cieczy z baterii
rozładowane baterie należy niezwłocznie wyjąć z produktu.
J Baterie przechowywać z dala od dzieci; baterii nie wrzucać
do ognia, nie doprowadzać do ich spięcia i nie rozmonto-
wywać ich.
J Należy uwzględnić biegunowość baterii (“+” i “-”).
J Używać wyłącznie podanego typu baterii.
PL16
J Nieprzestrzeganie powyższych wskazówek może dopro-
wadzić do rozładowania baterii. Może to doprowadzić do
wylania się cieczy z baterii. W przypadku wycieku cieczy
z baterii znajdującej się w produkcie, baterię należy natych-
miast wyjąć, by w ten sposób uniknąć uszkodzenia produktu.
J Używać rękawic ochronnych! Rozlane lub uszko-
dzone baterie mogą zranić skórę; w przypadku kontaktu z
takimi bateriami należy używać rękawic ochronnych.
J Unikać kontaktu ze skórą, oczyma i błonami śluzowymi.
W przypadku kontaktu z elektrolitem poszkodowane miejsce
spłukać dużą ilością wody i / lub skontaktować się z lekarzem!
OSTRZEŻENIE!
Przed włożeniem baterii produkt
WYŁĄCZYĆ (wyświetlacz LCD
5
jest wyłączony).
J W przypadku dłuższego nieużytkowania produktu baterie
wyjąć.
J W żadnym wypadku nie zwierać biegunów.
Q
Przed pierwszym użyciem produktu
Q
Wkładanie / wymiana baterii
Wskazówka: Mrugające cyfry wskazują na rozładowane /
puste baterie.
Wskazówka: Podczas wymiany baterii może dojść do
zakłóceń wyświetlacza
5
LCD. Baterię wyjąć i włożyć ją
ponownie po ponad 30 sekundach.
j
Przykrywkę schowka na baterie przesunąć
8
(patrz
ilustracja B).
j
Zużytą baterię wyjąć.
j
Do schowka na baterie włożyć nową baterię zwracając
uwagę na jej biegunowość („+“ i „-“). Zwrócić uwagę na
to, by biegun dodatni wskazywał na zewnątrz.
j
Przykrywkę schowka na baterie
8
zamknąć
(patrz ilustracja B).
Q
Przygotowanie suwmiarki
j
Śrubę zabezpieczającą poluzować,
4
co umożliwi
poruszanie suwmiarką.
j
Wszystkie powierzchnie pomiarowe oraz listwę suwmiarki
oczyścić suchą szmatką bawełnianą. Niewykonanie tego
kroku może na przykład - wskutek wpływu wilgotności po-
wietrza - doprowadzić do błędnych wyników pomiaru.
j
Sprawdzić wszystkie przyciski, przełączniki i wyświetlacz
LCD,
5
czy reagują bez zarzutu.
PL 17
Q
Uruchomienie produktu
Q
Użycie suwmiarki
j
Śrubę zabezpieczającą poluzować
4
poprzez przekręce-
nie jej w stronę odwrotną do ruchu wskazówek zegara.
j
Zewnętrzne
11
/ wewnętrzne szczęki
2
razem przesunąć.
j
Włączyć wyświetlacz LCD
5
poprzez przyciśnięcie przy-
cisku WŁACZNIK / WYŁĄCZNIK
10
.
j Wcisnąć przycisk cal / mm
3
, aby ustawić pożądaną
jednostkę miary (cal lub mm). Na wyświetlaczu LED
5
pojawi się komunikat „mm“ lub „inch“.
j
Przycisnąć przycisk wyzerowania (ZERO)
9
w celu wyze-
rowania
5
wyświetlacza LCD.
Pomiar wymiarów zewnętrznych:
j
Rozsunąć szczęki zewnętrzne
11
kręcąc kółkiem na zewnątrz
7
w kierunku przeciwnym do ruchu wskazówek zegara.
Szczęki zewnętrzne przyłożyć
11
do przedmiotu, który ma
zostać zmierzony.
j
Kółko przekręcić do środka
7
zgodnie z ruchem wskazó-
wek zegara.
Szczęki zewnętrzne rozsunąć
11
tak daleko od siebie, że
każda ze szczęk dotknie mierzonego przedmiotu ze swojej
strony. Uważać na to, aby nie uszkodzić mierzonego
przedmiotu wywierając zbyt duży nacisk.
Pomiar wymiarów wewnętrznych:
j
Szczęki wewnętrzne przyłożyć
2
do mierzonego przed-
miotu od środka.
j
Kółko przekręcić na zewnątrz
7
w kierunku przeciwnym
do ruchu wskazówek zegara. Szczęki wewnętrzne rozsu-
nąć
2
tak daleko od siebie, by obydwie szczęki dotknęły
wewnętrznych stron mierzonego przedmiotu. Uważać na
to, aby nie uszkodzić mierzonego przedmiotu wywierając
zbyt duży nacisk.
Pomiar głębokości:
j
Z suwmiarki wysunąć łopatkę do pomiaru
6
głębokości.
j
Łopatkę do pomiaru głębokości przyłożyć
6
do po-
wierzchni mierzonegoprzedmiotu (np. wewnątrz otworu).
j
Przesuwać suwmiarkę aż do napotkania oporu.
j
Uważać na to, aby nie uszkodzić łopatki do pomiaru głę-
bokości,
6
ani też mierzonego przedmiotu wskutek zbyt
dużego nacisku.
j
Wyświetlacz LCD
5
pokaże wymiar.
j
Po przeprowadzeniu pomiarów zewnętrzne
11
/ wewnętrzne
szczęki
2
zsunąć poprzez pokręcenie kółkiem do środka
7
w kierunku zgodnym z ruchem wskazówek zegara.
j
Wyświetlacz LCD wyłączyć
5
poprzez przyciśnięcie
WŁĄCZNIKA /WYŁĄCZNIKA
10
.
Wskazówka: Po upływie ok. 3 minut wyświetlacz
5
wyłącza się automatycznie.
 Loading...