


MOTION SENSOR
MOTION SENSOR |
CZUJNIK RUCHU |
Operation and Safety Notes |
Wskazówki dotyczące obsługi i bezpieczeństwa |
MOZGÁSÉRZÉKELŐ |
JAVLJALNIK GIBANJA |
Kezelési és biztonsági utalások |
Navodila za upravljanje in varnostna opozorila |
HLÁSIČ POHYBU |
HLÁSIČ POHYBU |
Pokyny pro obsluhu a bezpečnostní pokyny |
Pokyny pre obsluhu a bezpečnostné pokyny |
BEWEGUNGSMELDER |
|
Bedienungs - und Sicherheitshinweise |
|
IAN 102673
GB |
Operation and Safety Notes |
Page |
7 |
|
|
|
|
PL |
Wskazówki dotyczące obsługi i bezpieczeństwa |
Strona |
17 |
|
|
|
|
HU |
Kezelési és biztonsági utalások |
Oldal |
27 |
|
|
|
|
SI |
Navodila za upravljanje in varnostna opozorila |
Stran |
37 |
|
|
|
|
CZ |
Pokyny pro obsluhu a bezpečnostní pokyny |
Strana |
48 |
|
|
|
|
SK |
Pokyny pre obsluhu a bezpečnostné pokyny |
Strana |
58 |
|
|
|
|
DE / AT / CH |
Bedienungsund Sicherheitshinweise |
Seite |
68 |
|
|
|
|
A |
Z31712A/B |
|
1 |
||
|
||
|
1 |
|
|
Z31712C/D |
|
|
3 |

B |
|
|
Z31712A/B |
|
|
|
|
|
|
|
2 |
5 |
4 |
3 |
|
|
|
|
Z31712C/D |
|
|
3 |
|
2 |
|
|
|
|
|
4 |
5 |
4 |
|
|
|

C |
L |
|
|
N |
|
|
|
|
10 |
|
3 |
|
Z31712A/B |
L |
11 |
|
|
|
|
|
PIR |
N |
|
|
9 |
|
|
|
|
|
|
|
|
A |
|
|
L |
|
|
|
N |
|
|
|
10 |
|
3 |
|
Z31712C/D |
A |
11 |
|
|
||
|
9 |
N |
|
|
|
|
|
|
PIR |
L |
|
|
|
|
|
|
|
|
5 |
D |
Z31712A/B |
|
|
6 |
7 |
|
Z31712C/D |
|
6 |
8 |
7 |
6

Intended use......................................................................... |
Page |
8 |
Technical Data..................................................................... |
Page |
8 |
Scope of delivery............................................................. |
Page |
9 |
Parts description............................................................... |
Page |
9 |
Safety.......................................................................................... |
Page |
10 |
Mounting |
|
|
Select a suitable place for installation....................................... |
Page |
12 |
Installation.................................................................................... |
Page |
12 |
Start-up |
|
|
Setting the sensitivity of the sensor............................................. |
Page |
13 |
Setting the lighting duration of the device................................. |
Page |
14 |
Setting the day light level............................................................ |
Page |
14 |
Cleaning and Care.......................................................... |
Page |
15 |
Disposal..................................................................................... |
Page |
15 |
Warranty................................................................................. |
Page |
16 |
|
GB |
7 |

Motion Sensor
 Intended use
The motion detector is intended for the automatic control of light sources. The product is not intended for commercial use.
 Technical Data
Rated voltage: |
220–240 V 50 Hz |
Nominal load: |
max. 1200 watt (for LED bulb / halo- |
|
gen bulb) max. 300 watt (for energy |
|
saving bulb) |
Delay time min.: |
10 s - +/- 3 s |
Delay time max.: |
7 min +/- 2 min |
Surrounding light: |
3–2000 Lux (can be set) |
Range: |
max. 12 m |
Coverage area: |
max. 160 ° |
Operating temperature: |
-15–40 °C |
Operating humidity: |
< 93 % rF |
Recommended installation height: 1.8–2.5 m
Model no: Z31712A/C (black)/Z31712B/D (white)
8 GB

 Scope of delivery
1 motion sensor
2 screws
2 dowels
1 instruction manual
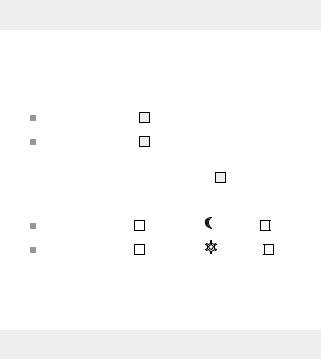
 Parts description
1Sensor
2Screw
3Block terminal
4Base plate
5Dowel (ø approx. 6 mm)
6Control dial TIME
7Control dial LUX
9 Internal wiring of the article (do not modify)
10Clamp room of the article
11Lamp (not included)
only Z31712C/D
8 Control dial SENS
GB 9

 Safety
YOU SHOULD STORE ALL SAFETY INFORMATION AND INSTRUCTIONS IN A SAFE PLACE IN CASE YOU NEED TO REFER TO THEM AGAIN IN THE FUTURE!
When passing this product on to others please be sure to also include all of its documentation.
Avoid the danger of death from electric shock!
Before installation, check the motion detector, as well as connection cords to ensure that these are intact. A defective product and defective cords increase the risk of electrical shock. A defective product and defective cords increase the risk of electrical shock.

 DANGER TO LIFE BY ELECTRIC SHOCK! Before installation or performing any work on outdoor lamp with LED/halo- gen/energy-saving bulb, switch off the electrical circuit at the circuit breaker box or remove the fuse from the fuse box.
10 GB
How to avoid personal injury and damage to the product!

 RISK OF FATAL INJURY AND
ACCIDENT HAZARD FOR TODDLERS AND SMALL CHILDREN! Never leave children unattended with the
packaging material or the product. Please keep children away from the device at all times.
This appliance can be used by children aged from 8 years and above and persons with reduced physical, sensory or mental capabilities or lack of experience and knowledge if they have been given supervision or instruction concerning use of the appliance in a safe way and understand the hazards involved. Children shall not play with the appliance. Cleaning and user maintenance shall not be made by children without supervision.
Before use, ensure that the mains voltage available is the same as the required operating voltage for the device (220–240 V ).
Avoid extreme temperature fluctuations. Install the product only if the ambient temperatures are acceptable.
Installation shall only be performed by an electrician who is familiar with the regulations and risks.
The fuse in the product is not replaceable.
GB 11
 Mounting
 Select a suitable place for installation
Ensure that
–the motion detector will not be functionally inhibited at the desired place of installation due to obstacles or constantly moving objects.
–the motion detector is not installed where there are strong temperature fluctuations, e.g. due to heating devices or air conditioners.
 Installation

 DANGER TO LIFE BY ELECTRIC SHOCK! Before installation, switch off the electrical circuit at the circuit breaker box or remove the fuse from the fuse box.
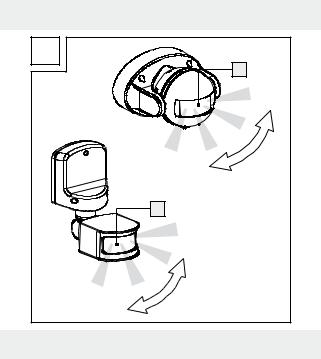
Note: The recommended installation height is between 1.8 and 2.5 m. Note: Before installation, ensure an optimal direction of motion. The motion detector reacts more sensitively to movement from the side than to motion from the front (see Ill. A). Therefore, we recommend installing the motion detector 1 to the side of the direction of movement.
Note: To attach the base plate 4 it is necessary to drill two holes. 
 Ensure that you do not damage any electricity cable!
12 GB
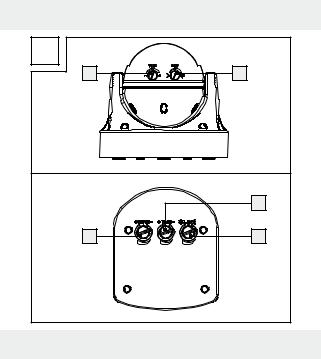
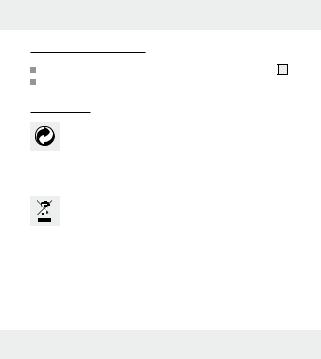
Remove the screws 2 from the front of the motion detector (see Ill. B). Insert the cable through the cable opening of the base plate 4 . Screw the base plate 4 to the desired position.
Connect the cable to the screw terminal 3 of the motion detector as depicted in Ill. C.
Attach the cover of the connection area back to the base plate 4 by screwing the screws 2 .
 Start-up
Turn the electricity back on. The device is now ready for use.
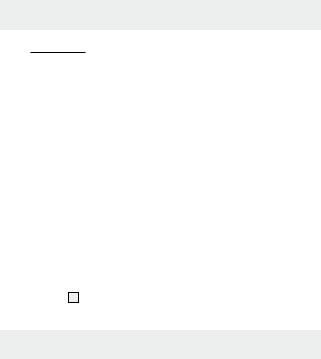
 Setting the sensitivity of the sensor (Ill. D)
Only models Z31712C/D
Note: the sensor range is max. 12 m (depending on the surrounding
temperature). |
|
|
||
Turn the control knob SENS |
|
in the direction „-” in order to reduce |
||
8 |
||||
the sensor range |
|
. |
|
|
1 |
|
|
||
Turn the control knob SENS |
|
in the direction „+” in order to |
||
8 |
||||
increase the sensor range 1 .
GB 13
 Setting the lighting duration of the device (Ill. D)
Note: the lighting duration of the device can be set from min. 10 seconds to max 7 minutes
Turn the control knob TIME 6 in the direction „-” in order to decrease the lighting duration of the device.
Turn the control knob TIME 6 in the direction „+“ in order to increase the lighting duration of the device.
Note: The lighting duration is always calculated based on the respective last movement recorded by the sensor 1 .
 Setting the day light level (Ill. D)
Turn the control knob LUX |
7 |
in the direction „ |
“. The sensor |
1 |
|
is in |
|
the night operation mode. |
|
|
|
|
|
|
|
Turn the control knob LUX |
|
in the direction „ |
“. The sensor |
|
|
is in |
|
7 |
|
1 |
|||||
the night and day operation mode.
Note: the intermediate range is for various light values.
14 GB
 Cleaning and Care
Never use cleaners or a rough cloth. These may damage the sensor 1 . Clean the product with a dry, lint-free cloth.
 Disposal
The packaging is made of environmentally friendly materials that can be disposed at your local recycling facilities.
Contact your local refuse disposal authority for more details on how to dispose of your worn-out product.
When your device has come to the end of its life, please do not throw it out with your household refuse, but in the interest of the environment, take it to a suitable centre where it can be disposed of properly. Please contact your local authority for information on collection points and their opening hours.
GB 15

 Warranty
The device has been manufactured to strict quality guidelines and meticulously examined before delivery. In the event of product defects you have legal rights against the retailer of this product. Your legal rights are not limited in any way by our warranty detailed below.
The warranty for this device is 3 years from the date of purchase. Should this device show any fault in materials or manufacture within three years from the date of purchase, we will repair or replace it - at our choice - free of charge to you.
The warranty period begins on the date of purchase. Please keep the original sales receipt in a safe location. This document is required as your proof of purchase. This warranty becomes void if the device has been damaged or improperly used or maintained.
The warranty applies to faults in material or manufacture. This warranty does not cover product parts subject to normal wear, thus possibly considered consumables (e.g. batteries) or for damage to fragile parts, e.g. switches, rechargeable batteries or glass parts.
16 GB
|
|
Zastosowanie zgodne z |
|
przeznaczeniem.............................................................. |
Strona 18 |
Dane techniczne.............................................................. |
Strona 18 |
Zawartość............................................................................. |
Strona 19 |
Opis części............................................................................ |
Strona 19 |
Bezpieczeństwo.............................................................. |
Strona 20 |
Montaż |
|
Wybrać odpowiednie miejsce na instalację........................... |
Strona 22 |
Instalacja.................................................................................... |
Strona 22 |
Uruchomienie |
|
Ustawienie czułości czujnika.................................................... |
Strona 23 |
Ustawianie czasu świecenia odbiornika.................................. |
Strona 24 |
Ustawianie trybu dziennego / nocnego................................... |
Strona 24 |
Czyszczenie i pielęgnacja...................................... |
Strona 25 |
Utylizacja............................................................................... |
Strona 25 |
Gwarancja........................................................................... |
Strona 26 |
|
|
|
PL 17 |
|
|

Czujnik ruchu
 Zastosowanie zgodne z przeznaczeniem
Czujnik ruchu przeznaczony jest to automatycznego sterowania źródłami światła. Produkt nie jest przeznaczony do użytku komercyjnego.
 Dane techniczne
Napięcie znamionowe: |
220–240 V 50Hz |
Obciążenie znamionowe: |
maks. 1200 Watt (w przypadku |
|
diod LED/żarówek halogenowych) |
|
maks. 300 Watt (w przypadku |
|
żarówek energooszczędnych) |
Czas opóźnienia min.: |
10 sek. +/- 3 sek. |
Czas opóźnienia maks.: |
7 min +/- 2 min |
Światło otoczenia: |
3–2000 lx (regulowane) |
Zasięg: |
maks. 12 m |
Zakres wykrywania: |
maks. 160 ° |
Temperatura robocza: |
-15 – 40 °C |
Robocza wilgotność powietrza: |
< 93 % rF |
Zalecana wysokość instalacji: |
1,8–2,5 m |
Nr modelu: Z31712A / C (czarny) / Z31712B / D (biały)
18 PL

 Zawartość
1 czujnik ruchu
2 śruby
2 kołki
1 instrukcja obsługi
 Opis części
1Czujnik
2Śruba
3Zacisk
4Podstawa
5Kołek rozporowy (ø ok. 6 mm)
6Pokrętło regulacyjne TIME
7Pokrętło regulacyjne LUX
9 Wewnętrzne okablowanie (nie należy dokonywać żadnych zmian)
10Skrzynka zaciskowa
11Lampa (nie zawarta w zestawie)
tylko Z31712C / D
8 Pokrętło regulacyjne SENS
PL 19
 Bezpieczeństwo
WSZYSTKIE INSTRUKCJE WRAZ ZE WSKAZÓWKAMI
BEZPIECZEŃSTWA ZACHOWAĆ NA PRZYSZŁOŚĆ!
W przypadku przekazania produktu innej osobie należy dołączyć do niego całą jego dokumentację!
Porażenie prądem elektrycznym grozi śmiercią!
Przed instalacją skontrolować czujnik ruchu oraz przyłączane przewody pod kątem uszkodzeń. Uszkodzony produkt lub wadliwe przewody zwiększają ryzyko porażenia prądem.

 ZAGROŻENIE ŻYCIA POPRZEZ PORAŻENIE PRĄDEM ELEKTRYCZNYM! Przed przystąpieniem do instalacji i do wykonywania wszelkich prac przy lampie zewnętrznej z żarówkami halogenowymi/LED/energooszczędnymi należy wyłączyć obwód prądu w skrzynce bezpiecznikowej lub wyjąć z niej bezpieczniki wkręcane.
20 PL
Należy unikać urazów i uszkodzenia produktu!

 ZAGROŻENIE ŻYCIA I
NIEBEZPIECZEŃSTWO WYPADKU U DZIECI!
Nigdy nie należy pozostawiać dzieci z materiałem opakowaniowym oraz produktem bez nadzoru. Dzieci nie powinny mieć dostępu do produktu.
Niniejsze urządzenie może być używane przez dzieci od lat 8 oraz przez osoby z obniżonymi zdolnościami fizycznymi, sensorycznymi lub mentalnymi lub brakiem doświadczenia i/lub wiedzy, jeśli pozostają pod nadzorem lub zostały pouczone w kwestii bezpiecznego użycia urządzenia i rozumieją wynikające z niego zagrożenia. Dzieci nie mogą bawić się urządzeniem. Czyszczenie i konserwacja przez użytkownika nie mogą być przeprowadzane przez dzieci bez nadzoru. Przed użyciem urządzenia należy upewnić się, że napięcie w sieci jest zgodne z wymaganym napięciem roboczym urządzenia (220–240 V ). Unikać ekstremalnych wahań temperatury. Należy zainstalować produkt dopiero wtedy, gdy temperatura otoczenia będzie odpowiednia. Montaż należy zlecić tylko specjalistom w dziedzinie elektryczności, którym znane są przepisy i zagrożenia.
Zabezpieczenie w produkcie nie jest wymienne.
PL 21
 Montaż
 Wybrać odpowiednie miejsce na instalację
Należy uważać na to,
–aby działanie czujnika ruchu na wybranym miejscu instalacji nie było zakłócane przez przeszkody lub ciągle poruszające się obiekty.
–aby nie instalować czujnika w miejscu, które ulega silnym wahaniom temperatury, na przykład przez urządzenia grzewcze lub klimatyzację.
 Instalacja

 ZAGROŻENIE DLA ŻYCIA PRZEZ PORAŻENIE ELEKTRYCZNE! Przed instalacją należy wyłączyć dopływ prądu w skrzynce bezpiecznikowej lub wyjąć z niej bezpieczniki wkręcane.
Wskazówka: Zalecana wysokość instalacji wynosi między 1,8 i 2,5 m.
Wskazówka: Przed instalacją należy uważać na optymalny kierunek ruchu. Czujnik ruchu reaguje czulej przy ruchach bocznych niż przy ruchach frontalnych (por. rys. A). Dlatego zalecamy, aby czujnik 1 instalować bocznie do kierunku ruchu.
22 PL

Wskazówka: Do zamocowania podstawy 4 muszą zostać wywiercone dwa otwory.

 Upewnić się, czy w ścianie w wierconych miejscach nie ma przewodów.
Wykręcić śruby 2 z przedniej części czujnika (por. rys. B).
Przełożyć przewód przez odpowiedni otwór podstawy 4 . Przykręcić podstawę 4 na wymaganej pozycji.
Połączyć przewód z kostką zaciskową 3 czujnika ruchu, jak pokazano na rysunku C.
Zamocować czujnik ruchu ponownie na podstawie 4 , dokręcając śruby 2 .
 Uruchomienie
Ponownie włączyć obwód prądu. Urządzenie jest gotowe do zastosowania.
 Ustawienie czułości czujnika (rys. D)
Tylko modele Z31712C / D
Wskazówka: Zakres wykrywania wynosi maksymalnie 12 m (w zależności od temperatury otoczenia).
PL 23
|
|
|
|
|
|
|
Przekręcić pokrętło regulacyjne SENS |
|
w kierunku „-”, aby |
||||
8 |
||||||
zmniejszyć zakres czujnika |
|
|
. |
|
|
|
1 |
|
|
|
|||
Przekręcić pokrętło regulacyjne SENS |
|
w kierunku „+”, aby |
||||
8 |
||||||
zwiększyć zakres czujnika |
|
. |
|
|
||
1 |
|
|
||||
 Ustawianie czasu świecenia odbiornika (rys. D)
Wskazówka: Czas świecenia odbiornika można ustawić na minimum 10 sekund i maksimum 7 minut.
Przekręcić pokrętło regulacyjne TIME 6 w kierunku „-”, aby skrócić czas świecenia odbiornika.
Przekręcić pokrętło regulacyjne TIME 6 w kierunku „+“, aby zwiększyć czas świecenia odbiornika.
Wskazówka: Czas świecenia obliczany jest od czasu danego ostatniego ruchu, który uchwyci czujnik 1 .
 Ustawianie trybu dziennego/nocnego (rys. D)
Przekręcić pokrętło regulacyjne LUX 7 w kierunku „ “. Czujnik 1 znajduje sie w trybie nocnym.
24 PL
 Loading...