


TYST65PF1
Table of contents
 Loading...
Panasonic
Model No. TY-ST65PF1
instructions d’instaiiation
Pied mobiie pour i'écran
instrucciones de montaje
Pedestai móvii para ia pantaiia
Fitting instructions
Mobile stand for Display
Инструкции no установке
Мобильная подставка для дисплея
Montageanweisungen
Mobiler Ständer für Display
Орнату жeнiндеri нускаулар
Дисплейге арналган жылжымалы т1реу1ш
istruzioni di montaggio
Supporto mobile per lo schermo
iнструкцiï 3 встановлення
Моб1льна п1дставка для дисплея
TQZJ449


:^ьушоуушшУп^у<ТсУУо
{ШШЬУУУУТУХЮШУпШ:УУ^ШаУУОУУЮУ^ШЩШУи^ЬУУГсГсУУУ
У^^ШУУГсЬУУо)
МП
mia
ш
■ X
Б-
Before commencing work, carefully read these Instructions and the Manual for the display to ¡/j
ensure that fitting is performed correctly. "o)
(Please keep these instructions. You may need them when maintaining or moving.) ^
Vorder Ausführung lesen Sie bitte diese Anleitung und die Bedienungsanleitung fürdas Display
sorgfältig durch, damitdie Montage richtig ausgeführtwird.
(Bitte bewahren Sie diese Anleitung auf. Sie kann bei der Wartung oder der erneuten
Anbringung benötigt werden.)
ü
СЯ
Ч—»
0
Q
Prima di iniziare il montaggio leggere attentamente le istruzioni e il manuale dello schermo per
poter procedere al montaggio in modo corretto.
(Conservare poi queste istruzioni che si renderanno necessarie per la manutenzione e
l’eventuale spostamento della supporto.)
о
c
cc
"cc
Avant de commencer le travail, veuillez bien lire ces Instructions ainsi que le Manuel de l’écran
afin de veiller à ce que l'installation soit effectuée correctement.
(Conservez soigneusement les présentes instructions. Vous pouvez en avoir besoin pour
effectuer un entretien ou si vous désirez déplacer l’applique.)
СЯ
'ce
O
c
cc
Antes de iniciar el trabajo, lea atentamente estas instrucciones y el manual de la pantalla para
garantizar que el montaje se realiza correctamente.
(Guarde estas instrucciones. Podrá necesitarlas cuando haga trabajos de mantenimiento o ^
mueva el pedestal.) LU
Перед проведением работ внимательно прочитайте эти инструкции и руководство по
эксплуатации дисплея, чтобы убедиться в том, что установка выполняется правильно.
(Сохраните, пожалуйста, эту инструкцию. Она может Вам понадобиться для технического
обслуживания или перемещения.)
ь:
Ü
Ü
>.
0_
Жумысты бастаудан бурын дурыс opнaтылfaнынa кез жeткiзy yшiн дисплейге apнaлfaн
осы нускауларды жене нус^аулы^ты мукият о^ып шыfыцыз.
(Осы нускаулыктарды сактап койыцыз. Ол сiзге кызмет керсеткен немесе орнын
ауыстырfан кезде керекболуы мyмкiн.)
Ü
><
со
го
Перед початком роб1т уважно прочитайте ц1 1нструкц|| та 1нструкц|| з експлуатац|| дисплея,
аби забезпечити правильне встановлення.
(Збереж1ть ц1 1нструкц||, оск1льки вони можуть знадобитись Вам, коли виникне необх1дн1сть
у техн1чному обслуговуванн1 або встановленн1 дисплея в 1ншому м1сц1.)
со
J3
О
со
Q.

y')^?4>
in^}Ì15:rJ^0TKl Luo ^ tmW,
'lu ool t)^'^ 'iLT0$№>^^i:>,^|
xzixnxmmxxx
°y')44?4>
2.\')fm44'i'^^à^(4)^mm^m±
y'\44?4>2.y'\n}(444'miimWs\
0
°XXQ^44X 41X44
xmmcDfi-i^uxMm 'oxnm 'onx
HHioii® • ufiipoo (m) -xxxy
\')44?4 > anii n miti 21
0
°y X Q m fl
x4xnxmmxx4-\4x±^ 'oxum
y')44?4>
aniia3Ì5:^li?:¥gì5: §>l 9 L 21 MI
0
° XXQ‘^X44Xnxm'mxX4-n
y'\44?4 > in 5:l®0qTSariÌ2| I
°XXQ^i<4
x4xnxmmxx4-\4xmm 'oxum
( °xx44>m^i4txmym4\inm)
y'\44?4>iniin Q 2/cj,(isLS 1£' 'Q X-
c|g2iH x^x'^m^cktmyncxy,é\
0
°XXQ^i<4
x4xnxmmxx4-\4xmm 'oxum
y'\44 ?4 >2 .y '\n^m M \
ÌIH K^X'^m^?4X^4y') 'Q 2/Cv(i®I
0
X4X44XBMIQ)X-Pì44Mm 'Q2/UÌIÌ
nÀ2?^> anfanai}« 21
i/^m№>n^¥ > 2/n ^ q: I
0
°XXQ44Xm'^CDX-(^]4'l\\m '4
xx^±fim^iCDmmmm a ^f 21
nÀ2?^>in
V
xmmxx4-\ 'inli® 'Qiuiii
nÀ2?^>i
niiniiJ«
n ■ aK¥C£^\ i
(D
°ÌigQÌ
'inQii^ 'QiUiii
1 Mig-i
'.'ì ,5/^ i n ^i?=-lan
?:US¥a2|MM0W '>ÌÌNf/>,(iill
.0
°ÌigQÌiHHiOv(7fl
'inli® 'QiUiii 'Q^2)|i}iO®T
\'\44 ?4 >^ \'\nQ^y,
#*Z I
0
mW
°ii
w
°ii^y
o
°Ìi^MniflÌ¥lin
o
(Ìi[ii}O^3Ì0ÌI^O °J.^nin^0i!iiè2Ìlll0ÌÌÌ5:gM>?-/2/nCjaSEI
°ii 'xxxQMxmmi
mW:W
°ii mxxmmx44Qrnxmmxxm
mW
°J.^nin^0i!i 'ini^a5:liIÌ0miÌ<;Vm^?:n^2IS?2/n3:^ni}2/c'5iH
( nig.?./>cia»se.^^)
m
■N'
Dilli
nw

МП
mia
ш
mñT^i^<^tb^mOsmnrOsmm
m^.^^rbo^D¿±fer<^^u
<r¿-¿l\
^'^^УU^^^№ШTЬrcDsШШЬZ
yy(DB,m¿yyy¿yy>Dyyo
[о
■ yyyyy^t^w^rnoi^ys
2ЛШ±^^эГ<Т^и
y^yyyyy\y№';^yBZs
V
¿yzyyyyDyyo
J
©■
7КЩ’^’^шь^т^шшьт<т^1\
mnrcDsmmbzyyorn.m¿yyy¿
y^Dy^o
mnrcDsm.mbzyyym.m¿y^y¿
ySDy^o
O
■ шт^Ш1ь^ш^^ш^ьт<т^1\
mnrcDsmmbzyyorn.m¿yyy¿
ySDy^o
Kts^yrnyy^z^ñbrcD^mbrcDy^ytymD
1) mmB^zmzrDsXb-yyyyyu^
УУФ^У'УШ<ГсУУо
yry^}%niZ}^nym^zyB^yr^zyyz<yyzoy^yyyyyyyy-smm^y^yxy
yysm.^yyyrcDbyyoz\i^mbybYz<yyyo
(у^хууууфу^^хпуу^хууууфушттвш^у<ууу0<^^^вууууштюш
УsУУ'ÆШsШУí^^У<УУУo0
3) 'i&miyy^-yyy-yy^¿Byyz<rcyyo3§byxyyBmmy'^yy¿yy>Dyyoyrcsyhy
уу-уш^уууш:ттшшууууу<ууУо
(^e©^H¿^Dy^o)
4) У^УУУУУ\РУПУУУУ^^УУУШШУШУТб.1\у<ГсУУо
• • xyпyФтuг7K)ñФ^^^в^nФm^ty
■ ууууу^7^шфшшууу^^щш^щит<шшфшш^у^уь^^шт<т^1\0
т■УУУУ^7^Ш\^Ш^Шtí'УЬ0sШШФШШtU^УtUm0Шrо
■ moi^yuü^ш^^.^-^tí'sШШФ^mшtшшr^ytuul\^ò^шшьz<т^l\о
ЬТ<Т^1\о
■Ш^^Г^Ш1*йЖ¥^¥5^Шт^^и.Ш1ШВД*^^эГ<Т^ио
■ ш^^zшшxm^i^ШФФшmФШ^tsmmФ^^шi^t^^U)îшльz<т^l\

9
0)))))))))))))))))))))))
№ 2) (99 X 9IAI)
nej:ffiqTSail^$№@
(i} L) (Mziiii})
m\PB)
(2|Z 9) (2 L X 17I/\I)
(2|z p) (2 L X 17I/\I)
nej:ffiilii}QÌ&W(D
(i}9L) (9IAI)
CT))))))))))))))))))))))
(2|z 8) (99 X 9IAI)
(§)lTTTTTTl
(2|Z8) (92 X 9IAI)
ìnUD
(2|Z 8) (9 L X 9IAI)
□□ciM
ssasi
m
■N'
Dilli
nw
co
î м ШЙ
HÍS /i*
&
ги
Q ^
^азпй^
0 2caich
&
2С
r^l- rS Л
S Oí й I
- oJ >J
N
V
0
d
r\
S^lsfF
РП

m
mia
ш
4.
mmr^^ü'R^Tm^b^^^rmmb
r<^'^Uo
Щ^:тт
Н®ФЛ(Л®^5Ф№^)
A
1047
B
1147
C
1247
D
1347
5. ®^^Д(±-Т)®^¥Щ4^т^Ь^
(8Ш)^Ш^Ы<^'гио
1.8 ~ 2.2 N-m)
6. ТШФ®^^ДФШ0^ШШ®(1 ^)^
<^'^Uo
^То)
1.2 ~ 1.5 N-m)
8
2.
МП
mia
ш
@ х>ЯЯЬФ^»^5+^^Я(4®)^
yyx^y^^-z^0nhz<^^^o
вдо^ьФФ^^ФйФщ^^еьФ<ФФФо
(ШШ^XУУ^^ШШZ^Шñ^^ШZZo)
^тя^-^-^4®)
^мшФЛñУУ^©z^mФ^э^^oмyz
<^'^Uo
(Ш^^УЬ^У^ 3 ~ 4 N-m)
Я^ЯК^^Д—
9
m
mia
ш
O^'í)
3.
1.
Ф хФЯ^ЬФ^^±ШФ^ШЯ^-^-^^ШЯ^
<DT^’^^o
@ хФЯЯЬФ^^^^>Ь^В±^’^№5.ТШФ^
ШЯ^-^-^^ШЯ^УК^^Т^ФК^ШЬ^
±^Ф^»Я^-Ф-
0
ФФЯЯЬФФ^Ф#Ф
ФФФФФФ.^ФЬФ
ФФФ^НФ^ФФФФ
ФОФФо
2. хФЯ^Ь^^^Ф®^
(Я^^^Ь^Яй 1.2 ~ 1.5 N-m)
ФФЯЯЬФФ^Ф^ФФФФФФФ^^ФЙйи
Ф№®Ф№±ДЙФЭФВДО^ФФ<ФФФо
ю
* ^ üu
э ш э uX
s • ® 0
ri
(\
Г1 |=г Г1
СШ
d Э é>J
г^ Э?^
Э tíí
ÇH 9;
>^>1-
í^ S а
>Íd Я *ж
3 ^ ^4
4 4 °
4 4^'
4 0 4
Э^'
4 Ш ^
п I • ^
©t Щ •
4 4 Щ
4 ñ 4
4 4 3
4 4 4
Зш
4 4
(4 С
3 4
4г А
Dint
4 4
4
4
Î4
©
3
4
3
4
4
о
&
ч
llfll
нй
"И
Fr
т
г
р|
л
ri
С"
^ г^ л
шен
g; Гг 4
' № S
S Ш Ш Xîf
3
и I®
st
ñ Ж'
$í ^
4
^тН1
О/
Г1 ^
с4
Л 4
¡4,Й
<г 1S
о @1
9tt
4
0
■ш ЫН law (у\ С11
ШШсШШ
ЩШ' шз
Шмс
Ё с о
- , Fr
- V ^ fit 0
4 iï öt ri
A a r\i ©
j A a ru ©
ri Гг a- '
c^rga
Ctt ^ ^
■ò
v:
Л
4r
54
a
SD
4
4
■ìb
Ш
о
Í® П ^
-ÖF )4 Ч-
Гг. S Гг
>фШ
a 4^ :ii
hr
§Ì
itÌD S+ ^
É Гг
n ptt 0
СЛ
■
■ mi
ILUI
tni
HÎÎ
n
Ü
C“
A
Q 4 4 >J ftt A Й -r Oì Л ^ v:r Й
5lì ° T ùt ri, о n Ü T. vji
0r,í-3:>J4ñV
4 AH
ПШ C“
ru
Ч- T A 4
ri ® I H ° a Vi ri I I
r-i- lìS Й a Si >o r-i- 4 Гг
ri о d;
^ 4Г Л
G 4 -r,
4 a ri
Ш S' 54
¡S G D)i
- $Ì>} 0)
gli
G I S
: 4iS
m 4l flii ¡Шп
a)g0>ia
M Э Ш G ftt
^4' 4ùt
4 >J^^0
Il T ^
a
G d; iìffl ài
4 I Л 4 d;
aa-
@4 '
A
vji a
V 5
>o A
I Ш
©Hi
^0
Ш Ш
4 01
ТП11
lUll
G •
4 ùt
A ^
ri ri
im
ru
Ш
lim
ГТШ
ВМЩРП
K)
Ч1>
@
■D ' ^ ^ U
“ ^ < v±
9 I
I T vb
°
° s I ^
- a. L ^
s^i
aîvPf
Й
№
ai
S
O
CD
CD
CD
O
СЛ
СЛ
СЛ
\J
4i^
nt
СЛ
Ш
w
Ей
□
n
>1- ^ i-ii 8i
ri ЕШ Pt r-p
РЙ JD s Ч
□ s n+ v:
г I DÎ> ¡M rît I I
ipt S r4t P
S ' ^
S r4t ri r,^ ^
A
UÌ <- й]>
rj 11 M Э
^ Йк 9+ ^ 0+
n O ^ ЙГ
âS itt iS Q
Й1 ^4 4
4 T
Й 9+ ri 4
4 ' 4 iS
й>
4 JÍ1 4 i4
ni ^ 4 A
Ч-
ÔJ
Ôi
m
St
лПг
0
JW
-KH
S<Si
0
Ôi
m
a
4 4 4
Ü
C“
Ш S 4 1Ш
4 n ri Й5
JW D® ' Q
^йЙ4^ш
ñ c a 4
im ' (Й1 JÍ1
4 m c ^
4 fia II 4
9+ Ш еЖ 4
1S^4^
4 il 4
D> 4 4 â
4 да 4 5^
4?n 4 4
A 4 Î4 i»
4 rît fia
4 Üm A ^
ТТП Dt> ГУ 4
4 ГУ 4
4 m Э ГУ.
4^¡4ñ
nt.4
ry fia г I Й
4ЙЖГУ
c 4 DÎÎP 4
rS
J®
(S)
®
hr
ÜU Ч.Ц
ГУ л'
ri 0 9tt >J
Й ^ 4 U
a iS
° 4
>4
"Ч
C Л
M
9tt 1
$F
4 4 0
° 1 ~7
cy
S
s
is 4Ì+
ri
Ut
№
hr
4-=
0
9tt
¡5
9tt №
hr
4H
n
^1
4Ì+
n
Ut
y
I
4
I
@
0
©
il
ï!M
ap
U
i
1
Fr c >J
~n
M
ri V¿r
4 0
A V
Ш
Q ri, ~n
Ш
ctt
ГУ 0
Ш
4 4-^
ob
ma
v:
° $F
Or
Л
Si
0 4
Ч-
ПШ
ЕЫ
1
Ш
$i
Fr
4
Pc.
M
4
ts
C
G
rS
C
@
Л
rS
fit
ri
Л
ùt
ГУ
ri
ru
C“
O
ГУ
C“
O
M
4

ш 1=1
: П :
-Za ЯП
■ X
Б-
as
as
т^шщм^штшшш,Ат^ШАМ^^
3S
¿t. ж
т^шщм^штшшш,Ат^ШАМ^^
т^тштщ.ЛоШтш^^п^т,т^тш'^шш&ш^шш±пт^по
SÆÂ1
. ast
• SI
13

■ X
Б-
1)
.)
^ШйМо
Vi
•т & ^ Ш Ш ^^ ^ Ш Ш Ж
• Ши^НШШйШ,иг1Ж^Ши&^ШЖ 40 Ш
• т'&^¥¥шштш±,шт^шшт^ж'пшшш^ш^±^
• шжш.тш^т\^й.ш\^й.ш.п^^^п,^ш^^0^хши^±^
ÄO^I
:
ж ш \ х
14

ш
■ X
Б-
rn ^
15
1.
■ X
Б-
(^@ЙШ : 1.8Ш2.2^#,Ж)
(^@ЙШ : 1.8Ш2.2^#,Ж)
16
№ (±/т) ®mrn^Ro
: вЖ
4
.
А 1047
В
1147
С
1247
D 1347
5.
ШШШ^{±/Т) ®о
(^@ЙШ : 1.8Ш2.2^#,Ж)
■ X
Б-
6. Д 4 1
Яо)
(^@ЙШ : 1.2Ш 1.5^#,Ж)
17
2.
■ X
Б-
1п ш ^х т ^ш ш ^т ^о
^'о
® 4 ^ШШо
ФФ^^ЙФ
(^ЯШЙ^#^ЯФФо)
(4 Щ^,Й^ШШШШ^,4 4
(^@ЙШ : ЗШ4^#,Ж)
18
è
й
й
й
й
а
й
м
№
te-
2иш
^
^ 1-Х 1^
S Ей _ч
Ш5:ш
»,_L> 2х (JJJ
m 4^
й -> И
¡SJ ^
ни
= ^ ^
* 3
Ш-
Ш
liî:
@
#
Ш1
•-Н-
Ч>
т
т
Й
Ж
Йй
W
Шн
ш
ш
т
Щ]
d4q
тт
Ш1№
• iâ
4ш^^Ш
й ^
)ф-^|5г
Йг
ntìf 4ш Stö
“ (4D?
Зп|: (oj
Зш
m i¿ í
CVCV
й
и^ ш
"И
3
й ^
п и\ш
и а/ю
S. Ц>
ш м
шз
- т
ж
-н ш
li
se Hÿ
- í:
m m
ж >
м ^
щ se
» й
да Ш
3
Mf^
Ч
- í:
Ж Jïï
ни
1^
Щ]
d4q
тт
1=1-
&
Ей
Т73
Е
W
Л1№
№
СО
■
т
W
CD
ФЙ
{шт- ^ ш± шш^ тш^ тш ш ^ )
20
1 ©)o
■ X
fl-
To
a^A^^nKmA^HK 1006
i ^ : http://panasonic.net
mum
Ws^M : 0^
© Panasonic Corporation 2012
3Ms6M
M n : 2012©5^
21

Safety precautions
w
"5)
c
LU
WARNING
Installation and removal should only be carried out by a qualified technician.
• Ifthe stand is not installed correctly, the display may fall over and become damaged, and personal
injury may result.
Do not disassemble or modify the mobile stand.
• Otherwise the unit may fall over and become damaged, and personal injury may result.
Set up in a location with little vibration that can support the weight of the unit.
• Otherwise the unit may fall over or down, and personal injury may result.
Ensure that the installation location is strong enough to support long-term use.
• If its strength becomes insufficient over the course of long-term use, the display may topple over,
possibly causing injury.
CAUTION
Do not use any displays other than those given in the catalogue.
• Otherwise the unit may fall over and become damaged, and personal injury may result.
Do not place weight of over 15Kg (33.06Lbs.) on the shelf plate.
• Otherwise the unit may fall over or down, and personal injury may result.
Do not use the mobile stand if it becomes warped or physically damaged.
• Otherwise the unit may fall over and become damaged, and personal injury may result.
Do not lubricate the casters.
• The casters may crack or became damaged, and the display may fall down and became damaged, and
personal injury may result.
Do not climb on or hang from the display or mobile stand.
• Be particularly careful that young children obey this caution. Otherwise the unit may fall over and
become damaged, and personal injury may result.
Do not block the ventilation holes. Do not block the space between the bottom of display and the
floorwhen using the mobile stand.
• Otherwise heat may build up inside and cause a fire.
Take steps to prevent toppling.
• Earthquakes or children climbing up or onto the display may cause the display to topple over, possibly
resulting in injury.
Secure at least 10 cm (3.9 inches) of space at the top, bottom, left, and right of the display. Also
secure at least 7 cm (2.8 inches) of space at the back.
• Failing to do so may result in a fire.
Keep the unit away from direct sunlight and heating equipment.
• Failure to do so may result in warping, deformation, or degradation of materials, and a loss ofstrength
that may cause the equipment to fall over or break and cause injury.
The work of fitting or removing the display must be performed by at least 2 people.
• The display may fall and cause injury.
During assembly and setup work, make sure that all screws are securely tightened.
• If assembly is not performed correctly, the stand will not be able to support the weight of the display.
This may result in the display falling over and becoming damaged, which may result in personal injury.
Set up on a stable, level surface.
• Otherwise the unit may fall over and become damaged, and personal injury may result.
For installation, use the special-purpose constituent parts.
• Otherwise, the display may fall offthe mobile stand and be damaged, possibly causing injury.
Unlock the casters when moving the display.
• Otherwise the unit may fall over and become damaged, and personal injury may result.
Dispose of the product when it is no longer going to be used.
• Otherwise the unit may fall over and become damaged, and personal injury may result.
22

Requests regarding handling
1) Exercise care when selecting the location for the display because it may discolor or deform due to light
or heat if it is placed where it is exposed to direct sunlight, or near a heater.
2) For cleaning, wipe the display using a soft dry cloth (made of cotton or flannel). If the unit is extremely
soiled, first wipe off soiling with a neutral detergent diluted in water, and then wipe with a dry cloth. Do
not use cleaners such as benzene, thinner orfurniture wax because they may cause paint peeling.
(For information on cleaning the display, see the display’s instruction manual. If using a chemically-
treated cloth, follow the instructions supplied with the cloth.)
3) Do not affix adhesive tape or stickers to the product. Doing so may dirty the surface of the mobile stand.
Do not allow long-term contact with rubber, vinyl products or the like. (Doing so will cause deterioration.)
4) Do not subject the panel of the display to a strong force or impact.
Precautions for mobile stand assembly and setup work
• To ensure correct display performance and prevent trouble, do not fit at any of the following locations.
• Near sprinklers or fire/smoke detectors
• Where there is a risk of exposure to vibration or impact
• Near high-voltage wires or dynamic power supplies
• Near sources of magnetism, heat, water vapor or soot
• Locations exposed to air blown from heating equipment
• Where droplets of condensation from an air conditioner or other unit may form
• For the display power supply plug, use a power supply outlet that can be reached easily.
• Ensure good airflow so that the ambient temperature does not exceed 40 °C (104 °F). Failure to do this
may cause heat to build up inside the display, resulting in malfunction.
• Fit so there is no contact between the attachment bolts or power cord and any metal inside the wall.
• Spread a soft blanket or cloth over the floor so that the stand and floor will not be marked or scratched
during the assembly and installation work.
• Conduct assembly and installation work on a horizontal and flat surface according to the fitting
instructions.
• When screwing down the parts, ensure that the screws are neither insufficiently tightened nor over
tightened.
• Take sufficient care to ensure safety around you when performing the assembly and installation work or
while moving about during the course of the work.
• Be sure to read and observe the “Safety precautions”.
Caution:
This stand is intended for only Panasonic display models.
Use with other apparatus is capable of resulting in instability causing possible injury.
w
"5)
c
LU
PROFESSIONAL INSTALLATION IS REQUIRED.
PANASONIC DISCLAIMS ANY PROPERTY DAMAGE AND/OR SERIOUS INJURY, INCLUDING
DEATH RESULTING FROM IMPROPER INSTALLATION OR INCORRECT HANDLING.
23
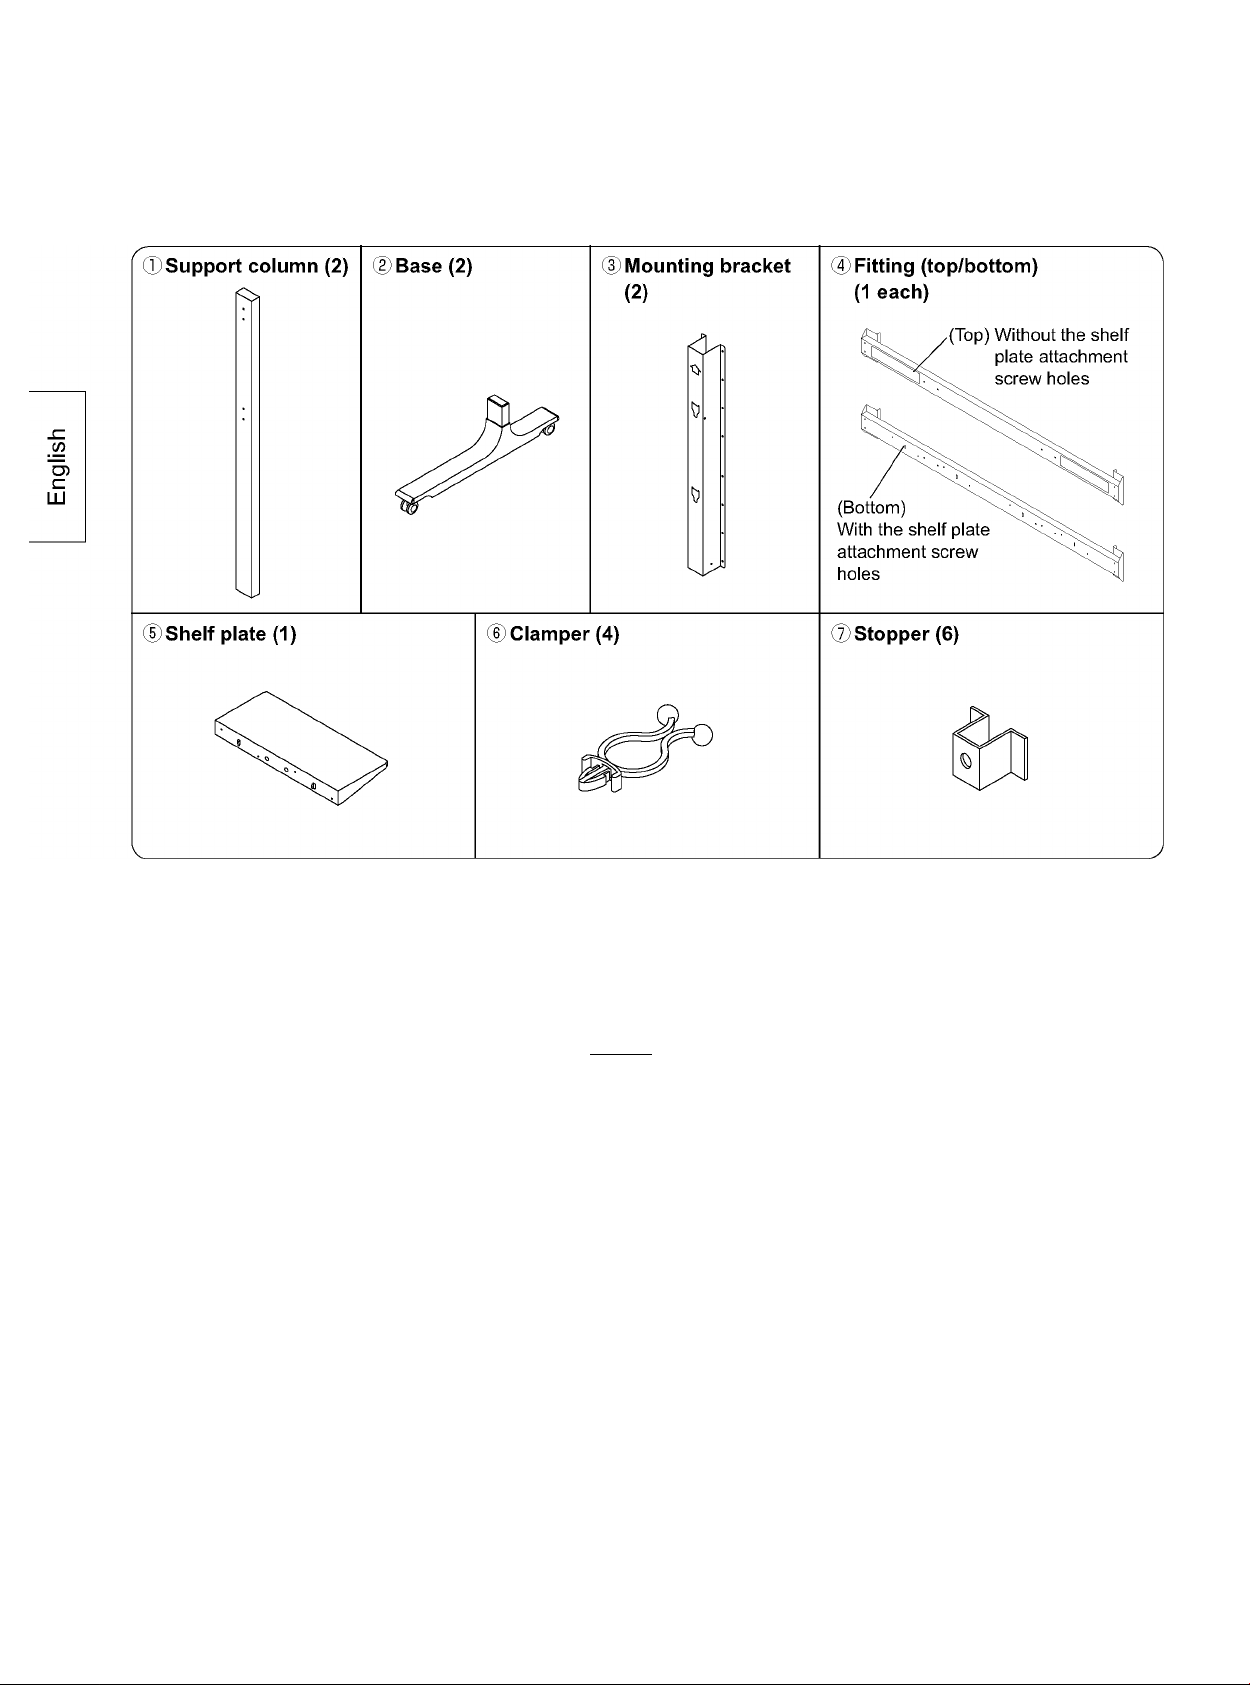
Components
Main parts Check that all the parts are accounted for and
present in their designated quantities.
Accessory parts
©Support column assembly
screw
(M6X16) (8)
Cllllfe
©Insert nut
(M6) (16)
® Bracket assembly screw
(M6 X 25) (8)
mmm
©Shelf plate attachment screw
(M4xi2)(4)
Stopper attachment screw
(M4X12) (6)
©Allen wrench (included tool) (1)
©Fitting attachment screw
(M6 X 65) (8)
©Allen head countersunk screw
Dished toothed washer
Insulation spacer
(4 each)
©Screw for securing unit
(M6 X 65) (2)
The images shown in this manual are for illustrative purpose only.
24
Assembly
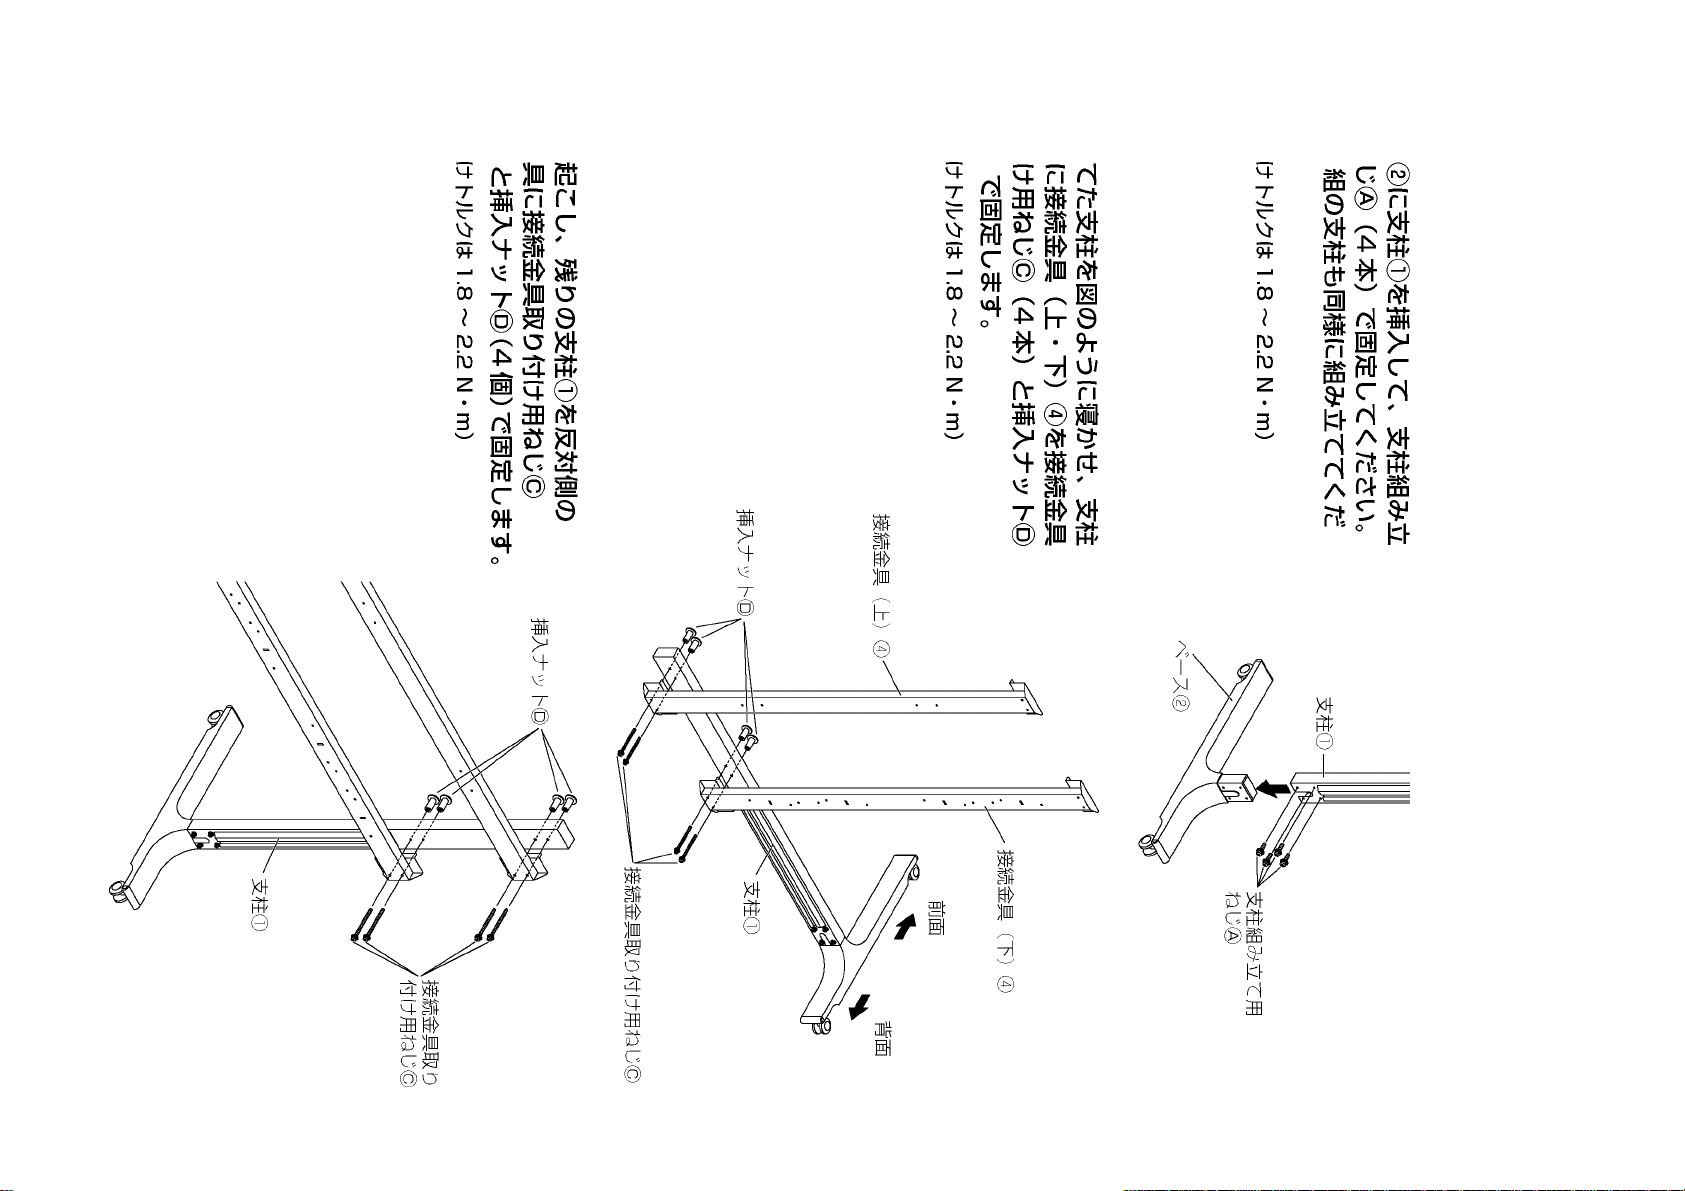
1. Assembling of the stand
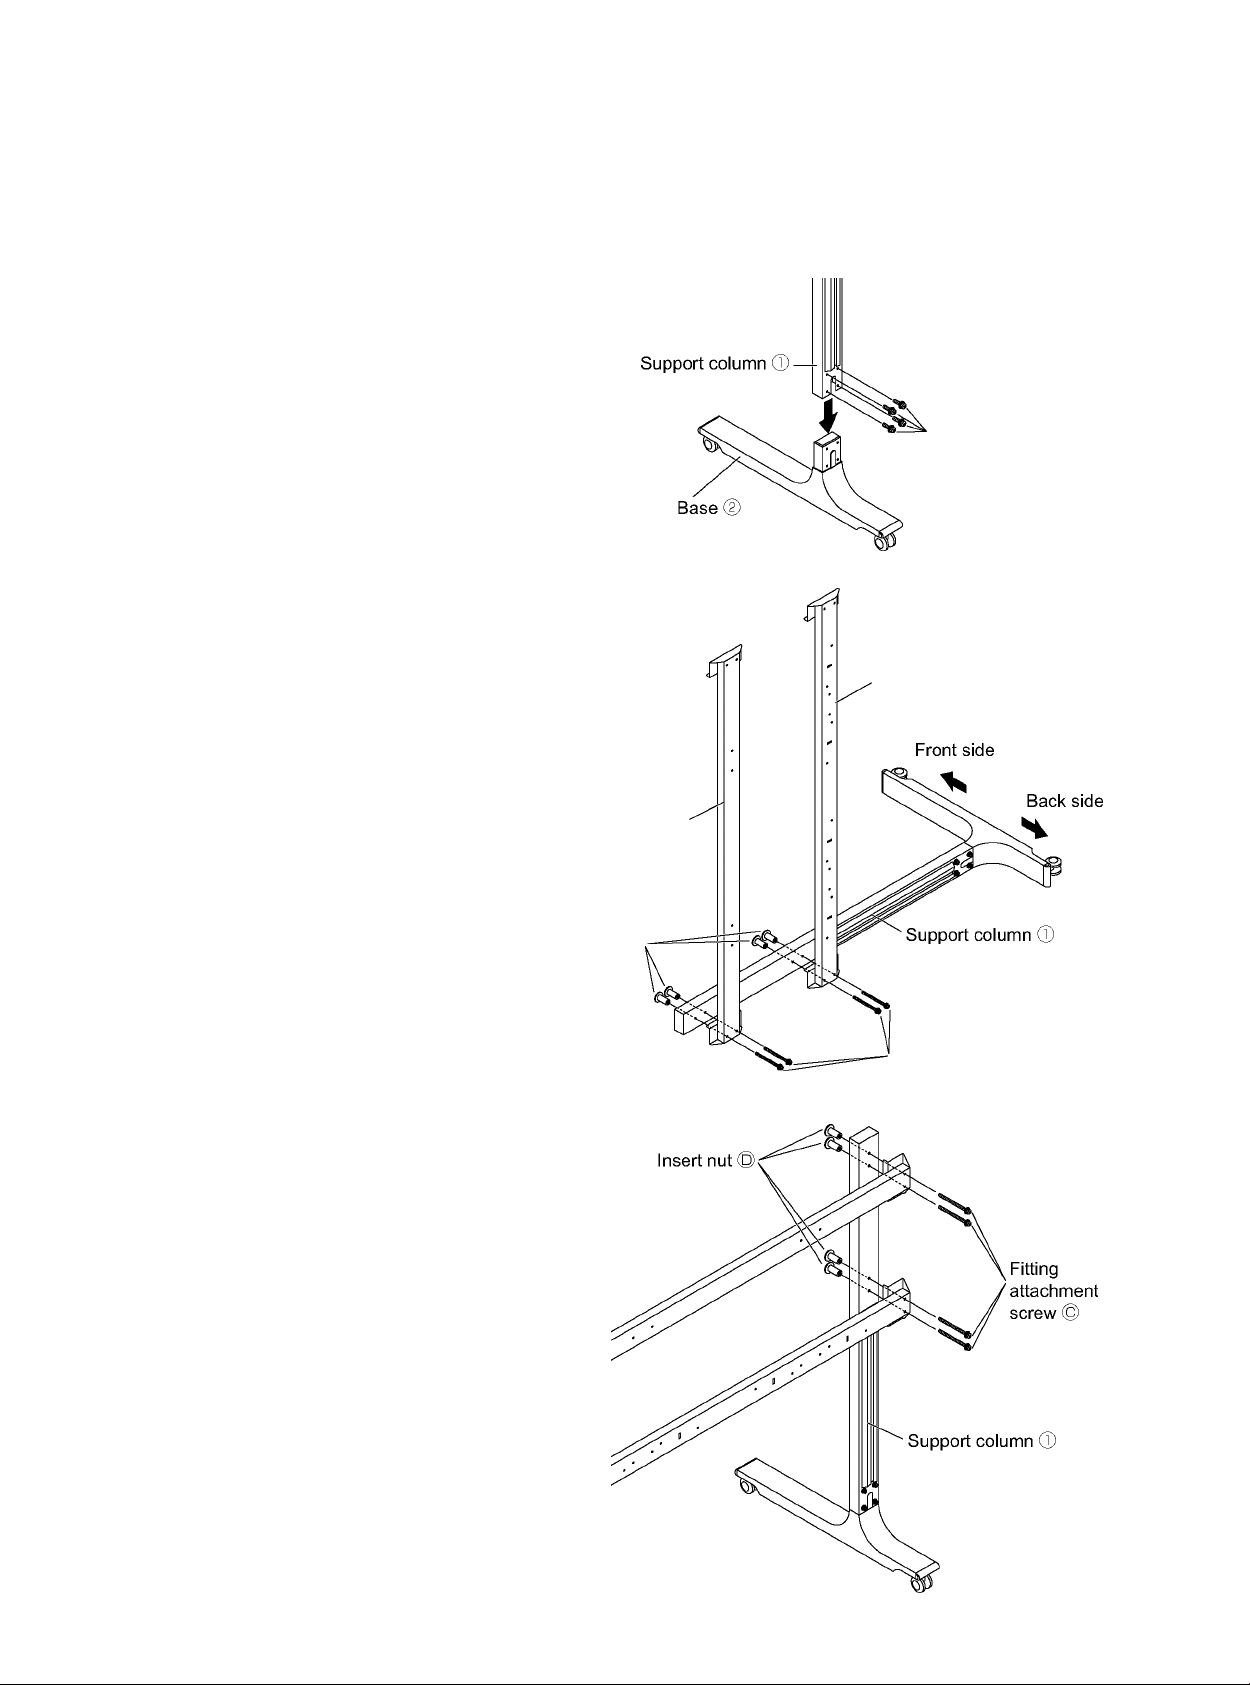
1. Insert one support column © to the
base ® and fix it with the support column
assembly screws ® (4). Assemble
the other support column in the same
procedure.
(Tightening torque: 1.8 to 2.2 N-m)
Support column
assembly screw ®
w
"5)
c
LU
2. Lay down the assembled support column
as shown in the figure, and to its back
side, fix the fittings (top/bottom) © with
the fitting attachment screws © (4) and
the insert nuts © (4).
(Tightening torque: 1.8 to 2.2 N-m)
Fitting (top) ©
Insert nut ©
Fitting (bottom) ©
Fitting attachment screw ©
3. Raise the support column and fix the
other support column © to the other side
of the fittings with the fitting attachment
screws © (4) and insert nuts © (4).
(Tightening torque: 1.8 to 2.2 N-m)
25
Assembly
w
"5)
c
LU
4.£>et the display to the desired height by
selecting from the options (4).
From the table below, select the screw
holes for fixing the mounting brackets ®
to the fittings (top/bottom) ®.
Unit: mm
Mark
Center of screen
(Distance from the floor surface)
A
1047
B
1147
C
1247
D
1347
5. Using the screw holes selected in step 4,
fix the mounting brackets ® to the
fittings (top/bottom) ® with the bracket
assembly screws ® (8) and insert nuts @
(8).
(Tightening torque: 1.8 to 2.2 N-m)
6. Fix the shelf plate ® (1)to the back of
the bottom fitting with the shelf plate
attachment screws ® (4). (It can be
attached to either the right or left side.)
(Tightening torque: 1.2 to 1.5 N-m)
26

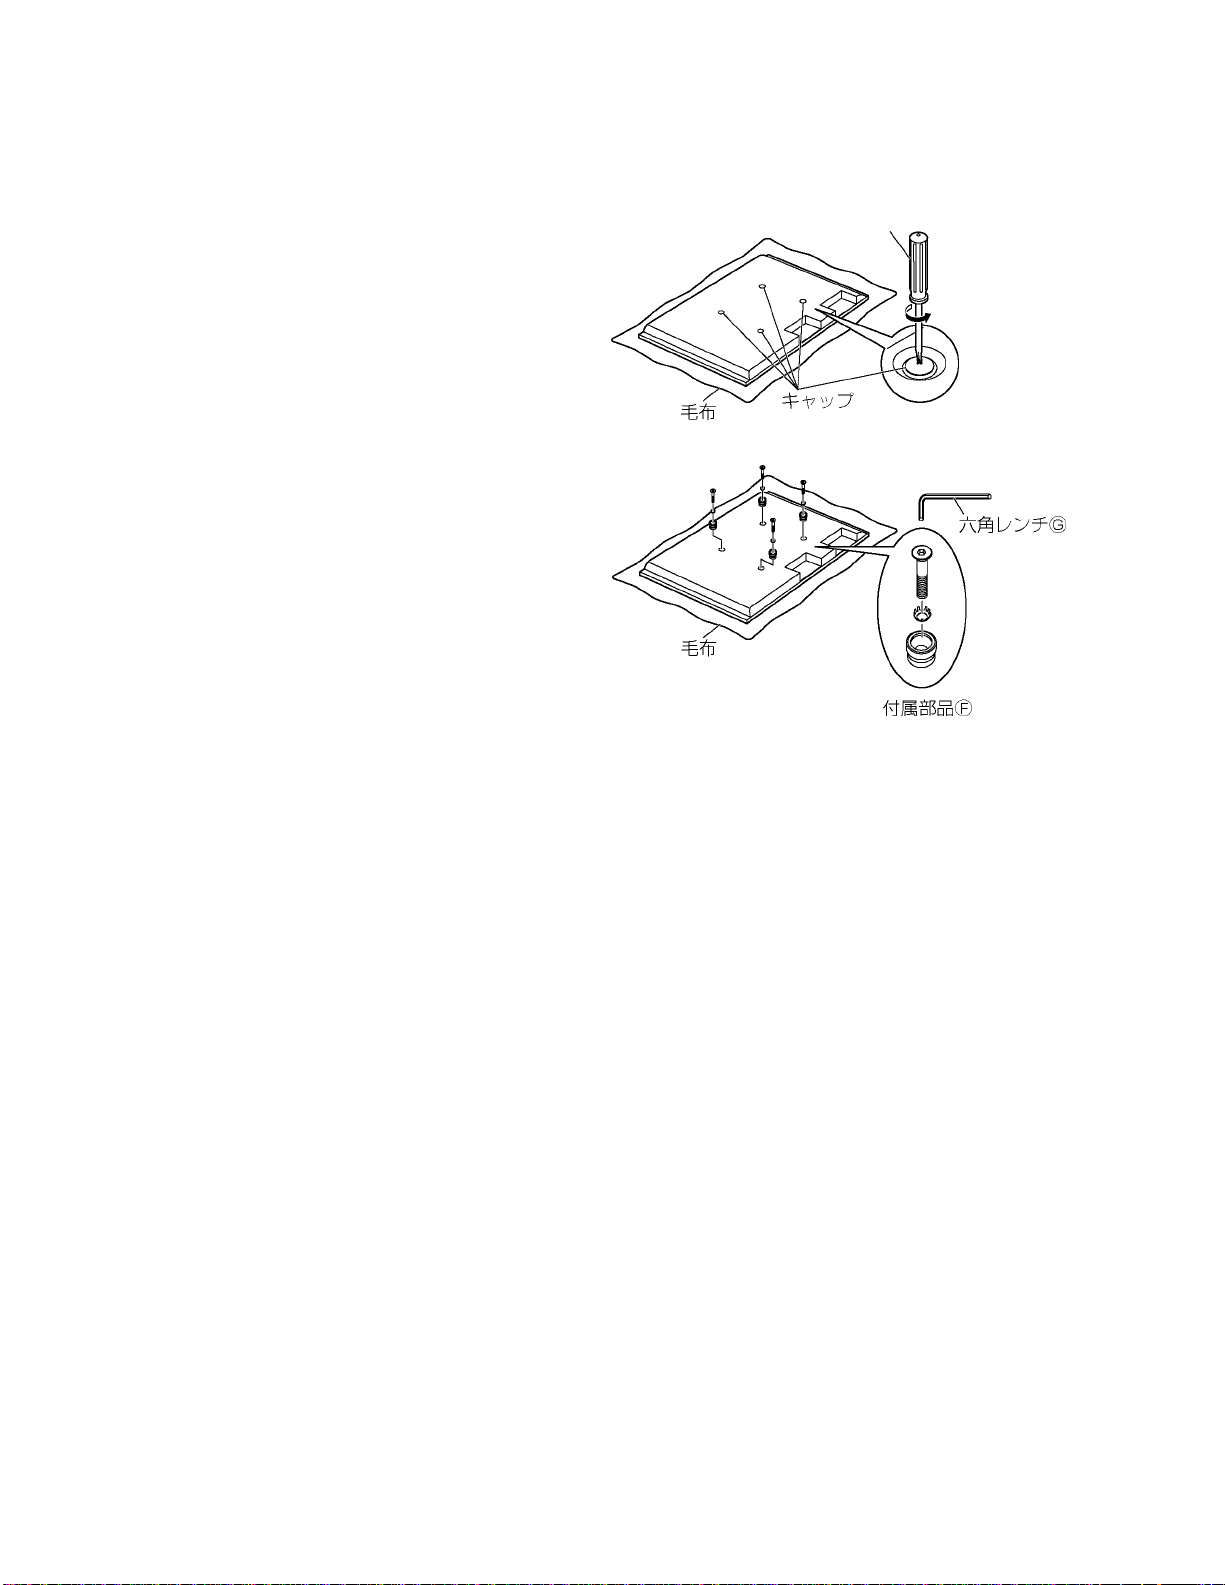
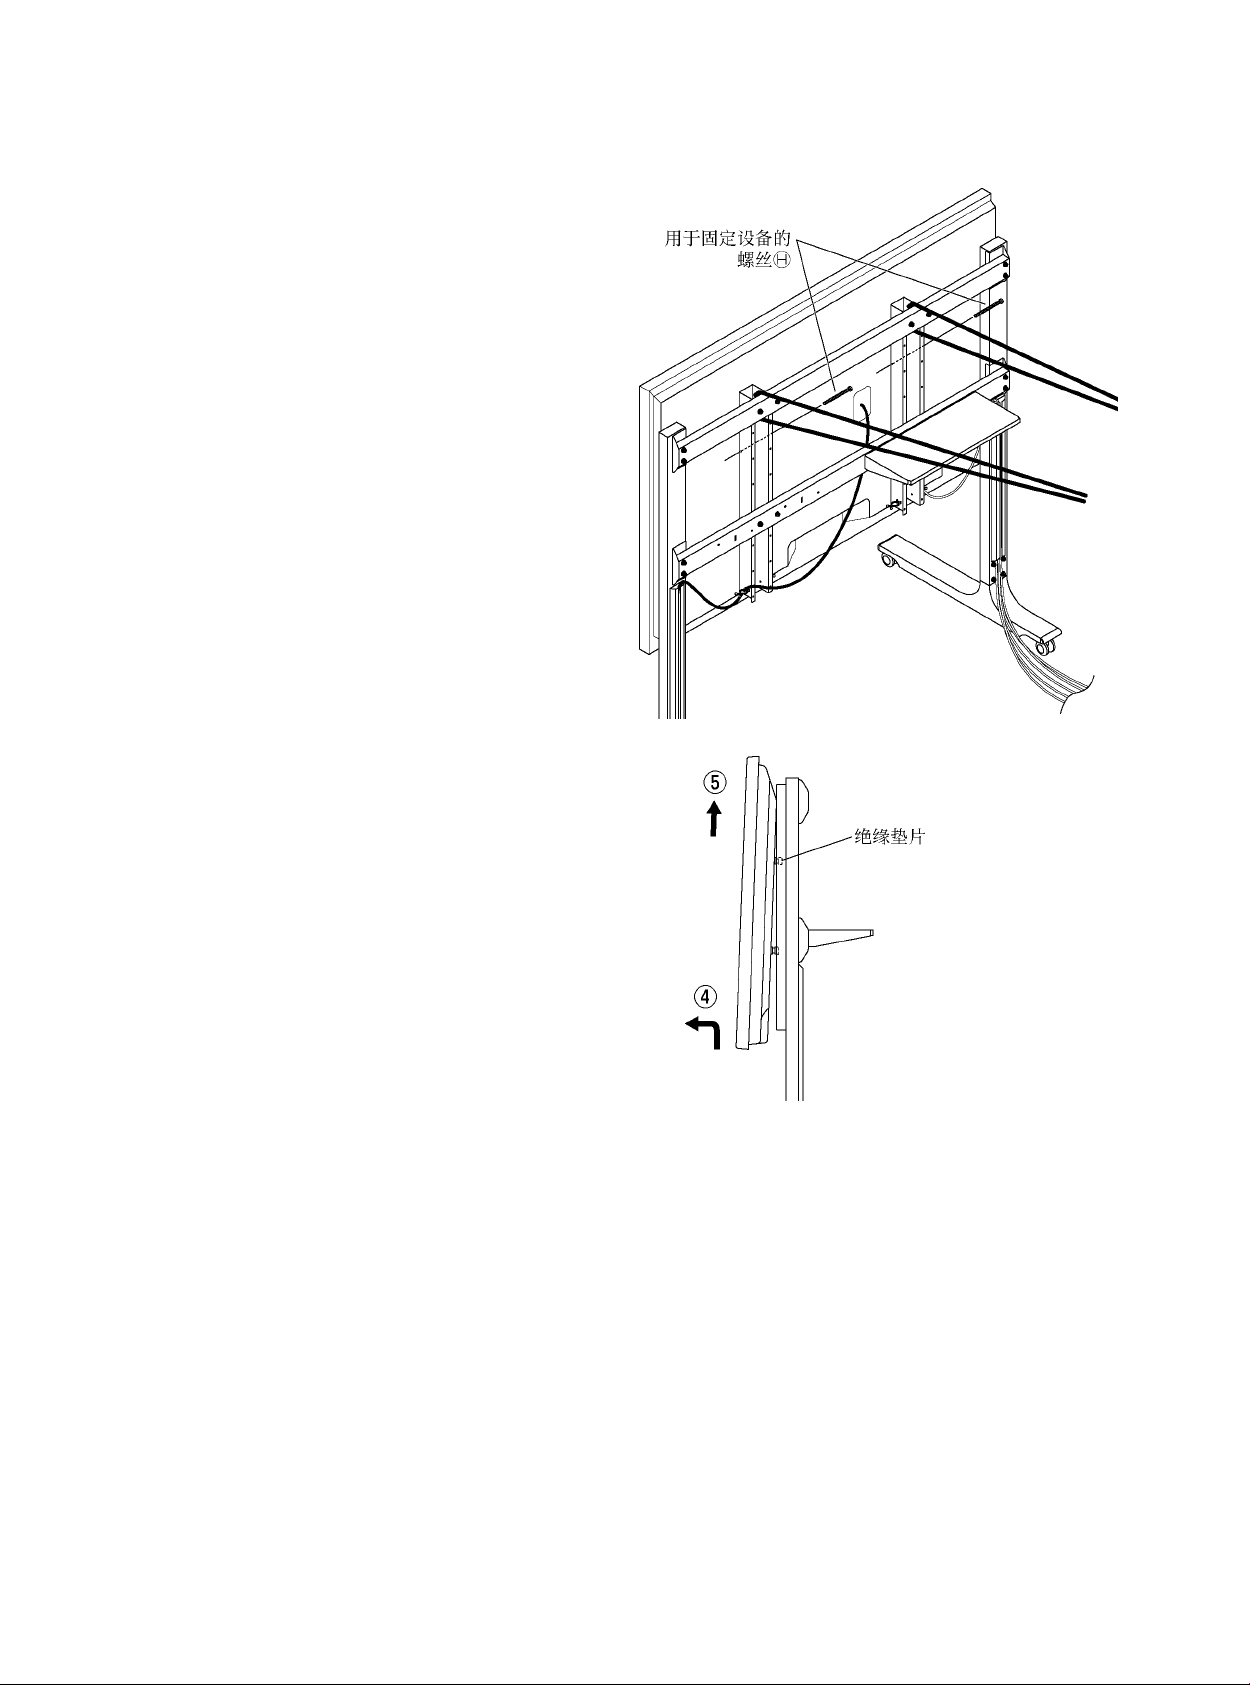
2. Preparing the display
Attaching the insulation spacers
©Place the front surface of the display on a clean
cloth that has no dirt orforeign objects on it, and
follow the procedure below.
Ifthe display has any protruding parts, take care
not to scratch or damage them.
©Remove the caps (4) from the display using a
Phillips head screwdriver.
Phillips head screwdriver
Keep the caps that were removed in a safe place.
(Theywill be required ifyou use the pedestal.)
© Using the supplied Allen wrench ©, attach
accessory parts © (four Allen head countersunk
screws, dished toothed washers, and insulation
spacers) at the locations where the caps were
removed as shown in the figure on the right.
(Tightening torque: 3to4 N-m)
w
"5)
c
LU
27
Assembly
3. Fitting to the stand
w
"5)
c
LU
Before fitting the dispiay, make sure to iock the casters.
Do not lift up the display higher than
necessary.
• Ifthe display is lifted too high, it may faii down
and personal injury may result.
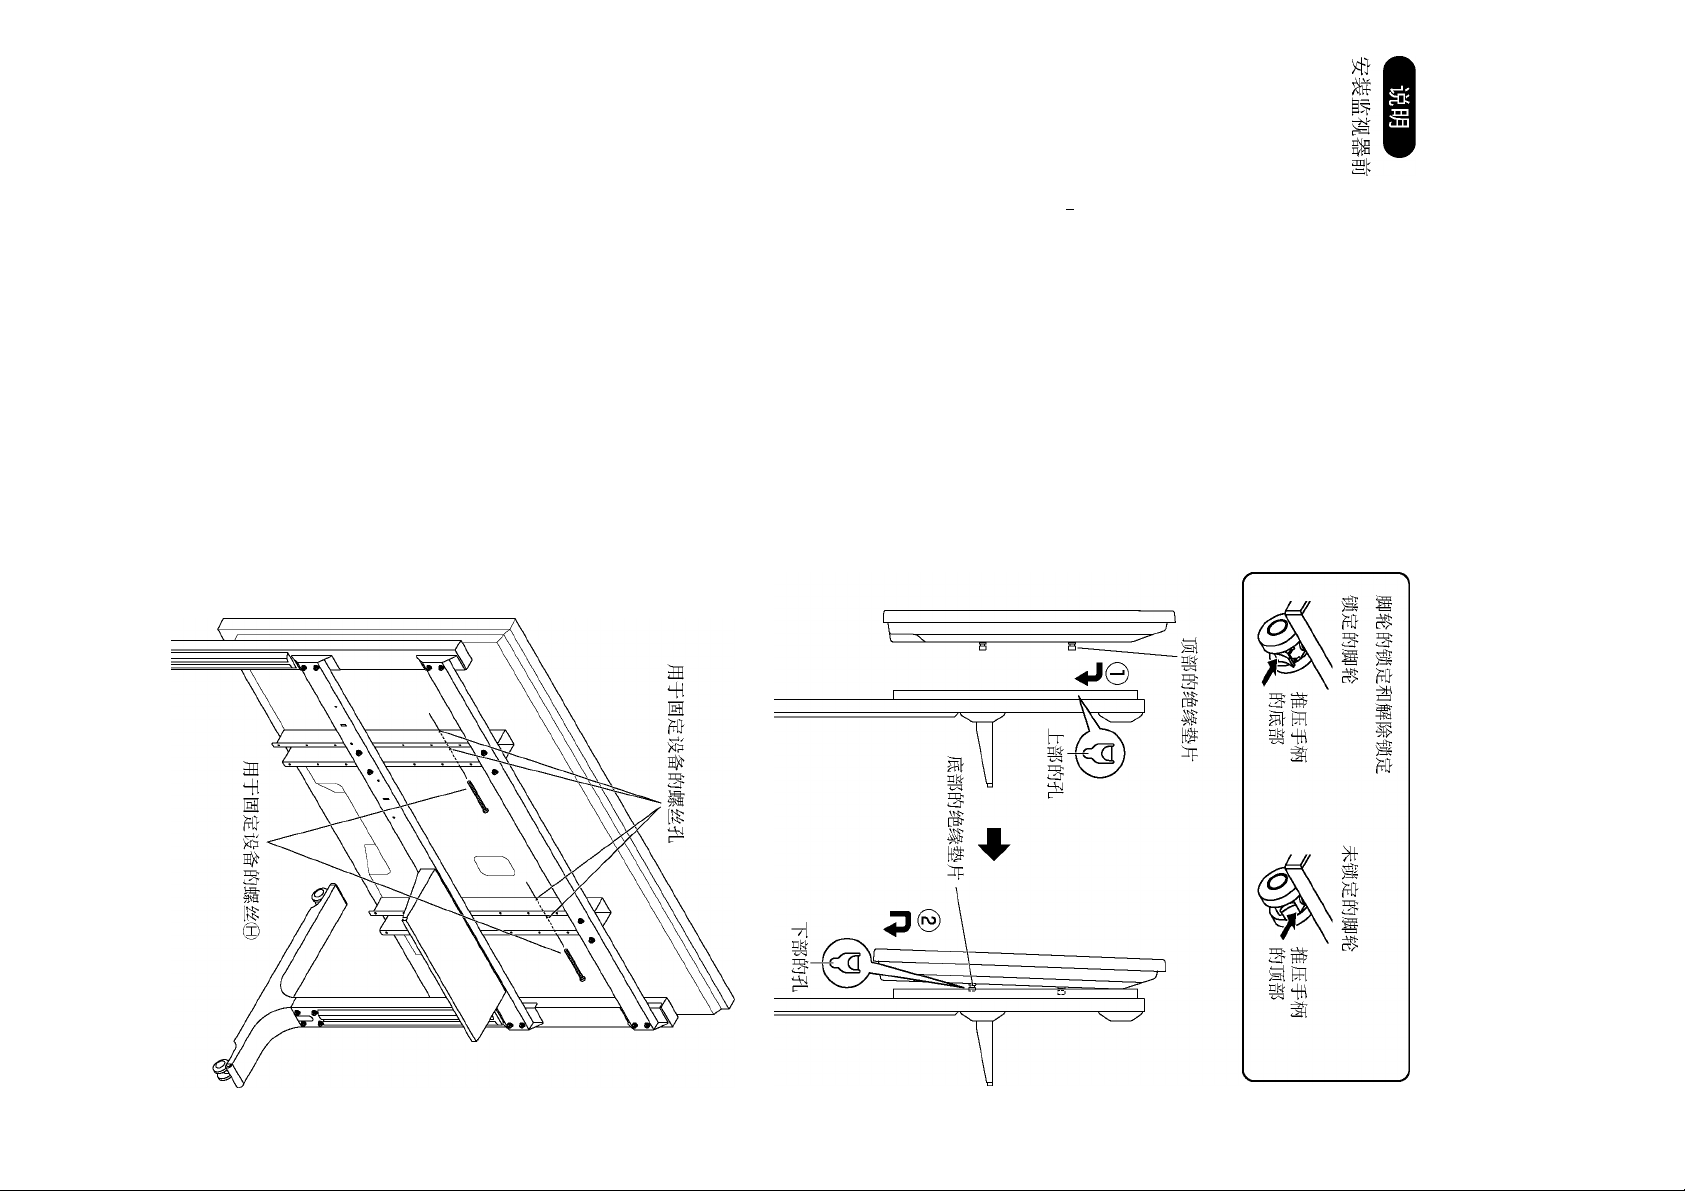
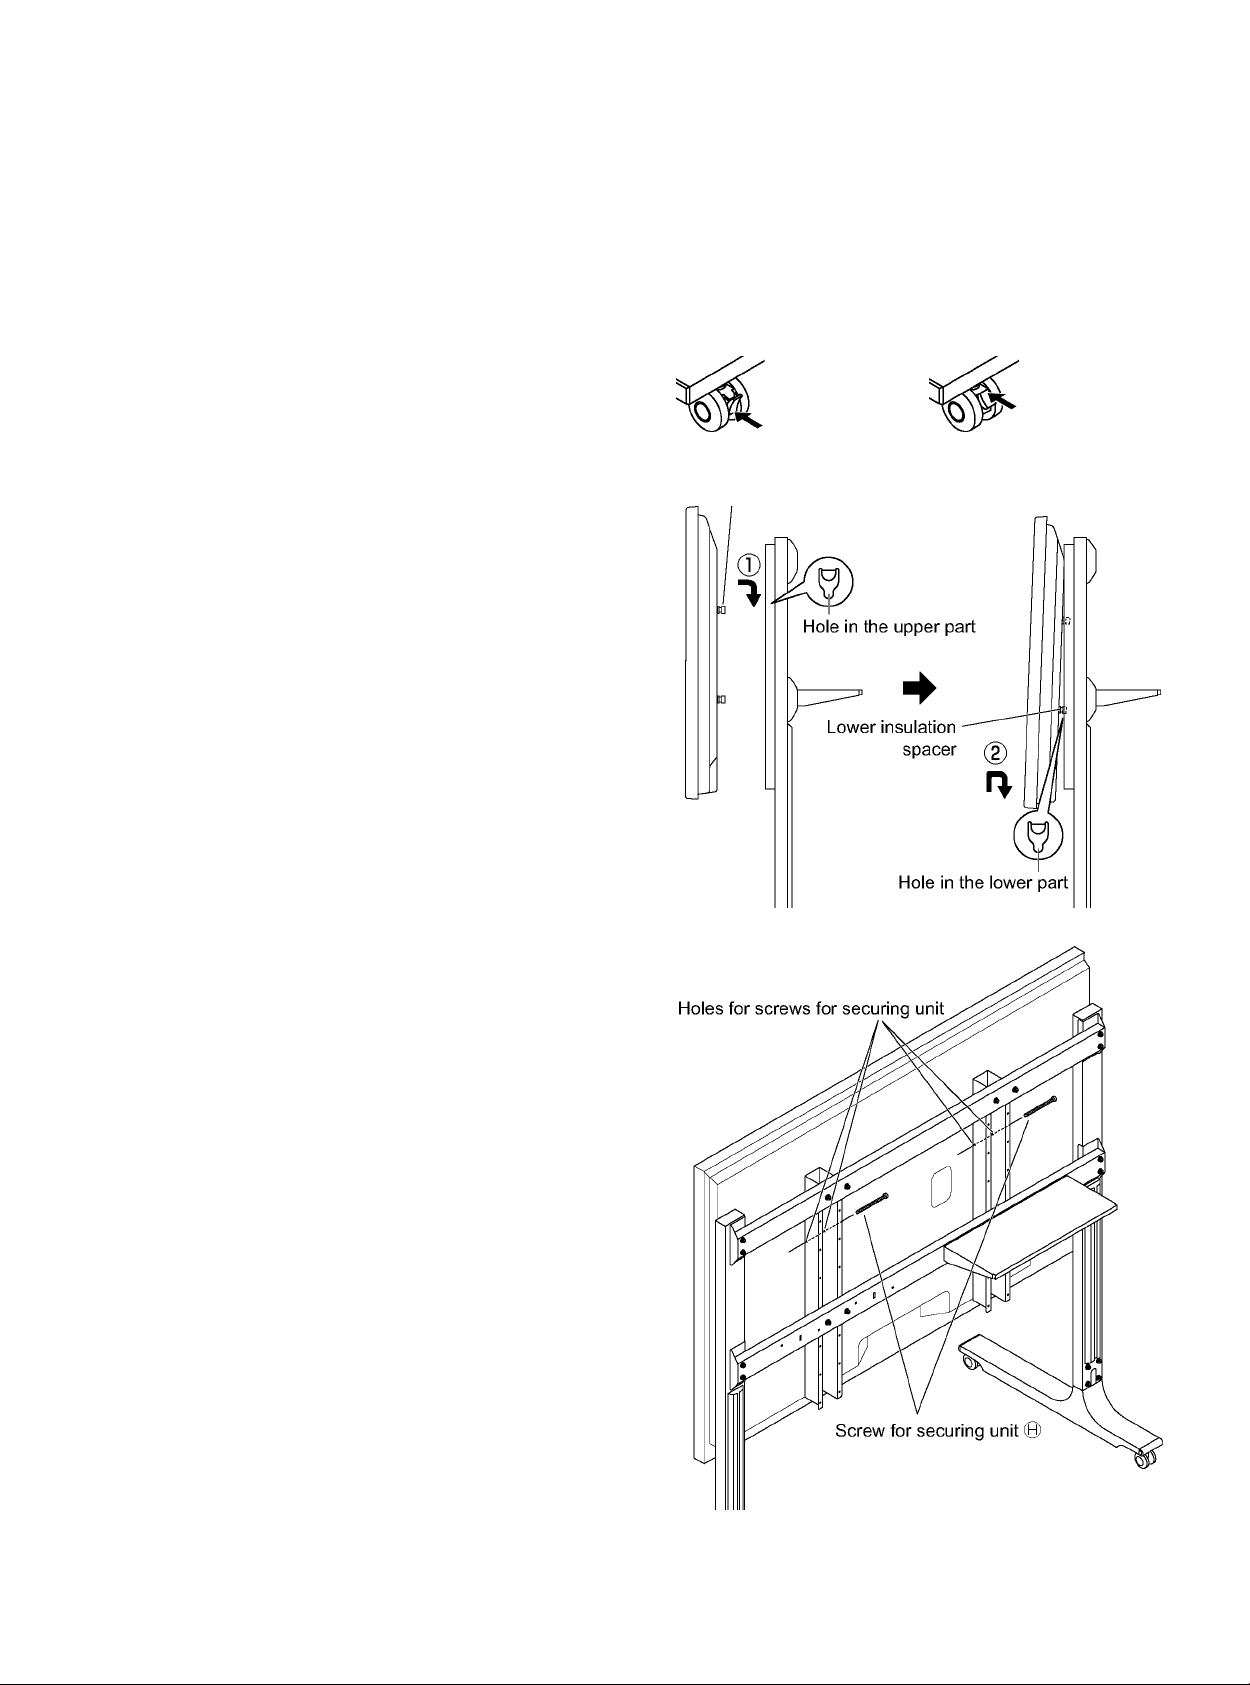
Locking and unlocking the casters
Caster locked Caster unlocked
1. Fitting the display
©Engage the upper insulation spacers ofthe
display with the cutouts at the top of the mobile
stand, and slowly lower the display into place.
©While lifting the display slightly, insert the bottom
insulation spacers into the holes at the lowerend
of the mobile stand, and then lower the display
straight down into place.
Push the bottom
of the lever
Push the top of
the lever
Upper insulation spacer
2. Fixing the display
Firmly tighten the screws (2) for securing unit
® in the screw holes on the upper part of the
mounting bracket (2).
(Tightening torque: 1.2 to 1.5 N-m)
Make sure to fit the screws for securing unit © on the
left and right to prevent the display from coming off.
28
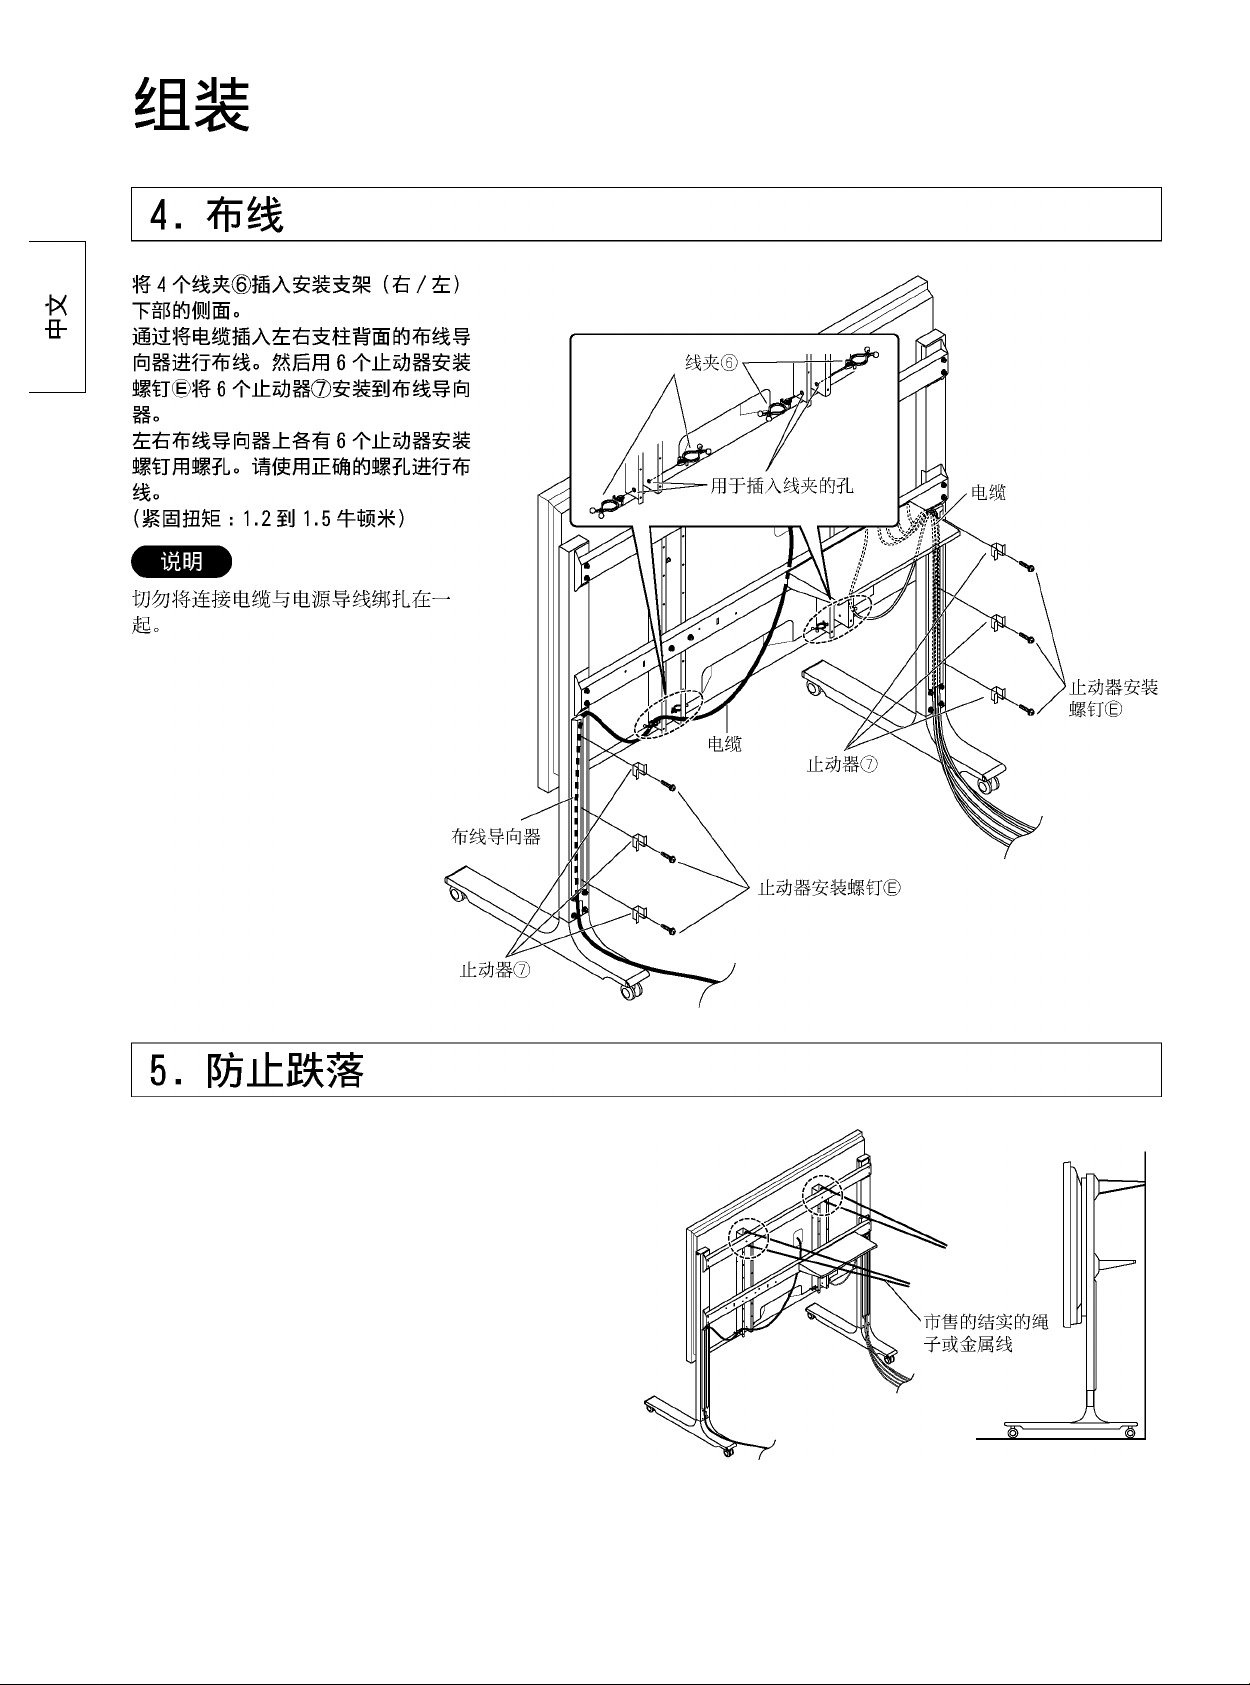
4. Wiring
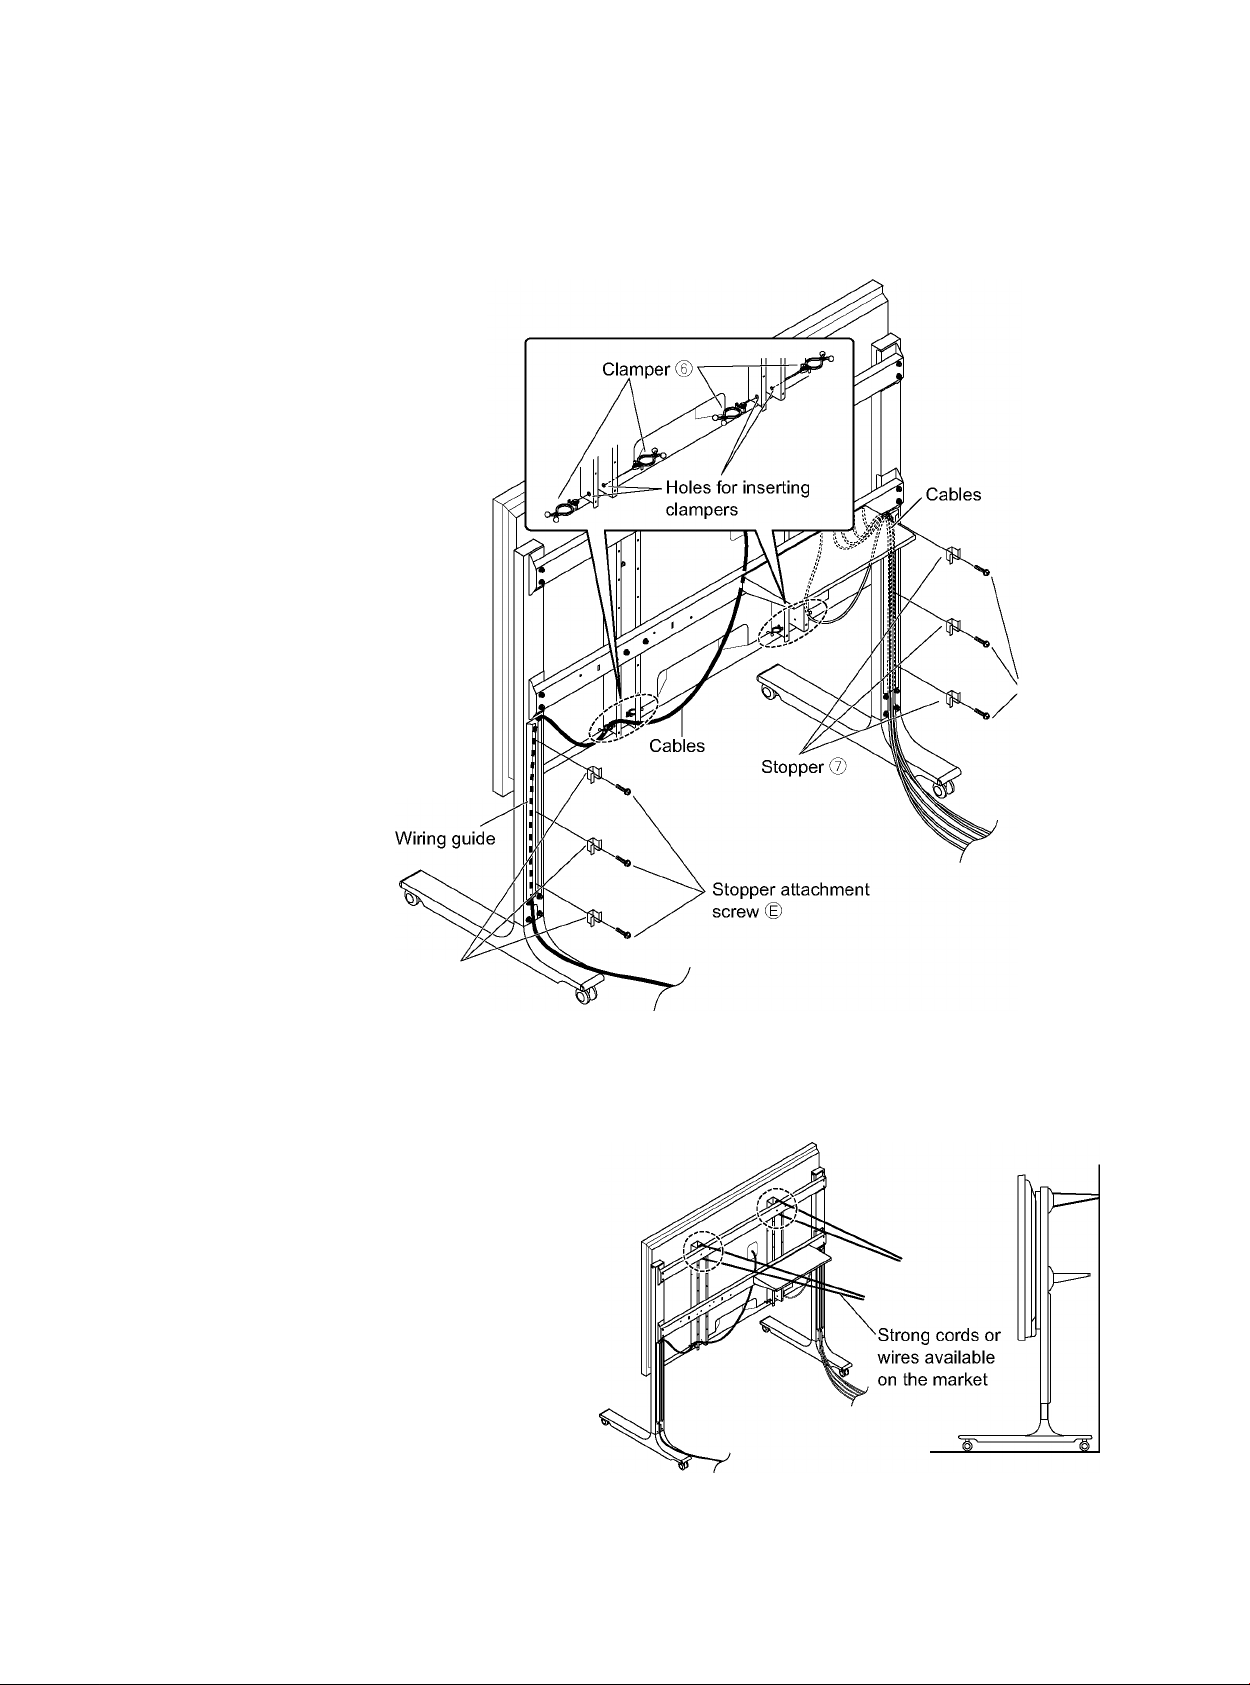
Insert the clampers ® (4) to
the side of the lower part of the
mounting brackets (right/left).
Wire the cables by inserting
them into the wiring guides on
the back of the right and left
support columns. Then attach
the stoppers ® (6) to the wiring
guides with the stopper attachment
screws © (6).
Each of the right and left wiring
guides has 6 screw holes for the
stopperattachment screws. Use
the screw holes appropriate for
yourwiring.
(Tightening torque: 1.2 to 1.5 N-m)
Do not bundle the connection cables
and main lead together.
w
"5)
c
LU
»Stopper
attachment
screw ©
Stopper ©
5. Preventing falling over
In order to prevent the unit from falling over, fix it
by passing strong cords orwires to the crossover
points (1 each on the right and left) of the mounting
brackets and the fitting (top), and connect them
without slack to sturdy pillars or walls.
(Use commercially available cord orwire to prevent
falling over.)
The distance between the pillar orwall and the rear
ofthe display must be1m (39.4 inches) or less.
29
Loading...