


®
DVD Home Theater Sound System
Operating Instructions
Model No. SC |
HT600 |
|||||||||||||||||||
|
|
|
|
|
SC |
HT860 |
||||||||||||||
|
|
|
|
|
|
|
|
|
|
|
|
|
|
|
|
|
|
|
|
|
|
|
|
|
|
|
|
|
|
|
|
|
|
|
|
|
|
|
|
|
|
|
|
|
|
|
|
|
|
|
|
|
|
|
|
|
|
|
|
|
|
|
|
|
|
|
|
|
|
|
|
|
|
|
|
|
|
|
|
|
|
|
|
|
|
|
|
|
|
|
|
|
|
|
|
|
|
|
|
|
|
|
|
|
|
|
|
|
|
|
|
|
|
|
|
|
|
|
|
|
|
|
|
|
|
|
|
|
|
|
|
|
|
|
|
|
|
|
|
|
|
|
|
|
|
|
|
|
|
|
|
|
|
|
|
|
|
|
|
|
|
|
|
|
|
|
|
|
|
|
|
|
|
|
|
|
|
|
|
|
|
|
|
|
|
|
|
|
|
|
|
|
|
|
|
|
|
|
|
|
|
|
|
|
|
|
|
|
|
(The iIIustration shows the SC-HT600)
GCS 
 GCU
GCU 
 EE
EE
Region number supported by this player
Region numbers are allocated to DVD players and software according to where they are sold.
For Asia
 The region number of this player is
  3
3 .
.
The player will play DVD-Video marked with labels containing  3
3 or
or  ALL
ALL .
.
Example
3ALL 235
For Russia
 The region number of this player is
  5
5 .
.
The player will play DVD-Video marked with labels containing  5
5 or
or  ALL
ALL
Example:
5ALL 135
Dear customer
Thank you for purchasing this product. For optimum performance and safety, please read these instructions carefully before connecting,operating or adjusting this product.
RQTC0019-1
Getting started
RQTC0019
 The operation instruction is applicable to SC-HT600 and SC-HT860.
 Unless otherwise indicated,illustrations in these operating instuctions are of SC-HT600 for Asia.
 The operation in these instructions are described for use with the remote control. They will also apply if the main unit has buttons with the same functions.


 Indicating the performances only for SC-HT600


 Indicating the performances only for SC-HT860
system |
SC-HT600 |
SC-HT860 |
Main unit |
SA-HT600 |
SA-HT860 |
|
|
|
Front speaker |
SB-FS600 |
SB-FS860 |
Center speaker |
SB-PC600 |
SB-PC600 |
|
|
|
Surround speaker |
SB-FS600 |
SB-FS600 |
|
|
|
Active Subwoofer |
SB-WA600 |
SB-WA600 |
|
|
|
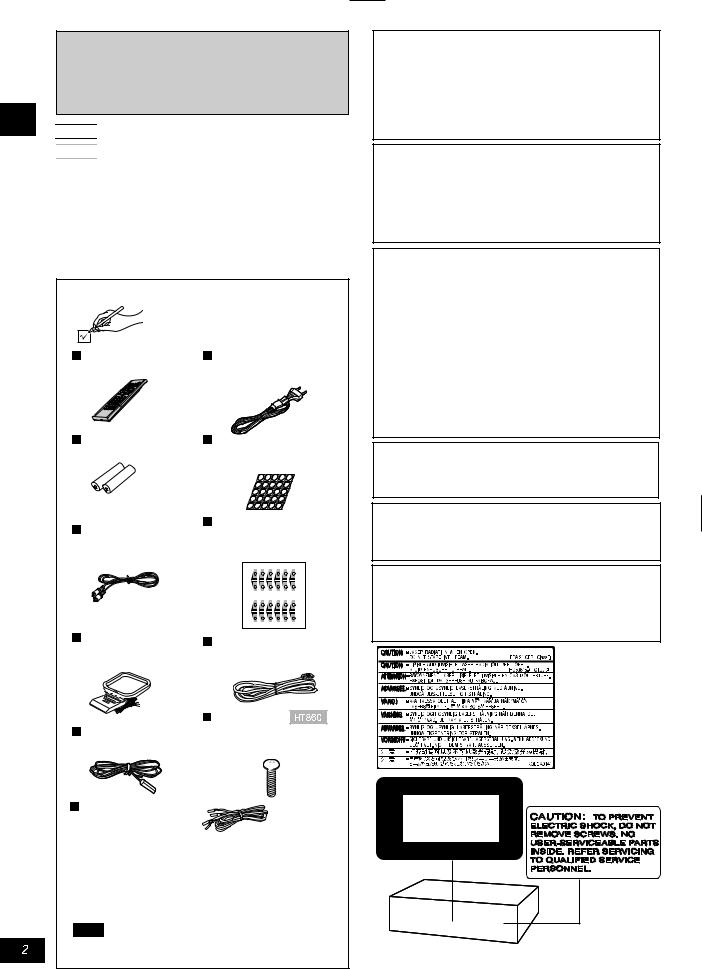
Accessories
1 Remote control (EUR7617070)
2 Batteries
1 Video cable (K2JA2A000018)
1 AM loop aerial (N1DAAAA00002)
1 FM indoor aerial (N1EAYY000002)
5 Speaker cables
5m cable (RWJC0006)
10m cable (RWJC0005)
Please check and identify the supplied accessories.
1 AC power supply cord (RJA0019-2X)
1 Sheet of speaker pads (5x5pic)
(RKAC0003)
1 sheet of stickers for speaker cables (12 stickers)cannot retail. (RQLCA0094)
One 25PIN connection wire (K1HA25JA0002)
6 pcs of screw (RHDC0007)
(enclosed in packing box for front speaker)
|
|
|
|
|
|
5m cable x 3 |
5m cable |
x 1 |
|
||
10m cable x 2 |
10m cable x 2 |
(enclosed in |
|||
|
|
5m cable |
x 2 |
||
packing box for front speaker)
Note
The included AC power supply cord is for use with this unit only. Do not use it with other equipment.
CAUTION!
THIS PRODUCT UTILIZES A LASER.
USE OF CONTROLS OR ADJUSTMENTS OR PERFORMANCE OF PROCEDURES OTHER THAN THOSE SPECIFIED HEREIN MAY RESULT IN HAZARDOUS RADIATION EXPOSURE. DO NOT OPEN COVERS AND DO NOT REPAIR YOURSELF. REFER SERVICING TO QUALIFIED PERSONNEL.
WARNING:
TO REDUCE THE RISK OF FIRE, ELECTRIC SHOCK OR PRODUCT DAMAGE, DO NOT EXPOSE THIS APPARATUS TO RAIN, MOISTURE, DRIPPING OR SPLASHING AND THAT NO OBJECTS FILLED WITH LIQUIDS, SUCH AS VASES, SHALL BE PLACED ON THE APPARATUS.
CAUTION!
 DO NOT INSTALL OR PLACE THIS UNIT IN A BOOKCASE, BUILT-IN CABINET OR IN ANOTHER CONFINED SPACE. ENSURE THE UNIT IS WELL VENTILATED. TO PREVENT RISK OF ELECTRIC SHOCK OR FIRE HAZARD DUE TO OVERHEATING, ENSURE THAT CURTAINS AND ANY OHTER MATERIALS DO NOT OBSTRUCT THE VENTILATION VENTS.
 DO NOT OBSTRUCT THE UNIT'S VENTILATION OPENINGS WITH NEWSPAPERS, TABLECLOTHS, CURTAINS, AND SIMILAR ITEMS.
 DO NOT PLACE SOURCES OF NAKED FLAMES, SUCH AS LIGHTED CANDLES, ON THE UNIT.
 DISPOSE OF BATTERIES IN AN ENVIRONMENTALLY FRIENDLY MANNER.
This produce may receive radio interference caused by mobile telephones during use. If such interference is apparent, please increase separation between the product and the mobile telephone.
Caution!
AC voltage varies in different regions.The voltage must be preset to local voltage before using this unit.
( for details, see page 9 )
Units for Russia
THIS UNIT IS INTENDED FOR USE IN MODERATE CLIMATES.
Units for Asia
THIS UNIT IS INTENDED FOR USE IN TROPICAL CLIMATES.
(Inside of product)
CLASS 1
LASER PRODUCT
(Back of product)

IMPORTANT SAFETY INSTRUCTIONS
Placement
The unit should be placed on a flat surface,away from direct sunshine, high temperature, humidity and frequent vibration. Otherwise, the case and other internal parts will be damaged and the service life of the unit will be shortened.
In order to avoid distortion or abnormal sound effects, there should be at least a distance of 15cm between the unit and the wall.Do not place heavy objects on the top of the unit.
Voltage
Overvoltage must be avoided; overvoltage will lead to overload of the unit and fire.
Do not use a DC power supply. Check if the power supply meets the requirement when the unit is set up in ships or other locations where DC power supply is used.
Protection of power supply cord
The AC power supply cord should be properly connected, ensuring that there is no damage in the cord. Poor connection or damage in cord may lead to fire or electrical shock. It is prohibited to pull or bend the cord or place heavy objects upon the cord.
When unplugging the AC power supply cord, just grasp the plug firmly. electric shock may occur if you unplug the cord by pulling the cord.
Do not plug in or unplug the plug with wet hand, for fear of electric shock.
Foreign matter
Do not drop metal objects into the unit for fear of leakage current orfault.
Do not drop liquid into the unit for fear of leakage current or fault. In case any liquid drops into the unit, immediately unplug the AC cord, and contact your dealer.
Do not spray insecticide onto or into the unit. The insecticide sprayons contains inflammable gas; if it enters the inside of the unit, fire may be caused.
Service
Do not try to repair the unit by yourself. If there is a fault e.g. interrupted sound, indicator blankoff, smoke emission or other faults unlisted in the operating instructions, unplug the AC power supply cord, and contact your dealer or the authorized service center. Electric shock or damage to the unit may occur if the unit is repaired, dismantled,or reassembled by unqualified personnel.
Before cleaning the unit, please unplug the AC power supply cord.
When the unit is not to be used for a long period, please unplug the AC power supply cord so as to prolong the service life of the unit.
Table of contents
Getting started
Accessories ............................................................................ |
2 |
|
||||||||
IMPORTANT SAFETY INSTRUCTIONS.................................... |
3 |
|
||||||||
Disc information...................................................................... |
4 |
|
||||||||
Handy setting |
|
|
||||||||
Step 1: Layout ................................................................................. |
5 |
started |
||||||||
Step 2: Connect the speakers |
6 |
|||||||||
|
||||||||||
Other methods for installation of center speakers and surround speakers..................... |
7 |
|
||||||||
How to install the baseplate of front speaker and how to use the rear clip.......................... |
7 |
Getting |
||||||||
Step 3: Connect to television |
8 |
|||||||||
|
||||||||||
Step 4: Connect the Active subwoofer, antenna and AC power cord...................... |
9 |
|
||||||||
Step 5: Remote control.......................................................................... |
9 |
|
||||||||
Step6: Quick setup.............................................................................. |
10 |
|
||||||||
Control reference guide.......................................................... |
11 |
|
||||||||
|
|
|
Basic operations |
|
|
|||||
Disc |
|
|
Basic play................................................................. |
12 |
|
|||||
|
|
|
||||||||
Disc |
|
|
|
Convenient functions............................................... |
14 |
|
||||
|
|
|
|
|||||||
Navigation menus................................................................... |
16 |
|
||||||||
Using On-Screen Menu lcons................................................. |
18 |
|
||||||||
|
|
|
Radio operations |
|
|
|||||
Radio |
..................................................................................... |
|
|
|
|
21 |
|
|||
Manual tuning......................................................................... |
21 |
|
||||||||
Preset tuning........................................................................... |
21 |
|
||||||||
|
|
|
Sound field/Sound quality |
|
|
|||||
Sound field............................................................................ |
22 |
|
||||||||
DOLBY DIGITAL and DTS............................................... |
22 |
|
||||||||
SOUND FIELD CONTROL............................................... |
22 |
|
||||||||
CENTER FOCUS............................................................. |
22 |
|
||||||||
DOLBY PRO LOGIC........................................................ |
23 |
|
||||||||
SUPER SURROUND SOUND......................................... |
23 |
|
||||||||
Volume control of speaker................................................ |
23 |
|
||||||||
Sound quality....................................................................... |
24 |
|
||||||||
Adjust the woofer............................................................. |
24 |
|
||||||||
Double re-master |
|
|
||||||||
|
|
|
|
|
enjoying more natural sound................................... |
24 |
|
|||
|
|
|
|
|
|
|||||
Virtual Rear Surround....................................................... |
24 |
|
||||||||
|
|
|
Other functions |
|
|
|||||
Convenient functions............................................................. |
25 |
|
||||||||
Muting the volume............................................................... |
25 |
|
||||||||
Setting the unit to turn off |
|
SLEEP timer........................... |
25 |
|
||||||
|
|
|||||||||
Use headphones................................................................ |
25 |
|
||||||||
Use Karaoke...................................................................... |
25 |
|
||||||||
Change settings..................................................................... |
26 |
|
||||||||
Common procedures........................................................... |
27 |
|
||||||||
Entering password (Ratings).............................................. |
27 |
|
||||||||
Change the delay time (speaker setting)............................ |
27 |
|
||||||||
Appreciate external signal source/record into other |
|
|||||||||
equipment............................................................................... |
28 |
|
||||||||
Connection of the optional antenna...................................... |
29 |
|
||||||||
|
|
|
Reference |
|
|
|||||
Glossary.................................................................................. |
29 |
RQTC0019 |
||||||||
Specifications........................................................... |
Back cover |
|||||||||
Troubleshooting guide ........................................................... |
30 |
|
||||||||
Maintenance............................................................................. |
31 |
|
||||||||
Getting started
Disc information
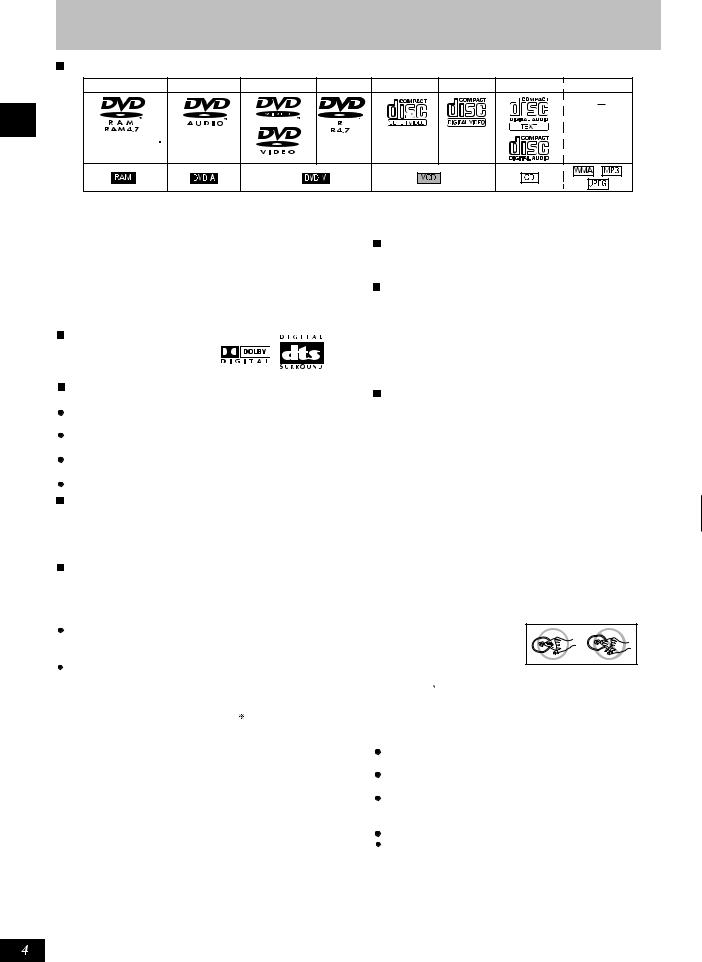
Discs that can be played
DVD-RAM |
DVD-Audio |
DVD-Video |
DVD-R |
SVCD |
VCD |
CD |
CD-R/RW |
Shown as DVD-VR |
|
|
|
Conforming |
|
|
|
on the display |
|
|
|
to IEC62107 |
|
|
|
- |
- |
Use discs with the above logos and that conform to specifications. The unit cannot play other discs correctly. Do not use irregularly shaped discs(e.g. heart-shaped),as these can damage the unit.
It may not be possible to play CD-R,CD-RW,DVD-R and DVD RAM in all cases due to the type of disc or condition of the recording.
 Discs that cannot be played
DVD-ROM,CD-ROM,CDV,CD-G,+RW,DVD-RW,CVD,SACD, Divx Video Disc and Photo CD, DVD-RAM that cannot be removed from their cartridge, 2.6-GB and 5.2-GB DVD-RAM, and  Chaoji VCD
 available on the market including CVD, DVCD and SVCD that do not conform to IEC62107.
Built-in decoders
This unit can play discs with these signs.
HighMAT discs
This unit is compatible with HighMAT discs containing WMA, MP3,and/or JPEG files.
CD-R and CD-RW discs
This unit can play CD-R/RW(audio recording disc)recorded with CD-DA, video CD, SVCD(conforming to IEC62107), WMA,MP3, or JPEG. Finalize the disc after recording.
See page 17 for more information about WMA, MP3, and JPEG.
 A process that allows play on compatible equipment.
Video systems
This unit can play PAL and NTSC, but your television must match the system used on the disc.
PAL discs cannot be correctly viewed on an NTSC television.
This unit can convert NTSC signals to PAL 60 for viewing on a PAL television( page 26, Video-NTSC Disc Output).
Output is interlace(576I),when playing PAL discs.
Playing DVDs and Video CDs
The producer of these discs can control how they are played so you may not always be able to control play as described in these operating instructions(for example if the play time is not displayed or if a Video CD has menus). Read the disc's instructions carefully.
DVD-RAM discs
The DVD-RAM you can play on this unit are those recorded with DVD video recorders,DVD video cameras, personal computers, etc.using Version1.1 of the Video Recording Format ( a unified video recording standard).
Remove discs from their cartridges before use and return them when you are finished, making sure that the labels of the disc and cartridge face the same way.
Some parts of the disc,for example where one program ends and another begins, may not play smoothly.
 DVD-R discs
Panasonic DVD-R recorded and finalized on a Panasonic DVD video recorder or DVD video camera are played as DVD-Video on this unit.
Disc structure
Disc structure and the labels given to the items on discs depend on the disc type.
Title: the largest division on DVD-Video, usually an entire movie.
Chapter: the smallest division on DVD-Video.
Group: collections of tracks on DVD-Audio and equivalent to folders or albums on data discs.
Track: the smallest division on DVD-Audio, CDs and Video CDs, or a single WMA/MP3 file.
Program: the division on DVD-RAM equivalent to a single recording.
Scene: DVD-RAM program sections specified and grouped into play lists on a DVD video recorder.
Play list: the largest grouping unit in the High MAT disk, or a bevy of DVD-RAM shots.
Content: including the musical pieces and images in HighMAT disk.
Picture: a single JPEG file.
 To clean discs
DVD-Audio,DVD-Video,VCD, CD:Wipe with a damp cloth and then wipe dry.
DVD-RAM DVD-R:
 Clean with an optional DVD-RAM/PD disc cleaner (LF-K200DCA1,where available).
 Never use cloths or cleaners for CDs etc.
 Handling precautions
Do not write on the label side with a ball-point pen or other writing instrument.
Do not use record cleaning sprays, benzine, thinner, static electricity prevention liquids or any other solvent.
Do not attach labels or stickers to discs.(Do not use discs with exposed adhesive from tape or left over peeled-off stickers.)
Do not use scratch-proof protectors or covers.
Do not use disc with label printed by the form printers available on the market.
RQTC0019
Handy setting
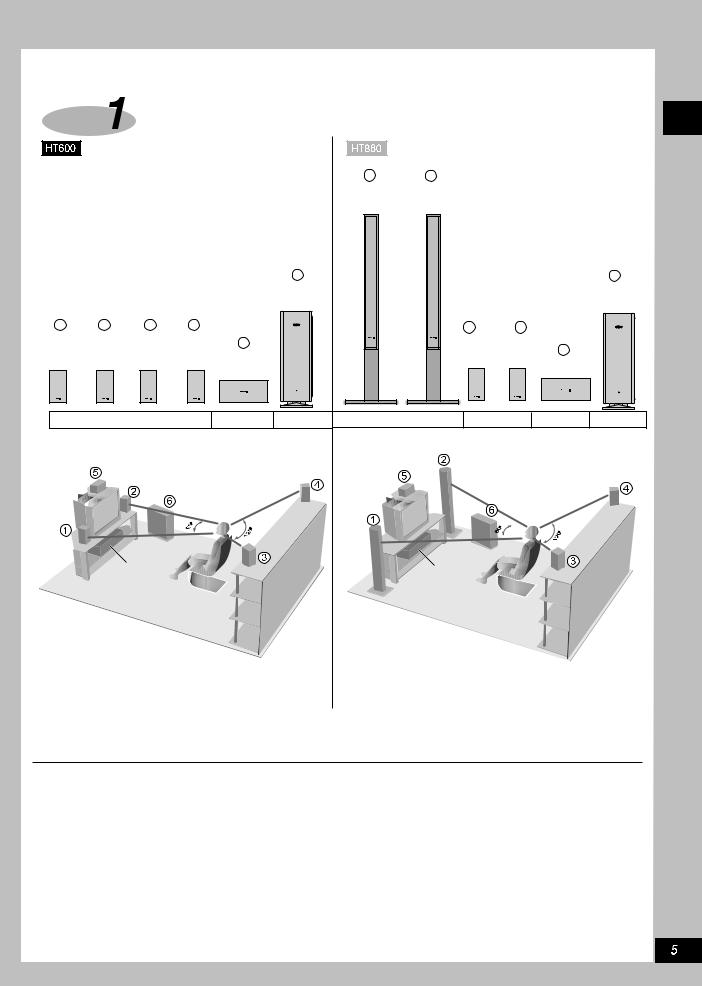
Step Layout
1 2
Front speaker Front speaker (left) (right)
|
|
|
|
|
6 |
|
|
|
|
6 |
|
|
|
|
|
Active |
|
|
|
|
Active |
|
|
|
|
|
Subwoofer |
|
|
|
|
Subwoofer |
1 |
2 |
3 |
4 |
|
|
|
3 |
4 |
|
|
Front |
Front |
Surround |
Surround |
|
|
Surround |
Surround |
|
||
speaker |
speaker |
speaker |
speaker |
5 |
|
|
speaker |
speaker |
5 |
|
(left) |
(right) |
(left) |
(right) |
Center |
|
|
(left) |
(right) |
Center |
|
|
|
|
|
speaker |
|
|
|
|
speaker |
|
|
SB-FS600 |
|
SB-PC600 |
SB-WA600 |
SB-FS860 |
SB-FS600 |
SB-PC600 |
SB-WA600 |
||
Example |
|
|
|
|
|
Example |
|
|
|
|
Main unit |
Main unit |
|
 The front speakers are the same as the surround speakers.
 Locate the front, center and surround speakers at spots with approximately equal distance from the listening area. The angles in the figure are only rough.
Getting started
 Only the attached speakers can be adopted.
If other speakers are used, the unit may be damaged, and affect the sound quality.
 Locate speakers on level and reliable plane in case of falling. If you can not locate them on level planes, take suitable measures to prevent the unit falling.
Optimal location for enjoyment
The way in which the speakers are laid out will have influence upon bass and sound field; the aspects below should be regarded:
 Locate speakers on level and reliable floor.
 If the speakers are located too closely to floors, walls, or corners, extra bass will be generated, shield the walls and windows with thick curtains.
Main unit
To ensure good ventilation, the speaker and main unit must be kept at least 10 cm apart.
Center speaker
 It is acceptable to put the speaker directly under the television.
  If the middle speaker is placed directly on the television, the generated vibration may cause graphics image distortion.
Active Subwoofer
It should be located on the ground or stable support to the left of television for fear of generating vibration.
To the right side of active subwoofer, there should be a space of 10cm in order to ensure the effective operation of the amplifier, and to the back panel of active subwoofer, there should be a space of 10cm in order to ensure ventilation.
RQTC0019

Getting started
Step  Connect the speakers
Speaker cables |
Stickers for |
5m cable x3 |
|
10m cable x2 |
speaker cables |
1 |
Stick the peeled-off stickers onto speaker cables |
|
Sticking peeled-off stickers on speaker cables may facilitate connection. |
|
|
5m cable |
10m cable |
|
|
Brassy |
|
silvery
2 Connect the speakers
Keep the numbers on peeled-off stickers for speaker cables to be consistent with those on the terminals.
RQTC0019
Front speaker |
|
Front speaker |
|
(left) |
|
(left) |
|
silvery |
Brassy |
silvery |
Brassy |
|
|
|
Front speaker |
|
|
|
(right) |
|
Front speaker |
|
|
|
(right) |
|
Surround speaker |
|
Surround speaker |
|
|
|
(left) |
|
(left) |
Active subwoofers |
Surround |
Active subwoofers |
Surround |
|
speaker (right) |
|
speaker (right) |
|
Center speaker |
|
Center speaker |
|
|
|
|
|
Click! |
|
Click! |
Note |
|
|
|
Do not lead to short circuit in positive/ negative pole of speaker cable.
Make sure to connect the positive pole (brassy color) of cable to terminal (+),
the negative pole (silvery color) of speaker cable to terminal (-). Incorrect connection may damage the speaker.

Other methods for installation of center speakers and surround speakers
Attaching to a wall
Note
The walls or beams for hanging speakers should be capable of bearing a weight of 10kg.
1. Screw the screws (not included) into |
2. Fix the speakers upon the screws through the |
the wooden walls. |
holes in the speakers |
|
E.g.Central Speaker |
30-35mm |
level layout |
7.5-9.0mm |
|
8-11mm |
200mm |
|
wall
Precautions on speaker operation
 If the speakers are operated at high volume for long term, they may be damaged and their service life may be shortened.
 In following conditions, please reduce the volume in order to avoid damage.
-When the speakers give out distorted sound.
-When speakers receive the whistle form microphone or record player, the noises from the FM radio, or the continuous signals from oscillator, testing disc or electronic instruments.
-When sound quality is being adjusted.
-When you switch on or off the unit.
Warning
 The speakers can be operated only together with the recommended devices, otherwise, the amplifier or speakers may be damaged, even leading to a fire.
If there is any damage or you feel that there is certain abrupt change, consult professional maintainers  Never hang these speakers in methods other than those described in the operating instruction.
If there are abnormal colors on the television
Although these speakers are designed to be located near televisions, with some combinations of television and equipment, the image may be affected.
If this happens, switch off the television for about 30 minutes.
The demagnetizing function of television can correct the problem; if the problem remains the same, locate the speakers farther from the television.
How to install the baseplate of front speaker and how to use the rear clip
|
Intallation method of |
Screw |
|
front speaker baseplate |
|
|
|
when installing,please avoid the speaker falling over.
The installation is requested to perform on a blanket or a floor covered with soft cloth for fear of damaging the speakers.
Reverse the front speaker box , and place the baseplate on the speaker (with the foot pads upward), and 3 holes in the baseplate should be aligned to the 3 holes in the speaker accordingly .
The screws attached to this packing box are used to place into the 3 holes. Use a screw driver to screw up the 3 screws until the baseplate and speaker tightly joined and secure.Please use proper strength, otherwise,the hole will be damaged.
Reverse the installed speaker, so that the unit is ready for use.
How to use the clip behind speaker
The speaker is equipped with clip at its upper rear, which may be used to prevent the speaker from falling.
User may tie the clip to a solid string, strain and fix the string onto wall behind the speaker or other solid objects.
String |
wall |
(not included) |
|
approx. 150mm 

wall screw (not included)
Speaker clip 

 The wall sur face must be
able to support over 30kg.
Getting started
RQTC0019
blanket

Getting started
Step |
Connect to television |
Video cable |
|
||
Connect the unit to television with |
Connect the unit to television with |
|
VIDEO IN terminal. |
COMPONENT VIDEO IN terminals. |
|
|
Television |
|
|
(not included) |
|
|
VIDEO |
|
|
IN |
|
|
Video cable |
S Video cable |
|
(included) |
(not included) |
Signal grounding terminal
Connect the signal grounding terminal with the earthing wire, so as to minimize the sound distortion in the microphone in Karaoke stereo system.
Connect your unit directly to your television.
Do not connect your unit to the television through the video cassette recorder, otherwise, this will cause the protection of the copy thus resulting in abnormal play of the images.
 Connect the unit to television with S-VIDEO IN terminals.
COMPONENT VIDEO OUT terminal
These terminals are applicable to either interlace output or progressive scanning output, so the pictures are clearer than those output by S-VIDEO OUT terminal.
Connection by these terminals can separately output PB/PR signal and Y signal, so it can reproduce hi-fi colors.
 View image by progressive scanning (NTSC disc only)
1.Connect onto a 480P compatible television with Component Video In terminals.
(If the unit is connected to an incompatible television, the images may not be correctly displayed.)
2.Press [PROGRESSIVE OUT] on the front panel of the
main unit, and the display of the base unit shows:  PROG.
PROG. (
( Page 12).
All Panasonic televisions applying Line-by-Line Scanning technology and with 480P input connectors are compatible. If you own another brand of television, please consult the manufacturer.
S Video cable (not included)
RQTC0019
S-VIDEO OUT terminal
By separating the chrome signal (C) and brightness signal (Y),more vivid pictures can be reproduced than that reproduced by S-VIDEO OUT terminal (actual results depend on the television.)
Connect the Active subwoofer, antenna and AC
Step |
power cord |
|
|
|
|
|
|
||
25 pin connection wire |
AM loop aerial |
FM indoor aerial |
AC power supply cord |
|
Connect the AC power supply cord after all other connections are finished.
Active subwoofers
FM indoor aerial
AM loop aerial
|
|
Erect the aerial on its mounting. |
Fix the |
Click! |
The loose connecting wire should |
other |
be away from other wires and |
|
end of |
|
connecting wires. |
the aerial |
|
at spot with |
|
best reception |
When dismantling, |
|
press and pull out |
shield cord(black) |
the staple. |
|
25 PIN connection wire
L |
1 |
R |
2 |
L |
3 |
R |
4 |
|
5 |
|
A |
For Asia
Before you connect the AC power supply
Prest voltage
(Back of active subwoofer)
Use flat screwdriver to turn the voltage adjusting switch at the rear of active subwoofer to the position matching with the region
where the system installed. If local voltage is 115V or 120V, please set the voltage selector switch as below:
 For 115V: Set it to 110V
 For120V: Set it to 127V
  Factory preset: 240V
Click!
Conserving power
The unit consumes a small amount of power, even when it is turned off (about 0.9W).To save power when the unit is not to be used for a long time, unplug it from the household AC outlet.
Remember that the radio programs and any other memory items should be reset before next operation of the unit.
When dismantling,
press and pull out AC power supply cord the staple.
To socket of domestic power supply
Reference
The data memorized by the unit can be preserved intact at most 2 weeks after the AC power cord is unplugged.
Step  Remote control
 Batteries
Do not:
mix old and new batteries.
use different types at the same time.
heat or expose to flame.
take apart or short circuit.
attempt to recharge alkaline or manganese batteries. use batteries if the covering has been peeled off.
Mishanding of batteries can cause electrolyte leakage which can damage items the fluid contacts and may cause a fire.
Remove if the remote control is not going to be used for a long period of time. Store in a cool, dark place.
 Insert so the poles(+ and-) match those in the remote control.
  Do not use rechargeable type batteries.
Operation
Aim at the sensor, avoiding obstacles, at a maximum range of 7m directly in front of the unit.
Getting started
RQTC0019
Step |
Quick setup |
||
Getting started |
|
|
|
|
|
|
RETURN |
|
1 |
2 |
3 |
|
4 |
5 |
6 |
|
7 |
8 |
9 |
|
|
0 |
10 |
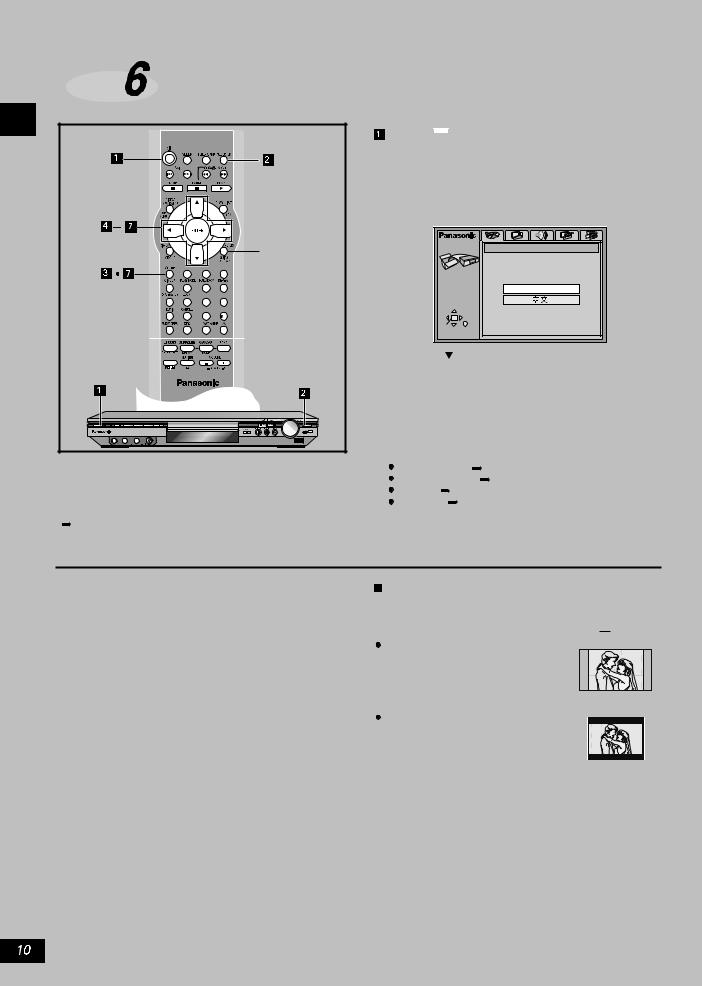
The QUICK SETUP screen sppears when you press [SETUP] the first time after purchase and assists you to make necessary settings.
To access this screen again later
page 26, Others |
|
QUICK SETUP |
|
Preparation
Turn on the television and select the appropriate video input on the television to suit the connections for the player.
Press [  ] to turn on the unit.
 Press [SELECTOR] to select
  DVD/CD
 for signal source.
 Press [SETUP] to show the QUICK SETUP screen.
SETUP |
QUICK SETUP |
|
Select the menu language. |
|
English |
SELECT |
|
ENTER RETURN |
|
 Press [
 , ,
, , ,
, ] to select the menu language and press [ENTER].
 Press [
 ,
, ] to select
  Yes
Yes to continue and press [ENTER].
 Press [
 ,
, ,
, ,
,  ] to select the item and press [ENTER].
Audio language ( |
page 26). |
|
Subtitle language ( |
page 26). |
|
TV Type ( |
below). |
|
TV Aspect ( |
below). |
|
 Press [ENTER] and then [SETUP] to end the settings.
To return to the previous screen
Press [RETURN].
 TV Type
Select an option to suit the television.
 Standard (Direct View TV)
 CRT Projector
 LCD TV/ Projector
 Projection TV
 Plasma TV
TV Aspect
Select  4:3
4:3 (regular)or
  16:9
16:9 (widescreen)to suit your television. If you have a regular 4:3 television,you can also select how
video on some discs is shown(  page 26,Video TV Aspect).
4:3Pan&Scan (Factory preset)
Wide screen program extended to cover all of the 4:3 TV screen (unless otherwise restricted by the CD producer).
4:3 Letterbox
Wide screen program displays on 4:3 TV screen in the form of mailbox.
RQTC0019
 Loading...