


Operating Instructions
Home Theater Audio System
Model No. SC-HTB688
SC-HTB498
SC-HTB488
Thank you for purchasing this product.
Please read these instructions carefully before using this product, and save this manual for future use.
Included Installation Instructions
The installation work should be done by a qualified installation specialist. ( 12 to 17)
Before commencing work, carefully read these installation instructions and the operating instructions to ensure that installation is performed correctly.
(Please keep these instructions. You may need them when maintaining or moving this system.)
Model number suffix “EB” denotes UK model.
|
|
|
|
|
|
|
|
|
|
EG |
|
EB |
|
GN |
TQBJ2019-2 |
|
|
|
|
||||
|
|
|
|
|

Safety precautions
 WARNING
Unit
≥To reduce the risk of fire, electric shock or product damage,
jDo not expose this unit to rain, moisture, dripping or splashing.
jDo not place objects filled with liquids, such as vases, on this unit.
jUse only the recommended accessories. jDo not remove covers.
jDo not repair this unit by yourself. Refer servicing to qualified service personnel.
≥To prevent injury, this apparatus must be securely attached to the wall in accordance with the installation instructions.
AC mains lead
≥To reduce the risk of fire, electric shock or product damage,
jEnsure that the power supply voltage corresponds to the voltage printed on this unit.
jInsert the mains plug fully into the socket outlet. jDo not pull, bend, or place heavy items on the lead. jDo not handle the plug with wet hands. jHold onto the mains plug body when
disconnecting the plug.
jDo not use a damaged mains plug or socket outlet.
≥The mains plug is the disconnecting device. Install this unit so that the mains plug can be unplugged from the socket outlet immediately.
Button-type battery (Lithium battery)
≥Risk of fire, explosion and burns. Do not recharge, disassemble, heat above 60 oC or incinerate.
≥If the button-type battery is swallowed, it can cause severe internal burns in just 2 hours and can lead to death.
≥If the battery compartment does not close securely, stop using the remote control and keep it away from children.
≥If you think batteries might have been swallowed or placed inside any part of the body, seek immediate medical attention.
Small object
≥Keep the screws out of reach of children to prevent swallowing.
≥Keep the button-type battery out of reach of children to prevent swallowing.
≥Keep the screw eyes out of reach of children to prevent swallowing.
 CAUTION
Unit
≥Do not place sources of naked flames, such as lighted candles, on this unit.
≥This unit may receive radio interference caused by mobile telephones during use. If such interference occurs, please increase separation between this unit and the mobile telephone.
≥This unit is intended for use in moderate climates.
≥Product Identification Marking is located on the bottom of the unit.
Placement
≥Place this unit on an even surface.
≥To reduce the risk of fire, electric shock or product damage,
jDo not install or place this unit in a bookcase, built-in cabinet or in another confined space. Ensure this unit is well ventilated.
jDo not obstruct this unit’s ventilation openings with newspapers, tablecloths, curtains, and similar items.
jDo not expose this unit to direct sunlight, high temperatures, high humidity, and excessive vibration.
Button-type battery (Lithium battery)
≥Danger of explosion if battery is incorrectly replaced. Replace only with the type recommended by the manufacturer.
≥Insert with poles aligned.
≥Mishandling of batteries can cause electrolyte leakage and may cause a fire.
jRemove the battery if you do not intend to use the remote control for a long period of time. Store in a cool, dark place.
jDo not heat or expose to flame.
jDo not leave the battery(ies) in a car exposed to direct sunlight for a long period of time with doors and windows closed.
≥When disposing of the batteries, please contact your local authorities or dealer and ask for the correct method of disposal.
2TQBJ2019
Caution for AC Mains Lead
(For the AC mains plug of three pins)
For your safety, please read the following text carefully.
This appliance is supplied with a moulded three pin mains plug for your safety and convenience. A 5-ampere fuse is fitted in this plug.
Should the fuse need to be replaced please ensure that the replacement fuse has a rating of 5- ampere and that it is approved by ASTA or BSI to BS1362.
Check for the ASTA mark Ï or the BSI mark Ì on the body of the fuse.
If the plug contains a removable fuse cover you must ensure that it is refitted when the fuse is replaced.
If you lose the fuse cover the plug must not be used until a replacement cover is obtained.
A replacement fuse cover can be purchased from your local dealer.
Before use
Remove the connector cover.
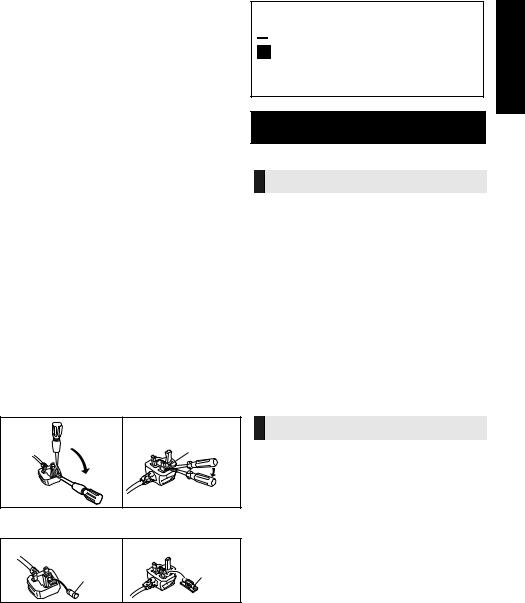
How to replace the fuse
The location of the fuse differ according to the type of AC mains plug (figures A and B). Confirm the AC mains plug fitted and follow the instructions below. Illustrations may differ from actual AC mains plug. 1. Open the fuse cover with a screwdriver.
Figure A |
Figure B |
Fuse cover
2. Replace the fuse and close or attach the fuse cover.
Figure A |
Figure B |
Fuse |
|
Fuse |
(5 ampere) |
|
(5 ampere) |
|
|
|
The symbols on this product (including the accessories) represent the following:
AC
Class II equipment (The construction of the product is double-insulated.)
IOn
ÍStandby
Safety information for customers in Norway
NORSK
ADVARSEL
Produkt
≥For å redusere faren for brann, elektrisk støt eller skade på apparatet:
jUtsett ikke produktet for regn, fukt, drypping eller sprut.
jIkke plasser objekter som er fylt med væske, som vaser, på apparatet.
jBruk kun anbefalt tilbehør. jFjern ikke deksler.
jReparer ikke denne enheten selv, overlat service til kvalifisert servicepersonell.
Vekselstrømnett
≥Nettstøpselet er trukket ut fra denne enheten. Installer denne enheten slik at nettstøpselet umiddelbart kan trekkes fra stikkontakten.
FORSIKTIG
Produkt
≥Plasser ikke åpen ild, slik som levende lys, oppå apparatet.
≥Dette apparatet er beregnet for bruk under moderate klimaforhold.
Plassering
≥For å redusere faren for brann, elektrisk støt eller skade på apparatet:
jIkke plasser apparatet i en bokhylle, et innebygget kabinett eller et annet lukket sted. Pass på at produktet er godt ventilert.
jApparatets ventilasjonsåpninger må ikke dekkes til med aviser, duker, gardiner eller lignende.
Precautions
TQBJ2019 3

≥Operations in this operating instructions are described mainly with the remote control, but you can perform the operations on the main unit if the controls are the same.
≥[HTB688]: indicates features applicable to SC-HTB688 only. [HTB498]: indicates features applicable to SC-HTB498 only. [HTB488]: indicates features applicable to SC-HTB488 only.
Table of contents |
|
Safety precautions............................................................................................ |
2 |
Caution for AC Mains Lead .............................................................................. |
3 |
Before use |
|
Supplied items.................................................................................................. |
5 |
This system ......................................................................................................................... |
5 |
Accessories ......................................................................................................................... |
5 |
Control reference guide................................................................................... |
6 |
This system (Front) .............................................................................................................. |
6 |
This system (Rear) .............................................................................................................. |
7 |
Remote control .................................................................................................................... |
8 |
Getting started |
|
Step 1 Connections......................................................................................... |
9 |
Connection with the TV ....................................................................................................... |
9 |
Connection to a 4K Ultra HD TV ........................................................................................ |
10 |
AC mains lead connection ................................................................................................. |
11 |
Step 2 Placement........................................................................................... |
12 |
Safety Precautions ............................................................................................................ |
12 |
The active subwoofer ........................................................................................................ |
12 |
Wireless interference ......................................................................................................... |
12 |
Selecting the placement method ....................................................................................... |
13 |
When placing the main unit in a rack or on a table ............................................................ |
14 |
When attaching the main unit to a wall .............................................................................. |
15 |
Step 3 Wireless connections........................................................................ |
18 |
Active subwoofer wireless connection ............................................................................... |
18 |
Bluetooth® connection ....................................................................................................... |
18 |
Operations |
|
Using this system ........................................................................................... |
19 |
Advanced operations ..................................................................................... |
20 |
“HDMI CEC” .................................................................................................... |
22 |
Reference |
|
Troubleshooting ............................................................................................. |
23 |
Indicator illumination ..................................................................................... |
25 |
Unit care .......................................................................................................... |
25 |
About Bluetooth® ............................................................................................ |
26 |
Licenses .......................................................................................................... |
26 |
Specifications ................................................................................................. |
27 |
Limited Warranty (ONLY FOR AUSTRALIA)................................................. |
31 |
4TQBJ2019

Supplied items
This system
∏ 1 Main unit (speaker) |
∏ 1 Active subwoofer |
|
≥ ([HTB688]: SU-HTB688) |
≥ ([HTB688]: SB-HWA688) |
|
≥ ([HTB498]: SU-HTB498) |
≥ ([HTB498]: SB-HWA488) |
|
≥ ([HTB488]: SU-HTB488) |
≥ ([HTB488]: SB-HWA488) |
|
|
|
|
|
|
|
|
|
|
Accessories
Check the supplied accessories before using this system.
∏ 1 Remote control (with a |
∏ 2 Wall mount brackets |
∏ 4 Screws |
|
battery) |
(TEKL014, TEKL015) |
(XYN5+J14FJK) |
|
(N2QAYC000115) |
|
|
|
|
|
|
|
|
|
|
|
≥ Product numbers are correct as of December 2016. These may be subject to change.
Disposal of Old Equipment and Batteries
Only for European Union and countries with recycling systems
These symbols on the products, packaging, and/or accompanying documents
mean that used electrical and electronic products and batteries must not be mixed
with general household waste.
For proper treatment, recovery and recycling of old products and used batteries, please take them to applicable collection points in accordance with your national
legislation.
By disposing of them correctly, you will help to save valuable resources and prevent any potential negative effects on human health and the environment.
For more information about collection and recycling, please contact your local municipality.
Penalties may be applicable for incorrect disposal of this waste, in accordance with national legislation.
Note for the battery symbol (bottom symbol):
This symbol might be used in combination with a chemical symbol. In this case it complies with the requirement set by the Directive for the chemical involved.
Precautions
Before use
Getting started
Operations
Reference
TQBJ2019 5

Control reference guide
This system (Front)
1 |
2 |
3 |
4 |
Main unit
Active subwoofer
|
|
A B C |
D E |
|
|
|
11 |
5 |
6 |
7 |
8 |
9 |
10 |
1Standby/on switch (Í/I)
Press to switch the unit from on to standby mode or vice versa. In standby mode, the unit
is still consuming a small amount of power. 2 Adjust the volume of this system ( 19)
3Select the input source ( 19)
“HDMI (ARC)”# “OPTICAL”# “ |
”(Bluetooth®) |
^--------------------------------------------------------------- |
} |
4Select the Bluetooth® device as the source ( 19)
Bluetooth® pairing ( 18)
Disconnecting a Bluetooth® device ( 18) 5 Remote control signal sensor
6Sound mode indicators
Lights when the corresponding sound mode is selected
A STANDARD indicator B MUSIC indicator
C CINEMA indicator D NEWS indicator E VOICE indicator
7SURROUND indicator
Lights when the surround effect is activated
8HDMI (ARC) indicator
Lights when the device connected to the HDMI (ARC) terminal is the audio source
9OPTICAL indicator
Lights when the device connected to the OPTICAL DIGITAL AUDIO IN terminal is the
audio source
10  (Bluetooth®) indicator
Lights when the Bluetooth® device is the audio source
11 WIRELESS LINK indicator ( 18)
6TQBJ2019

This system (Rear)
Main unit
1 |
2 |
3 |
Before use
|
|
Active subwoofer |
1 HDMI (ARC) terminal (ARC compatible) |
2 |
USB port (for service use only) |
( 9, 10) |
3 |
OPTICAL DIGITAL AUDIO IN terminal ( 10) |
§ The I/D SET button is only used when the main unit is not paired with the active subwoofer. ( 24)
TQBJ2019 7

Remote control
1
2
SUBWOOFER 

 5
5
3
4 |
6 |
7
1 Turn the main unit on or off ( 19) 2 Select the sound mode ( 20)
3 Set the surround mode ( 20)
4Adjust the subwoofer level ( 19)
5 Adjust the volume of this system ( 19) 6 Mute the sound ( 20)
7Select the input source
A Select the HDMI (ARC) device as the source ( 19)
B Select the Optical device as the source ( 19)
C Select the Bluetooth® device as the source ( 19)
Bluetooth® pairing ( 18)
Disconnecting a Bluetooth® device ( 18)
∫Before using for the first time
Remove the insulation sheet A.
∫To replace a button-type battery
Battery type: CR2025 (Lithium battery)
≥Set the button-type battery with its (i) mark facing upward.
∫About remote control signal sensor The remote control signal sensor is located on the main unit.
≥ Use the remote control within the correct operation range.
Distance: Within approx. 7 m directly in front Angle: Approx. 30o left and right
8TQBJ2019

Step 1 Connections
≥Turn off all equipment before connection and read the appropriate operating instructions.
Do not connect the AC mains lead until all other connections are completed.
∫ HDMI (High-Definition Multimedia Interface)
≥Use the ARC compatible High Speed HDMI Cables. Non-HDMI-compliant cables cannot be utilised.
≥It is recommended that you use Panasonic’s HDMI cable.
Connection with the TV
 Verify if the TV’s HDMI terminal is labelled “HDMI (ARC)”.
Connection differs depending on the label printed next to the HDMI terminal.
Labelled “HDMI (ARC)”: Connection [A]
Not Labelled “HDMI (ARC)”: Connection [B]
∫ What is ARC?
ARC is an abbreviation of Audio Return Channel, also known as HDMI ARC. It refers to one of the HDMI functions. When you connect the main unit to the terminal labelled “HDMI (ARC)” on the TV, the optical digital audio cable that is usually required in order to listen to sound from a TV is no longer required, and TV pictures and sound can be enjoyed with a single HDMI cable.
 Make the connection.
[A] Labelled “HDMI (ARC)”
HDMI IN (ARC)
TV
Be sure to connect to
A the TV’s ARC compatible terminal. (Refer to the operating
instructions for the TV.)
A HDMI cable
Before use
Getting started
TQBJ2019 9

[B] Not labelled “HDMI (ARC)”
A
B
OPTICAL OUT
TV
HDMI IN
A Optical digital audio cable |
B HDMI cable |
≥When you use the optical digital audio cable, insert the tip correctly into the terminal.
Connection to a 4K Ultra HD TV
This system cannot pass-through the 4K content of a 4K compatible equipment to a 4K Ultra HD TV. However, you can connect the system to a 4K Ultra HD TV to enjoy the 4K content.
Connect both ends to ARC compatible HDMI terminals.
TV |
HDMI IN (ARC) |
HDMI IN (4K) |
(4K compatible)
|
A |
e.g., Blu-ray Disc player |
||||||||
|
|
|
(4K compatible) |
|||||||
|
|
|
||||||||
|
|
|
|
HDMI OUT |
||||||
|
|
|
|
|
|
|
|
|
|
|
|
|
|
|
|
|
|
|
|
|
|
|
|
|
|
|
|
|
|
|
|
|
A
A HDMI cable
≥Refer to the operating instructions of the 4K Ultra HD TV (VIERA) and the 4K/60p compatible equipment for setup and for playing the 4K content.
≥To enjoy multi-channel output from this system, set the audio output of other equipment to Bitstream.
≥The audio signal input to this system is up to 5.1 channels.
10 TQBJ2019
 Loading...