


DVD System
Operating Instructions
Model No. SC-DT300
SC-DT100
SCSC-- SV1SV1
SCSV1
The illustrations show SC-DT300.
[DT300] |
[DT100] |
AUDIO/ VIDEO
[DT300]: indicates features applicable to SC-DT300 only. [DT100]: SC-DT100 only.
EB E GN GCS EE GCT
Region number supported by this player
Region numbers are allocated to DVD players and DVD-Video according to where they are sold.
For the United Kingdom and
Continental Europe
≥The region number of this player is “2”.
≥The player will play DVD-Video marked with labels containing “2” or “ALL”.
Example:
2 ALL |
23 |
5 |
|
|
For Asia
≥The region number of this player is “3”. ≥The player will play DVD-Video marked with
labels containing “3” or “ALL”.
Example:
3 ALL |
23 |
6 |
|
|
For Australia and N.Z.
≥The region number of this player is “4”. ≥The player will play DVD-Video marked with
labels containing “4” or “ALL”.
Example:
4 ALL |
24 |
6 |
|
|
For Russia
≥The region number of this player is “5”.
≥The player will play DVD-Video marked with labels containing “5” or “ALL”.
Example:
5 ALL |
25 |
6 |
|
|
Note:
“EB” on the packaging indicates the United Kingdom.
Before connecting, operating or adjusting this product, please read these instructions completely.
Please keep this manual for future reference.
RQT6387-B

Getting started
Dear customer
Thank you for purchasing this product.
For optimum performance and safety, please read these instructions carefully.
These operating instructions are applicable to models SC-DT300 and SC-DT100.
Unless otherwise indicated, illustrations in these operating instructions are of SC-DT300.
System |
SC-DT300 |
SC-DT100 |
DVD/CD player |
SL-DT300 |
SL-DT100 |
|
|
|
AV control receiver |
SA-DT300 |
SA-DT100 |
|
|
|
Front speakers |
SB-DT300 |
SB-DT100 |
|
|
|
Center speaker |
SB-AFC301 |
SB-AFC301 |
|
|
|
Surround speakers |
SB-AFC301 |
SB-AFC301 |
|
|
|
Subwoofer |
SB-W300 |
SB-W300 |
|
|
|
CAUTION!
THIS PRODUCT UTILIZES A LASER.
USE OF CONTROLS OR ADJUSTMENTS OR PERFORMANCE OF PROCEDURES OTHER THAN THOSE SPECIFIED HEREIN MAY RESULT IN HAZARDOUS RADIATION EXPOSURE.
DO NOT OPEN COVERS AND DO NOT REPAIR YOURSELF. REFER SERVICING TO QUALIFIED PERSONNEL.
WARNING:
TO REDUCE THE RISK OF FIRE, ELECTRIC SHOCK OR PRODUCT DAMAGE, DO NOT EXPOSE THIS APPARATUS TO RAIN, MOISTURE, DRIPPING OR SPLASHING AND THAT NO OBJECTS FILLED WITH LIQUIDS, SUCH AS VASES, SHALL BE PLACED ON THE APPARATUS.
CAUTION!
≥DO NOT INSTALL, OR PLACE THIS UNIT, IN A BOOKCASE,
BUILT-IN CABINET OR IN ANOTHER CONFINED SPACE. ENSURE THE UNIT IS WELL VENTILATED. TO PREVENT RISK OF ELECTRIC SHOCK OR FIRE HAZARD DUE TO OVERHEATING, ENSURE THAT CURTAINS AND ANY OTHER MATERIALS DO NOT OBSTRUCT THE VENTILATION VENTS.
≥DO NOT OBSTRUCT THE UNIT’S VENTILATION OPENINGS
WITH NEWSPAPERS, TABLECLOTHS, CURTAINS, AND SIMILAR ITEMS.
≥DO NOT PLACE SOURCES OF NAKED FLAMES, SUCH AS
LIGHTED CANDLES, ON THE UNIT.
≥DISPOSE OF BATTERIES IN AN ENVIRONMENTALLY FRIEND-
LY MANNER.
This product may receive radio interference caused by mobile telephones during use. If such interference is apparent, please increase separation between the product and the mobile telephone.
[For\Southeast\Asia]
THIS UNIT IS INTENDED FOR USE IN TROPICAL CLIMATES.
[For\others]
THIS UNIT IS INTENDED FOR USE IN MODERATE CLIMATES.
SUOMI
VAROITUS!
LAITTEEN KÄ YTTÄ MINEN |
MUULLA KUIN |
TÄ SSÄ KÄ YT- |
|
TÖ OHJEESSA MAINITULLA |
TAVALLA |
SAATTAA ALTISTAA |
|
KÄ YTTÄ JÄ N TURVALLISUUSLUOKAN |
1 |
YLITTÄ VÄ LLE |
|
NÄ KYMÄ TTÖ MÄ LLE LASERSÄ TEILYLLE. |
|
|
|
VAROITUS:
TULIPALO-, SÄ HKÖ ISKUVAARAN TAI TUOTETTA KOHTAAVAN MUUN VAHINGON VÄ HENTÄ MISEKSI EI LAITETTA SAA ALTISTAA SATEELLE, KOSTEUDELLE, VESIPISAROILLE TAI ROISKEELLE, EIKÄ NESTETTÄ SISÄ LTÄ VIÄ ESINEITÄ , KUTEN ESIMERKIKSI MALJAKOITA, SAA ASETTAA LAITTEEN PÄÄ LLE.
VAROITUS!
≥Ä LÄ |
ASENNA TAI LAITA |
TÄ TÄ |
LAITETTA KABINET- |
|||
TITYYPPISEEN KIRJAKAAPPIIN TAI MUUHUN SULJETTUUN |
||||||
TILAAN, JOTTA TUULETUS ONNISTUISI. VARMISTA, ETTÄ |
||||||
VERHO TAI MIKÄÄ N MUU MATERIAALI EI HUONONNA TUULE- |
||||||
TUSTA, |
JOTTA |
VÄ LTETTÄ ISIIN |
YLIKUUMENEMISESTA |
|||
JOHTUVA SÄ HKÖ ISKUTAI TULIPALOVAARA. |
|
|||||
≥Ä LÄ |
PEITÄ LAITTEEN TUULETUSAUKKOJA |
SANOMALEH- |
||||
DELLÄ , |
PÖ YTÄ LIINALLA, VERHOLLA TAI |
MUULLA VAS- |
||||
TAAVALLA ESINEELLÄ . |
|
|
|
|||
≥Ä LÄ |
ASETA PALAVAA KYNTTILÄÄ |
TAI MUUTA AVOTULEN |
||||
LÄ HDETTÄ LAITTEEN PÄÄ LLE. |
|
|
|
|||
≥HÄ VITÄ |
PARISTOT |
LUONTOA |
VAHINGOITTAMATTOMALLA |
|||
TAVALLA. |
|
|
|
|
||
TÄMÄ LAITE ON TARKOITETTU KÄYTETTÄVÄKSI LEUDOSSA ILMASTOSSA.
NORSK
ADVARSEL!
DETTE PRODUKTET ANVENDER EN LASER.
BETJENING AV KONTROLLER, JUSTERINGER ELLER ANDRE INNGREP ENN DE SOM ER BESKREVENT I DENNE BRUKSANVISNING, KAN FØRE TIL FARLIG BESTRÅ LING.
DEKSLER MÅ IKKE Å PNES, OG FORSØK ALDRI Å REPARERE APPARATET PÅ EGENHÅ ND. ALT SERVICE OG REPARASJONSARBEID MÅ UTFØRES AV KVALIFISERT PERSONELL.
|
|
|
|
|
|
|
|
|
|
|
CLASS 1 |
|
|
||
|
|
|
|
|
|
|
|
|
|
|
LASER PRODUCT |
|
|
||
|
|
|
|
|
|
|
|
|
|
|
|
|
|
|
|
|
|
|
|
|
|
|
|
|
|
|
|
||||
|
|
|
|
|
|
|
|
|
LUOKAN 1 LASERLAITE |
||||||
|
|
(Back of product) |
KLASS 1 LASER APPARAT |
||||||||||||
|
|
DANGER - VISIBLE AND INVISIBLE LASER RADIATION WHEN OPEN. |
|
|
|
||||||||||
|
|
AVOID DIRECT EXPOSURE TO BEAM. |
|
|
(FDA 21 CFR) |
|
|
|
|||||||
|
|
CAUTION - VISIBLE AND INVISIBLE LASER RADIATION WHEN OPEN. |
|
|
|
|
|||||||||
|
|
AVOID EXPOSURE TO BEAM. |
|
|
(IEC60825-1) |
|
|
|
|||||||
|
|
ATTENTIONRAYONNEMENT LASER VISIBLE ET INVISIBLE EN CAS D’OUVERTURE. |
|
|
|
|
|||||||||
|
|
EXPOSITION DANGEREUSE AU FAISCEAU. |
|
|
|
|
|
|
|
||||||
|
|
ADVARSELSYNLIG OG USYNLIG LASERSTRÅ LING VED Å BNING. |
|
|
|
||||||||||
|
|
UNDGÅ UDSÆTTELSE FOR STRÅ LING. |
|
|
|
|
|
|
|
||||||
|
|
VARO! - AVATTAESSA OLET ALTTIINA NÄ KYVÄÄ JA NÄ KYMÄ TÖ N |
|
|
|
||||||||||
|
|
LASERSÄ TEILYLLE. Ä LÄ KATSO SÄ TEESEEN. |
|
|
|
|
|||||||||
|
|
VARNING - SYNLIG OCH OSYNLIG LASERSTRÅ LNING NÄ R DENNA DEL |
|
|
|
||||||||||
|
|
Ä R Ö PPNAD. BETRAKTA EJ STRÅ LEN. |
|
|
|
|
|
|
|
||||||
|
|
ADVARSEL - SYNLIG OG USYNLIG LASERSTRÅ LING NÅ R DEKSEL Å PNES. |
|
|
|
||||||||||
|
|
UNNGÅ EKSPONERING FOR STRÅ LEN. |
|
|
|
|
|
|
|
||||||
|
|
VORSICHT - SICHTBARE UND UNSICHTBARE LASERSTRAHLUNG, WENN ABDECKUNG |
|
(Inside of product) |
|||||||||||
|
|
GEÖ FFNET. NICHT DEM STRAHL AUSSETZEN. |
|
|
|
|
|||||||||
|
|
- |
|
|
|
|
|
|
|
|
|
|
(Tuotteen sisällä) |
||
|
|
|
|
|
|
|
|
|
|
|
|
|
|||
|
|
- |
|
|
|
|
|
|
|
|
|
|
|||
|
|
|
|
|
|
|
|
|
|
RQLS0233 |
(Produktets innside) |
||||
|
|
|
|
|
|
|
|
|
|
|
|||||
|
|
AV control receiver (SA-DT300/SA-DT100) |
|
|
|
||||||||||
2 |
|
|
|
|
|||||||||||
|
Marking sign is located on bottom of the unit. |
|
|
|
|||||||||||
RQT6387 |
|
|
|
||||||||||||
|
|
|
|
|
|
|
|
|
|
|
|
|
|
||
ADVARSEL:
FOR Å REDUSERE FAREN FOR BRANN, ELEKTRISK STØT ELLER SKADER PÅ PRODUKTET, MÅ DETTE APPARATET IKKE UTSETTES FOR REGN, FUKTIGHET, VANNDRÅ PER ELLER VANNSPRUT. DET MÅ HELLER IKKE PLASSERES GJENSTANDER FYLT MED VANN, SLIK SOM BLOMSTERVASER, OPPÅ APPARATET.
ADVARSEL!
≥APPARATET MÅ IKKE PLASSERES I EN BOKHYLLE, ET IN-
NEBYGGET KABINETT ELLER ET ANNET LUKKET STED HVOR VENTILASJONSFORHOLDENE ER UTILSTREKKELIGE. SØRG FOR AT GARDINER ELLER LIGNENDE IKKE FORVERRER VENTILASJONSFORHOLDENE, SÅ RISIKO FOR ELEKTRISK SJOKK ELLER BRANN FORÅ RSAKET AV OVERHETING UNNGÅ S.
≥APPARATETS VENTILASJONSÅ PNINGER MÅ IKKE DEKKES
TIL MED AVISER, BORDDUKER , GARDINER OG LIGNENDE. ≥PLASSER IKKE Å PEN ILD, SLIK SOM LEVENDE LYS, OPPÅ
APPARATET.
≥BRUKTE BATTERIER MÅ KASSERES UTEN FARE FOR MIL-
JØET.
DETTE APPARATET ER BEREGNET TIL BRUK UNDER MODERATE KLIMAFORHOLD.

Accessories
Please check and identify the supplied accessories. Use numbers indicated in parentheses when asking for replacement parts.
∏ 1 Remote control
[DT300] (N2QAJB000049)
[DT100] (For The United Kingdom and
Continental Europe: N2QAJB000048)
(For others: N2QAJB000058)
∏ 2 Batteries
for remote control
∏ 1 AC mains lead
[For\the\United\Kingdom] [For\Australia\and\N.Z.]
(RJA0053-3X) (RJA0035-2X)
[For\others]
(RJA0019-2X)
∏ 1 AM loop antenna
(REK0063)
∏1 FM indoor antenna
(RSA0007)
∏1 Video cable
(RJL1P019B15)
∏ 2 Speaker cables [DT300]
(REX1129)
∏ 1 Sheet of speaker feet (small)
(25 feet)
∏ 1 Sheet of speaker feet (large)
(10 feet)
∏4 Spikes [DT300]
(RGG0210-S)
∏1 Sheet of speaker pads [DT300]
(8 pads)
∏ 1 Cleaning cloth for main unit (RFE0088-1)
∏ 1 Sheet of speaker-cord stickers
(RQCA0950)
[For\the\United\Kingdom\only]
∏1 Antenna plug adaptor
(SJP9009)
[For\the\United\Kingdom,\Continental\Europe\and\Russia\
∏1 RCAJ adaptor
(VFA0151-2)
Note
The included AC mains lead is for use with this unit only. Do not use it with other equipment.
Table of contents
Getting started
Accessories . . . . . . . . . . . . . . . . . . . . . . . . . . . . . . 13 Caution for AC Mains Lead . . . . . . . . . . . . . . . . . 4 Disc information . . . . . . . . . . . . . . . . . . . . . . . . . . 5 Disc handling . . . . . . . . . . . . . . . . . . . . . . . . . . . . . 5
Simple setup
STEP 1 Locating . . . . . . . . . . . . . . . . . . . . . . . . . . |
6 |
|
|
STEP 2 Connecting the speakers [DT100] . . . . . . |
7 |
started |
|
STEP 4 Antennas and AC mains lead . . . . . . . |
10 |
||
Connecting the speakers [DT300] . . . . . . |
8 |
|
|
STEP 3 Television and flat cable . . . . . . . . . . . |
10 |
|
|
STEP 5 The remote control . . . . . . . . . . . . . . . . |
11 |
Getting |
|
STEP 6 Selecting TV screen type |
11 |
||
|
|||
Control reference guide . . . . . . . . . . . . . . . . . . . . |
12 |
|
Disc operations
Discs—Basic play . . . . . . . . . . . . . . . . . . . . . . . . . 13
Playing MP3/Resume function . . . . . . . . . . . . . . . . . . . . . . . . 14 Skipping chapters or tracks . . . . . . . . . . . . . . . . . . . . . . . . . . . 15 Fast forward and rewind—SEARCH . . . . . . . . . . . . . . . . . . . . 15 Slow-motion play . . . . . . . . . . . . . . . . . . . . . . . . . . . . . . . . . . . 15 Frame-by-frame viewing . . . . . . . . . . . . . . . . . . . . . . . . . . . . . 15 Starting play from a selected title or track . . . . . . . . . . . . . . . . 15 Selecting groups to play . . . . . . . . . . . . . . . . . . . . . . . . . . . . . 15
Selecting still pictures—Page Skip . . . . . . . . . . . . . . . . . . . . . 15
Discs—Convenient functions . . . . . . . . . . . . . . . 16
A-B repeat play/Repeat play . . . . . . . . . . . . . . . . . . . . . . . . . . 16 To enjoy even higher quality sound—AUDIO ONLY . . . . . . . . 16 All group play/Program play/Random play . . . . . . . . . . . . . . . 17
Changing soundtracks, subtitle languages
and angles . . . . . . . . . . . . . . . . . . . . . . . . . . . . . 18 Using Graphical User Interface (GUI) screens . . 19
Common procedures . . . . . . . . . . . . . . . . . . . . . . . . . . . . . . . . 19 Disc information . . . . . . . . . . . . . . . . . . . . . . . . . . . . . . . . . . . . 20 Unit information . . . . . . . . . . . . . . . . . . . . . . . . . . . . . . . . . . . . 20 Shuttle screen . . . . . . . . . . . . . . . . . . . . . . . . . . . . . . . . . . . . . 21
Radio operations
The radio: manual tuning . . . . . . . . . . . . . . . . . . . 22 The radio: preset tuning . . . . . . . . . . . . . . . . . . . . 23
Sound quality/sound field operations
Sound field . . . . . . . . . . . . . . . . . . . . . . . . . . . . . . . 24
DOLBY DIGITAL and DTS/DOLBY PRO LOGIC . . . . . . . . . . . 25 SUPER SURROUND . . . . . . . . . . . . . . . . . . . . . . . . . . . . . . . 26 CENTER FOCUS . . . . . . . . . . . . . . . . . . . . . . . . . . . . . . . . . . 26 Changing sound field and quality . . . . . . . . . . . . . . . . . . . . . . 26 Adjusting the bass . . . . . . . . . . . . . . . . . . . . . . . . . . . . . . . . . . 26 Turning the subwoofer off . . . . . . . . . . . . . . . . . . . . . . . . . . . . 26
Other functions
Convenient functions . . . . . . . . . . . . . . . . . . . . . . 27
Muting the volume . . . . . . . . . . . . . . . . . . . . . . . . . . . . . . . . . . 27 Turning off the display . . . . . . . . . . . . . . . . . . . . . . . . . . . . . . . 27 Timer functions . . . . . . . . . . . . . . . . . . . . . . . . . . . . . . . . . . . . 27 Using headphones . . . . . . . . . . . . . . . . . . . . . . . . . . . . . . . . . 27
Changing settings . . . . . . . . . . . . . . . . . . . . . . . . . 28
Language code list . . . . . . . . . . . . . . . . . . . . . . . . . . . . . . . . . 28 Common procedures . . . . . . . . . . . . . . . . . . . . . . . . . . . . . . . . 29 Entering a password (Ratings) . . . . . . . . . . . . . . . . . . . . . . . . 29 Changing the delay time . . . . . . . . . . . . . . . . . . . . . . . . . . . . . 29
Using the remote control with other equipment . . 30 Listening to an external source/
Recording to other equipment . . . . . . . . . . . . . 31 Optional antenna connections . . . . . . . . . . . . . . . 32
Reference
Safety precautions . . . . . . . . . . . . . . . . . . . . . . . . 33 Glossary . . . . . . . . . . . . . . . . . . . . . . . . . . . . . . . . . 33 Troubleshooting guide . . . . . . . . . . . . . . . . . . . . . 34 Maintenance . . . . . . . . . . . . . . . . . . . . . . . . . . . . . 35 3 Specifications . . . . . . . . . . . . . . . . . . . . Back cover RQT6387
Caution for AC Mains Lead
(For United Kingdom)
(“EB” area code model only)
For your safety, please read the following text carefully.
started |
This appliance is supplied with a moulded three pin |
|
mains plug for your safety and convenience. |
||
|
||
|
A 5-ampere fuse is fitted in this plug. |
|
Getting |
Should the fuse need to be replaced please ensure |
|
Check for the ASTA mark Ï or the BSI mark Ì on |
||
|
that the replacement fuse has a rating of 5-ampere |
|
|
and that it is approved by ASTA or BSI to BS1362. |
|
|
the body of the fuse. |
|
|
If the plug contains a removable fuse cover you must |
|
|
ensure that it is refitted when the fuse is replaced. |
|
|
If you lose the fuse cover the plug must not be used |
|
|
until a replacement cover is obtained. |
|
|
A replacement fuse cover can be purchased from |
|
|
your local dealer. |
CAUTION!
IF THE FITTED MOULDED PLUG IS UNSUITABLE FOR THE SOCKET OUTLET IN YOUR HOME THEN THE FUSE SHOULD BE REMOVED AND THE PLUG CUT OFF AND DISPOSED OF SAFELY.
THERE IS A DANGER OF SEVERE ELECTRICAL SHOCK IF THE CUT OFF PLUG IS INSERTED INTO ANY 13-AMPERE SOCKET.
If a new plug is to be fitted please observe the wiring code as stated below.
If in any doubt please consult a qualified electrician.
IMPORTANT
The wires in this mains lead are coloured in accordance with the following code:
Blue: Neutral, Brown: Live.
As these colours may not correspond with the coloured markings identifying the terminals in your plug, proceed as follows:
The wire which is coloured Blue must be connected to the terminal which is marked with the letter N or coloured Black or Blue.
The wire which is coloured Brown must be connected to the terminal which is marked with the letter L or coloured Brown or Red.
4
WARNING: DO NOT CONNECT EITHER WIRE TO THE EARTH TERMINAL WHICH IS MARKED WITH THE LETTER E, BY THE EARTH SYMBOL Ó OR
COLOURED GREEN OR GREEN/YELLOW.
THIS PLUG IS NOT WATERPROOF—KEEP DRY.
Before use
Remove the connector cover.
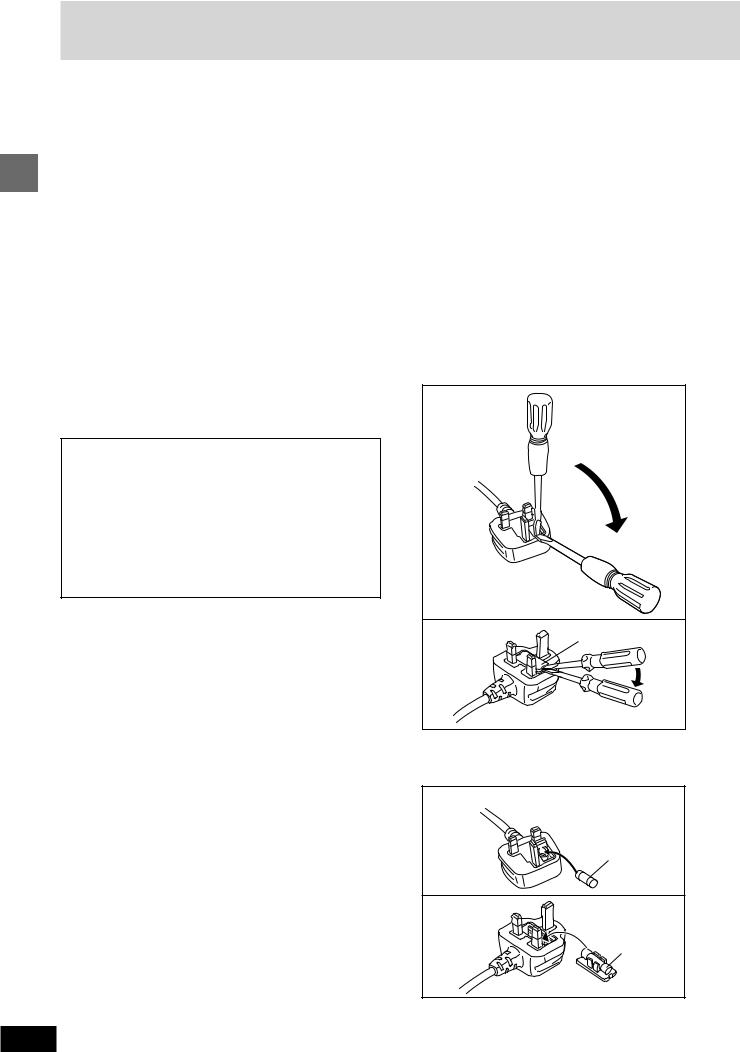
How to replace the fuse
The location of the fuse differ according to the type of AC mains plug (figures A and B). Confirm the AC mains plug fitted and follow the instructions below.
Illustrations may differ from actual AC mains plug.
1. Open the fuse cover with a screwdriver.
Figure A
Figure B |
Fuse cover |
2.Replace the fuse and close or attach the fuse cover.
Figure A
Fuse
(5 ampere)
Figure B
Fuse
(5 ampere)
RQT6387

Disc information
∫ Discs that can be played
Disc type |
Logo |
|
|
|
|
|
|
|
|
|
|
|
|
|
Indication used in |
||||||||||||||||
|
|
|
|
|
|
|
|
|
|
|
|
|
|
|
|
|
|
|
|
|
|
|
|
|
|
|
|
|
|
|
instructions |
|
|
|
|
|
|
|
|
|
|
|
|
|
|
|
|
|
|
|
|
|
|
|
|
|
|
|
|
|
|
|
|
[DT300] |
|
|
|
|
|
|
|
|
|
|
|
|
|
|
|
|
|
|
|
[DVD-A] |
|||||||||||
DVD-Audio |
|
|
|
|
|
|
|
|
|
|
|
|
|
|
|
|
|
|
|
|
|||||||||||
|
|
|
|
|
|
|
|
|
|
|
|
|
|
|
|
|
|
|
|
|
|
|
|
|
|
|
|
|
|
|
|
DVD-Video |
|
|
|
|
|
|
|
|
|
|
|
|
|
|
|
|
|
|
|
[DVD-V] |
|||||||||||
|
|
|
|
|
|
|
|
|
|
|
|
|
|
|
|
|
|
|
|
|
|
|
|
|
|
|
|
|
|
|
|
|
|
|
|
|
|
|
|
|
|
|
|
|
|
|
|
|
|
|
|
|
|
|
|
|
|
|
|
|
|
|
|
|
|
|
|
|
|
|
|
|
|
|
|
|
|
|
|
|
|
|
|
|
|
|
|
|
|
|
|
|
|
|
|
DVD-R
Audio CD |
[CD] |
(Including CD-R/RW and discs recorded with MP3)
Video CD |
[VCD] |
∫ Discs that cannot be played
DVD-Audio([DT100]), DVD-ROM, DVD-RAM, CD-ROM, CDV, CD-G, iRW, DVD-RW, CVD, SVCD, SACD, Divx Video Discs and Photo
CD.
∫ Playing DVDs and Video CDs
The producer of these discs can control how they are played so you may not always be able to control play as described in these operating instructions. Read the disc’s instructions carefully.
∫ Video systems
This unit can play both the PAL and NTSC video systems. To view
PAL or NTSC, however, your television must match the system used on the disc.
PAL discs cannot be correctly viewed on an NTSC television. NTSC can be correctly viewed on a PAL television by converting the video signal to PAL 60 ( page 28, Video—NTSC Disc Output).
∫ CD-R and CD-RW discs
This unit can play CD-DA (digital audio) and video CD format audio CD-R and CD-RW that have been finalized (a process that enables
CD-R/CD-RW players to play audio CD-R and CD-RW) upon completion of recording.
It may not be able to play some CD-R or CD-RW due to the condition of the recording.
∫ DVD-R discs
Panasonic DVD-R recorded and finalized on a Panasonic DVD video recorder are played as DVD-Video on this unit.
It may not be possible to play these discs in all cases due to the type of disc or condition of the recording.
Disc handling
Do not use irregularly shaped discs, such as heart-shaped.
(These can damage the unit.)
∫ How to hold a disc
Do not touch the recorded surface.
∫ If the surface is dirty
Wipe it with a damp cloth and then wipe dry.
∫ If the disc is brought from a cold to a warm environment, moisture may form on the disc
Wipe with a soft, dry, lint-free cloth before using the disc.
∫ Handling precautions
≥Do not write on the label side with a ball-point pen or other writing instrument.
≥Do not use record cleaning sprays, benzine, thinner, static electricity prevention liquids or any other solvent.
≥Do not attach labels or stickers to discs. (Do not use discs with exposed adhesive from tape or left over peeled-off stickers.)
≥Do not use scratch-proof protectors or covers.
≥Do not use discs printed with label printers available on the market.
∫ Do not place or store discs in the following places
≥Locations exposed to direct sunlight
≥Humid or dusty locations
≥Locations directly exposed to a heat vent or heating appliance
Getting started
5
RQT6387
Simple setup
6
Simple setup
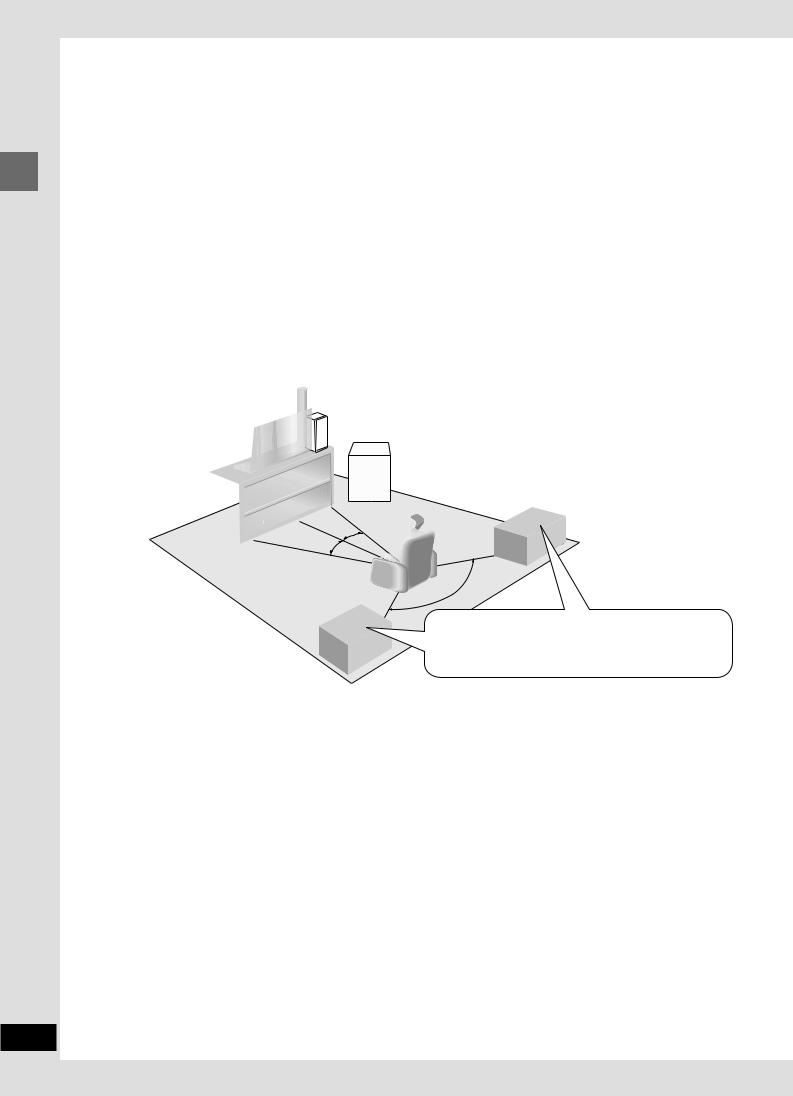
STEP1 Locating [DT300] ]DT100]
Use only supplied speakers
Using other speakers can damage the unit and sound quality will be negatively affected.
Set the speakers up on an even surface to prevent them from falling. Take proper precautions to prevent the speakers from falling if you cannot set them up on an even surface.
Place the front, center, and surround speakers at approximately the same distance from the seating position. The angles in the diagram are approximate.
Front speakers (1 Left 2 Right)
[DT300] SB-DT300 |
[DT100] SB-DT100 |
≥Place it at least 15 cm away from wall surfaces to avoid distortion and unwanted acoustical effects.
≥The left and right speakers are the same.
Main unit
Keep your speakers at least 10 mm away
from the system for  1 proper ventilation.
Stacking
AV control receiver
6
30
˚ 30
3
DVD/CD Player
Center speaker (5) SB-AFC301
≥You can also put this speaker directly under the television.
≥Do not place the center speaker on the main unit as sound quality will be affected.
≥Vibration caused by the center speaker can disrupt the picture if it is placed directly on the television. Put the center speaker on a rack or shelf.
Subwoofer (6) SB-W300
Place near the television, on the floor or a sturdy shelf so that it won’t cause vibration.
4
Surround speakers (3 Left 4 Right) SB-AFC301
Place either side of the seating position, or slightly to the rear, about 1 meter higher than ear level.
≥The left and right speakers are the same.
≥After you have completed setup and connection, wind the excess cord and keep together with string.
≥The front speaker nets can be removed.
Notes on speaker use
≥You can damage your speakers and shorten their useful life if you play sound at high levels over extended periods.
≥Reduce the volume in the following cases to avoid damage. –When playing distorted sound.
–When the speakers are receiving howling from a microphone or record player, noise from FM broadcasts, or continuous signals from an oscillator, test disc, or electronic instrument.
–When adjusting the sound quality. –When turning the unit on or off.
Caution
≥Use the speakers only with the recommended system.
Failure to do so may lead to damage to the amplifier and/or the speakers, and may result in the risk of fire. Consult a qualified service person if damage has occurred or if you experience a sudden change in performance.
≥Do not attempt to attach these speakers to walls using methods other than those described in this manual.
If irregular coloring occurs on your television
These speakers are designed to be used close to a television, but the picture may be affected with some televisions and setup combinations.
If this occurs, turn the television off for about 30 minutes.
The television’s demagnetizing function should correct the problem. If it persists, move the speakers further away from the television.
RQT6387

STEP2 Connecting the speakers [DT100]
1 Attach the stickers to the speaker cords.
Attach the speaker-cord stickers to make connection easier.
FRONT L, R |
|
SURROUND, CENTER |
|
e.g.) FRONT L |
|
e.g.) CENTER |
|
FRONT |
CENTER |
L ch |
|
1 |
5 |
speaker-cord stickers
SUBWOOFER
SUB
WOOFER
6
2 Connecting
Match the labels on the speaker stickers with the labels on the terminals.
|
|
AV control receiver |
|
|||
Insert with the hook |
|
SUB |
|
|
FRONTHF/LF |
|
down, until it clicks |
WOOFER CENTER SURROUND |
|||||
|
|
|
|
|
|
|
into place. |
|
|
|
|
|
|
|
|
6 |
5 4 |
3 2 |
1 |
|
|
|
|
R |
L |
R |
L |
Hook |
B FE |
|
|
|
|
|
|
R |
|
|
|
|
|
|
O |
6 |
|
|
|
|
|
SU O |
|
CENTER5 |
|
|
|
|
W |
|
|
|
||
|
|
|
|
|
SURROUNDRch4 |
|
|
|
|
|
|
|
SURROUNDLch3 |
|
|
|
CENTER |
|
|
F |
|
|
|
|
|
|
T |
|
|
|
|
|
|
N |
|
|
|
|
|
|
O Rch2 |
|
|
|
|
|
|
R |
T
N
O Lch1
SURROUND(R) |
R |
|
F |
SUBWOOFER
SURROUND(L)
FRONT(R)
FRONT(L)
To disconnect
Press on the hook and pull.
3 Attach the speaker feet.
≥Attach the speaker feet to the bases of the speakers to help stop them from moving due to vibration. ≥You can set the speakers up at an angle by attaching two large speaker feet to the front of each speaker.
To face up
Base
Simple setup
|
Sheet of |
Sheet of |
To attach center and surround speakers to a wall or |
|
Sheet of |
speaker feet |
speaker feet |
|
|
speaker feet |
(large) |
(small ) |
speaker stands ( page 9) |
7 |
(small ) |
|
|
|
RQT6387 |
|
|
|
|

Simple setup
8
Simple setup
STEP2 Connecting the speakers [DT300]
These front speakers are bi-wired for high quality sound reproduction.
1 Attach the stickers to the speaker cords.
Attach the speaker-cord stickers to make connection easier.
FRONT L, R |
|
SURROUND, CENTER |
e.g.) FRONT L |
|
e.g.) CENTER |
FRONT |
|
|
HF |
|
|
Lch |
|
|
|
FRONT |
|
|
Lch |
|
FRONT |
1 |
CENTER |
LF Lch |
|
|
|
|
5 |
SUBWOOFER
SUB
WOOFER
6
speaker-cord stickers
2 Connecting
Match the labels on the speaker stickers with the labels on the terminals.
FRONT
Insert with the hook |
AV control receiver |
|
|
|
|
||||||
|
|
|
|
|
|
|
|
||||
down, until it clicks |
SUB |
|
|
FRONTHF/LF |
|
|
|
||||
into place. |
|
|
WOOFER CENTER SURROUND |
|
|
|
|||||
|
|
|
|
|
|
|
|
|
|
||
|
|
|
NT |
|
|
|
|
|
FRO |
|
|
|
|
O |
6 |
5 4 |
3 |
2 |
1 |
|
|
||
|
|
Rch |
L ch |
|
|||||||
|
|
FR |
|
|
|
|
|
|
|
NT |
|
|
FH |
|
2 |
|
R |
L |
R |
L |
1 |
|
|
hcR |
|
|
|
|
|
|
|
|
|
Lch FH |
|
F |
|
|
|
|
|
|
|
|
|
||
TNOR |
|
|
|
|
|
|
|
|
|
TNOFR |
|
|
|
|
Hook |
|
|
|
|
|
|
|
|
|
FRONT |
|
|
|
|
|
|
|
LFRONT |
||
|
Rch |
|
|
|
|
|
|
|
|
F L |
ch |
HF |
LF |
|
|
|
|
|
|
|
|
|
|
|
|
|
|
|
|
|
|
|
|
|
|
|
To prevent damage to circuitry, never short-circuit pos- |
|||||||
LF |
itive (r) and negative (s) speaker wires. |
|
||||||
|
Push the lever in the di- |
|
|
|
|
|||
|
rection |
indicated by the |
|
|
HF |
Copper |
||
|
|
|
|
|||||
Right |
allow, |
insert |
the |
wire, |
|
|
|
|
then release the lever. |
|
|
|
|
||||
|
|
|
|
|
||||
|
Copper: r |
|
|
|
|
LF |
Silver |
|
|
|
|
|
|
Copper |
|||
HF: High Frequency |
Silver: s |
|
|
|
|
|
||
|
|
|
|
|
|
|
|
|
LF: Low Frequency |
|
|
|
|
|
|
Silver |
|
|
|
|
|
|
|
|
|
|
SURROUND, CENTER, SUBWOOFER |
|
|
AV control receiver |
|
||||
|
|
|
SUB |
|
FRONTHF/LF |
|
||
|
|
|
WOOFER CENTER SURROUND |
|
||||
|
|
|
6 |
5 4 |
3 2 |
1 |
|
|
|
|
|
|
R |
L |
R |
L |
|
|
Hook |
R |
E |
|
|
|
|
|
|
|
|
SUBOOFE6 |
R |
|
|
|
|
|
|
|
N 5 |
|
|
|
|
|
|
|
|
|
T |
|
|
|
|
|
|
|
W |
E |
|
|
|
|
|
|
|
|
C |
|
|
|
|
|
|
|
|
|
|
UND |
4 |
|
|
|
|
|
|
|
h |
|
|
|
|
|
|
|
|
O c |
|
|
|
|
|
|
|
|
RRR |
|
|
|
|
|
|
|
|
SU |
|
|
|
|
|
|
|
|
|
|
D |
|
|
|
|
|
|
|
|
UN |
|
|
|
|
|
|
|
|
h |
|
|
|
|
|
|
|
|
ROc 3 |
|
|
|
|
|
|
|
|
R L |
|
|
|
|
|
|
|
|
SU |
|
|
|
|
CENTER |
|
|
|
|
|
|
|
|
SURROUND(R) |
|
|||
|
SUBWOOFER |
|
|
SURROUND(L) |
||||
|
|
|
|
|
|
|
||
To disconnect |
|
|
|
|
|
|
|
|
Press on the hook and pull. |
|
|
|
|
|
|
|
|
HF
LF
Left
RQT6387

3 Attach the spikes and speaker feet to the bases of the front speakers.
These help stop the speakers from moving due to vibration and also change their angle.
Speaker net |
≥Remove the seals from the adhesive surfaces of the spikes and |
|
speaker feet. |
|
≥Be sure to attach the spikes to the front of the speaker's base. |
Spikes |
Sheet of |
|
speaker feet |
|
(small ) |
To protect surfaces from scratching |
|
1. Adhere two pads together. |
2. Place the pads under the spikes. |
Adhesive surface
 Pads
Pads
≥If you put the speakers in a position where it is not appropriate to attach the spikes, attach speaker feet in ther place. ≥Use speaker feet for the remaining speakers.
≥You can set the surround and center speakers up at an angle by attaching two large speaker feet to the front.
To face up
Base
|
Sheet of |
Sheet of |
|
speaker feet |
speaker feet |
Sheet of |
(large) |
(small) |
|
|
|
speaker feet |
|
|
(small ) |
|
|
[DT300] ]DT100]
Attaching to a wall
Center and surround speakers can be attached to a wall.
Set the speaker onto screw and slide through bracket to lock into position.
Screw
(not included)
Speaker feet
30–35 mm

 7.5–9.5 mm
7–9 mm
Attaching to speaker stands
Ensure the following conditions are met when you purchase your speaker stands.
≥Observe the diameter and length of the screws and the distance between screws as shown in the diagram.
≥The stands must be able to support over 10 kg .
≥The stands must be stable even if the speakers are in a high position.
5 mm,
pitch 0.8 mm 60 mm
Attach the stands |
|
|
|
|
|
|
|
|
|
|
|
|
|
|
|
|
|
|
|
|
|
|
|
|
|
|
|
|
|
|
|
|
|
|
|
|
|
|
|
|
|
|
|
|
|
|
|
|
|
|
|
|
|
|
|
|
|
|
|
Plate thickness |
|
||||||||
with these holes. |
|
||||||||
plus 7 to 10 mm |
|
||||||||
|
|
||||||||
|
Speaker stand |
|
|||||||
|
(not included) |
|
|||||||
Note
The wall or pillar on which the speakers are to be attached should be capable of supporting 10 kg per screw.
Simple setup
9
RQT6387

Simple setup
Simple setup
STEP3 Television and flat cable [DT300] ]DT100]
Connect directly to your television.
Do not connect the unit through a video cassette recorder, because the picture may not be played correctly due to the copy guard.
[For\the\United\Kingdom,\Continental\Eupope\and\Russia]
Use the RCAJ adaptor (included) if your television has a 21-pin SCART terminal. You do not have to connect anything to the AUDIO terminals.
VIDEO |
Video |
IN |
|
|
cable |
|
(included) |
VIDEO
OUT
To connect |
To unplug |
|
cable |
cable |
|
|
2 |
1 |
|
|
|
|
1 |
|
VIDEO OUT
S-VIDEO  OUT
OUT 
Video cable |
Video terminal |
|
|
(included) |
To your |
|
|
|
television |
|
RCAJ adaptor |
|
Audio terminals |
S-VIDEO OUT terminal
The S-video terminal achieves a more vivid picture than the VIDEO
OUT terminal by separating the chrominance (C) and luminance(Y) signals. (Actual results depend on the television.)
STEP4 Antennas and AC mains lead [DT300] ]DT100]
FM indoor antenna |
Adhesive tape |
Fix the other end of the antenna where reception is best.
3

 2
2
1 1
AC IN
Noise filter
To household mains socket
AC mains lead (included)
≥Leave the noise filter attached.
10
AM loop antenna
Stand the antenna up on its base.
Keep loose antenna cord away from other wires and cords.
[For\the\United\Kingdom\only]
BE SURE TO READ THE CAUTION FOR THE AC MAINS LEAD ON PAGE 4 BEFORE CONNECTION.
Insertion of connector |
Appliance inlet |
||
Even when the connector is perfectly |
|||
|
Connector |
||
inserted, depending on the type of inlet |
|
||
|
|
||
used, the front part of the connector |
|
|
|
may jut out as shown in the drawing. |
|
|
|
However there is no problem using the unit. |
Approx. 6 mm |
||
|
|
||
Conserving power
The unit consumes power (approx. 0.7 W) even when it is turned off with [Í]. To save power when the unit is not to be used for a long time, unplug it from the household mains socket. Remember to reset the radio stations and any other memory items before using the unit again.
For your reference
Information you enter into the unit’s memory remains intact for up to a week after the AC mains lead is disconnected.
RQT6387
STEP5 The remote control [DT300] ]DT100]
∫ Batteries
Do not;
≥mix old and new batteries.
≥use different types at the same time. ≥heat or expose to flame.
≥take apart or short circuit.
≥attempt to recharge alkaline or manganese batteries. ≥use batteries if the covering has been peeled off.
Mishandling of batteries can cause electrolyte leakage which can damage items the fluid contacts and may cause a fire.
Remove if the remote control is not going to be used for a long period of time. Store in a cool, dark place.
R6, AA, UM-3
1
3
≥Insert so the poles (i and j) match those in the remote control. ≥Do not use rechargeable type batteries.
∫ Use
Aim at the sensor, avoiding obstacles, at a maximum range of 7 m directly in front of the unit.
STEP6 Selecting TV screen type [DT300] ]DT100]
2 |
|
TV |
FM MODE |
1·3 |
|
|
TUNER/BAND DVD/CD |
||||
X SKIP W |
SLOW/SEARCH |
||||
|
|||||
|
VCR |
TV/AV |
|
|
|
|
|
AUDIO ONLY |
|
||
|
TOP MENU |
|
|
MENU |
|
|
TEST |
|
|
CH |
|
5·6·7 |
|
|
|
SELECT |
|
|
|
SET |
|
||
|
|
ENTER |
|
||
|
GROUP |
|
|
PAGE |
|
4·8 |
TIMER |
|
|
RETURN |
|
|
OSD |
|
|
RETURN |
|
|
|
|
|
ANGLE |
|
|
RDS |
SETUP |
AUDIO |
SUBTITLE |
|
|
PLAY MODE |
|
|
|
|
|
|
1 |
2 |
3 |
|
|
DISPLAY |
|
|
|
|
|
|
4 |
5 |
6 |
|
Change the setting to suit your television.
The menu language is set to English, but you can change it
( page 28, Display—Menu Language). English is used in the examples.
Preparation
Turn on the television and select the appropriate video input on the television to suit the connections for the unit.
1 Press either [DVD/CD] or [TUNER/BAND] to set the remote control to operate this unit.
2 Press [Í] to turn on the unit.
3 Press [DVD/CD] to select “DVD”.
4 Press [SETUP] to show the menus.
SETUP |
Disc |
|
|
Audio |
English |
|
Subtitle |
Automatic |
|
Menus |
English |
SELECT |
Ratings |
Level 8 |
|
5 Press [2, 1] to select the “Video” tab.
6 Press [3, 4] to select “TV Aspect” and press [ENTER].
7 Press [3, 4] to select the item and press [ENTER].
≥4:3 Pan&Scan (Factory preset) Select if you have a regular television and to view 16:9 software in the pan and scan style.
16:9 software prohibited from being shown in the pan and scan style will appear in the letterbox style despite the setting here.
≥4:3 Letterbox
Select if you have a regular television and to view 16:9 software in the letterbox style.
≥16:9
Select if you have a widescreen (16:9) television.
Use the television’s screen modes to change the way the picture is shown.
8 Press [SETUP] to end the settings.
To return to the previous screen
Press [RETURN].
Simple setup
11
RQT6387
 Loading...