


 Operating Instructions Instrucciones de funcionamiento Instrukcja obsługi Návod k obsluze Käyttöohjeet
CD Stereo System Sistema estéreo con reproductor de discos compactos Zestaw stereo z CD Stereosystém s CD CD-stereojärjestelmä
Model No. SC-AKX710
Thank you for purchasing this product.
For optimum performance and safety, please read these instructions carefully.
Please keep this manual for future reference.
Muchísimas gracias por haber adquirido este aparato.
Lea con atención estas instrucciones para obtener las máximas prestaciones y seguridad. Guarde este manual para su consulta en el futuro.
Dziękujemy za zakupienie tego produktu.
Proszę dokładnie zapoznać się z tą instrukcją obsługi, aby jak najlepiej wykorzystać to urządzenie i zapewnić jego bezpieczne użytkowanie.
Prosimy o zachowanie niniejszej instrukcji obsługi.
Děkujeme za zakoupení tohoto výrobku.
Pro dosažení optimálního výkonu a z bezpečnostních důvodu si pečlivě přečtěte tyto pokyny. Uschovejte si prosím tento návod k obsluze.
Kiitos, että hankit tämän tuotteen.
Lue nämä ohjeet huolellisesti parhaan suorituskyvyn ja turvallisuuden takaamiseksi.
Säilytä ohje tulevaa tarvetta varten.
E |
TQBJ2107 |

These operating instructions are applicable to the following system.
System |
SC-AKX710 |
Main unit |
SA-AKX710 |
Speakers |
SB-AKX700 |
Your system and the illustrations can look differently.

 back of product
The symbols on this product (including the accessories) represent the following:
AC
Class II equipment (The construction of the product is double-insulated.)
ON
Standby
Recording and playback of content on this (or any other) device may require permission from the copyright owner. Panasonic has no authority to and does not grant you that permission and explicitly disclaims any right, ability or intention to obtain such permission on your behalf. It is your responsibility to ensure that your use of
this or any other device complies with applicable copyright law in your country.
TQBJ2107
2
Safety precautions
WARNING!
Unit
•To reduce the risk of fire, electric shock or product damage,
–Do not expose this unit to rain, moisture, dripping or splashing.
–Do not place objects filled with liquids, such as vases, on this unit.
–Use the recommended accessories.
–Do not remove covers.
–Do not repair this unit by yourself. Refer servicing to qualified service personnel.
–Do not let metal objects fall inside this unit.
CAUTION!
Unit
•To reduce the risk of fire, electric shock or product damage,
–Do not install or place this unit in a bookcase, built-in cabinet or in another confined space. Ensure this unit is well ventilated.
–Do not obstruct this unit’s ventilation openings with newspapers, tablecloths, curtains, and similar items.
–Do not place sources of naked flames, such as lighted candles, on this unit.
•This unit is intended for use in moderate climates.
•This unit may receive radio interference caused by mobile telephones during use. If such interference occurs, please increase separation between this unit and the mobile telephone.
•This unit utilizes a laser. Use of controls or adjustments or performance of procedures other than those specified herein may result in hazardous radiation exposure.
•Set the unit up on an even surface away from direct sunlight, high temperatures, high humidity, and excessive vibration.
AC mains lead
•The mains plug is the disconnecting device. Install this unit so that the mains plug can be unplugged from the socket outlet immediately.
Battery
•Danger of explosion if battery is incorrectly replaced. Replace only with the type recommended by the manufacturer.
•When disposing of the batteries, please contact your local authorities or dealer and ask for the correct method of disposal.
•Do not heat or expose to flame.
•Do not leave the battery(ies) in a car exposed to direct sunlight for a long period of time with doors and windows closed.
•Do not break open or short-circuit the battery.
•Do not charge the alkaline or manganese battery.
•Do not use the battery if the cover has peeled off.
•Remove the battery if you do not use the remote control for a long period of time. Keep in a cool, dark area.
2

Table of contents
Safety precautions. . . . . . . . . . . . . . . . . . . . . . . . . . . . . .2 Sales and Support Information . . . . . . . . . . . . . . . . . . . .3 Caution for AC mains lead. . . . . . . . . . . . . . . . . . . . . . . .3 Supplied accessories. . . . . . . . . . . . . . . . . . . . . . . . . . . .4 Placement of speakers . . . . . . . . . . . . . . . . . . . . . . . . . .4 Preparing the remote control . . . . . . . . . . . . . . . . . . . . . .4 Making the connections. . . . . . . . . . . . . . . . . . . . . . . . . .5 Overview of controls . . . . . . . . . . . . . . . . . . . . . . . . . . . .6 Preparing media . . . . . . . . . . . . . . . . . . . . . . . . . . . . . . .8 Media playback . . . . . . . . . . . . . . . . . . . . . . . . . . . . . . . .9 Radio . . . . . . . . . . . . . . . . . . . . . . . . . . . . . . . . . . . . . . .10 Recording . . . . . . . . . . . . . . . . . . . . . . . . . . . . . . . . . . . 11 Sound effects. . . . . . . . . . . . . . . . . . . . . . . . . . . . . . . . .13 Illumination. . . . . . . . . . . . . . . . . . . . . . . . . . . . . . . . . . .13 DJ functions. . . . . . . . . . . . . . . . . . . . . . . . . . . . . . . . . .13 Using a microphone. . . . . . . . . . . . . . . . . . . . . . . . . . . .14 Karaoke . . . . . . . . . . . . . . . . . . . . . . . . . . . . . . . . . . . . .15 Clock and timers . . . . . . . . . . . . . . . . . . . . . . . . . . . . . .15 External equipment . . . . . . . . . . . . . . . . . . . . . . . . . . . .16 Others . . . . . . . . . . . . . . . . . . . . . . . . . . . . . . . . . . . . . .17 Maintenance . . . . . . . . . . . . . . . . . . . . . . . . . . . . . . . . .17 Troubleshooting. . . . . . . . . . . . . . . . . . . . . . . . . . . . . . .17 Specifications. . . . . . . . . . . . . . . . . . . . . . . . . . . . . . . . .20 References . . . . . . . . . . . . . . . . . . . . . . . . . . . . . . . . . .21
Sales and Support Information
For the United Kingdom and Ireland
Customer Communications Centre
•For customers within the UK: 0344 844 3899
•For customers within Ireland: 01 289 8333
•Monday – Friday 9:00am – 5:00pm (Excluding public holidays).
•For further support on your product, please visit our website: www.panasonic.co.uk
Direct Sales at Panasonic UK
•Order accessory and consumable items for your product with ease and confidence by phoning our Customer Communications Centre Monday – Friday 9:00am – 5:00pm (Excluding public holidays).
•Or go on line through our Internet Accessory ordering application at www.pas-europe.com.
•Most major credit and debit cards accepted.
•All enquiries transactions and distribution facilities are provided directly by Panasonic UK.
•It couldn’t be simpler!
Also available through our Internet is direct shopping for a wide range of finished products. Take a browse on our website for further details.
Caution for AC mains lead |
|
|
|
ENGLISH |
|||
This appliance is supplied with a moulded three pin mains |
|||
(For the AC mains plug of three pins) |
|
||
For your safety, please read the following text carefully. |
|
||
plug for your safety and convenience. |
|
||
A 5-ampere fuse is fitted in this plug. |
|
||
Should the fuse need to be replaced please ensure that |
|
||
the replacement fuse has a rating of 5-ampere and that it |
|
||
is approved by ASTA or BSI to BS1362. |
|
||
Check for the ASTA mark  or the BSI mark
  on the body of the fuse.
If the plug contains a removable fuse cover you must ensure that it is refitted when the fuse is replaced.
If you lose the fuse cover the plug must not be used until a replacement cover is obtained.
A replacement fuse cover can be purchased from your local dealer.
Before use
Remove the connector cover.
How to replace the fuse
The location of the fuse differ according to the type of AC mains plug (figures A and B). Confirm the AC mains plug fitted and follow the instructions below.
Illustrations may differ from actual AC mains plug. 1. Open the fuse cover with a screwdriver.
Figure A |
Figure B |
Fuse cover
2. Replace the fuse and close or attach the fuse cover.
Figure A |
Figure B |
Fuse (5 ampere)
Fuse (5 ampere)
TQBJ2107
3
3

Supplied accessories
Check and identify the supplied accessories.
Product numbers correct as of April 2018. These may be subject to change.
2 AC mains leads
For the United Kingdom and Ireland
(K2CT2YY00089)
1 Ferrite core
(J0KG00000037)
1 AM loop antenna
(N1DYYYY00011)
1 FM indoor antenna
(RSAX0002)
1 Remote control
(N2QAYB001198)
1 Remote control battery
For the United Kingdom and Ireland
1 Antenna plug adaptor
(K1YZ02000013)
CAUTION!
Keep the antenna plug adaptor out of reach of children to prevent swallowing.
Note:
Use the AC mains lead that is suitable for your household mains socket.
Placement of speakers
The left and right speakers are the same.
Use only the supplied speakers.
You can cause damage to the system and decrease the sound quality if you use other speakers.
Note:
•Keep your speakers more than 10 mm from the main unit for ventilation.
•Put the speakers on a flat safe surface.
•These speakers do not have magnetic shielding. Do not put them near TVs, PCs or other equipment easily influenced by magnetism.
•When you play at high levels for a long period, it can cause damage to the speakers and decrease the life of the speakers.
•Decrease the volume in these conditions to prevent damage:
–When the sound is distorted.
–When you adjust the sound quality.
CAUTION!
•Use the speakers only with the recommended system. If not, you can cause damage to the amplifier and speakers and can cause a fire.
Consult an approved service personnel if damage occurs or if there is a sudden apparent change in performance.
•Do not modify the speaker or speaker wires as this can cause damage to the system.
•Do the procedures included in these instructions when you attach the speakers.
•Do not touch the speaker cone’s reverberating surfaces:
–This may damage the speaker cone.
–The speaker cone may be hot.
TQBJ2107
4
Preparing the remote control
Use alkaline or manganese battery.
Install the battery so that the poles (+ and –) align with those in the remote control.
4

Making the connections
Connect the AC mains lead only after all the other connections have been made.
4 |
3 |
2 |
|
SPEAKERS ( TO SB-AKX700 ) |
|||
|
1
1Connect the AM loop antenna.
Stand the antenna up on its base until it clicks.
2Connect the FM indoor antenna.
Put the antenna where reception is best.
Adhesive tape
(not supplied)
For the United Kingdom and Ireland
Connect the FM outdoor antenna.
Use an outdoor antenna if reception is poor.
 FM outdoor antenna


 (not supplied)
 75 Ω coaxial cable


 (not supplied) Antenna plug adaptor
Note:
•Do not use the outdoor antenna during a lightning storm.
•Disconnect the outdoor antenna if you do not use the system.
3Connect the speakers.
Connect the speaker cables to the corresponding terminal.
4Connect the AC mains lead.
Do not use any other AC mains lead except the supplied one.
(For the AC mains plug of three pins)
READ THE “Caution for AC mains lead” BEFORE CONNECTION.
To household mains socket
Attaching the ferrite core near to the terminal
A Pull on the tabs (both sides) to open.
B Put the AC mains lead onto one of the concave surfaces.
C Coil the AC mains lead around the ferrite core and
onto the other concave surface.
D Close the ferrite core until it clicks.
Note:
Failure to attach the ferrite core to the AC mains lead may cause interference to other devices nearby.
Conserving power
The system consumes a small amount of power even when it is in standby mode. Disconnect the power supply if you do not use the system.
Some settings will be lost after you disconnect the system. You have to set them again.
Note:
SPEAKERS ( TO SB-AKX700 ) |
Keep the antennas away from the speaker cables and the AC |
|||
|
|
|
|
mains lead to avoid picking up noise. |
|
|
|
|
|
|
|
|
|
|
|
|
|
|
|
|
|
|
|
|
|
|
|
|
|
|
|
|
|
|
|
|
|
|
|
|
|
|
|
|
|
|
|
|
|
|
|
|
|
|
ENGLISH
TQBJ2107
5
5

Overview of controls
Do the procedures with the remote control. You can also use the buttons on the main unit if they are the same.
A Standby/on switch [`], [1]
Press to switch the unit from on to standby mode or vice versa. In standby mode, the unit is still consuming a small amount of power.
B Numeric buttons
To select a 2-digit number Example: 16: [ 10]=[1]=[6]
C Decrease the brightness of the display panel
The illumination effect is also switched off. To cancel, press the button again.
D Select the audio source
Press [SELECT <, >] (main unit: [SELECT]) repeatedly to select the source:
USBAA USBBB
USBBB CD
CD FM
FM FMAM
FMAM
MEMORYMEMORYBLUETOOTHBLUETOOTHAUX DAUX-IN
On the main unit:
To start Bluetooth® pairing, press and hold [ ]. E Basic playback control
F Select DJ effect or DJ sampler G View the content information H Select the Karaoke effects
I Select MP3 album or track
Press [ALBUM/TRACK] to select album or track.
Browse tracks or albums
Press [R, T] or turn [MULTI CONTROL] to browse. To start playback from the selection, press [4/9].
J View the setup menu
K Recording operation control
L Operate a Panasonic TV (compatible models only) Point the remote control to a Panasonic TV: [`/TV]: Switch on or switch off the TV
[AV/INPUT]: Change the video input mode of the TV [VOL +/–]: Adjust the volume level of the TV
M Adjust the volume level
N Mute the sound
To cancel, press the button again.
“MUTE” is also cancelled when you adjust the volume or when you switch off the system.
O Select the sound effects
P Adjust the microphone volume level Q Select DJ jukebox or Karaoke jukebox R Select the illumination effects
S Select or confirm the option T View the play menu
U Set the sleep timer
TQBJ2107
6
6

ENGLISH
SOUND |
SELECT |
K
VOL
SELECT
KARAOKE
VOL
MIC VOL
MIC 1 |
MIC 2 |
VOpen or close the disc tray
WKnob for DJ and multi control
XDisc tray
YMicrophone jack
ZUSB A
USB port ( ) USB status indicator Play MP3 tracks.
a USB B
USB port ( ) USB status indicator Play MP3 tracks.
Record sound or music tracks.
bDisplay panel
cRemote control sensor
Distance: Within approximately 7 m Angle: Approximately 20° up and down,
30° left and right
dSelect the DJ function direct buttons
Press [JUKEBOX] or [DJ] to switch on the DJ function. Press [DJ1] to [DJ6] on the main unit to select the desired function.
To cancel, press the selected [DJ1] to [DJ6] again.
TQBJ2107
7
7

Preparing media
Disc
1Press [x] on main unit to open the disc tray.
Put in a disc with the label facing up. Press again to close the disc tray.
2Press [SELECT <, >] repeatedly to select “CD”.
USB
Preparation
Before you connect a USB device to the system, make sure you do a backup of the data.
1Decrease the volume and connect the USB device
to the USB port.
Hold the main unit when connecting or disconnecting the USB device.
2Press [SELECT <, >] repeatedly to select “USB A”
or “USB B”.
USB status indicator lights up in red when selected.
Note:
•Do not use a USB extension cable. The system cannot recognise USB device connected through a cable.
•Some devices cannot be charged as the maximum USB charging current is 500 mA only.
Bluetooth®
You can connect and play an audio device wirelessly through Bluetooth®.
Preparation
•Switch on the main unit.
•Switch on the Bluetooth® feature of the device and put the device near the system.
•Read the operating instructions of the device for details.
█ Pairing a device
Preparation
If this system is connected to a Bluetooth® device, disconnect it (~8).
1 |
Press [ ]. |
2 |
If “PAIRING” is shown, continue with step 3. |
Press [PLAY MENU] repeatedly to select |
|
3 |
“PAIRING” and then press [OK]. |
Select “SC-AKX710” from the Bluetooth® menu of |
|
|
the device. |
|
If prompted for a passkey, input “0000” or “1234”. |
|
The device connects with this system automatically |
|
after pairing is complete. |
|
The MAC address (example: 6C:5A:B5:B3:1D:0F) |
|
may be shown before “SC-AKX710” is shown. |
|
The name of the connected device is shown for a few |
TQBJ2107 |
seconds. |
|
8
Using the main unit
1Press and hold [ ] until “PAIRING” is shown.
2Select “SC-AKX710” from the Bluetooth® menu of the device.
Note:
You can pair up to 8 devices with this system. If a 9th device is paired, the device that has not been used for the longest time will be replaced.
█ Connecting a device
Preparation
If this system is connected to a Bluetooth® device, disconnect it (~8).
1Press [ ].
].
“BLUETOOTH READY” is shown.
2Select “SC-AKX710” from the Bluetooth® menu of
the device.
The name of the connected device is shown for a few seconds.
3Start playback on the device.
Note:
•A device must be paired to connect.
•This system can only connect to one device at a time.
•When “BLUETOOTH” is selected as the source, this system will automatically try to connect to the last connected device. (“LINKING” is shown during this process.)
█ Disconnecting a device
While a Bluetooth® device is connected
1Press [PLAY MENU] repeatedly to select “DISCONNECT?”.
2Press [Y, U] to select “OK? YES” and then press
[OK].
“BLUETOOTH READY” is shown. To cancel, select “OK? NO”.
Using the main unit
Press and hold [ ] until “PAIRING” is shown.
Note:
A device is disconnected when you:
•Select a different source.
•Move the device out of the maximum range.
•Disable the Bluetooth® transmission of the device.
•Switch off the system or the device.
8
Media playback
The following marks indicate the availability of the feature.
 : CD-R/RW in CD-DA format or with MP3 files. USB : USB device with MP3 files.
BLUETOOTH :Bluetooth® device.
MEMORY : Internal memory (refer to “Recording” on page 11 for adding tracks to the internal memory).
Basic playback
BLUETOOTH MEMORY
Play |
|
Press [4/9]. |
|||||||
Stop |
|
Press [8]. |
|||||||
|
|
|
|
|
MEMORY |
is memorised. |
|||
|
|
The |
|
position |
|||||
|
|
“RESUME” is shown. |
|||||||
|
|
Press again to stop fully. |
|||||||
Pause |
|
Press [4/9]. |
|||||||
|
Press again to continue playback. |
||||||||
Skip |
Press [2/3] or [5/6] to skip track. |
||||||||
|
|
|
|
|
|
|
MEMORY |
|
|
|
|
Press [R, T] to skip MP3 album. |
|||||||
Search |
|
Press and hold [2/3] or [5/6]. |
|||||||
Note:
Depending on the Bluetooth® device, some operations may not work.
Viewing available information
BLUETOOTH MEMORY
You can view the available information, such as MP3 album and track number, on the display panel.
Press [DISPLAY] repeatedly.
Example: MP3 album and track number display.
Play menu
MEMORY
1Press [PLAY MENU].
2Press [Y, U] to select the setting and then press
[OK].
OFF |
Cancel the setting. |
|
PLAYMODE |
|
|
1-TRACK |
Play one selected track. |
|
1 |
|
Press the numeric buttons to select the |
|
|
track. |
1-ALBUM |
Play one selected MP3 album. |
|
1 |
|
Press [R, T] to select the MP3 album. |
RANDOM |
Play all tracks randomly. |
|
RND |
|
|
1-ALBUM |
Play all tracks in one selected MP3 |
|
RANDOM |
album randomly. |
|
1 |
RND |
Press [R, T] to select the MP3 album. |
ALL REPEAT |
Repeat all tracks. |
|
|
|
|
1-TRACK |
Repeat 1-TRACK. |
|
REPEAT |
|
|
1 |
|
|
1-ALBUM |
Repeat 1-ALBUM. |
|
REPEAT |
|
|
1 |
|
|
RANDOM |
Repeat random playback. |
|
REPEAT |
|
|
RND |
|
|
1-ALBUM |
Repeat 1-ALBUM RANDOM. |
|
RANDOM |
|
|
REPEAT |
|
|
1 |
RND |
|
|
|
|
Note:
•During random playback, you cannot skip to tracks which have been played.
•The setting is cancelled when you open the disc tray or disconnect the USB device.
|
|
|
|
|
|
|
|
|
|
Album |
Track |
|||
number |
number |
|||
Note:
•Maximum characters that can be shown: Approximately 32
•This system supports ver. 1.0, 1.1 and 2.3 ID3 tags.
•Text data that the system does not support can show differently.
ENGLISH
TQBJ2107
9
9

Link mode
BLUETOOTH
You can change the link mode to suit the connection type.
Preparation
If this system is connected to a Bluetooth® device, disconnect it (~8).
1Press [PLAY MENU] repeatedly to select “LINK MODE”.
2Press [Y, U] to select the mode and then press
[OK].
MODE 1 Emphasis on connectivity.
MODE 2 Emphasis on sound quality. (default)
Note:
•When enjoying video contents with this function, the video and audio output may not be synchronised. In this case, select “MODE 1”.
•Select “MODE 1” if the sound is interrupted.
█ Note on disc
•This system can play CD-R/RW with CD-DA or MP3 format content.
•Before playback, finalise the disc on the device it was recorded on.
•Some CD-R/RW cannot be played because of the condition of the recording.
█ Note on USB device
•This system does not guarantee connection with all USB devices.
•This system supports USB 2.0 full speed.
•This system can support USB devices of up to 32 GB.
•Only FAT 12/16/32 file system is supported.
█ Note on MP3 file
•Files are defined as tracks and folders are defined as albums.
•Tracks must have the extension “.mp3” or “.MP3”.
•Tracks will not necessarily be played in the order you recorded them.
•Some files can fail to work because of the sector size.
MP3 file on disc
•This system can access up to:
–255 albums (including root folder)
–999 tracks
–20 sessions
•Disc must conform to ISO9660 level 1 or 2 (except for extended formats).
MP3 file on USB device
•This system can access up to:
–800 albums (including root folder)
–8000 tracks
–999 tracks in one album
Radio
Preparation
Press [SELECT <, >] repeatedly to select “FM” or “AM”.
Manual tuning
1Press [PLAY MENU] repeatedly to select “TUNE MODE”.
2Press [Y, U] to select “MANUAL” and then press
[OK].
3Press [2/3] or [5/6] to tune in to the
station.
To tune automatically, press and hold the button until the frequency starts changing quickly.
“STEREO” is shown when a stereo broadcast is being received.
Memory presetting
You can preset up to 30 FM and 15 AM stations.
█ Automatic presetting
1Press [PLAY MENU] to select “A. PRESET”.
2Press [Y, U] to select “LOWEST” or “CURRENT” and then press [OK].
LOWEST |
Tuning begins from the lowest |
|
frequency. |
CURRENT |
Tuning begins from the current |
|
frequency. |
The tuner presets all the stations it can receive into the channels in ascending order.
To cancel, press [8].
█ Manual presetting
1Press [PLAY MENU] repeatedly to select “TUNE MODE”.
2Press [Y, U] to select “MANUAL” and then press
[OK].
3Press [2/3] or [5/6] to tune in to the station.
4Press [OK].
5Press the numeric buttons to select a preset
number.
Do steps 3 through 5 again to preset more stations. The new station replaces any station that occupies the same preset number.
TQBJ2107
10
10
█ Selecting a preset station
1Press [PLAY MENU] repeatedly to select “TUNE MODE”.
2Press [Y, U] to select “PRESET” and then press
[OK].
3Press the numeric buttons, [2/3] or [5/6] to select the preset station.
Improving the sound quality
When “FM” is selected
1Press [PLAY MENU] repeatedly to select “FM MODE”.
2Press [Y, U] to select “MONO” and then press
[OK].
To cancel, select “STEREO”.
“MONO” is also cancelled when you change the frequency.
To memorise the setting
Continue with step 4 of “Manual presetting” (~10).
When “AM” is selected
1Press [PLAY MENU] repeatedly to select “B.PROOF”.
2Press [Y, U] to select the setting that provides the best reception and then press [OK].
Checking the signal status
When “FM” is selected
Press [DISPLAY] to select "FM STATUS".
FM – – – – The FM signal is weak.
|
The system is not tuned in to a station. |
FM ST |
The FM signal is in stereo. |
FM MONO |
“MONO” is selected as the “FM MODE”. |
|
The FM signal is in monaural. |
RDS broadcasting
This system can show the text data transmitted by the radio data system (RDS) available in some areas.
Press [DISPLAY] repeatedly.
PS |
Programme service |
PTY |
Programme type |
FREQ |
Frequency |
Note:
RDS may not be available if reception is poor.
AM allocation setting |
|
|
||
ENGLISH |
||||
By main unit only |
||||
|
||||
This system can also receive AM broadcasts allocated in |
|
|||
10 kHz steps. |
|
|||
1 |
Press [SELECT] repeatedly to select “AM”. |
|
||
2 |
Press and hold [SELECT]. |
|
||
|
||||
After a few seconds, the display panel shows the current minimum radio frequency. Release the button when the minimum frequency changes.
•To go back to the initial setting, do the above steps again.
•Preset frequencies are erased after you change the setting.
Recording
This system can record up to 800 folders (maximum 999 tracks in an album) or a total of 8000 tracks, depending on the available storage capacity of the internal memory or the USB device in USB B .
To check storage space
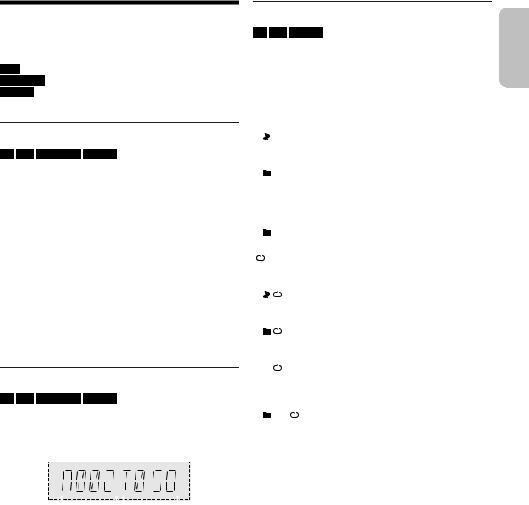
In the stop mode, press [DISPLAY] repeatedly.
Example: Remaining recording time of the internal memory.
|
|
|
|
|
|
|
|
|
|
|
|
|
|
|
|
|
|
|
|
|
|
|
|
|
|
|
|
Internal memory |
Remaining |
|||||
source |
recording time |
|||||
•“UPDATE” is shown when the system is reading the USB device.
•“NO DEVICE” is shown if there is no USB device connected to USB B .
To select where recordings are kept
1Press [SETUP] repeatedly to select “REC TO?”.
2Press [Y, U] to select “MEMORY” or “USB B” and then press [OK].
Note:
•All recordings are in “.mp3” format.
•You cannot do recording when you are using random playback mode.
•The DJ function or Karaoke function is switched off when you start recording.
•Repeat playback mode is cancelled during recording.
•A new album is added each time you do a recording.
•The sequence of album may change after the recording.
•The recordings are kept in a folder named “REC_DATA” in the USB device or the internal memory.
•USB status indicator blinks in red during USB recording.
TQBJ2107
11
11

Basic recording
1Select the source you want to record.
CD-DA
Prepare the disc playback mode.
Record all |
Select “OFF PLAYMODE” (~9). |
tracks |
|
Record a |
Select “1-TRACK” (~9). |
specified track |
|
Make sure the disc is stopped.
Radio
Tune in to the radio station.
AUX
Connect and play the equipment (~16).
2Press [REC 7/9] to start recording.
The name of the folder that keeps the recording is shown.
Stop recording |
Press [8]. “WRITING” is shown. |
Pause |
Press [REC 7/9] during recording. |
recording |
Press again to continue recording. |
|
Note: |
|
You can pause during recording from the |
|
radio, AUX (except in “SYNCHRO” mode). |
|
A track mark is added every time you |
|
pause (~12). |
Note:
•Wait for a few seconds for the system to prepare the USB device before you start recording.
•When the next track of the disc is being recorded, it will be shown on the display.
█ High-speed recording
CD-DA disc recording speed:
CD, CD-R: Three times (3x) the normal speed.
CD-RW: Two times (2x) the normal speed.
1Put in the disc you want to record.
2Press [REC MODE] to select “NORMAL” or “HI-SPEED” and then press [OK].
3Press [REC 7/9] to start recording.
Note:
•If you cannot record at high-speed because of the condition of the disc, record at normal speed.
•The sound is muted during high-speed recording.
TQBJ2107
12
█ Adding track marks
When recording from radio or AUX, you can divide tracks using various modes.
Before recording
Press [REC MODE] to select the mode.
MANUAL |
Add a track mark manually. |
|
Press [OK] during recording to add a |
|
track mark. |
|
Note: |
|
Recording is automatically divided in |
|
60-minute per track. |
SYNCHRO |
Recording starts automatically when |
(For AUX |
the other equipment starts to play. |
source) |
Recording pauses when it detects |
|
silence for 3 seconds. |
TIME MARK |
A track is automatically divided at |
|
5-minute intervals. |
Note:
•During recording, if you press [OK] or pause recording while using “TIME MARK” mode, the 5-minute counter is reset.
•You cannot add track marks manually in “SYNCHRO” mode.
Recording MP3 tracks
You can record MP3 tracks from:
• MP3 disc to USB B or internal memory
• USB A to USB B or internal memory
•USB B to internal memory or vice versa
1 Prepare the source you want to record.
Record all |
Select “OFF PLAYMODE” |
tracks |
(~9). |
Record a |
Select “1-ALBUM” or “1-TRACK” |
specified |
(~9). |
album or track |
|
2Press [REC 7/9] to start recording.
To check the recording progress, press [DISPLAY].
Stop recording Press [8].
Recording stops at the last fully recorded track in the album. For example, if you stop recording during the fourth track, only the first three tracks are recorded.
“NO FILE RECORDED” is shown if no track is recorded.
Note:
•Some tracks can use a longer time to record.
•Some tracks cannot be recorded because of the condition of the source.
•The recorded file name is the same as the original file (only a maximum of 32 characters can be shown on the display panel).
12

Deleting the recorded tracks
1Press [SELECT <, >] repeatedly to select “MEMORY” or “USB B”.
2Press [R, T] to select the album.
3Press [2/3] or [5/6] to select the track.
4Press [EDIT MODE] to select the mode.
TRACK DEL |
Delete a single track. |
ALBUM DEL |
Delete one album (maximum 999 |
|
tracks). |
FORMAT |
Format the USB device. |
ALL DEL |
Delete all albums in the internal |
|
memory. |
5Press [OK].
The selected item to be deleted is shown.
6Press [OK].
“SURE? NO” is shown.
7Press [Y, U] to select “SURE? YES” and then
press [OK].
“WRITING” is shown.
To cancel, select “SURE? NO”.
Sound effects
1Press [SOUND] to select the sound effect.
2Press [Y, U] to select the setting and then press
[OK].
Or turn [MULTI CONTROL] to select the setting.
PRESET EQ |
“ROCK”, “POP”, “AFRO BEAT”, |
|
“ARABIC”, “PERSIAN”, “INDIA |
|
BASS”, “DANGDUT”, “MALAY |
|
POP”, “ELECTRONICA”, |
|
“REGGAETON”, “SALSA”, |
|
“SAMBA”, “FOOTBALL”, |
|
“KARAOKE” or “FLAT” |
BASS/MID/TREBLE |
–4 to +4 |
|
Note: |
|
These settings can change when you |
|
select a PRESET EQ setting. |
SURROUND |
“ON SURROUND” or |
|
“OFF SURROUND” |
D.BASS LEVEL |
“OFF”, “LEVEL 1” to “LEVEL 6” |
D.BASS BEAT |
“ON D.BASS BEAT” or |
|
“OFF D.BASS BEAT” |
Note:
•This function emphasises the attack level of the drumbeat and produces a punchy sound. Depending on the track, the effect may be small.
•This function does not work when “D.BASS LEVEL” is set to “OFF”.
Illumination |
|
|
||
ENGLISH |
||||
You can change the illumination effect on the system. |
||||
|
||||
Press [ILLUMINATION] to select the desired effect. |
|
|||
|
|
|
|
|
COLOR |
A selection of 6 different illumination colours |
|
||
|
on the main unit. |
|
|
|
|
|
|||
AUTO |
Illuminate in one colour. The colour changes |
|
||
|
automatically. |
|
|
|
OFF |
Cancel the effect. |
|
|
|
You can also press [Y, U] to select the next or previous effect and then press [OK].
Or turn [MULTI CONTROL] to select the effect.
DJ functions
You can use the DJ functions to add sound effect or sample sound between songs.
Using the “Panasonic MAX Juke” app
You can download and install the free Android™ app “Panasonic MAX Juke” on Google Play™ for additional features, such as to request song playback from multiple devices simultaneously.
For details on the app, refer to the below site. http://av.jpn.support.panasonic.com/support/global/ cs/audio/app/
(This site is in English only.)
Note:
The DJ function is switched off when you switch off the system, change to another source or start recording.
DJ jukebox
MEMORY
You can use the DJ jukebox function to add cross-fade effect or sample sound mix between songs.
1Press [JUKEBOX] to select “DJ JUKEBOX
SELECT NUMBER” or “ON DJ JUKEBOX”.
To cancel, select “OFF JUKEBOX”.
2Press [1] to [6] (main unit: [DJ1] to [DJ6]) to select the effect.
[1]Cross-fade: The current track volume gradually becomes soft, and the next track volume gradually becomes loud.
[2]to [6] Sample sound mix: Sample sound is added to the intervals of all tracks.
To cancel, press the button again.
Note:
•The system switches to repeat mode automatically when you switch on DJ Jukebox.
•The cross-fade function may not work between songs that have different sampling frequencies.
TQBJ2107
13
13

█ Changing the repeat setting
1Press [PLAY MENU].
2Press [Y, U] to select the setting and then press
[OK].
Using the main unit
In the stop mode, turn [MULTI CONTROL] to select the setting and then press [4/9].
RANDOM REPEAT |
Repeat random playback. |
RND |
|
ALL TITLE REPEAT |
Repeat all tracks. |
|
|
RANDOM MIX REPEAT |
Repeat random playback. |
RND |
Sample sound is added to the |
|
intervals of all tracks. |
Note:
You cannot select the DJ jukebox effect when you are using “RANDOM MIX REPEAT” mode.
Using the “Panasonic MAX Juke” app
You can call up the tracks you want to play through the app.
DJ effect
(Except for AUX source)
You can use the DJ effect function to add the sound effects.
1Press [DJ] to select “DJ EFFECT SELECT
NUMBER” or “ON DJ EFFECT”.
To cancel, select “OFF EFFECT”.
2Press [1] to [6] (main unit: [DJ1] to [DJ6]) to select the effect.
[1]PHASER
Add space and dimension to the sound.
[2]FILTER
Enhance or filter specific ranges of the sound.
[3]SOUND CHOPPER
Cut off the sound periodically.
[4]ELECTRO ECHO
Add digital echo to the sound.
[5]PITCH SHIFTER
Adjust the keys of the sound.
[6]HARMONIZER
Add notes to the sound to create harmony.
To cancel, press the button again.
3Press [Y, U] to select the setting.
Or turn [MULTI CONTROL] to select the setting.
DJ sampler
(Except for AUX source)
You can apply a scratch sound or sample sound to the track you are playing.
1Press [DJ] to select “SAMPLER SELECT
NUMBER” or “ON SAMPLER”.
To cancel, select “OFF EFFECT”.
2Press [1] to [6] (main unit: [DJ1] to [DJ6]) to select
the desired sound.
To cancel, press the button again.
3Press [Y, U].
Or turn [MULTI CONTROL].
Using the “Panasonic MAX Juke” app
You can change the sample sound on the app. (To return all sample sounds to the factory preset, when in the stop mode, press and hold [DJ] on the main unit until “SAMPLER RESTORED” is shown.)
Using a microphone
Preparation
Decrease the volume of the system to its minimum before you connect or disconnect a microphone.
1Connect a microphone (not supplied) to the
microphone jack.
Plug type: Ø 6.3 mm monaural
2Press [MIC VOL] and then press [Y, U] to adjust the volume of the microphone.
If you want to sing with the background music.
3Play the music source and adjust the volume of the system.
Note:
•If a strange noise (howling) is emitted, move the microphone away from the speakers, or decrease the volume of the microphone.
•When you do not use the microphone, disconnect it from the microphone jack, and decrease the volume of the microphone to its minimum.
•This system cannot record from microphone.
TQBJ2107
14
14

Karaoke
Preparation
Select the music source.
Note:
The Karaoke function is switched off when you switch off the system or start recording.
Karaoke effect
You can use the Karaoke effect function to add the sound effects.
1 Press [KARAOKE] repeatedly to select the effect.
VOCAL CANCEL |
Reduce the vocal level or change |
||||||
|
|
the audio mode (depending on |
|||||
|
|
the source). |
|||||
ECHO |
|
Add an echo effect to the sound. |
|||||
KEY CONTROL |
Change the key of a song. |
||||||
|
|
Note: |
|||||
|
|
The setting is cancelled when you |
|||||
|
|
change to another source. |
|||||
TEMPO |
|
|
|
|
|
|
|
|
|
|
MEMORY |
||||
|
|
Change the speed of a song. |
|||||
BGM |
Change the background music |
||||||
|
level. |
||||||
MIC EQ |
|
Select a MIC EQ mode. |
|||||
OFF EFFECT |
|
Cancel the effect. |
|||||
|
|
Press [OK] (main unit: [4/9]) to |
|||||
|
confirm. |
||||||
To check the current setting, press [OK].
2Press [Y, U] to select the setting and then press
[OK].
Or turn [MULTI CONTROL] to select the setting.
VOCAL CANCEL “OFF”, 1 to 3, “L”, “R”, “L+R”
|
When using stereo source not |
|
formatted for Karaoke |
|
It is recommended to use “2 VOCAL |
|
CANCEL” for most songs. |
|
When using Karaoke formatted |
|
source |
|
L: Only left channel sound |
|
(accompaniment only) |
|
R: Only right channel sound (vocals |
|
only) |
|
L+R: Left and right channel sounds |
|
are mixed |
ECHO |
“OFF”, 1 to 4 |
KEY CONTROL |
–6 to +6 |
TEMPO |
“OFF”, –2 to +2 |
BGM |
“OFF”, 1 to 3 |
MIC EQ |
“SINGING” or “SPEECH” |
Note:
To use the Karaoke effect in AUX source, set “AUX MODE” to “MODE 1” (~16).
Karaoke jukebox |
ENGLISH |
To cancel, select “OFF JUKEBOX”. |
|
You can use the Karaoke effect while using Karaoke |
|
jukebox. |
|
Press [JUKEBOX] to select “ON KARAOKE JUKEBOX”. |
|
Note:
•The system switches to repeat mode automatically when you switch on Karaoke jukebox.
•Karaoke jukebox is switched off when you change to another source.
█ Changing the repeat setting
1Press [PLAY MENU].
2Press [Y, U] to select the setting and then press
[OK].
Using the main unit
In the stop mode, turn [MULTI CONTROL] to select the setting and then press [4/9].
RANDOM REPEAT |
Repeat random playback. |
RND |
|
ALL TITLE REPEAT |
Repeat all tracks. |
|
|
RANDOM MIX REPEAT |
Repeat random playback. |
RND |
Sample sound is added to the |
|
intervals of all tracks. |
Clock and timers
Setting the clock
This is a 24-hour clock.
1Press [SETUP] to select “CLOCK”.
2Press [Y, U] to set the time and then press [OK].
To check the time
Press [SETUP] to select “CLOCK” and then press [OK].
In standby mode, press [DISPLAY].
Note:
Reset the clock regularly to maintain accuracy.
Sleep timer
The sleep timer switches off the system after the set time.
Press [SLEEP] to select the setting (in minutes).
To cancel, select “OFF”.
To check the remaining time
Press [SLEEP].
Note: |
TQBJ2107 |
|
• |
remains. |
|
The remaining time is shown for a few seconds every |
|
|
|
minute. “SLEEP 1” is always shown when only 1 minute |
|
• The sleep timer always comes first. Be sure not to set an |
15 |
|
|
overlap of timers. |
|
15
TQBJ2107
16
Play timer and record timer
(Except for Bluetooth® and AUX source)
You can set the timer to come on at a certain time to:
•Wake you up (play timer).
•Record from the radio (record timer).
Play timer and record timer cannot be used together.
Preparation
Set the clock.
1Press [SETUP] repeatedly to select “TIMER ADJ”.
2Press [Y, U] to select “#PLAY” or “#REC” and then press [OK].
3Press [Y, U] to set the start time and then press
[OK].
4Do step 3 again to set the end time.
5For play timer, press [Y, U] to select the source you want to play and then press [OK].
6For record timer, press [Y, U] to select “MEMORY”
or “USB B” to keep the recording and then press [OK].
To start the timer
1 Prepare the source.
Play timer |
Prepare the source you want to |
||
|
listen to (disc, USB, internal memory |
||
|
or radio) and set the volume. |
||
Record timer |
Connect the USB device to |
|
|
USB B |
|||
|
(for USB recording) and tune in to |
|
|
|
the radio station. |
||
2Press [SETUP] repeatedly to select “TIMER SET”.
3Press [Y, U] to select the setting and then press
[OK].
PLAY ON |
Start the play timer. |
PLAY OFF |
Cancel the play timer. |
REC ON |
Start the record timer. |
REC OFF |
Cancel the record timer. |
“#” is shown.
The system must be switched off for the timer to operate.
To check the setting
1Press [SETUP] repeatedly to select “TIMER ADJ”.
2Press [Y, U] to select “#PLAY” or “#REC” and then press [OK].
In standby mode, press [DISPLAY] two times.
Note:
•The play timer starts at a low volume and increases gradually to the preset level.
•The record timer starts 30 seconds before the set time with the volume muted.
•The timer comes on at the set time every day if the timer is on.
•If you switch off the system and then switch on again while a timer is in operation, the timer will not stop at the end time.
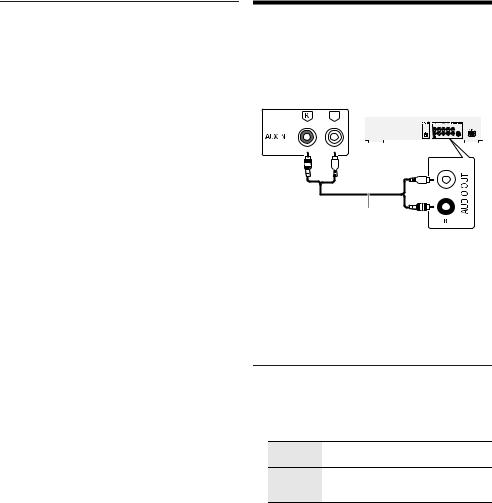
External equipment
Preparation
•Disconnect the AC mains lead.
•Switch off all equipment and read the appropriate operating instructions.
Rear panel of |
|
|
DVD player |
||||||||||||||
this main unit |
|
|
|||||||||||||||
|
|
(not supplied) |
|||||||||||||||
|
|
|
|
|
|
|
|
|
|||||||||
|
|
|
|
|
|
|
|
|
|
|
|
|
|
|
|
|
|
|
|
|
|
|
|
|
|
|
|
|
|
|
|
|
|
|
|
|
|
|
|
|
|
|
|
|
|
|
|
|
|
|
|
|
|
|
|
|
|
|
|
|
|
|
|
|
|
|
|
|
|
|
|
|
|
|
|
|
|
|
|
|
|
|
|
|
|
|
|
|
|
|
|
|
|
|
|
|
|
|
|
|
|
|
|
|
|
|
|
|
|
|
|
|
|
|
|
|
|
|
|
|
|
|
|
|
|
|
|
|
|
|
|
|
|
|
|
|
|
|
|
|
|
|
|
|
|
|
|
|
|
|
|
|
|
|
|
|
|
|
|
|
|
|
|
|
|
|
|
|
|
|
|
|
|
|
|
|
|
|
|
|
|
|
|
|
|
|
|
|
|
|
|
|
|
|
|
|
|
|
|
|
|
|
|
|
|
|
|
|
|
|
|
|
|
|
|
|
|
|
|
|
|
|
|
|
|
|
|
|
|
|
|
|
|
Audio cable (not supplied)
1Connect the external equipment.
2Press [SELECT <, >] repeatedly to select “AUX”.
3Play the external equipment.
Note:
•Components and cables are sold separately.
•If you want to connect equipment other than those described, refer to the audio dealer.
•Sound distortion can occur when you use an adapter.
16

Others
Auto off
This system automatically switches off when you do not use it for approximately 20 minutes.
1Press [SETUP] repeatedly to select “AUTO OFF”.
2Press [Y, U] to select “ON” and then press [OK].
To cancel, select “OFF”.
Note:
•This function does not work when you are in radio source or when a Bluetooth® device is connected.
•This function may not work when a microphone is connected.
Bluetooth® standby
This function automatically switches on the system when you establish a Bluetooth® connection from a paired device.
1Press [SETUP] repeatedly to select “BLUETOOTH STANDBY”.
2Press [Y, U] to select “ON” and then press [OK].
To cancel, select “OFF”.
Note:
Some devices may take longer to respond. If you are connected to a Bluetooth® device before switching off the system, wait for a minimum of 5 seconds before connecting to this system from your Bluetooth® device again.
Software update
Occasionally, Panasonic may release updated software for this unit that may add or improve the way a feature operates. These updates are available free of charge. For more details, refer to the following website. http://panasonic.jp/support/global/cs/
(This site is in English only.)
█ Checking the software version
1Press [SETUP] repeatedly to select “SW VER.”
and then press [OK].
The software version is shown.
2Press [OK] again to exit.
Maintenance
Disconnect the AC mains lead before maintenance. Clean this system with a soft, dry cloth.
•Never use alcohol, paint thinner or benzine to clean this system.
•Before using chemically treated cloth, read the instructions that came with the cloth carefully.
Troubleshooting |
ENGLISH |
Before requesting service, make the following checks. If |
|
you are in doubt about some of the check points, or if the |
|
solutions indicated do not solve the problem, consult your |
|
dealer for instructions. |
|
█ Common problems
The unit does not work.
•The safety device has been activated. Do the following:
1.Press [1] on the main unit to switch the unit to standby mode. If the unit does not switch to standby mode, disconnect the AC mains lead and then connect it again.
2.Press [1] again to switch on the unit. If the problem persists, consult your dealer.
The display panel lights up and changes continuously in standby mode.
• Press and hold [8] on the main unit to select “DEMO OFF”.
No operations can be done with the remote control.
• Examine that the battery is installed correctly.
Sound is distorted or no sound.
•Adjust the volume of the system.
•Switch off the system, determine and correct the cause, and then switch on again. It can be caused by straining of the speakers through excessive volume or power, and when using the system in a hot environment.
A humming sound can be heard during playback.
•An AC mains lead or fluorescent light is near the cables. Keep other appliances and cords away from the cables of this system.
The sound level reduces.
•The protection circuit has been activated due to the continuous use at high volume output. This is to protect the system and maintain the sound quality.
█ Disc
Display not shown correctly.
Playback does not start.
•You have not put in the disc correctly. Put it in correctly.
•Disc is dirty. Clean the disc.
•Replace the disc if it is scratched, warped, or non-standard.
•There is condensation. Let the system dry for 1 to 2 hours.
The total number of tracks displayed is incorrect. The disc cannot be read.
Distorted sound is heard.
•You put in a disc that the system cannot play. Change to a playable disc.
•You put in a disc that has not been finalised.
█ USB
The USB device or the contents in it cannot be read.
•The format of the USB device or the contents in it are not compatible with the system.
•USB devices with storage capacity of more than 32 GB cannot work in some conditions.
Slow operation of the USB device.
•Large content size or large memory USB device takes longer time to read.
TQBJ2107
17
17

█ Bluetooth®
Pairing cannot be done.
•Check the Bluetooth® device condition.
•The device is out of the 10 m communication range. Move the device nearer to the system.
The device cannot be connected.
•The pairing of the device was unsuccessful. Do pairing again.
•The pairing of the device has been replaced. Do pairing again.
•This system might be connected to a different device. Disconnect the other device and try connecting the device again.
•The system may have a problem. Switch off the system and then switch on again.
•If “MODE 2” is selected in “LINK MODE”, select “MODE 1” (~10).
The device is connected but audio cannot be heard through the system.
•For some built-in Bluetooth® devices, you have to set the audio output to “SC-AKX710” manually. Read the operating instructions of the device for details.
Sound from the device is interrupted.
•The device is out of the 10 m communication range. Move the device nearer to the system.
•Remove any obstacle between the system and the device.
•Other devices that use the 2.4 GHz frequency band (wireless router, microwaves, cordless phones, etc.) are interfering. Move the device nearer to the system and distance it from the other devices.
•Select “MODE 1” for a stable communication (~10).
█ Radio
Sound is distorted.
•Use an optional FM outdoor antenna. The antenna should be installed by a competent technician.
A beat sound is heard.
•Switch off the TV or move it away from the system.
•Move mobile telephones away from the system if the interference is apparent.
•When in AM tuner mode, select the “B.PROOF” setting that provides the best reception.
A low hum is heard during AM broadcasts.
• Move the antenna away from other cables and cords.
█ AUX
Playback image and sound are not synchronised.
• Set “AUX MODE” to “MODE 2”.
Karaoke effect cannot be used.
• Set “AUX MODE” to “MODE 1”.
█ Main unit displays
“--:--”
•You connected the AC mains lead for the first time or there was a power failure recently. Set the clock.
•Track play time is more than 99 minutes.
“ADJUST CLOCK”
• The clock is not set. Adjust the clock.
“ADJUST TIMER”
•The play timer and/or record timer is not set. Adjust the play timer and/or record timer.
“ALB FULL”
• The number of albums has exceeded the supported limit.
“AUTO OFF”
•The system has not been used for 20 minutes and will switch off within a minute. To cancel, press any button.
“CAN’T REC” “DEVICE FULL”
•You cannot do recording because the remaining recording time of the USB device is less than the total time of the music source. Change to a USB device which has enough recording time and do the recording again.
•You cannot do recording because the USB device is write-protected. Remove the write protection of the USB device and try again.
“ERROR”
•An incorrect operation was done. Read the instructions and try again.
“ERROR” (during recording)
•You cannot select other playback source (example: radio, USB etc.) or press [2/3] or [5/6] during recording. Stop the recording function.
•You cannot open the disc tray when recording from an AM source.
“F
 ” / “F

 ” (“
” (“ ” represents a number.)
•The protection circuit has been activated and the system may be switched off automatically.
•Disconnect the AC mains lead and wait for a few seconds before connecting it again. If the problem persists, disconnect the AC mains lead and consult your dealer.
“INSERT USB B”
•You cannot do recording because there is no USB device connected to USB B .
“MEMORY ERROR”
•The files in the internal memory can be corrupted. Switch off the system and then disconnect the AC mains lead. Wait for a minimum of 1 minute before switching on the system again. If the problem persists, press [EDIT MODE] to select “ALL DEL” to delete all albums in the internal memory and do recording again.
“NO DEVICE”
•You cannot check available storage space because there is no USB device connected to USB B .
“NO DISC”
• You have not put in a disc.
TQBJ2107
18
18

“NO PLAY” “UNSUPPORT”
•There is no album or track in the USB device.
•Examine the content. You can only play supported format.
•The files in the USB device can be corrupted. Format the USB device and try again.
•The system may have a problem. Switch off the system and then switch on again.
“NO TRACK”
• There is no album or track in the internal memory.
“NOT SUPPORTED”
•To use Karaoke effect in AUX source, set “AUX MODE” to “MODE 1”.
“PLAYERROR”
•An unsupported MP3 file has been played. The system will skip that track and play the next one.
“REC ERROR”
•You disconnected the USB device during recording. Connect the USB device and do recording again.
•An error occurred during USB recording. Disconnect the USB device and then connect it again.
“REMOTE 1” “REMOTE 2”
•The remote control and the main unit are using different codes. Change the code of the remote control.
–When “REMOTE 1” is shown, press and hold [OK] and [1] for a minimum of 4 seconds.
–When “REMOTE 2” is shown, press and hold [OK] and [2] for a minimum of 4 seconds.
“TEMP NG”
•The temperature protection circuit has been activated, and the system will switch off. Let the unit cool down before switching it on again.
•Check that the ventilation opening of the unit is not obstructed.
•Ensure this unit is well ventilated.
“TRK FULL”
• The number of files has exceeded the supported limit.
“USB A NO DEVICE”
“USB B NO DEVICE”
• The USB device is not connected. Examine the connection.
“USB OVER CURRENT ERROR”
•The USB device is drawing too much power. Disconnect the USB device, switch off the system and then switch on again.
•Check the connection, it may be caused by a faulty USB cable.
“VBR”
•The system cannot show the remaining play time for variable bit rate (VBR) tracks.
Remote control code
When other Panasonic equipment responds to the remote control of this system, change the remote control code for this system.
Preparation
Press [SELECT <, >] repeatedly to select “AUX”.
█ To set the code to “REMOTE 2”
1Press and hold [SELECT] on the main unit and [2] on the remote control until “REMOTE 2” is shown.
2Press and hold [OK] and [2] for a minimum of 4 seconds.
█ To set the code to “REMOTE 1”
1Press and hold [SELECT] on the main unit and [1] on the remote control until “REMOTE 1” is shown.
2Press and hold [OK] and [1] for a minimum of 4 seconds.
System memory reset
Reset the memory when the following situations occur:
•There is no response when buttons are pressed.
•You want to clear and reset the memory contents.
1Disconnect the AC mains lead.
2While you press and hold [1] on the main unit,
connect the AC mains lead again.
Continue to press and hold the button until “– – – – – – – – –” is shown.
3Release [1].
All the settings are set back to the factory preset. It is necessary to set the memory items again.
ENGLISH
TQBJ2107
19
19

Specifications
█ General
Power supply |
AC 220 V to 240 V, 50 Hz |
Power consumption |
225 W |
Power consumption in standby mode (approximate)
With “BLUETOOTH STANDBY” set to “OFF” |
0.5 W |
With “BLUETOOTH STANDBY” set to “ON” |
0.6 W |
Dimensions (W x H x D) 458 mm x 137 mm x 341 mm
Mass (SA-AKX710) |
4.0 kg |
Operating temperature range |
0°C to +40°C |
Operating humidity range
35% to 80% RH (no condensation)
█ Amplifier section
RMS output power stereo mode
Front Hi (both ch driven)
500 W per channel (2 Ω), 1 kHz, 30% THD
Front Lo (both ch driven)
500 W per channel (2 Ω), 100 Hz, 30% THD
Total RMS stereo mode power |
2000 W |
█ Tuner section
Frequency modulation (FM) |
|
Preset memory |
30 stations |
Frequency range |
|
87.50 MHz to 108.00 MHz (50 kHz step) Antenna terminals 75 Ω (unbalanced)
Amplitude modulation (AM)
Preset memory 15 stations Frequency range
522 kHz to 1629 kHz (9 kHz step)
520 kHz to 1630 kHz (10 kHz step)
█ Disc section
Disc played (8 cm or 12 cm)
CD, CD-R/RW (CD-DA, MP3 )
)  MPEG-1 Layer 3, MPEG-2 Layer 3
Pick up |
|
Wavelength |
790 nm (CD) |
NORSK |
|
Bølgelengde |
790 nm (CD) |
Laserstyrke |
Ingen farlig stråling sendes ut |
█ Terminal section
USB port |
|
|
USB standard |
|
USB 2.0 full speed |
Media file format support |
MP3 (*.mp3) |
|
USB device file system |
|
FAT12, FAT16, FAT32 |
USB recording |
|
|
Bit rate |
|
128 kbps |
USB recording speed |
|
1x, 3x (CD only) |
Recording file format |
|
MP3 (*.mp3) |
AUX |
|
|
Audio input |
|
Pin jack (1 system) |
Microphone |
|
|
Terminal |
Mono, 6.3 mm jack (2 systems) |
|
█ Internal memory section
Memory |
|
Memory size |
4 GB |
Media file format support |
MP3 (*.mp3) |
Memory recording |
|
Bit rate |
128 kbps |
Memory recording speed |
1x, 3x (CD only) |
Recording file format |
MP3 (*.mp3) |
█ Bluetooth® section
Version |
Bluetooth® Ver. 2.1 + EDR |
Class |
Class 2 |
Supported profiles |
A2DP, AVRCP, SPP, OPP, FTP |
Operating frequency |
2.4 GHz band FH-SS |
Frequency band |
2402 MHz to 2480 MHz |
Maximum power (EIRP) |
4 dBm |
Operation distance |
10 m line of sight |
Supported codec |
SBC |
█ Speaker section
Speaker unit(s) |
|
Super Woofer |
20 cm cone type |
Woofer |
8 cm cone type |
Tweeter |
6 cm cone type |
Impedance |
High 2 Ω / Low 2 Ω |
Dimensions (W x H x D) 313 mm x 425 mm x 264 mm
Mass |
6.9 kg |
Note:
•Specifications are subject to change without notice. Mass and dimensions are approximate.
•Total harmonic distortion is measured by the digital spectrum analyser.
TQBJ2107
20
20
References
Licenses
The Bluetooth® word mark and logos are registered trademarks owned by the Bluetooth SIG, Inc. and any use of such marks by Panasonic Corporation is under license. Other trademarks and trade names are those of their respective owners.
Android and Google Play are trademarks of Google LLC.
About Bluetooth®
Panasonic bears no responsibility for data and/or information that is compromised during a wireless transmission.
Frequency band
• This system uses the 2.4 GHz frequency band.
Certification
•This system conforms to the frequency restrictions and has received certification based on frequency laws. Thus, a wireless permit is not necessary.
•The actions below are punishable by law in some countries:
–Taking apart or modifying the main unit.
–Removing specification indications.
Restrictions of use
•Wireless transmission and/or usage with all Bluetooth® equipped devices is not guaranteed.
•All devices must conform to standards set by the Bluetooth SIG, Inc.
•Depending on the specifications and settings of a device, it can fail to connect or some operations can be different.
•This system supports Bluetooth® security features. But depending on the operating environment and/or settings, this security is possibly not sufficient. Transmit data wirelessly to this system with caution.
•This system cannot transmit data to a Bluetooth® device.
Range of use
•Use this device at a maximum range of 10 m.
•The range can decrease depending on the environment, obstacles or interference.
Interference from other devices
•This system may not function properly and troubles such as noise and sound jumps may arise due to radio wave interference if this unit is located too close to other Bluetooth® devices or the devices that use the 2.4 GHz band.
•This system may not function properly if radio waves from a nearby broadcasting station, etc. is too strong.
Intended usage
•This system is for normal, general use only.
•Do not use this system near an equipment or in an environment that is sensitive to radio frequency interference (example: airports, hospitals, laboratories, etc.).
Disposal of Old Equipment and Batteries |
|
|||||
|
||||||
Only for European Union and countries with |
ENGLISH |
|||||
|
|
|
|
|
used electrical and electronic products and |
|
recycling systems |
|
|||||
|
|
|
|
|
These symbols on the products, packaging, |
|
|
|
|
|
|
and/or accompanying documents mean that |
|
|
|
|
|
|
batteries must not be mixed with general |
|
|
|
|
|
|
household waste. |
|
|
||||||
|
|
|
|
|
For proper treatment, recovery and recycling |
|
|
|
|
|
|
|
|
|
|
|
|
|
of old products and used batteries, please |
|
|
|
|
|
|
take them to applicable collection points in |
|
|
|
|
|
|
accordance with your national legislation. |
|
|
|
|
|
|
By disposing of them correctly, you will help |
|
|
|
|
|
|
to save valuable resources and prevent any |
|
|
|
|
|
|
potential negative effects on human health |
|
|
|
|
|
|
and the environment. |
|
|
|
|
|
|
For more information about collection and |
|
|
|
|
|
|
recycling, please contact your local |
|
|
|
|
|
|
municipality. |
|
|
|
|
|
|
Penalties may be applicable for incorrect |
|
|
|
|
|
|
disposal of this waste, in accordance with |
|
|
|
|
|
|
national legislation. |
|
Note for the battery symbol (bottom symbol):
This symbol might be used in combination with a chemical symbol. In this case it complies with the requirement set by the Directive for the chemical involved.
TQBJ2107
21
21

English
Declaration of Conformity (DoC)
Hereby, “Panasonic Corporation” declares that this product is in compliance with the essential requirements and other relevant provisions of Directive 2014/53/EU.
Customers can download a copy of the original DoC to our RE products from our DoC Server: http://www.ptc.panasonic.eu
Contact to Authorised Representative:
Panasonic Marketing Europe GmbH, Panasonic Testing Centre, Winsbergring 15, 22525 Hamburg, Germany
Type of wireless |
Frequency band |
Maximum power |
|
|
(dBm E.I.R.P.) |
Bluetooth® |
2402 – 2480 MHz |
4 dBm |
Ελληνικά
Δήλωση συμμόρφωσης (DoC)
Η “Panasonic Corporation” δηλώνει ότι το προϊόν αυτό είναι συμμορφωμένο προς τις βασικές απαιτήσεις και άλλες σχετικές διατάξεις της Οδηγίας 2014/53/EΕ.
Οι πελάτες μπορούν να κατεβάσουν ένα αντίγραφο του πρωτοτύπου DoC για τα RE προϊόντα μας από τον DoC server μας:
http://www.ptc.panasonic.eu
Επικοινωνήστε με τον Εξουσιοδοτημένο Αντιπροσωπό μας:
Panasonic Marketing Europe GmbH, Panasonic Testing Centre, Winsbergring 15, 22525 Hamburg, Γερμανία
Τύπο ασύρματης |
Ζώνη |
Μέγιστη ισχύς |
|
συχνοτήτων |
(dBm e.i.r.p.) |
||
|
|||
Bluetooth® |
2402 – 2480 MHz |
4 dBm |
Português
Declaração de Conformidade (DoC)
Com o presente documento, a “Panasonic Corporation” declara que este produto se encontra em conformidade com os requisitos específicos e demais especificações referentes à Diretiva 2014/53/UE.
Os clientes podem baixar uma cópia da declaração de conformidade (DoC) para nossos produtos RE do Server DoC:
http://www.ptc.panasonic.eu
Contacto com um Representante Autorizado: Panasonic Marketing Europe GmbH, Panasonic Testing Centre, Winsbergring 15, 22525 Hamburg, Alemanha
Tipo de ligação |
Banda de |
Potência máxima |
sem fios |
frequência |
(dBm e.i.r.p.) |
Bluetooth® |
2402 – 2480 MHz |
4 dBm |
TQBJ2107
22
22
Lietuviškai
Atitikties deklaracija (AD)
Bendrovė “Panasonic Corporation” patvirtina, kad šis gaminys atitinka direktyvos 2014/53/ES esminius reikalavimus ir kitas taikytinas nuostatas.
Mūsų RE gaminių originalios atitikties deklaracijos kopiją klientai gali atsisiųsti iš mūsų AD serverio: http://www.ptc.panasonic.eu
Įgaliotojo atstovo adresas:
Panasonic Marketing Europe GmbH, Panasonic Testing Centre, Winsbergring 15, 22525 Hamburg, Vokietija
Bevielio ryšio |
Dažnių |
Maksimali siuntimo |
tinklas |
diapazonas |
galia (dBm e.i.r.p.) |
Bluetooth® |
2402 – 2480 MHz |
4 dBm |
Slovensko
Izjava o skladnosti (DoC)
“Panasonic Corporation” v tem dokumentu izjavlja, da je izdelek v skladu z bistvenimi zahtevami in drugimi pomembnimi določbami Direktive 2014/53/EU.
Stranka lahko naloži izvod izvirnega DoC o naših izdelkih RE s strežnika DoC:
http://www.ptc.panasonic.eu
Naslov pooblaščenega predstavnika:
Panasonic Marketing Europe GmbH, Panasonic Testing Centre, Winsbergring 15, 22525 Hamburg, Nemčija
Vrsta brezžične |
Frekvenčni pas |
Največja moč |
|
povezave |
(dBm EIRP) |
||
|
|||
Bluetooth® |
2402 – 2480 MHz |
4 dBm |
Slovensky
Vyhlásenie o zhode (DoC)
“Panasonic Corporation” týmto vyhlasuje, že tento výrobok je v súlade so základnými požiadavkami a ďalšími príslušnými ustanoveniami smernice 2014/53/EÚ.
Zákazníci si môžu stiahnuť kópiu pôvodného DoC na naše RE výrobky z nášho servera DoC: http://www.ptc.panasonic.eu
Kontakt na splnomocneného zástupcu:
Panasonic Marketing Europe GmbH, Panasonic Testing Centre, Winsbergring 15, 22525 Hamburg, Nemecko
Typ bezdrôtového |
Frekvenčné |
Maximálny výkon |
pripojenia |
pásmo |
(dBm e.i.r.p.) |
Bluetooth® |
2402 – 2480 MHz |
4 dBm |
Norsk Samsvarserklæring (DoC)
“Panasonic Corporation” erklærer herved at dette produktet samsvarer med de grunnleggende kravene og andre relevante bestemmelser i direktivet 2014/53/EU.
Kundene kan laste ned en kopi av den originale samsvarserklæringen (DoC) for vårt RE utstyr fra vår DoC server:
http://www.ptc.panasonic.eu Kontaktinformasjon autorisert representant:
Panasonic Marketing Europe GmbH, Panasonic Testing Centre, Winsbergring 15, 22525 Hamburg, Tyskland
Type trådløs |
Frekvensbånd |
Maks. effekt |
|
(dBm e.i.r.p.) |
|||
|
|
||
Bluetooth® |
2402 – 2480 MHz |
4 dBm |

Eesti keel Vastavusdeklaratsioon (DoC)
Käesolevaga kinnitab “Panasonic Corporation”, et see toode vastab direktiivi 2014/53/EL olulistele nõuetele ja teistele asjakohastele sätetele.
Kliendid saavad koopia meie RE toodetele kehtiva originaalvastavusdeklaratsiooni koopia alla laadida meie DoC-serveristt:
http://www.ptc.panasonic.eu
Võtke ühendust volitatud esindajaga:
Panasonic Marketing Europe GmbH, Panasonic Testing Centre, Winsbergring 15, 22525 Hamburg, Saksamaa
Juhtmevaba |
|
Maksimaalne |
seadme |
Sagedusriba |
võimsus |
tüüp |
|
(dBm EIRP) |
Bluetooth® |
2402 – 2480 MHz |
4 dBm |
Latviski
Atbilstības deklarācija (DoC)
Ar šo “Panasonic Corporation” paziņo, ka šis izstrādājums atbilst pamatprasībām un pārējiem Direktīvas 2014/53/ES noteikumiem.
Pircēji var lejupielādēt oriģinālo DoC kopiju mūsu RE izstrādājumos no mūsu DoC servera: http://www.ptc.panasonic.eu
Lūdzam sazināties ar pilnvaroto parstāvi:
Panasonic Marketing Europe GmbH, Panasonic Testing Centre, Winsbergring 15, 22525 Hamburg, Vācijā
Bezvadu tips |
Frekvenču josla |
Maksimālā jauda |
|
|
(dBm EIRP) |
Bluetooth® |
2402 – 2480 MHz |
4 dBm |
Български
Декларация за съответствие (DoC)
С настоящото “Panasonic Corporation” декларира, че този продукт е в съответствие с основните изисквания и други съответни разпоредби на Директива
2014/53/EС.
Потребителите могат да свалят копие от оригиналните DoC към нашите продуктите от типа RE от сървъра, на който се съхраняват DoC: http://www.ptc.panasonic.eu
Свържете се с нашия упълномощен представител: Panasonic Marketing Europe GmbH, Panasonic Testing Centre, Winsbergring 15, 22525 Hamburg, Германия
Вид безжична |
|
Максимална |
Честотна лента |
мощност |
|
връзка |
|
(dBm e.i.r.p.) |
|
|
|
Bluetooth® |
2402 – 2480 MHz |
4 dBm |
Român |
|
|
|
|
Declaraţie de Conformitate (DoC) |
|
|
ENGLISH |
|
“Panasonic Corporation” declară prin prezenta că acest |
||||
Clienţii pot descărca o copie a DoC-ului original al |
||||
produs este conform cu cerinţele esenţiale şi alte |
|
|||
prevederi relevante ale Directivei 2014/53/UE. |
|
|||
produselor noastre RE de la adressa noastră DoC din |
|
|||
Internet: |
|
|
|
|
|
|
|
|
|
http://www.ptc.panasonic.eu |
|
|
|
|
Contactaţi Reprezentantul Autorizat: |
|
|
|
|
Panasonic Marketing Europe GmbH, Panasonic Testing |
|
|||
Centre, Winsbergring 15, 22525 Hamburg, Germania |
|
|||
|
|
|
|
|
Tip de wireless |
Interval de |
Putere maximă |
|
|
frecvenţă |
(dBm e.i.r.p.) |
|
|
|
|
|
|
||
Bluetooth® |
2402 – 2480 MHz |
4 dBm |
|
|
Magyar
Megfelelőségi Nyilatkozat (DoC)
Ezennel a, “Panasonic Corporation” kijelenti, hogy a jelen termék kielégíti az 2014/53/EU Irányelv létfontosságú követelményeit és más vonatkozó rendelkezéseit.
A vásárlók letölthetik az RE termékek eredeti DoC másolatát a DoC szerverünkről: http://www.ptc.panasonic.eu
A hivatalos képviselő elérhetősége:
Panasonic Marketing Europe GmbH, Panasonic Testing Centre, Winsbergring 15, 22525 Hamburg, Németország
Wireless |
Frekvenciasáv |
Maximális teljesítmény |
típus |
|
(dBm e.i.r.p.) |
Bluetooth® |
2402 – 2480 MHz |
4 dBm |
Hrvatski
Deklaracija o podobnosti (DoC)
Ovime „Panasonic Corporation” izjavljuje da ovaj proizvod udovoljava osnovnim zahtjevima i ostalim relevantnim
odredbama Direktive 2014/53/EU.
Kupci mogu preuzeti kopiju originalne DoC za naše RE proizvode s našeg DoC poslužitelja: http://www.ptc.panasonic.eu
Adresa ovlaštenog predstavništva:
Panasonic Marketing Europe GmbH, Panasonic Testing Centre, Winsbergring 15, 22525 Hamburg, Njemačka
Vrstabežične |
Frekvencijski |
Maksimalna snaga |
mreže |
pojas |
(dBm e.i.r.p.) |
Bluetooth® |
2402 – 2480 MHz |
4 dBm |
Türkçe
Uygunluk Beyanı (DoC)
“Panasonic Corporation” bu belge ile bu ürünün 2014/53/EU Direkti’nin temel gerekliliklerine ve diğer ilgili hükümlerine uygun olduğunu beyan eder.
Müşterilerimiz RE ürünlerimizle ilgili orijinal DoC belgesinin bir kopyasını DoC sunucumuzdan indirebilir: http://www.ptc.panasonic.eu
Yetkili Temsilci ile temasa geçin:
Panasonic Marketing Europe GmbH, Panasonic Testing Centre, Winsbergring 15, 22525 Hamburg, Almanya
Bluetooth® |
2402 – 2480 MHz |
Maksimum güç |
TQBJ2107 |
4 dBm |
|||
Kablosuz türü |
Frekans bandı |
(dBm e.i.r.p.) |
|
|
|
|
|
|
|
|
|
|
|
|
23 |
23

Estas instrucciones de funcionamiento se aplican al siguiente sistema.
Sistema |
SC-AKX710 |
Unidad principal |
SA-AKX710 |
Altavoces |
SB-AKX700 |
Su sistema y las ilustraciones pueden parecer diferentes.
Los símbolos de este producto (incluidos los accesorios) representan lo siguiente:
CA
Equipo de Clase II (La construcción del producto presenta doble aislamiento.)
ENCENDIDO
En espera
La grabación y la reproducción de contenido mediante estos dispositivos (o cualquier otro) pueden requerir permiso del propietario de los derechos de autor. Panasonic no tiene autoridad para y no le concede dicho permiso y desiste explícitamente del derecho, la capacidad o la intención de obtener tales permisos en representación de usted. Es responsabilidad suya asegurarse de que el uso de este o cualquier otro dispositivo cumplen con la legislación sobre derechos de autor en su país.
TQBJ2107
2
Precauciones de seguridad
¡ADVERTENCIA!
Unidad
•Para reducir el riesgo de incendios, descargas eléctricas o daños en el producto,
–No exponga este aparato a la lluvia, humedad, goteo o salpicaduras.
–No coloque encima del mismo objetos con líquidos como, por ejemplo, floreros.
–Utilice los accesorios recomendados.
–No quite las tapas.
–No reparar esta unidad usted mismo. Solicite las reparaciones al personal de servicio cualificado.
–No permita que objetos de metal caigan dentro de la unidad.
¡ATENCIÓN!
Unidad
•Para reducir el riesgo de incendios, descargas eléctricas o daños en el producto,
–Para mantener bien ventilada esta unidad, no la instale ni la ponga en un estante de libros, mueble empotrado u otro espacio de dimensiones reducidas.
–No obstruya las aberturas de ventilación de la unidad con periódicos, manteles, cortinas u objetos similares.
–No coloque objetos con llama descubierta, una vela por ejemplo, encima de la unidad.
•Esta unidad ha sido diseñada para ser utilizada en climas moderados.
•Esta unidad puede tener interferencias causadas por teléfonos móviles durante su utilización. Si tales interferencias resultan evidentes, aumente la separación entre la unidad y el teléfono móvil.
•Esta unidad utiliza un láser. Usar los controles, hacer los ajustes o los pasos requeridos en forma diferente de la aquí expuesta puede suponer en exposición peligrosa a la radiación.
•Coloque la unidad en una superficie plana lejos de la luz la del sol, temperatura y humedad altas, y vibración excesiva.
Cable de alimentación de CA
•El enchufe de corriente es el dispositivo que sirve para desconectar el aparato. Instale esta unidad de tal forma que el enchufe de corriente pueda desenchufarse de la toma de corriente inmediatamente.
Pila
•Hay peligro de explosión si se sustituye incorrectamente la pila. Solo sustituir con el mismo tipo recomendado por el fabricante.
•Al desechar las baterías, por favor contacte con sus autoridades locales o distribuidor y consulte el método correcto de eliminación.
•No caliente o exponga a las llamas.
•No deje la(s) pila(s) en un automóvil expuesto a luz solar directa durante un largo período de tiempo con las puertas y ventanas cerradas.
•No abra forzando o cortocircuitando la pila.
•No cambie la pila alcalina o de manganeso.
•No utilice la pila si la cubierta protectora está levantada.
•Quite la pila si no utiliza el mando a distancia durante un largo periodo de tiempo. Guárdela en una zona fresca y oscura.
24

Declaración de Conformidad (DoC)
Por la presente, “Panasonic Corporation” declara que este producto es de conformidad con los requisitos sustanciales y con las disposiciones pertinentes de la Directiva 2014/53/UE.
Los usuarios pueden descargar una copia de la declaración de conformidad original (DoC) de los productos RE del servidor DoC: http://www.ptc.panasonic.eu
Contacto con el representante autorizado:
Panasonic Marketing Europe GmbH, Panasonic Testing Centre, Winsbergring 15, 22525 Hamburg, Alemania
Tipo de red |
Banda de |
Potencia máxima |
inalámbrica |
frecuencia |
(dBm p.i.r.e) |
Bluetooth® |
2402 – 2480 MHz |
4 dBm |
Contenido
Precauciones de seguridad . . . . . . . . . . . . . . . . . . . . . . .2 Accesorios suministrados . . . . . . . . . . . . . . . . . . . . . . . .3 Colocación de los altavoces . . . . . . . . . . . . . . . . . . . . . .4 Preparación del mando a distancia . . . . . . . . . . . . . . . . .4 Conexiones . . . . . . . . . . . . . . . . . . . . . . . . . . . . . . . . . . .5 Controles . . . . . . . . . . . . . . . . . . . . . . . . . . . . . . . . . . . . .6 Preparación de los medios . . . . . . . . . . . . . . . . . . . . . . .8 Reproducción de medios. . . . . . . . . . . . . . . . . . . . . . . . .9 Radio . . . . . . . . . . . . . . . . . . . . . . . . . . . . . . . . . . . . . . .10 Grabación . . . . . . . . . . . . . . . . . . . . . . . . . . . . . . . . . . . 11 Efectos de sonido . . . . . . . . . . . . . . . . . . . . . . . . . . . . .13 Iluminación. . . . . . . . . . . . . . . . . . . . . . . . . . . . . . . . . . .13 Funciones de DJ . . . . . . . . . . . . . . . . . . . . . . . . . . . . . .13 Utilización un micrófono. . . . . . . . . . . . . . . . . . . . . . . . .14 Karaoke . . . . . . . . . . . . . . . . . . . . . . . . . . . . . . . . . . . . .15 Reloj y temporizadores . . . . . . . . . . . . . . . . . . . . . . . . .15 Equipo externo. . . . . . . . . . . . . . . . . . . . . . . . . . . . . . . .16 Otros . . . . . . . . . . . . . . . . . . . . . . . . . . . . . . . . . . . . . . .17 Mantenimiento . . . . . . . . . . . . . . . . . . . . . . . . . . . . . . . .17 Solución de problemas . . . . . . . . . . . . . . . . . . . . . . . . .17 Especificaciones . . . . . . . . . . . . . . . . . . . . . . . . . . . . . .20 Referencias . . . . . . . . . . . . . . . . . . . . . . . . . . . . . . . . . .21
Accesorios suministrados
Por favor, compruebe e identifique los accesorios suministrados.
2 Cable de alimentación de CA
1 Núcleo de ferrita
1 Antena de cuadro de AM
1 Antena interior de FM
1 Mando a distancia
(N2QAYB001198)
1 Pila del mando a distancia
Para el Reino Unido e Irlanda
1 Adaptador del enchufe de la antena
¡ATENCIÓN!
Mantenga el adaptador del enchufe de la antena fuera del alcance de los niños para evitar que puedan tragárselo.
Nota:
Utilice el cable de alimentación adecuado para la toma de CA de su hogar.
ESPAÑOL
TQBJ2107
3
25

Colocación de los altavoces
Los altavoces izquierdo e derecho son iguales.
Utilice solamente los altavoces suministrados.
Puede provocar daños al sistema y reducir la calidad del sonido si utiliza otros altavoces.
Nota:
•Mantenga sus altavoces a más de 10 mm de la unidad principal para que se ventilen.
•Ponga los altavoces en una superficie plana segura.
•Estos altavoces no disponen de blindaje magnético. No lo ponga cerca de la TV, el PC u otros equipos afectados fácilmente por el magnetismo.
•Cuando reproduzca a niveles elevados durante un largo periodo de tiempo, puede dañar los altavoces y reducir la vida de los altavoces.
•Reduzca el volumen en estas condiciones para evitar daños:
–Cuando se distorsiona el sonido.
–Cuando ajuste la calidad del sonido.
¡ATENCIÓN!
•Use los altavoces sólo con el sistema recomendado. Si no, puede dañar el amplificador y los altavoces y puede provocar un incendio. Consulte a un técnico de servicio oficial si se ha producido algún daño o un cambio repentino en su funcionamiento.
•No modifique los altavoces ni el cable de altavoz dado que podría provocar daños al sistema.
•Realice los procedimientos incluidos en estas instrucciones cuando una los altavoces.
•No toque las superficies reverberantes del cono del altavoz:
–Podría dañar el cono del altavoz.
–El cono del altavoz puede estar caliente.
Preparación del mando a distancia
TQBJ2107
4
Use una pila alcalina o de manganeso.
Instale la pila de forma que los polos (+ y –) estén alineados con los del mando a distancia.
26
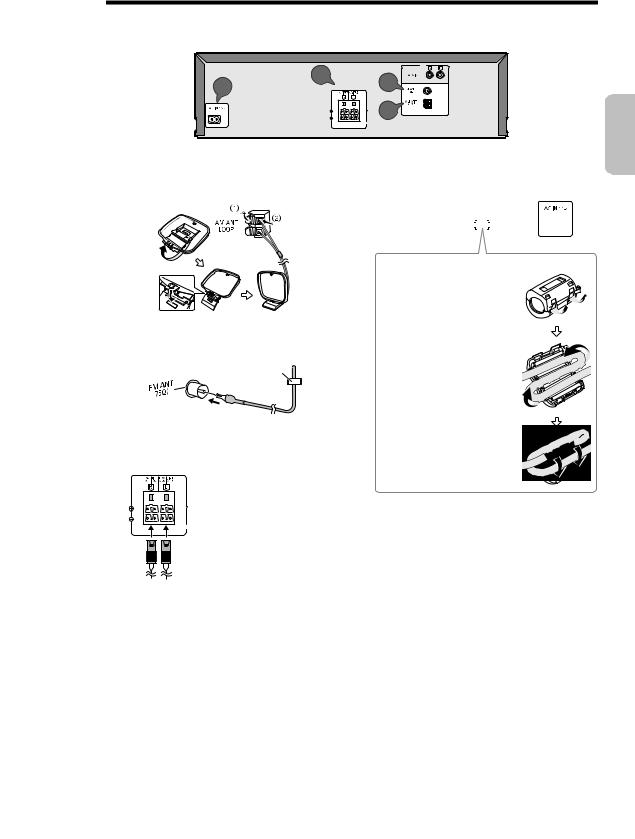
Conexiones
Conecte el cable de alimentación de CA cuando haya realizado todas las demás conexiones.
4 |
3 |
2 |
|
SPEAKERS ( TO SB-AKX700 ) |
|||
|
1
1
2
3
Conecte la antena de cuadro de AM.
Coloque la antena de cuadro sobre su base hasta que haga clic.
Conecte la antena interior de FM.
Coloque la antena en la posición que ofrezca la mejor recepción.
Cinta adhesiva
(no suministrada)
Conecte los altavoces.
Conecte los cables de los altavoces a los terminales correspondientes.
SPEAKERS ( TO SB-AKX700 )
4Conecte el cable de alimentación de CA.
No utilice ningún otro cables de alimentación de CA que no sea el proporcionado.
A la toma de CA


Sujeción del núcleo de ferrita al terminal
A Tire de las pestañas (de ambos lados) para abrirlas.
B Coloque el cable de alimentación de CA sobre
una de las superficies cóncavas.
C Bobine el cable de alimentación de CA
rodeando el núcleo de ferrita y hasta la otra superficie cóncava.
D Cierre el núcleo de ferrita
hasta que haga clic.
Nota:
Si no se coloca el núcleo de ferrita en el cable de alimentación de CA se podrían originar interferencias sobre otros dispositivos cercanos.
Conservación de la energía
El sistema consume una pequeña cantidad de energía cuando está en modo en espera. Desconecte el suministro eléctrico si no utiliza el sistema.
Se perderá alguna función después de desconectar el sistema. Tiene que ajustarlos de nuevo.
Nota:
Mantenga las antenas a distancia de los cables de los altavoces y del cable de alimentación de CA para evitar la captación de ruido.
ESPAÑOL
TQBJ2107
5
27

TQBJ2107
6
Controles
Realice los procedimientos con el mando a distancia. También puede utilizar los botones en la unidad principal si son los mismos.
A Botón de alimentación en espera/conectada [`], [1]
Pulse este botón para cambiar del modo de alimentación conectada al modo de alimentación en espera o viceversa. En el modo de alimentación en espera, el aparato consume una pequeña cantidad de corriente.
B Botones numéricos
Para seleccionar un número de 2 dígitos Ejemplo: 16: [ 10]=[1]=[6]
C Reducir el brillo del panel de visualización
El efecto de iluminación se apaga igualmente. Para cancelar, pulse el botón de nuevo.
D Selección de la fuente de audio
Pulse [SELECT <, >] (unidad principal: [SELECT]) repetidamente para seleccionar la fuente:
USBAA USBBB CD
CD FM
FM FMAM
FMAM
MEMORYMEMORYBLUETOOTHBLUETOOTHAUX DAUX-IN
En la unidad principal:
Para iniciar el emparejamiento Bluetooth®, mantenga pulsado [ ].
].
E Control de reproducción básico
F Seleccione el efecto de DJ o DJ sampler G Ver la información del contenido
H Seleccionar los efectos Karaoke
I Seleccionar álbum MP3 o pista
Pulse [ALBUM/TRACK] para seleccionar el álbum o la pista.
Explorar pistas o álbumes
Pulse [R, T] o gire [MULTI CONTROL] para explorar. Para iniciar la reproducción desde la selección, pulse [4/9].
J Ver el menú de configuración
K Control de funcionamiento de grabación
L Manejar un televisor Panasonic (solo los modelos compatibles)
Dirija el mando a distancia a un televisor Panasonic: [`/TV]: Encienda el sistema y el televisor [AV/INPUT]: cambia el modo de entrada de vídeo del
TV
[VOL +/–]: ajusta el nivel de volumen del TV M Ajusta el nivel de volumen
N Silencia el sonido
Para cancelar, pulse el botón de nuevo. “MUTE” también se cancela cuando se ajusta el volumen o se apaga el aparato.
O Seleccionar los efectos de sonido
P Ajusta el nivel de volumen del micrófono Q Seleccionar DJ jukebox o Karaoke jukebox R Seleccionar los efectos de iluminación
S Selecciona o confirma la opción T Ver el menú de reproducción
U Configure el temporizador para dormir
28
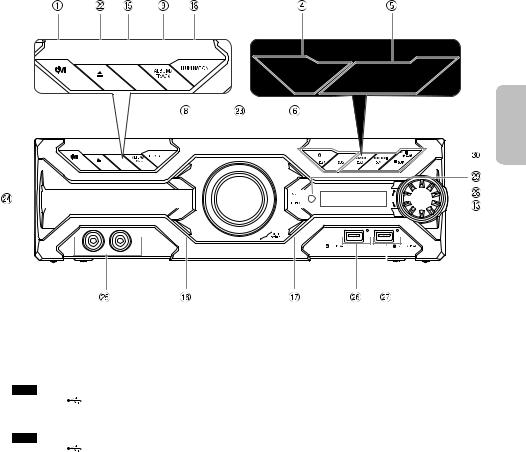
SOUND |
SELECT |
K
VOL
SELECT
KARAOKE
VOL
MIC VOL
ESPAÑOL
MIC 1 |
MIC 2 |
b Visualizador
c Sensor de mando a distancia
Distancia: Dentro de aproximadamente 7 m Ángulo: Aproximadamente 20° arriba y abajo,
30° izquierda y derecha
d Seleccionar los botones directos de las funciones de DJ
Pulse [JUKEBOX] o [DJ] para activar la función de DJ. Pulse [DJ1] a [DJ6] en la unidad principal para seleccionar la función deseada.
Para cancelar, pulse de nuevo el botón [DJ1] a [DJ6] seleccionado.
TQBJ2107
7
29

Preparación de los medios
Disco
1Pulse [x] en la unidad principal para abrir la
bandeja del disco.
Ponga un disco con la etiqueta hacia arriba. Vuelva a pulsar para cerrar la bandeja del disco.
2Pulse [SELECT <, >] repetidamente para seleccionar “CD”.
USB
Preparación
Antes de conectar un dispositivo USB al sistema, asegúrese de hacer una copia de seguridad de los datos.
1Reduzca el volumen y conecte el dispositivo USB
al puerto USB.
Sostenga la unidad principal cuando conecte o desconecte el dispositivo USB.
2Pulse [SELECT <, >] repetidamente para
seleccionar “USB A” o “USB B”.
El indicador de estado USB se ilumina en rojo cuando se ha seleccionado.
Nota:
•No use un cable de extensión USB. El sistema no puede reconocer dispositivos USB conectados mediante cable.
•No es posible cargar ciertos dispositivos, dado que la corriente de carga máxima del USB es de tan solo 500 mA.
Bluetooth®
Puede conectar y reproducir un dispositivo de audio inalámbricamente mediante Bluetooth®.
Preparación
•Encienda la unidad principal.
•Encienda la función Bluetooth® del dispositivo y ponga el dispositivo cerca del sistema.
•Lea las instrucciones de funcionamiento del dispositivo para más detalles.
█ Emparejamiento de un dispositivo
Preparación
Si este sistema está conectado a un dispositivo Bluetooth®, desconéctelo (~8).
1Pulse [ ].
].
Si aparece el mensaje “PAIRING”, continúe con el paso 3.
2Pulse [PLAY MENU] repetidamente para
seleccionar “PAIRING” y, a continuación, pulse [OK].
TQBJ2107
8
3Seleccione “SC-AKX710” en el menú Bluetooth®
del dispositivo.
Si le pide una contraseña, introduzca “0000” o “1234”. El dispositivo se conecta con este sistema automáticamente después de que se haya completado el emparejamiento.
Antes de que se muestre “SC-AKX710”, es posible que aparezca la dirección MAC (ejemplo: 6C:5A:B5:B3:1D:0F).
Se muestra el nombre del dispositivo conectado durante unos segundos.
Utilización el unidad principal
1Mantenga pulsado [ ] hasta que aparezca el mensaje “PAIRING”.
2Seleccione “SC-AKX710” en el menú Bluetooth® del dispositivo.
Nota:
Puede emparejar hasta 8 dispositivo con este sistema. Si se empareja un 9º dispositivo, se sustituirá el dispositivo que no haya sido utilizado durante más tiempo.
█ Conexión de un dispositivo
Preparación
Si este sistema está conectado a un dispositivo Bluetooth®, desconéctelo (~8).
1Pulse [ ].
].
Se muestra “BLUETOOTH READY”.
2Seleccione “SC-AKX710” en el menú Bluetooth®
del dispositivo.
Se muestra el nombre del dispositivo conectado durante unos segundos.
3Inicie la reproducción en el dispositivo.
Nota:
•Debe haber emparejado un dispositivo para conectar.
•Este sistema solo puede conectarse a un dispositivo cada vez.
•Cuando se seleccione “BLUETOOTH” como la fuente, el sistema intenta de forma conectarse de forma automática al último dispositivo conectado. (durante este proceso se muestra “LINKING”.)
█ Desconexión de un dispositivo
Mientras un dispositivo Bluetooth ® está conectado
1Pulse [PLAY MENU] repetidamente para seleccionar “DISCONNECT?”.
2Pulse [Y, U] para seleccionar “OK? YES” y, a
continuación, pulse [OK].
Se muestra “BLUETOOTH READY”. Para cancelar, seleccione “OK? NO”.
Utilización el unidad principal
Mantenga pulsado [ ] hasta que aparezca el mensaje “PAIRING”.
Nota:
Se desconecta un dispositivo cuando:
•Selecciona una fuente diferente.
•Aleja el dispositivo más allá de la distancia máxima.
•Deshabilita la transmisión Bluetooth® del dispositivo.
•Apaga el sistema o el dispositivo.
30
 Loading...