


SC-CH75
Table of contents
 Loading...
Panasonic’
CD Stereo System
SC-CH75
SC-CH74
Operating Instructions
The illustration shows SC-CH74.
t'
; Note: ^
|: The “EB” indication shown on the outside packing case indicates
United Kingdom.
& Before connecting, operating or adjusting this product, please read
W
these instructions completely. Please save this manual.
EB GN
COMPACT
DIGITAL AUDIO
RQT3309-1B

Dear Customer
Thank you for purchasing this system.
For optimum performance and safety, please read these instructions
carefully.
These operating instructions are applicable to the following systems.
System
Main unit
SC-CH75
SA-CH75
SC-CH74
SA-CH74
CAUTION!
THIS PRODUCT UTILIZES A LASER.
USE OF CONTROLS OR ADJUSTMENTS OR PERFORM
ANCE OF PROCEDURES OTHER THAN THOSE SPECI
FIED HEREIN MAY RESULT IN HAZARDOUS RADIATION
EXPOSURE.
DO NOT OPEN COVERS AND DO NOT REPAIR
YOURSELF. REFER SERVICING TO QUALIFIED
PERSONNEL.
(For United
Speaker system
SB-CH75
Kingdom)
SB-CH74
(For others)
SB-CH430
CAUTION!
DO NOT INSTALL OR PLACE THIS UNIT IN A
BOOKCASE, BUILT IN CABINET OR IN ANOTHER CON
FINED SPACE IN ORDER TO KEEP WELL VENTILATED
CONDITION. ENSURE THAT CURTAINS AND ANY
OTHER MATERIALS DO NOT OBSTRUCT THE
Back of product
VENTILATION HOLES TO PREVENT RISK OF ELECTRIC
SHOCK OR FIRE HAZARD DUE TO OVERHEATING.
N VISIBLE LASER RADIATION WHE.N OPEN
DANGER
AVOID direct E>!FOSlWErO BEAM
:jSiNLIGL;SEPSIP4..NGVEDiBNINC.NABSIM(:RHEDyEeP'C;=i
ADWRSEL
fB .JC: AF FI.INK'ION LiNDGAUCSinELSE FOE jEFIALINS.
AVAIIAEsSAjA EuüJALUKITUSOWTETTAESSAOLETALmiNi
V.ARO!
NAKYWATONTALASERSArEILVLLE. ÄLAKAISOSA TEE SEEN.
OSVNLIG LASEflSrRALNIW fJAR DENNA DEL ARflPPftADCCH
VARNING
SPARREN AR UfiKOPPLAD. ВЕТЯАКТА tj STRAFEN
usynlis lasötsiraling nab DEKsa ARNES cg SIKKEBHEDSLAS
ADVARSEL
BBYTES UNNGAEKSPCNERINGEDRSTRALEN
LNSICHIBARE LAS[RSrB.AHLUNG. №NN ABCECKUNG GECf FNE’
VORSICHT
NICHT DEM STRAHL AUSSETZEN
(Inside of product)
(Indersiden at apparate!)
(Tjotteen sisaNa)
(Apparaterts insida)
(Produktets innside)
(Im Inneren des Gerätes)
THIS MUSIC SYSTEM IS CAPABLE OF RECEIVING THE NEW AM STEREO BROADCASTS FROM THE AM BAND
RADIO STATIONS. HOWEVER LIKE MANY MUSIC SYSTEM CURRENTLY AVAILABLE ON THE MARKET IT WILL
REPRODUCE THIS AM STEREO SIGNAL ONLY IN AM MONO, WHICH, IN EFFECT, IS OF NO LESSER QUALITY
THAN YOUR EXISTING AM MONO MUSIC SYSTEM.
Suggestions for safety
Placement Power cord protection
Avoid placing the unit in areas of:
•direct sunlight
•high temperature
• high humidity
•excessive vibration
•uneven surfaces (Place the unit on a flat level surface.)
Such conditions might damage the cabinet and/or other component parts and
thereby shorten the unit s service life.
To protect the unit against sound distortion and acoustical effects, please place
the unit at least 15 cm away from wall surfaces etc.
Ventilation
Place the unit in a well-ventilated position at least 10 cm away from wall
surfaces etc.
Ensure that curtains and similar materials do not obstruct the ventilation holes.
Stacking
Never place heavy items on top of the unit or the power cord.
Voltage
• ft is very dangerous to use an AC power source of high voltage such as for an
air conditioner.
A fire might be caused by such a connection.
•A DC power source can not be used. * *
Be sure to check the power source carefully, especially if on a ship or other
pface where DC is used.
• Avoid cuts, scratches or poor connection of the AC main cord, as this may
result in fire or electric shock.
Excessive bending, pulling or slicing of the cord should also be avoided.
•Do not pull on the cord when you are disconnecting the power, as this could
cause an electric shock. Grasp the plug firmly when you disconnect the power
supply.
•Never touch the plug with wet hands or a serious electric shock could result.
Foreign materials
• Ensure that no foreign objects, such as needles, coins, screwdrivers etc.,
accidentally fail into the unit or through the ventilation holes.
Otherwise, a serious electric shock or malfunction could occur.
• Be extremely careful about spilling water or liquid on/into the unit, as a fire or
electric shock could occur.
(Disconnect the power plug and contact your dealer immediately if this oc
curs.)
• Avoid spraying insecticides onto the unit as they contain flammable gases
which can be ignited.
• Insecticides, alcohol, paint thinner and similar chemicals should never be
used to clean the unit as they can cause flaking or cloudiness to the cabinet
finish.
Service
• Never attempt to repair, disassemble or reconstruct the unit if there seems to
be a probiem.
A serious electric shock could result if you ignore this precautionary measure,
• If a problem occurs during operation (the sound is interrupted, indicators fail to
light up, smoke is detected, etc.) contact your dealer or Authorized Service
Center immediately.
• Disconnect the power supply if the unit will not be used for a long time.
Otherwise the operation life could be shortened.
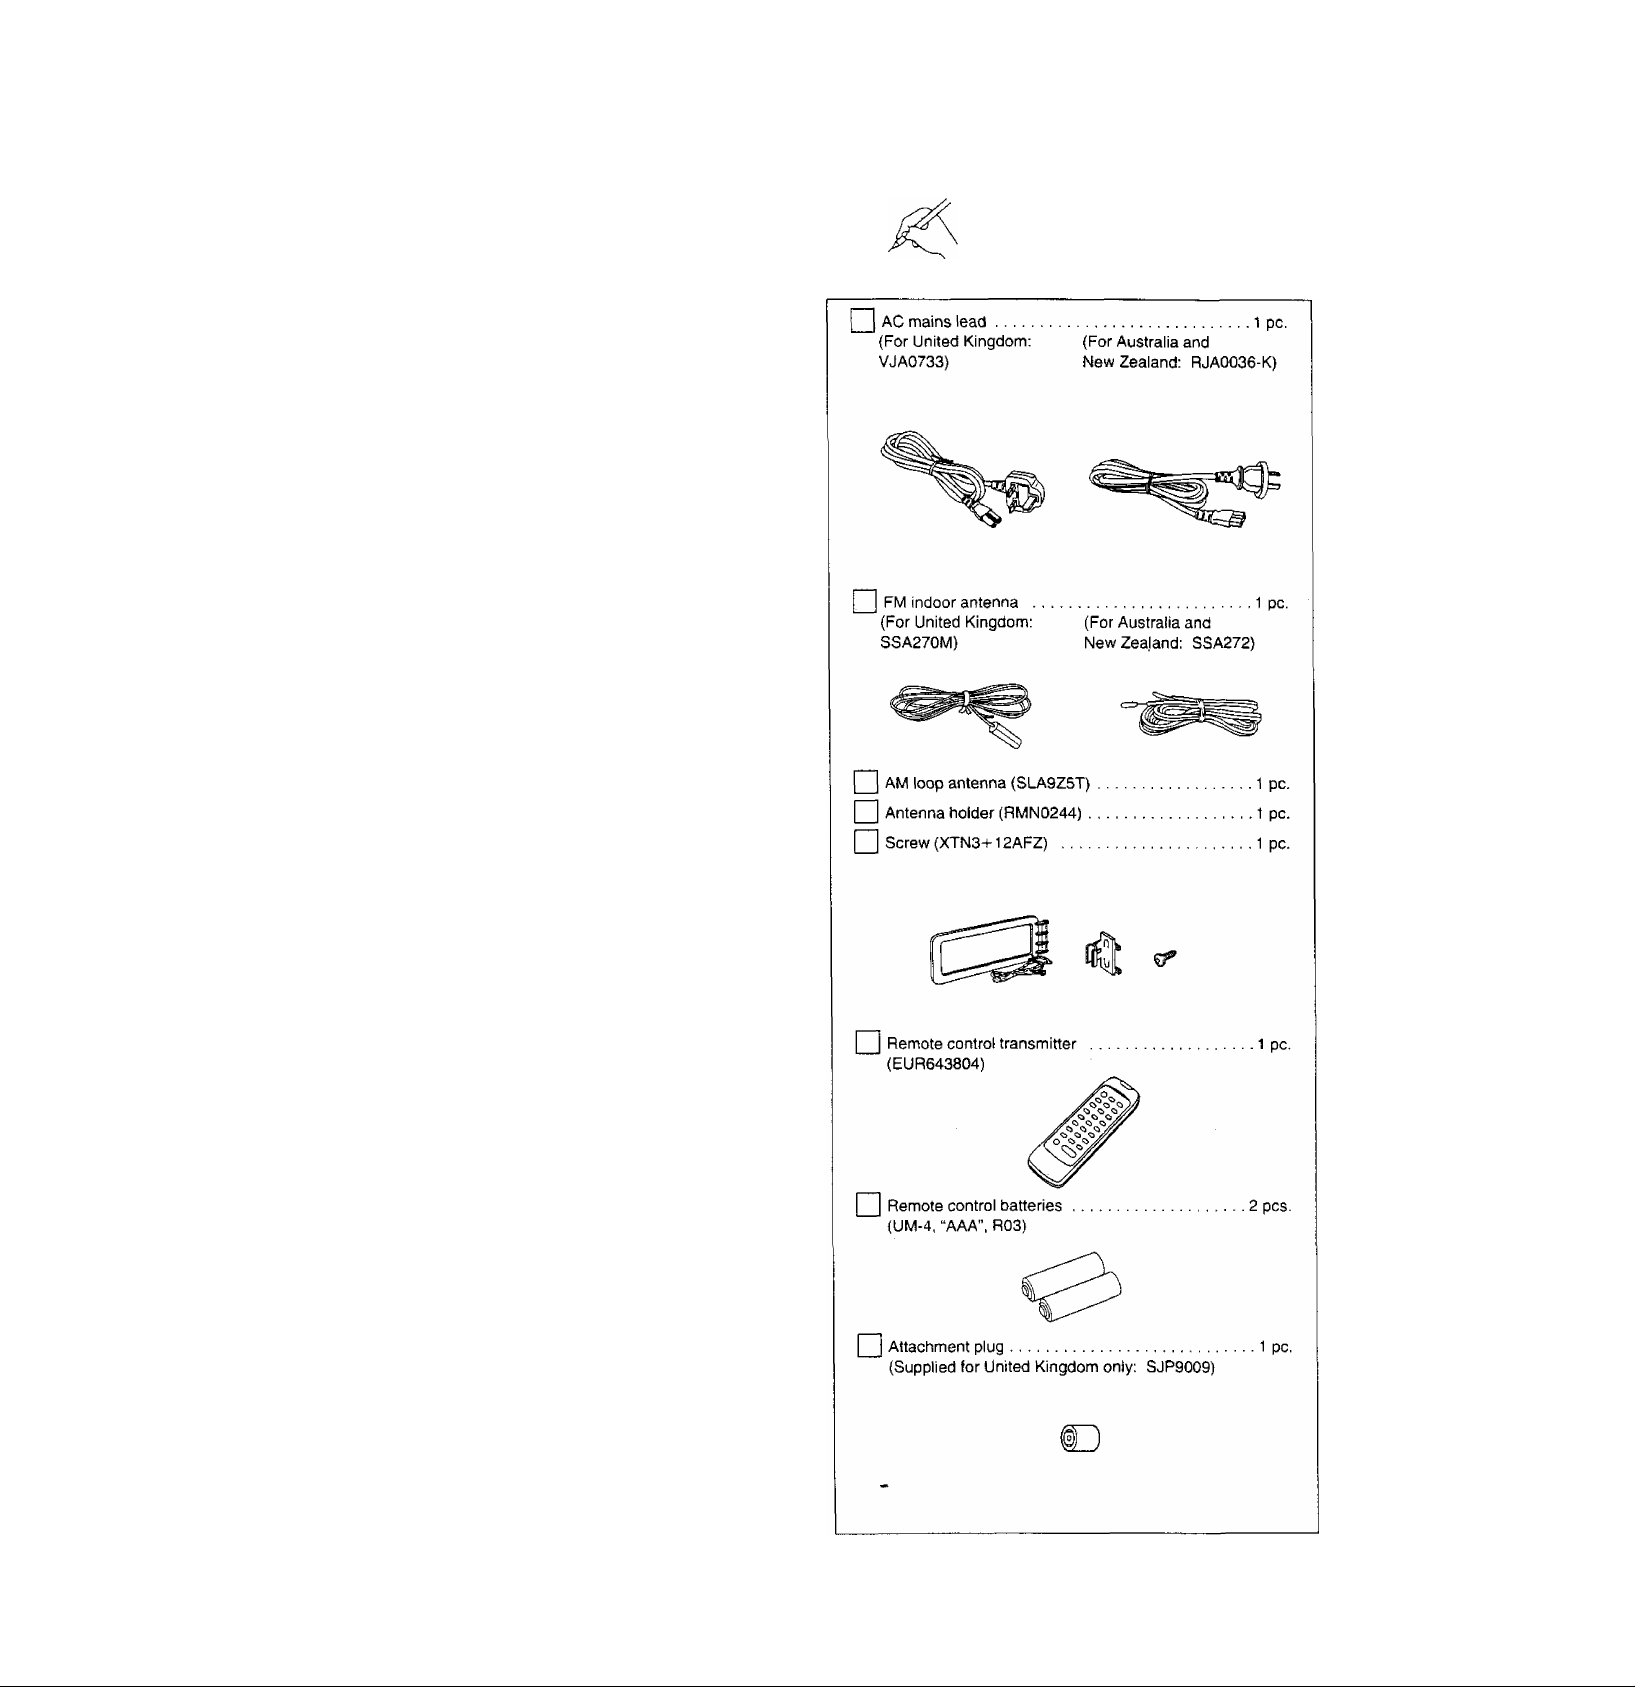
Table of contents Supplied accessories
Please check and identify the supplied ac
Before use
cessories.
Supplied accessories............................................... 3
Caution for AC mains lead
..........
...........................
Preparations
Concerning the remote control .............................. 5
Installation................................................................. 5
Connections.............................................................. 6
Front panel controls................................................. 8
Setting the time......................................................... 9
Memory presetting .................................................10
Operations
Listening to radio broadcasts
Listening to compact discs
Listening to tapes
Changing sound quality and field
Convenient functions
..................................................
.............................................
..............................
..................................
........................
11
12
16
18
19
Recording operations
Before recording.....................................................19
Recording from radio broadcasts........................20
Recording from compact discs
Tape to tape recording
...........................................
..........................
.21
25
0
4
Timer operations
Using the play timer ... '
Using the record timer
Using the sleep timer
To use two timers together ...................................30
........................................
.........................................
...........................................
26
28
30
ijSxternal unit operations
iinging along with karaoke
pJsing an external unit
rOther functions......................................................32
.................................
...........................................
31
32
leference
Quick reference of remote control
operations ..........................................................33
^Concerning compact discs .................................36
^Concerning cassette tapes..................................36
laintenance........................................^
^Troubleshooting guide.........................................38
^Technical specifications.......................Back cover
These operating instructions fundamentally explain the
operation of system SC-CH74.
.................
37
1*^
GmHon /or AC mains lead
(For United Kingdom)
(“EB” area code model only)
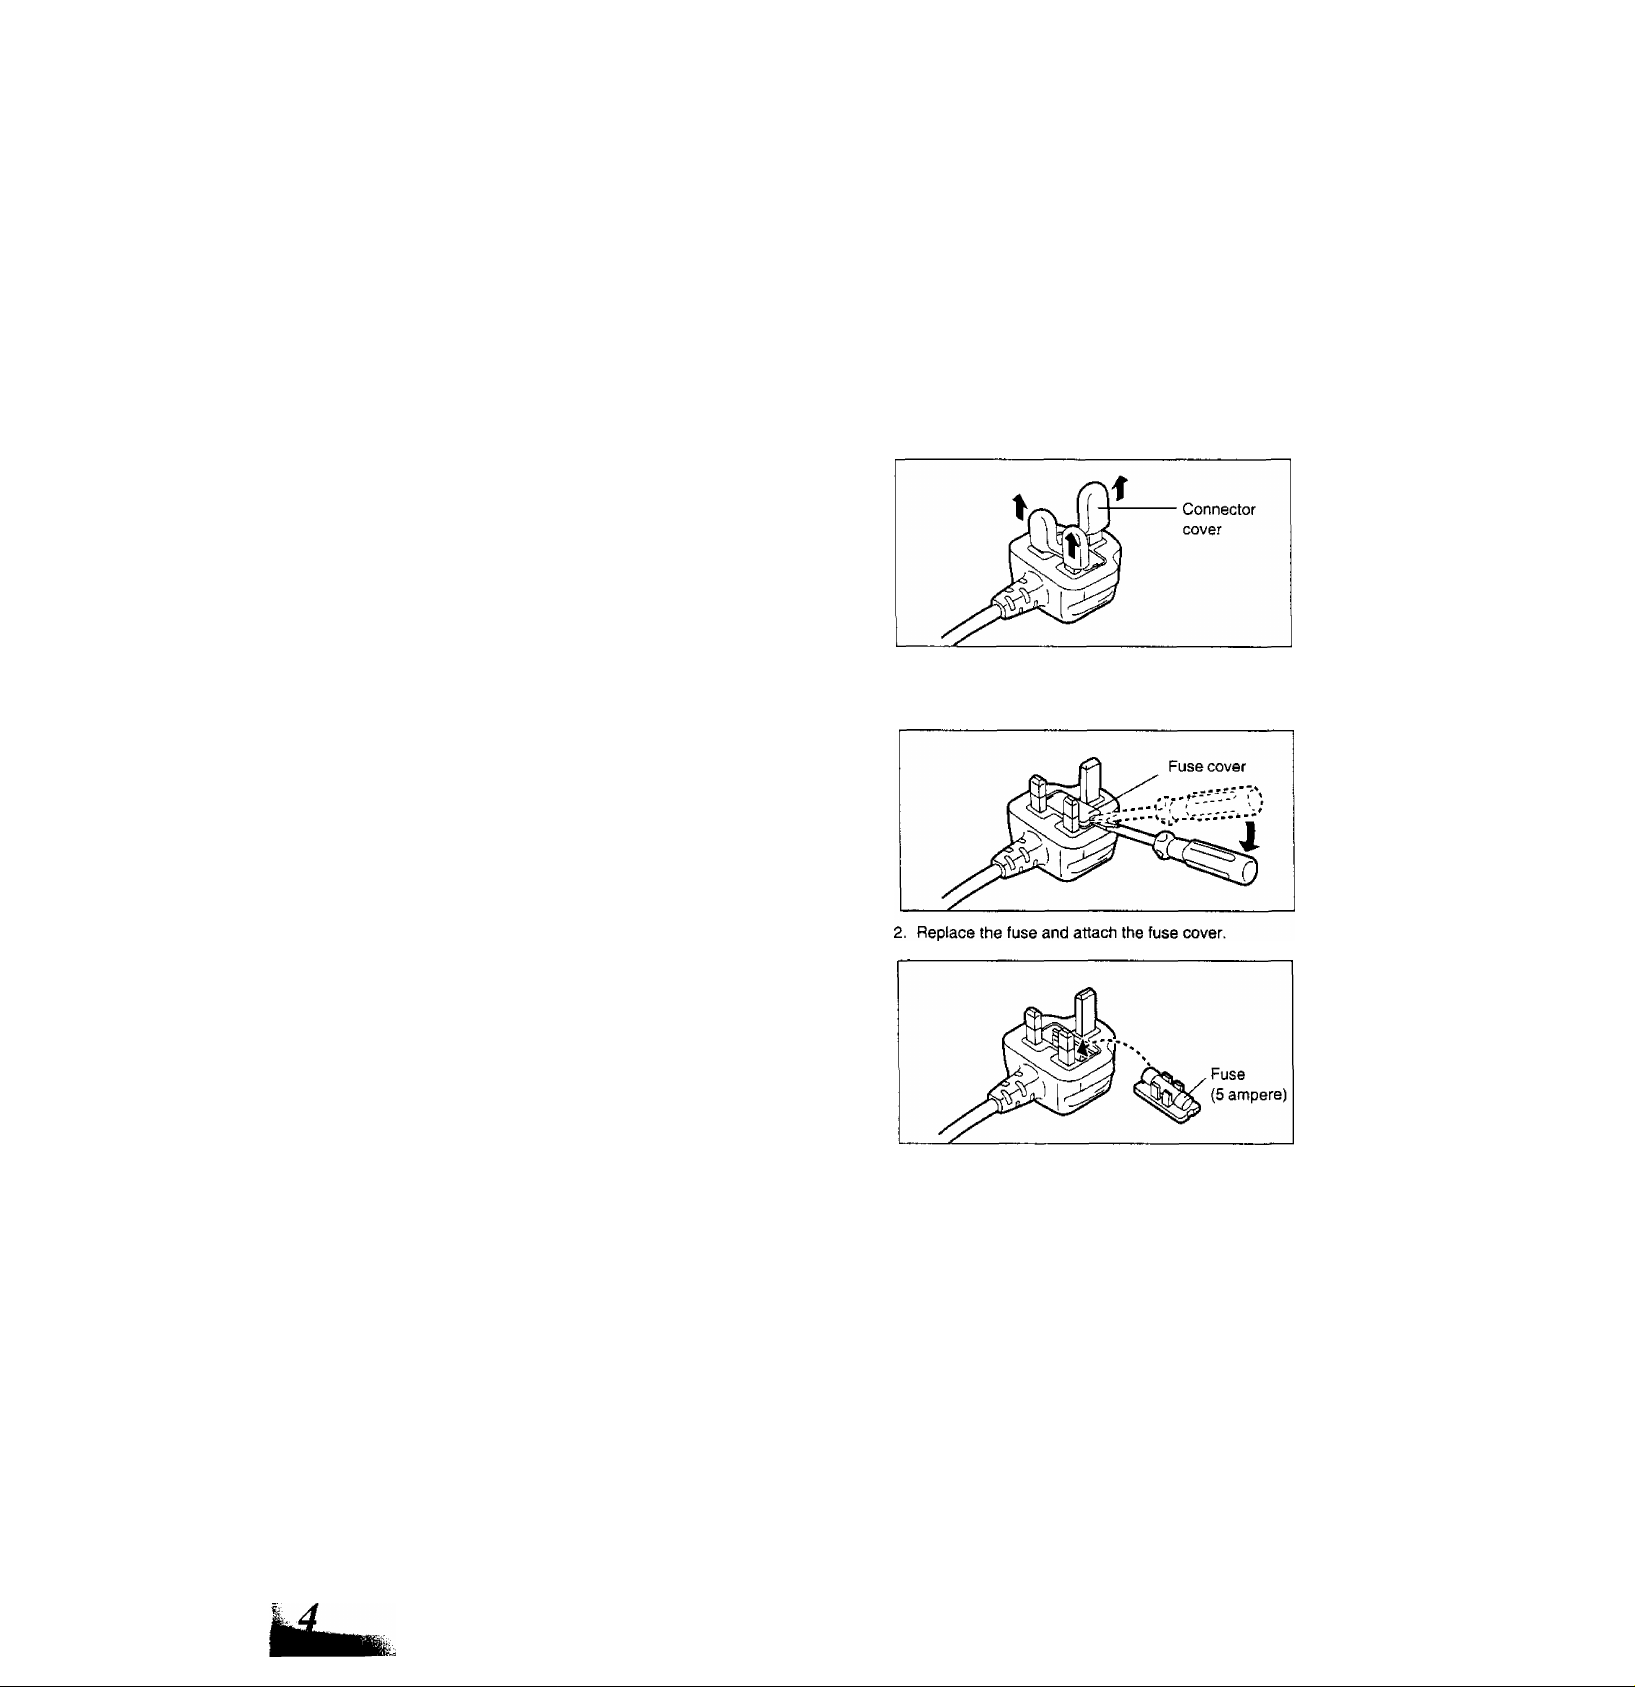
For your safety, please read the following text carefully.
This appliance is supplied with a moulded three pin mains plug for
your safety and convenience.
A 5*ampere fuse is fitted in this plug.
Should the fuse need to be replaced please ensure that the replace
ment fuse has a rating of 5-ampere and that it is approved by ASTA
or BSIto BS1362.
Check for the ASTA mark ^ or the BSI mark ^ on the body of the
fuse.
If the plug contains a removable fuse cover you must ensure that it is
refitted when the fuse is replaced.
If you lose the fuse cover the plug must not be used until a replace
ment cover is obtained.
A replacement fuse cover can be purchased from your local dealer.
CAUTION!
IF THE FITTED MOULDED PLUG IS UNSUITABLE FOR
THE SOCKET OUTLET IN YOUR HOME THEN THE FUSE
SHOULD BE REMOVED AND THE PLUG CUT OFF AND
DISPOSED OF SAFELY.
THERE IS A DANGER OF SEVERE ELECTRICAL SHOCK
IF THE CUT OFF PLUG IS INSERTED INTO ANY 13AMPERE SOCKET.
If a new plug is to be fitted please observe the wiring code as shown
below.
If in any doubt please consult a qualified electrician.
The wire which is coloured BROWN must be connected to the
terminal in the plug which is marked with the letter L or coloured
RED.
Under no circumstances should either of these wires be connected to
the earth terminal of the three pin plug, marked with the letter E or the
Earth Symbol i.
Before use
Remove the connector cover as follows.
How to replace the fuse
1. Remove the fuse cover with a screwdriver.
IMPORTANT
The wires in this mains lead are coloured in accordance with the
following code:
Slue: Neutral
Brown: Live
As the colours of the wires in the mains lead of this appliance may not
correspond with the coloured markings identifying the terminals in
your plug, proceed as follows:
The wire which is coloured BLUE must be connected to the terminal
in the plug which is marked with the letter N or coloured BLACK.
Il
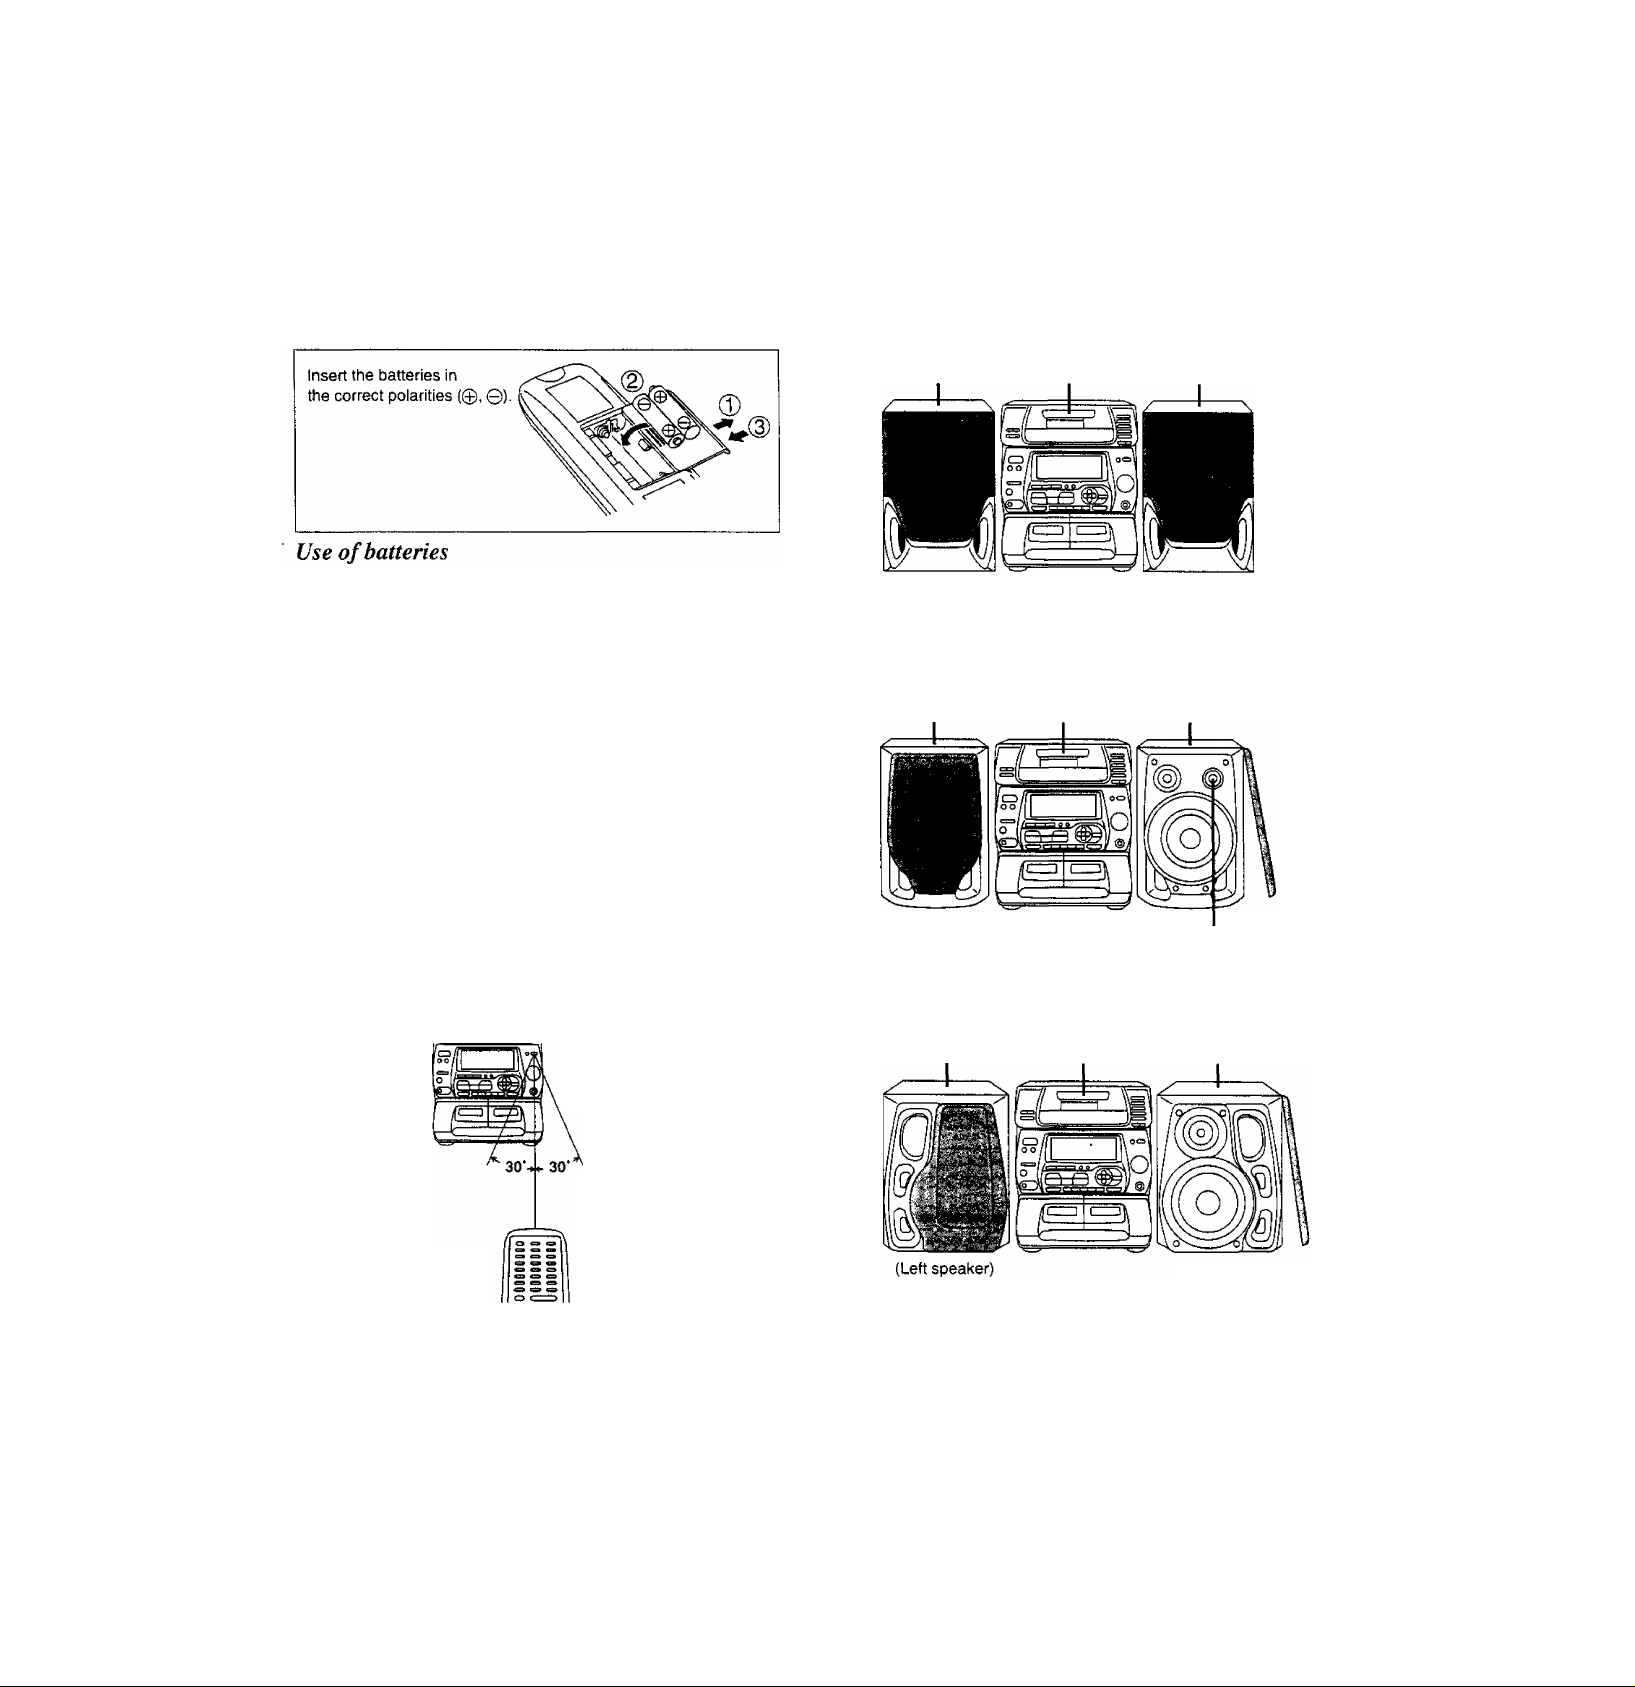
Concerning the remote
^ control
Installation
Placement of speakers
Battery installation
Insert the batteries with this unit as shown below.
Use two UM-4 “AAA”, lEC R03 (1,5 V) or equivalent batteries.
• Do not mix old and new batteries, or batteries of different types
(manganese and alkaline, etc.).
• Never subject batteries to excessive heat or flame; do not attempt
to disassemble them; and be sure they are not short-circuited.
• If the remote control is not to be used for a long period of time,
remove the batteries and store them in a cool, dark place.
• Do not attempt to recharge alkaline or manganese batteries.
Battery life
The battery life is about one year.
The batteries should be replaced if commands from the remote
control transmitter do not operate the unit even when the transmitter
is held close to the front panel.
To produce a better stereo sound, install both speakers away from
the system.
1
(For United Kingdom)
SB-CH74 SA-CH74
Speakers are symmetrically the same on the inside, so you don’t
have to orient them in a certain one or another.
(For Australia and New Zealand)
SB-CH430 SA-CH74 SB-CH430
SB-CH74
When you need to replace these batteries
Use two UM-4, “AAA”, lEC R03 (1.5 V) or equivalent batteries.
Correct method of use
Remote control
sensor
About 7 meters in front of
the signal sensor (The
Transmission
window
Operations notes
•Aim the remote control’s transmission window toward the unit’s
sensor. Avoid any obstacles.
•Be sure the transmission window and the unit’s sensor are free
from dust. Excessive dust might affect its performance.
'•The operation may not be correct if direct sunlight or other strong
light source strikes the receiving sensor of this unit. If there is a
problem, place the unit away from the light source.
'•if this system Is installed in a rack with glass doors, the glass doors’
thickness or color might make it necessary to use the remote
control a shorter distance from the system.
• Never place heavy items.
• Do not disassemble or reconstruct,
• Do not spill water or other liquids.
actual range will depend
on the angle at which the
remote control is used.)
Set the speakers so that the tweeter with the silver cap is on the
outside.
(For Australia and New Zealand)
SB-CH75 SA-CH75 SB-CH75
(Right speaker)
For your reference
For your listening pleasure, keep your speakers from touching the
stereo.
Commèàams
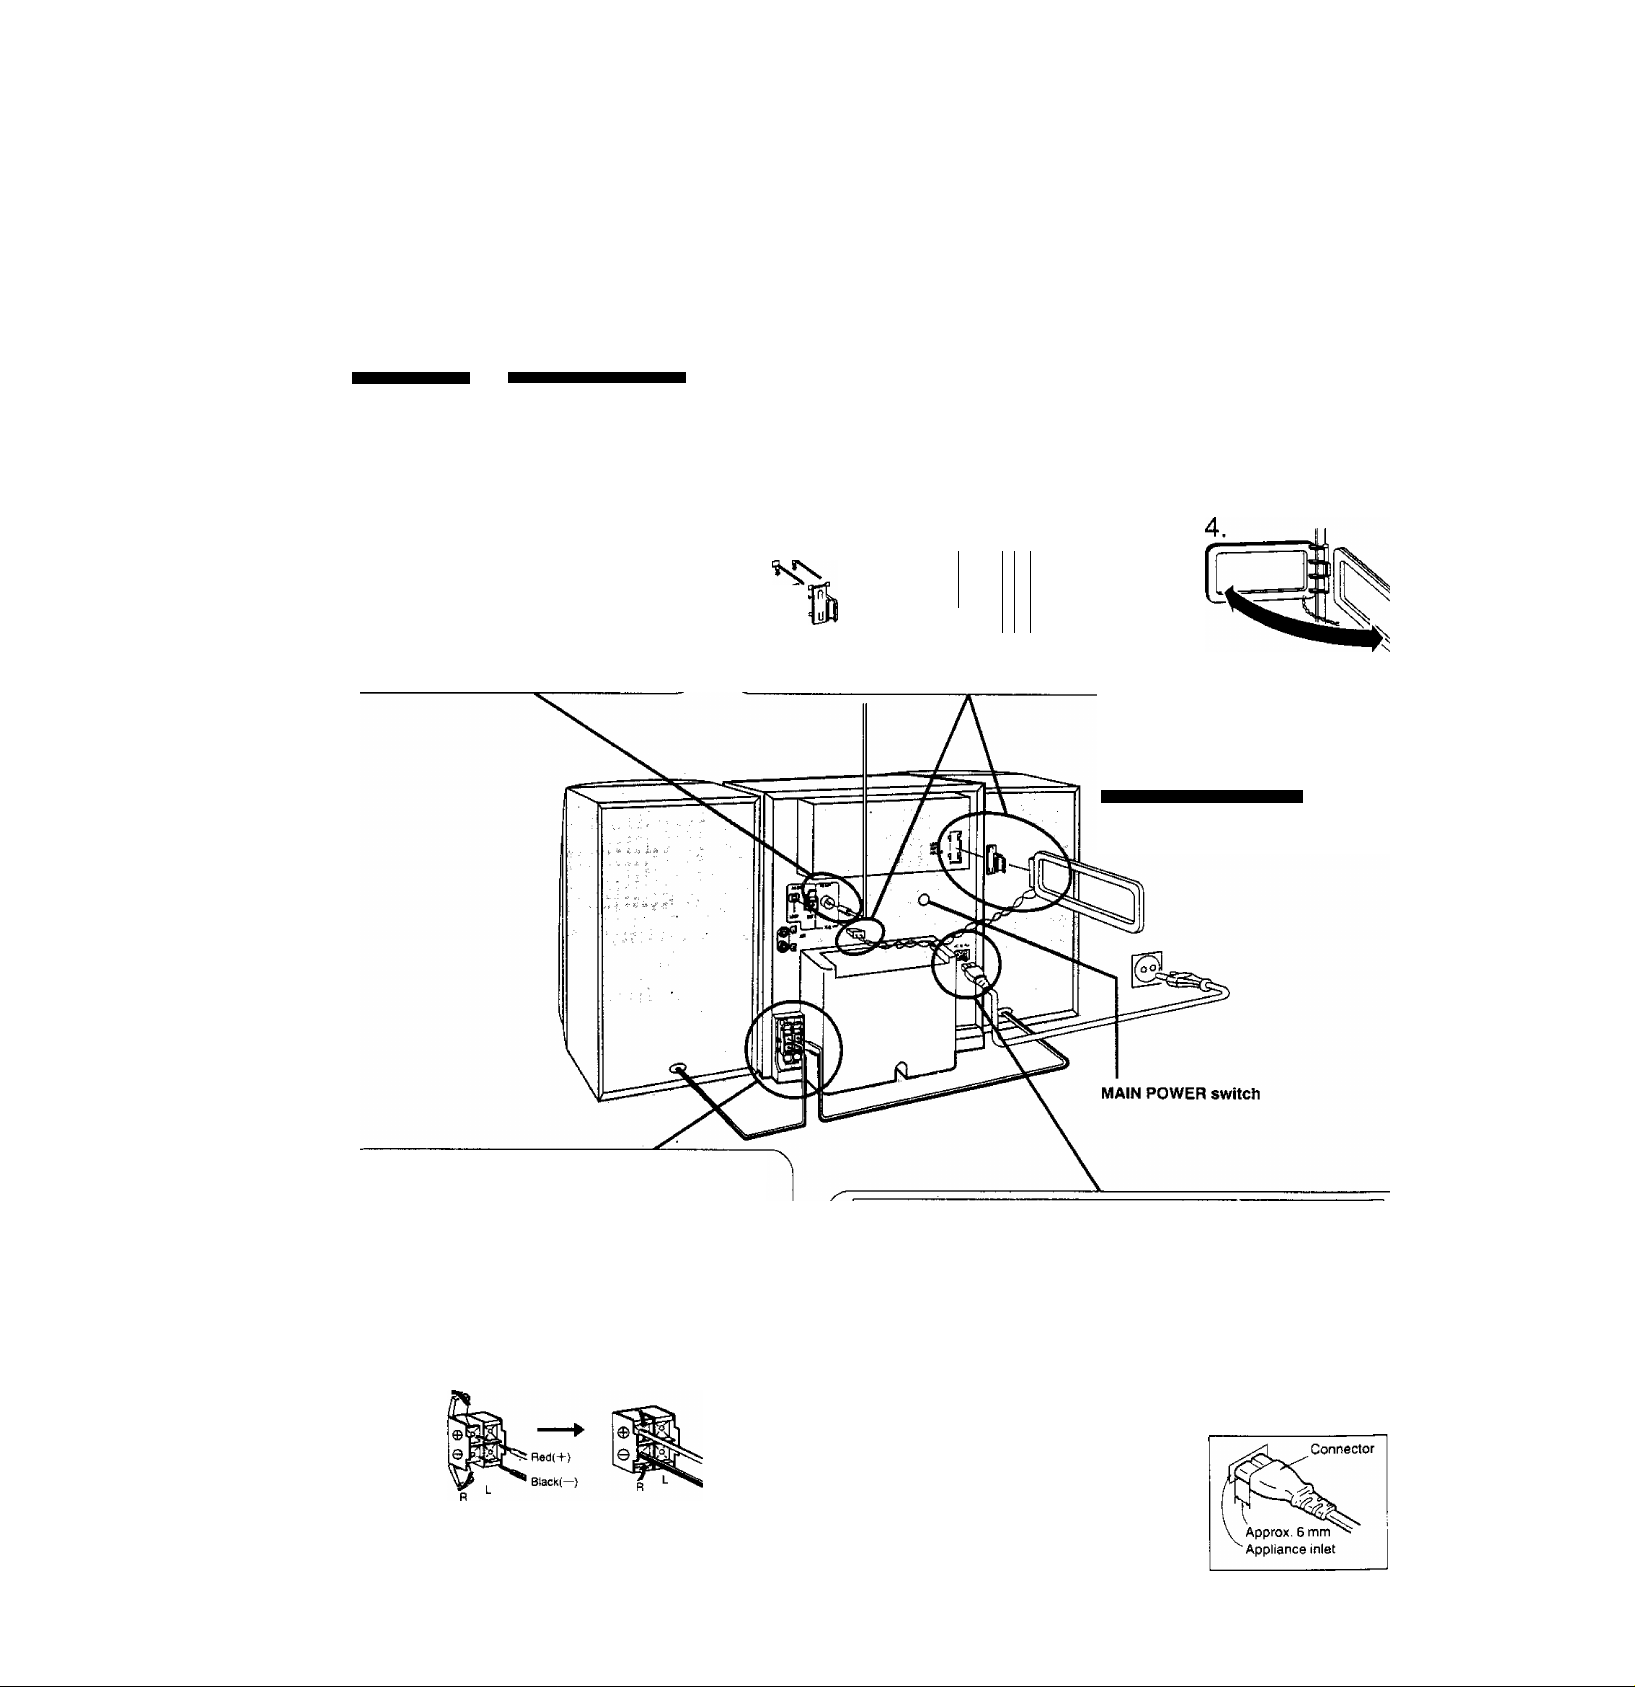
Basic connections (for supplied accessories)
FM indoor antenna
Twist
For United Kingdom
Adhesive tape E!I!
FM ANT
(75Q)
Attach to a wall {using tape) facing in the
direction of best reception.
For best reception sound quality:
An FM outdoor antenna is recommended.
Disconnect the FM indoor antenna if an FM
outdoor antenna is installed.
For Australia and New Zealand
FM ANT
(750)
AM loop antenna
1. Attach the anten
na holder to the
rear panel. Press
the antenna hold
er hard enough
to get it fixed
firmly in place,
with a click.
1.-®
1.-(
2. Clamp the anten
na to the antenna
holder.
2.
%
3. Connect the an
tenna terminal to
the rear panel of
the unit.
4.
While listening to
an AM broad
cast, position the
loop antenna for
the best recep
tion.
3.
For Australia and New Zealand
The configutation of AC mains lead and I
antenna terminal are different.
%j Speaker cords
® Strip off the outer covering, and twist the center con
ductor.
o
X
' Match the cords to the terminals by color and con
nect.
To prevent damage to circuitry, never short-circuit posi
tive (-F) and negative (-) speaker wires.
For United Kingdom:
BE SURE TO READ THE CAUTION FOR AC MAINS
LEAD ON PAGE 4 BEFORE PROCEEDING TO
STEP 4.
AC mains lead
Plug the cord into an outlet only after all other connections have been
made.
For United Kingdom;
insertion of Connector
Even when the connector is perfectly in
serted, depending on the type of inlet
used, the front part of the connector may
jut out as shown in the drawing.
However there is no problem using the
unit.
a -:. Í
-r ;
SC-CH75
For Australia and New Zealand
After you have connected all other cables:
Press MAIN POWER switch at the rear panel to
ON position.
The primary circuit is always “live” as long as this
switch is set to ON position.
Note:
If you do not plan to use the system for a long
time, press the MAIN POWER switch to OFF
position or disconnected the AC power supply
cord.
Caution
Use this speaker only with the recommended system.
Failure to do so may lead to damage to the amplifier
and/or the speaker, and may result in the risk of fire.
Consuit a qualified service person if damage has oc*
curred or if you experience a sudden change in perfor
mance.
External unit connection
• For details, refer to the instruction manual of the units which are to
be connected.
•When units other than those described beiow are to be connected,
please consult with your audio dealer.
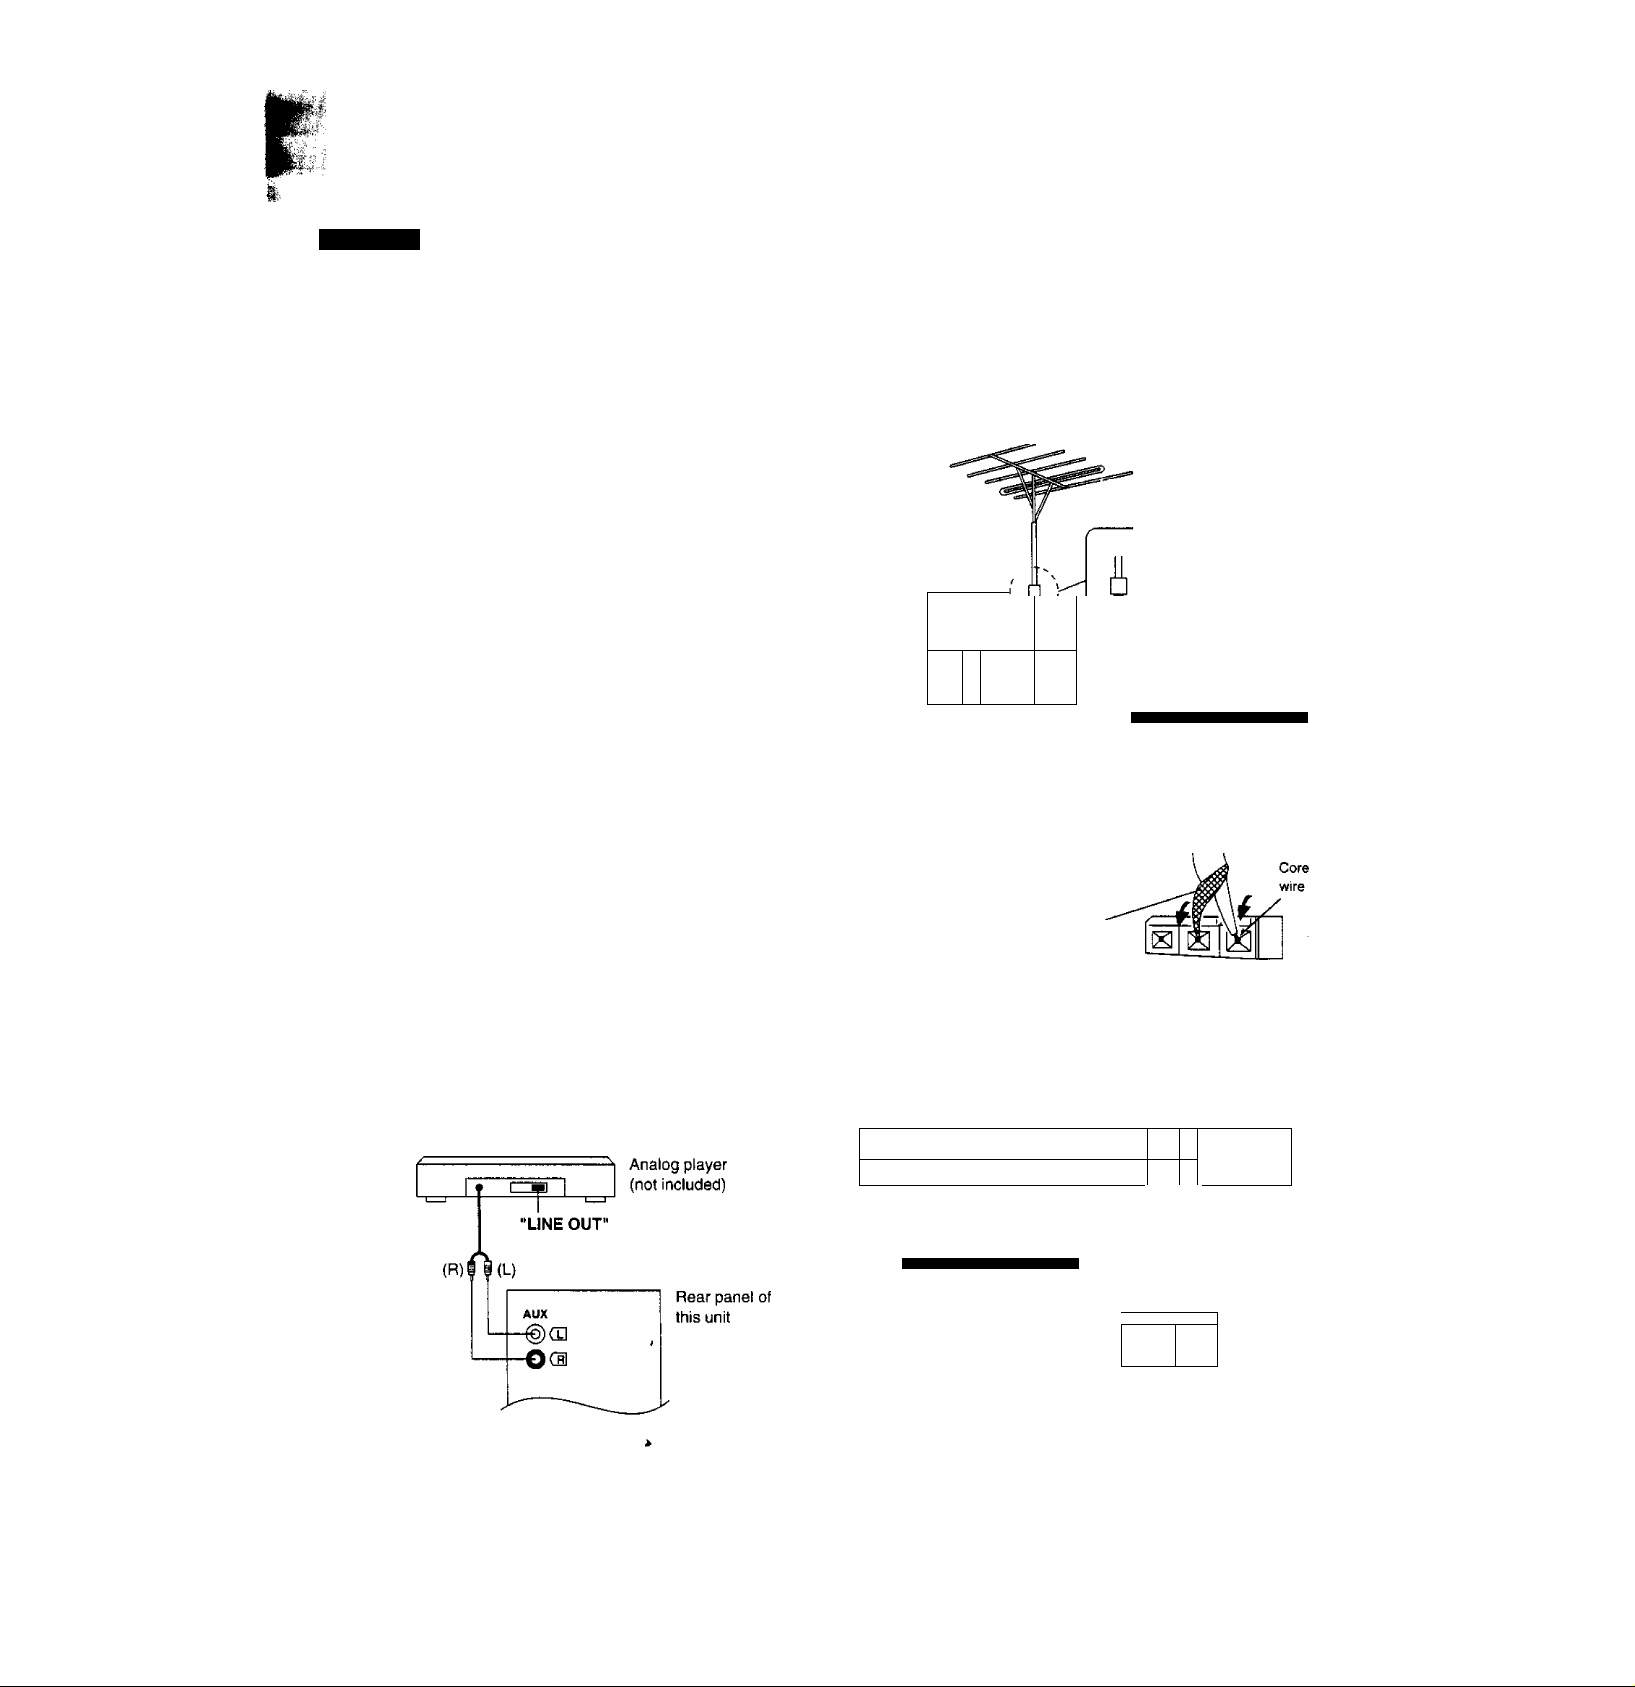
Optional antenna connections
You may need an outdoor antenna if you use this system in a
mountainous region or inside a reinforced-concrete building, etc.
FM outdoor antenna
An outdoor antenna should be installed by a competent technician
only.
FM outdoor antenna
(not included)
75Q coaxial
cable
(not included) ,
(T) Remove a piece of the outer vinyl
insulator.
(D Twist the shield braid to expose
the core wire.
@ Connect the shield braid and the
core wire as shown at the left.
7“
\
FM ANT
(750)
_
For United
Kingdom only:
Use the
¿^attachment
plug (included)
For Australta and New Zealand
30 mm (iVis")
15 mm {'%/)«
Analog player
Only an analog player with a built-in phono equalizer can be con
nected.
This example shows how to connect the analog player with the
PHONO OUT/LINE OUT switch.
Set the switch to the “LINE OUT" position at the back of the analog
player.
Shield braid
GND FM ANT
AM outdoor antenna (not included)
Connect the outdoor antenna without removing the AM loop antenna.
Run 5 to 12 m of vinyl-covered wire horizontally along a window or
other convenient location.
AM outdoor antenna
(not included)
1
-------
5-12m
-----------------------
For Ausiralia and New Zealand
When the unit is not in use, disconnect the outdoor antenna to
prevent possible damage that may be caused by lightning. Never use
an outdoor antenna during an electrical storm.
1
AM ANT
EXT
y
1____
----
AM ANT
EXT
____
(S)
L
®c
t= =^.J
—*
____1__
{
No,
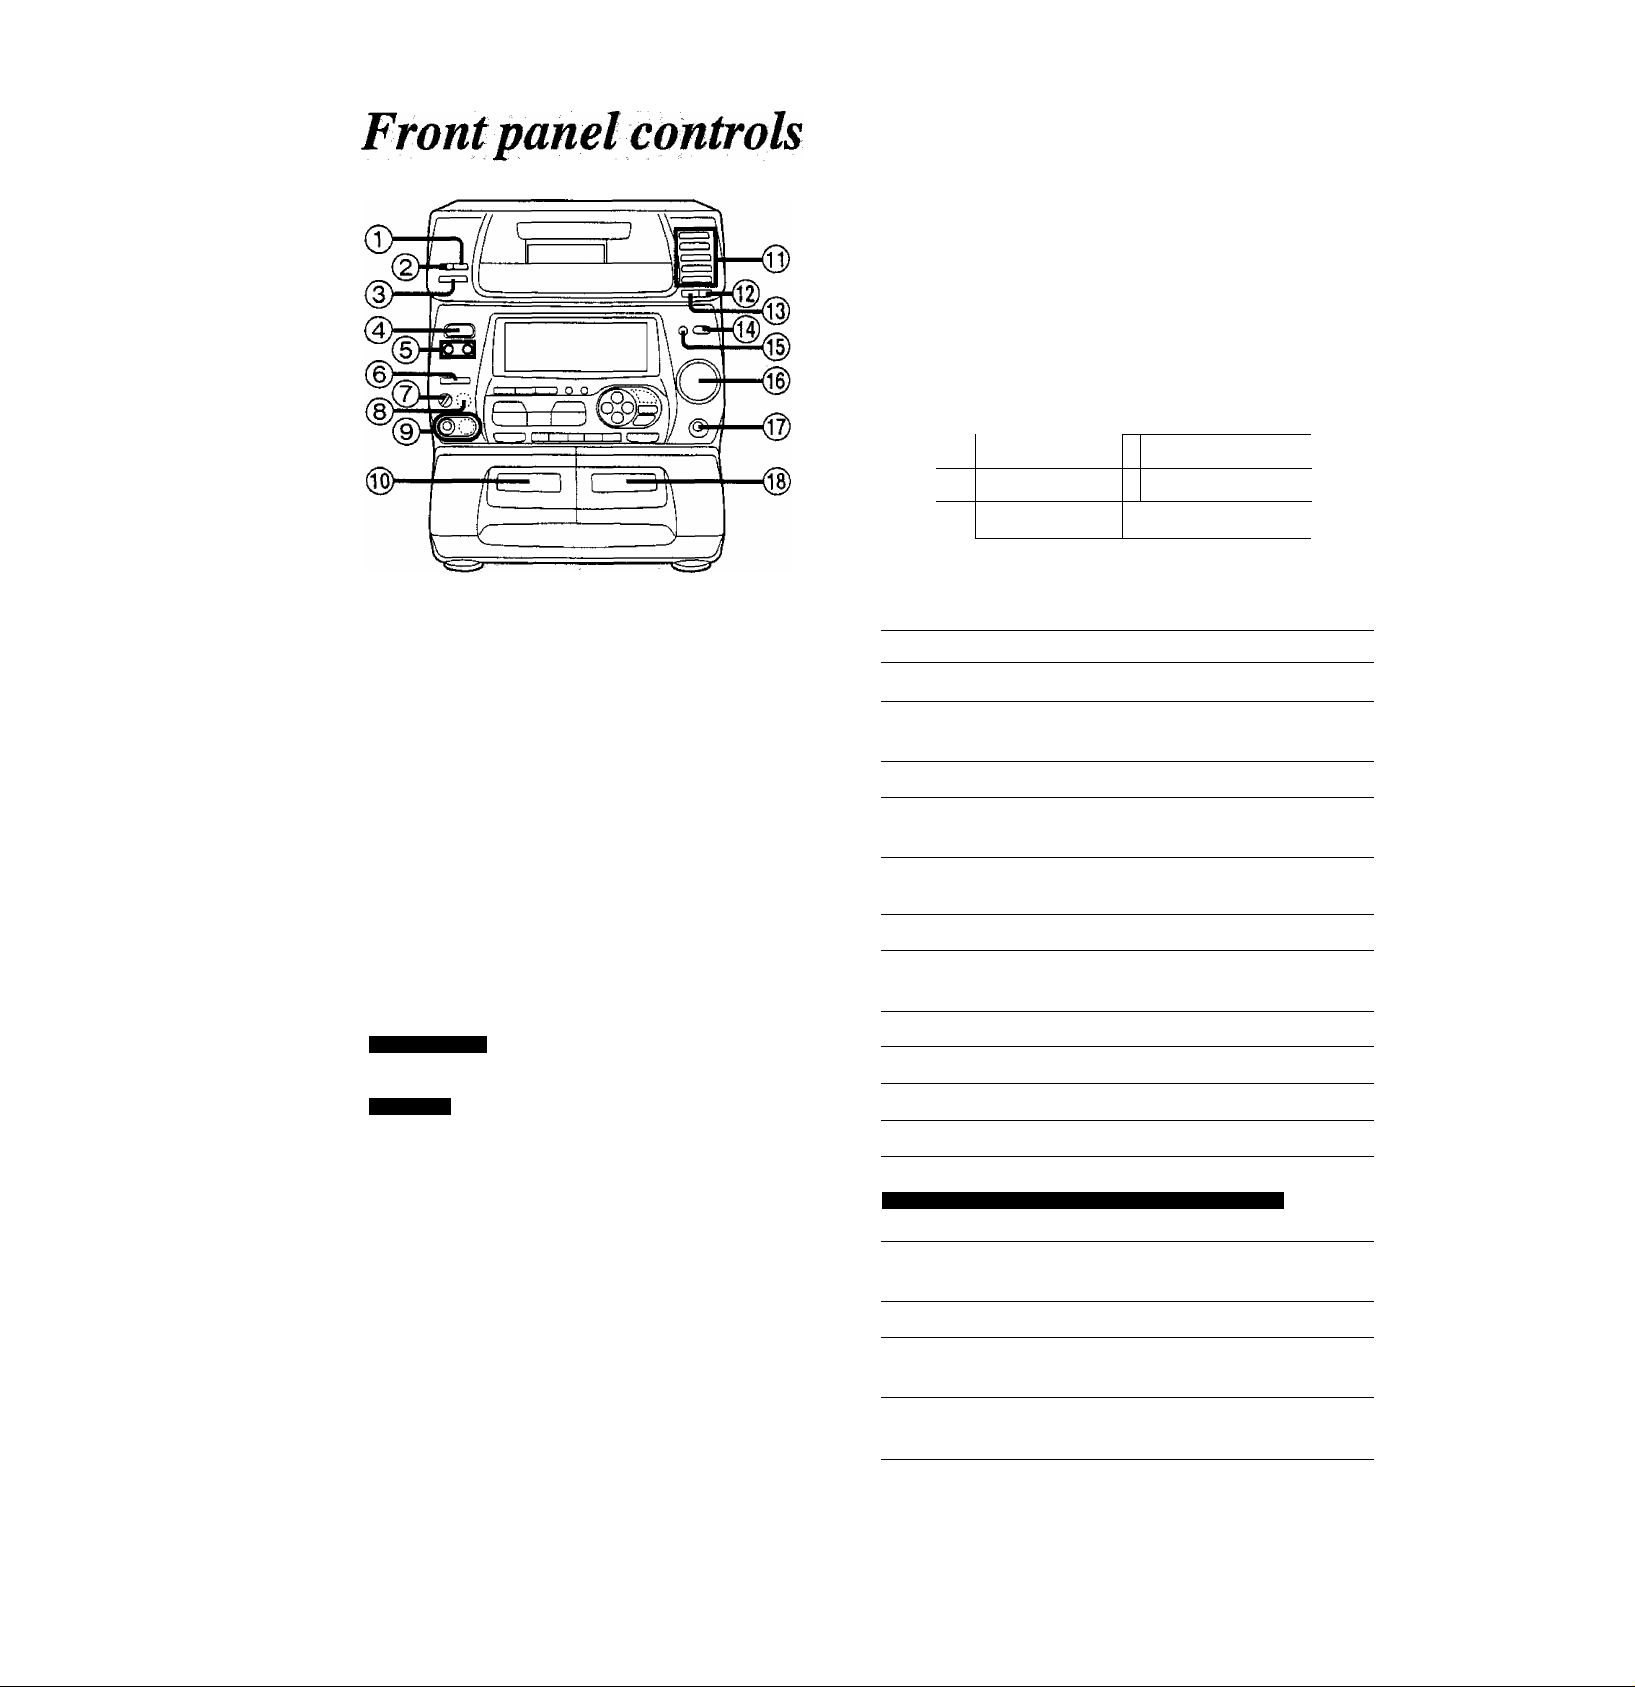
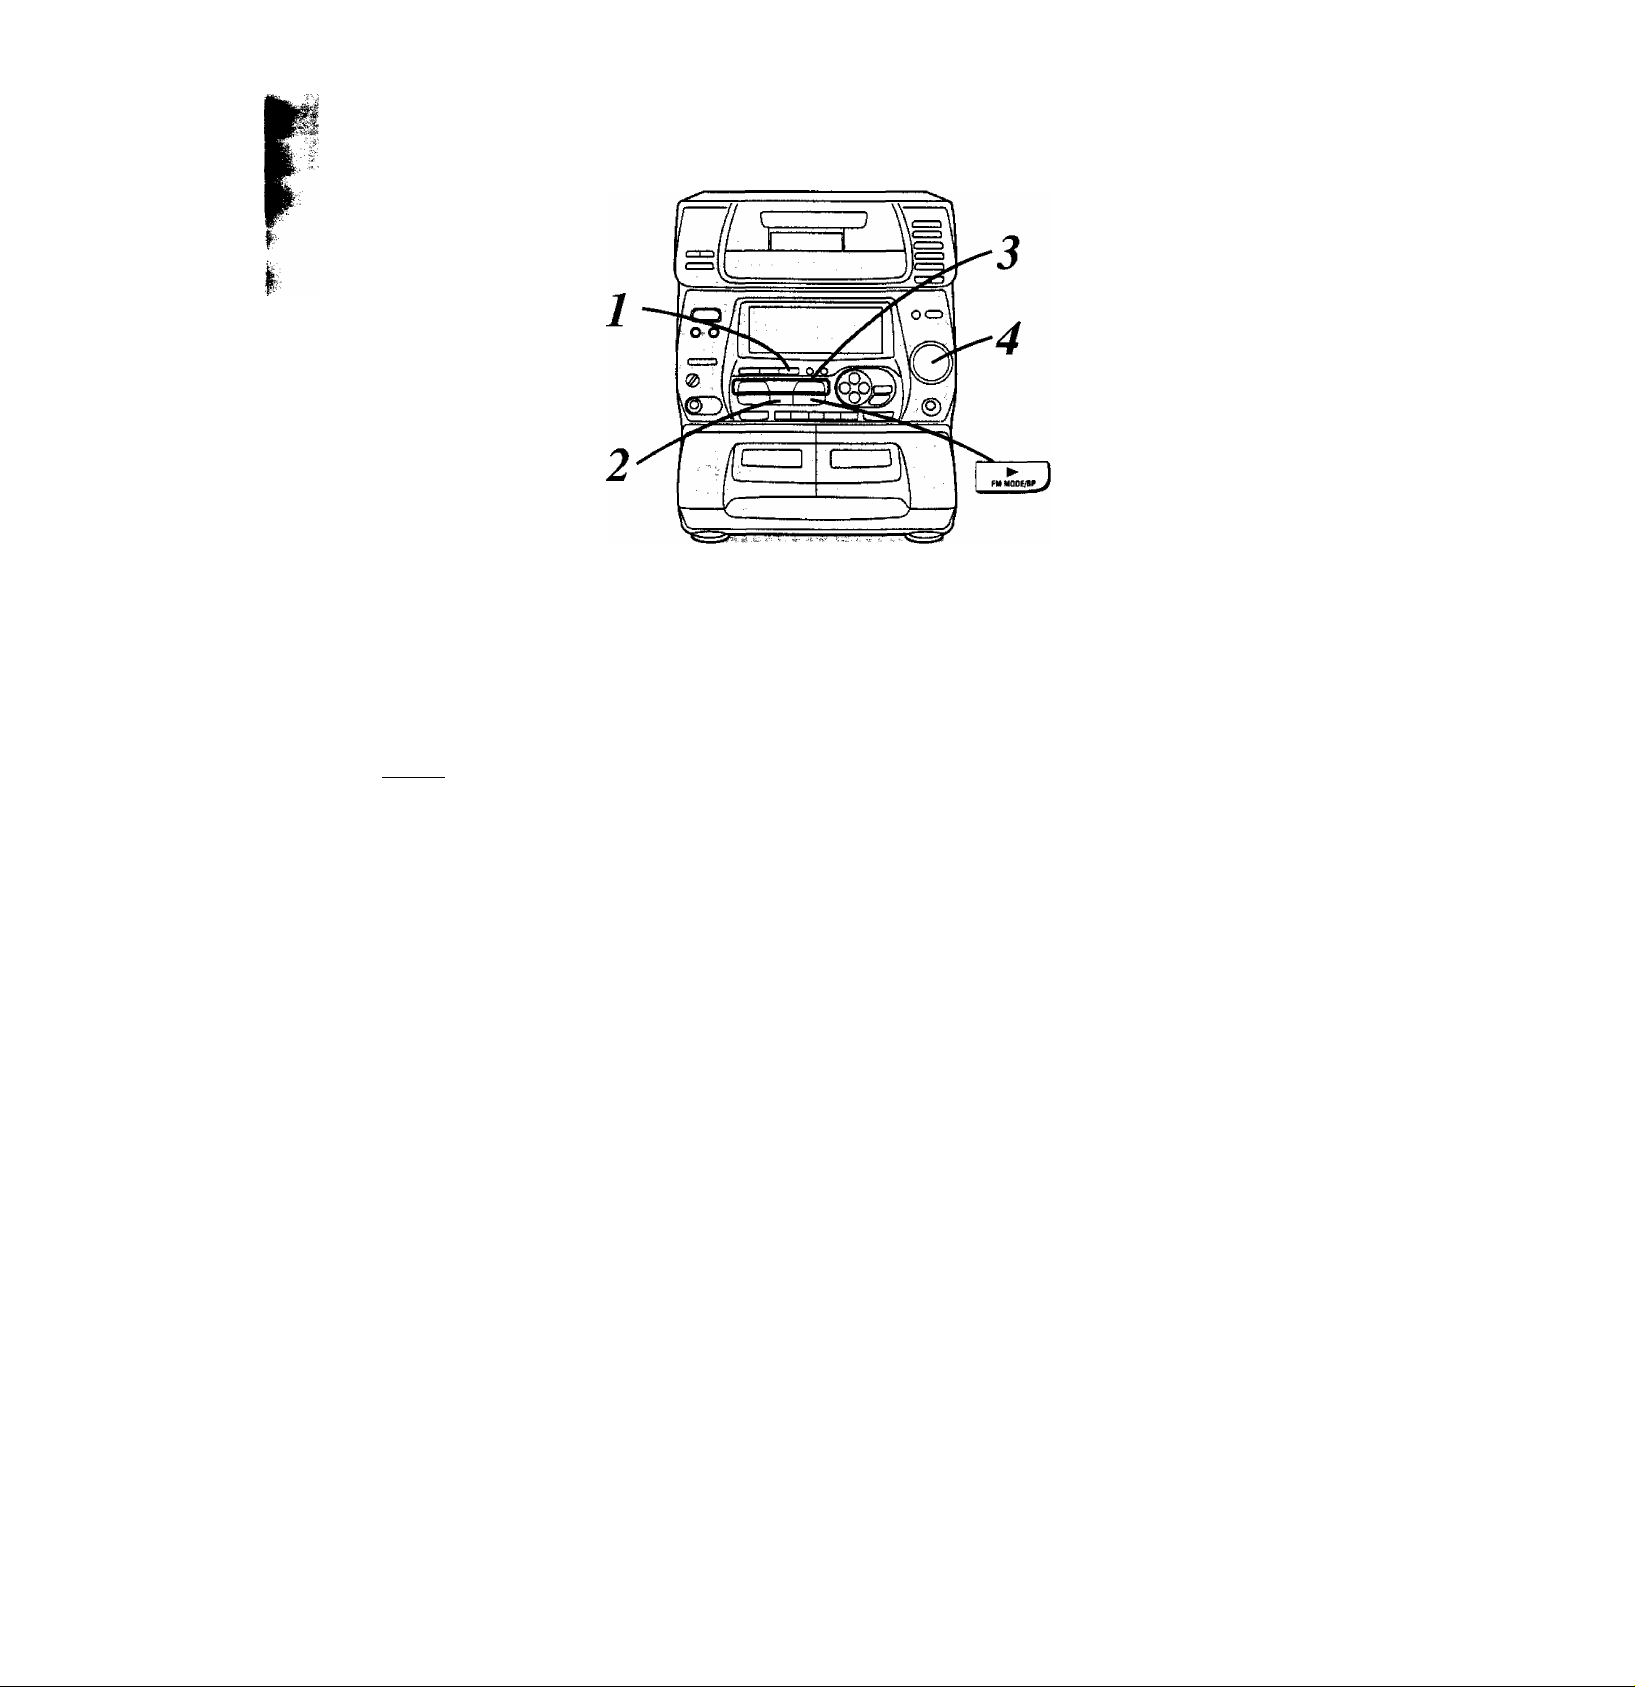
Name Ref. page
© Repeat button (REPEAT)
(D Random play button (RANDOM)
© CD edit button (EASY EDIT)
@ Power “STANDBY 6/ON” switch
(POWER, STANDBY (l)/ON) 9
Press to switch the unit from on to standby mode or vice versa. In
standby mode, the unit is still consuming a small amount of
power.
Record timer/play timer button
(E REC, E PLAY)
(6) Karaoke button (KARAOKE)
0 Microphone volume control (MIC)
SC-CH75 only
Echo volume control (ECHO)
SC-CH75
Microphone jacks (MIC 1 -2)
Microphone jack (MIC)
© Deck 1 cassette holder
0 Disc select buttons (DISC 1-5)
0 Disc check button (CHECK-NEXT/-AUTO)
0 Disc tray open/close button
(A OPEN/CLOSE)
©Remote control signal sensor
0 Display select/demonstratlon button
(-DISPLAY/-DEMO)
27,29
13
14
23
31
31
31
31
31
16
14
12
12
32
No. Name
0 Disc tray
Ref. page
12
©Tuner, band select button
(TUNER, BAND)
©CD button (CD)
10
13
©Tape, deck select button
(TAPE, DECK 1/2)
16
© Basic operating buttons
Buttons change according to the source.
© Deck 1 open button (DECK 1, ^ OPEN)
11,13,16
16
©Tape edit buttons
(TAPE EDIT NORMAL, HIGH)
©Disc indicators (DISC 1-5)
25
13
© Display
© AUX button (AUX)
32
© Clock/timer button (CLOCK/TIMER) 9
© Sound quality buttons
18
Graphic equalizer button (G. EQ) 18
© Deck 2 cassette open button
(DECK 2, ^ OPEN)
20
© Reverse mode select button (REV MODE) 16
© Dolby noise reduction button
5
(DOLBY NR)
16
© Recording start/stop button
(REC. START/STOP)
20
©Volume control (VOLUME)
0 Headphones jack (PHONES)
0 Deck 2 cassette holder
11
32
20
t ■
/is.
. V-
OISPLAY/-DEMO
O
•The built-in demo function will run automatically shortly after
you plug in the system (see page 32).
•The demo function in the power standby mode will be
cancelled automatically by setting the time.
This is a 24-hour display clock.
This example in the figure shows how to set the time for 16:25
(4:25 p.m.).
POWER
STANDBYc!)/ON
Switch on the power.
^
__
© Press V or A to select the
f ^ hour.
b
"■ f D'U u ■ —
n
Press MEMORY/SET.
VMenwBY^gTXS^
© Press V or A to select the
minutes.
b
©Press MEMORY/SET to fin
ish setting the time.
The clock now starts.
The display will return to the previous
display after few seconds.
When “0:00” flashes or the demo function is run
ning:
This happens when you connect the AC power supply cord for the
first time or if there has been a power failure.
In this case, reset the time.
CLO CK /TIMEft
©Press CLOCK/TIMER once
to show “CLOCK”.
Within 7 seconds:
(2)
Press MEMORY/SET.
If the minutes setting has gone wrong:
1. Press CLOCK/TIMER.
2. Press MEMORY/SET twice.
3. Press V or A to set the minutes, and then press MEMORY/SET.
To display the clock again:
Press CLOCK/TIMER.
The display will return to the previous display after about 5 seconds.
For your reference
The hour indication will not change when the minutes pass from “59’’
to “00".
Demo function while the power is on;
When the input source is set to "CD" or “TAPE”, the demo
function will run automatically after about 2 minutes or more in
the stop mode.
You can cancel the demo function by pressing and holding
-DISPLAY/-DEMO for about 2 seconds or more.
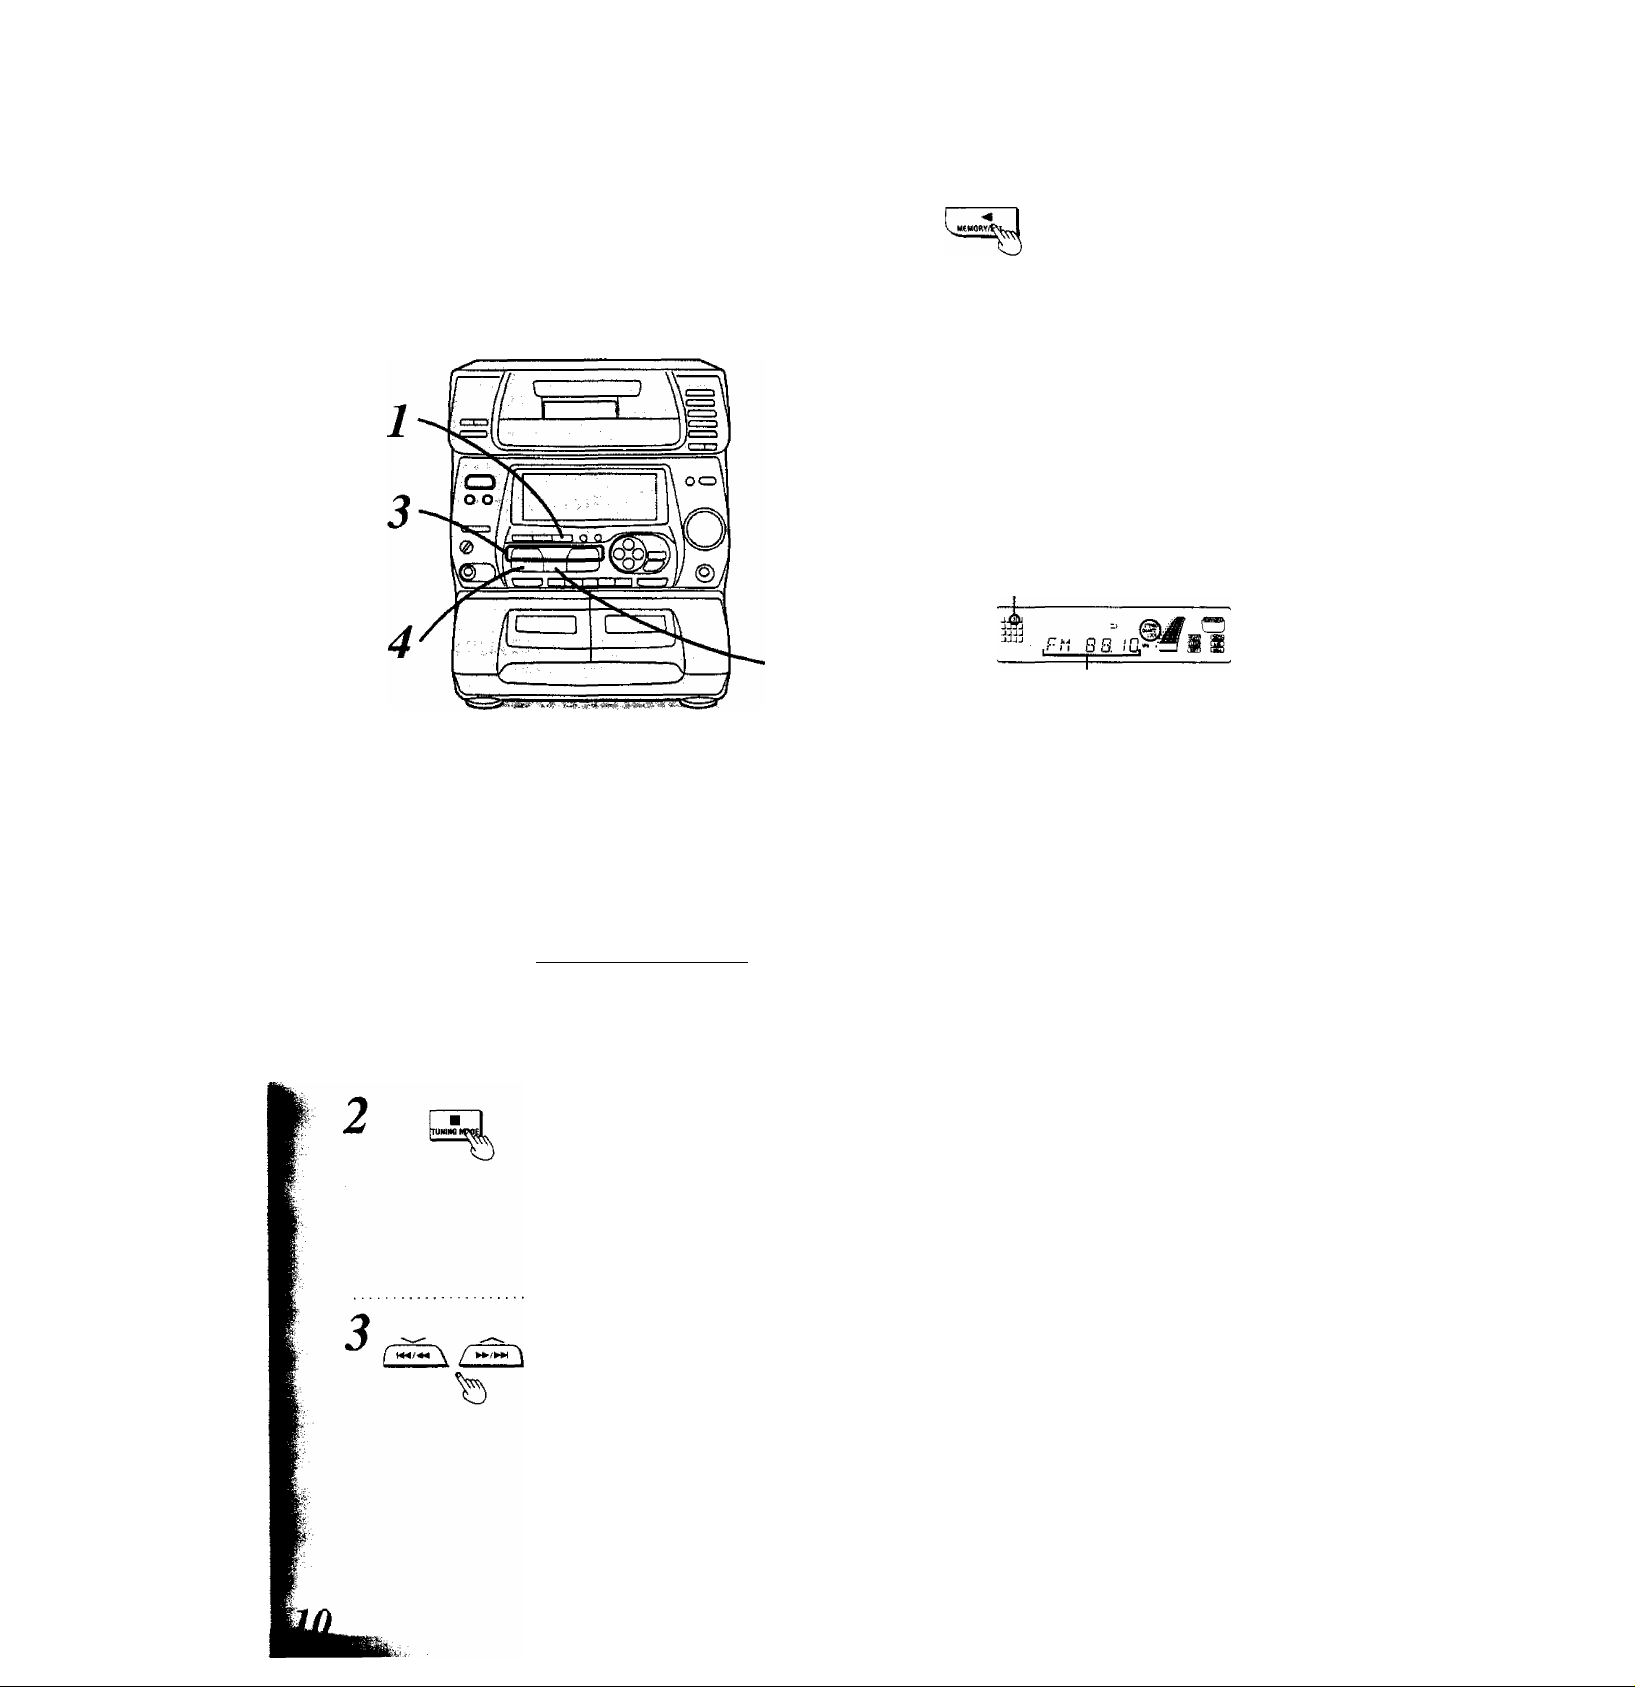
Memory presetting
• If broadcast frequencies are preset in the memory, you can easily
tune in any of these frequencies from the system or remote control
unit.
• Up to 12 stations can each be set in the FM, LW and MW {For the
Australia and New Zealand: AM) bands with the automatic or man
ual memory presetting.
Automatic memory presetting
II
Press and hold MEMORY/SET.
Release the button when the frequency
display begins to change.
The unit v/ill automatically memorize the
received broadcast frequencies in se
quence.
The moment the frequency is mem
orized
The station and channel will be displayed
for about 1 second.
When auto memorization is complete
The last station to be memorized will be
left on the display.
To confirm the preset stations:
1. Press TUNING MODE to select "PRESET,
2. Press V or A,
Preset channel
Station
Auto memory presetting does not work when radio waves from the
broadcasting station are too strong or too weak.
In such case, carry out presetting manually, (See below.)
This example in the figure shows how to preset stations in the FM
band.
Press TUNER, BAND to select
“FM”, “MW” or “LW”.
I
For Australia and New Zealandl
Note that for Australia and New
Zealand, there are two bands of “FM”,
“AM” instead of “FM”, “MW", “LW”.
The power will come on automatically,
even if the system is on standby.
Press TUNING MODE to select
“MANUAL”.
Each time you press the button,
“MANUAL" and “PRESET will appear al
ternately.
JJJJ
JJJJ
JJJJ
JJJJ
.M o
^ H HE
Press V or A until the display
shows the^ frequency from
which you want to begin auto
matic memory presetting.
Holding the button down will scroll the
frequency. Repeatedly tapping on it will
change the frequency one step with
every touch.
White scrolling, if the radio picks up a
station, it will automatically tune it in (auto
tuning).
Manual memory presetting
(After step 2)
1. Press V or A to select the desired frequency, and press
"MEMORY/SET’. (“PROGRAM" flashes.)
2. Press V or A to select the preset channel, and then press
“MEMORY/SET’ during “PROGRAM" flashes,
“PROGRAM" indicator goes off.
Memory retention
The contents of the memory will continue to be stored for approxi
mately 2 weeks, even if the power supply cord is disconnected.
Listeningia radio broadcasts
Preset tuning
Be sure you’ve completed the steps in “Memory presetting” on page
10.
I This example in the figure shows how to listen to FM preset channel
' 3.
BAND
( nJHEIKi
I I
Press TUNER, BAND to select
"FM”, “MW” or “LW*
I For Australia and New Zealand {
Note that for Australia and New
Zealand, there are two bands of "FM”,
"AM” instead of “FM”, “MW”, "LW”.
The power will come on automatically,
even if the system is on standby.
Press TUNING MODE to select “PRESET”.
Each time you .press the button,
“MANUAL” and "PRESET" will appear al
ternately.
Press V or A to select the pre
set channel.
"STEREO” lights when an FM stereo
broadcast is being received. “QUARTZ
LOCK" lights when you precisely tune in
a broadcast station.
Preset channel
О
FM 8 8.
Turn VOLUME>to adjust the volume as you like.
Manual tuning
If the frequency is not known, use the tuning buttons for searching.
Press TUNER, BAND to select band,
Press TUNING MODE to select "MANUAL”.
Each time you press the button, “MANUAL” and “PRESET' will
appear alternately.
3.
Press V or A to tune in the desired broadcast.
Repeatedly tapping on the button will change the frequency one
step with every touch. Holding it down will scroll the frequency.
While scrolling, if the radio picks up a station, it will automatically
tune it in (auto tuning).
4. Turn VOLUME to adjust the volume as you like.
Tuning may stop automatically if any jamming is encountered.
Switching the mode from stereo to monaurai
while iistening to an FM station:
Press FM MODeBP.
The sound reception mode switches to “MONO” (monaural)
and “MONO” lights.
When “MONO” indicator lights up:
Use this setting when listening to or recording in monaural. All
sound reception including stereo sound, is in monaural.
When “MONO” indicator goes off:
Use this setting for normal listening. Both stereo and monau
ral sounds can be heard as they are.
For your reference:
If too much noise is produced in the FM stereo mode, press
FM MODE/BP and check “MONO" lights up.
The sound will then be heard in monaural. If the broadcast
signal is weak, or if there is a large amount of interference, you
will get a clearer sound in “MONO" mode.
IZBSi
You cannot memorize the stations in the "MONO" mode.
/'TTn t
о
•I'S
11
Listening to compact discs
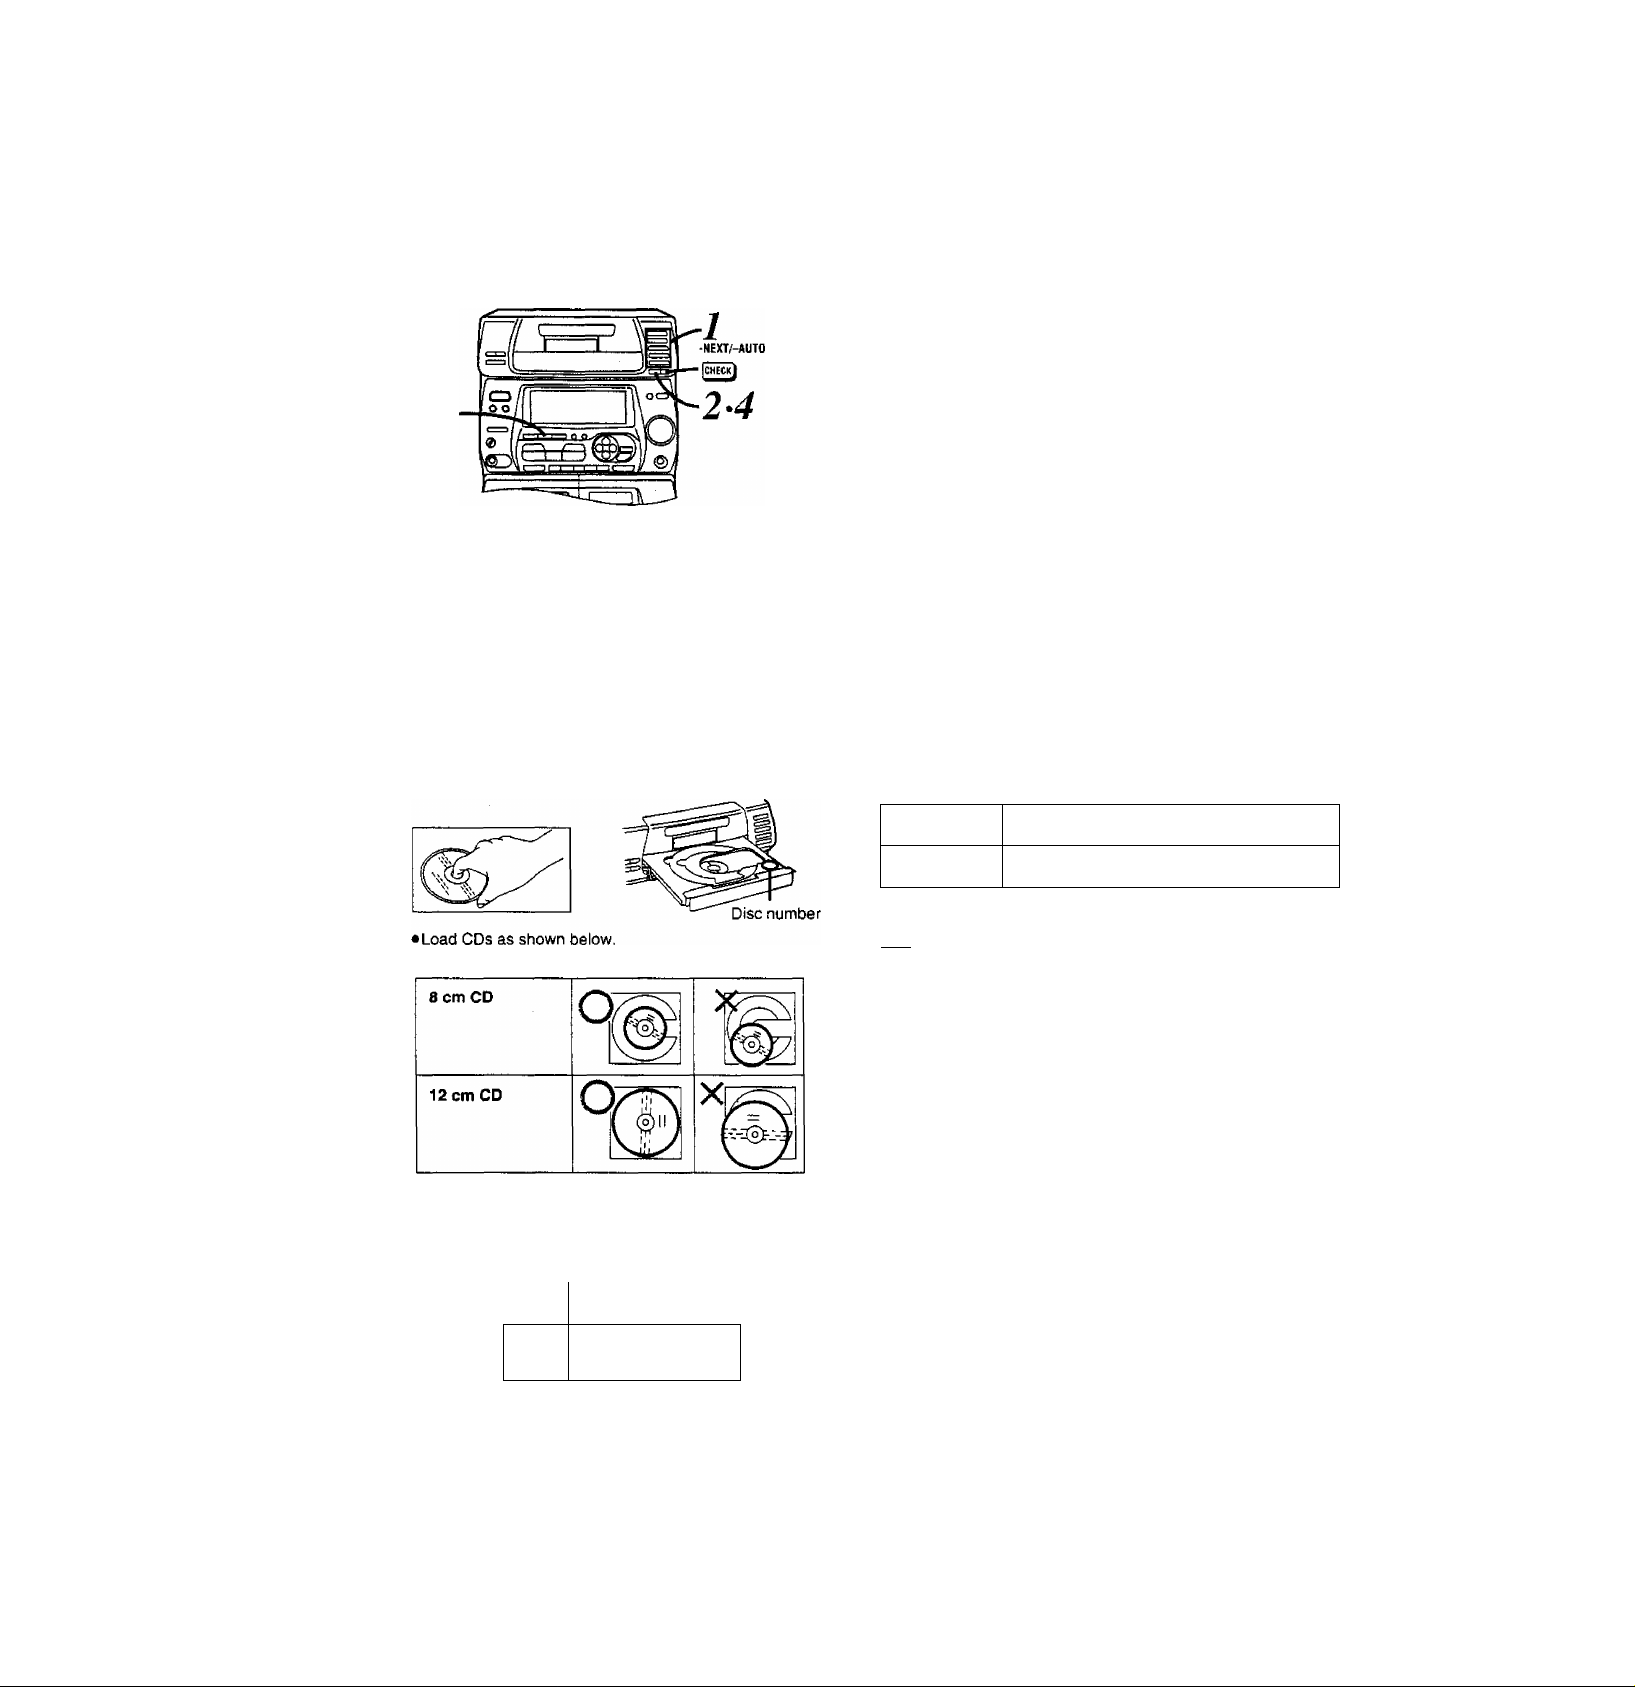
- Loading and checking CDs
Always stop the changer before loading or changing CDs. You
cannot change CDs while a disc is playing.
---------------------
How to load CDs
Press DISC 1-5, whichever you want to
1
open.
Within about 5 seconds:
2
Press A OPEN/CLOSE.
Set the CD in the tray.
3
• How to hold CDs
How to check which trays have discs
“CHECK” is a convenient way to know what discs you have in
your changer and where.
Press CHECK (-NEXT).
• Every time you press the button, the next tray opens.
•You can change the CD while the tray is open.
• To close the tray, press A OPEN/CLOSE,
Press and hold CHECK (-AUTO).
The trays will open (and close) automatically one after another.
The first one to open will be the next tray after the disc number
shown on the display. This way, you can check all trays in a row.
• To stop the auto check in course, press ■.
Do not attempt to change CDs while trays are opening and
closing in the auto check.
Disc indicators
When you open or close a tray with the A OPEN/CLOSE button,
the changer automatically detects whether there is a CD in the
tray or not. The indicator will act as follows.
Press ^ OPEN/CLOSE.
The open tray will close.
Number of tracks
Total playing time
USUH
iISJS
Disc number
' // m
G 'nSGI?’ U i 1
• (red) There's a CD in the tray.
light off
While the CD is playing, its indicator is green.
ffwa
In the following cases, CD detection is OFF. The indicators will be
red whether there Is a disc in the tray or not.
Assuming that the tray is already opened.
• When the tray is closed with CHECK
• When the tray is closed with DISC 1 -5
•When an input mode (TUNER/TAPE/AUX) other than CD is
selected and the tray is closed with A OPEN/CLOSE.
There isn’t a CD in the tray.
For your reference;
While the CD changer is changing discs, the disc indicators will
flash.
^ To load other CDs, repeat steps 1 through
For your reference:
If the tray you want to open is already shown on the display, you
obviously do not need to perform step 1,
Loading...