


TGA405(option)_(e-e).fm Page 1 Wednesday, March 5, 2014 4:56 PM
Range Extender
Model No. KX-TGA405
Installation Guide
By installing this unit, you can extend the range of your phone system to include areas where reception was previously not available.
The unit extends the range in all directions, allowing several floors to be covered.
Important:
LThis unit is an accessory unit for use with a Panasonic Digital Cordless phone. For more details, visit our Web site: http://www.panasonic.com/RangeExtender
LYou must register this unit with your base unit before it can be used. LFor assistance, visit our Web site:
http://www.panasonic.com/help
for customers in the U.S.A. or Puerto Rico.
Accessory information
Supplied accessories
Accessory item/Order number |
Quantity |
AC adaptor/PQLV219Y |
1 |
|
|
|
|
|
|
|
|
For best performance
Placement
LInstall the unit within base unit range in an indoor environment. We recommend installing the unit in a raised position (such as on a wall).
LAvoid positioning the unit close to objects that will interfere with reception, such as thick walls, radiators, metal shelving, etc.
LFor maximum distance noise-free operation, place the unit away from electrical appliances such as TV, radio, personal computer, or other telephone equipment.
PNQW2215YA DC0410SN1024 (A)
Printed in China

TGA405(option)_(e-e).fm Page 2 Wednesday, March 5, 2014 4:56 PM
LKeep an appropriate distance from the base unit to maximize the range of your phone system. Find the appropriate location by checking the w indicator. If the w indicator lights red or amber, re-position this unit in a place where the w indicator lights green.
Handset
Range extender
Base unit
Base unit range  Range extender range
Controls
|
A STATUS indicator |
|
B w indicator |
A |
ID indicator |
B |
C {PROGRAM} |
|
C |
Understanding the STATUS indicator and w indicator
|
|
Indicator |
Light status |
Meaning |
|
|
||||||
|
|
STATUS |
Green |
On |
LWithin base unit range. The unit is ready for |
|
|
|||||
|
|
indicator |
|
|
|
use. |
|
|
||||
|
|
|
|
|
Flashing |
L1 handset is communicating with the base |
|
|
||||
|
|
|
|
|
|
|
unit through this unit. |
|
|
|||
|
|
|
|
|
Flashing |
L2 handsets are communicating with the base |
|
|
||||
|
|
|
|
|
rapidly |
unit through this unit. |
|
|
||||
|
|
|
|
Red |
On |
LOut of base unit range. |
|
|
||||
|
|
|
|
|
Flashing |
LThe unit is in registration mode. |
|
|
||||
|
|
|
|
Off |
|
|
LThe power is off. (AC adaptor is not |
|
|
|||
|
|
|
|
|
|
|
connected properly.) |
|
|
|||
|
|
w |
Green |
On |
LSignal strength of the base unit is strong. |
|
|
|||||
|
|
indicator |
Amber |
On |
LSignal strength of the base unit is weak. |
|
|
|||||
|
|
|
|
Red |
On |
LOut of base unit range. |
|
|
||||
|
|
|
|
Off |
|
|
LThe unit is not being used. |
|
|
|||
|
|
|
|
|
|
|
LThe power is off. |
|
|
|||
|
|
|
|
|
|
|
|
|
|
|
|
|
|
|
2 |
|
For assistance, please visit http://www.panasonic.com/help |
|
|
||||||
|
|
|
|
|
|
|
|
|
|
|
|
|
|
|
|
|
|
|
|
|
|
|
|
|
|
|
|
|
|
|
|
|
|
|
|
|
|
|

TGA405(option)_(e-e).fm Page 3 Wednesday, March 5, 2014 4:56 PM
Installation/Registering the range extender to the base unit
Once the unit is connected to a power outlet in step 3, it automatically goes into registration mode (if not already registered).
1Range extender: Connect the AC adaptor.
LUse only the supplied Panasonic AC adaptor PQLV219.
Hook
Press plug firmly.
2Base unit: Press and hold {LOCATOR} for about 5 seconds.
LDepending on the base unit, a registration tone sounds.
LIf all registered handsets start ringing, press the same button to stop. Then repeat this step.
LThe next step must be completed within 90 seconds.
3Range extender: Connect the AC adaptor to a power outlet.
 (120 V AC, 60 Hz)
LWhen the unit is turned on, the STATUS indicator and w indicator light amber for about 2 seconds.
4Range extender: Confirm that the STATUS indicator and w indicator light green. (The unit is ready for use.)
LIf the indicators do not light green, re-position the unit in a place where the indicators light green.
5Base unit: To exit registration mode, press {LOCATOR}.
Note:
LThe AC adaptor must remain connected at all times. (It is normal for the adaptor to feel warm during use.)
LThe AC adaptor should be connected to a vertically oriented or floor-mounted AC outlet. Do not connect the AC adaptor to a ceiling-mounted AC outlet, as the weight of the adaptor may cause it to become disconnected.
LThe unit can support a maximum of 2 handsets at a time. LUp to 2 range extenders can be registered to the base unit.
|
|
3 |
For assistance, please visit http://www.panasonic.com/help |
|
|
||||
|
|
|
|
|
|
|
|
|
|
|
|
|
|
|
|
|
|
|
|
|
|
|
|
|
|
|
|
|
|
TGA405(option)_(e-e).fm Page 4 Wednesday, March 5, 2014 4:56 PM
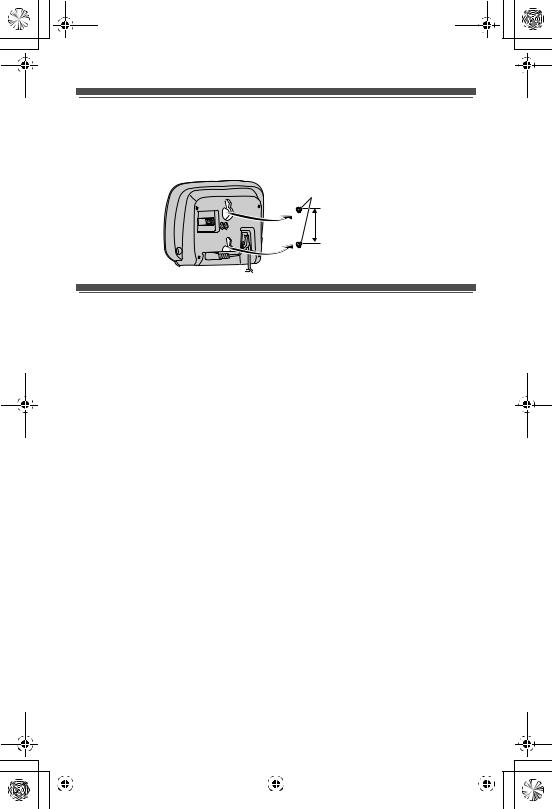
Wall Mounting
Drive the screws (not supplied) into the wall. Mount the unit, then slide it down.
Note:
LMake sure that the wall is strong enough to support the weight of the unit.
Screws
37.0 mm (115/32 inches)
Troubleshooting
|
|
Problem |
|
Cause/solution |
|
|
|||||
|
|
The unit does not work. |
LWhen the indicators do not light, the AC adaptor is not |
|
|
||||||
|
|
|
|
|
connected properly. Check the connections. |
|
|
||||
|
|
|
|
|
LWhen the indicators do not light green, move the unit |
|
|
||||
|
|
|
|
|
closer to the base unit. |
|
|
||||
|
|
|
|
|
LRegistration may have been canceled. |
|
|
||||
|
|
|
|
|
Deregister the unit, then re-register. |
|
|
||||
|
|
|
|
|
Deregister: |
|
|
||||
|
|
|
|
|
1 Unplug the AC adaptor, then press and hold |
|
|
||||
|
|
|
|
|
{PROGRAM}. |
|
|
||||
|
|
|
|
|
2 While pressing and holding {PROGRAM}, |
|
|
||||
|
|
|
|
|
re-connect the AC adaptor. |
|
|
||||
|
|
|
|
|
3 Keep pressing and holding {PROGRAM} for about |
|
|
||||
|
|
|
|
|
10 seconds until the STATUS indicator flashes |
|
|
||||
|
|
|
|
|
amber. Then release {PROGRAM}. |
|
|
||||
|
|
|
|
|
Re-register: Unplug the AC adaptor, then perform |
|
|
||||
|
|
|
|
|
from step 2, “Installation/Registering the range |
|
|
||||
|
|
|
|
|
extender to the base unit”, page 3. |
|
|
||||
|
|
|
|
|
|
|
|
|
|
|
|
|
|
While talking using the |
LThe handset is out of range. Move the handset closer |
|
|
||||||
|
|
handset, sound cuts in |
to this unit. |
|
|
||||||
|
|
and out. |
|
|
|
|
|
|
|
|
|
|
|
|
|
|
|
|
|
|
|
|
|
|
|
The STATUS indicator |
L{PROGRAM} was pressed. The unit is in |
|
|
||||||
|
|
continues to light |
programming mode. To exit, press {PROGRAM} |
|
|
||||||
|
|
amber for a while. |
again. Do not press {PROGRAM}, except when |
|
|
||||||
|
|
|
|
|
deregistering the unit. |
|
|
||||
|
|
|
|
|
|
|
|
|
|
|
|
|
|
|
|
|
|
|
|
|
|
|
|
|
|
4 |
|
For assistance, please visit http://www.panasonic.com/help |
|
|
|||||
|
|
|
|
|
|
|
|
|
|
|
|
|
|
|
|
|
|
|
|
|
|
|
|
|
|
|
|
|
|
|
|
|
|
|
|
 Loading...