


5.8 GHz Expandable Cordless Handset
Model No. KX-TGA520
Installation Manual
PLEASE READ BEFORE USE AND SAVE.
This handset is an accessory cordless handset, for use with Panasonic base units KX-TG5200/KX-TG5202/KX-TG5210/KX-TG5212/KX-TG5213/KX-TG5230/KX-TG5240/ KX-FPG391. This installation manual only describes the steps necessary to start up the handset. Please read the base unit operating instructions for further details.
Accessories (included) For extra orders, call 1-800-332-5368.
ACharger Unit . . . . . . . . . . . . . . . . . . . . . . . |
one |
ABattery . . . . . . . . . . . . . . . . . |
one |
Charger Order No. PQLV30024ZM |
|
Order No. HHR-P104 |
|
AC Adaptor Order No. KX-TCA1-G (KX-TCA1) |
ABelt Clip . . . . . . . . . . . . . . . . |
one |
|
AHandset Cover. . . . . . . . . . . . . . . . . . . . . . |
one |
Order No. PQKE10377Z1 |
|
Order No. PQKK10142Z1 |
|
|
|
Installation
Connect the Charger unit
Power Outlet
(AC 120 V, 60 Hz)
AC Adaptor
•USE ONLY WITH Panasonic AC ADAPTOR KX-TCA1 (Order No. KX-TCA1-G).
•The AC adaptor must remain connected at all times. (It is normal for the adaptor to feel warm during use.)
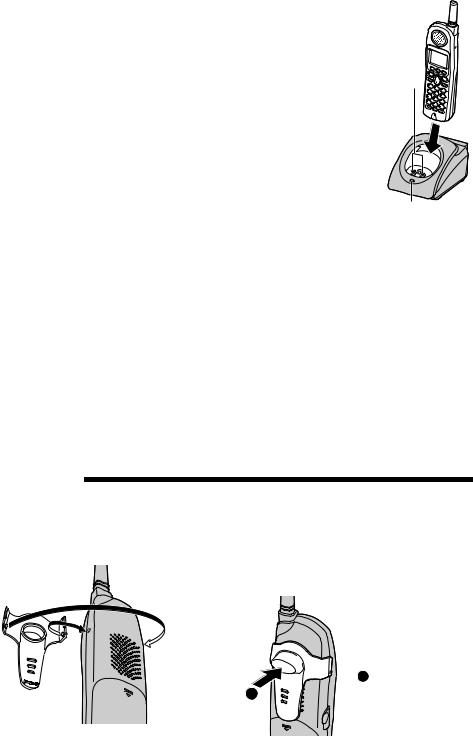
Install the battery
Insert the battery (1), and press it down until it snaps into the compartment (2). Close the cover.
 2
2
1
For assistance, please call: 1-800-211-PANA(7262)
– 1 – |
PQQX14000ZA S0104-0 |
Charging the battery
Place the handset on the charger and charge for 6 hours before initial use.
•The unit beeps once, the CHARGE indicator lights and “Charging” is displayed.
•When the battery is fully charged, “Charge completed” is displayed if there are no new calls in the Caller List.
•Recharge the battery when:
—“Recharge battery” is displayed on the handset,
—“3” flashes, or
—the handset beeps intermittently while it is in use.
Charge Contacts
CHARGE Indicator
•If the battery has been discharged, the handset will display “Charge for 6 HRS” and “4” when you place the handset on the charger. The handset will not work unless the battery is charged. Continue charging.
Handset battery information
After your Panasonic battery is fully charged, you can expect the following performance:
Operation |
Operating time |
While in use (TALK) |
Up to 5 hours |
|
|
While not in use (Standby) |
Up to 11 days |
|
|
While using the Clarity Booster feature |
Up to 3 hours |
|
|
•Clean the charge contacts of the handset and the charger with a soft, dry cloth once a month. Clean more often if the unit is subject to grease, dust or high humidity. Otherwise the battery may not charge properly.
Belt Clip
You can hang the handset on your belt or pocket using the included belt clip.
To attach the belt clip |
To remove the belt clip |
|
While pressing the top of the clip (1), |
|
pull the right edge in the direction of the |
|
arrow (2). |

 B
B
A
– 2 –
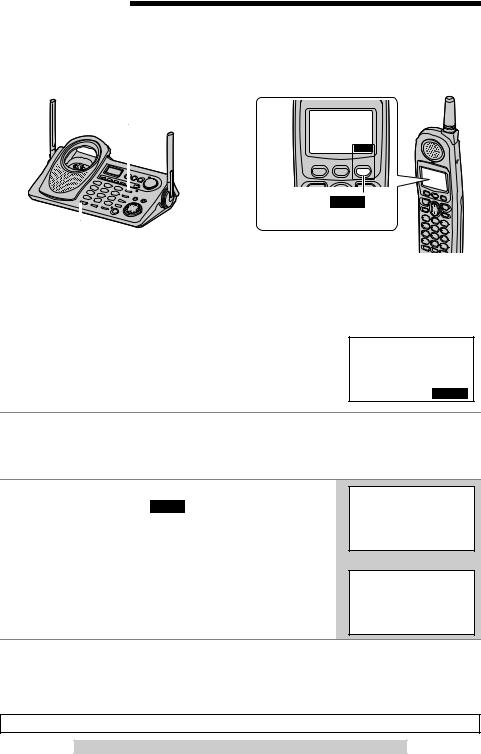
Registration
This cordless handset must be registered to a KX-TG5200/KX-TG5202/KX-TG5210/ KX-TG5212/KX-TG5213/KX-TG5230/KX-TG5240/KX-FPG391 base unit. The handset will be assigned the extension number at registration. Only one handset can be registered at a time. Charge the battery fully. Make sure the base unit and the other handsets are not being used. Have both the handset and base unit nearby during registration.
*LOCATOR Button
CHARGE Indicator
• Base unit model shown here is KX-TG5240.
1[-]
Press LOCATOR on base unit for 3 sec.
Then press OKL
BACK OK
To operate “ OK ”, press the right soft key.
*The location of the LOCATOR button varies by base unit model.
KX-TG5200/KX-TG5202: LOCATOR [ ], [
], [ ], [
], [ ], [
], [ ] or [
 ] KX-TG5210/KX-TG5212/KX-TG5213: LOCATOR/INTERCOM [
 ], [
], [ ], [
], [ ], [
], [ ] or [
 ] KX-TG5230/KX-TG5240/KX-FPG391: [LOCATOR/INTERCOM/TRANSFER]
The handset display shows the instructions as shown on the right.
Press LOCATOR on base unit for 3 sec.
Then press OKL
BACK PLAY O K
1Base unit: Press and hold the *LOCATOR button for 3 seconds.
•The CHARGE indicator flashes. After the CHARGE indicator starts flashing, the rest of the procedure must be completed within 1 minute.
•On the KX-FPG391, “HS REGISTRATION” is displayed.
2Handset:
(1)Press the soft key ( OK ).
(2)Wait until a long beep sounds and the display shows the new extension number.
• Registration is complete.
IN USE SPIPRIVACY1[-]
Handset
Registering
Ex. Extension number 2
IN USE SPIPRIVACY1[2]
Handset [2] Registered
•The registered number “[1]” to “[4]” is shown on the top right of the display.
•You can stop registration by pressing [OFF] on the handset and pressing the *LOCATOR button on the base unit.
•If you try to register this handset to the KX-TG6500 base unit, “Wrong handset Refer to manual” is displayed. The base units for this handset are mentioned above.
To cancel the handset registration, please see your base unit Operating Instructions.
For assistance, please call: 1-800-211-PANA(7262)
– 3 –

Selecting the display language
You can select either “English” or “Spanish” as the display language. The factory preset is “English”.
Press [MENU] N[d] or [B] to select “Initial setting” NSoft key ( |
|
|
|
) N |
|
|||||||
|
SELECT |
|
||||||||||
N[d] or [B] to select “Change language” NSoft key ( |
|
) NSoft key ( |
|
|
|
) |
||||||
SELECT |
|
|
|
|||||||||
to select “Español”, or soft key ( |
|
) to select “English” NSoft key ( |
|
) for |
|
|||||||
ENGLISH |
GUARDAR |
|
||||||||||
Spanish, or soft key ( |
|
) for English N[OFF] |
|
|||||||||
SAVE |
|
|||||||||||
Optional Headset
Connecting an optional headset to the handset allows hands-free phone conversation. Please use only a Panasonic KX-TCA60, KX-TCA86, KX-TCA88, KX-TCA88HA, KX-TCA91, KX-TCA92 or KX-TCA98 headset. To order, call the accessories telephone number on page 1.
Connecting an optional headset
Open the headset jack cover, and insert the headset plug into the headset jack as shown below.
Headset Jack
• Headset sold separately. Model shown here is KX-TCA88.
Wall Mounting
The charger can be wall mounted. Connect the AC adaptor. Install screws using the wall template (see below). Mount the charger (A). Slide it down (B), then slide down to the right (C) until it is secured.
|
2.45 cm |
|
|
(31⁄32") |
|
|
|
A |
|
|
B |
|
Screws |
C |
|
To Power |
|
|
Outlet |
|
2.45 cm |
Wall Template |
|
(31⁄32") |
|
|
|
– 4 – |
|
 Loading...