


 Loading...
Preface
Every effort has been made to ensure that the information in this document is complete, accurate, and up-to-date. Oki assumes no responsibility for the results of errors beyond its control. Oki also cannot guarantee that changes in software and equipment made by other manufacturers and referred to in this guide will not affect the applicability of the information in it. Mention of software products manufactured by other companies does not necessarily constitute endorsement by Oki.
While all reasonable efforts have been made to make this document as accurate and helpful as possible, we make no warranty of any kind, expressed or implied, as to the accuracy or completeness of the information contained herein.
The most up-to-date drivers and manuals are available from the Oki web site:
http://www.okiprintingsolutions.com
Copyright © 2008 Oki Europe Ltd.
Oki and Microline are registered trademarks of Oki Electric Industry Company, Ltd. ENERGY STAR is a trademark of the United States Environmental Protection Agency. Microsoft, MS-DOS and Windows are registered trademarks of Microsoft Corporation.
Other product names and brand names are registered trademarks or trademarks of their proprietors.
APPAREIL A RAYONNEMENT LASER DE CLASSE 1 CLASS 1 LASER PRODUCT
LASER KLASSE 1 PRODUKT PRODUCTO LASER DE CLASE 1 APARECCHIO LASER DI CLASSE 1
As an ENERGY STAR Program Participant, the manufacturer has determined that this product meets the ENERGY STAR guidelines for energy efficiency.
Repairs/maintenance: Repairs and maintenance should only be carried out by a qualified technician. There are no user serviceable parts inside the machine. To reduce the risk of electrical shock, you must not carry out these operations yourself. Opening or removing the covers exposes you to two hazards:
-The laser beam can cause irreversible eye damage.
-Contact with electrical components can lead to electrical shock.
For installation conditions and safety precautions, refer to the separate Safety/ Installation Instructions booklet provided.
Declaration of confomity
Notice to Users in EU Countries
This product complies with the requirements of the Council Directives 2004/108/EC (EMC), 2006/95/EC (LVD)and 1999/5/EC (R&TTE), as amended where applicable on the approximation of the laws of the member states relating to Electromagnetic Compatibility, Low Voltage and Radio & Telecommunications Terminal Equipment.

Environmental Information

Dear Customer,
For printing purposes, your device utilises the most up-to- date laser technology. A starter cartridge is provided with the device. For this starter cartridge, you do not require
any Plug’n’Print card.
EN
You can store up to 200 entries in the telephone book of your device. Your device can store 10 different groups with up to 199 entries.
With the broadcasting key (= Broadcasting) you can add further numbers during the dialing process and send a message quickly and simply to several recipients.
You can send fax messages in different resolutions to one or more recipients or a group. You can also poll faxes and prepare documents for polling.
Five fax templates, which you can use, are stored in your device. With these templates you can quickly create, for example, a short fax note or an invitation.
The device prints the date and the exact arrival time on every incoming fax received. This allows you to document the exact time at which you have received a fax transmission. A memory buffer in the device ensures that the correct date and time of reception will be maintained even after a power loss.
Select the resolution for text and photo in order to copy documents with your machine. You can also create multiple copies.
You can send SMS messages from your machine if this service is activated for your telephone line (this function is not supported in all countries and networks). Received SMS messages can be managed with the extensive functions of the SMS menu.
You can enter text on your device and send as a fax transmission to another device (in countries and networks without SMS function).
If you want, your device can print Sudoku puzzles in four different difficulty levels with solution.
We hope you enjoy your machine and its many functions!
About this User Manual
With the installation guide on the following pages, you can start using your machine quickly and easily. Detailed descriptions can be found in the following sections of this user manual.
Read the entire user manual carefully. Follow all safety instructions in order to ensure proper operation of your machine. The manufacturer accepts no liability if these instructions are not followed.
Symbols Used
Warns about dangers for people, damage to the device or other objects as well as possible loss of data. Injuries or damage can result from improper handling.
This symbol designates tips that will help you to use your machine more effectively and easily.
2 |
OKIFAX 160 |

Table of Contents |
|
|
Dear Customer, ......................................................... 2 |
||
About this User Manual ............................................ |
2 |
|
1 |
Installation Guide............................... |
4 |
Contained in the Packing .......................................... |
4 |
|
Attaching the Document Support .............................. |
4 |
|
Loading Paper ........................................................... |
4 |
|
Extending the Printout and Fax Outlet Tray ............. |
5 |
|
Attaching the Document Outlet Tray ........................ |
5 |
|
Connecting the Telephone Handset .......................... |
5 |
|
Inserting Starter Cartridge ......................................... |
5 |
|
Connecting the Telephone Cable .............................. |
6 |
|
Connecting the Mains Cable ..................................... |
6 |
|
Initial Installation ...................................................... |
6 |
|
2 |
Overview............................................. |
7 |
Overview of the Menu Functions .............................. |
7 |
|
Printing Help Pages ................................................... |
7 |
|
Device Overview ........................................................ |
8 |
|
Panel with Display ..................................................... |
9 |
|
3 |
Telephone Functions ....................... |
10 |
Making Telephone Calls on the Machine ................ |
10 |
|
Getting outside line ................................................. |
10 |
|
Chain Dialling ......................................................... |
10 |
|
Insert Dialling Pause ................................................ |
10 |
|
Dialling with the Handset Replaced ........................ |
10 |
|
Telephone Book ...................................................... |
10 |
|
Groups .................................................................... |
11 |
|
Calling Line Identification (CLIP) ........................... |
11 |
|
Missed Calls ............................................................ |
11 |
|
4 |
Fax ..................................................... |
12 |
Sending a Fax .......................................................... |
12 |
|
Manually Sending a Fax ........................................... |
12 |
|
Direct Inward Dialling or Selecting Sub-address ...... |
13 |
|
Listening while a connection is established .............. |
13 |
|
Broadcasting ............................................................ |
13 |
|
Sending Fax Later .................................................... |
13 |
|
Using Fax Templates ............................................... |
13 |
|
Fax Reception .......................................................... |
13 |
|
Receiving Fax Manually ........................................... |
14 |
|
Time Stamp ............................................................. |
14 |
|
Deactivating Automatic Fax Printout ...................... |
14 |
|
Polling Faxes ............................................................ |
14 |
|
Jobs ......................................................................... |
15 |
|
5 |
Copier ............................................... |
16 |
Inserting Documents ............................................... |
16 |
|
Making a Copy ........................................................ |
16 |
|
Adjusting Copies ..................................................... |
16 |
|
6 |
SMS ................................................... |
17 |
SMS Requirements .................................................. |
17 |
|
Sending SMS ........................................................... |
17 |
|
Receiving SMS Messages ......................................... |
17 |
|
Reading SMS Messages ............................................ |
17 |
|
Printing SMS Messages ............................................ |
17 |
|
Deleting SMS Messages ........................................... |
18 |
|
Modifying the Settings ............................................ |
18 |
|
Sending Text2Fax .................................................... |
18 |
|
7 Sudoku.............................................. |
19 |
|
|
Printing a Game |
19 |
|
|
|
|||
Printing the Last Game Again .................................. |
19 |
EN |
|
Printing the Solution |
19 |
||
|
|||
Sudoku for Every Day .............................................. |
19 |
|
|
|
8 Settings............................................. |
20 |
Energy Saving Mode ................................................ |
20 |
Selecting the Country .............................................. |
20 |
Selecting the Language ............................................. |
20 |
Entering the Date and Time .................................... |
20 |
Entering Your Telephone Number and Name ......... |
20 |
Locking the Device .................................................. |
20 |
Set Resolution .......................................................... |
20 |
Reducing Transmission Speed ................................. |
21 |
Turning Page Header On/Off .................................. |
21 |
Switches Time Stamp On/Off ................................. |
21 |
Switching Transmission Report On/Off .................. |
21 |
Additional Fax Reception Options ........................... |
21 |
Setting the Ring Tones ............................................ |
21 |
Setting the Fax Reception Mode .............................. |
22 |
Printing Lists and Help Pages .................................. |
22 |
9 Telephone Lines and Additional |
|
Devices .................................................. |
23 |
Configuring Telephone Lines and Services ............... |
23 |
Connecting Additional Devices ................................ |
23 |
Using Additional Telephones (Easylink) .................. |
23 |
10 Service .............................................. |
25 |
Changing the Toner Cartridge ................................. |
25 |
Restart the Recharging Process ................................. |
26 |
Displaying the Toner Level ...................................... |
26 |
Fixing a Paper Jam ................................................... |
26 |
Fixing a Document Jam ........................................... |
27 |
Cleaning .................................................................. |
27 |
Power Cycling .......................................................... |
27 |
11 Glossary ............................................ |
29 |
12 Appendix .......................................... |
32 |
Technical Data ........................................................ |
32 |
Table of Contents |
3 |
1 Installation Guide
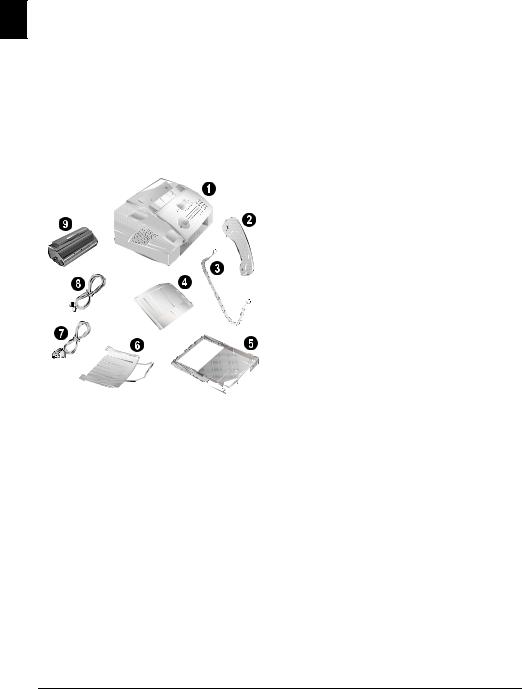
Contained in the Packing
EN ‚ Device
ƒ Telephone handset
„ Spiral cable for telephone handset
… Document support
† Paper tray
‡ Document outlet tray
ˆ Mains cable with plug (country-specific)
‰ Telephone cable with plug (country-specific)
Š Starter cartridge
Product information and operating instructions/CD (not depicted)
If one of the parts is missing or damaged, please contact your retailer or our customer service.
Attaching the Document Support
Insert the document support into the two openings in the cover. The document support should snap securely into place.
Loading Paper
Initial operation: Please remove the protective cardboard from the paper tray before loading paper and replacing the paper tray into the device.
Before you can receive documents or make copies, you must load paper into the device. Please use only appropriate paper in standard format A4 · 210¦×¦297 millimetre · preferably80¦g/m2. Follow the specifications in the technical data.
Separate the paper sheets by fanning them out, then align them by tapping edge of the stack lightly against a flat surface. This will prevent several sheets of paper from being drawn in all at once.
1 Remove the cover from the paper tray.
Initial operation: Please remove the protective cardboard from the paper tray before loading paper and replacing the paper tray into the device.
2Put in only as much paper as will fit under the raised limit markers on the upper edge of the paper tray (see also the drawings on the cover of the paper tray). You can load up to 250 sheets.
If you would like to print on an input sheet (for example, forms or stationery), place the input sheet face down in the paper tray, with the top of the page toward the rear.
Forms that have been printed out by a laser printer are not suitable for further printing. This can lead to a paper jam.
4 |
OKIFAX 160 |
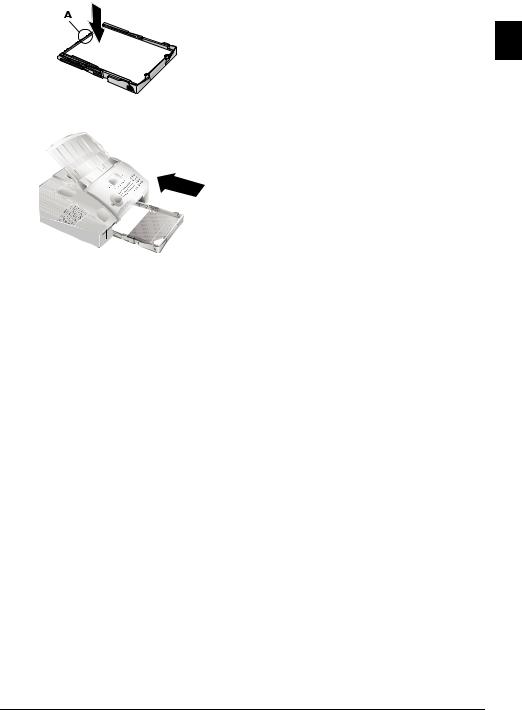
3Press the paper down until the lever (A) snaps into place at the rear of the paper tray.
4Place the cover back on the paper tray. Push the paper tray into the device all the way to the stopping point.
Connecting the Telephone Handset
Plug one end of the spiral cable into the socket on the tel- |
|
ephone handset. Insert the other end into the socket desig- |
|
nated with the ) symbol. |
EN |
|
Do not pull out the paper tray while the device is in the process of printing. This can lead to a paper jam.
Extending the Printout and Fax
Outlet Tray
Pull the print-out and fax outlet tray out of the paper tray cover.
Attaching the Document Outlet
Tray
Insert the document outlet tray into the two openings under the operation panel.
Inserting Starter Cartridge
Before you can receive documents, make copies, or print, a toner cartridge must be inserted into the device. For this reason, a starter cartridge is supplied with the device. The toner level memory for this starter cartridge was set at the factory. The starter cartridge need not be updated with a Plug’n’Print card. For each additional toner cartridge that you insert into your device, you must update the toner level memory with the Plug’n’Print card provided.
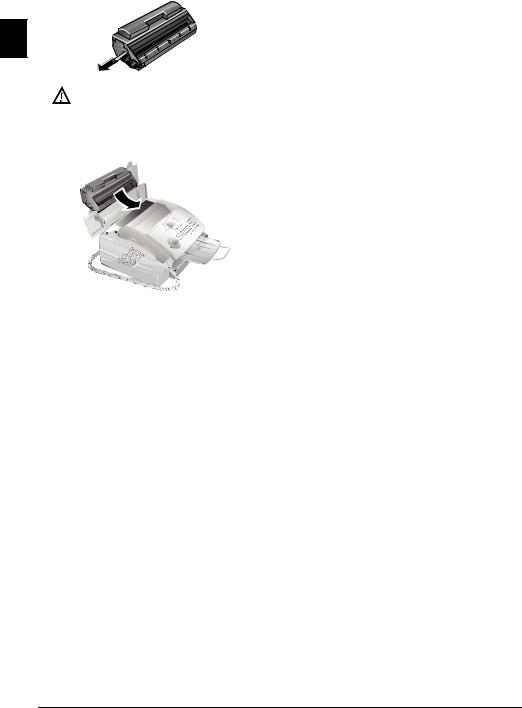
1Open the cover by taking hold of both document guides and tipping the cover backward.
Never open a toner cartridge. If toner dust is released into the air, you should avoid allowing it to contact your skin and eyes. Do not inhale the released toner dust. Remove the toner dust from clothing or objects with cold water; hot water would only cause the toner to set.
2 Take the new toner cartridge from the package.
3Remove the black protective foil and other packaging material, but do not yet remove the protective strip from the cartridge.
4Shake the new toner cartridge back and forth several times in order to distribute the toner evenly, thereby improving the print quality.
Installation Guide |
5 |
5Only after completely pull off the protection strip located on the left side of the cartridge.
EN
Once you have removed the protection strip, do not shake the toner cartridge any more. Otherwise, it is possible that toner dust will be released into the air.
6Place the toner cartridge into your device. The cartridge should snap securely into position.
7Close the cover. Make sure that the cover snaps securely into position on both sides.
Connecting the Telephone Cable
Connect the telephone cord to the device by inserting it in the socket designated with LINE (RJ-11-Connector). Insert the telephone plug into your telephone connection socket.
If you connect your device as extension to a telephone system, you must set it for working as an extension (also see Chapter "Telephone connections and additional devices, page 23).
Connecting the Mains Cable
Check whether the mains voltage of your device (indicated on the type label) matches the mains voltage available at the setup location.
Insert the mains cable into the connection located on the rear side of the device. Connect the mains cable to the electrical socket.
Initial Installation
After you connect your device to the mains, the initial installation commences.
Selecting the Country
Always set the country in which you are operating the machine. Otherwise, your machine is not adapted to the telephone network. If your country is not included in the list, you must select a different setting and use the correct telephone cable for the country. Consult your retailer.
1 Press OK.
2Use [ to select the country in which you are operating the device.
3 Confirm twice with OK.
Entering Number
Your name and number are added together with date, time and page number at the top edge of each fax transmission (= header).
1 Enter your number.
To insert special characters and symbols, press ;ü. Select with [. Confirm with OK.
You can move the cursor using [. Use Cto delete individual characters.
2 Confirm with OK.
Entering Name
1 Enter the name using the keys (A—Z).
Enter capital letters by pressing and holding ú button. You can enter special characters using ½.
To insert special characters and symbols, press ;ü. Press ûüto insert language specific special characters. Select with [. Confirm with OK.
You can move the cursor using [. Use Cto delete individual characters.
2 Confirm with OK.
Entering the Date and Time
1Enter the date (two digits for each field), for example 31¦05¦25 for May 31th, 2025.
2 Enter the time, e.g. 14 00 for 2 pm.
3 Confirm with OK.
6 |
OKIFAX 160 |

2 Overview
Overview of the Menu Functions
The following functions are available on your device. There are two ways in which you can call functions.
Navigating in the menu: Press OK or one of the two arrow keys [ to open the function menu. Page through [menu entries. Use OKto select a function. Press Cto return to the previous menu level. Press j to close the menu and return to the starting mode.
Calling functions directly: You can call a menu function directly using the function number. Press OKand enter the appropriate function number using the numeric keypad. Confirm using OK. You will find the function number in the following list.
1 Installation
12 Selecting the language................................ |
page 20 |
13 Entering the date and time ........................ |
page 20 |
14 Entering your telephone number and name page 20
15 Configuring telephone lines and services.... |
page 23 |
16 Various settings ......................................... |
page 21 |
17 Setting the number of rings ....................... |
page 21 |
18 Setting the ring volume ............................. |
page 21 |
19 Setting the fax reception mode .................. |
page 22 |
2 Fax
21 Reducing transmission speed ..................... |
page 21 |
22 Fax polling................................................. |
page 14 |
23 Polling send............................................... |
page 14 |
24 Sending fax later ........................................ |
page 13 |
25 Settings for transmission reports ................ |
page 21 |
26 Switches Time Stamp On/Off ................... |
page 21 |
27 Deactivating automatic fax printout .......... |
page 14 |
28 Settings for fax reception ........................... |
page 21 |
29 Using fax templates.................................... |
page 13 |
3 SMS
(Function is not supported in all countries and networks)
31 Sending SMS............................................. |
page 17 |
32 Reading SMS............................................. |
page 17 |
33 Deleting SMS ............................................ |
page 18 |
34 Printing SMS............................................. |
page 17 |
35 Settings for sending and receiving SMS ..... |
page 18 |
36 Changing transmitting and receiving numbers
.......................................................................page 18
4 Lists and Reports |
|
|
|
|
|
41 List of the available functions.................... |
page 22 |
EN |
42 Printing fax journal................................... |
page 22 |
|
43 Printing the telephone book...................... |
page 22 |
|
44 Printing the settings .................................. |
page 22 |
|
45 Printing the jobs list.................................. |
page 15 |
|
5 Jobs |
|
|
51 Immediate job execution........................... |
page 15 |
|
52 Changing a job ......................................... |
page 15 |
|
53 Deleting a job ........................................... |
page 15 |
|
54 Printing a job............................................ |
page 15 |
|
55 Printing the jobs list.................................. |
page 15 |
|
6 Miscellaneous |
|
|
61 Locking the device .................................... |
page 20 |
|
62 Installing a new toner cartridge ................. |
page 26 |
|
68 Sudoku ..................................................... |
page 19 |
|
Printing Help Pages
Printing the Functions List
You can also print the functions list by pressing ¨, 1and
OK.
Printing the Telephone Book
You can also print the telephone book by pressing ¨, 4 and OK.
Printing the Fax Templates
You can also print the fax templates by pressing ¨, 8and
OK.
Printing Fax Journal
You can also print the fax journal by pressing ¨, 3 and
OK.
Printing the Job List
You can also obtain a print-out of the jobs list by pressing ¨, 6 and OK.
Sudoku: Printing a Game
You can also print a new Sudoku by pressing ¨, 7 and
OK.
Printing the List of Settings
You can also print the list of settings by pressing ¨, 5and
OK.
Overview |
7 |

Device Overview |
ΠToner cartridge |
‚ Cover |
|
ƒ Scan: document support |
|
„ Scan: document feed slot |
|
EN … Scan: document guide |
|
† Panel with display |
|
‡ Document outlet |
|
ˆ Printout and fax outlet (extendable) |
|
‰ Paper tray |
|
Š Slot for the Plug’n’Print card |
|
‹ Telephone handset with spiral cable |
|
Connections on the Rear Side
‚ )-Socket—Connection socket for the telephone handset
ƒ EXT-Socket—Connection socket for additional devices
„LINE-Socket—Connection socket for telephone cable
… Mains cable socket
8 |
OKIFAX 160 |
Panel with Display
Keys (A—Z)—Telephone book register: Calling up telephone book entries / entering letters. Entering capital letters by pressing and holding ú button. Entering a space using ½. Entering a full stop using .. Entering a break using Rø.
;ü—Entering special characters (punctuation marks and symbols). Select the entries with [. Confirm with
OK.
ûü—Entering language specific special characters (special letters). Select the entries with [. Confirm with OK.
ú—Shift key: entering capital letters / in combination with other keys: calling additional functions
am—Calls up telephone book functions
Red lamp Æ—If the lamp flashes, please read what is indicated on the display
Green Lamp â/_—It flashes whenever an SMS message has arrived or when a document is waiting to be retrieved from the fax memory.
j—Function abort / return to the starting mode / documents eject
C—Returning to the previous menu level / deleting individual digits
[—Calling the menu functions / navigation within the menu / selecting options / moving the cursor
OK—Calling the menu functions / confirming input
o—Start a fax transmission or fax reception
COPY—Press twice: making copies automatically. Press once: adjusting copies
¨—Print list of functions, jobs, settings / printing fax jour- |
|
|
nal or telephone book / Sudoku: printing a game / printing |
|
|
the fax templates |
|
|
_—Calling up the SMS menu (function is not support- |
|
|
|
||
ed in all countries and networks) / in countries and net- |
EN |
|
works without SMS function: calling up Text2Fax sending |
||
|
||
À—Sending to multiple recipients (= Broadcasting): |
|
|
|
||
Sending fax or SMS message to multiple recipients |
|
|
fx—Setting higher resolution for faxes and copying |
|
|
(NORMAL, h—FINE, f—SFINE, x—PHOTO) |
|
|
Numeric keys—Entering digits |
|
|
@ù—List of the last ten numbers dialled (= redialling |
|
|
list) |
|
|
ú and @ù—List of last ten callers (= caller list) |
|
|
μ—Dialling with the handset replaced |
|
|
Rø—Insert short line interruption (Hook Flash) as office |
|
|
index on PABX or for calling special functions in the pub- |
|
|
lic telephone network (PSTN) |
|
|
ú and Rø—Inserting dialling pause |
|
|
Symbols on the LCD Display |
|
|
f—SFINE resolution configured (for documents with |
|
|
many details) |
|
|
x—PHOTOresolution configured (for photos). |
|
h—FINE resolution configured (for documents with small print or drawings)
ž—Incoming calls during absence (function is not supported in all countries and networks)
_—Incoming SMS messages (function is not supported in all countries and networks)
Overview |
9 |

3 Telephone Functions
For information on how to connect additional telephones and which functions are available to you, please refer the
EN
chapter on Telephone Connections and Additional Devices, Page 23.
Making Telephone Calls on the Machine
Dial the desired telephone number. There are multiple ways to do this. Then lift up the handset.
You can also lift up the receiver first, then dial a number. The dialling process begins immediately.
Manual dialling: Dial the desired telephone number with the number pad.
Telephone book register: with the keys (A—Z) you can access entries saved in the telephone book. Enter the initial letters or the name of the desired entry. Your device will show you the telephone book entries for the corresponding letters. Select an entry using [.
You can also call the telephone book entries by pressing am and select using [ SEARCH.
The function Search works even while you are conversing on the telephone.
If you are loading entries from the telephone book, it is possible to edit the numbers after you have loaded them. For example, you can add or delete prefixed numbers or direct dial numbers.
Redial list: Press @ù. Use [ to select an entry from the list of the dialled numbers.
Calling List: Press ú and @ù. Use the [ to select an entry from the list of callers.
For this function to work, the caller line identification (CLIP) must be activated for your telephone connection (country and network dependent). The number and name will not be shown if the caller suppresses his number.
Getting outside line
Private branch exchanges (PABX) are typical in many offices and some households. You must dial an outside line access code in order to get a connection to the public telephone network (PSTN) from a PABX.
Enter the outside line access code with which you reach the public telephone network before you enter the desired number or select a stored entry. The outside line access code is usually 0.
In rare cases, the outside line access code may be a different number or a two-digit number. For older telephone systems, the outside line access code can be R (= Flash). Press Rø to enter this outside line access code. If the connection to the public telephone network is not possible, contact your telephone system supplier.
If you operate your device permanently at an extension, store the outside line access code with the 15 function (see page 23).
Chain Dialling
You can combine and edit manually entered digits and saved entries, before the dialling process starts. If you have saved, for example, the telephone number prefix of an inexpensive telephone service provider (call-by-call) as a telephone book entry, select this entry and manually enter the subsequent telephone number or select another saved entry.
Insert Dialling Pause
It may be necessary to insert a dial pause in telephone number, for example, for a direct-inward dialling number, a sub-address or in a long distance number. Press ú and Rø. The second part of the number is dialled only after a short pause.
Dialling with the Handset Replaced
Press μ to dial without lifting up the handset. You will hear the dial tone from the loudspeaker; the dialling process will commence immediately.
Telephone Book
Press ¨, 4and OKto print a list of all saved entries and groups in the telephone book.
Call the telephone book functions using am: You can store new entries, search for entries as well as set and edit groups. You can save up to 200 entries in the telephone book of your device.
You can move the cursor using [. Use C to delete individual characters. Press jto close the menu and return to the starting mode.
Saving Entry
1 Press am.
2 Using [ select ADD NAME.
3 Confirm with OK.
4 Enter the name using the keys (A—Z).
To insert special characters and symbols, press ;ü. Press ûüto insert language specific special characters. Select with [. Confirm with OK.
5 Confirm with OK.
6 Enter the number using the number pad.
7 Confirm with OK.
8Select the speed for fax transmissions to this recipient. Normally you can select the highest speed. Set a lower transmission speed if you are sending faxes into networks with poor line quality.
9 Confirm with OK. The entry is saved.
10 |
OKIFAX 160 |
Loading...