


 Loading...
PrintSuperVision
Configuration Guide
PREFACE
Every effort has been made to ensure that the information in this document is complete, accurate, and up-to-date. The manufacturer assumes no responsibility for the results of errors beyond its control. The manufacturer also cannot guarantee that changes in software and equipment made by other manufacturers and referred to in this guide will not affect the applicability of the information in it. Mention of software products manufactured by other companies does not necessarily constitute endorsement by the manufacturer.
While all reasonable efforts have been made to make this document as accurate and helpful as possible, we make no warranty of any kind, expressed or implied, as to the accuracy or completeness of the information contained herein.
07107101 iss.1 - Copyright © 2009 Oki Europe Ltd. All rights reserved. Oki is a registered trademark of Oki Electric Industry Company, Ltd.
Oki Printing Solutions is a registered trademarks of Oki Data Corporation.
Microsoft, MS-DOS and Windows are registered trademarks of Microsoft Corporation. Apple, Macintosh, Mac and Mac OS are registered trademarks of Apple Computer.
Other product names and brand names are registered trademarks or trademarks of their proprietors.
Preface > 2
CONTENTS
Preface . . . . . . . . . . . . . . . . . . . . . . . . . . . . . . . . . . . . . . . . . . . . . . . . . . .2 Contents . . . . . . . . . . . . . . . . . . . . . . . . . . . . . . . . . . . . . . . . . . . . . . . . . .3 Notes, cautions and warnings. . . . . . . . . . . . . . . . . . . . . . . . . . . . . . . . . .5 Introduction . . . . . . . . . . . . . . . . . . . . . . . . . . . . . . . . . . . . . . . . . . . . . . .6 New names/new editions . . . . . . . . . . . . . . . . . . . . . . . . . . . . . . . . . . . . .7 Installation . . . . . . . . . . . . . . . . . . . . . . . . . . . . . . . . . . . . . . . . . . . . . . . .8
Setup and configuration . . . . . . . . . . . . . . . . . . . . . . . . . . . . . . . . . . . . . .9
Selecting a default location/language. . . . . . . . . . . . . . . . . . . . . . . . . . . . 9 Optional easy configuration (PSV professional edition only) . . . . . . . . . . . .10 Selecting a database . . . . . . . . . . . . . . . . . . . . . . . . . . . . . . . . . . . . . . .10 Selecting a web server. . . . . . . . . . . . . . . . . . . . . . . . . . . . . . . . . . . . . .12 Assigning admin username and password . . . . . . . . . . . . . . . . . . . . . . . .12 Configuring your e-mail server for alerts . . . . . . . . . . . . . . . . . . . . . . . . .13 Registration . . . . . . . . . . . . . . . . . . . . . . . . . . . . . . . . . . . . . . . . . . . . .14 Check for security updates . . . . . . . . . . . . . . . . . . . . . . . . . . . . . . . . . . .15 Program: identifying version numbers . . . . . . . . . . . . . . . . . . . . . . . . . . .16
Getting started . . . . . . . . . . . . . . . . . . . . . . . . . . . . . . . . . . . . . . . . . . . .17
Context sensitive help . . . . . . . . . . . . . . . . . . . . . . . . . . . . . . . . . . . . . .17 User access levels . . . . . . . . . . . . . . . . . . . . . . . . . . . . . . . . . . . . . . . . .17 Adding a user/assigning individual user rights. . . . . . . . . . . . . . . . . . . . . .17 Importing a list of users . . . . . . . . . . . . . . . . . . . . . . . . . . . . . . . . . . . . .18 Creating user groups . . . . . . . . . . . . . . . . . . . . . . . . . . . . . . . . . . . . . . .18 Changing your password . . . . . . . . . . . . . . . . . . . . . . . . . . . . . . . . . . . .19
Grouping devices, adding maps and floor plans . . . . . . . . . . . . . . . . . . .20
Create or edit a group of devices. . . . . . . . . . . . . . . . . . . . . . . . . . . . . . .20 Adding a device to an existing group . . . . . . . . . . . . . . . . . . . . . . . . . . . .21 To add a device to an existing group . . . . . . . . . . . . . . . . . . . . . . . . . .21 To remove a device from an existing group . . . . . . . . . . . . . . . . . . . . .22 Adding maps and floor plans to a group . . . . . . . . . . . . . . . . . . . . . . . . . .23
Discovering devices. . . . . . . . . . . . . . . . . . . . . . . . . . . . . . . . . . . . . . . . .26
Discovery: add button . . . . . . . . . . . . . . . . . . . . . . . . . . . . . . . . . . . . . .26 Discovery: exclude button . . . . . . . . . . . . . . . . . . . . . . . . . . . . . . . . . . .28 Discovery: windows button. . . . . . . . . . . . . . . . . . . . . . . . . . . . . . . . . . .30 Discovery: schedule button . . . . . . . . . . . . . . . . . . . . . . . . . . . . . . . . . .30 Discovery: logs button . . . . . . . . . . . . . . . . . . . . . . . . . . . . . . . . . . . . . .31 Other discovery options . . . . . . . . . . . . . . . . . . . . . . . . . . . . . . . . . . . . .32
Show addresses . . . . . . . . . . . . . . . . . . . . . . . . . . . . . . . . . . . . . . . .32 Save DNS addresses . . . . . . . . . . . . . . . . . . . . . . . . . . . . . . . . . . . . .32 Start discovery . . . . . . . . . . . . . . . . . . . . . . . . . . . . . . . . . . . . . . . . .32 Configure timeouts . . . . . . . . . . . . . . . . . . . . . . . . . . . . . . . . . . . . . .32 Making discovery easier: importing IP addresses from a text file. . . . . . . . .33 Discovering network devices: professional edition: easy configuration . . . . .33 My printers . . . . . . . . . . . . . . . . . . . . . . . . . . . . . . . . . . . . . . . . . . . . . .34 Near me. . . . . . . . . . . . . . . . . . . . . . . . . . . . . . . . . . . . . . . . . . . . . . . .34
Configuring email alerts . . . . . . . . . . . . . . . . . . . . . . . . . . . . . . . . . . . . .35
Configuring email server . . . . . . . . . . . . . . . . . . . . . . . . . . . . . . . . . . . .36 Testing your email alert configuration . . . . . . . . . . . . . . . . . . . . . . . . .37 Configuring status events. . . . . . . . . . . . . . . . . . . . . . . . . . . . . . . . . . . .37 Customizing status codes . . . . . . . . . . . . . . . . . . . . . . . . . . . . . . . . . . . .39
Data collection interval . . . . . . . . . . . . . . . . . . . . . . . . . . . . . . . . . . . . . .42 Cloning . . . . . . . . . . . . . . . . . . . . . . . . . . . . . . . . . . . . . . . . . . . . . . . . . .43 Group configuration . . . . . . . . . . . . . . . . . . . . . . . . . . . . . . . . . . . . . . . .45
Contents > 3
Configuring supplies ordering. . . . . . . . . . . . . . . . . . . . . . . . . . . . . . . . .47
Search for a supply item . . . . . . . . . . . . . . . . . . . . . . . . . . . . . . . . . . . .47 Select printers, then items . . . . . . . . . . . . . . . . . . . . . . . . . . . . . . . . .47 Items for local printers. . . . . . . . . . . . . . . . . . . . . . . . . . . . . . . . . . . .48 All available items . . . . . . . . . . . . . . . . . . . . . . . . . . . . . . . . . . . . . . .48 Customize order . . . . . . . . . . . . . . . . . . . . . . . . . . . . . . . . . . . . . . . . . .48 Configuring the supplies list . . . . . . . . . . . . . . . . . . . . . . . . . . . . . . . . . .49 Default. . . . . . . . . . . . . . . . . . . . . . . . . . . . . . . . . . . . . . . . . . . . . . .49 Enabling/disabling on-line supplies ordering . . . . . . . . . . . . . . . . . . . . .50 Editing the supplies list . . . . . . . . . . . . . . . . . . . . . . . . . . . . . . . . . . .50 Selecting an alternative supplies list . . . . . . . . . . . . . . . . . . . . . . . . . .51 Disable ordering supplies . . . . . . . . . . . . . . . . . . . . . . . . . . . . . . . . . .51 Editing the supplies list (optional link) . . . . . . . . . . . . . . . . . . . . . . . . . . .52
Supplies ordering calendar . . . . . . . . . . . . . . . . . . . . . . . . . . . . . . . . . . .53
Reporting. . . . . . . . . . . . . . . . . . . . . . . . . . . . . . . . . . . . . . . . . . . . . . . . .54
Available reports . . . . . . . . . . . . . . . . . . . . . . . . . . . . . . . . . . . . . . . . . .54 Selecting report attributes . . . . . . . . . . . . . . . . . . . . . . . . . . . . . . . . . . .54 Toner changes report. . . . . . . . . . . . . . . . . . . . . . . . . . . . . . . . . . . . . . .55 Generating a toner changes report . . . . . . . . . . . . . . . . . . . . . . . . . . .55 Scheduling a toner changes report . . . . . . . . . . . . . . . . . . . . . . . . . . .56 Schedule log report . . . . . . . . . . . . . . . . . . . . . . . . . . . . . . . . . . . . . . . .56 Supplies usage report . . . . . . . . . . . . . . . . . . . . . . . . . . . . . . . . . . . . . .57 Printed pages report . . . . . . . . . . . . . . . . . . . . . . . . . . . . . . . . . . . . . . .58 Color/mono pages report . . . . . . . . . . . . . . . . . . . . . . . . . . . . . . . . . . . .59 Usage report. . . . . . . . . . . . . . . . . . . . . . . . . . . . . . . . . . . . . . . . . . . . .61 Exporting properties and attributes . . . . . . . . . . . . . . . . . . . . . . . . . . . . .62
Adding device attribute data. . . . . . . . . . . . . . . . . . . . . . . . . . . . . . . . . .63 Configuring a print device remotely . . . . . . . . . . . . . . . . . . . . . . . . . . . .64
Performing day to day tasks . . . . . . . . . . . . . . . . . . . . . . . . . . . . . . . . . .65
Viewing device status . . . . . . . . . . . . . . . . . . . . . . . . . . . . . . . . . . . . . .65 Quickly access a group of devices . . . . . . . . . . . . . . . . . . . . . . . . . . . . . .65 Changing the device properties displayed. . . . . . . . . . . . . . . . . . . . . . . . .66 Searching for a device . . . . . . . . . . . . . . . . . . . . . . . . . . . . . . . . . . . . . .67 Changing languages . . . . . . . . . . . . . . . . . . . . . . . . . . . . . . . . . . . . . . .67 Downloading Oki drivers . . . . . . . . . . . . . . . . . . . . . . . . . . . . . . . . . . . .68 Print to remote locations . . . . . . . . . . . . . . . . . . . . . . . . . . . . . . . . . . . .69 Creating a maintenance log / managing supplies inventory . . . . . . . . . . . .70 Creating a login log . . . . . . . . . . . . . . . . . . . . . . . . . . . . . . . . . . . . . . . .72 Clearing (deleting) logs . . . . . . . . . . . . . . . . . . . . . . . . . . . . . . . . . . . . .72
Public web services. . . . . . . . . . . . . . . . . . . . . . . . . . . . . . . . . . . . . . . . .73
Contents > 4
NOTES, CAUTIONS AND WARNINGS
NOTE
A note provides additional information to supplement the main text.
CAUTION!
A caution provides additional information which, if ignored, may result in equipment malfunction or damage.
WARNING!
A warning provides additional information which, if ignored, may result in a risk of personal injury.
Specifications subject to change without notice. All trademarks acknowledged.
Notes, cautions and warnings > 5

INTRODUCTION
NOTE
This guide is written to cover all editions of PrintSuperVision and as such may contain information about features that your edition does not support.
Example screenshots are used throughout this manual and as such some of the features shown may not be available in your edition of PrintSuperVision.
PrintSuperVision (referred to as PSV throughout this document) is a Windows server application designed for managing and monitoring network connected printing and copying devices. The core application is server-based and is accessible from any browser enabled device connected to the network. Popular browsers supported include Internet Explorer, Mozilla and Opera.
The application is available in two editions: Professional Edition and Enterprise Edition.
The Professional Edition is a subset of the Enterprise edition and shares the same menu structure and many of the same features. Notations will be made throughout the document to indicate differences between the Enterprise and Professional Editions.
The only major feature in the Professional Edition that does not exist in the Enterprise Edition is the single-user Easy Configuration option. The single user option can be installed in a “non server configuration” on network-connected laptops and desktops.
The single-user Easy Configuration option allows users to check status of supply levels, monitor consumable life remaining and printed page counts. The easy configuration option is designed for very small offices and does not support the automatic delivery of device Alerts through email.
Some of the common features of both PSV Professional and Enterprise Editions include:
>Discovers and configures devices
>Helps pinpoint devices on the network
>Assists in remote trouble shooting
>Automatically identifies device status and can email alerts
>Produces reports and automatically delivers them via email
>On-line supplies and consumable ordering (only available in the United States)
Introduction > 6

NEW NAMES/NEW EDITIONS
PSV Version 3.6 introduces two new editions that better support various size organizations.
>The Professional Edition is designed for small and mid-size organizations with just a few or several hundred print/copy devices. It is generally installed on a centrally located Windows server accessible from any browser-enabled device.
The professional edition also offers the choice to install a single-user “Easy Configuration” option that does not require a server and can be installed on a XP or Vista class Windows laptop or desktop that is connected to the network.
>The Enterprise Edition is designed to monitor and manage several thousand print/ copy devices within large organizations with features and functionality required by sophisticated IT organizations.
Both editions have similar base functionality and a consistent look-and-feel. Each edition supports 32 and 64-bit versions of Windows XP, Vista and Windows Server 2000/2003.
Upgrades can be easily performed from older versions of PrintSuperVision to version 3.6 or from the Professional edition to the Enterprise Edition without loss of data.
NOTE
Upgrading from the Single-user Easy Configuration Option to the standard
Professional Edition requires re-installation.
New names/new editions > 7
INSTALLATION
There are two methods to install PrintSuperVision, either:
>place the DVD in the appropriate drive and wait for it to auto-run. A standard licensing agreement is presented.
>locate the executable file that was downloaded from the Oki website, and click on it. A standard licensing agreement is presented.
If you agree with the license agreement click Next.
The PSV Enterprise Edition package contains the PrintSuperVision application, an optional version of SQL Server 2005 Express Edition, an optional version of SQL Server Compact Edition version 3.5 and the.NET 2.0 framework.
NOTE
The PSV Enterprise Edition installer will look for a compatible version of .NET installed on the server during installation. If .NET 2.0 or higher is found, the installer will not attempt to install the .NET framework. If an older version of
.NET is found (below version 2.0), PSV will install .NET 2.0.
The .NET Framework or SQL Compact Edition 3.5 is not included in the PSV Professional Edition installer, both of which can be downloaded from the web.
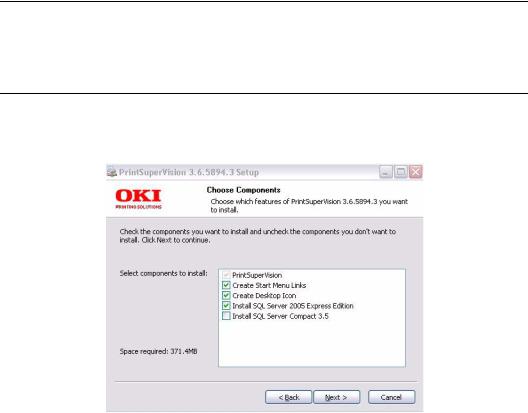
For PSV Enterprise edition, select the desired components to install and click Next.
If the SQL modules listed in the screen above are not checked and therefore not installed, you will still be able to use a built-in Microsoft Access database that installs automatically with the PSV application.
PSV Professional Edition does not include SQL Server 2005 Express Edition as an optional component.
Installation > 8
SETUP AND CONFIGURATION
Immediately following installation, the PSV setup tool is launched. Follow the step by step process to configure PrintSuperVision. Keep in mind that many of the configuration options are also available from within the PSV application so it is not imperative to complete all settings during the setup process.
You may also return to the PSV Setup Tool at any time. It is available from the Windows Start menu by going to All Programs > PrintSuperVision > PrintSuperVision Setup.
NOTE
Certain changes using the PSV setup tool can only be made when the web application and “PSV Engine” services are not running. For example, in order to change the web server component from “embedded” to “IIS” the web service application must not be running.
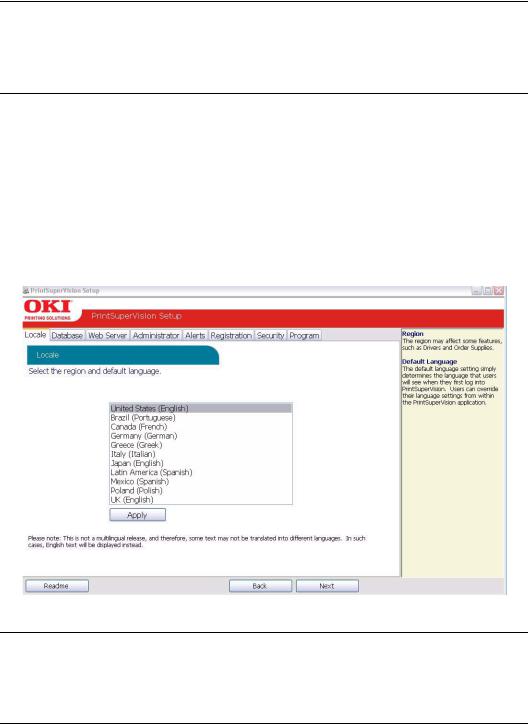
SELECTING A DEFAULT LOCATION/LANGUAGE
The PSV setup tool displays the location/language selection screen first.
1.Select a default location/language for all users.
2.Click Apply and Next.
Each user can later change his/her language preference from their browser. Use caution when selecting the desired language since it is changed immediately (but will not be applied until the user clicks Apply). If you are not familiar with the language selected, it may be difficult to return to your native language.
NOTE
The location/language selected has an effect on enabling or disabling the OnLine supplies ordering feature in PSV. Selecting “United States” will enable the On-Line ordering feature while selecting any other location disables the ability to order supplies on-line from within the application. Refer to page 47.
Setup and configuration > 9
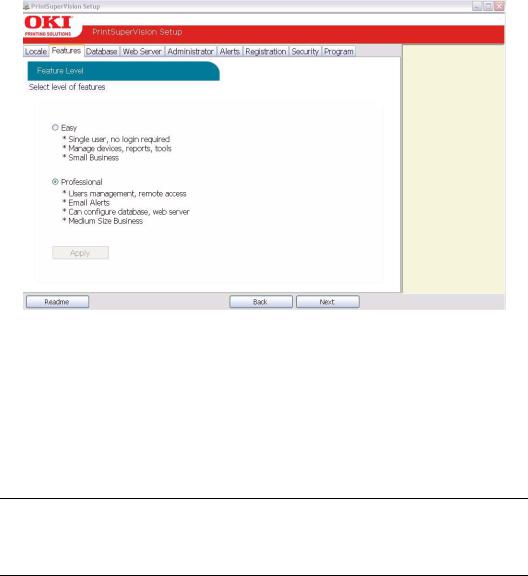
OPTIONAL EASY CONFIGURATION (PSV PROFESSIONAL EDITION ONLY)
The Features tab is not included in PSV Enterprise Edition.
After choosing a language and clicking Next you will be prompted to select the single-user “Easy” configuration or the standard server-based PSV Professional configuration located in the Features Tab.
Select the desired configuration and click Apply and Next.
SELECTING A DATABASE
The next step is to select the type of database you would like to use with Print SuperVision. As mentioned previously, both editions of PrintSuperVision utilize a built-in Microsoft Access database but you can choose other options as well.
If you do not wish to use the built in Access database, PSV provides an option to install and select SQL Compact Edition 3.5 (supported in the Pro version) as well as SQL Server 2005 Express edition from the Enterprise edition.
NOTE
SQL Compact Edition is not included in the PSV Professional installation. If SQL Compact Edition is not installed on the server, PSV will prompt you to download it from the Microsoft website.
The database section also allows you to apply the following options to a previously used database:
>back up
>export
>erase
>copy
>trim data
1.Click the Data tab to view these options.
Setup and configuration > 10
2.From the Setup tab, select the desired database from the dropdown menu and click
Apply.
If you already have SQL Compact Edition installed on your server, you still must go through the following steps to “create” it.
3.After clicking Apply, you will be prompted to create a new database, Change an existing one, or migrate your current database to a new one.
>For new PSV Installations click Create.
>To switch to an existing database without saving any data click Change.
>To create a new database and copy existing data to the new database click
Migrate.
Back at the main Database setup screen, PSV (Enterprise edition only) even allows you to test the connection to the server by clicking the Test Connection button.
4.If “Running” appears in the Database Status box, you have successfully connected to the desired database. Click Next to move to the next setup module.
Setup and configuration > 11
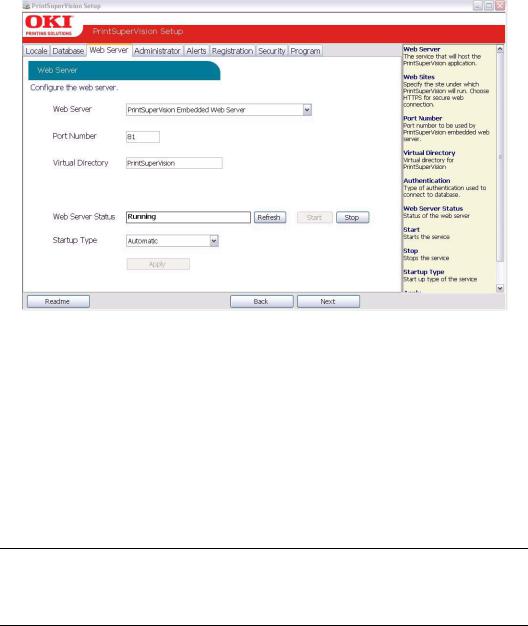
SELECTING A WEB SERVER
PSV supports Microsoft IIS web server and an Embedded Web Server that is packaged with the PSV application. It is strongly recommended to use IIS if you will be monitoring large networks with hundreds or thousands of devices.
If IIS it is not installed on the target server/computer, it will not be visible in the Web Server drop down box displayed below.
To install IIS (in XP):
1.Go to your Control Panel and select Add/Remove programs and Add/Remove Windows components from the left sidebar.
2.Check the box associated with Internet Information Services and click Next.
When IIS is selected from the dropdown menu, an Authentication option displays. If you select Integrated Windows Authentication from the dropdown list, PSV will automatically use your Windows login domain name to log an admin into PSV.
Embedded Web Server:
As an alternative to using the IIS web server, you may select the embedded web server that is included with PSV. The embedded server provides the same functionality as IIS but performance can be affected when using it in large network installations.
NOTE
A TCP Port number must be selected that does not conflict with the TCP port number used by other tools or protocols running on the same computer/ server. Add appropriate port number and click Next.
ASSIGNING ADMIN USERNAME AND PASSWORD
New versions of PSV come with a single user account called “Admin” which has all Administrator Access rights. Enter a new Username and Password for the global Administrator.
The Global Administrator can later add other administrators or standard users from within the application.
Setup and configuration > 12
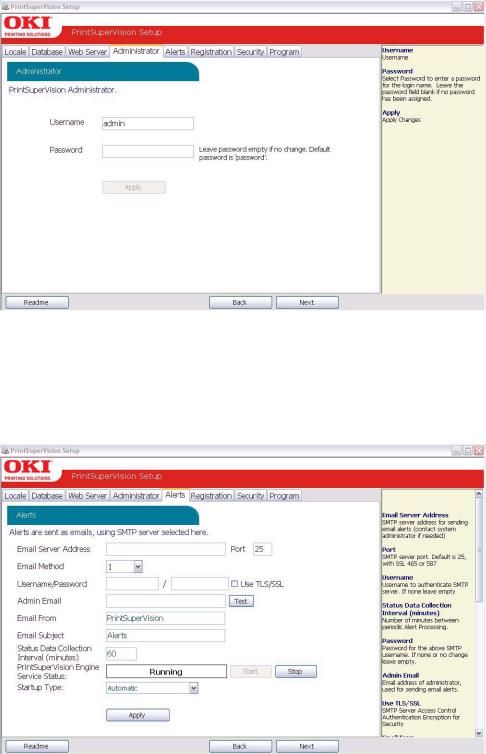
1.Click Apply after a new username and password have been created.
2.Click Next to go on to the next setup module.
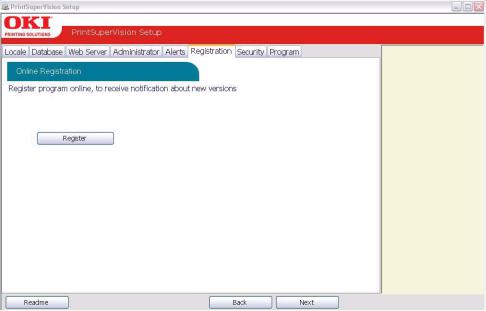
CONFIGURING YOUR E-MAIL SERVER FOR ALERTS
In order for PSV to send out device related alerts via email, you must first enter the necessary information such as the address of your email server, username, password, the email address of the recipient, etc.
1.Enter the desired Email Server Address and SMTP server port (default port number is 25 and 456 or 587 if using SSL/TLS).
2.Select the appropriate email sending method. PSV provides 4 methods that define how the email message is sent:
>Method 1 - This is the Default setting. It uses a SMTP library from IP Works
>Method 2 - Permits streaming. Emails are sent without buffering once the connection is established
Setup and configuration > 13
>Method 3 - Uses Webmail library from .NET 1.1
>Method 4 - Content of email is saved as a file attached to an email message
Method 1 is recommended, but you may try methods 2, 3 and 4 if emails are not successfully sent using the default setting.
3.If your email server requires authentication, indicate the appropriate username and password in the fields provided. Click the TLS/SSL checkbox if your organization uses these communication protocols.
4.Enter the email address of the recipient in the Admin Email field.
5.PSV allows you customize the header and subject line of the email message. Add the word PrintSuperVision to the Email From field and add the word Alerts to the
Email Subject field.
6.Indicate the interval time (in minutes) for PSV to wait to obtain device status. Set to a larger number if network traffic is a concern. Set to a smaller number if you would like more frequent updates reported from your print/copy devices.
The admin can start and stop the PrintSuperVision Service from the set up menu and select whether the PSV Services should start automatically, manually or are disabled.
7.Test the email connection by clicking the Test button. PSV will attempt to send an email to the account you specified.
8.If an email is received successfully, click Apply to save your settings.
9.Click Next to go to the next setup module.
REGISTRATION
You can register your new PrintSuperVision software with Oki Europe or Oki Americas by clicking the Register button.
Registering your name and email address with Oki Printing Solutions will help us keep you informed of new product releases and PSV related information. All registration information supplied is kept in strict confidence.
1.Select the appropriate language/location to register.
>Use the European locations if you are located in Europe.
>Use the Americas locations if you are located in North or South America.
Setup and configuration > 14
2.Enter all user information including your email address.
3.Click Save.
A validation email will be sent to the email address indicated.
4.Click the validation link in the email message when you receive it and your information will be registered.
5.Close the browser to return to the PSV Setup.
6.Click Next to go on to the next setup module.
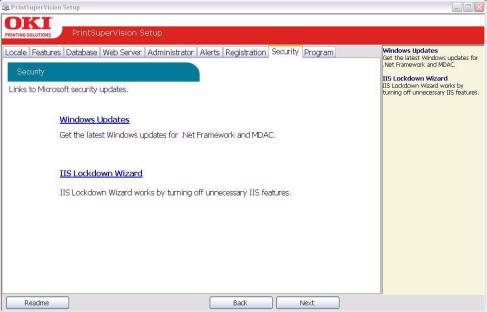
CHECK FOR SECURITY UPDATES
PSV provides links to check for Microsoft security updates before completing the setup process.
1.Click on the Windows Updates Link to go to: http://update.microsoft.com/microsoftupdate/v6/default.aspx?ln=en-us Or
Click the IIS Lockdown Wizard link to go to:
http://www.microsoft.com/downloads/details.aspx?FamilyID=dde9efc0-bb30-47eb- 9a61-fd755d23cdec&displaylang=en
The IIS Lockdown Wizard assists in turning off unnecessary features, thus reducing attack surface available to attackers.
2.Click Next to go to the next setup module.
Setup and configuration > 15
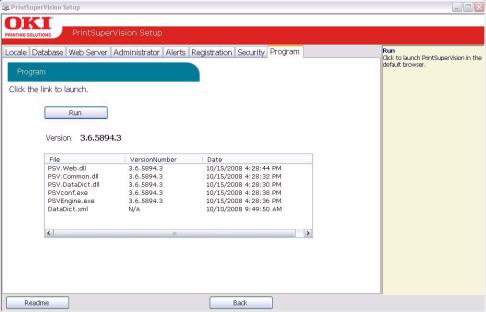
PROGRAM: IDENTIFYING VERSION NUMBERS
The Program tab is provided as a means to quickly identify the version numbers of each major component in PrintSuperVision.
Click Run to complete the setup process and begin using the PSV application.
Setup and configuration > 16
GETTING STARTED
Now that you have installed and configured PrintSuperVision, use any browser-enabled computer or device connected to your network to access the PSV application.
Open your browser and type the IP address of the PSV server.
If you are the Global Administrator or have Admin rights, click Login, and type your user name and password.
CONTEXT SENSITIVE HELP
Throughout the PrintSuperVision application, help is just a click away. For context sensitive
help, click the  icon located in the upper right hand corner (next to the printer icon) on every page.
USER ACCESS LEVELS
One of the first things to decide is the level of access rights to assign to each user. There are 3 ways a user can access the PSV application from any browser:
>Without Logging into PSV.
>Logging in as a User.
>Logging in as an Administrator.
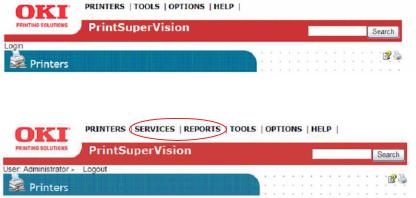
Be aware that certain menu options are only available to users with Admin rights that have logged into PSV. See example below:
User is not logged in
User is logged in as an Administrator
If a user does not log in, the two areas that are not accessible are Reports and Services and the following functionality will not be available:
>Cannot view, add, or configure Alerts.
>Cannot generate any type of report or configure email sending.
ADDING A USER/ASSIGNING INDIVIDUAL USER RIGHTS
To add an individual user to the system:
1.Select Options from the main menu.
2.Click Users from the drop down box.
3.Click the Add User button and fill in the user's information. Make sure that you include a password that contains at least 6 digits.
Getting started > 17

4.Before clicking Save, assign the appropriate user rights by: Selecting Administrator from the Add to Group drop down box. Or
Leave blank For Standard User rights.
5.Click Save.
A list of users will be displayed. Notice that individuals with Admin rights are displayed with a red line under the icon while those with Standard User rights are displayed with a blue line under the icon.
NOTE
User attributes can be changed at any time by clicking the icon in the Edit column and entering new information.
IMPORTING A LIST OF USERS
It may also be helpful to take advantage of the Import Users feature to save time. You can import users into the application from a text file using a comma separated format. The fields available for data import are the same fields listed in the Add User section.
Fields cannot be left empty with the exception of Password. If passwords are not supplied in the text file, PSV will set it to the word “password” by default.
1.Click Options > Users and select the Import Users button.
2.Select the Import Users button.
3.Specify the text file location or click Browse to locate the file.
4.Click the Import Users button.
PSV will add users one by one into the application. When complete, the number of users imported successfully will be displayed as well as details of any errors that may have occurred.
CREATING USER GROUPS
In large organizations it may be helpful to organize users into groups based on admin status, user status or by any number of criteria.
To create a group of users:
1.Click your browser's back button or select Options from the main menu.
2.Select User from the drop down box.
3.Click the User Groups button.
4.Click the Add User Group button.
5.Enter a name for the user group.
6.Click Save.
A list of groups will be displayed.
You will notice that the new group name is automatically added to the Add to Group drop down menu when adding an individual user.
For convenience, the All Users button has been provided in the User Groups area to help identify if an individual has been assigned to a group.
Getting started > 18

CHANGING YOUR PASSWORD
To change your password:
1.Select Options from the main menu.
2.Click Change Password.
3.Enter your current password, your new password and confirm the new password by typing it again.
4.Click Change to save new password.
NOTE
Default User name and password is: admin, password.
Getting started > 19
GROUPING DEVICES, ADDING MAPS AND FLOOR PLANS
Before discovering the devices on your network, it may be beneficial to create groups in order to monitor and manage them in an efficient manner.
>A group can have attributes assigned to it such as location, contact person, SNMP community and even images of maps and floor plans which are used to quickly locate individual devices.
>Groups can be arranged in a hierarchy where a “parent group” can contain sub groups. A device can also be a member of more than one group.
>You can assign a subnet or a range of IP addresses (for discovery purposes) to a group, and as an added convenience, a link to the discovery screen is provided when groups are displayed.
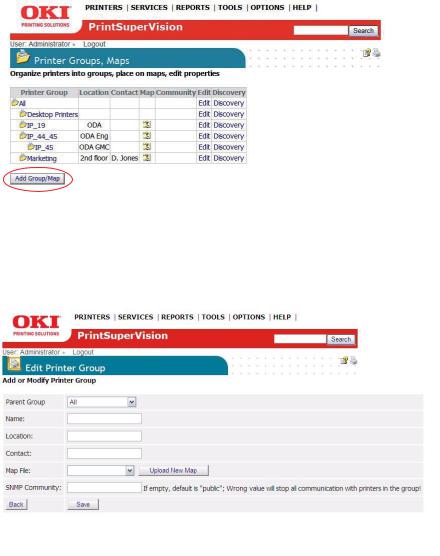
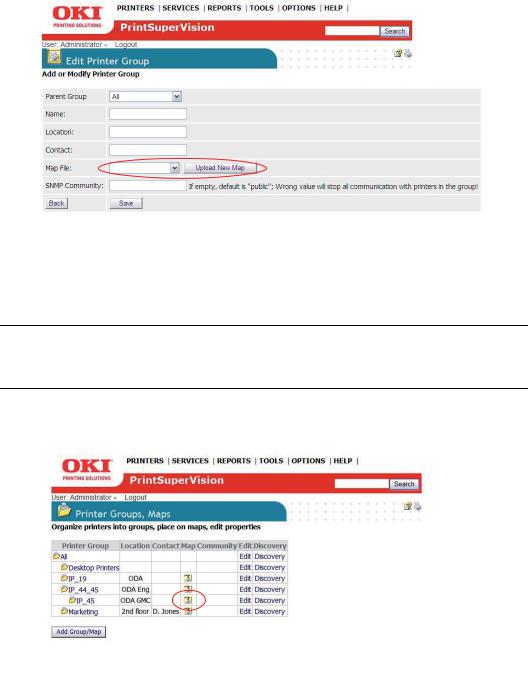
CREATE OR EDIT A GROUP OF DEVICES
1.Click Printers from the main menu and Printer Groups,Maps from the drop down menu to view a list of groups already created.
2.Click the Add Group/Map button to create a new group of devices.
3.Assign a Parent group, a group name, location, contact person responsible for the group, a map or floor plan and the SNMP community.
See “Adding maps and floor plans to a group” on page 23 for more information on assigning maps and floor plans to a group.
Grouping devices, adding maps and floor plans > 20
ADDING A DEVICE TO AN EXISTING GROUP
TO ADD A DEVICE TO AN EXISTING GROUP
1.Click Printers from the main menu and Printer Groups, Maps from the drop down menu to view a list of groups already created.
2.Click Edit in the Edit Column.
3.Click Add Printer.
4.Select the appropriate device from the Printer drop down menu and click Save.
If the group was initially empty, you will see the added device listed after saving. If the group already contained devices you will see an updated list of all devices in that group.
Grouping devices, adding maps and floor plans > 21
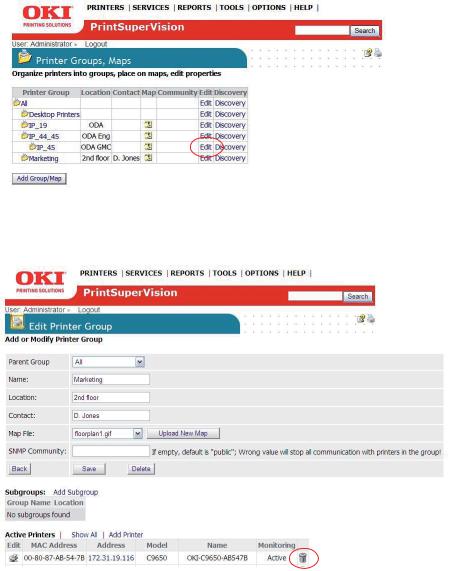
TO REMOVE A DEVICE FROM AN EXISTING GROUP
1.Click Printers from the main menu and Printer Groups, Maps from the drop down menu to view a list of groups already created.
2.Click Edit in the Edit Column.
3.Click the Trash Can icon from the list of grouped devices displayed on the Edit Printer Group screen.
Grouping devices, adding maps and floor plans > 22
ADDING MAPS AND FLOOR PLANS TO A GROUP
Groups can also have images of maps, floor plans, etc. assigned to them, which in turn allows PSV to display the location of a device icon on an associated map or building floor plan. Several popular image file formats for maps and floor plans are supported, such as
.gif, .jpg, .bmp, or .png.
You can assign a map or floor plan image to a new group as soon as you create the group or you can add a map/floor plan image to an existing group at any time.
To add the image while creating the group:
1.Select Printers from the main menu and click Printer Groups, Maps.
2.Select a saved image file from the drop down menu and click Save or click Upload New Map to browse for your desired image. Once your desired image has been located, click Upload.
3.Place a device icon on the map or floor plan.
NOTE
Remember the individual device must be a member of a group before it can be placed on the map.
4.Click Printers/Printer Groups from the main menu. If you have successfully linked an image with a group, you will see an icon in the map column.
5.Click the map icon and the image will be displayed.
6.Click Place on Map and select a device from the drop down menu.
Grouping devices, adding maps and floor plans > 23
Loading...