


Oki OKIPAGE 24N, OKIPAGE 24DX, OKIPAGE 24TN, OKIPAGE 18, OKIPAGE 24DXN ACCESSORY INSTRUCTION GUIDE
...
English
User’s Guide | |
E-1 |
Every effort has been made to ensure that the information in this document is complete, accurate, and up-to-date. Okidata assumes no responsibility for the results of errors beyond its control. Okidata also cannot guarantee that changes in software and equipment made by other manufacturers and referred to in this guide will not affect the applicability of the information in it. Mention of software products manufactured by other companies does not necessarily constitute endorsement by Okidata.
Copyright 1999 by Okidata. All rights reserved.
Written and produced by the Okidata Training & Publications Department. Please address any comments on this publication
·
·
We welcome you to visit our multilingual web site: http://www.okidata.com
Okidata and OKIPAGE are registered trademarks and OKILAN is a trademark of Oki Electric Industry Company, Ltd. Okidata marque désposés de Oki Electric Industry Company, Ltd.; marca registrada, Oki Electric Industry Company, Ltd. Hewlett-Packard, HP, LaserJet, and PCL5e are registered trademarks of Hewlett-Packard Company. PostScript and Adobe are trademarks of Adobe Systems Inc. which may be registered in certain jurisdictions. IBM is a registered trademark of International Business Machines Corp. Epson is a registered trademark of Epson America, Inc. Microsoft and Windows are either registered trademarks or trademarks of Microsoft Corporation in the United States and/or other countries. Intellifont is a registered trademark of Compugraphic Corporation. Zip Code is a registered trademark of the United States Postal Service. ENERGY STAR is a registered trademark of the United States Environmental Protection Agency. Portions of software ã 1994-1995 Adobe Systems Incorporated. All Rights Reserved.
E-2 |OKIPAGE 18/24DX
 Contents
Print Media ............................................................... |
7 |
Information on Paper ...................................................... |
7 |
Storing Paper .................................................................. |
9 |
Feed Paths ....................................................................... |
9 |
Exit Paths ...................................................................... |
11 |
Paper Tray ..................................................................... |
13 |
Front Feeder .................................................................. |
15 |
General Information ...................................................... |
15 |
Loading Multiple Media Pieces ................................... |
17 |
Using the Front Feeder to Print Multiple Pieces of Media |
|
17 |
|
Loading Single Sheets (Manual Feed) ......................... |
20 |
Manual Feed: Standard Paper ....................................... |
20 |
Manual Feed: Envelopes .............................................. |
22 |
Manual Feed: Labels .................................................... |
25 |
Manual Feed: Transparencies ....................................... |
27 |
Manual Feed: Heavy (Card) Stock ............................... |
30 |
Duplex Printing ............................................................ |
33 |
Duplex Printing: Windows 3.1x ................................... |
33 |
Duplex Printing: Windows 95 ...................................... |
34 |
Duplex Printing: Windows NT 4.0 ............................... |
34 |
Duplex Printing: Windows 98 ...................................... |
35 |
Duplex Printing: Macintosh ......................................... |
36 |
OKIPAGE 18 ................................................................. |
36 |
OKIPAGE 24DX ............................................................ |
36 |
Selecting Duplex in Your Application |
|
(OKIPAGE 18 & 24DX) ................................................ |
36 |
Automatic Tray Switching ........................................... |
37 |
Problem Solving ..................................................... |
38 |
Paper Jams ..................................................................... |
38 |
Paper Jam Messages ...................................................... |
39 |
Why Paper Jams Occur ................................................. |
39 |
Clearing a Paper Input Jam ........................................... |
40 |
Clearing a Paper Feed Jam ............................................ |
42 |
Clearing a Paper Exit Jam ............................................. |
44 |
Duplex Feeder Paper Jams ............................................ |
45 |
Clearing Duplex Feeder Input Jams ............................. |
45 |
Clearing a Duplex Feeder Open Jam ............................ |
46 |
User’s Guide | |
E-3 |
Clearing Duplex Feeder Jams 1 & 2 ............................. |
47 |
Clearing Duplex Feeder Jam 3 ..................................... |
48 |
Print Quality Problems ................................................. |
50 |
Adjusting Print Quality ................................................ |
54 |
Software Problems ........................................................ |
55 |
Hardware Problems ....................................................... |
57 |
Display Messages ......................................................... |
59 |
Purchasing Supplies ............................................... |
65 |
Ways to Purchase .......................................................... |
65 |
Supply Order Numbers: Consumables ......................... |
65 |
Supply Order Numbers: Accessories ............................. |
66 |
Maintenance ........................................................... |
67 |
Replacing the Toner Cartridge ..................................... |
67 |
Replacing the Image Drum ........................................... |
73 |
Cleaning the LED Array ............................................... |
80 |
Generating a Drum Cleaning Page ............................... |
81 |
Printer Control ...................................................... |
84 |
Control Panel ................................................................ |
84 |
Control Panel Button Functions .................................. |
85 |
Printer Menus ............................................................... |
87 |
Using the Level-1 Menu ............................................... |
90 |
Using the Level-2 Menu ............................................. |
102 |
The User Maintenance Menu ..................................... |
108 |
Changing Parallel Interface Menu Settings ............... |
112 |
Changing Serial Interface Menu Settings .................. |
113 |
Selecting an Emulation .............................................. |
113 |
Adjusting the Warm-up Cycle .................................... |
115 |
Changing the ECP Setting ......................................... |
116 |
Changing the Media Type for Tray 1 ......................... |
116 |
Changing the Paper Size and/or Media Type for the Front |
|
Feeder ......................................................................... |
117 |
Test Pages ................................................................... |
118 |
Specifications ........................................................ |
120 |
General ........................................................................ |
120 |
Typefaces – HP Mode ................................................. |
121 |
Typefaces – Epson, IBM Modes ................................. |
121 |
Typefaces – PostScript Mode ..................................... |
121 |
Paper Handling Specifications ................................... |
122 |
Physical ...................................................................... |
122 |
Environmental ............................................................ |
123 |
Electrical ..................................................................... |
123 |
Interface ...................................................................... |
124 |
Network Print Server ................................................... |
128 |
Print Media ................................................................. |
128 |
Fonts ........................................................................... |
130 |
Toner ........................................................................... |
131 |
Image Drum ................................................................ |
131 |
E-4 |OKIPAGE 18/24DX
Options .................................................................. |
132 |
Installing SIMMs ........................................................ |
132 |
Installing the Second/Third Paper Feeder .................. |
140 |
Installing the Multi-Purpose Feeder ........................... |
143 |
Uninstalling the Printer Software ..................... |
146 |
Windows 95, 98 and NT 4.0 ....................................... |
146 |
Windows 3.1x ............................................................. |
147 |
Macintosh ................................................................... |
147 |
Re-packing the Printer ....................................... |
148 |
Index ...................................................................... |
152 |
User’s Guide | |
E-5 |
E-6 |OKIPAGE 18/24DX
 Print Media
Information on Paper
When you buy paper, keep in mind that page printers require a smooth finish paper. For most everyday applications, paper rated for copiers and laser printers should work well with your printer. Before buying any large quantity of a particular paper, always test a sample first.
!Print media (including ink on preprinted forms) must be able to withstand 392 F (200 C) for 0.1 second.
User’s Guide | |
E-7 |
Path |
Media: Qty |
Weight |
Sizes |
Exit Path |
|
|
|
|
|
Paper Tray |
Paper: 530 sheets 20-lb. |
16-28 lb. |
Width: 5.8 to 8.5 inches |
Top or Rear |
|
|
|
Length: 8.3 to 14 inches |
|
|
|
|
|
|
Front Feeder |
Paper: 100 sheets 20-lb. |
16-28 lb. |
Letter, 13 or 14 inch |
Top or Rear |
|
|
|
Legal, Executive, A4, |
|
|
|
|
A5, B5, C5 |
|
|
|
|
3.4 x 5.5 inches |
|
|
|
|
|
|
|
Envelopes: 10 |
16-28 lb. |
Com 10, Com 9, |
Rear Only |
|
|
|
Monarch, DL, C4, C5 |
|
|
|
|
|
|
|
Transparencies: |
N.A. |
Letter or A4 |
Rear Only |
|
Transparencies must |
|
|
|
|
withstand 392°F (200°C) for |
|
|
|
|
0.1 second |
|
|
|
|
Labels: Labels must withstand |
N.A. |
Letter or A4 |
Rear Only |
|
392°F (200°C) for 0.1 second |
|
|
|
|
Card Stock |
Up to 36 lb. |
Letter, 13 or 14 inch |
Rear Only |
|
|
|
Legal, Executive, A4, A5, B5, C5 |
|
|
|
|
|
|
Paper Expansion |
Paper: 530 sheets 20 lb. |
16-28 lb. |
Width: 5.8 to 8.5 inches |
Top or Rear |
Tray |
|
|
Length: 8.3 to 14 inches |
|
|
|
|
|
|
Multi-Purpose |
Paper: 100 sheets 20 lb. |
16-28 lb. |
Width: 3.4 to 8.5 inches |
Top or Rear |
Feeder |
|
|
Length: 5.5 to 14 inches |
|
|
|
|
|
|
|
Envelopes: 50 |
16-28 lb. |
Com 10, Com 9, Monarch, DL, C4, |
Rear Only |
|
|
|
C5 |
|
|
|
|
|
|
Duplex |
|
16-24 lb. |
Legal, letter, A4 |
Top or Rear |
|
|
|
Executive |
|
|
|
|
(7.25 x 10.5 inches) |
|
|
|
|
|
|
E-8 |OKIPAGE 18/24DX

Storing Paper
If paper is stored improperly, print quality could be affected.
∙Store paper in a dark, dry place such as a closet or a cabinet.
∙Don’t open the package until you are ready to use it.
∙Always store paper lying flat or it may curl.
∙Store your paper in a static-free environment.
∙Ideally, store paper at a constant temperature of 70°F (21.1°C) with less than 50% humidity.
∙Discard the top sheet from each ream of paper before loading it into the paper tray – it may be contaminated with glue or dust.
Feed Paths
Paper can be supplied to the printer in four ways:
∙ From the paper tray, which holds up to 530 sheets of 20-lb. paper
User’s Guide | |
E-9 |

∙ From the 100-sheet Front Feeder
∙ From the optional 100-sheet/50 envelope multipurpose feeder
∙ From the optional paper expansion tray which holds up to 530 sheets of 20-lb. paper
The paper tray will accommodate 16 to 28 lb. paper within the following size ranges:
∙Width: 3.4 to 8.5 inches (86.4 to 216 mm)
∙Length: 5.5 to 14 inches (140 to 355.6 mm)
E-10 |OKIPAGE 18/24DX
Exit Paths
The OKIPAGE 18/24DX has two paper exit paths:
∙ Top Exit: the normal exit used for routine printing
∙ Rear Exit: used for special types of print media such as envelopes, labels,
transparencies, etc.
Top Paper Exit
The top paper exit is the one normally used for routine printing.
∙Printed pages feed face down into the bin on top of the printer.
∙The bin holds 250 sheets of 20 lb. paper.
∙Pages stack in the correct order.
∙When the bin is full, STACKER FULL REMOVE THE
PAPER displays in the control panel window and printing will stop until the paper is removed.
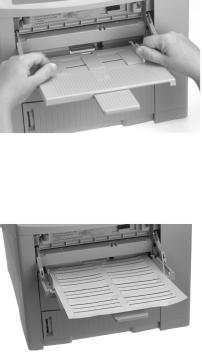
To use the top paper exit:
1Lift out the paper catcher and pull it toward the front of the printer until it stops.
User’s Guide | E-11
2 Flip up the extender. |
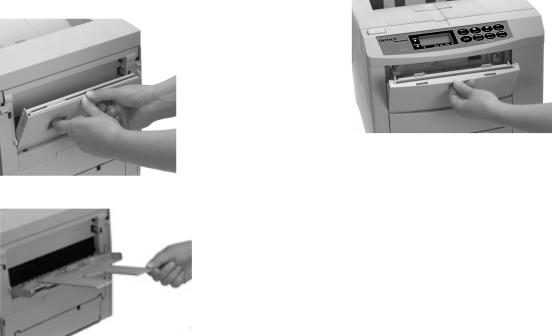
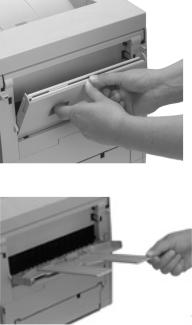
To use rear paper exit: |
|
|
! |
Caution: Do not extend the rear exit tray while |
|
printing: a paper jam may occur. |
|
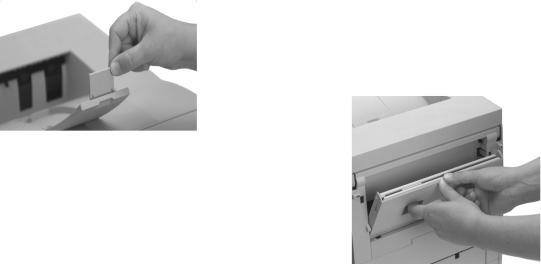
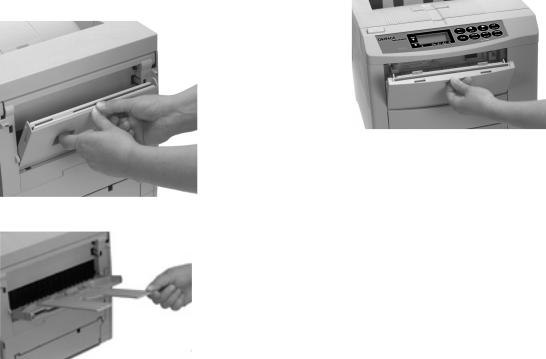
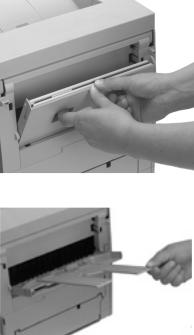
1 Pull the tray down.
Rear Paper Exit
Use rear exit when printing on heavy paper, envelopes, labels, and transparencies.
∙Printed pages feed face up into the rear tray.
∙The tray holds a maximum of 100 sheets of 20 lb. paper or 10 envelopes.
∙Pages stack in reverse order.
∙To avoid paper jams, remove paper when rear exit tray is full.
E-12 |OKIPAGE 18/24DX
2 Pivot out the extenders.
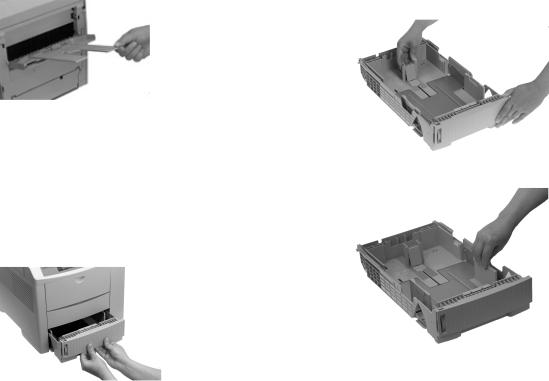
2Adjust the rear and side paper guides before loading paper. This will help to avoid paper jams.
Paper Tray
Load the Paper Tray
1 Pull out the paper tray.
User’s Guide | E-13
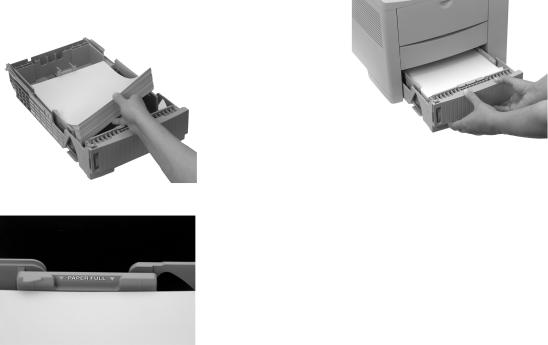
3 Fan a stack of paper (up to 530 sheets of 20-lb. paper) and |
4 Push the tray into the printer until it locks. |
place it in the tray under the tabs. |
|
Do not fill above the PAPER FULL marks. |
|
E-14 |OKIPAGE 18/24DX
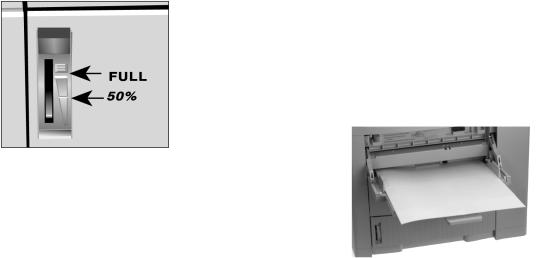
The Paper Tray Gauge
The paper tray gauge indicates the amount of paper left in the tray. This eliminates having to open the tray to check how much paper remains.
Front Feeder
General Information
Use the front feeder to print on special media without having to change the paper you have loaded in the tray(s). You can print up to 100 pieces of media or you can use the front feeder as a manual feed unit to print individual pieces of media “on-the-fly.”
For media other than standard paper, you must use the rear paper exit. This eliminates curling, and for labels, it eliminates peeling.
User’s Guide | E-15
You can use the front feeder to print on the following media:
∙Standard weight paper that is different from the paper loaded in the paper tray: e.g., letterhead, different size
-Up to 100 sheets
-16 to 28 lb.
-Letter, 13" & 14" Legal, Executive, A4, A5, B5, C5 (minimum 3.4" x 2.8"; maximum 8.5" x 14")
-Use either top or rear paper exit path
∙Envelopes
-Up to 10 envelopes
-16 to 28 lb.
-Com 10, Com 9, Monarch, DL, C4, C5
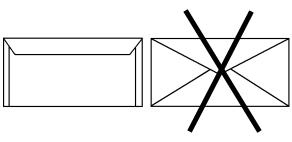
-Use envelopes that have seams that run down the sides and squared-off flaps: envelopes with v-type flap are not recommended.
-Use envelopes with a smooth, even surface that are designed for laser printers: no metal clasps, snaps, windows, or self-adhesive flaps
-Use rear paper exit only
∙Labels
!Important: Carrier sheet and label adhesive must withstand the fusing process heat of 392° F (200°C) for 1 second. Label adhesive must not be exposed; if
it is, it will cause jamming in the printer.
-Up to 100 sheets
-Letter or A4
-Use label sheets designed for laser printers
-Labels must cover the entire carrier sheet.
-Use rear paper exit only
∙Transparencies (up to 100 sheets)
!Important: Transparencies must withstand the fusing process heat of 392° F (200°C) for 1 second without wrinkling or gumming up.
-Letter or A4
-Use transparencies designed for laser printers
-Use rear paper exit only
E-16 |OKIPAGE 18/24DX
∙Heavy weight paper such as index or card stock
-Up to 100 sheets
-Up to 36-lb.
-Letter, 13" & 14" Legal, Executive, A4, A5, B5, C5 (minimum 3.4" x 2.8"; maximum 14")
-Use rear paper exit only
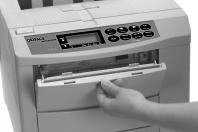
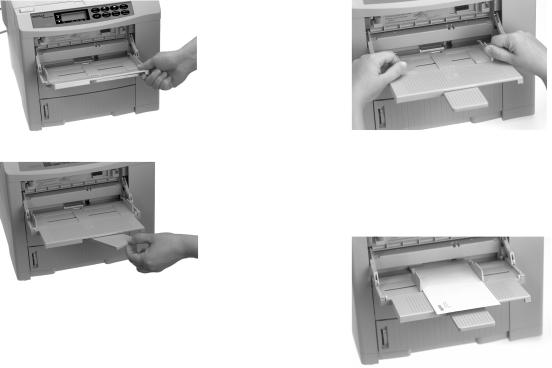
2 Lower the printer’s front feeder.
Loading Multiple Media Pieces
Using the Front Feeder to Print Multiple Pieces of Media
To set up the printer for multiple-piece print jobs using the front feeder:
1In your software program:
a.Enter the printer setup menu.
b.Select front feeder.
c.Select the media type, size and orientation.
User’s Guide | E-17

3 Flip out the tray, then pivot out the extender.
4Enter the Level-1 menu and make changes:
a.Press the ON LINE button (printer goes off line).
b.Press MENU 1/Menu 2 until TRAY SELECT displays.
c.Press ENTER.
d.Make sure that MANUAL FEED is set to OFF (the factory default), then press ENTER.
e.Press MENU 1/Menu 2 (display reads PAPER FEED).
f.Press ©/Reset until the display reads FRONT TRAY, then press ENTER to engage the setting (an asterisk appears next to FRONT TRAY).
g.Press ON LINE to return the printer to on-line status.
!When you are done printing using the Front Feeder, reenter the Level-1 menu and change the PAPER FEED
setting back to its former setting (normally TRAY 1).
E-18 |OKIPAGE 18/24DX
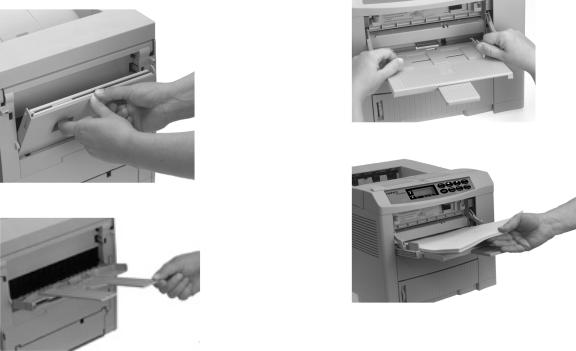
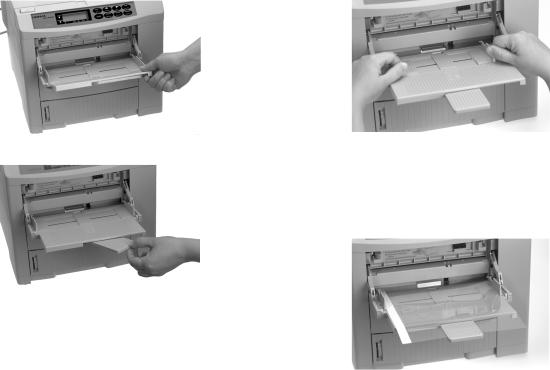
5 Open the rear paper exit path (not required for standard |
6 Adjust the front feeder paper width guides for the media |
weight paper). |
you are using and load the print media. |
! |
Insert letterhead paper face-up, with the top edge of |
the paper pointed into the printer. |
User’s Guide | E-19

7 Send the print job. |
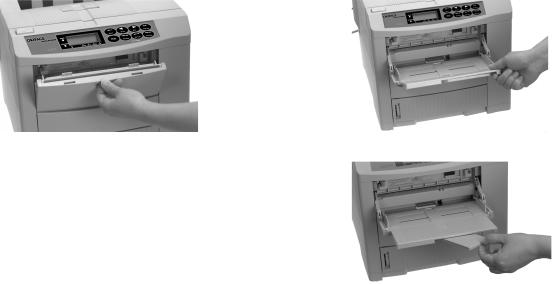
2 Lower the printer’s Manual Feeder. |
!The software application will override the printer menu settings.
Loading Single Sheets (Manual Feed)
You can open up the Front Feeder and use it as a manual feeder to print an individual piece of standard paper, an envelope, or specialty print media, without having to change any of the menu settings.
Manual Feed: Standard Paper
Setting up Manual Feed for Standard Weight Paper
1In your software program:
a.Enter the printer setup menu.
b.Select Manual Feed.
c.Select the paper size and orientation.
E-20 |OKIPAGE 18/24DX
3 Flip out the tray, then pivot out the extender. |
4 Adjust the paper width guides. |
User’s Guide | E-21
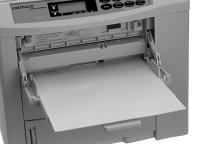
5 Load a sheet of paper. |
Manual Feed: Envelopes |
!
!
Use rear paper exit to avoid curling
Do not use v-flap type envelopes (see “General Information”)
To print an envelope:
1 In your software program:
a. Enter the printer setup menu. b. Select Manual Feed.
c. Select the envelope size.
d. Select landscape orientation.
!Insert letterhead paper face-up, top edge of paper in first.
6Send the print command from your software.
7When prompted by the printer’s display, press the FORM FEED button on the printer
control panel.
The page prints.
E-22 |OKIPAGE 18/24DX
2 Lower the rear paper exit tray and pull out the rear exit |
3 Lower the front feeder. |
extender.
User’s Guide | E-23
4 Flip out the manual feed tray, then pivot out the extender. |
5 Adjust the paper width guides. |
6 Insert the envelope with return address on lower left side and flap underneath.
E-24 |OKIPAGE 18/24DX
7 Send the print command from your software. |
2 Lower the rear paper exit tray and pull out the rear exit |
|
extender. |
8When prompted by the printer’s display, press the FORM FEED button on the printer
control panel.
The printed envelope will exit at the rear.
Manual Feed: Labels
!Sheet and label adhesive must withstand the fusing process heat of 392°F (200°C) for 1 second.
Label adhesive must not be exposed; if it is, it will cause jamming in the printer.
∙Labels must cover the entire carrier sheet.
∙Use rear paper exit to avoid peeling.
To print labels:
1In your software program:
a.Enter the printer setup menu.
b.Select Manual Feed.
c.Select the label sheet size.
User’s Guide | E-25
3 Lower the front feeder. |
4 Flip out the tray, then pivot out the extender. |
E-26 |OKIPAGE 18/24DX
5 Adjust the paper width guides.
6 Insert the label sheet face up.
7Send the print command from your software.
8When prompted by the printer’s display, press the FORM FEED button on the printer
control panel.
The printed label sheet will exit at the rear.
Manual Feed: Transparencies
!Transparency must withstand the fusing process heat of 392°F (200°C) for 1 second without wrinkling or
gumming up.
∙Use transparencies designed for laser printers.
∙Use rear paper exit to avoid curling.
To print a transparency:
1In your software program:
a.Enter the printer setup menu.
b.Select Manual Feed.
c.Select the transparency size.
User’s Guide | E-27
2 Lower the rear paper exit tray and pull out the rear exit |
3 Lower the Front Feeder. |
extender.
E-28 |OKIPAGE 18/24DX
4 Flip out the tray, then pivot out the extender. |
5 Adjust the paper width guides. |
6 Insert the transparency with the side to be printed facing up.
User’s Guide | E-29
7 Send the print command from your software. |
2 Lower the rear paper exit tray and pull out the rear exit |
|
extender. |
8When prompted by the printer’s display, press the FORM FEED button on the printer
control panel.
The printed transparency will exit at the rear.
Manual Feed: Heavy (Card) Stock
Heavy (Card) Stock Specifications
∙Weight range : 28 - 36 lb.
∙Use rear paper exit to avoid curling
!To maximize print quality, see Adjusting Print Quality for the proper printer menu settings.
To print heavy stock:
1In your software program:
a.Enter the printer setup menu.
b.Select Manual Feed.
c.Select the media size.
E-30 |OKIPAGE 18/24DX
 Loading...