


 Loading...
English
Setup Guide

English
Every effort has been made to ensure that the information in this document is complete, accurate, and up-to-date. The manufacturer of this equipment assumes no responsibility for the results of errors beyond its control. The manufacturer of this equipment also cannot guarantee that changes in software and equipment made by other manufacturers and referred to in this guide will not affect the applicability of the information in it.
Mention of software products manufactured by other companies does not necessarily constitute endorsement by the manufacturer of this equipment.
While all reasonable efforts have been made to make this document as accurate and helpful as possible, we make no warranty of any kind, expressed or implied, as to the accuracy or completeness of the information contained herein.
Copyright 2002 by Oki. All rights reserved.
Written and produced by Oki Europe Ltd.
OKI and OKIOFFICE are registered trademarks of Oki Electric Industry Company, Ltd.
Energy Star is a trademark of the United States Environmental Protection Agency.
This product complies with the requirements of the Council Directives 89/336/EEC (EMC), 73/23/EEC (LVD) and 1999/5/EC (R&TTE), as amended where applicable, on the approximation of the laws of the member states relating to Electromagnetic Compatibility, Low Voltage and Radio & Telecommunications Terminal Equipment.
Energy Star
As an Energy Star Program Participant, the manufacturer has determined that this product meets the Energy Star guidelines for energy efficiency.
ii |
Setup Guide |
English
Contents
Safety . . . . . . . . . . . . . . . . . . . . . . . . . . . . . . . . . . . . . . . v
General . . . . . . . . . . . . . . . . . . . . . . . . . . . . . . . . . . . v
Installation Hints . . . . . . . . . . . . . . . . . . . . . . . . . . . . v
Operation & Maintenance . . . . . . . . . . . . . . . . . . . . .vi
Notes, cautions and warnings . . . . . . . . . . . . . . . . . vii
Introduction . . . . . . . . . . . . . . . . . . . . . . . . . . . . . . . . . . 1
Unpacking . . . . . . . . . . . . . . . . . . . . . . . . . . . . . . . . . . . 2
Removing the equipment from the box. . . . . . . . . . . 2
Checking the box contents . . . . . . . . . . . . . . . . . . . . 3
What the parts are called . . . . . . . . . . . . . . . . . . . . . . . . 5
Fitting the Control Panel Sheet . . . . . . . . . . . . . . . . . 5
Identifying the parts . . . . . . . . . . . . . . . . . . . . . . . . . 5
Control Panel overview . . . . . . . . . . . . . . . . . . . . . . . 8
Setting up . . . . . . . . . . . . . . . . . . . . . . . . . . . . . . . . . . . 13
Choosing the installation location . . . . . . . . . . . . . . 13
Checking the power supply . . . . . . . . . . . . . . . . . . . 13
Unlocking the mirror carriage . . . . . . . . . . . . . . . . . 14
Installing consumables . . . . . . . . . . . . . . . . . . . . . . 15
Attaching the tray . . . . . . . . . . . . . . . . . . . . . . . . . . 19
Connecting and powering up. . . . . . . . . . . . . . . . . . 19
Loading paper (A4 size) . . . . . . . . . . . . . . . . . . . . . 20
How to use the keys . . . . . . . . . . . . . . . . . . . . . . . . 23
Entering characters . . . . . . . . . . . . . . . . . . . . . . . 23
Deleting characters . . . . . . . . . . . . . . . . . . . . . . . 24
Instruction format . . . . . . . . . . . . . . . . . . . . . . . . 24
EasyStart (Initial settings) . . . . . . . . . . . . . . . . . . . . 24
Getting started . . . . . . . . . . . . . . . . . . . . . . . . . . 24
Clearing stored settings . . . . . . . . . . . . . . . . . . . 25
Entering initial settings. . . . . . . . . . . . . . . . . . . . 25
Turning off Transport Mode . . . . . . . . . . . . . . . . . . 27
Getting started . . . . . . . . . . . . . . . . . . . . . . . . . . . . . . . 29
Changing modes . . . . . . . . . . . . . . . . . . . . . . . . . . . 29
Sending faxes . . . . . . . . . . . . . . . . . . . . . . . . . . . . . 29
Using the ADF . . . . . . . . . . . . . . . . . . . . . . . . . . 30
Using the FBS. . . . . . . . . . . . . . . . . . . . . . . . . . . 31
Receiving faxes . . . . . . . . . . . . . . . . . . . . . . . . . . . . 33
Answering calls manually . . . . . . . . . . . . . . . . . 33
Selecting reception mode . . . . . . . . . . . . . . . . . . 33
OKIOFFICE 1200/1600 |
iii |
English
Making copies. . . . . . . . . . . . . . . . . . . . . . . . . . . . . .36 Making a single copy. . . . . . . . . . . . . . . . . . . . . .36 Stacking multiple copies . . . . . . . . . . . . . . . . . . .36 Sorting multiple copies (using the ADF). . . . . . .37 Making enlarged or reduced copies . . . . . . . . . . .38 Making copy settings . . . . . . . . . . . . . . . . . . . . . .39
Clearing paper jams. . . . . . . . . . . . . . . . . . . . . . . . . . . .41 Original document jams . . . . . . . . . . . . . . . . . . . . . .41 Printout jams. . . . . . . . . . . . . . . . . . . . . . . . . . . . . . .43
iv |
Setup Guide |
English
Safety
Your machine has been carefully designed to give you years of safe, reliable performance. As with all electrical equipment, however, there are a few basic precautions you should take to avoid hurting yourself or damaging the machine.
General
•Read this setup guide carefully and keep it in a safe but accessible place so that you can use it for future reference.
•Read and follow all warning and instruction labels on the machine itself.
•Disconnect the machine before you clean it. DO NOT use liquid or aerosol cleaners to clean the machine.
•Place your machine on a firm, solid surface. If you place the machine on something unsteady, it may fall and become damaged or injure someone. If you place the machine on a soft surface, such as a rug, sofa, or bed, the vents may become blocked causing the machine to overheat.
•Do not use your machine near water, or spill liquid of any kind into it.
Installation Hints
•Install your machine in a dust-free location away from direct sunlight.
•Do not connect your machine to a power source that is used by other equipment producing electrical noise (e.g. air conditioners).
•Leave electronic adjustments to authorized service personnel.
•The LINE terminal connects your machine to a standard telephone line. To avoid damage to your telephone system or to the machine, do not connect your machine into anything other than a standard telephone socket.
•Your machine has an earthed plug as a safety feature and it will only connect to an earthed outlet. If you cannot connect this plug to your power outlet, then it is possible that you have an older, non-earthed outlet. Contact an electrician to have your power outlet replaced. Do not use an adapter to defeat the earthing.
•The electrical power outlet should be located near the machine and should be easily accessible.
OKIOFFICE 1200/1600 |
v |
English
•The two TEL ports on the back of the machine are only suitable for 2 wire devices. Not all standard telephones will respond to incoming ringing when connected to an extension socket.
•This machine may not necessarily provide an effective hand-over of a call from a telephone connected to the same line.
•The operation of this machine on the same line as a telephone or other equipment with audible warning devices or automatic ring detectors will give rise to bell tinkle or noise and may cause false tripping of the ring detector. Should such problems occur, the user is not to contact the telephone company.
Operation & Maintenance
•Use a dry cloth to clean the control panel and the main body of the unit.
•Aside from the instructions specifically mentioned in this setup guide, your machine is not user serviceable. DO NOT attempt to service the machine or lubricate moving parts by yourself.
•Disconnect the power cable before trying to remove any objects that may have fallen into the machine.
•Immediately disconnect the machine if it becomes physically damaged and arrange for its repair or disposal.
•When relocating your machine, always disconnect the telephone line before disconnecting the power cable. When reconnecting your machine, connect the power cable first, then the telephone line.
•This machine is not intended to be used in parallel with any other telephone devices.
vi |
Setup Guide |

English
Notes, cautions and warnings
Note:
A note appears in this manual like this. A note provides additional information to supplement the main text which may help you to use and understand the product.
Caution:
A caution appears in this manual like this. A caution provides additional information which, if ignored, may result in equipment malfunction or damage.
WARNING:
A WARNING APPEARS IN THIS MANUAL LIKE THIS. A WARNING PROVIDES ADDITIONAL INFORMATION WHICH, IF IGNORED, MAY RESULT IN A RISK OF PERSONAL INJURY.
OKIOFFICE 1200/1600 |
vii |
English
viii |
Setup Guide |
English
Introduction
This document explains how to carry out the following operations in respect of the OKIOFFICE 1200/1600 Plain-paper Digital Copier/Fax/ Printer:
•Unpacking
•Getting to know the main parts
•Setting up
•Getting started
•Clearing paper jams
OKIOFFICE 1200/1600 |
1 |

English
Unpacking
Ensure that you have sufficient space to accommodate the items you unpack from the box.
Removing the equipment from the box
1Remove the fastening bands from the box.
2Open the box and remove all the items and packaging until only the OKIOFFICE 1200/1600 and its base packaging remains.
3Pull the release tabs on the handle insert in each side of the box, pull out the handle inserts and allow the lower flaps (which had been retained by the handle inserts) to drop.
4Lift the box sides away from the base, leaving the OKIOFFICE 1200/ 1600 and its base packaging exposed in the base.
WARNING:
THE OKIOFFICE 1200/1600 WEIGHS 33KG. DO NOT ATTEMPT TO LIFT IT WITHOUT ASSISTANCE.
5Remove the OKIOFFICE 1200/1600 from its packaging and place it in a position where you have easy access to it.
6Retain the box and packaging for possible future reshipment.
2 |
Setup Guide |
English
Checking the box contents
Check that you have unpacked all of the following items:
1
2
8 |
|
3 |
|
|
|
7 |
5 |
4 |
|
||
|
6 |
|
1Main unit with 500-sheet paper cassette installed
2Drum cartridge
3Toner cartridge
4Extension paper tray
5Telephone line cord
6AC power cord
7Operating Instructions (on CD)
8Setup Guide
9Labels and stickers (not illustrated)
– Control Panel Sheet
OKIOFFICE 1200/1600 |
3 |
English
–Paper size stickers
–One-touch labels
–Soft Key labels
4 |
Setup Guide |

English
What the parts are called
Fitting the Control Panel Sheet
Remove the blank Control Panel Sheet from the Control Panel (1) and fit the supplied Control Panel Sheet.
1
Identifying the parts
In this section, the names for the different parts of your machine are introduced and a brief description of each part is provided.
18 |
3 |
4 |
5 |
|
|
||
|
2 |
|
6 |
|
|
|
7 |
|
|
|
8 |
|
1 |
|
9 |
|
|
|
|
|
|
|
10 |
|
17 |
|
11 |
|
|
12 |
|
|
|
|
|
|
16 |
15 |
13 |
|
14 |
||
|
|
|
1Control Panel — The keys you use to operate your machine. (See Control Panel overview for more details.)
OKIOFFICE 1200/1600 |
5 |
English
2ADF (Automatic Document Feeder) — The ADF automatically feeds original documents into the machine, one at a time. It can hold up to 50 pages.
3Scanner cover — Open this cover to remove original document jams.
4Document guides — Adjust these to fit the width of the original document so it will feed properly into the machine.
5Document tray — Holds original documents placed for scanning into the machine.
6Platen cover — Opens to scan an original document using the FBS (Flatbed Scanner) glass.
7Original document exit — Where your original document comes out after being scanned.
8Top cover — Opens to provide access for changing the toner and drum cartridge (or, occasionally, clearing printout jams).
9AC power switch — Turns your fax machine on and off.
10AC power jack — Where you plug in the AC power cord.
11Bypass tray — Open and use the bypass tray for paper that cannot be used in the paper cassette. It can hold up to 50 sheets of paper.
12Side cover — Open to fix a printout jam.
13Side cover release — Pull this to open the side cover.
14Top cover release — Pull up on this to open the top cover.
15Recording paper size sticker — Shows the size of the paper that is set in the paper cassette.
16Recording paper level indicator — Shows the level of the current paper supply without requiring you to open the paper cassette.
17Paper cassette — Load paper here. It can hold up to 500 sheets.
6 |
Setup Guide |

English
18 FBS (Flatbed Scanner) glass — Makes it possible for you to fax or copy objects and even irregularly shaped sheets, just as in a conventional copier.
26
25
24
23
LINE PHONE2 PHONE1 |
22 |
|
19 20 21
19 LINE jack — Where you plug in the telephone line cord. The other end of the cord plugs into a wall telephone jack.
20 PHONE2 jack — If you connect a second telephone to your machine, this is where you plug in the cord.
21 PHONE1 jack — Where you plug in the optional handset.
22RS-232C interface port (optional) — Where you plug in the RS-232C cable when you use the optional RS-232C interface kit.
23PRINTER PARALLEL port (optional) — Where you plug in the printer cable when you use the optional printer controller.
24Extension paper tray — Supports the printout after it emerges.
25Printed document exit — Where the printout emerges.
26Handset (optional) — Used for voice communication.
OKIOFFICE 1200/1600 |
7 |
English
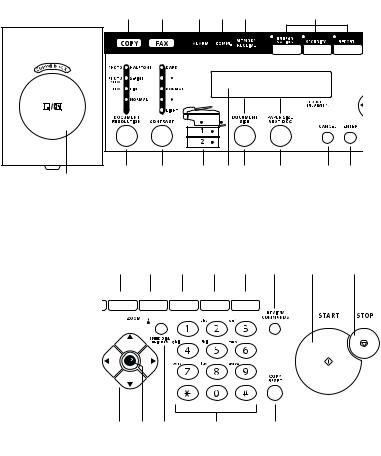
Control Panel overview
Note:
Not all of these controls will be required in this Setup Guide.
1 |
2 |
3 |
4 |
5 |
|
6 |
|
27 |
26 |
25 |
24 |
23 |
22 |
21 |
20 |
28
7 |
|
|
|
|
8 |
9 |
10 |
11 |
12 |
13 |
14 |
||
|
|
|
|
|
|
|
|
|
|
|
|
|
|
|
|
|
|
|
|
|
|
|
|
|
|
|
|
|
|
|
|
|
|
|
|
|
|
|
|
|
|
|
|
|
|
|
|
|
|
|
|
|
|
|
|
|
|
|
|
|
|
|
|
|
|
|
|
|
|
|
|
|
|
|
|
|
|
|
|
|
|
|
|
0 |
19 |
18 |
17 |
16 |
15 |
1COPY light — Glows when the machine is in the Copy mode.
2FAX light — Glows when the machine is in the Fax mode.
3ALARM light — Glows when a problem occurs during fax communication, printing or scanning. The light stays on until the machine prints a Check Message report.
8 |
Setup Guide |
English
4COMM. light — Glows when the machine is communicating with another machine.
5MEMORY RECEIVE light — Glows when the machine is receiving an incoming fax document into its electronic memory.
6Soft Keys — Shortcut keys. Any function that can be turned on or off can be programmed into these three keys. If the light above one of these keys glows, this indicates the setting that has been programmed into it is turned on. These keys are programmed at the factory to turn the following functions on or off:
a)Soft Key 1: ENERGY SAVING — Press to turn the energy saving mode on or off.
b)Soft Key 2: SECURITY — Press to turn the security reception on or off.
c)Soft Key 3: REPORT — Press to turn the confirmation report on or off for the next fax transmission.
7REDIAL/PAUSE — Redials the last number you dialled. In certain operations, it also produces a special pause character which can be useful when dialling long-distance numbers.
8DIALLING OPTIONS — Press this to insert special symbols into telephone numbers.
9BROADCAST — Press to send a broadcast fax (sending the same document to more than one location).
10GROUP — Press this to set up a fax transmission to a call group, a set of fax numbers which will receive the same document in one fax operation.
11ADVANCED FUNCTIONS —
In Fax mode: Chooses from the following fax options – Delayed transmission, Polling, F-Code transmission, F-Code polling and Batch transmission.
In Copy mode: Chooses from the following copy options – Nega/Posi copy, Combine copy (only for OKIOFFICE1600) or Ultra copy (only for OKIOFFICE1600).
12REVIEW COMMANDS — Press to review pending fax commands or to view a brief description of delayed commands.
OKIOFFICE 1200/1600 |
9 |
Loading...