


OKIFAX 2510
Table of contents
 Loading...
OF2510
OO2530
User’s Guide

OKIFAX 2510 / OKIOFFICE 2530
Dear customer
Dear customer
For your security and comfort, we urge you to carefully read the safety booklet before any use.
By buying this multifunction machine, you have opted for a quality pr od u ct. You r devic e sa tisfie s th e diff er en t
specifications of a modern office automation tool.
This machine allows you to scan and fax in color and black and white, to print and copy in black and white. You can
connect the OKIOFFICE 2530 multifunction device to your PC (Microsoft Windows 98SE/ME/2000/XP/Vista).
Install the software included to use the OKIOFFICE 2530 multifunction device as a prin ter. Besides, you can scan, edit
and save documents through the PC.
Thanks to its navigator and its multitask access, it is powerful, user-friendly and easy to use.
The OKIFAX 2510 / OKIOFFICE 2530 multifunction machine hereby described, comes with a 600 dpi scanner and a
black and white laser printer offering a printing speed of 16 ppm. The Com panion Suite Pro LL software provided allows
you to use your OKIOFFICE 2530 multifunction machine like a scanner an d a printer from a personal co mputer. It also
gives you the possibility to manage your multifunction machine.
Consumables
Refer to the maintenance section of this booklet.

OKIFAX 2510 / OKIOFFICE 2530
- I -
Contents
Contents
Dear customer I
Consumables I
Preface 1
Declaration of confomity 1
Notice to Users in EU Countries 1
Environmental Information 2
Software use license 3
Definition 3
License 3
Property 3
Duration 3
Warranty 3
Responsibility 3
Development 3
Applicable law 4
Registered trademarks 4
Prohibited reproductions 4
Installation 5
Location conditions 5
Cautions of use 5
Paper recommendations 6
Loading paper in the main unit tray 6
Handling of paper 6
Humidity control 6
Use of envelopes 6
EP Cartridge recommendations 6
Terminal description 7
Command panel 8
Accessing terminal menus 9
Packaging contents 10
Device installation 10
Installing the document feeder 10
Feed cassette paper insertion 10
Cartridge installation 11
Paper delivery stop 11
Starting your device 12
Device connection 12
Paper insertion in the manual input tray 12
Copy 13
Simple copy 13
ECO mode copy 13
Sophisticated copy 13
Special setup for the copy 13
Resolution setup 14
Zoom setup 14
Assembled copy setup 14
Analysis origin setup 14
Contrast setup 14
Brightness setup 14
Paper type setup 14
Paper tray selection 15
Sheet-feed analysis margins setup 15
Left and right printing margins setup 15
Top and bottom printing margins setup 15
Format paper setup 15
Fax 16
Fax transmission 16
Immediate transmission 16
Delayed transmission 16
Transmission with auto redial 16
Fax reception 16
Relay broadcast 17
Fax answering machine 17
Saving an access code 17
Activating / Deactivating the answering
machine 17
Printing fax messages stored in the memory 17
Fax rerouting 18
Activating rerouting 18
Setting the re-direction contact 18
Printing rerouted documents 18
Rerouting fax messages to a USB memory
key (model OKIOFFICE 2530) 18
Activating rerouting 18
Printing rerouted documents 18
Transmission waiting queue 18
Performing immediate transmission
from the waiting queue 19
Consulting or modifying the waiting queue 19
Deleting a transmission on hold 19
Printing a document in waiting or in deposit 19
Printing the waiting queue 19
Cancelling a transmission in progress 19
MailBoxes (MBX Fax) 19
Creating an MBX 19
Modifying the features of a MBX 20
Printing the contents of a MBX 20
Deleting a MBX 20
Printing the MBX list 20
MBX deposit in your fax 20
MBX deposit in a remote fax 20
MBX polling from a remote fax 20
Deposit and Polling 20
Placing a document in deposit 21
Polling a deposited document 21
SMS 22
SMS Parameters 22
Presentation of the sender 22
SMS Center transmission number 22
Sending an SMS 22
Parameters/Setup 23
Date/Time 23
Your fax number/Your name 23
Type of network 23
Geographical settings 23
Country 23
Network 23
Language 24
Local prefix 24
Prefix 24
Transmission report 24
Document feed type 24
Economy period 25
Reception Mode 25
Reception without paper 25
Number of copies 25
Fax or PC reception (Model OKIOFFICE 2530) 26
Received faxes reduction mode 26
Technical Parameters 26
Printing the functions guide 27
Printing the logs 27
Print the list of setups 27
Lock the machine 28
Lock the keyboard 28
Lock the numbers 28

OKIFAX 2510 / OKIOFFICE 2530
- II -
Contents
Lock the SMS service 28
Read the counters 28
Sent pages counter 28
Received pages counter 28
Scanned pages counter 28
Printed pages counter 29
Display the consumables status 29
Calibrate your scanner 29
Directory 30
Creating subscribers record 30
Creating subscribers list 30
Modifying a record 30
Deleting a record or a list 30
Printing the directory 30
USB memory key
(Model OKIOFFICE 2530) 31
Use of the USB memory key 31
Print your documents 31
Print the list of files located in the key 31
Print the files located in the key 31
Delete your files located in the key 32
Analyse the USB memory key content 32
Save a document on a USB memory key 32
Activate/deactivate file automatic deletion
on a USB memory key 33
PC Features (Model OKIOFFICE 2530) 34
Introduction 34
Configuration requirements 34
Installation 34
Install the software on your PC 34
Connections 36
USB Connection 36
Uninstall the software from your PC 36
Multifunction Terminal's Supervision 37
Checking the connection between the PC
and the multifunction machine 37
Companion Director 37
Graphical presentation 37
Utilities and applications activation 38
MF Monitor 38
Graphical presentation 38
Display the consumable status 38
Scan To 38
Companion Suite Pro LL functionalities 39
Document analysis 39
Analysis with Scan To 39
Analysis from a TWAIN compatible software 39
Character recognition software (OCR) 39
Printing 39
Printing with the multifunction machine 39
Address book 40
Add a contact to the terminal address book 40
Add a group to the terminal address book 40
Manage the address book 40
Modify the information related to a contact 41
Modify a group 41
Delete a contact or a group from
the address book 41
Print the address book 41
Import or export a directory 41
Import a directory 41
Save your address book 41
Fax communications 41
Presentation of the Fax window 41
Send a fax 42
Send a fax from the hard disk or the terminal 42
Send a fax from application 42
Receive a fax 43
Follow-up of fax communications 43
The outbox 43
The send memory (items sent) 43
The outbox log 43
The inbox log 43
Fax parameters 43
Access to fax parameters 43
Description of the tab Logs and Reports 44
Description of the tab Fax Parameters 44
Cover sheet 44
Creating a cover sheet 44
Description of the tab Cover page 45
Creating a cover page template 45
SMS Communication 47
Presentation of the SMS window 47
Send an SMS 47
Follow-up of SMS 48
The outbox 48
The outbox log 48
The sent item memory (items sent) 48
SMS Parameters 48
Access to SMS parameters 48
Description of the tab Logs and reports 48
Maintenance 49
Service 49
General information 49
Toner cartridge replacement 49
Issues with smart cards 49
Cleaning 50
Scanner reading system cleaning 50
Printer cleaning 50
Printer external cleaning 50
Printer issues 50
Error messages 50
Paper jam 51
Scanner issues 51
Miscellaneous issues 52
Communication errors 52
Transmission from the feeder 52
Transmission from memory 52
Communication error codes 52
General codes 52
Specifications 54
Physical specifications 54
Electrical specifications 54
Environmental specifications 54
Peripheral specifications 54
Consumable specifications 55

OKIFAX 2510 / OKIOFFICE 2530
- 1 -
1 - Preface - Environmental Information - Software use license
Preface
Every effort has been made to ensure that the information in this document is complete, accurate, and up-to-date. Oki
assumes no responsibility for the results of errors beyond its control. Oki also cannot guarantee that changes in
software and equipment made by other manufacturers and referred to in this guide will not affect the applicability of the
information in it. Mention of software products m an uf ac tu red by othe r co mp a nie s do es not nece ss ar ily cons tit ut e
endorsement by Oki.
While all reasonable efforts have been made to make this document as accurate and helpful as possible, we make no
warranty of any kind, expressed or implied, as to the accuracy or completeness of the information contained herein.
The most up-to-date drivers and manuals are available from the Oki web site:
http://www.okiprintingsolutions.com
Copyright © 2007 Oki Europe Ltd.
Oki and Microline are registered trademarks of Oki Electric Industry Company, Ltd.
ENERGY STAR is a trademark of the United States Environmental Protection Agency.
Microsoft, MS-DOS and Windows are regist ered trademarks of Microsoft Corporation.
Other product names and brand names are registered trademarks or tradema rks of their proprietors.
As an ENERGY STAR Program Participant, the manufacturer has determined that
this product meets the ENERGY STAR guidelines for energy efficiency.
Declaration of confomity
Notice to Users in EU Countries
This product complies with the requirements of the Council Directives 2004/108/EC
(EMC), 2006/95/EC (LVD)and 1999/5/EC (R&TTE), as amended where applicable
on the approximation of the laws of the member states relating to Electromagnetic
Compatibility, Low Voltage and Radio & Telecommunications Terminal Equipment.
Repairs/maintenance: Repairs and maintenance should only be carried out by a
qualified technician. There are no user serviceable parts inside the machine. To
reduce the risk of electrical shock, you must not carry out these operations yourself.
Opening or removing the covers exposes you to two hazards:
- The laser beam can cause irreversible eye damage.
- Contact with electrical components can lead to electrical shock.
For installation conditions and safety precautions, refer to the separate Safety/
Installation Instructions booklet provided.
APPAREIL A RAYONNEMENT LASER DE CLASSE 1
CLASS 1 LASER PRODUCT
LASER KLASSE 1 PRODUKT
PRODUCTO LASER DE CLASE 1
APARECCHIO LASER DI CLASSE 1

OKIFAX 2510 / OKIOFFICE 2530
- 2 -
1 - Preface - Environmental Information - Software use license
Environmental Information

OKIFAX 2510 / OKIOFFICE 2530
- 3 -
1 - Preface - Environmental Information - Software use license
Software use license
CAREFULLY READ ALL THE TERMS AND CONDITIONS OF THE PRESENT LICENSE BEFORE OPENING THE
SEALED ENVELOPE CONTAINING THE SOFTWARE. OPENING THIS ENVELOPE INDICATES THAT YOU
ACCEPT THESE TERMS AND CONDITIONS.
In case you should not accept the terms of this license, the CD-ROM packaging should be returned to the retailer
unopened, along with the other components of the product. The purchase price of this product will be refunded. No
refunds will be made for products if the CD-ROM packaging have been opened, if components are missing or if the
reimbursement request is made after te n (1 0) days from the purchase date, your receipt is the proof of purchase.
Definition
The Software designates program s an d ass oc iated documentation.
License
- This license allows you to use this Software on personal computers on a local network. You only have permission to
use this Software to print on one multifunction machine; you can not lend the Software or authorize anyone to use it.
- You are allowed to make a back up copy.
- This license is non-exclusive and non-transferable.
Property
The manufacturer or its providers hold the Software property right. You only become the owner of the CD-ROM. You
shall not modify, adapt, decompile, translate, create any derived piece, rent or sell the Software or the documentation.
Any rights not explicitly approved are reserved by the manufacturer or its providers.
Duration
This license remains valid until cancelled. You can cancel it by destroying the program and the documentation as well
as any other copies of them. This license will automatically be canceled in case you do not respect the terms of this
license. If the license is rendered invalid, you agree to destroy all copies of the program and the associate
documentation.
Warranty
The Software is provided "as is" with no warranties what so ever, whether expressed or implied, including without
limitation, any warranties of merchantability or fitness for a particular purpose; all the risks concerning the results and
performance of this Software are assumed by the buyer. In case the program should appear defective, all the repair
and service expenses will be covered by the buyer.
Nevertheless, the license holder benefits from the following warranty: we guarantee that the CD-ROM on which the
Software is recorded is free from hardware or ma nufactur ing faults if used in no rmal conditions, the guarantee is valid
for ninety (90) days from the delivery date, the copy of the receipt being the proof of purchase. In case of a CD-ROM
fault that due to accident or misuse, the CD-ROM will not be replaced as per the warranty.
Responsibility
If the CD-ROM is not working properly, send it to the retailer together with a copy of the receipt. It is the retailer's sole
responsibility to replace the CD-ROM. Nobody, not even the manufacturer who is involved in the creation, realization,
merchantability and delivery of this program would be responsible for direct, indirect or immaterial damages, such as,
but not limited to, loss of information, loss of time, execution loss, loss of revenue, loss of customers, due to the use or
inability to use the program.
Development
With a constant concern for improvement, the manufacturer reserves the right to modify the Software specifications
without any notice. In case of modification, your user right does not give you access to free updates.

OKIFAX 2510 / OKIOFFICE 2530
- 4 -
1 - Preface - Environmental Information - Software use license
Applicable law
This license is under the French law. Any dispute following the interpretation or execution of this license will be
submitted to the Paris Court.
Given the continuous technology development, the manufacturer reserves the right to modify the technical
specifications indicated for this product, at any time, without prior notice, and/or to stop manufacturing of the product.
All the names of the products and brands that could be trademarks registered by their respective owners are
recognized in the present document.
Registered trademarks
Adobe® and the Adobe® products referred to here are registered trademarks of Adobe Systems Incorporated.
PaperPort11SE is a registered trademark of ScanSoft.
Microsoft® Windows® 98, Microsoft® Windows® Millennium®, Microsoft® Windows NT®, Microsoft® Windows
2000®, Microsoft® Windows XP®, Microsoft® Windows Vista® a nd any other Microsoft® product refer red to here are
registered trademarks of Microsoft Corporation registered and/or used in the United States and/or in other countries.
All the other brands or products referred to as examples or in order to give additional information are registered
trademarks of their respective owners.
The informations contents of this user manual are subject to change without notice.
Prohibited reproductions
Do not copy or print any item for which reproduction is prohibited by law.
Copying or printing the following items is generally prohibited by local law :
- bank notes;
- checks;
- bonds;
- stock certificates;
- bank drafts;
- passports;
- driver's licenses.
The preceding list is meant as a guide only and is not inclusive. If you have any questions concerning the legality of
copying or printing certain items, consult with your legal advisor.
OKIFAX 2510 / OKIOFFICE 2530
- 5 -
2 - Installation
Installation
Location conditions
By choosing an appropriate location, you preserve the longevity of the machine. Check that the selected location has
the following characteristics:
- Choose a well ventilated location.
- Make sure not to obstruct the ventilation grids located on the left and right sides of the device. During the
installation, make sure to place the machine thirty centimeters away from the surrounding objects so all the lids
can be easily opened.
- Make sure that this location does not present any ammonia nor any other organic gasses emission hazard.
- The ground outlet (refer to the security notices presented in th e Safety booklet) to wh ich you p lan to conne ct the
machine shall be located close to this one and have an easy access.
- Make sure that the machine is not directly exposed to sun light.
- Make sure not to place the machine in an area exposed to an air flow generated by an air con ditioning, heating or
ventilation system, nor in an area subject to big temperature or humidity jumps.
- Choose a solid and horizontal surface on which the machine will not be exposed to intense vibrations.
- Keep the machine away from any object that could obstruct its ventilation ports .
- Do not place the machine close to hangings or any other flammable objects.
- Choose a location where the water and other splashes of liquid are limited.
- Make sure that this location is dry, clean and dust free.
Cautions of use
Take into account the important precautions below when using the machine.
Running environment:
- Temperature: 10 °C to 32 °C with a maximum amplitude of 10 °C per hour.
- Humidity: 15 to 80 % of ambient humidity (without condensation), with a maximum amplitude of 20 % per hour.
Terminal:
The section below describes the precautions to be taken when using the machine:
- Never turn the machine off and never open the lids while printing.
- Never use gas or flammable liquids, or objects generating magnetic field close to the machine.
- When you unplug the power cord, always hold the connector without pulling the cord. A damaged cord presents
a potential fire hazard or an electric shock hazard.
- Never touch the power cord with wet hands. You risk getting an electric shock.
- Always unplug the power cord before moving the machine. Otherwise, you could risk having the cord da maged
and create a fire hazard or an electric shock hazard.
- Always unplug the power cord when you plan not to use the machine for a long period of time.
- Never put objects on the power cord, never pull it and never fold it. This could cause a fire hazard or an electric
shock hazard.
- Always make sure that the machine is not sitting on the power cord or any other electric device communication
cables. Make sure also that neither cord nor cable is introduced to the machine inner mechanism. This would
expose you to a machine malfunction risk or to a fire hazard.
- Make sure that the printer is unplugged from the power outlet before connecting or disconnecting an interface
cable to the printer (use a shielded interface cable).
- Never try to remove any fixed pane or hood. The machine contains high voltage circuits. Any contact with these
circuits can cause an electric shock risk.
Make sure to place the machine in well ventilated premises. When operating, the printer genera tes a
small amount of ozone. An unpleasant smell can come from the printer if it is used intensively in not
well ventilated premises. For a secure use, make sure you place the machine in well ventilated
premises.

OKIFAX 2510 / OKIOFFICE 2530
- 6 -
2 - Installation
- Never try to modify the machine. This could cause a fire hazard or an electric shock hazard.
- Always make sure that paper clips, staples or other small metallic items do not get inside the machine via the
ventilation ports or other ports. Such items create fire hazards or electric shock hazards.
- Prevent water and any other liquid from spilling on the machine or near to it. Any contact of the machine with water
or liquid can cause a fire hazard or an electric shock hazard.
- If liquid or metallic item gets accidentally inside the machine, turn it off immediately, unplug the power cord and
contact your retailer. Otherwise, you would face a fire hazard or an electric shock hazard.
- In case of heat, smoke, unusual smell or abnormal noise emissions, turn the machine o ff, unplug th e po wer cord
immediately and contact your retailer. Otherwise, you would face a fire hazard or an electric shock hazard.
- Avoid using the machine during an "electric storm", this can cause an electric shock hazard due to lightning.
- Never move the terminal during printing.
- Always lift the terminal when you wish to move it.
Paper recommendations
Loading paper in the main unit tray
- Insert paper with the face down, and adjust paper guides to the paper format to avoid feed failure, skewing, and
paper jams.
- Amount of loaded paper must not exceed the loading mark. If the loading mark is exceeded, this may cause feed
failure, skewing, and paper jams.
- Adding paper in the pile must be avoided because it may cause double feeding.
- When withdrawing the cassette from the main unit, always support it with both hands to avoid doing drop it.
- If you use paper already printed by your machine or another printer, the printing quality may not be optimal.
Handling of paper
- Curling must be corrected before printing. Curls must not exceed 10 mm.
- Care must be taken with storage to prevent feed faults and image defects due to leaving the paper in conditions
of high humidity.
Humidity control
- Paper which has become damp, or paper which has been left unused for a very long time.
- After opening the paper, it must be kept in a plastic bag.
- Paper with waved ends, paper which is creased, paper wi th cr um ples, an d an y other no n- nor ma l paper mu st no t
be used.
Use of envelopes
- Feeding can be done only through the manual feed.
- Recommended area should be the area which excludes 15 mm from the leading edge, 10 m m from and both the
left and right edges, and the rear edge.
- A few lines may be given in solid print at the part of being overlapped.
- Envelopes which are not recommended may lead to improper printing (refer to paragraph Peripheral
specifications, page 54).
- Curled envelope after printing should be fixed manually.
- Small crumples on the edge of the wide side of envelopes. Smearing, or less clear printing may appear on the
reverse side.
- Set envelope by pressing the folding line of four edges properly after releasing air inside. Set envelope in a proper
position after aligning in case it is bent or warped.
EP Cartridge recommendations
- Must not be stood on the side, or held upside down.
OKIFAX 2510 / OKIOFFICE 2530
- 7 -
2 - Installation
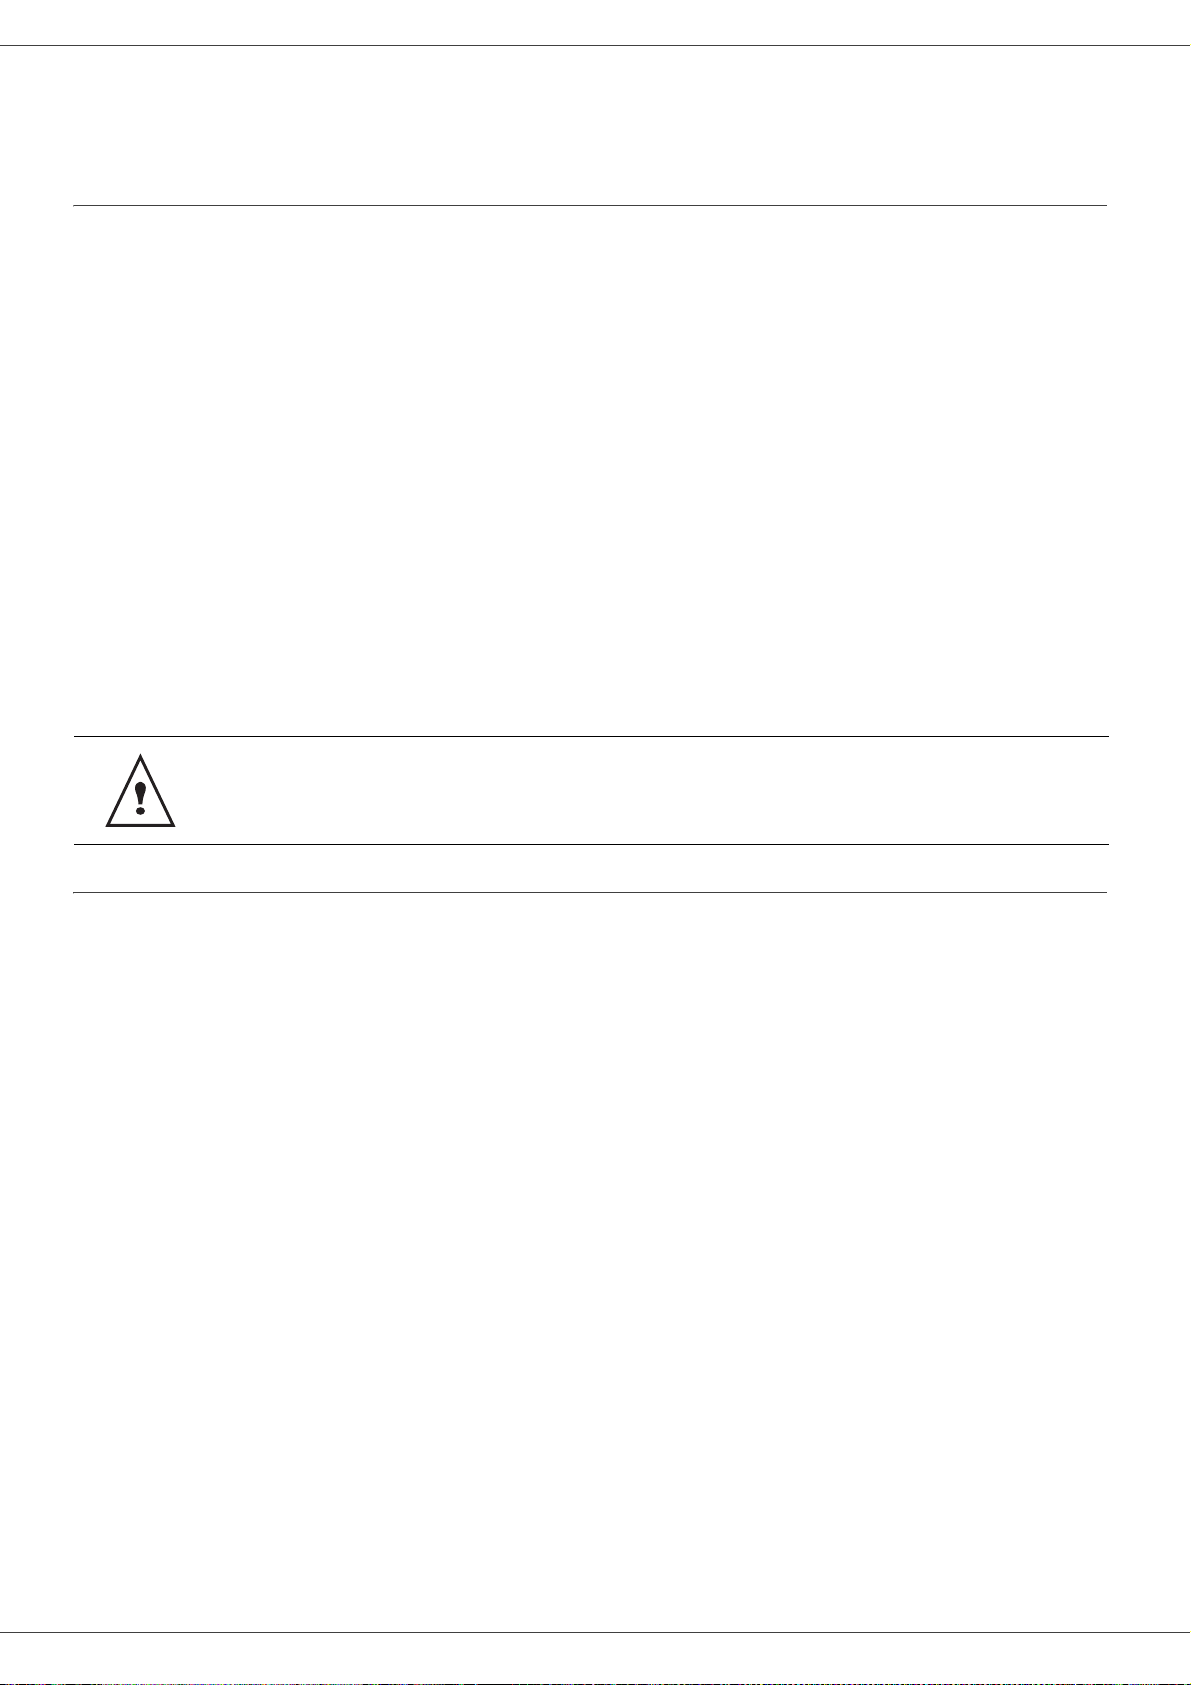
Terminal description
Front side
Back side
Document feeder
Commands panel
Paper output
Manual
Paper tray
Master USB
Cartridge access cover
Manual paper feed
setup guides
input tray
(USB key)
Smart card
insertion point
Fold-down stop
for paper
delivery
connection
(Model OKIOFFICE 2530)
Slave USB
connection (for PC)
On/Off switch
Power supply cord
connection
Paper jam cover
Additional telephone
cable socket
Master USB
connection (USB key)
(Model OKIOFFICE 2530)
(Model OKIOFFICE 2530)
Telephone cable
socket
OKIFAX 2510 / OKIOFFICE 2530
- 8 -
2 - Installation
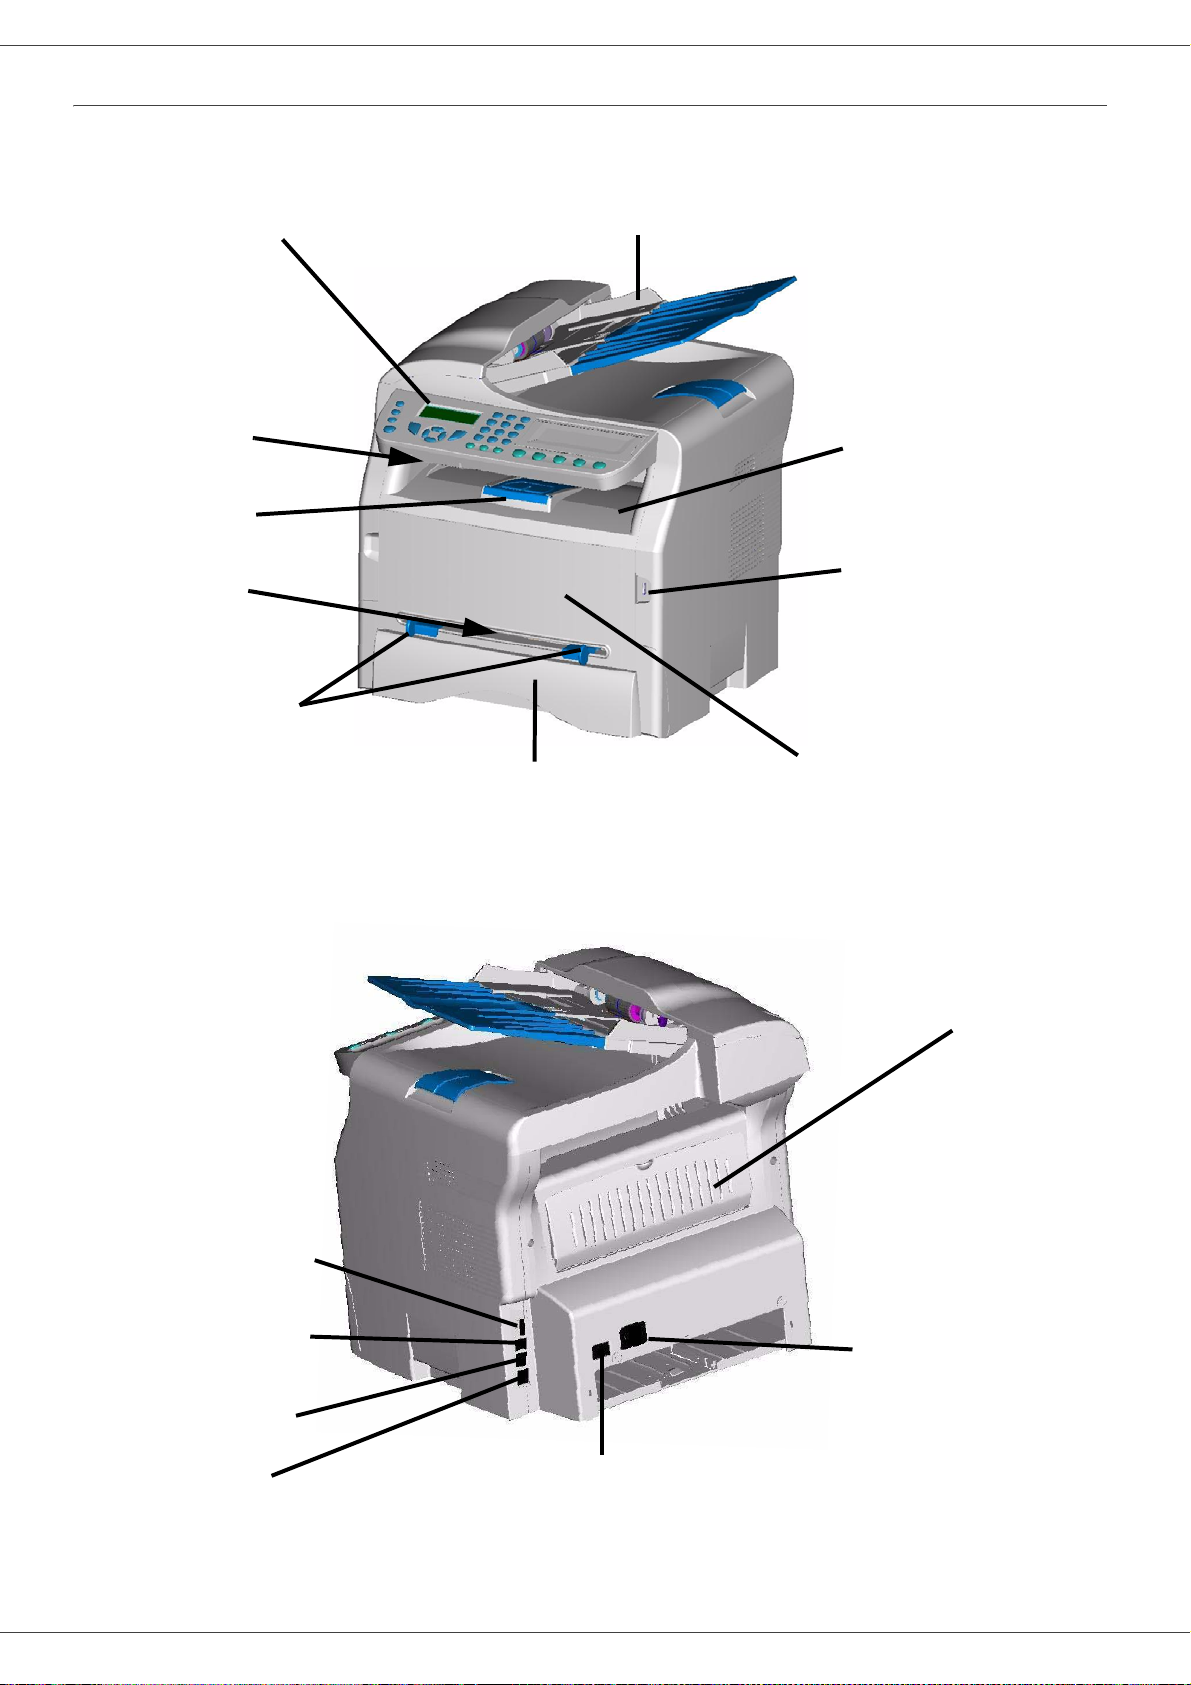
Command panel
OKIFAX 2510
C
O
P
Y
F
A
X
S
M
S
E
C
O
ABC
GHI
PQRS
WXYZ
TUV
JKL
MNO
DEF
1
2
891016171819202122
1315
14
3
23
25
26
4
5
6
7
33
32
3129
28
27
S
C
AN
F
A
X
C
O
P
Y
S
M
S
S
T
O
P
P
R
I
N
T
E
C
O
ABC
GHI
PQRS
WXYZ
TUV
JKL
MNO
DEF
12
3
4
5
6
7
11
1210
16171819202122
89
1315
14
24
25
26
33
32
31
30
29
28
27
OKIOFFICE 2530
1. Screen.
2. Digital keypad.
3. Alphabetical keypad.
4. Key
Í
: deletes the character to the left of the
cursor.
5. Key : input or line feed.
6. Key : access to special characters.
7. Key
:
Shift.
8. Key COPY: local copy.
9. Key : sending of an SMS (Short Message
Service).
10. Key : sending of a fax.
11. Key SCAN: document analysis to a PC or a media
(USB key).
12. Key STOP PRINT: stops the current PC printing.
13. Key :
access to directory and quick dial numbers.
14. Key
:
line manual connection, listen for tone
during fax sending.
15. Key :
multiple contact sending (fax, e-mail or
SMS).
16. Key : Validation.
17. Key OK: confirms the displayed selection.
18. Key : menu access and navigation down the
menus.
19. Key C: back to the previous menu and input
correction.
20. Key : navigation up the menus.
21. Key : stops the current operation.
22. Key ECO: sets up the activation delay.
23. Key : prints the functions list.
24. Key : color analysis mode selection.
25. Key : analysis resolution setup.
26. Key : contrast setup.
27. Icon : SuperFine resolution.
28. Icon : Photo resolution.
29. Icon : Fine resolution.
30. Icon : colour mode.
31. Icon : activity on the telephone line.
32. Icon : Fax mode.
33. Icon : external answering machine mode.

O K IF A X 2 5 1 0 / O K IO F F IC E 2 5 3 0
- 9 -
2 - Installation
Accessing terminal menus
All terminal functions and settings are available via the menu and are associated to a specific menu command.
For example, the menu command 51 launches the printing of the functions list (the functions list stores the list of all
terminal menus, sub-menus and their identification number).
Two methods are available to access menu items : a step by step method or a shortcut method.
To print the functions list with the Step by step method:
1 Press on .
2 Use the or button to browse the menu and select 5 - P
RINT. Confirm with OK.
3 Use the or button to browse the menu P
RINT and select 51-FUNCTIONS LIST. Confirm with OK.
To print the functions list with with the shortcut method:
1 Press on .
2 Enter 51 with the numerical keypad to directly print the functions list.
OKIFAX 2510 / OKIOFFICE 2530
- 10 -
2 - Installation
Packaging contents
The packaging contains the items listed below:
Multifunction device
1 toner cartridge
1 installation guide, 1 PC installation CD ROM (model
OKIOFFICE 2530) and 1 user guide CD ROM
1 power cord
1 telephone cord
2 booklets (safety and warranty)
Device installation
1 Unpack the device.
2 Install the device respecting the security notices
stated in the Safety booklet.
3 Remove all tapes from the machine.
4 Remove the plastic protection film from the screen.
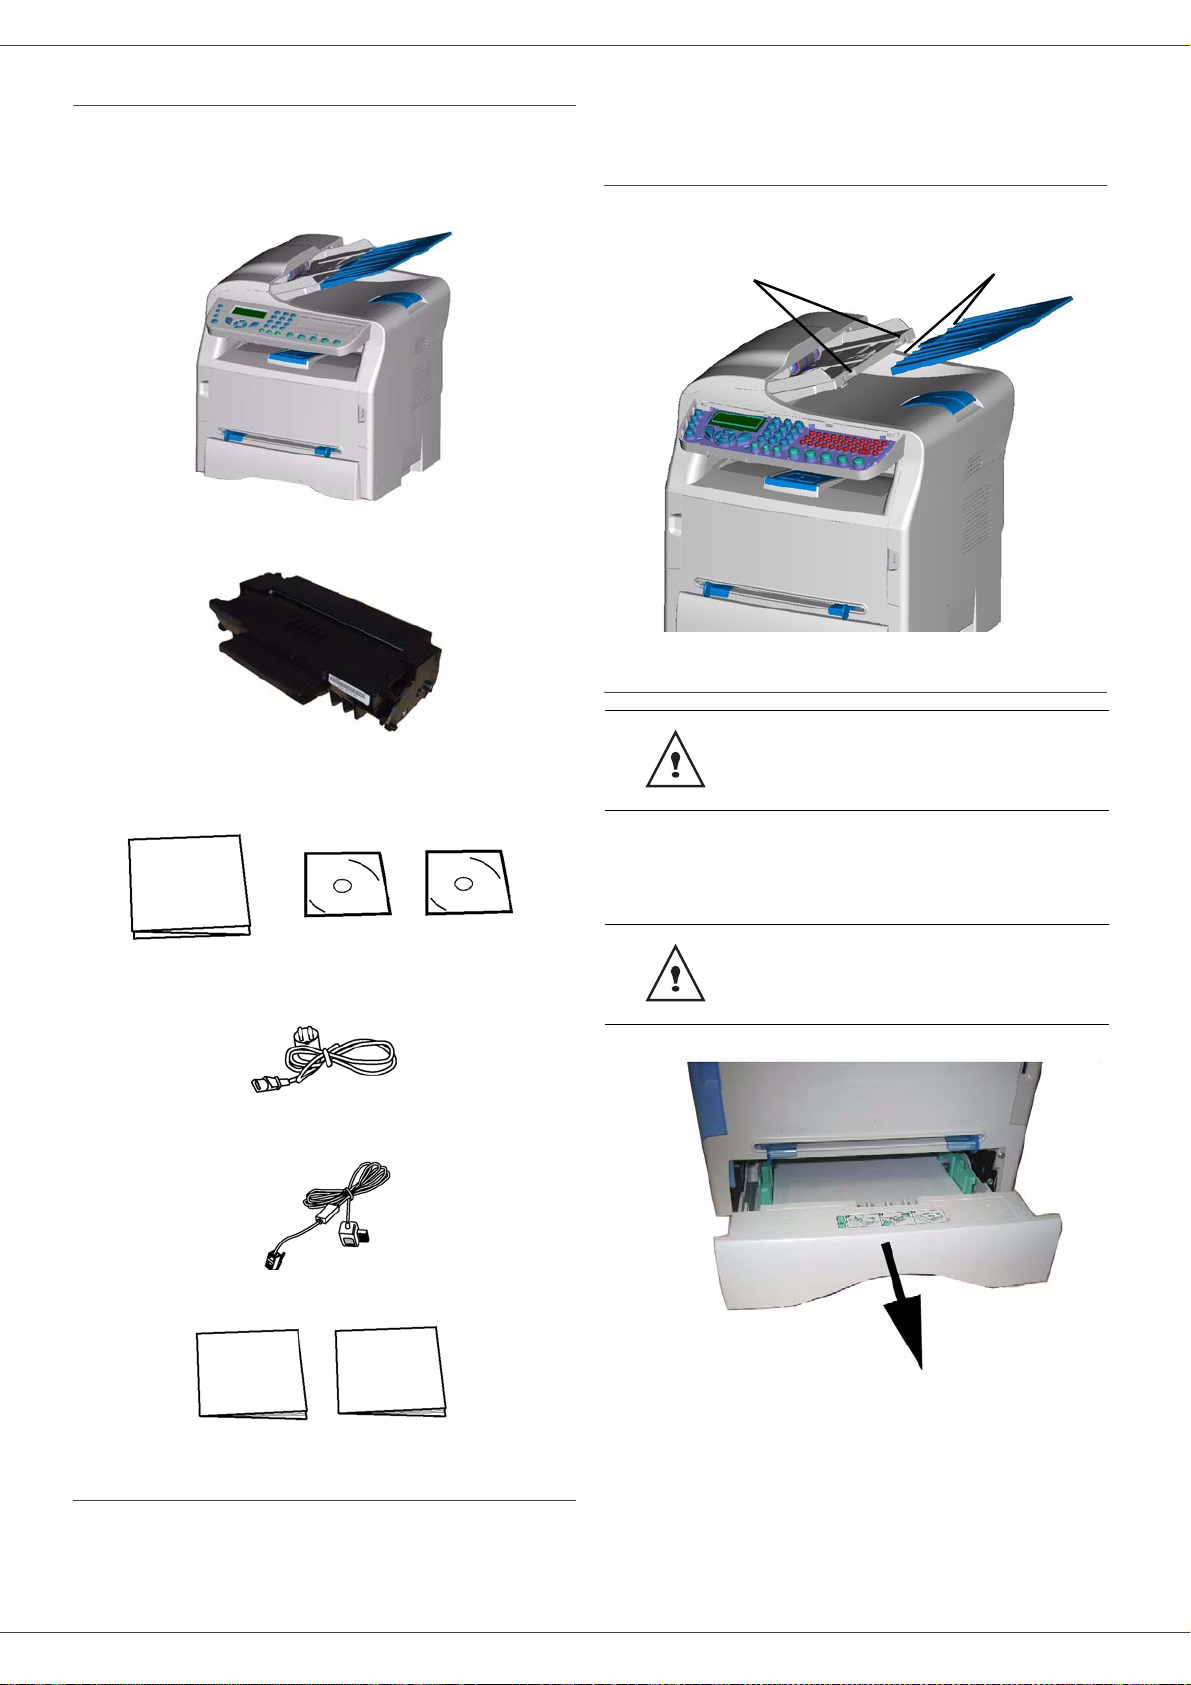
Installing the document feeder
1 Secure the document feeder by fitting the two clips
(B) in the notches (A) provided for this purpose.
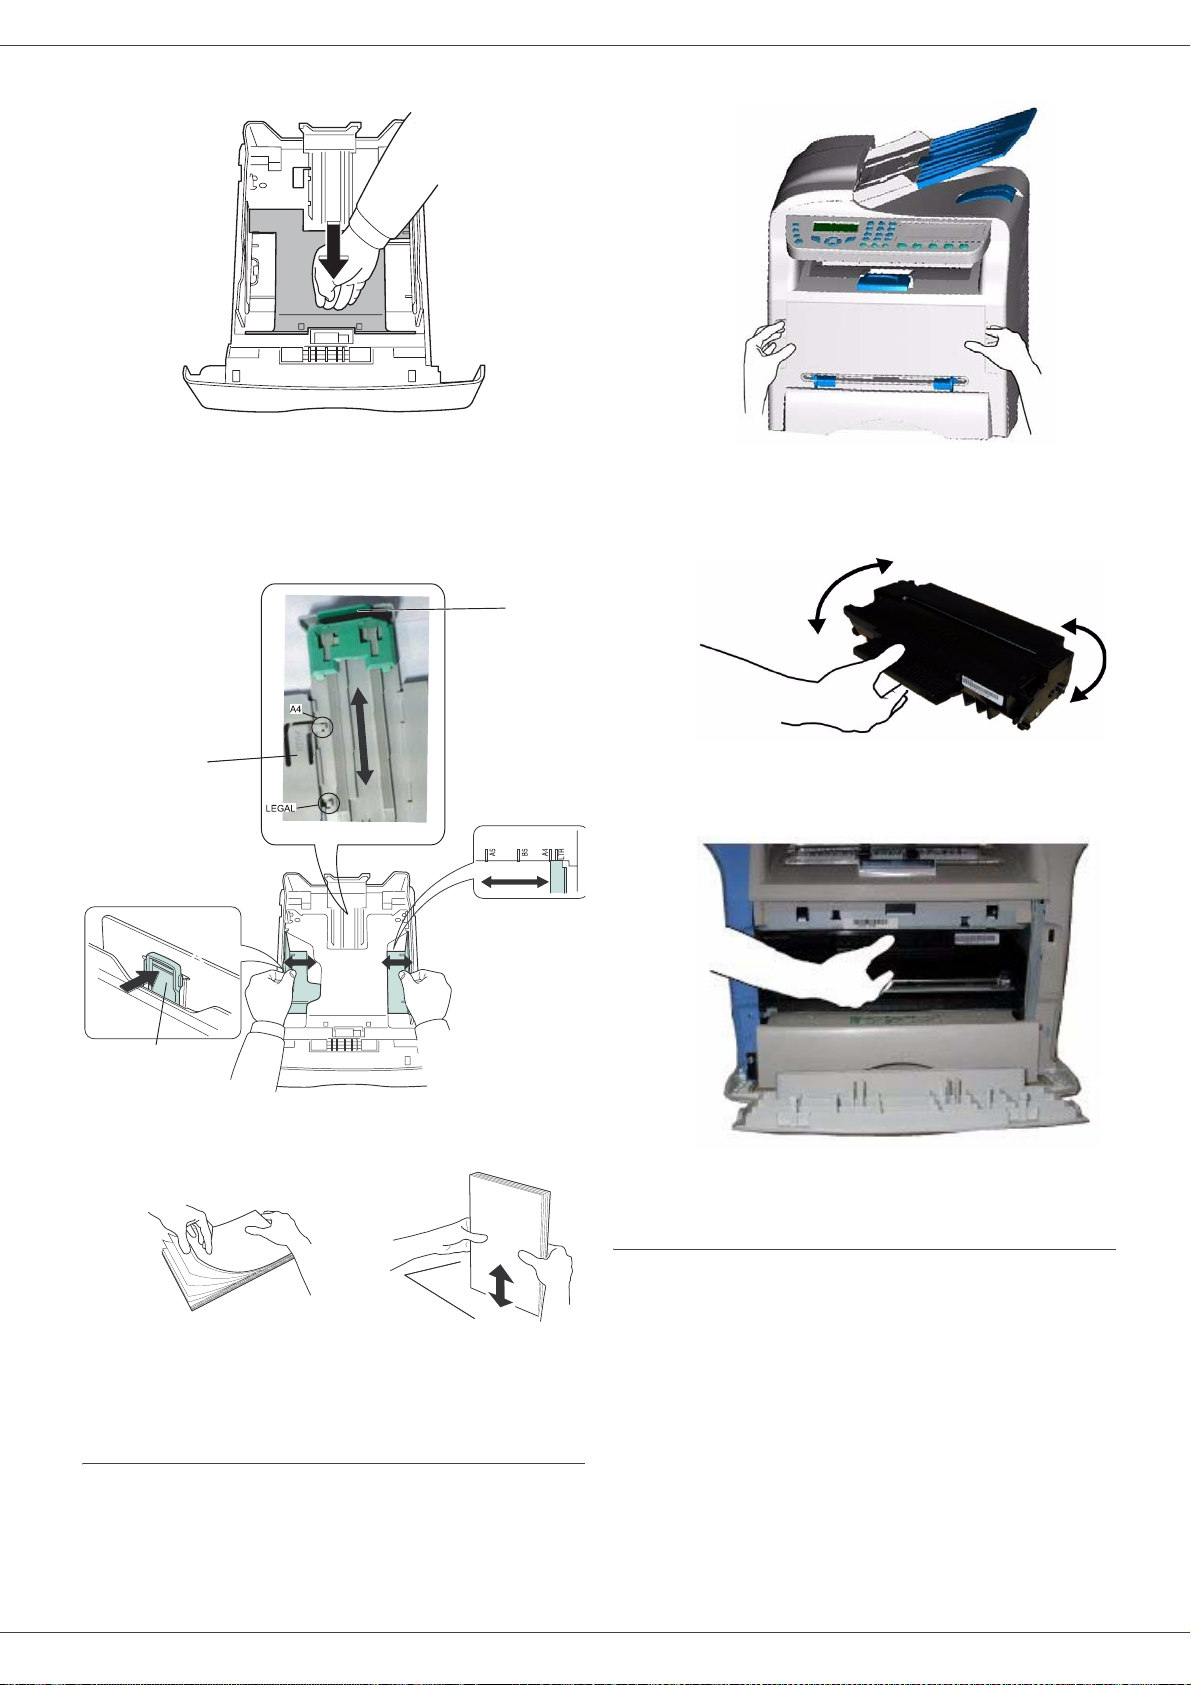
Feed cassette paper insertion
Your device accepts a number of formats and types of
papers (refer to paragraph Consumable s pecifications,
page 55).
1 Remove the paper feed cassette completely.
Before inserting paper, refer to
paragraph Paper recommendations,
page 6.
You can use paper weighing between
60 and 105 g/m2.
A
B
OKIFAX 2510 / OKIOFFICE 2530
- 11 -
2 - Installation
2 Push the lower panel down until it clicks.
3 Setup the back side feed cassette stop by pushing
the "PUSH" lever (A).
Then adjust the lateral paper guides to the paper
format by pushing lever (B) located on the left
guide. Adjust the length paper guide to the paper
format by pushing lever (C).
4 Take a paper stack, pull the paper off and alig n it
on a flat surface.
5 Put the paper stack in the feed cassette
(200 sheets for 80 g/m² paper for instance ).
6 Put the feed cassette back in its location.
Cartridge installation
1 Stand in front of the machine.
2 Push the left and right sides of the cover and pull it
at the same time towards you.
3 Unpack the new cartridge. Gently roll the cartridge
5 or 6 times to distribute the toner evenly inside the
cartridge. Thoroughly rolling the cartridge will
assure the maximum copies per cartridge.
4 Insert the cartridge in its slot by pushing it until it
clicks (last move down) as shown on the picture
below.
5 Close the cover.
Paper delivery stop
Adjust the paper delivery stop, depending on the format o f
the document to be printed. Do not forget to raise the flap
PUSH
B
A
C
OKIFAX 2510 / OKIOFFICE 2530
- 12 -
2 - Installation
to prevent the sheets from falling down.
Starting your device
Device connection
1 Plug the end of the telephone line into the terminal
socket and the other end into the wall telephone
socket.
2 Make sure that the On/Off switch is on Off
(O position).
3 Connect the power cord to the device.
Plug the power cord to outlet on the wall
4 Press the On/Off button to turn on the device
(I position).
5 By default, the machine is set to operate in England
and in English. To modify this parameter, refer to
Country, page 23.
6 Set the date and time, refer to Date/Time, page 23.
Paper insertion in the manual input tray
The manual input tray allows you to use various paper
formats with greater weightings than the one used in the
paper feed cassette (refer to paragraph Consumable
specifications, page 55).
Only one sheet or envelope can be fed at a time.
1 Spread the manual feed guides to the maximum.
2 Insert a sheet or an envelope in the manual input
tray.
3 Adjust the paper guides against the right and left
edges of the sheet or the envelope.
Before plugging the power cord, it is
imperative to refer to the Safety
booklet.
Before inserting paper, refer to
paragraph Paper recommendations,
page 6.
You can use paper, which weights
between 52 and 160 g/m².
Before printing, check that the paper
format you are using matches the
paper format set on the printer (refer to
Copy, page 13).
OKIFAX 2510 / OKIOFFICE 2530
- 13 -
3 - Copy
Copy
Your machine has the function to make one or more
copies.
You can also setup several parameters in order to make
copies at your will.
Simple copy
In this case, the default parameters are applied.
1 Place the document to be copied in the automatic
document feeder, face printed on the top.
2 Press the button twice. The copy is made
using the default parameters.
ECO mode copy
The ECO mode enables you to reduce the amount of
toner consumed on the page so as to save your printing
costs.
When the ECO mode is used, the toner consumption is
reduced and the print density becomes lighter.
1 Place the document to be copied in the automatic
document feeder, face printed on the top.
2 Press the button.
3 Press the button.
Sophisticated copy
The sophisticated copy allows to do custom setups for the
current copy.
1 Place the document to be copied in the automatic
document feeder, face printed on the top.
2 Press the button.
3 Enter the number of copies that you want and
confirm with the OK button.
4 Choose the paper tray AUTOMATIC or MANUAL
with the buttons or , then confirm with the OK
button.
5 Choose with the buttons or the printing
option (see examples below) depending on the
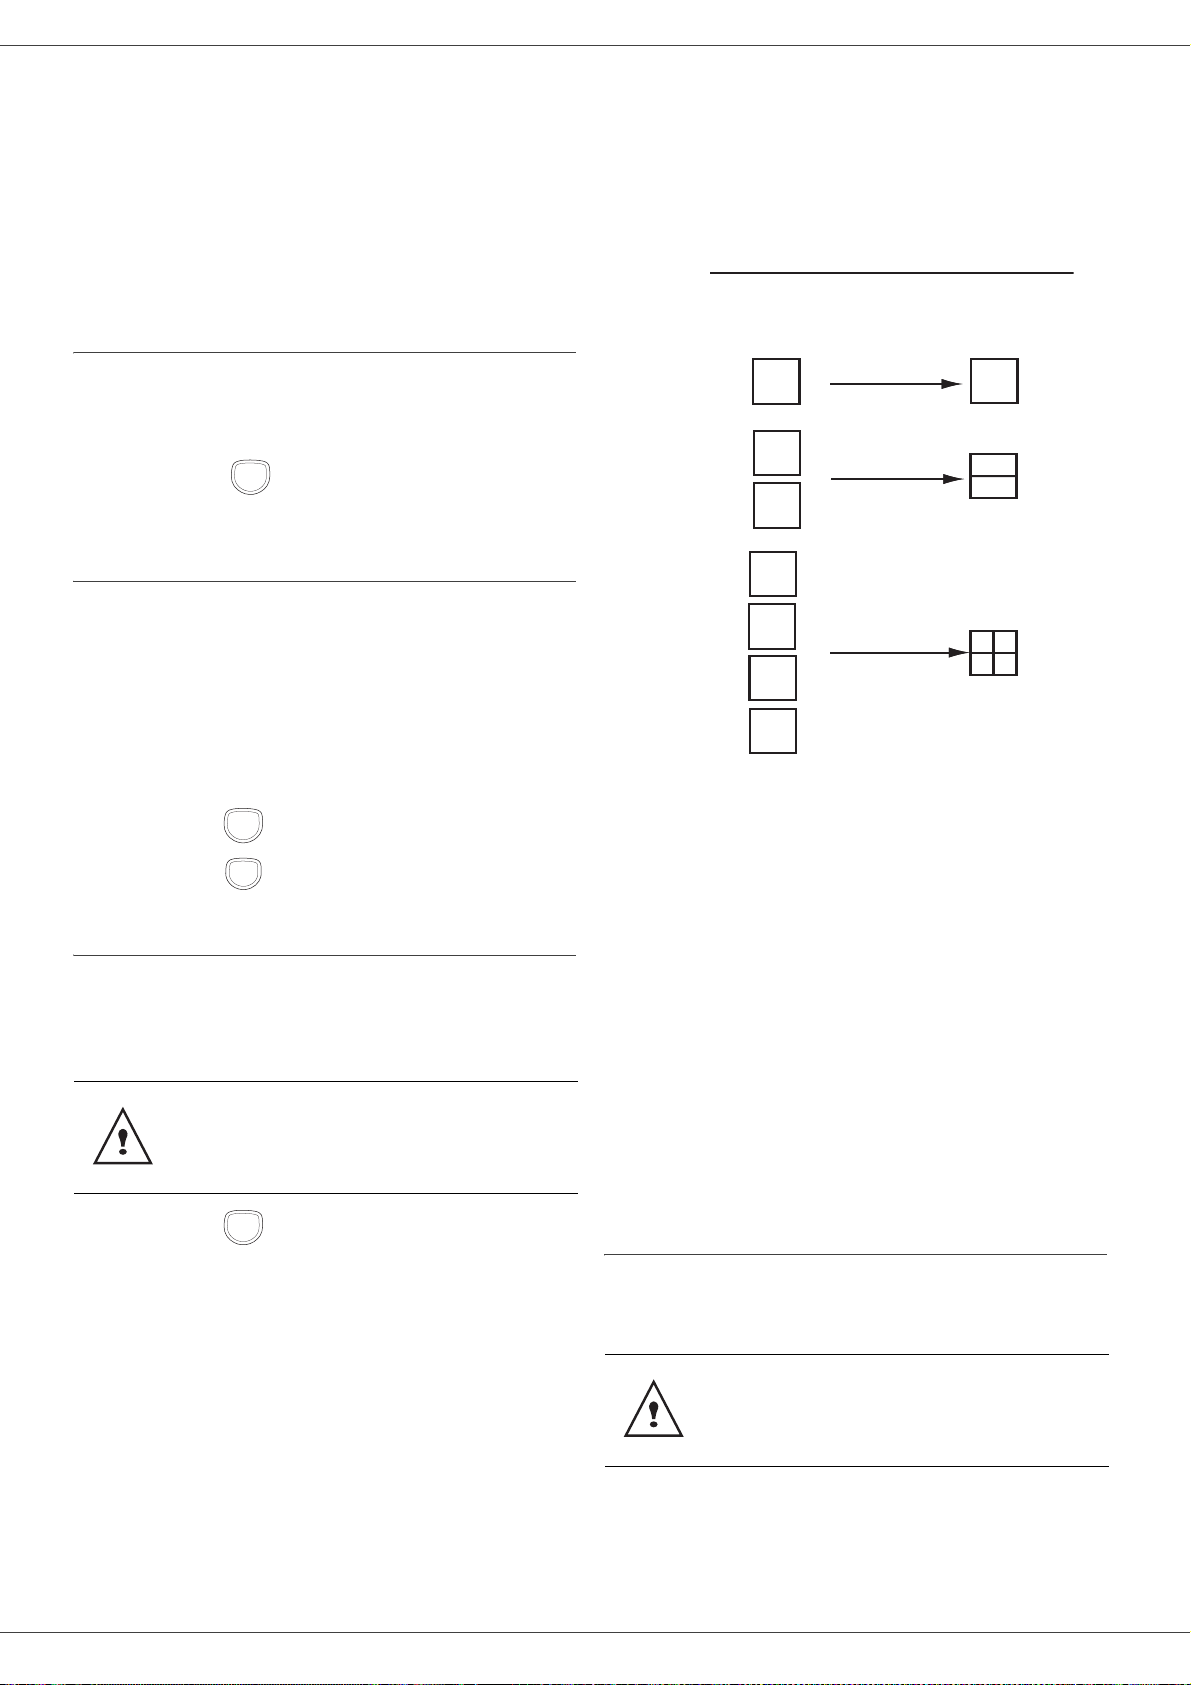
copy mode that you want:
- Mosaic mode : 1 Page to 1, 2 Pages to 1, or
4 Pages to 1.
Confirm with the OK button.
6 Adjust the desired zoom level, from 25% TO 400%
with the buttons or , confirm with the OK
button.
7 Adjust the desired origin values with the digital
keyboard buttons or then confirm with the OK
button.
8 Choose the resolution depending on the printing
quality that you want DRAFT, AUTO, QUALITY
TEXT or PHOTO with the buttons or , then
confirm with the OK button.
9 Adjust the contrast level with the buttons or ,
then confirm with the OK button.
10 Adjust the desired brightness level with the buttons
or , then confirm with the OK bu tt on .
11 Choose the paper type NORMAL, THICK with the
buttons or , then confirm with the OK button.
Special setup for the copy
Setups done through this menu become the device
default setups after you confirm.
After step 1, you can directly enter the
number of copies with the numerical
keypad and press the OK button to
validate. Then refer to step 4.
COPY
COPY
ECO
COPY
When the quality of the printing is not
satisfying, you can proceed to a calibration
(refer to paragraph Calibrate your
scanner, page 29).
Analyzed sheets
1
2
1
3
2
4
2 pages to 1
4 pages to 1
MOSAÏC Copy mode
1
2
12
3
4
1
1 page to 1
1
Output
OKIFAX 2510 / OKIOFFICE 2530
- 14 -
3 - Copy
Resolution setup
The RESOLUTION parameter allows you to setup the
photocopy resolution.
841 - ADVANCED FCT/COPY/RESOLUTION
1 Choose the resolution with the buttons or
according to the following table:
2 Confirm your choice by pressing the OK button.
Zoom setup
The ZOOM parameter allows you to reduce or enlar ge an
area of a document by choosing the origin and the zoom
level to apply to the document, from 25 to 400 %.
842 - ADVANCED FCT/COPY/ZOOMING
1 Enter the desired zoom level with the
Alpanumerical keyboard or choose among
predefined values with the buttons and .
2 Confirm your choice by pressing the OK button.
Assembled copy setup
843 - ADVANCED FCT/COPY/ASSEMBLED
The ASSEMBLED parameter allows you to assemble or
disassemble your copies. Enter the desired setting and
confirm your choice by pressing the OK button.
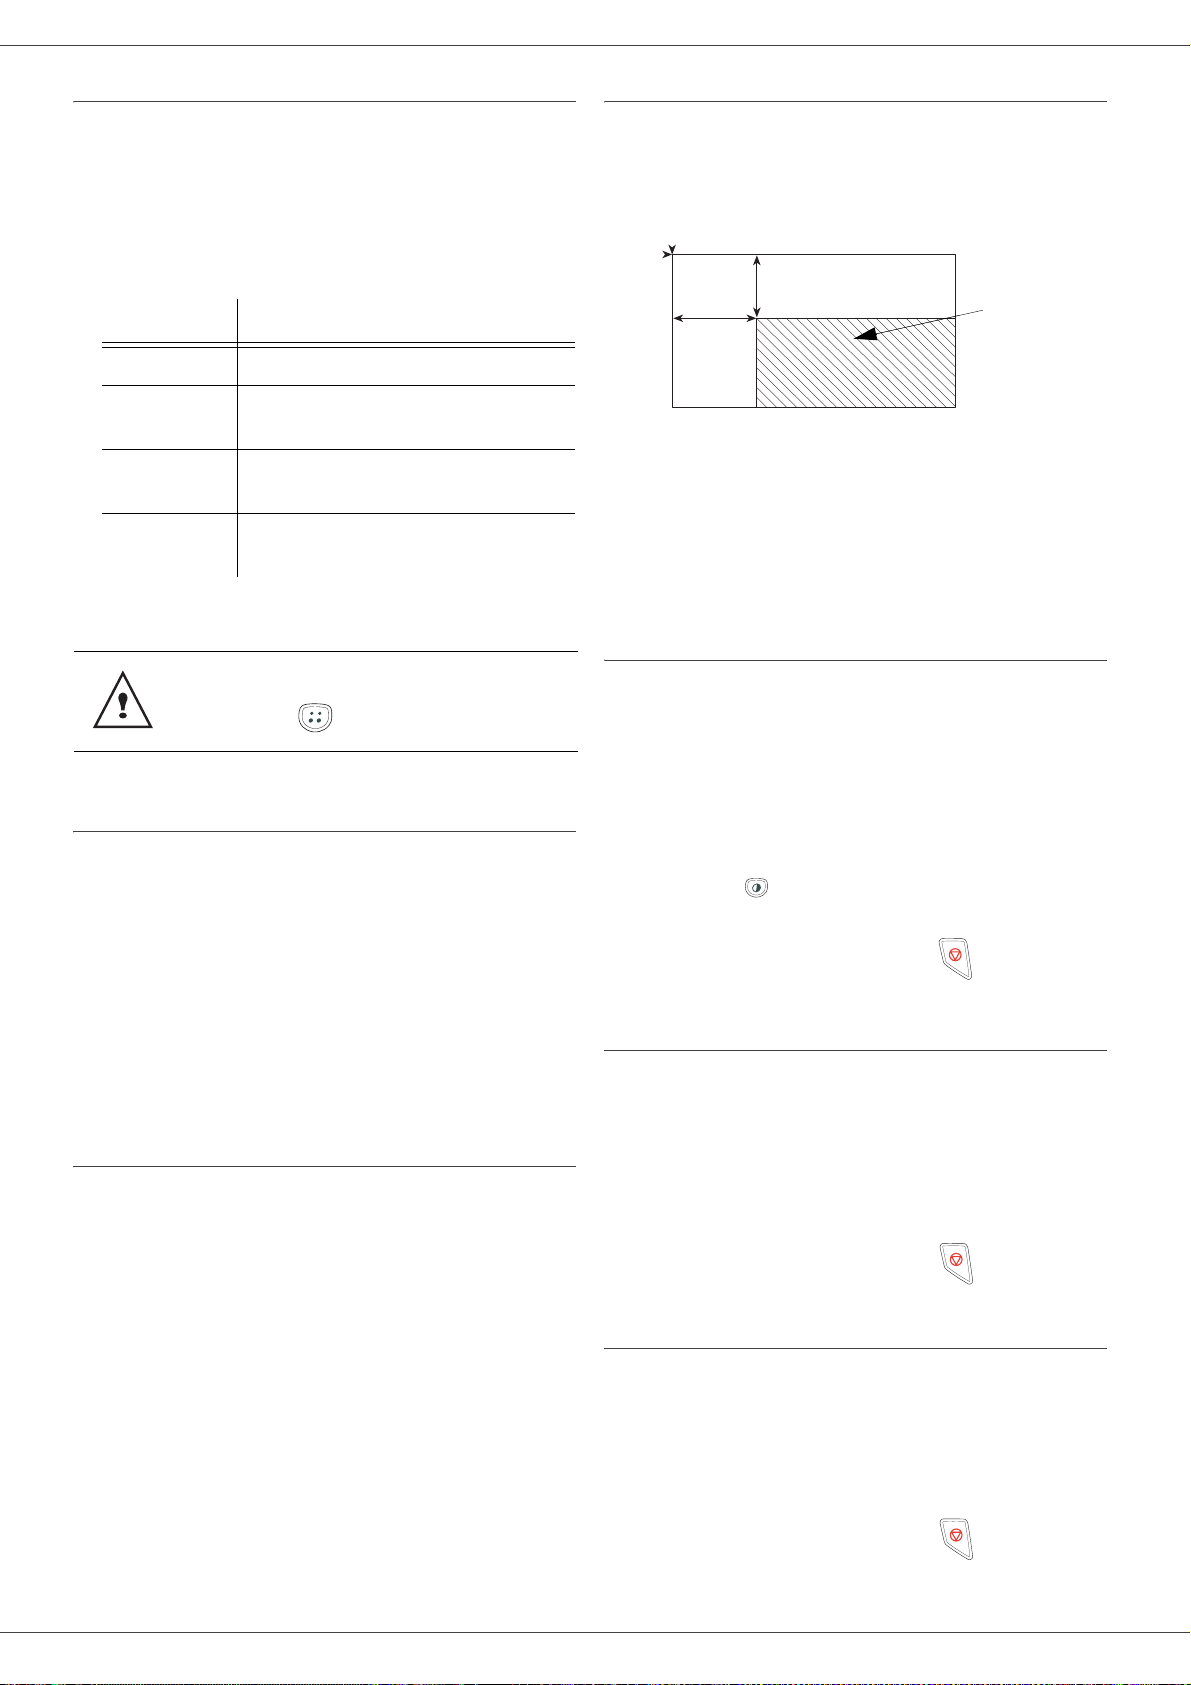
Analysis origin setup
If you want, you can change the origin of the scanner.
By entering new values for X and Y in mm (X < 209 and
Y < 280), you move the analysed area as shown on the
diagram below.
844 - ADVANCED FCT/COPY/ORIGIN
1 Select the X and Y coordinates with the buttons
or .
2 Setup the desired coordinates with the digital
keyboard or the buttons and , confirm your
choice by pressing on the OK button.
Contrast setup
The CONTRAST parameter allows to choose the
photocopy contrast.
845 - ADVANCED FCT/COPY/CONTRAST
1 Setup the desired level of contrast with the buttons
and , confirm by pressing the OK button.
2 You can also directly setup the desired contrast
with the button, press several times on this
button until the desired setup without using the
Menu 845.
3 Quit this menu by pressing the
button.
Brightness setup
The BRIGHTNESS parameter allows to lighten or darken
your original document.
846 - ADVANCED FCT/COPY/LUMINOSITY
1 Setup the desired brightness with the buttons
and .
2 Confirm your choice by pressing the OK button.
3 Quit this menu by pressing the
button.
Paper type setup
851 - ADVANCED FCT/SCAN. & PRINT/PAPER
TYPE
1 Select the paper NORMAL or THICK that you use
with the buttons and .
2 Confirm your setup by pressing the OK button.
3 Quit this menu by pressing the
button.
Parameter Signification
DRAFT
Low resolution.
AUTO
Standard resolution for documents
containing text and graphics.
QUALITY
TEXT
Optimal resolution for documents
containing text.
PHOTO
Optimal resolution for documents
containing photographies.
You can also setup the resolution by
pressing the button.
y
DEBUT FEUILLE
FIN FEUILLE
x
Analysed area
BEGIN. OF SHEET
END OF SHEET
Loading...