


NordicTrack CISEX22523, CAUEX25023, CKOEX25023, CKOEX22523, CISEX25023 Owner's Manual
...
Model No.
Serial No.
The model number and serial number are found in the location shown below. Write the model number and serial number in the space above.
Serial

 Number
Decal
QUESTIONS?
At FreeMotion Fitness, we’re committed to providing complete customer satisfaction. If you have questions, see HOW TO CONTACT CUSTOMER CARE on page 2 of this manual.
 CAUTION
Read all precautions and instructions in this manual before using this equipment. Keep this manual for future reference.
USER’S MANUAL

TABLE OF CONTENTS
How to Contact Customer Care . . . . . . . . . . . . . . . . . . . . . . . . . . . . . . . . . . . . . . . . . . . . . . . . . . . . .2
SECTION 1
Important Precautions . . . . . . . . . . . . . . . . . . . . . . . . . . . . . . . . . . . . . . . . . . . . . . . . . . . . . . . . . . . . .3 Before You Begin . . . . . . . . . . . . . . . . . . . . . . . . . . . . . . . . . . . . . . . . . . . . . . . . . . . . . . . . . . . . . . . .4 How to Assemble the Recumbent Bike . . . . . . . . . . . . . . . . . . . . . . . . . . . . . . . . . . . . . . . . . . . . . . . .5 How to Set Up the Recumbent Bike . . . . . . . . . . . . . . . . . . . . . . . . . . . . . . . . . . . . . . . . . . . . . . . . . .7 How to Upgrade the Console . . . . . . . . . . . . . . . . . . . . . . . . . . . . . . . . . . . . . . . . . . . . . . . . . . . . . . .8
SECTION 2
How to Use the Basic Console . . . . . . . . . . . . . . . . . . . . . . . . . . . . . . . . . . . . . . . . . . . . . . . . . . . . . .9 How to Use the Workout TV Console . . . . . . . . . . . . . . . . . . . . . . . . . . . . . . . . . . . . . . . . . . . . . . . .23
SECTION 3
Maintenance and Troubleshooting . . . . . . . . . . . . . . . . . . . . . . . . . . . . . . . . . . . . . . . . . . . . . . . . . .25
SECTION 4
Exercise Guidelines . . . . . . . . . . . . . . . . . . . . . . . . . . . . . . . . . . . . . . . . . . . . . . . . . . . . . . . . . . . . .27
SECTION 5
Part List . . . . . . . . . . . . . . . . . . . . . . . . . . . . . . . . . . . . . . . . . . . . . . . . . . . . . . . . . . . . . . . . . . . . . . .31
Exploded Drawing . . . . . . . . . . . . . . . . . . . . . . . . . . . . . . . . . . . . . . . . . . . . . . . . . . . . . . . . . . . . . . .32
NordicTrack is a registered trademark of ICON IP, Inc.
1
HOW TO CONTACT CUSTOMER CARE
If you have questions after reading this manual, or if you require assistance, please contact Customer Care at the address and phone number listed below. Please be prepared to give the following information:
•The MODEL NUMBER OF THE PRODUCT (see the front cover of this manual for the location)
•The NAME OF THE PRODUCT (NordicTrack® 9600 recumbent bike)
•The SERIAL NUMBER OF THE PRODUCT (see the front cover of this manual for the location)
When ordering replacement parts, please also give the KEY NUMBER and DESCRIPTION OF THE PART(S) (see the PART LIST and the EXPLODED DRAWING on pages 31 to 33)
Customer Care: 1-800-201-2109, Monday–Friday, 8 a.m.–5 p.m. Mountain Time FreeMotion Fitness, Inc. • 1096 Elkton Drive, Suite 600 • Colorado Springs, CO 80907
2

IMPORTANT PRECAUTIONS
 WARNING: To reduce the risk of serious injury, read the following important precautions and information before operating the recumbent bike.
1.It is the responsibility of the owner to ensure that all users of the recumbent bike are adequately informed of all warnings and precautions.
2.Operate the recumbent bike only as described in this manual.
3.Do not operate the recumbent bike until it is properly assembled (see HOW TO ASSEMBLE THE RECUMBENT BIKE on page 5).
4.Keep the recumbent bike indoors, away from moisture and dust. Do not place the recumbent bike in a garage or covered patio or near water.
5.Place the recumbent bike on a level surface. To protect the floor or carpet from damage, place a mat beneath the recumbent bike.
6.Regularly inspect and tighten all parts of the recumbent bike.
7.Keep children under the age of 12 and pets away from the recumbent bike at all times.
8.The recumbent bike should not be used by persons weighing more than 160 kg (350 lbs.).
9.Always wear appropriate exercise clothes and athletic shoes when operating the recumbent
bike. Do not wear loose clothes that could become caught on the recumbent bike.
10.Do not modify the power cord or use an adaptor to connect the power cord to an improper receptical. Keep the power cord away from heated surfaces. Do not use an extension cord.
11.Keep your back straight when using the recumbent bike; do not arch your back.
12.If you feel pain or dizziness while exercising, stop immediately and cool down.
13.The pulse sensor is not a medical device. Various factors, including the user’s movement, may affect the accuracy of heart rate readings. The pulse sensor is intended only as an exercise aid in determining heart rate trends in general.
14.A warning decal has been placed on the recumbent bike
in the locations shown on page 4. If the decal is missing, or if it is not legible, please see
HOW TO CONTACT CUSTOMER CARE on page 2 and order a free replacement decal. Apply the decal in the locations shown.
 WARNING: Before beginning this or any exercise program, consult your physician. This is especially important for persons over the age of 35 or persons with pre-existing health problems. Read all instructions before using. ICON assumes no responsibility for personal injury or property damage sustained by or through the use of this product.
SAVE THESE INSTRUCTIONS
3

BEFORE YOU BEGIN
Congratulations for selecting the revolutionary NordicTrack® 9600 recumbent bike. The NordicTrack 9600 recumbent bike offers an impressive array of features to make your workouts more effective and enjoyable.
For your benefit, read this manual carefully before using the NordicTrack 9600 recumbent bike. If you have questions after reading this manual, see HOW TO CONTACT CUSTOMER CARE on page 2. To help us
assist you, please note your product model number and serial number before calling. The model number and serial number can be found on a decal attached to the recumbent bike (see the front cover of this manual for the location of the decal).
Before reading further, please familiarise yourself with the parts that are labelled in the drawing below.
|
Console |
Handlebar |
|
|
FRONT |
Seat |
|
Seat Back |
Seat Latch |
|
|
Water Bottle Holder* |
Pedal/Strap |
|
|
|
Handgrip Pulse Sensor |
Warning Decal |
|
(One on each side |
Wheel |
of the Seat Carriage) |
|
|
CD/Accessory Tray |
|
RIGHT SIDE |
REAR |
|
Levelling Foot |
*No water bottle is included |
|
4 |

HOW TO ASSEMBLE THE RECUMBENT BIKE
Assembly requires two persons. Set the recumbent bike in a cleared area and remove all packing materials. Do not dispose of the packing materials until assembly is completed. Assembly can be completed using the included tools.
Use the drawings below to identify the small parts used in assembly. The number in parenthesis below each drawing refers to the key number of the part. The second number refers to the quantity needed for assembly.
1/4” x 3/4” Socket |
1/4” x 3/4” Button |
3/8” x 1/2” Button |
3/8” x 3/4” Button |
3/8” x 1 1/4” Button |
||
Screw (64)–4 |
Screw (67)–4 |
Screw (74)–4 |
|
|
Screw (81)–2 |
Screw (76)–4 |
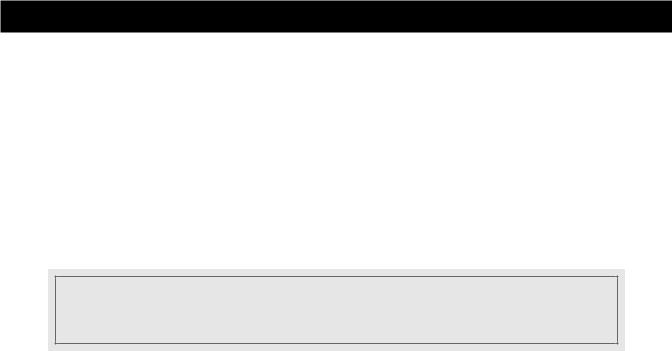
1. Push the excess console wiring down into the |
1 |
|
|
|
||
Frame (1). Attach the Handlebar (3) to the Frame |
|
|
|
|||
|
|
|
|
|||
with four 3/8” x 1/2” Button Screws (74). Make sure |
|
|
|
|
||
that the wiring is not pinched between the |
|
|
|
|
||
Handlebar and the Frame. |
|
|
|
|
|
|
|
|
|
|
74 |
Console |
|
|
|
|
|
Wires |
|
|
|
|
|
|
|
1 |
|
|
|
|
|
|
74 |
3 |
|
|
|
|
|
|
|
2. Attach the Seat Back (10) to the Seat Carriage (5) |
2 |
|
|
|
||
with four 1/4” x 3/4” Socket Screws (64). |
|
|
|
|
||
|
|
|
|
|
||
|
|
|
|
|
10 |
|
|
|
|
|
|
5 |
|
|
|
|
|
|
|
64 |
|
|
5 |
|
|
|
|

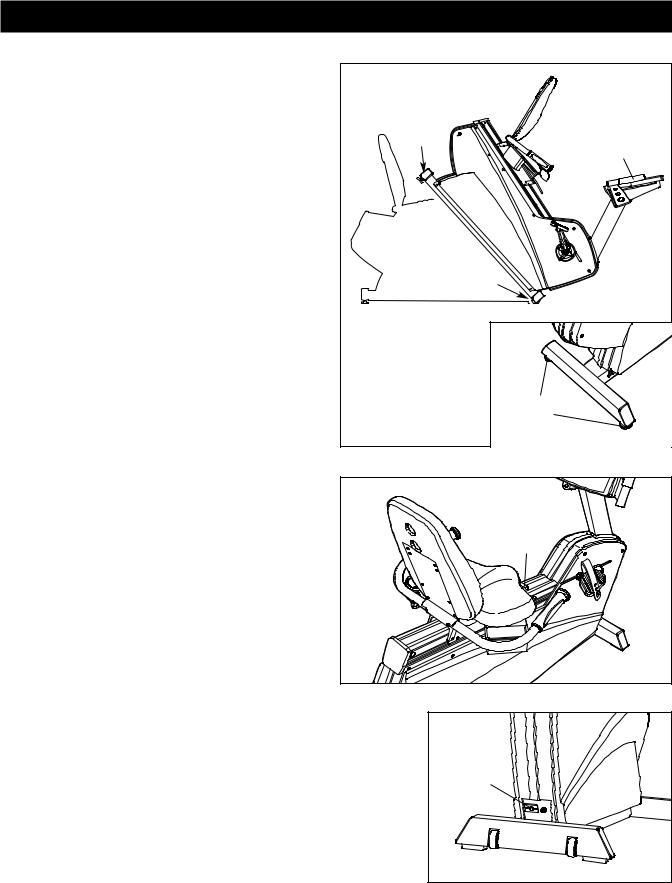
3.Attach the Seat Handlebar (6) to the Seat Carriage
(5) with four 3/8” x 1 1/4” Button Screws (76) and two 3/8” x 3/4” Button Screws (81). Next, insert the Pulse Plug (78) into the pulse jack near the top of the Right Side Shield (8).
4.Attach the Seat (9) to the Seat Carriage (5) with four 1/4” x 3/4” Button Screws (67). Insert the four 1/2” Round Endcaps (80) into the indicated holes in the Seat Handlebar (6).
3 |
81 |
|
|
|
|
5 |
|
6 |
78 |
|
|
|
8 |
76 |
|
|
|
4 |
|
|
9 |
|
|
|
|
67 |
5 |
|
|
67 |
|
6 |
67 |
|
|
|
80 |
6
HOW TO SET UP THE RECUMBENT BIKE
HOW TO MOVE AND LEVEL THE RECUMBENT BIKE
Before moving the recumbent bike, make sure that the power cord is unplugged. Note: If a CATV cable is connected to the recumbent bike, it may be necessary to disconnect the cable if the recumbent bike will be moved far.
Due to the size and weight of the recumbent bike, moving it requires two persons. While one person lifts the indicated end, firmly hold the handlebar and tip the recumbent bike forward until it rolls on the front wheels. Carefully move the recumbent bike to the desired location and then lower it back to the level position. CAUTION: To reduce the risk of injury, use extreme caution while moving the recumbent bike. Do not attempt to move the recumbent bike over uneven surfaces.
If the recumbent bike rocks slightly during use, turn the Levelling feet under the rear of the frame until the rocking motion is eliminated.
HOW TO ADJUST THE SEAT
To adjust the seat, lift the seat latch, slide the seat forward or backward to the desired position, and then push the seat latch back down.
Lift |
Here |
Handlebar |
Wheels |
Levelling |
Feet |
Seat |
Latch |
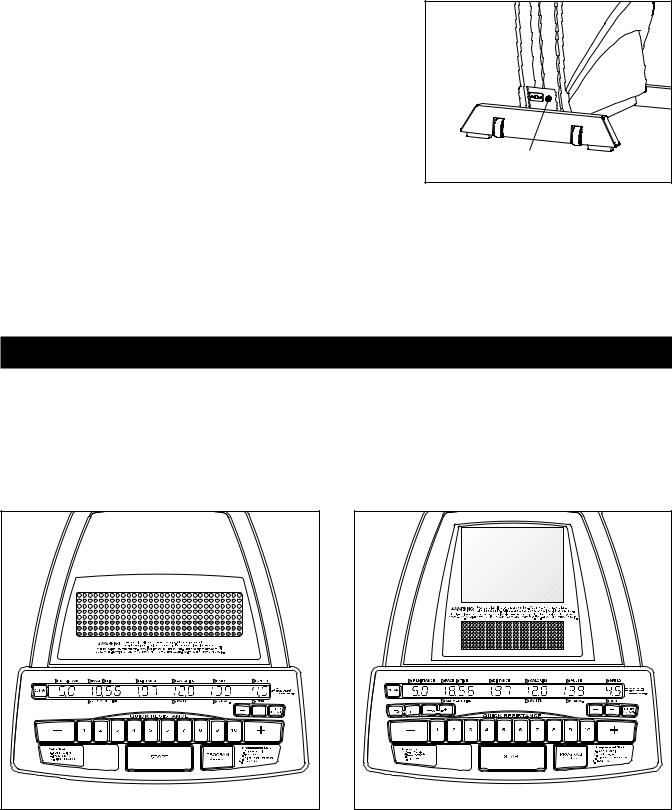
HOW TO CONNECT THE POWER CORD
If the recumbent bike has a Basic console, it can be used with or without the included power cord. If the recumbent bike has a Workout TV console, the power cord must be used for the TV to be operated.
To use the power cord, first plug one end of the power cord into the jack on the front of the recumbent bike. Plug the other end of the power cord into an appropriate outlet that is properly installed in accordance with all local codes and ordinances.
Power |
Cord |
Jack |
7
HOW TO CONNECT A CATV CABLE
If your recumbent bike has a Workout TV console, a CATV cable must be connected to the recumbent bike for cable TV stations to be viewed.
Locate the cable jack on the front of the recumbent bike. Connect the CATV cable to the cable jack.
A satellite receiver, VCR, or DVD player can also be connected to the recumbent bike. Connect a CATV cable from the coaxial output
on your equipment (usually labelled TV OUT or RF OUT) to the cable jack. Note: Audio/video equipment without coaxial outputs
(some satellite receivers and DVD players) will require an RF modulator to operate with the recumbent bike. RF modulators and external CATV cables are not available from FreeMotion Fitness, but are available at electronics stores. See the owner’s manual included with the equipment you wish to connect to see whether an RF modulator is needed.
HOW TO UPGRADE THE CONSOLE
Your recumbent bike has been pre-configured to operate with a Basic console and a Workout TV console (see the drawings below). To learn about the features of the Basic console, see page 9. For information about the state-of-the-art Workout TV console, see page 23.
To upgrade your console and expand the capabilities of your recumbent bike whenever you choose, see HOW TO CONTACT CUSTOMER CARE on page 2.
Basic |
Console |
Workout TV |
Console |
8
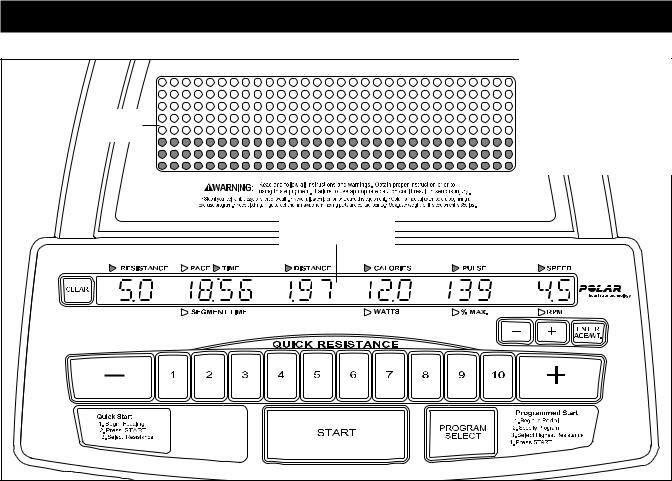
HOW TO USE THE BASIC CONSOLE
Matrix
Main Display
Note: If there is a sheet of clear plastic on the console, remove the clear plastic.
FEATURES OF THE CONSOLE
The Basic console offers an impressive array of features to help you get the most from your exercise.
When the manual mode of the console is selected, the resistance of the pedals can be changed with a touch of a button. As you exercise, the console will provide continuous exercise feedback. You can even measure your heart rate using the built-in pulse sensor.
A variety of preset workout programs is also offered. Each program automatically controls the resistance of the pedals as it guides you through an effective workout.
In addition, the console offers three pulse programs that adjust the resistance of the pedals to keep your heart rate near target levels during your workouts, and a unique fitness test program that measures your VO2 max level. Note: The pulse programs and the fitness test program require the use of a Polar®-compatible chest pulse sensor (not included).
To use the QUICK START mode of the console, follow the steps beginning on page 10. To use a preset program, see pages 12 to 16. To use a pulse program, see page 17. To use the fitness test program, see page 19. To use the maintenance mode, see page 20.
9
HOW TO USE THE QUICK START MODE
Plug in the power cord or begin pedalling to 1 activate the console.
If the recumbent bike has a Basic console, it can be used with or without the included power cord.
To use the power cord, see HOW TO CONNECT THE POWER CORD on page 7. To use the recumbent bike without the power cord, begin pedalling at a cadence of about 20 revolutions per minute (RPM) or faster. After a moment, the console displays will light and a series of tones will sound. While you pedal, power will be supplied by a generator; remember to continue pedalling while using the recumbent bike.
If the recumbent bike has a Workout TV console, the power cord must be used for the TV to be operated.
2 Select the QUICK START mode.
When the power is turned on, the QUICK START mode will be selected. If you have already selected a program, select the QUICK START mode again by repeatedly pressing the PROGRAM SELECT button until the words “QUICK START” appear in the main display.
A few seconds after the mode is selected, the words “QUICK START” will begin to scroll across the main display.
3 Press the START button and begin pedalling.
When the button is pressed, the console will begin displaying exercise data.
4 Change the resistance of the pedals as desired.
As you pedal, change the resistance of the
pedals by pressing the RESISTANCE + and – buttons. To change the
resistance quickly, press
the QUICK RESISTANCE buttons. There are twenty resistance levels, from level 0.5 to level 10.
Follow your progress with the matrix and the 5 main display.
The matrix—When the QUICK START mode is selected, the matrix will show a graph of the resis-
tance levels that you select. The flashing column shows the current resistance level. Every thirty seconds, all columns will move one position to the left. As you increase or decrease the resistance, additional indicators will light or darken in the flashing column (and in all columns to the right).
Flashing Column
Note: The matrix shows relative resistance levels. As you increase or decrease the resistance, the lit indicators in all columns may shift upward or downward so that the highest indicators are always shown in the matrix.
The main display—The main display will show the following information:
Resistance—The left end of the main display will show the resistance level of the pedals.
Pace/Time—When the
QUICK START mode is selected, this section of the main display will
show your pedalling pace (in minutes per
mile) and the elapsed time. The display will change from one number to the other every few seconds. Note: Any time that the resistance level changes, the display will show your pedalling pace.
Note: When a preset program or a pulse program is selected, the display will show your pedalling pace, the time remaining in the program, and the time remaining in the current segment of the program. During the fitness test program, the display will show the elapsed time.
10
 Loading...