


NordicTrack NTXC80184 Owner's Manual
www.nordictrack.com
Model No. NTXC8018.4
Serial No.
.#$/"'/0"'1"#$%&'2)*+"#'$2'/0"'13%-"'
%+45"'64#'#"6"#"2-"7
!"#$%&'
()*+"#'
,"-%&
ACTIVATE YOUR
WARRANTY
To register your product and
activate your warranty today, go
to www.nordictrackservice.com/
registration.
USER%S MANUAL
CUSTOMER CARE
For service at any time, go to
www.nordictrackservice.com.
8#'-%&&'9:;<<:=8:>?:@A=
B9:;<<:;CD:EEF;G
H427I@#$7'C'%7*7IC'37*7'H=
!%/7';'%7*7IF'37*7'H=
Please do not contact the store.
CAUTION
Read all precautions and instructions in this manual before using
this equipment. Keep this manual
for future reference.
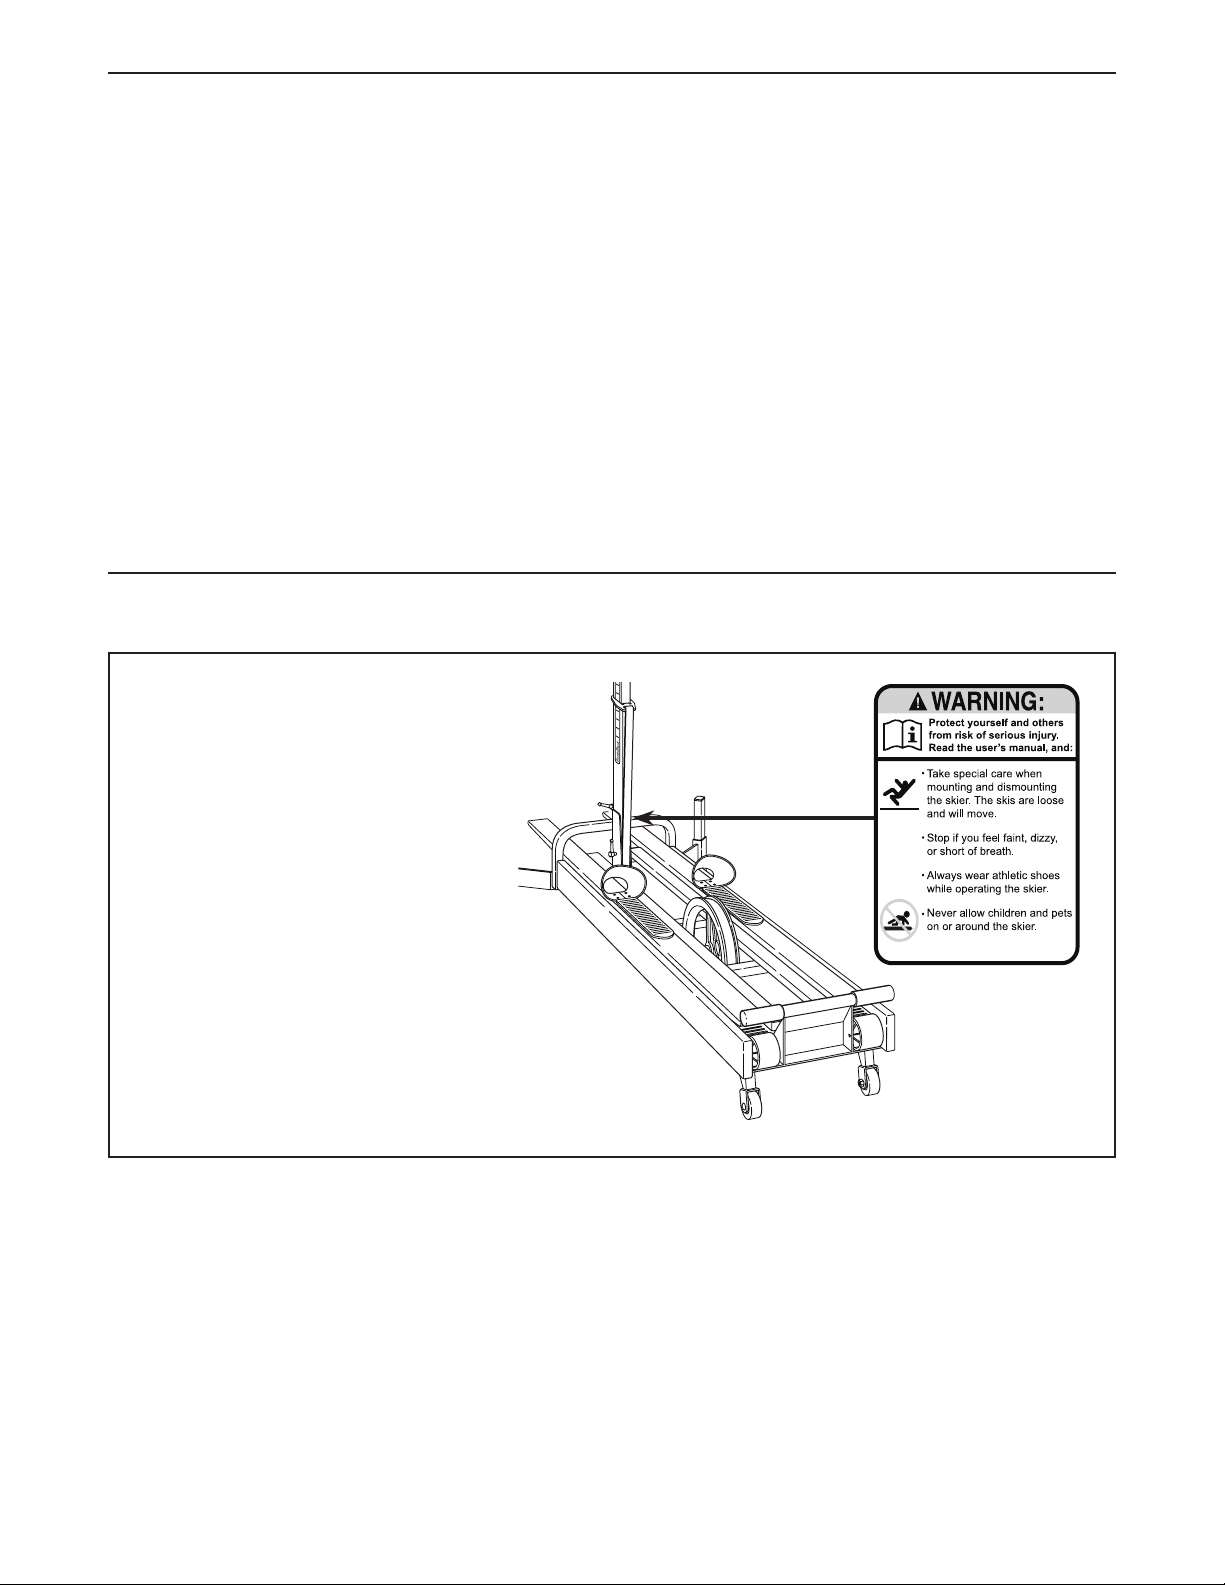
TABLE OF CONTENTS
.LJ(A(W',?KLX'QXLK?H?(= 7'7'7'7'7'7'7'7'7'7'7'7'7'7'7'7'7'7'7'7'7'7'7'7'7'7'7'7'7'7'7'7'7'7'7'7'7'7'7'7'7'7'7'7'7'7'7'7'7'7'7'7'7'7'7'7'7'7'7'7'7'7'7D
AHQ8J=L(='QJ?KLY=A8(!'7'7'7'7'7'7'7'7'7'7'7'7'7'7'7'7'7'7'7'7'7'7'7'7'7'7'7'7'7'7'7'7'7'7'7'7'7'7'7'7'7'7'7'7'7'7'7'7'7'7'7'7'7'7'7'7'7'7'7'7'7'7'7'7'7'7E
>?@8J?'Z8Y'>?WA(7'7'7'7'7'7'7'7'7'7'7'7'7'7'7'7'7'7'7'7'7'7'7'7'7'7'7'7'7'7'7'7'7'7'7'7'7'7'7'7'7'7'7'7'7'7'7'7'7'7'7'7'7'7'7'7'7'7'7'7'7'7'7'7'7'7'7'7'7'7'7'7 [
L!!?H>XZ 7'7'7'7'7'7'7'7'7'7'7'7'7'7'7'7'7'7'7'7'7'7'7'7'7'7'7'7'7'7'7'7'7'7'7'7'7'7'7'7'7'7'7'7'7'7'7'7'7'7'7'7'7'7'7'7'7'7'7'7'7'7'7'7'7'7'7'7'7'7'7'7'7'7'7'7'7'7'7'7C
\8.'=8'L,]Y!='=\?'!MA'?^?JKA!?J'7'7'7'7'7'7'7'7'7'7'7'7'7'7'7'7'7'7'7'7'7'7'7'7'7'7'7'7'7'7'7'7'7'7'7'7'7'7'7'7'7'7'7'7'7'7'7'7'7'7'7'7'7'7'79<
\8.'=8'Y!?'=\?'!MA'?^?JKA!?J7'7'7'7'7'7'7'7'7'7'7'7'7'7'7'7'7'7'7'7'7'7'7'7'7'7'7'7'7'7'7'7'7'7'7'7'7'7'7'7'7'7'7'7'7'7'7'7'7'7'7'7'7'7'7'7'7'7'7 99
HLA(=?(L(K?'L(,'!=8JLW? 7'7'7'7'7'7'7'7'7'7'7'7'7'7'7'7'7'7'7'7'7'7'7'7'7'7'7'7'7'7'7'7'7'7'7'7'7'7'7'7'7'7'7'7'7'7'7'7'7'7'7'7'7'7'7'7'7'7'7'7'7'79E
=J8Y>X?!\88=A(W '7'7'7'7'7'7'7'7'7'7'7'7'7'7'7'7'7'7'7'7'7'7'7'7'7'7'7'7'7'7'7'7'7'7'7'7'7'7'7'7'7'7'7'7'7'7'7'7'7'7'7'7'7'7'7'7'7'7'7'7'7'7'7'7'7'7'7'7'7'79[
?^?JKA!?'WYA,?XA(?!'7'7'7'7'7'7'7'7'7'7'7'7'7'7'7'7'7'7'7'7'7'7'7'7'7'7'7'7'7'7'7'7'7'7'7'7'7'7'7'7'7'7'7'7'7'7'7'7'7'7'7'7'7'7'7'7'7'7'7'7'7'7'7'7'7'7'7'79_
QLJ='XA!=7'7'7'7'7'7'7'7'7'7'7'7'7'7'7'7'7'7'7'7'7'7'7'7'7'7'7'7'7'7'7'7'7'7'7'7'7'7'7'7'7'7'7'7'7'7'7'7'7'7'7'7'7'7'7'7'7'7'7'7'7'7'7'7'7'7'7'7'7'7'7'7'7'7'7'7'7'7'7'7D<
?^QX8,?,',JL.A(W7'7'7'7'7'7'7'7'7'7'7'7'7'7'7'7'7'7'7'7'7'7'7'7'7'7'7'7'7'7'7'7'7'7'7'7'7'7'7'7'7'7'7'7'7'7'7'7'7'7'7'7'7'7'7'7'7'7'7'7'7'7'7'7'7'7'7'7'7'7DD
8J,?JA(W'J?QXLK?H?(='QLJ=! '7'7'7'7'7'7'7'7'7'7'7'7'7'7'7'7'7'7'7'7'7'7'7'7'7'7'7'7'7'7'7'7'7'7'7'7'7'7'7'7'7'7'7'7'7'7'7'7'7'7' >%-P'K45"#
XAHA=?,'.LJJL(=Z7'7'7'7'7'7'7'7'7'7'7'7'7'7'7'7'7'7'7'7'7'7'7'7'7'7'7'7'7'7'7'7'7'7'7'7'7'7'7'7'7'7'7'7'7'7'7'7'7'7'7'7'7'7'7'7'7'7'7'7'7'7'7' >%-P'K45"#
WARNING DECAL PLACEMENT
=0$1'O#%S$2N'104S1'/0"'&4-%/$42B1G'
46'/0"'S%#2$2N'O"-%&B1G7'If a decal is
missing or illegible, call the telephone number on the front cover
of this manual and request a free
replacement decal. Apply the decal
in the location shown. (4/"T'=0"'
O"-%&B1G'*%U'24/'+"'104S2'%/'%-/)%&'
1$V"7
(8J,AK=JLKM'$1'%'#"N$1/"#"O'/#%O"*%#P'46'AK8('AQR'A2-7
2

IMPORTANT PRECAUTIONS
WARNING: To reduce the risk of serious injury, read all important precautions and
instructions in this manual and all warnings on your ski exerciser before using your ski exerciser.
ICON assumes no responsibility for personal injury or property damage sustained by or through the
use of this product.
1. It is the responsibility of the owner to
ensure that all users of the ski exerciser are
adequately informed of all precautions.
2. Before beginning any exercise program,
consult your physician. This is especially
important for persons over age 35 or persons with pre-existing health problems.
3. Use the ski exerciser only as described in
this manual.
4. The ski exerciser is intended for home use
only. Do not use the ski exerciser in a commercial, rental, or institutional setting.
5. Keep the ski exerciser indoors, away from
moisture and dust. Do not put the ski exerciser in a garage or covered patio, or near
water.
6. Place the ski exerciser on a level surface,
with a mat beneath it to protect the floor or
carpet. Make sure that there is at least 2 ft.
(0.6 m) of clearance around the ski exerciser.
7. Inspect and properly tighten all parts regularly. Replace any worn parts immediately.
8. Keep children under age 12 and pets away
from the ski exerciser at all times.
9. Wear appropriate clothes while exercising;
do not wear loose clothes that could become
caught on the ski exerciser. Always wear
athletic shoes for foot protection.
10. The ski exerciser should not be used by persons weighing more than 250 lbs. (113 kg).
11. Keep hands and feet away from moving parts
of the ski exerciser.
12. The pulley will become hot during use (see
page 5 to identify the pulley). Avoid
touching the pulley immediately after use.
13. The heart rate monitor is not a medical
device. Various factors may affect the accuracy of heart rate readings. The heart rate
monitor is intended only as an exercise aid
in determining heart rate trends in general.
14. Over exercising may result in serious injury
or death. If you feel faint or if you experience
pain while exercising, stop immediately and
cool down.
3

STANDARD SERVICE PLANS
all
4
BEFORE YOU BEGIN
K42N#%/)&%/$421'64#'1"&"-/$2N'/0"'$2245%/$5"'
(8J,AK=JLKM`'KXL!!AK'QJ8'1P$'"a"#-$1"#7'K#411:
-4)2/#U'1P$$2N'$1'42"'46'/0"'*41/'"66"-/$5"'"a"#-$1"1'64#'
$2-#"%1$2N'-%#O$45%1-)&%#''/2"11R'+)$&O$2N'"2O)#%2-"R'
%2O'/42$2N'/0"'"2/$#"'+4OU7'=0"'KXL!!AK'QJ8'1P$'
"a"#-$1"#'6"%/)#"1'1*44/0'1P$1R')33"#:+4OU'%#*'-4#O1R'
%2O'%Ob)1/%+&"'#"1$1/%2-"'O"1$N2"O'/4'&"/'U4)'"2b4U'
/0$1'OU2%*$-'"a"#-$1"'$2'/0"'-425"2$"2-"'%2O'3#$5%-U'
46'U4)#'04*"7'
For your bene t, read this manual carefully before
you use the ski exerciser.'A6'U4)'0%5"'c)"1/$421'%6/"#'
L#*'K4#O
K4214&"
\%2ON#$3
\%2O&"+%#
#"%O$2N'/0$1'*%2)%&R'3&"%1"'1""'/0"'6#42/'-45"#'46'/0$1'
*%2)%&7'=4'0"&3')1'%11$1/'U4)R'24/"'/0"'3#4O)-/'*4O"&'
2)*+"#'%2O'1"#$%&'2)*+"#'+"64#"'-42/%-/$2N')17'=0"'
*4O"&'2)*+"#'%2O'/0"'&4-%/$42'46'/0"'1"#$%&'2)*+"#'
O"-%&'%#"'104S2'42'/0"'6#42/'-45"#'46'/0$1'*%2)%&7'
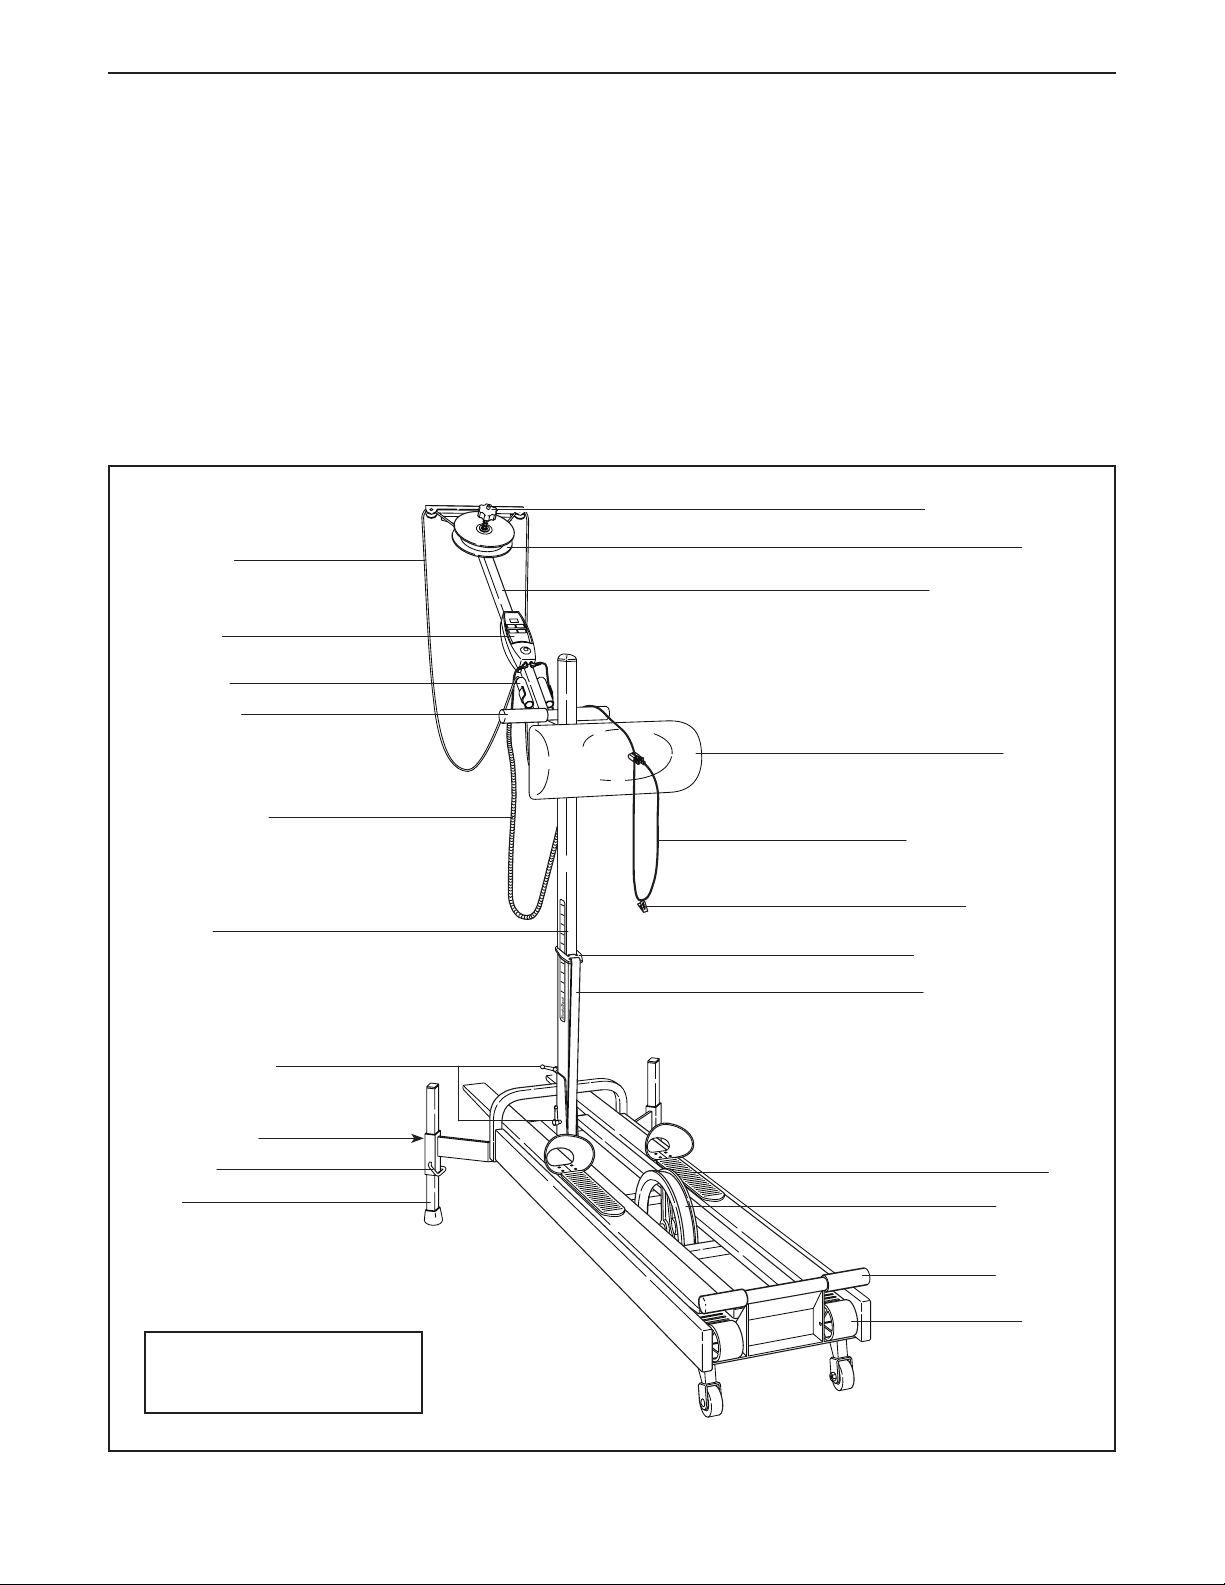
>"64#"'#"%O$2N'6)#/0"#R'3&"%1"'6%*$&$%#$V"'U4)#1"&6'S$/0'
/0"'3%#/1'/0%/'%#"'&%+"&"O'$2'/0"'O#%S$2N'+"&4S7
J"1$1/%2-"'M24+
Q)&&"U
Y33"#'>4OU'L#*
K4214&"'.$#"
Y3#$N0/
Y3#$N0/'M24+1
A2-&$2"'M24+
X"N'Q$2
X"N
\$3'Q%O
\"%#/'J%/"'H42$/4#
K&4/0"1'K&$3
J"1$1/%2-"'K&%*3
J"1$1/%2-"'!/#%3
!P$
@&US0""&
M$-P'Q%O
J4&&"#
X"2N/0T'_'6/7'd'$27'BDEC'-*G
.$O/0T' D'6/7'BC9'-*G
5

ASSEMBLY
e' L11"*+&U'#"c)$#"1'/S4'3"#14217
e' Q&%-"'%&&'3%#/1'$2'%'-&"%#"O'%#"%'%2O'#"*45"'/0"'
3%-P$2N'*%/"#$%&17',4'24/'O$1341"'46'/0"'3%-P$2N'
*%/"#$%&1')2/$&'U4)''2$10'%&&'%11"*+&U'1/"317
97' Go to www.nordictrackservice.com/
registration on your computer and register
your product.
' e' '%-/$5%/"1'U4)#'S%##%2/U
' e' '1%5"1'U4)'/$*"'$6'U4)'"5"#'2""O'/4'-42/%-/'
K)1/4*"#'K%#"
' e' '%&&4S1')1'/4'24/$6U'U4)'46')3N#%O"1'%2O'466"#1
''(4/"T'A6'U4)'O4'24/'0%5"'A2/"#2"/'%--"11R'-%&&'
K)1/4*"#'K%#"'B1""'/0"'6#42/'-45"#'46'/0$1'
*%2)%&G'%2O'#"N$1/"#'U4)#'3#4O)-/7
D7' Make sure that the two Self-backing Nuts (71)
are inside the Front Frame (1).
e' L11"*+&U'#"c)$#"1'/0"'$2-&)O"O'/44&B1G7
e' L11"*+&U'*%U'+"'"%1$"#'$6'U4)'0%5"'%'1"/'46'
S#"2-0"17'=4'%54$O'O%*%N$2N'3%#/1R'O4'24/')1"'
34S"#'/44&17
9
D
' 8#$"2/'/0"'X"N'>#%-P"/'BDG'%1'104S2f'make
sure that the indicated hole is in the position
shown.'
' L//%-0'/0"'X"N'>#%-P"/'BDG'/4'/0"'@#42/'@#%*"'B9G'
S$/0'/S4'H9<'a'9C**'\"a'!-#"S1'B_EG'%2O'/S4'
H9<'>&%-P'.%10"#1'B_DG7'
\4&"
_E
9
D
_9
_D
_D
_E
_9
6

E7' A21"#/'%'X"N'B_CG'$2/4'42"'46'/0"'1c)%#"'43"2$2N1'
$2'/0"'X"N'>#%-P"/'BDG7'
E
' L&$N2'/0"'1"-42O'04&"'6#4*'/0"'+4//4*'46'/0"'X"N'
B_CG'S$/0'/0"'$2O$-%/"O'04&"'$2'/0"'X"N'>#%-P"/R'
%2O'$21"#/'/0"'1/#%$N0/'"2O'46'%'X"N'Q$2'B_FG'
$2/4'/0"'04&"17'Make sure that the Leg Pin
is inserted completely through the holes
and that the bent end of the Leg Pin points
toward the floor.'J4/%/"'/0"'X"N'Q$2'/4'1"-)#"'$/'
%#4)2O'/0"'X"N7
' !&$O"'%2'A2-&$2"'K&%*3'BdDG'42/4'/0"'$2O$-%/"O'
1/)O'%2O'$2/4'/0"'1&4/1'$2'/0"'X"N'>#%-P"/'BDG7'
=$N0/"2'%2'A2-&$2"'M24+'BdEG'%2O'%2'H;'.%10"#'
BdFG'42/4'/0"'1/)O7
Attach the other Leg (76) in the same way.
F7' X$6/'/0"'Y33"#'>4OU'L#*'BD_G'1&$N0/&U'14'/0%/'
$/'S$&&'24/'-%/-0'42'/0"'@#42/'@#%*"'B9GR'%2O'
#%$1"'/0"'Y3#$N0/'B9CG'/4'/0"'341$/$42'104S2f'/0"'
Y3#$N0/'S$&&'12%3'$2/4'3&%-"'S0"2'$/'$1'341$/$42"O'
-4##"-/&U7'
' H%P"'1)#"'/0%/'/0"'H;'Q)10'()/'B9;G'$1'between'
/0"'Y3#$N0/'B9CG'%2O'/0"'@#42/'@#%*"'B9G7
!&4/1
!/)O
dD
dF
dE
F
_C
D
\4&"
_F
!"-42O'\4&"
_C
' =$N0/"2'/0"')33"#'Y3#$N0/'M24+'B9_G7'(4/"T'?%-0'
Y3#$N0/'M24+'$1'&$P"'%'S#"2-0f'/)#2'/0"'Y3#$N0/'
M24+'-&4-PS$1"R'3)&&'$/'%S%U'6#4*'/0"'Y3#$N0/'
B9CGR'/)#2'$/'-4)2/"#-&4-PS$1"R'3)10'$/'/4S%#O'/0"'
Y3#$N0/R'%2O'/0"2'/)#2'$/'-&4-PS$1"'%N%$27'J"3"%/'
/0$1'3#4-"O)#"')2/$&'/0"'Y3#$N0/'M24+'$1'/$N0/7'
' ("a/R'/$N0/"2'/0"'&4S"#'Y3#$N0/'M24+'B9_G7'
(4/"T'.0"2'/$N0/"2$2N'/0"'&4S"#'Y3#$N0/'M24+R'
)1"'/0"'%11"*+&U'/44&'/4'04&O'/0"'0"%O'46'/0"'
H;'a'F[**'\"a'>4&/'B24/'104S2G'42/4'S0$-0'/0"'
Y3#$N0/'M24+'$1'/0#"%O"O7'
D_
9C
9_
9;
9
9_
7
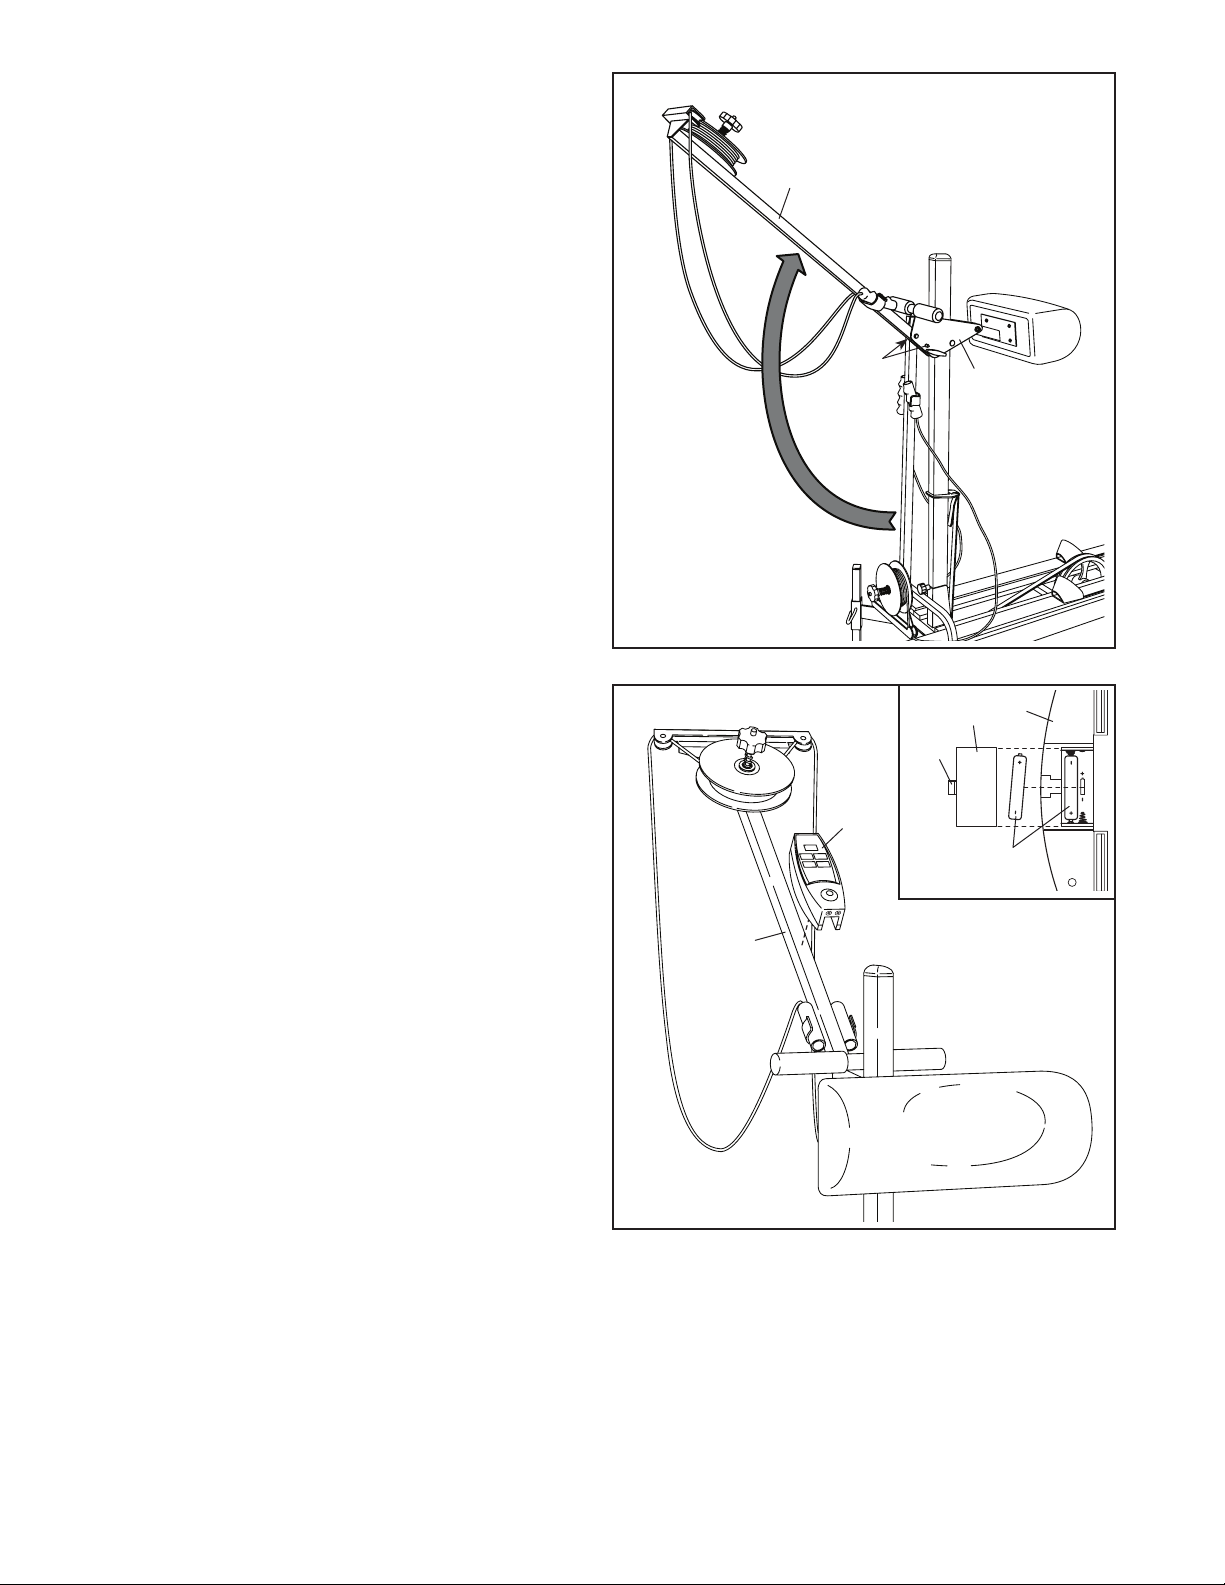
[7' J%$1"'/0"'Y33"#'>4OU'L#*'BD_G'/4'/0"'341$/$42'
104S27'Make sure that the posts on the Snap
Button (40) are fully extended and locked
into position on both sides of the Hip Pad
Slide (42).
[
D_
'C7' =0"'K4214&"'BCCG'-%2')1"'/S4'LL'+%//"#$"1'B24/'
$2-&)O"OGf'%&P%&$2"'+%//"#$"1'%#"'#"-4**"2O"O7'
,4'24/')1"'4&O'%2O'2"S'+%//"#$"1'/4N"/0"#'4#'
%&P%&$2"R'1/%2O%#OR'%2O'#"-0%#N"%+&"'+%//"#:
$"1'/4N"/0"#7'IMPORTANT: If the Console has
been exposed to cold temperatures, allow
it to warm to room temperature before you
insert batteries. Otherwise, you may damage the console displays or other electronic
components.
' See the inset drawing.'X4-%/"'/0"'>%//"#U',44#'
B;dG'42'/0"'+%-P'46'/0"'K4214&"'BCCG7'Q#"11'/0"'
$2O$-%/"O'/%+'42'/0"'>%//"#U',44#R'#"*45"'/0"'
>%//"#U',44#R'%2O'$21"#/'+%//"#$"1'$2/4'/0"'+%//"#U'
-4*3%#/*"2/7'=0"2R'#"%//%-0'/0"'>%//"#U',44#7
F<
C
CC
D_
=%+
>%//"#$"1
FD
;d
CC
' L//%-0'/0"'K4214&"'BCCG'/4'/0"'Y33"#'>4OU'L#*'
BD_G'+U'6$#*&U'3#"11$2N'$/'$2/4'3&%-"'$2'/0"'O"1$#"O'
&4-%/$427
8
 Loading...