

www.nordictrack.com
Model No. 831.21977.0
Serial No.
.#$/"'/0"'1"#$%&'2)*+"#'$2'/0"'
13%-"'%+45"'64#'#"6"#"2-"7
!"#$%&'()*+"#'
,"-%&
QUESTIONS?
86'94)'0%5"':)"1/$421;'4#'$6'3%#/1'
%#"'<%*%="<'4#'*$11$2=;'DO NOT
CONTACT THE STORE; please
contact Customer Care.
IMPORTANT: Please register this
product (see the limited warranty
on the back cover of this manual)
before contacting Customer Care.
USER%S MANUAL
CALL TOLL-FREE:
1-800-TO-BE-FIT
(1-800- 862-3348)
Mon.]Fri. 6 a.m.]6 p.m. MT
Sat. 8 a.m.]4 p.m. MT
ON THE WEB:
www.nordictrackservice.com
CAUTION
Read all precautions and instructions in this manual before using
this equipment. Keep this manual
for future reference.
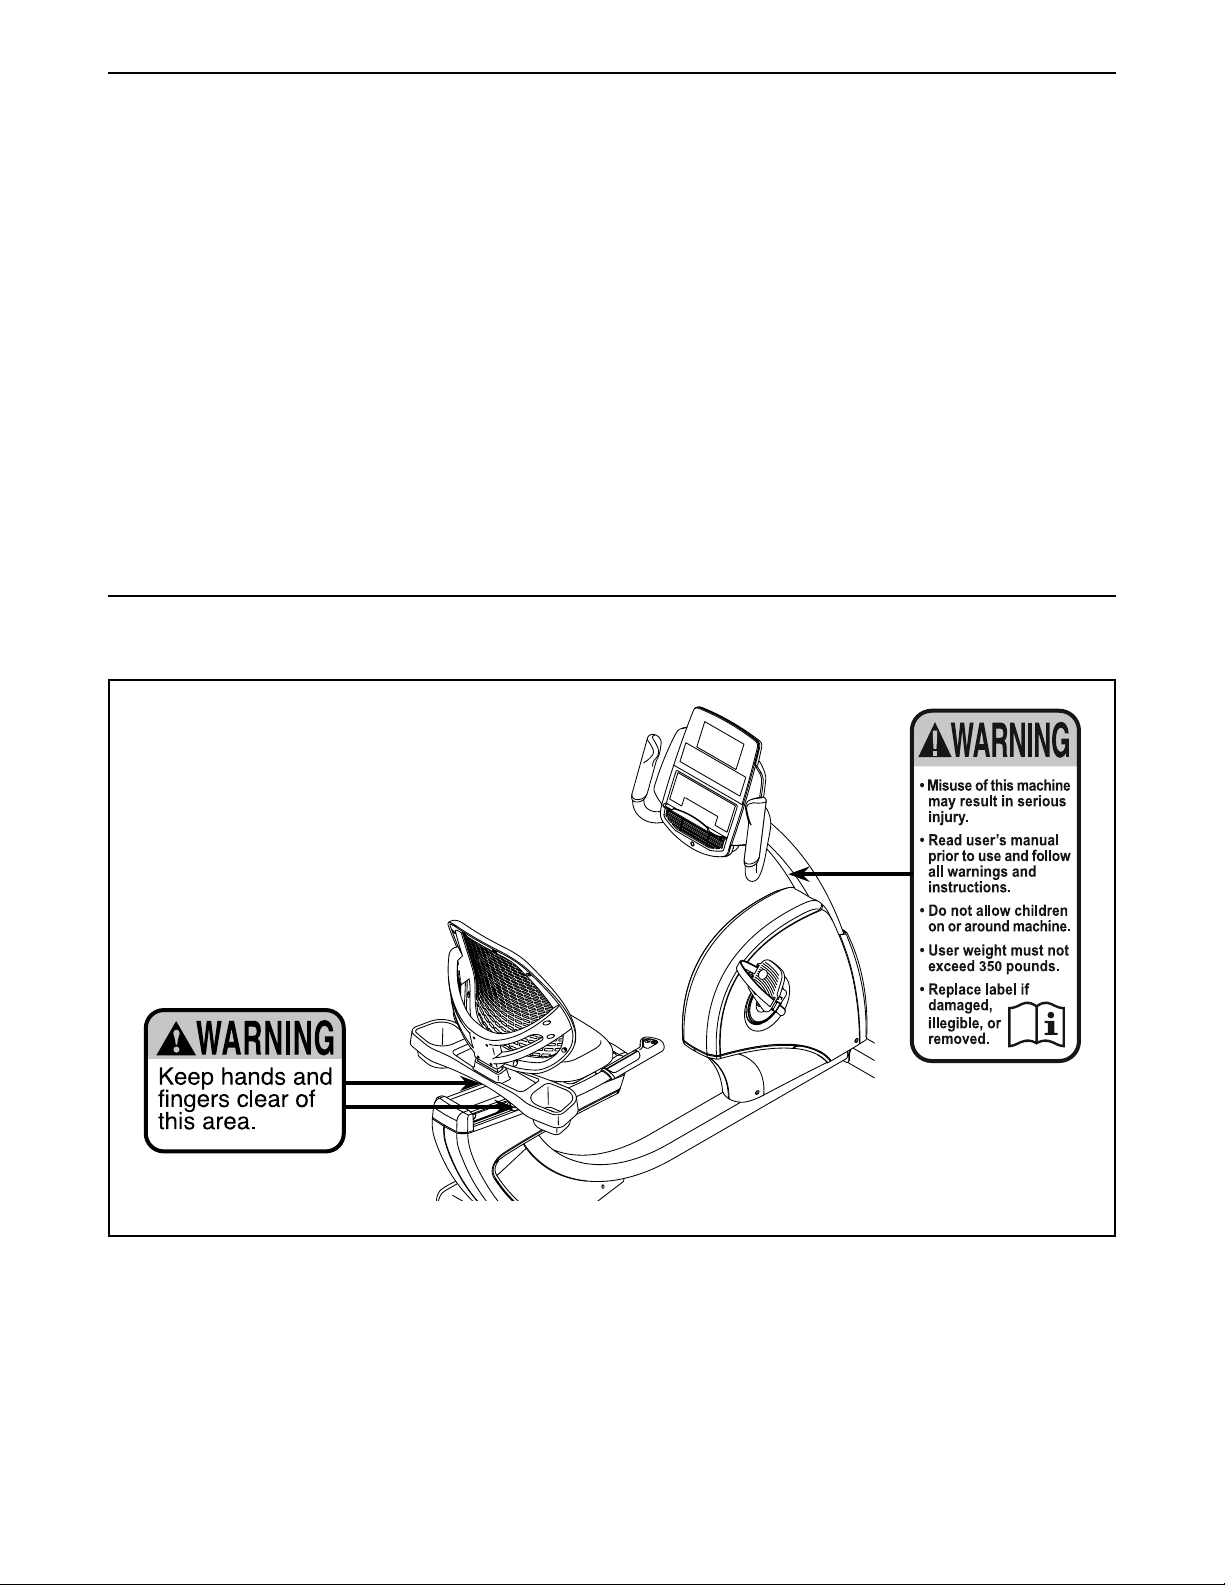
TABLE OF CONTENTS
.DE(8(F',GHDI'JIDHGKG(> 7'7'7'7'7'7'7'7'7'7'7'7'7'7'7'7'7'7'7'7'7'7'7'7'7'7'7'7'7'7'7'7'7'7'7'7'7'7'7'7'7'7'7'7'7'7'7'7'7'7'7'7'7'7'7'7'7'7'7'7'7'7'7L
8KJME>D(>'JEGHDN>8M(!'7'7'7'7'7'7'7'7'7'7'7'7'7'7'7'7'7'7'7'7'7'7'7'7'7'7'7'7'7'7'7'7'7'7'7'7'7'7'7'7'7'7'7'7'7'7'7'7'7'7'7'7'7'7'7'7'7'7'7'7'7'7'7'7'7'7 O
PGQMEG'RMN'PGF8(7'7'7'7'7'7'7'7'7'7'7'7'7'7'7'7'7'7'7'7'7'7'7'7'7'7'7'7'7'7'7'7'7'7'7'7'7'7'7'7'7'7'7'7'7'7'7'7'7'7'7'7'7'7'7'7'7'7'7'7'7'7'7'7'7'7'7'7'7'7'7'7 S
JDE>'8,G(>8Q8HD>8M('HTDE>7'7'7'7'7'7'7'7'7'7'7'7'7'7'7'7'7'7'7'7'7'7'7'7'7'7'7'7'7'7'7'7'7'7'7'7'7'7'7'7'7'7'7'7'7'7'7'7'7'7'7'7'7'7'7'7'7'7'7'7'7'7'7'7 U
D!!GKPIR 7'7'7'7'7'7'7'7'7'7'7'7'7'7'7'7'7'7'7'7'7'7'7'7'7'7'7'7'7'7'7'7'7'7'7'7'7'7'7'7'7'7'7'7'7'7'7'7'7'7'7'7'7'7'7'7'7'7'7'7'7'7'7'7'7'7'7'7'7'7'7'7'7'7'7'7'7'7'7'7V
>TG'HTG!>'TGDE>'ED>G'KM(8>ME7'7'7'7'7'7'7'7'7'7'7'7'7'7'7'7'7'7'7'7'7'7'7'7'7'7'7'7'7'7'7'7'7'7'7'7'7'7'7'7'7'7'7'7'7'7'7'7'7'7'7'7'7'7'7'7'7'7 WO
TM.'>M'N!G'>TG'GXGEH8!G'P8YG7'7'7'7'7'7'7'7'7'7'7'7'7'7'7'7'7'7'7'7'7'7'7'7'7'7'7'7'7'7'7'7'7'7'7'7'7'7'7'7'7'7'7'7'7'7'7'7'7'7'7'7'7'7'7'7'7'7'7 WS
QHH'8(QMEKD>8M( 7'7'7'7'7'7'7'7'7'7'7'7'7'7'7'7'7'7'7'7'7'7'7'7'7'7'7'7'7'7'7'7'7'7'7'7'7'7'7'7'7'7'7'7'7'7'7'7'7'7'7'7'7'7'7'7'7'7'7'7'7'7'7'7'7'7'7'7'7'7'7'7 LO
KD8(>G(D(HG'D(,'>EMNPIG!TMM>8(F'7'7'7'7'7'7'7'7'7'7'7'7'7'7'7'7'7'7'7'7'7'7'7'7'7'7'7'7'7'7'7'7'7'7'7'7'7'7'7'7'7'7'7'7'7'7'7'7'7'7'7'7'7 LS
GXGEH8!G'FN8,GI8(G!'7'7'7'7'7'7'7'7'7'7'7'7'7'7'7'7'7'7'7'7'7'7'7'7'7'7'7'7'7'7'7'7'7'7'7'7'7'7'7'7'7'7'7'7'7'7'7'7'7'7'7'7'7'7'7'7'7'7'7'7'7'7'7'7'7'7'7'7LV
JDE>'I8!>7'7'7'7'7'7'7'7'7'7'7'7'7'7'7'7'7'7'7'7'7'7'7'7'7'7'7'7'7'7'7'7'7'7'7'7'7'7'7'7'7'7'7'7'7'7'7'7'7'7'7'7'7'7'7'7'7'7'7'7'7'7'7'7'7'7'7'7'7'7'7'7'7'7'7'7'7'7'7'7 LZ
GXJIM,G,',ED.8(F7'7'7'7'7'7'7'7'7'7'7'7'7'7'7'7'7'7'7'7'7'7'7'7'7'7'7'7'7'7'7'7'7'7'7'7'7'7'7'7'7'7'7'7'7'7'7'7'7'7'7'7'7'7'7'7'7'7'7'7'7'7'7'7'7'7'7'7'7'7O[
ME,GE8(F'EGJIDHGKG(>'JDE>! '7'7'7'7'7'7'7'7'7'7'7'7'7'7'7'7'7'7'7'7'7'7'7'7'7'7'7'7'7'7'7'7'7'7'7'7'7'7'7'7'7'7'7'7'7'7'7'7'7'7' P%-\'H45"#
I8K8>G,'.DEED(>R7'7'7'7'7'7'7'7'7'7'7'7'7'7'7'7'7'7'7'7'7'7'7'7'7'7'7'7'7'7'7'7'7'7'7'7'7'7'7'7'7'7'7'7'7'7'7'7'7'7'7'7'7'7'7'7'7'7'7'7'7'7'7' P%-\'H45"#
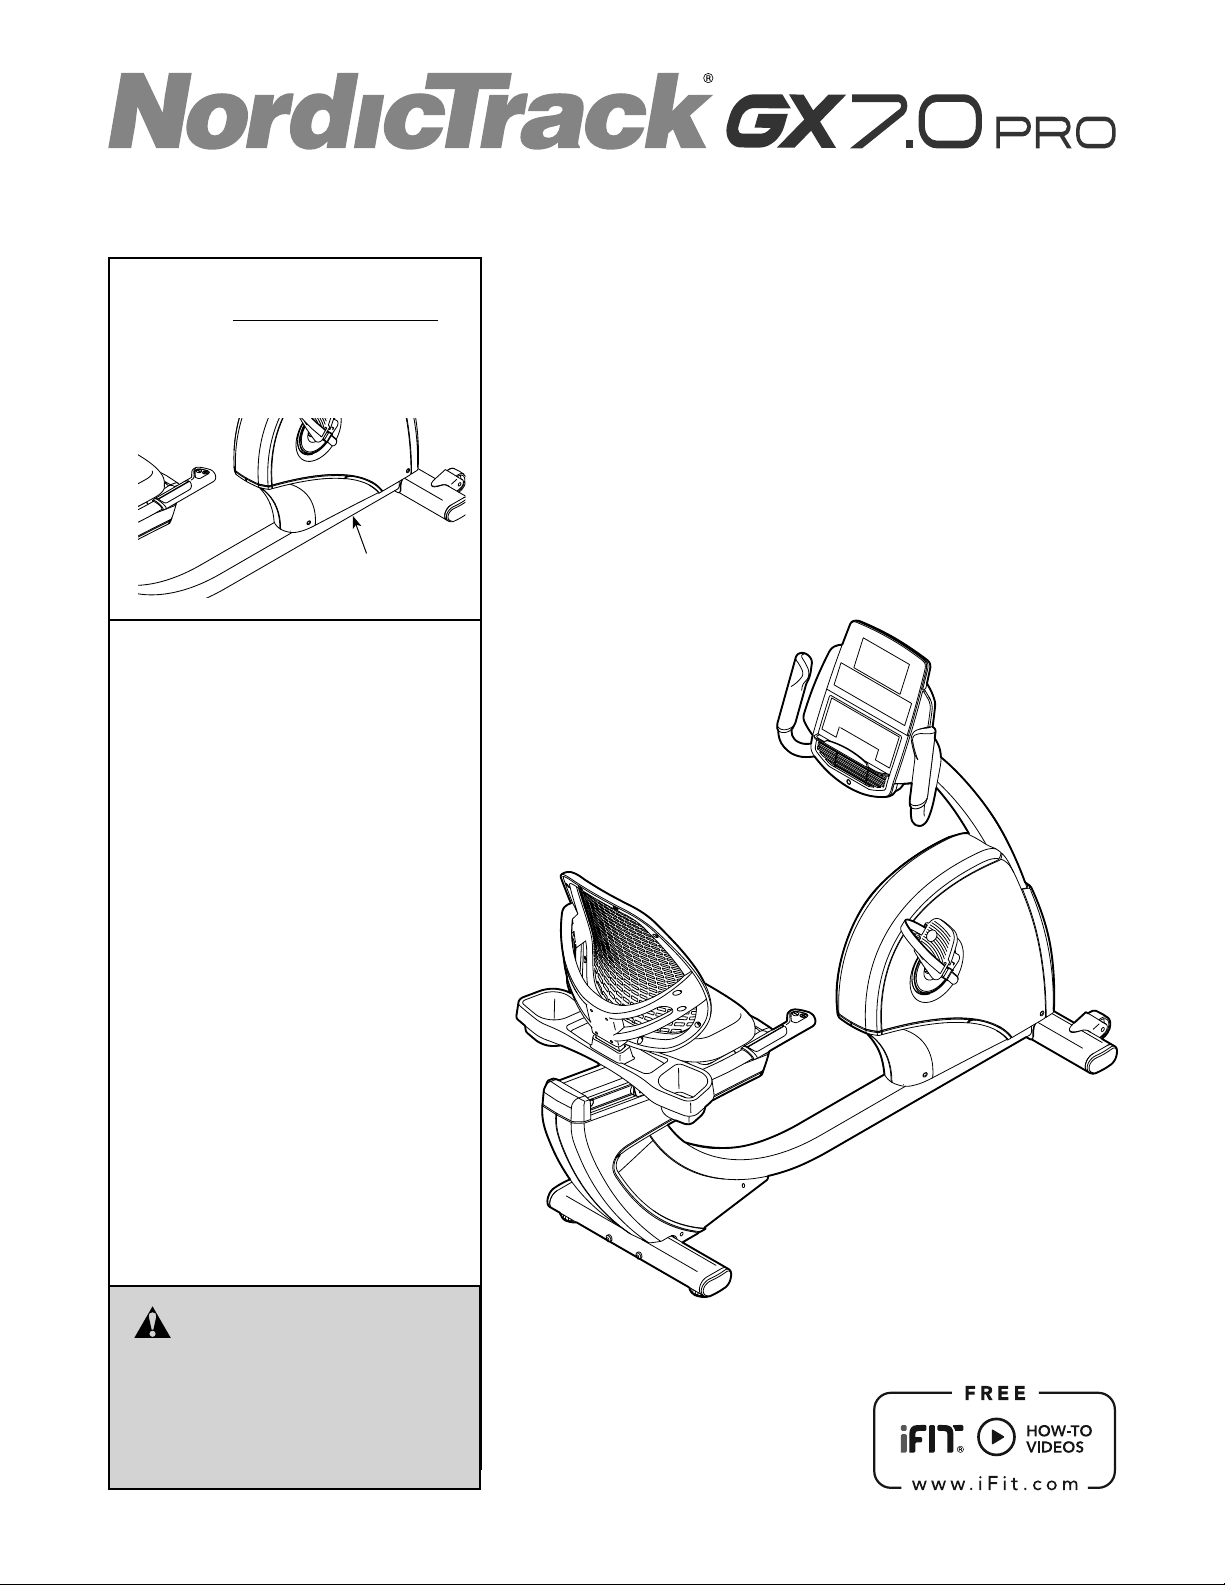
WARNING DECAL PLACEMENT
>0$1'<#%?$2='104?1'/0"'&4-%/$42@1A'46'/0"'?%#2$2='
<"-%&@1A7'If a decal is missing or illegible, see
the front cover of this manual and request a
free replacement decal. Apply the decal in the
location shown. (4/"B'>0"'<"-%&@1A'*%9'24/'+"'
104?2'%/'%-/)%&'1$C"7
(ME,8H>EDHY'$1'%'#"=$1/"#"<'/#%<"*%#\'46'8HM('8J;'82-7
2

IMPORTANT PRECAUTIONS
WARNING: To reduce the risk of serious injury, read all important precautions and
instructions in this manual and all warnings on your exercise bike before using your exercise bike.
ICON assumes no responsibility for personal injury or property damage sustained by or through the
use of this product.
1. It is the responsibility of the owner to ensure
that all users of the exercise bike are adequately informed of all precautions.
2. Before beginning any exercise program,
consult your physician. This is especially
important for persons over age 35 or persons with pre-existing health problems.
3. Use the exercise bike only as described in
this manual.
4. The exercise bike is intended for home use
only. Do not use the exercise bike in a commercial, rental, or institutional setting.
5. Keep the exercise bike indoors, away from
moisture and dust. Do not put the exercise
bike in a garage or covered patio, or near
water.
6. Place the exercise bike on a level surface
with at least 2 ft. (0.6 m) of clearance around
the exercise bike. To protect the floor or
carpet from damage, place a mat under the
exercise bike.
8. Keep children under age 12 and pets away
from the exercise bike at all times.
9. Wear appropriate clothes while exercising;
do not wear loose clothes that could become
caught on the exercise bike. Always wear
athletic shoes for foot protection.
10. The exercise bike should not be used by
persons weighing more than 350 lbs.
(159 kg).
11. The heart rate monitor is not a medical
device. Various factors, including the user%s
movement, may affect the accuracy of heart
rate readings. The heart rate monitor is
intended only as an exercise aid in determining heart rate trends in general.
12. Always keep your back straight while using
the exercise bike; do not arch your back.
13. Over exercising may result in serious injury
or death. If you feel faint or if you experience
pain while exercising, stop immediately and
cool down.
7. Inspect and properly tighten all parts regularly. Replace any worn parts immediately.
3
BEFORE YOU BEGIN
>0%2\'94)'64#'1"&"-/$2='/0"'#"54&)/$42%#9'
(ME,8H>EDHY_'FX'`7['JEM'"a"#-$1"'+$\"7'H9-&$2='
$1'%2'"66"-/$5"'"a"#-$1"'64#'$2-#"%1$2='-%#<$45%1-)&%#'
'/2"11;'+)$&<$2='"2<)#%2-";'%2<'/42$2='/0"'+4<97'>0"'
FX'`7['JEM'"a"#-$1"'+$\"'3#45$<"1'%2'$*3#"11$5"'
1"&"-/$42'46'6"%/)#"1'<"1$=2"<'/4'*%\"'94)#'?4#\4)/1'
%/'04*"'*4#"'"66"-/$5"'%2<'"2]49%+&"7
For your bene t, read this manual carefully before
you use the exercise bike.'86'94)'0%5"':)"1/$421'%6/"#'
I"2=/0B' U'6/7'Z'$27'@W`O'-*A
.$</0B' W'6/7'W['$27'@UV'-*A
Q%2
D<])1/*"2/'T%2<&"
!"%/
#"%<$2='/0$1'*%2)%&;'3&"%1"'1""'/0"'6#42/'-45"#'46'/0$1'
*%2)%&7'>4'0"&3')1'%11$1/'94);'24/"'/0"'3#4<)-/'*4<"&'
2)*+"#'%2<'1"#$%&'2)*+"#'+"64#"'-42/%-/$2=')17'>0"'
*4<"&'2)*+"#'%2<'/0"'&4-%/$42'46'/0"'1"#$%&'2)*+"#'
<"-%&'%#"'104?2'42'/0"'6#42/'-45"#'46'/0$1'*%2)%&7'
P"64#"'#"%<$2='6)#/0"#;'3&"%1"'6%*$&$%#$C"'94)#1"&6'?$/0'
/0"'3%#/1'/0%/'%#"'&%+"&"<'$2'/0"'<#%?$2='+"&4?7
H4214&"
T%2<&"+%#
P%-\#"1/
.4#\4)/1'
H42/#4&
I"5"&$2='Q44/
J"<%&^!/#%3
.0""&
E"1$1/%2-"'H42/#4&
T"%#/'E%/"'K42$/4#
D--"114#9'>#%9
4
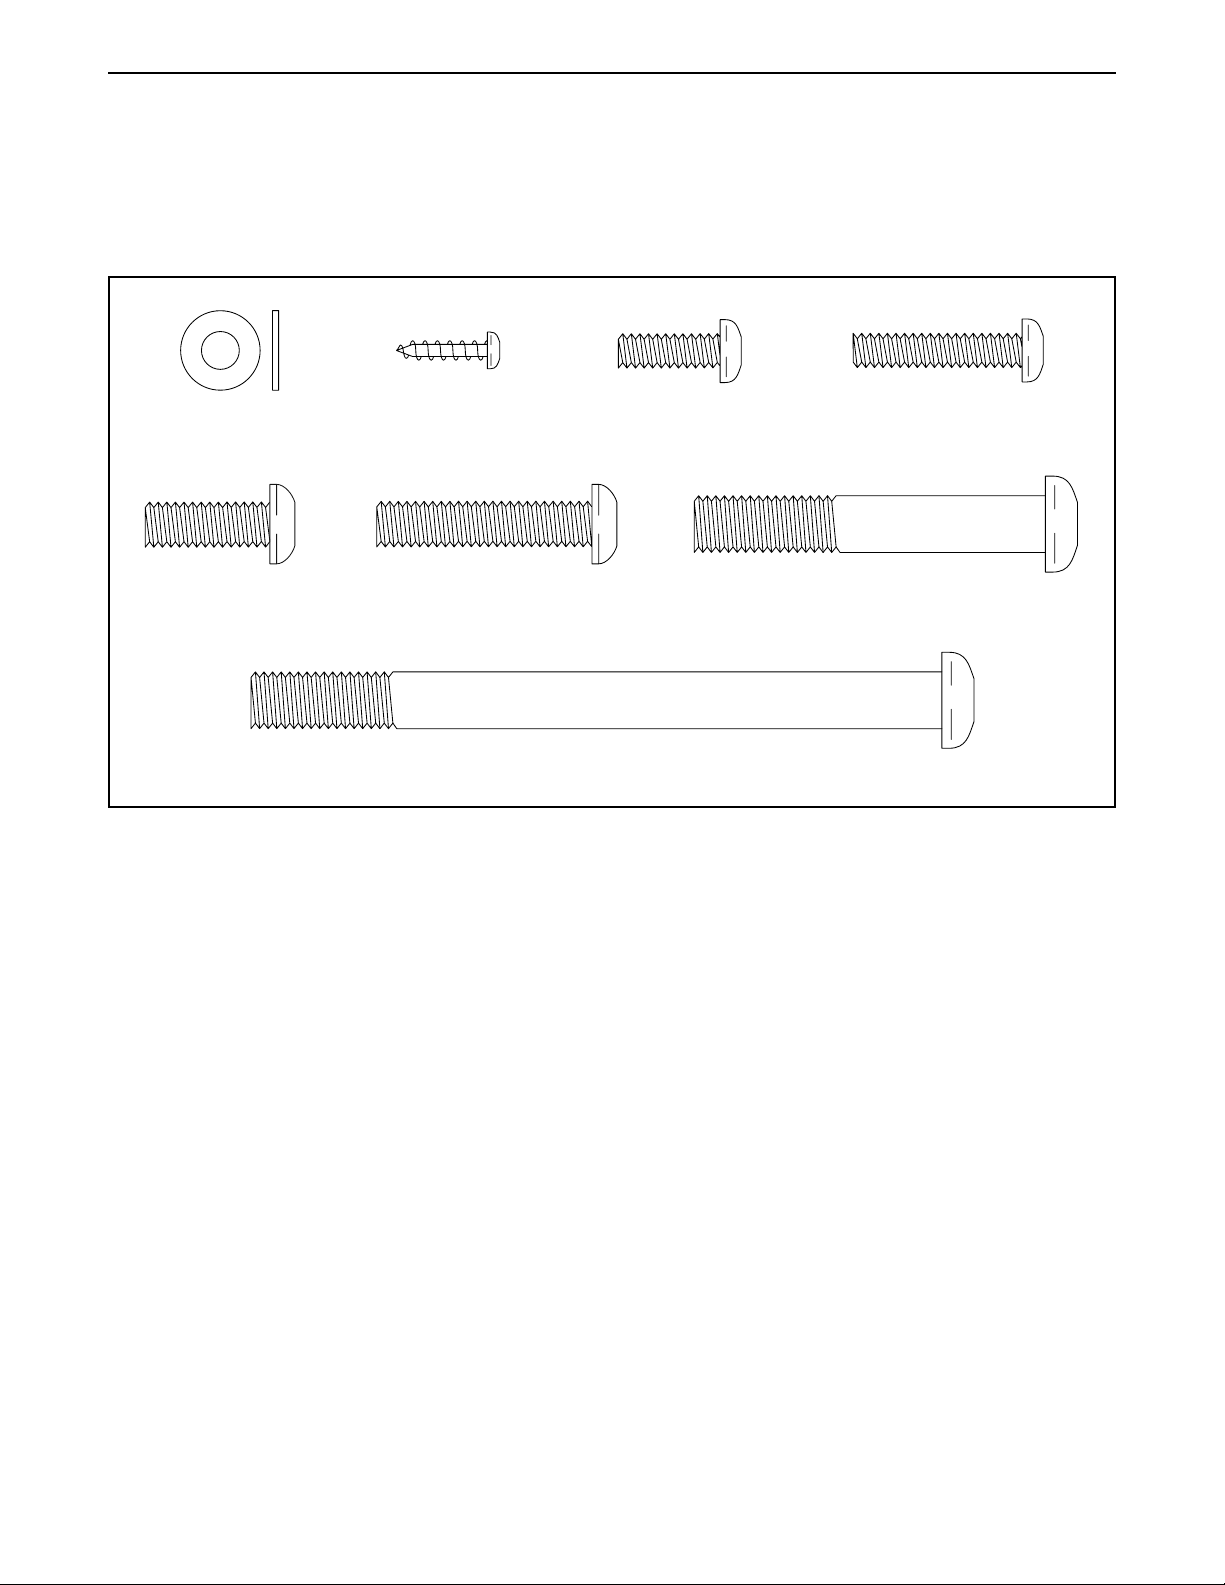
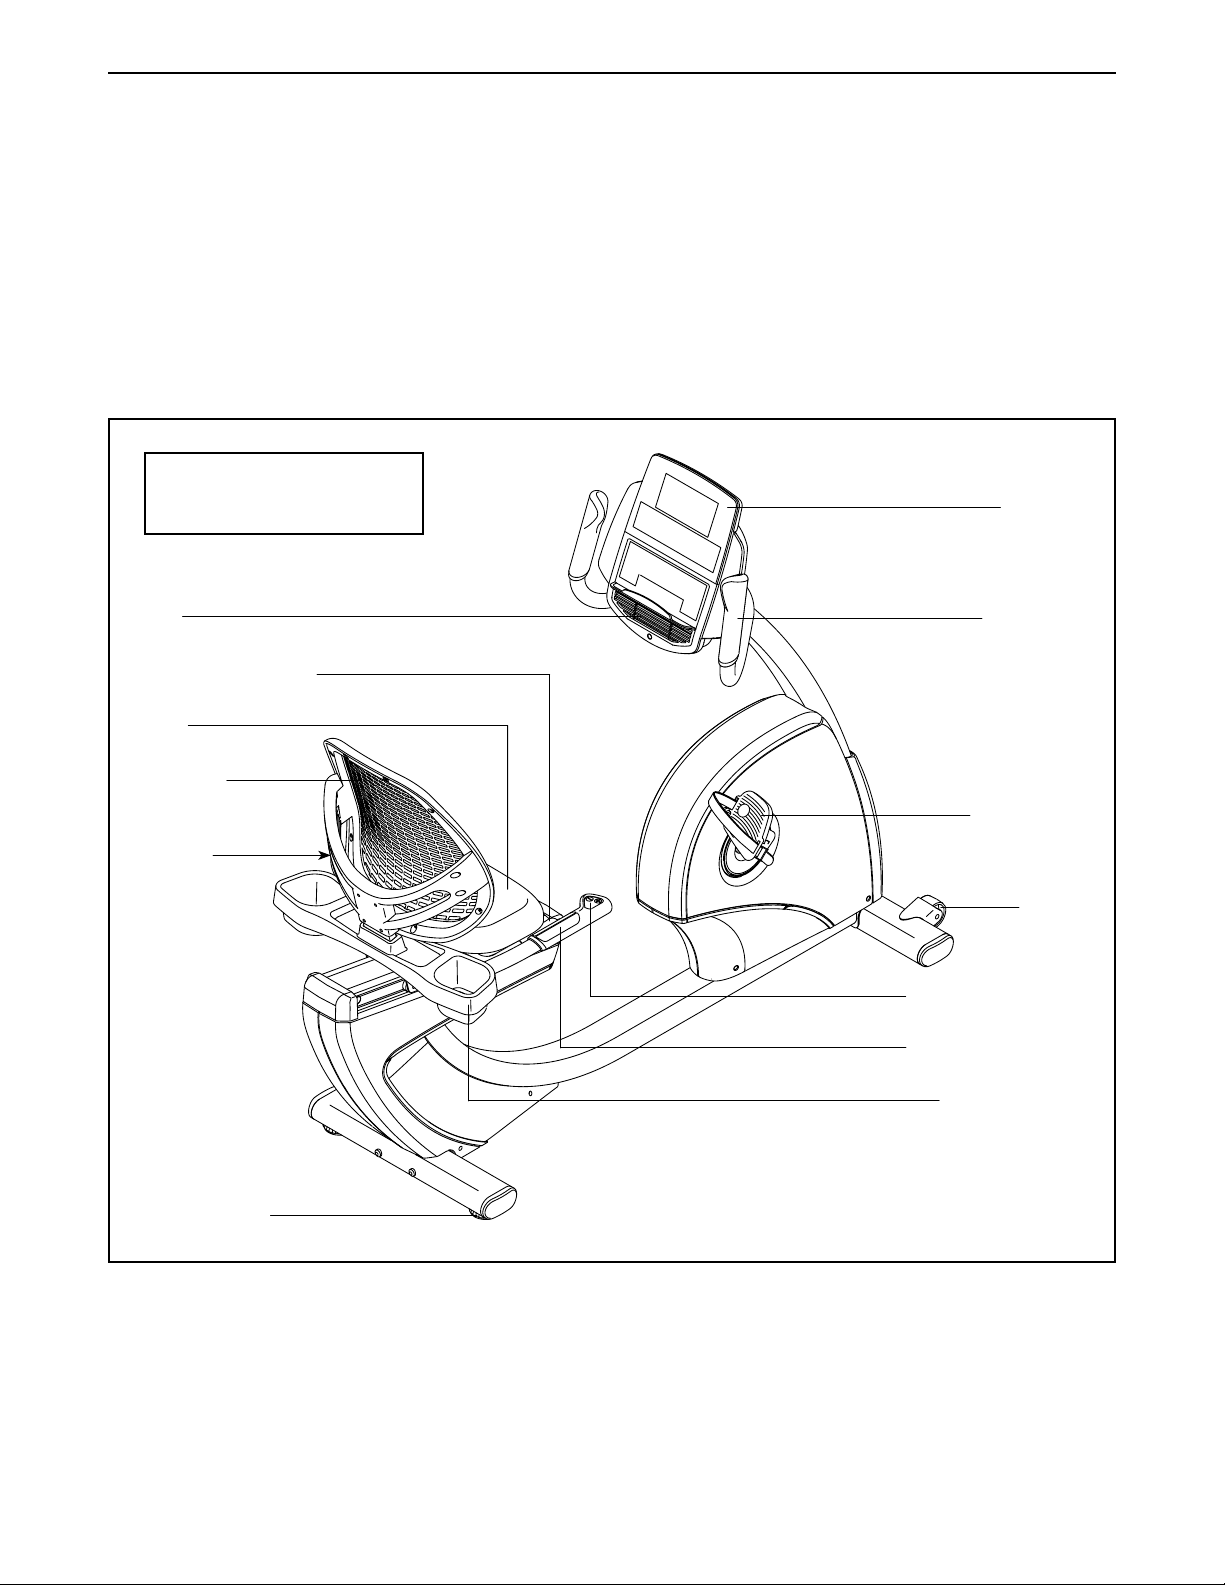
PART IDENTIFICATION CHART
N1"'/0"'<#%?$2=1'+"&4?'/4'$<"2/$69'/0"'1*%&&'3%#/1'2""<"<'64#'%11"*+&97'>0"'2)*+"#'$2'3%#"2/0"1"1'+"&4?'"%-0'
<#%?$2='$1'/0"'\"9'2)*+"#'46'/0"'3%#/;'6#4*'/0"'JDE>'I8!>'2"%#'/0"'"2<'46'/0$1'*%2)%&7'>0"'2)*+"#'64&&4?$2='/0"'
\"9'2)*+"#'$1'/0"':)%2/$/9'2""<"<'64#'%11"*+&97'Note: If a part is not in the hardware kit, check to see if it
has been preassembled. Extra parts may be included.
KV'.%10"#'
@ZZAbZ
KZ'a'LL**'
!-#"?'@VcAbL
KS'a'WV**
!-#"?'@``AbW[
KZ'a'OZ**'
!-#"?'@V`AbS
KW['a'WLL**'!-#"?'@VUAbS
KV'a'WZ**'
!-#"?'@LUAbS
KV'a'O[**'
!-#"?'@`UAbS
KW['a'VL**'!-#"?'@`[AbS
5
ASSEMBLY
d' >4'?%/-0'%2'%11"*+&9'
5$<"4;'=4'/4'
0//3B^^3#4<)-/5$<"47-4^
%11"*+&9^1"%#1^24#<$-e
/#%-\'4#')1"'94)#'*4+$&"'
3042"'4#'1*%#/3042"'/4'
#"%<'/0"'fE'-4<"'%/'/0"'
#$=0/7'
d' D11"*+&9'#":)$#"1'/?4'3"#14217
d' J&%-"'%&&'3%#/1'$2'%'-&"%#"<'%#"%'%2<'#"*45"'/0"'
3%-\$2='*%/"#$%&17',4'24/'<$1341"'46'/0"'3%-\$2='
*%/"#$%&1')2/$&'94)''2$10'%&&'%11"*+&9'1/"317
W7' '!"/'%'1/)#<9'3$"-"'46'3%-\$2='*%/"#$%&')2<"#'/0"'
#"%#'46'/0"'Q#%*"'@WA7'Have a second person
hold the Frame to prevent it from tipping
while you complete this step.
' M#$"2/'/0"'E"%#'!/%+$&$C"#'@WVA'%1'$2<$-%/"<'+9'
/0"'1/$-\"#7'D//%-0'/0"'E"%#'!/%+$&$C"#'/4'/0"'
Q#%*"'@WA'?$/0'/?4'KW['a'WLL**'!-#"?1'@VUA7'
d' I"6/'3%#/1'%#"'*%#\"<'gIh'4#'gI"6/h'%2<'#$=0/'3%#/1'
%#"'*%#\"<'gEh'4#'gE$=0/7h
d' >4'$<"2/$69'1*%&&'3%#/1;'1""'3%="'U7
82'%<<$/$42'/4'/0"'$2-&)<"<'/44&@1A;'%11"*+&9'
#":)$#"1'/0"'64&&4?$2='/44&1B
42"'J0$&&$31'1-#"?<#$5"#'
%<])1/%+&"'?#"2-0' '
D11"*+&9'*%9'+"'"%1$"#'$6'94)'0%5"'%'1"/'46'
?#"2-0"17'>4'%54$<'<%*%=$2='3%#/1;'<4'24/')1"'
34?"#'/44&17
W
' E"*45"'/0"'3%-\$2='*%/"#$%&7
L7' '!"/'%'1/)#<9'3$"-"'46'3%-\$2='*%/"#$%&')2<"#'/0"'
6#42/'46'/0"'Q#%*"'@WA7'Have a second person
hold the Frame to prevent it from tipping
while you complete this step.
' M#$"2/'/0"'Q#42/'!/%+$&$C"#'@WUA'14'/0%/'/0"'
?0""&1'%#"'6%-$2='%?%9'6#4*'/0"'"a"#-$1"'+$\"7'
D//%-0'/0"'Q#42/'!/%+$&$C"#'/4'/0"'Q#%*"'@WA'?$/0'
/?4'KW['a'WLL**'!-#"?1'@VUA7'
' E"*45"'/0"'3%-\$2='*%/"#$%&7
WV
W
VU
L
.0""&
WU
W
VU
6
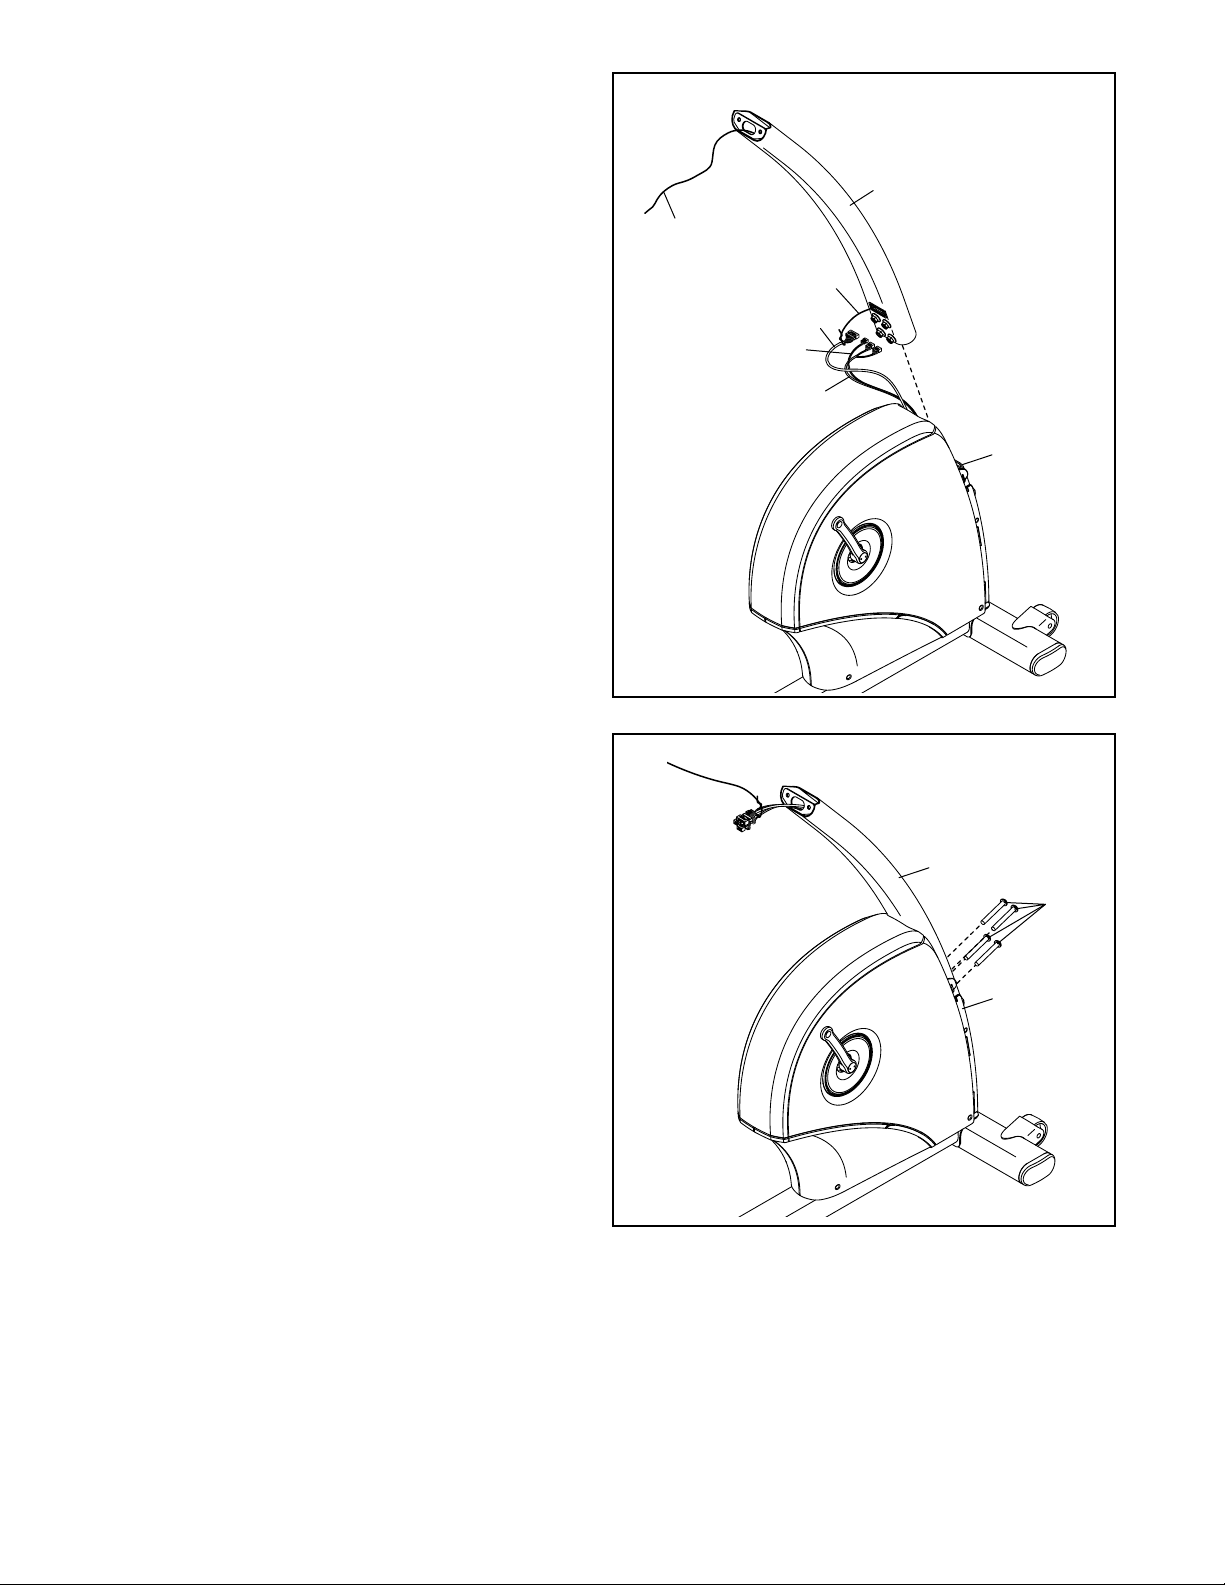
O7' M#$"2/'/0"'N3#$=0/'@LA'%1'104?27'T%5"'%'1"-42<'
3"#142'04&<'/0"'N3#$=0/'2"%#'/0"'6#42/'46'/0"'
Q#%*"'@WA7
O
' >$"'/0"'&4?"#'"2<'46'/0"'?$#"'/$"'$2'/0"'N3#$=0/'
@LA'/4'/0"'K%$2'.$#"'@SOA;'/4'/0"'Q#%*"'J)&1"'
.$#"'@SLA;'%2<'/4'/0"'Ga/"21$42'.$#"'@ZVA'$2'/0"'
Q#%*"'@WA7'
' J)&&'/0"')33"#'"2<'46'/0"'?$#"'/$"')2/$&'/0"'?$#"1'
%#"'#4)/"<'/0#4)=0'/0"'N3#$=0/'@LA7
S7' Tip: Avoid pinching the wires.'!&$<"'/0"'
N3#$=0/'@LA'42/4'/0"'Q#%*"'@WA7'
L
.$#"'>$"
.$#"'>$"
SO
ZV
SL
W
S
' D//%-0'/0"'N3#$=0/'@LA'?$/0'64)#'KW['a'VL**'
!-#"?1'@`[Ai'start all the Screws, and then
tighten them.
Avoid pinching
the wires
L
`[
W
7
U7' J#"11'/0"'*4)2/'42'/0"'Q#42/'!0$"&<'@UZA'$2/4'/0"'
Q#%*"'@WA7'>0"2;'3#"11'/0"'Q#42/'!0$"&<'$2/4'/0"'
I"6/'%2<'E$=0/'Q#42/'!0$"&<1'@WO;'WSA7
U
V7' M#$"2/'/0"'N3#$=0/'H45"#'@U`A'%1'104?27'T4&<'/0"'
N3#$=0/'H45"#'2"%#'/0"'N3#$=0/'@LA;'%2<'$21"#/'
/0"'?$#"1')3?%#<'/0#4)=0'/0"'N3#$=0/'H45"#7
' >0"2;'1&$<"'/0"'N3#$=0/'H45"#'@U`A'42/4'/0"'
N3#$=0/'@LA7
V
WO
.$#"'>$"
U`
.$#"1
W
UZ
WS
L
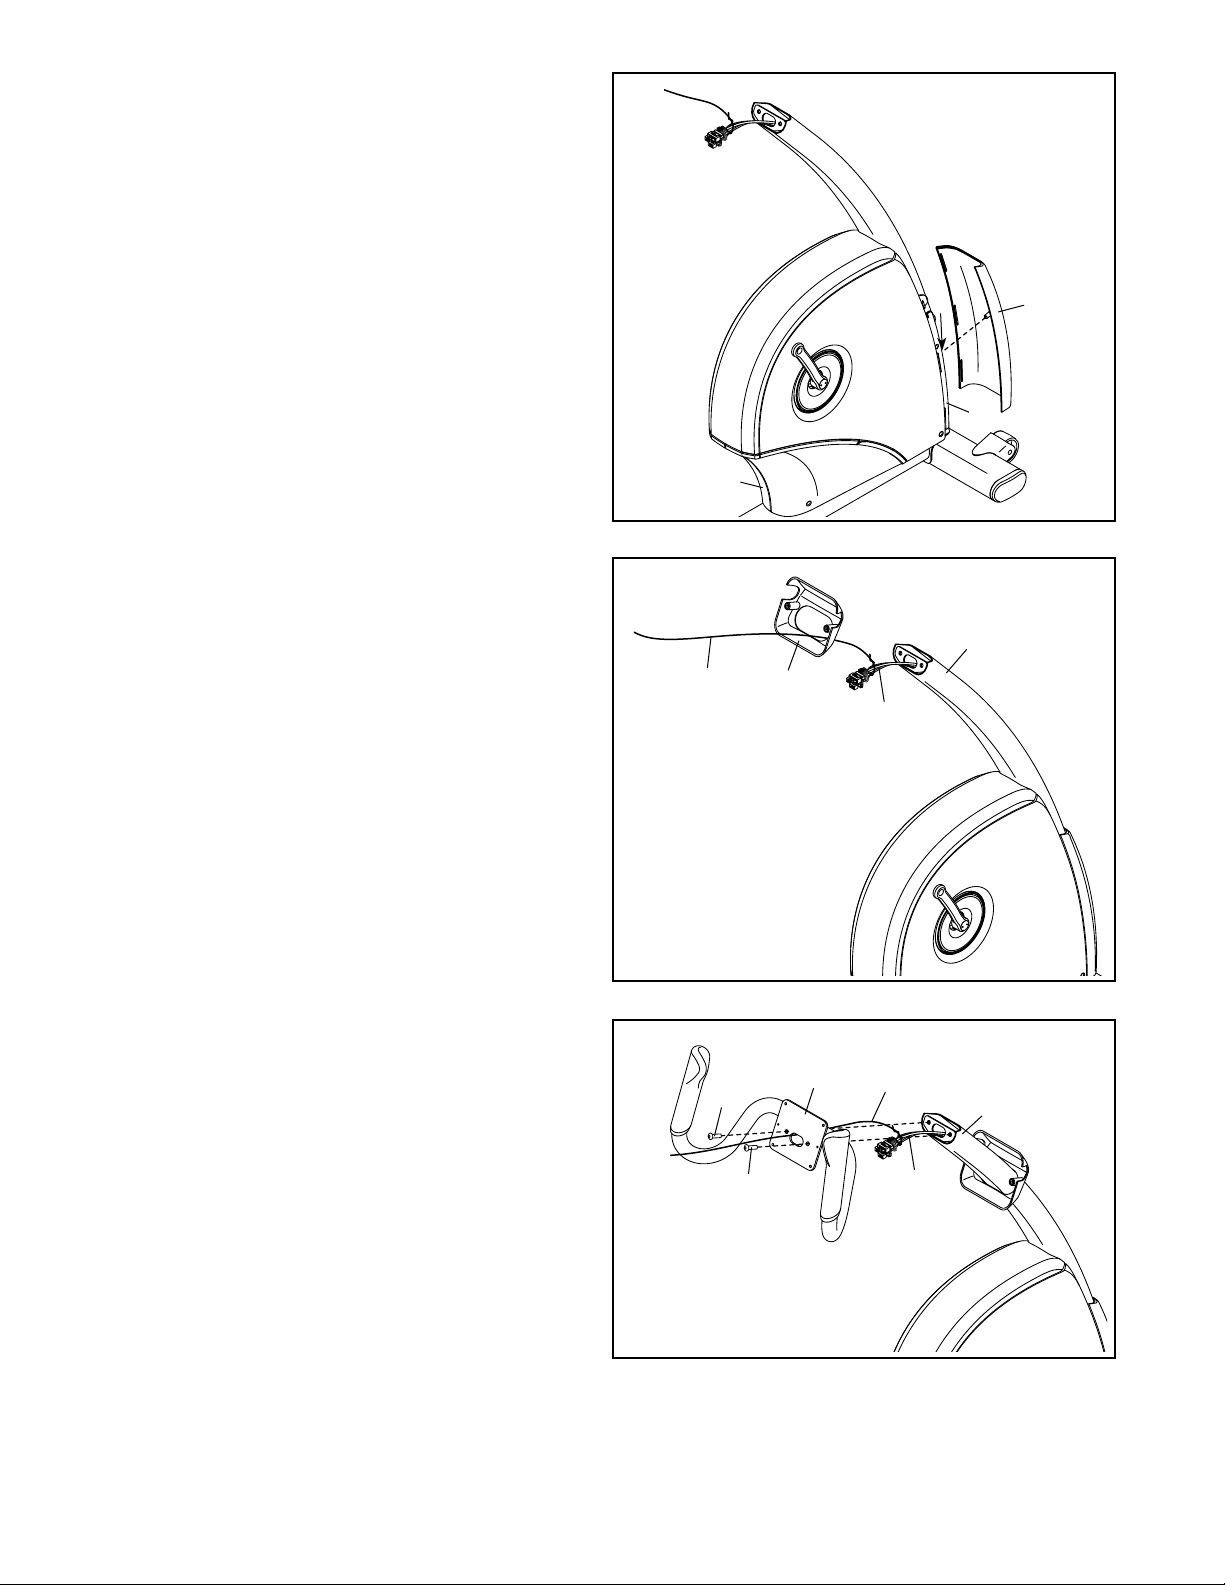
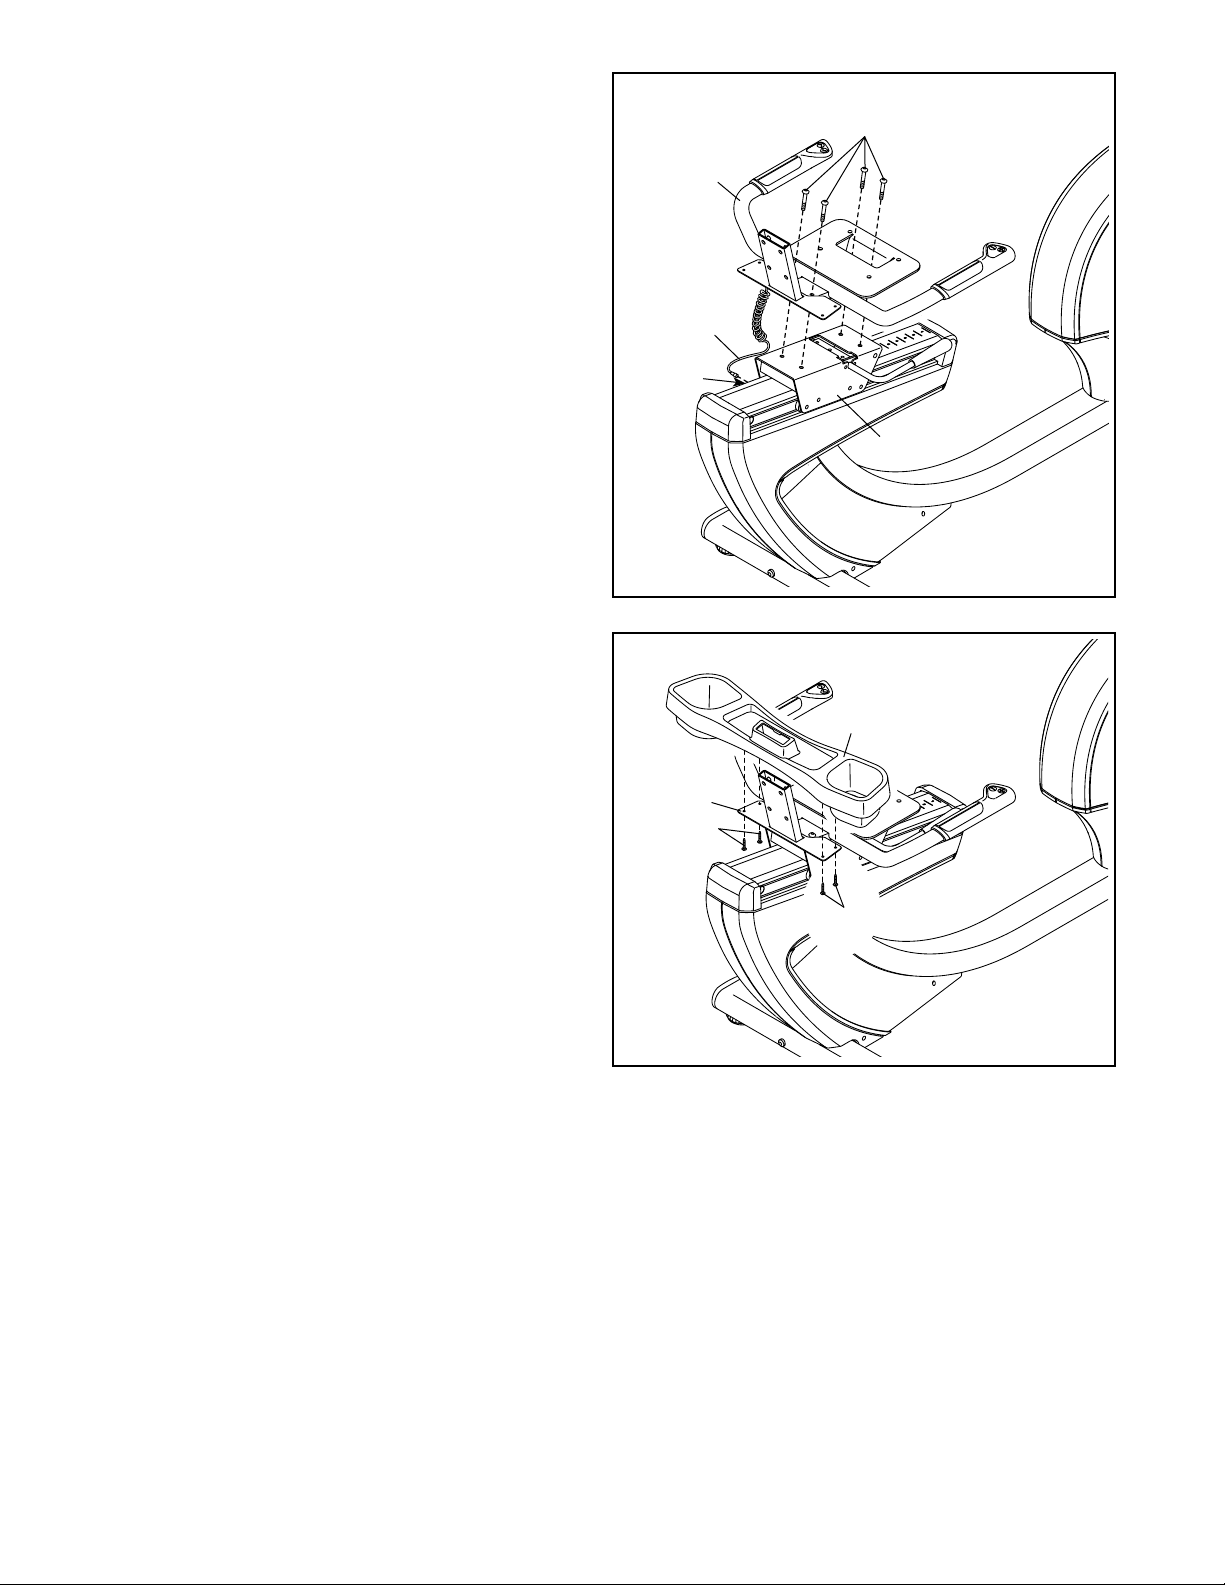
`7' M#$"2/'/0"'T%2<&"+%#'@`A'%1'104?27'.0$&"'%'
1"-42<'3"#142'04&<1'/0"'T%2<&"+%#'2"%#'/0"'
N3#$=0/'@LA;'$21"#/'/0"'?$#"1')3?%#<'/0#4)=0'/0"'
T%2<&"+%#7
' Tip: Avoid pinching the wires.'D//%-0'/0"'
T%2<&"+%#'@`A'/4'/0"'N3#$=0/'@LA'?$/0'/?4'KZ'a'
LL**'!-#"?1'@VcA7
`
Avoid pinching
the wires
8
Vc
Vc
`
.$#"'>$"
L
.$#"1
Z7' .0$&"'%'1"-42<'3"#142'04&<1'/0"'H4214&"'@SA'
2"%#'/0"'T%2<&"+%#'@`A;'-422"-/'/0"'?$#"1'42'
/0"'H4214&"'/4'/0"'K%$2'.$#"'@SOA;'/4'/0"'Q#%*"'
J)&1"'.$#"1'@SLA;'%2<'/4'/0"'Ga/"21$42'.$#"'@ZVA7
' 821"#/'/0"'"a-"11'?$#"'$2/4'/0"'T%2<&"+%#'@`A'4#'
$2/4'/0"'H4214&"'@SA7
Z
S
ZV
SO
H4214&"'
.$#"1
`
SL
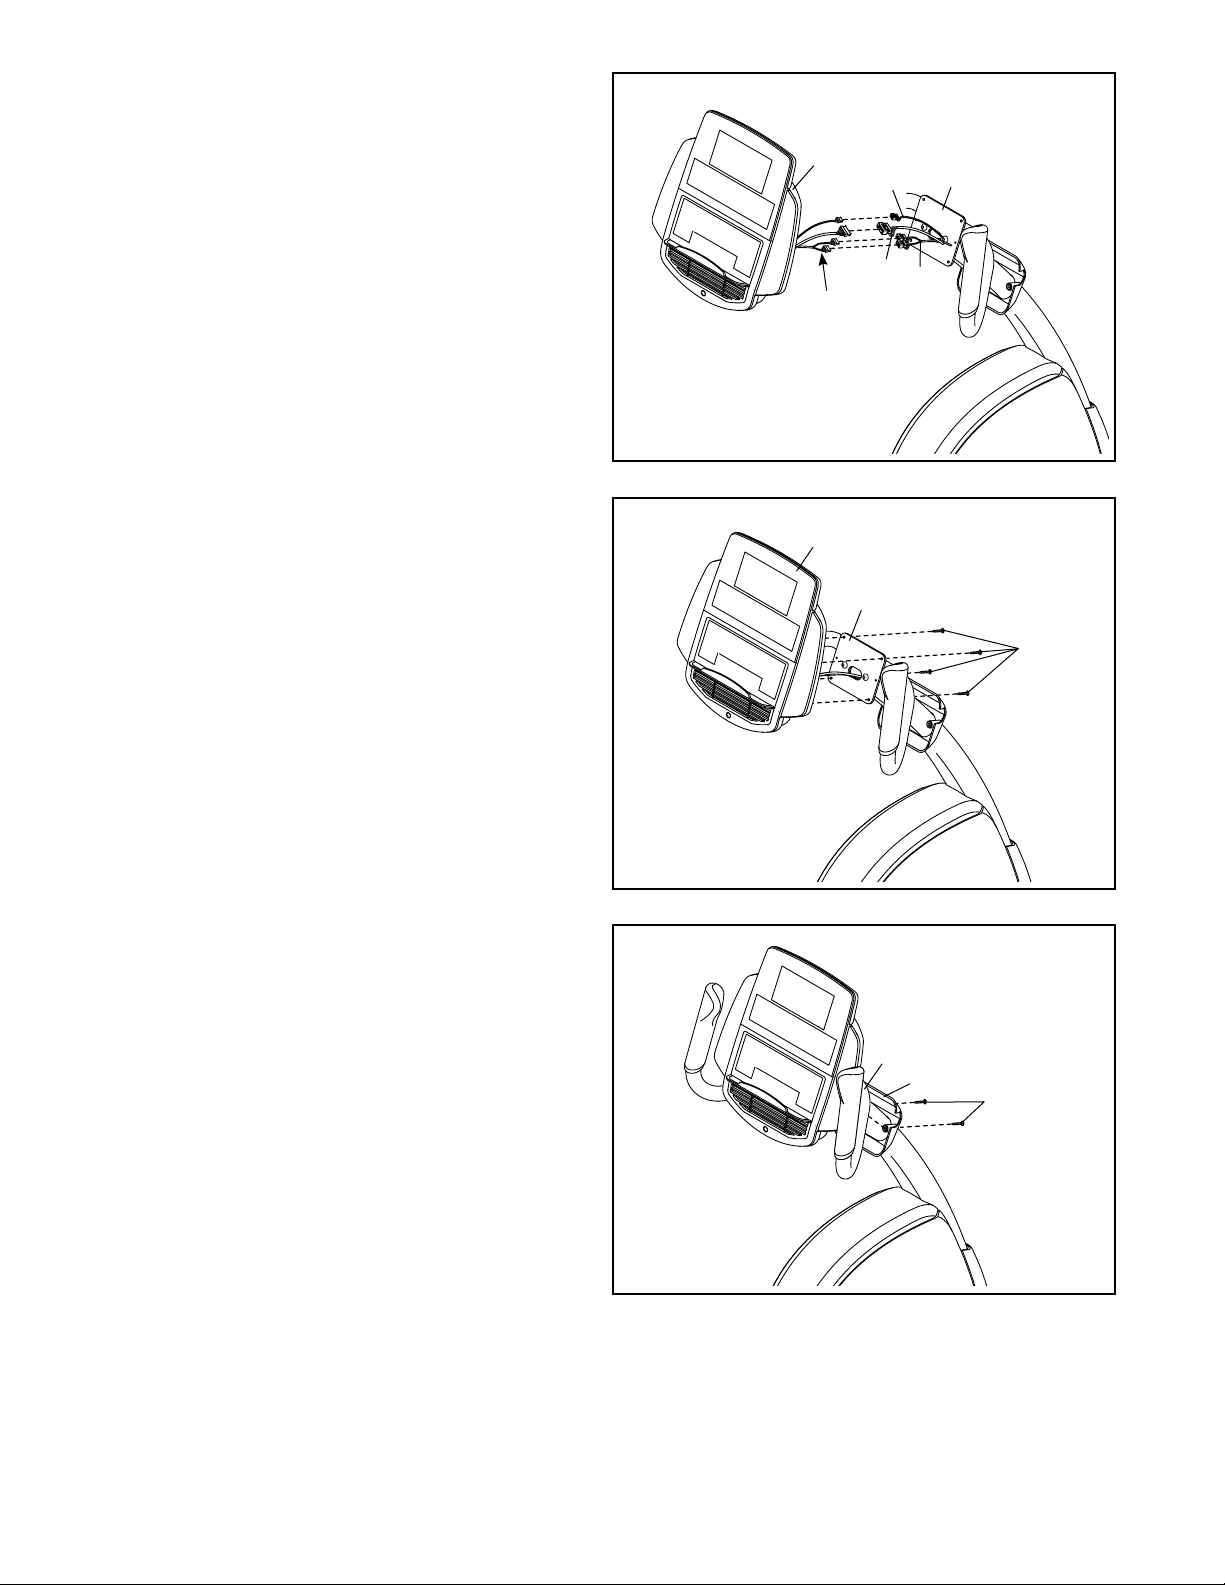
c7' Tip: Avoid pinching the wires. D//%-0'/0"'
H4214&"'@SA'/4'/0"'T%2<&"+%#'@`A'?$/0'64)#'KS'a'
WV**'!-#"?1'@``A7
W[7'D//%-0'/0"'N3#$=0/'H45"#'@U`A'/4'/0"'T%2<&"+%#'
@`A'?$/0'/?4'KS'a'WV**'!-#"?1'@``A7
c
S
`
``
Avoid pinching
the wires
W[
`
U`
``
9
WW7' D//%-0'/0"'!"%/'T%2<&"+%#'@W[A'/4'/0"'!"%/'
H%##$%="'@SWA'?$/0'64)#'KZ'a'OZ**'!-#"?1'@V`Ai'
start all the Screws, and then tighten them.
WW
V`
' J&)='/0"'?$#"'42'/0"'!"%/'T%2<&"+%#'@W[A'6)&&9'
$2/4'/0"'Q#%*"'J)&1"'E"-"3/%-&"'@SLA'42'/0"'&"6/'
1$<"'46'/0"'"a"#-$1"'+$\"7
WL7'!&$<"'/0"'D--"114#9'>#%9'@UVA'42/4'/0"'!"%/'
T%2<&"+%#'@W[A7
' D//%-0'/0"'D--"114#9'>#%9'@UVA'/4'/0"'!"%/'
T%2<&"+%#'@W[A'?$/0'64)#'KS'a'WV**'
!-#"?1'@``A7
W[
.$#"
SL
SW
WL
UV
W[
``
``
10

WO7'M#$"2/'/0"'!"%/'@cA'%1'$2<$-%/"<'+9'/0"'1/$-\"#7
' D//%-0'/0"'!"%/'@cA'/4'/0"'!"%/'T%2<&"+%#'@W[A'
?$/0'64)#'KV'a'WZ**'!-#"?1'@LUA'%2<'64)#'KV'
.%10"#1'@ZZA'@42&9'/?4'46'"%-0'%#"'104?2Ai'
start all the Screws, and then tighten them.
WO
c
W[
ZZ
LU
WS7'!&$<"'/0"'P%-\#"1/'P%-\'@ZWA'42/4'/0"'!"%/'
T%2<&"+%#'@W[A7
' D//%-0'/0"'P%-\#"1/'P%-\'@ZWA'?$/0'64)#'KV'a'
O[**'!-#"?1'@`UA'%2<'64)#'KV'.%10"#1'@ZZAi'
start all the Screws, and then tighten them.
WS
ZW
ZZ
`U
W[
11

WU7'8<"2/$69'/0"'E$=0/'J"<%&'@LWA7'
' N1$2='%2'%<])1/%+&"'?#"2-0;'firmly tighten'/0"'
E$=0/'J"<%&'@LWA'clockwise'$2/4'/0"'E$=0/'H#%2\'
D#*'@LOA7'
' Firmly tighten'/0"'I"6/'J"<%&'@24/'104?2A'
counterclockwise'$2/4'/0"'I"6/'H#%2\'D#*'@24/'
104?2A7
' D<])1/'/0"'1/#%3'42'/0"'E$=0/'J"<%&'@LWA'/4'/0"'
<"1$#"<'341$/$42;'%2<'3#"11'/0"'"2<1'46'/0"'1/#%3'
42/4'/0"'/%+1'42'/0"'E$=0/'J"<%&7'Adjust the
strap on the Left Pedal (not shown) in the
same way.
WU
LO
LW
WV7'J&)='/0"'J4?"#'D<%3/"#'@UWA'$2/4'/0"'#"-"3/%-&"'
42'/0"'6#%*"'46'/0"'"a"#-$1"'+$\"7'
' (4/"B'>4'3&)='/0"'J4?"#'D<%3/"#'@UWA'$2/4'%2'
4)/&"/;'1""'TM.'>M'JINF'8('>TG'JM.GE'
D,DJ>GE'42'3%="'WS7
W`7'Make sure that all parts are properly tightened before you use the exercise bike. (4/"B'Ga/#%'3%#/1'*%9'
+"'$2-&)<"<7'J&%-"'%'*%/'+"2"%/0'/0"'"a"#-$1"'+$\"'/4'3#4/"-/'/0"'6&44#7'
WV
UW
12

THE CHEST HEART RATE MONITOR
HOW TO PUT ON THE HEART RATE MONITOR
>0"'0"%#/'#%/"'
*42$/4#'-421$1/1'46'
%'-0"1/'1/#%3'%2<'%'
1"214#7'821"#/'/0"'
/%+'42'42"'"2<'46'
/0"'-0"1/'1/#%3'$2/4'
/0"'04&"'$2'42"'"2<'
46'/0"'1"214#'%1'
104?27'>0"2;'3#"11'
/0"'"2<'46'/0"'1"2e
14#')2<"#'/0"'+)-\&"'
42'/0"'-0"1/'1/#%37'
>0"'/%+'104)&<'+"'
6&)10'?$/0'/0"'6#42/'46'
/0"'1"214#7''
>0"'0"%#/'#%/"'*42$e
/4#'*)1/'+"'?4#2'
)2<"#'94)#'-&4/0"1;'
/$=0/'%=%$21/'94)#'
1\$27'.#%3'/0"'0"%#/'
#%/"'*42$/4#'%#4)2<'
94)#'-0"1/'$2'/0"'
&4-%/$42'104?27'
K%\"'1)#"'/0%/'
/0"'&4=4'$1'#$=0/e
1$<"e)37'>0"2;'%//%-0'/0"'4/0"#'"2<'46'/0"'-0"1/'1/#%3'
/4'/0"'1"214#7'D<])1/'/0"'&"2=/0'46'/0"'-0"1/'1/#%3;'$6'
2"-"11%#97
J)&&'/0"'1"214#'%?%9'6#4*'94)#'+4<9'%'6"?'$2-0"1'%2<'
&4-%/"'/0"'/?4'"&"-/#4<"'%#"%1;'?0$-0'%#"'-45"#"<'+9'
10%&&4?'#$<="17'N1$2='1%&$2"'14&)/$42'1)-0'%1'1%&$5%'4#'
-42/%-/'&"21'14&)/$42;'?"/'/0"'"&"-/#4<"'%#"%17'>0"2;'
#"/)#2'/0"'1"214#'/4'%'341$/$42'%=%$21/'94)#'-0"1/7'
CARE AND MAINTENANCE
d' >04#4)=0&9'<#9'/0"'1"214#'?$/0'%'146/'/4?"&'%6/"#'
"%-0')1"7'K4$1/)#"'*%9'\""3'/0"'1"214#'%-/$5%/"<;'
104#/"2$2='/0"'&$6"'46'/0"'+%//"#97
d' !/4#"'/0"'0"%#/'#%/"'*42$/4#'$2'%'?%#*;'<#9'3&%-"7',4'
24/'1/4#"'/0"'0"%#/'#%/"'*42$/4#'$2'%'3&%1/$-'+%='4#'
4/0"#'-42/%$2"#'/0%/'*%9'/#%3'*4$1/)#"7
>%+1
H0"1/'
!"214#
!/#%3
!"214#
>%+
'P)-\&"
d' ,4'24/'"a341"'/0"'0"%#/'#%/"'*42$/4#'/4'<$#"-/'1)2e
&$=0/'64#'"a/"2<"<'3"#$4<1'46'/$*"i'<4'24/'"a341"'$/'/4'
/"*3"#%/)#"1'%+45"'WLLj'Q'@U[j'HA'4#'+"&4?'WSj'Q'
@eW[j'HA7'
d' ,4'24/'"a-"11$5"&9'+"2<'4#'1/#"/-0'/0"'1"214#'?0"2'
)1$2='4#'1/4#$2='/0"'0"%#/'#%/"'*42$/4#7
d' >4'-&"%2'/0"'1"214#;')1"'%'<%*3'-&4/0'%2<'%'1*%&&'
%*4)2/'46'*$&<'14%37'>0"2;'?$3"'/0"'1"214#'?$/0'%'
<%*3'-&4/0'%2<'/04#4)=0&9'<#9'$/'?$/0'%'146/'/4?"&7'
("5"#')1"'%&-404&;'%+#%1$5"1;'4#'-0"*$-%&1'/4'-&"%2'
/0"'1"214#7'T%2<'?%10'%2<'%$#'<#9'/0"'-0"1/'1/#%37
TROUBLESHOOTING
86'/0"'0"%#/'#%/"'*42$/4#'<4"1'24/'6)2-/$42'3#43"#&9;'/#9'
/0"'1/"31'+"&4?7
d' K%\"'1)#"'/0%/'94)'%#"'?"%#$2='/0"'0"%#/'#%/"'*42$e
/4#'%1'<"1-#$+"<'%/'/0"'&"6/7'86'/0"'0"%#/'#%/"'*42$/4#'
<4"1'24/'6)2-/$42'?0"2'341$/$42"<'%1'<"1-#$+"<;'
*45"'$/'1&$=0/&9'&4?"#'4#'0$=0"#'42'94)#'-0"1/7
d' 86'0"%#/'#%/"'#"%<$2=1'%#"'24/'<$13&%9"<')2/$&'94)'
+"=$2'3"#13$#$2=;'#"?"/'/0"'"&"-/#4<"'%#"%17
d' Q4#'/0"'-4214&"'/4'<$13&%9'0"%#/'#%/"'#"%<$2=1;'94)'
*)1/'+"'?$/0$2'%#*k1'&"2=/0'46'/0"'-4214&"7
d' 86'/0"#"'$1'%'+%//"#9'-45"#'42'/0"'+%-\'46'/0"'1"214#;'
#"3&%-"'/0"'+%//"#9'?$/0'%'2"?'+%//"#9'46'/0"'1%*"'
/93"7
d' >0"'0"%#/'#%/"'*42$/4#'$1'<"1$=2"<'/4'?4#\'?$/0'
3"43&"'?04'0%5"'24#*%&'0"%#/'#09/0*17'T"%#/'#%/"'
#"%<$2='3#4+&"*1'*%9'+"'-%)1"<'+9'*"<$-%&'-42<$e
/$421'1)-0'%1'3#"*%/)#"'5"2/#$-)&%#'-42/#%-/$421'
@35-1A;'/%-09-%#<$%'+)#1/1;'%2<'%##09/0*$%7
d' >0"'43"#%/$42'46'/0"'0"%#/'#%/"'*42$/4#'-%2'+"'
%66"-/"<'+9'*%=2"/$-'$2/"#6"#"2-"'6#4*'0$=0'34?"#'
&$2"1'4#'4/0"#'14)#-"17'86'94)'1)13"-/'/0%/'*%=2"/$-'
$2/"#6"#"2-"'$1'-%)1$2='%'3#4+&"*;'/#9'#"&4-%/$2='/0"'
6$/2"11'":)$3*"2/7
13

HOW TO USE THE EXERCISE BIKE
HOW TO PLUG IN THE POWER ADAPTER
IMPORTANT: If the exercise bike has been exposed
to cold temperatures, allow it to warm to room
temperature before plugging in the power adapter.
If you do not do this, you may damage the console
displays or other electronic components.
J&)='/0"'34?"#'%<%3/"#'
$2/4'/0"'#"-"3/%-&"'
42'/0"'6#%*"'46'/0"'
"a"#-$1"'+$\"7'>0"2;'
3&)='/0"'34?"#'%<%3/"#'
$2/4'%2'%33#43#$%/"'
4)/&"/'/0%/'$1'3#43"#&9'
$21/%&&"<'$2'%--4#<%2-"'
?$/0'%&&'&4-%&'-4<"1'%2<'
4#<$2%2-"17
HOW TO ADJUST THE SEAT
>4'%<])1/'/0"'1"%/;'3)10'<4?2?%#<'42'/0"'1"%/'0%2<&";'
1&$<"'/0"'1"%/'64#?%#<'4#'+%-\?%#<'/4'/0"'<"1$#"<'341$e
/$42;'%2<'/0"2'3)&&')3?%#<'42'/0"'1"%/'0%2<&"'/4'&4-\'
/0"'1"%/'$2'3&%-"7'
J4?"#'D<%3/"#
HOW TO ADJUST THE PEDAL STRAPS
>4'%<])1/'/0"'3"<%&'
1/#%31;''#1/'3)&&'/0"'
"2<1'46'/0"'1/#%31'466'
/0"'/%+1'42'/0"'3"<%&17'
D<])1/'/0"'1/#%31'/4'/0"'
<"1$#"<'341$/$42;'%2<'
/0"2'3#"11'/0"'"2<1'
46'/0"'1/#%31'42/4'/0"'
/%+17'
HOW TO LEVEL THE EXERCISE BIKE
86'/0"'"a"#-$1"'+$\"'
#4-\1'1&$=0/&9'42'94)#'
'44#'<)#$2=')1";'/)#2'
42"'4#'+4/0'46'/0"'
&"5"&$2='6""/'+"2"%/0'
/0"'#"%#'1/%+$&$C"#')2/$&'
/0"'#4-\$2='*4/$42'$1'
"&$*$2%/"<7
I"5"&$2='
Q""/
!/#%3
>%+
T%2<&"
14

CONSOLE DIAGRAM
FEATURES OF THE CONSOLE
>0"'%<5%2-"<'-4214&"'466"#1'%2'%##%9'46'6"%/)#"1'
<"1$=2"<'/4'*%\"'94)#'?4#\4)/1'*4#"'"66"-/$5"'%2<'
"2]49%+&"7'
.0"2'94)')1"'/0"'*%2)%&'*4<"'46'/0"'-4214&";'94)'
-%2'-0%2="'/0"'#"1$1/%2-"'46'/0"'3"<%&1'?$/0'/0"'/4)-0'
46'%'+)//427'
.0$&"'94)'"a"#-$1";'/0"'-4214&"'?$&&'<$13&%9'-42/$2)e
4)1'"a"#-$1"'6""<+%-\7'R4)'-%2'%&14'*"%1)#"'94)#'
0"%#/'#%/"')1$2='/0"'0%2<=#$3'0"%#/'#%/"'*42$/4#'4#'/0"'
$2-&)<"<'-0"1/'0"%#/'#%/"'*42$/4#7'
>0"'-4214&"'466"#1'/0$#/9e/?4'42+4%#<'?4#\4)/1l
1$a/""2'-%&4#$"'?4#\4)/1'%2<'1$a/""2'3"#64#*%2-"'
?4#\4)/17'G%-0'?4#\4)/'%)/4*%/$-%&&9'-0%2="1'/0"'
#"1$1/%2-"'46'/0"'3"<%&1'%1'$/'=)$<"1'94)'/0#4)=0'%2'
"66"-/$5"'?4#\4)/7'R4)'-%2'%&14'1"/'%'-)1/4*$C"<'?4#\e
4)/'=4%&'?$/0'/0"'1"/e%e=4%&'?4#\4)/7
>0"'-4214&"'%&14'6"%/)#"1'%2'$Q$/'*4<"'/0%/'"2%+&"1'
/0"'-4214&"'/4'-4**)2$-%/"'?$/0'94)#'?$#"&"11'2"/?4#\'
/0#4)=0'%2'43/$42%&'$Q$/'*4<)&"7'.$/0'/0"'$Q$/'*4<";'
94)'-%2'<4?2&4%<'3"#142%&$C"<'?4#\4)/1;'-#"%/"'94)#'
4?2'?4#\4)/1;'/#%-\'94)#'?4#\4)/'#"1)&/1;'#%-"'%=%$21/'
4/0"#'$Q$/')1"#1;'%2<'%--"11'*%29'4/0"#'6"%/)#"17'To
purchase an iFit module at any time, go to
www.iFit.com or call the telephone number on the
front cover of this manual.'
R4)'-%2'"5"2'-422"-/'94)#'KJO'3&%9"#'4#'H,'3&%9"#'
/4'/0"'-4214&"'14)2<'191/"*'%2<'&$1/"2'/4'94)#'6%54#$/"'
*)1$-'4#'%)<$4'+44\1'?0$&"'94)'"a"#-$1"7
To use the manual mode,'1""'3%="'WV7'To use
the sound system,'1""'3%="'W`7'To use an
onboard workout,'1""'3%="'WZ7'To use a seta-goal workout,'1""'3%="'Wc7'To use an iFit
workout,'1""'3%="'L[7'To change console
settings,'1""'3%="'LL7
(4/"B'86'/0"#"'$1'%'10""/'46'3&%1/$-'42'/0"'<$13&%9;'
#"*45"'/0"'3&%1/$-7
15

HOW TO USE THE MANUAL MODE
1. Begin pedaling or press any button on the
console to turn on the console.
''.0"2'94)'/)#2'42'/0"'-4214&";'/0"'<$13&%9'?$&&'/)#2'
427'>0"'-4214&"'?$&&'/0"2'+"'#"%<9'64#')1"7
''Calories per Hour (Calories/Hr)l>0$1'<$13&%9'
*4<"'?$&&'104?'/0"'%33#4a$*%/"'2)*+"#'46'-%&4#$"1'
94)'%#"'+)#2$2='3"#'04)#7
''Distance (Dist.)l>0$1'<$13&%9'*4<"'?$&&'104?'
/0"'<$1/%2-"'/0%/'94)'0%5"'3"<%&"<'$2'*$&"1'4#'
\$&4*"/"#17'
2. Select the manual mode.
''J#"11'/0"'K%2)%&'H42/#4&'+)//42'42'/0"'-4214&"'/4'
1"&"-/'/0"'*%2)%&'*4<"7'
''86'%'?$#"&"11'$Q$/'*4<)&"'$1'24/'$21"#/"<'$2/4'/0"'-42e
14&"'%2<'-422"-/"<'/4'$Q$/;'/0"'*%2)%&'*4<"'?$&&'+"'
1"&"-/"<'%)/4*%/$-%&&97
3. Change the resistance of the pedals as desired.
''D1'94)'3"<%&;'-0%2="'/0"'#"1$1/%2-"'46'/0"'3"<%&1'
+9'3#"11$2='/0"'W'!/"3'E"1$1/%2-"'$2-#"%1"'%2<'
<"-#"%1"'+)//421'42'/0"'-4214&"'4#'42'/0"'#$=0/'
0%2<&"+%#'4#'+9'3#"11$2='42"'46'/0"'2)*+"#"<'W'
!/"3'E"1$1/%2-"'+)//421'42'/0"'-4214&"7
''(4/"B'D6/"#'94)'3#"11'%'+)//42;'$/'?$&&'/%\"'%'
*4*"2/'64#'/0"'3"<%&1'/4'#"%-0'/0"'1"&"-/"<'
#"1$1/%2-"'&"5"&7'
4. Follow your progress with the display.
''>0"'<$13&%9'-%2'104?'/0"'64&&4?$2='?4#\4)/'
$264#*%/$42B
''Pulsel>0$1'<$13&%9'*4<"'?$&&'104?'94)#'0"%#/'#%/"'
?0"2'94)')1"'/0"'0%2<=#$3'0"%#/'#%/"'*42$/4#'4#'
/0"'$2-&)<"<'-0"1/'0"%#/'#%/"'*42$/4#'@1""'1/"3'UA7
' Resistance (Resist.)l>0$1'<$13&%9'*4<"'?$&&'
104?'/0"'#"1$1/%2-"'&"5"&'46'/0"'3"<%&1'64#'%'6"?'
1"-42<1'"%-0'/$*"'/0"'#"1$1/%2-"'&"5"&'-0%2="17'
''Speedl>0$1'<$13&%9'*4<"'?$&&'104?'94)#'3"<%&$2='
13""<'$2'*$&"1'3"#'04)#'4#'\$&4*"/"#1'3"#'04)#7
''Timel.0"2'/0"'*%2)%&'*4<"'$1'1"&"-/"<;'/0$1'
<$13&%9'*4<"'?$&&'104?'/0"'"&%31"<'/$*"7'.0"2'%2'
42+4%#<'?4#\4)/'$1'1"&"-/"<;'/0$1'<$13&%9'*4<"'?$&&'
104?'/0"'/$*"'#"*%$2$2='$2'/0"'?4#\4)/7
''>0"'*%/#$a'466"#1'1"5"#%&'<$13&%9'/%+17'J#"11'/0"'
,$13&%9'+)//42')2/$&'/0"'<"1$#"<'/%+'$1'104?27'R4)'
-%2'%&14'3#"11'/0"'$2-#"%1"'%2<'<"-#"%1"'+)//421'
2"a/'/4'/0"'G2/"#'+)//427
''Speedl>0$1'/%+'?$&&'104?'%'3#46$&"'46'/0"'13""<'
1"//$2=1'46'/0"'?4#\4)/7'D'2"?'1"=*"2/'?$&&'%33"%#'
%/'/0"'"2<'46'"%-0'*$2)/"7
' My Traill>0$1'/%+'?$&&'104?'%'/#%-\'/0%/'#"3#"1"2/1'
W^S'*$&"'@S[['*A7'D1'94)'"a"#-$1";'/0"'6&%10$2='
#"-/%2=&"'?$&&'104?'94)#'3#4=#"117'>0"'K9'>#%$&'/%+'
?$&&'%&14'104?'/0"'2)*+"#'46'&%31'94)'-4*3&"/"7'
''Caloriesl>0$1'<$13&%9'*4<"'?$&&'104?'/0"'%33#4ae
$*%/"'2)*+"#'46'-%&4#$"1'94)'0%5"'+)#2"<7
''Caloriel>0$1'/%+'?$&&'104?'/0"'%33#4a$*%/"'
%*4)2/'46'-%&4#$"1'94)'0%5"'+)#2"<7'>0"'0"$=0/'46'
"%-0'1"=*"2/'#"3#"1"2/1'/0"'%*4)2/'46'-%&4#$"1'
+)#2"<'<)#$2='/0%/'1"=*"2/7
''D1'94)'"a"#-$1";'/0"'?4#\4)/'$2/"21$/9'&"5"&'+%#'
?$&&'$2<$-%/"'/0"'%33#4a$*%/"'$2/"21$/9'&"5"&'46'94)#'
"a"#-$1"7'
16

''J#"11'/0"'T4*"'+)//42'/4'#"/)#2'/4'/0"'<"6%)&/'
*"2)'@1""'TM.'>M'HTD(FG'HM(!MIG'
!G>>8(F!'42'3%="'LL'/4'1"/'/0"'<"6%)&/'*"2)A7'
86'2"-"11%#9;'3#"11'/0"'T4*"'+)//42'%=%$27
''.0"2'%'?$#"&"11'$Q$/'*4<)&"'
$1'-422"-/"<;'/0"'?$#"&"11'
19*+4&'%/'/0"'/43'46'/0"'<$1e
3&%9'?$&&'104?'/0"'1/#"2=/0'46'
94)#'?$#"&"11'1$=2%&7'Q4)#'%#-1'
$2<$-%/"'6)&&'1$=2%&'1/#"2=/07
''>4'"a$/'/0"'*%2)%&'*4<"'4#'%'?4#\4)/;'3#"11'/0"'
T4*"'+)//427'86'2"-"11%#9;'3#"11'/0"'T4*"'+)//42'
%=%$27
''H0%2="'/0"'54&)*"'&"5"&'46'
/0"'-4214&"'+9'3#"11$2='/0"'
54&)*"'$2-#"%1"'%2<'<"-#"%1"'
+)//4217
5. Measure your heart rate if desired.
''.0"2'94)#'3)&1"'$1'<"/"-/"<;'%'0"%#/'19*+4&'?$&&'
6&%10'$2'/0"'<$13&%9'"%-0'/$*"'94)#'0"%#/'+"%/1;'
42"'4#'/?4'<%10"1'?$&&'%33"%#;'%2<'/0"2'94)#'0"%#/'
#%/"'?$&&'+"'104?27'For the most accurate heart
rate reading, hold the contacts for at least 15
seconds.'
''86'/0"'<$13&%9'<4"1'24/'104?'94)#'0"%#/'#%/";'*%\"'
1)#"'/0%/'94)#'0%2<1'%#"'341$/$42"<'%1'<"1-#$+"<7'
P"'-%#"6)&'24/'/4'*45"'94)#'0%2<1'"a-"11$5"&9'4#'
/4'1:)""C"'/0"'-42/%-/1'/$=0/&97'Q4#'43/$*%&'3"#64#e
*%2-";'-&"%2'/0"'-42/%-/1')1$2='%'146/'-&4/0i'never
use alcohol, abrasives, or chemicals to clean
the contacts.
6. Turn on the fan if desired.
''>0"'6%2'0%1'&4?'%2<'0$=0'
13""<'1"//$2=17'J#"11'/0"'6%2'
$2-#"%1"'%2<'<"-#"%1"'+)/e
/421'#"3"%/"<&9'/4'1"&"-/'%'6%2'
13""<'4#'/4'/)#2'466'/0"'6%27
''>4')1"'/0"'$2-&)<"<'-0"1/'0"%#/'#%/"'*42$/4#;'1""'
3%="'WO7'>4')1"'/0"'0%2<=#$3'0"%#/'#%/"'*42$/4#;'
64&&4?'/0"'$21/#)-/$421'+"&4?7'IMPORTANT: If you
use both heart rate monitors at the same time,
the console will not display your heart rate
accurately.
''If there are sheets
of plastic on the
metal contacts
on the handgrip
heart rate monitor,
remove the plastic. >4'*"%1)#"'
94)#'0"%#/'#%/";'
04&<'/0"'0%2<=#$3'
0"%#/'#%/"'*42$/4#'
?$/0'94)#'3%&*1'
#"1/$2='%=%$21/'/0"'
-42/%-/17 Avoid moving your hands or gripping
the contacts tightly.'
H42/%-/1
''(4/"B'86'/0"'3"<%&1'<4'24/'*45"'64#'%+4)/'/0$#/9'
1"-42<1;'/0"'6%2'?$&&'/)#2'466'%)/4*%/$-%&&97'
7. When you are finished exercising, the console
will turn off automatically.
''86'/0"'3"<%&1'<4'24/'*45"'64#'1"5"#%&'1"-42<1;'%'
/42"'?$&&'14)2<;'/0"'-4214&"'?$&&'3%)1";'%2<'/0"'
/$*"'?$&&'6&%10'$2'/0"'<$13&%97'>4'#"1)*"'94)#'?4#\e
4)/;'1$*3&9'#"1)*"'3"<%&$2=7'
''86'/0"'3"<%&1'<4'24/'*45"'64#'1"5"#%&'*$2)/"1'%2<'
/0"'+)//421'%#"'24/'3#"11"<;'/0"'-4214&"'?$&&'/)#2'
466'%2<'/0"'<$13&%9'?$&&'+"'#"1"/7
HOW TO USE THE SOUND SYSTEM
>4'3&%9'*)1$-'4#'%)<$4'+44\1'/0#4)=0'/0"'-4214&"'
14)2<'191/"*'?0$&"'94)'"a"#-$1";'3&)='94)#'%)<$4'
-%+&"'$2/4'/0"']%-\'42'/0"'-4214&"'%2<'$2/4'%']%-\'42'
94)#'KJO'3&%9"#'4#'H,'3&%9"#i'make sure that your
audio cable is fully plugged in.'
("a/;'3#"11'/0"'3&%9'+)//42'42'94)#'KJO'3&%9"#'4#'
H,'3&%9"#7'D<])1/'/0"'54&)*"'&"5"&')1$2='/0"'54&)*"'
$2-#"%1"'%2<'<"-#"%1"'+)//421'42'/0"'-4214&"'4#'/0"'
54&)*"'-42/#4&'42'94)#'KJO'3&%9"#'4#'H,'3&%9"#7'
17

HOW TO USE AN ONBOARD WORKOUT
1. Begin pedaling or press any button on the
console to turn on the console.
''.0"2'94)'/)#2'42'/0"'-4214&";'/0"'<$13&%9'?$&&'/)#2'
427'>0"'-4214&"'?$&&'/0"2'+"'#"%<9'64#')1"7
2. Select an onboard workout.
''>4'1"&"-/'%2'42+4%#<'?4#\4)/;'3#"11'/0"'WV'H%&4#$"'
.4#\4)/1'+)//42'4#'/0"'WV'J"#64#*%2-"'.4#\4)/1'
+)//42'#"3"%/"<&9')2/$&'/0"'<"1$#"<'?4#\4)/'%33"%#1'
$2'/0"'<$13&%97
#"1$1/%2-"'&"5"&'%2<^4#'/%#="/'13""<'$1'3#4=#%**"<'
64#'/0"'2"a/'1"=*"2/;'/0"'#"1$1/%2-"'&"5"&'%2<^4#'
/%#="/'13""<'?$&&'%33"%#'$2'/0"'<$13&%9'64#'%'6"?'
1"-42<1'/4'%&"#/'94)7'>0"'#"1$1/%2-"'46'/0"'3"<%&1'
?$&&'/0"2'-0%2="7'
''D1'94)'"a"#-$1";'94)'?$&&'+"'3#4*3/"<'/4'\""3'94)#'
3"<%&$2='13""<'2"%#'/0"'/%#="/'13""<'64#'/0"'-)#e
#"2/'1"=*"2/7'When an upward-pointing arrow
appears in the display,'$2-#"%1"'94)#'3"<%&e
$2='13""<7'When a downward-pointing arrow
appears,'<"-#"%1"'94)#'3"<%&$2='13""<7'When
no arrow appears,'*%$2/%$2'94)#'-)##"2/'3"<%&$2='
13""<7'
''R4)'-%2'%&14'3#"11'/0"'.4#\4)/1'$2-#"%1"'%2<'
<"-#"%1"'+)//421'42'/0"'&"6/'0%2<&"+%#7
''.0"2'94)'1"&"-/'%2'42+4%#<'?4#\4)/;'/0"'<$13&%9'
?$&&'104?'/0"'<)#%/$42'46'/0"'?4#\4)/'%2<'/0"'2%*"'
46'/0"'?4#\4)/7'D'3#46$&"'46'/0"'13""<'1"//$2=1'46'/0"'
?4#\4)/'?$&&'%33"%#'$2'/0"'*%/#$a7'
''>0"'*%a$*)*'#"1$1/%2-"'&"5"&'%2<'/0"'*%a$*)*'
13""<'64#'/0"'?4#\4)/'?$&&'%&14'%33"%#'$2'/0"'
<$13&%97'
3. Begin pedaling to start the workout.
''G%-0'?4#\4)/'$1'<$5$<"<'$2/4'42"e*$2)/"'1"=e
*"2/17'M2"'#"1$1/%2-"'&"5"&'%2<'42"'/%#="/'13""<'
$1'3#4=#%**"<'64#'"%-0'1"=*"2/7'(4/"B'>0"'1%*"'
#"1$1/%2-"'&"5"&'%2<^4#'/%#="/'13""<'*%9'+"'3#4e
=#%**"<'64#'-421"-)/$5"'1"=*"2/17'
'',)#$2='
/0"'?4#\e
4)/;'/0"'
3#46$&"'42'
/0"'13""<'
/%+'?$&&'
104?'94)#'
3#4=#"117'
>0"'6&%10e
$2='1"=*"2/'46'/0"'3#46$&"'#"3#"1"2/1'/0"'-)##"2/'
1"=*"2/'46'/0"'?4#\4)/7'>0"'0"$=0/'46'/0"'6&%10$2='
1"=*"2/'$2<$-%/"1'/0"'/%#="/'13""<'64#'/0"'-)##"2/'
1"=*"2/7'
J#46$&"
IMPORTANT: The target speed is intended only
to provide motivation. Your actual pedaling
speed may be slower than the target speed.
Make sure to pedal at a speed that is comfortable for you.
''86'/0"'#"1$1/%2-"'&"5"&'64#'/0"'-)##"2/'1"=*"2/'$1'
/44'0$=0'4#'/44'&4?;'94)'-%2'*%2)%&&9'45"##$<"'
/0"'1"//$2='+9'3#"11$2='/0"'E"1$1/%2-"'+)//4217'
IMPORTANT: When the current segment of the
workout ends, the pedals will automatically
adjust to the resistance level programmed for
the next segment.
''>0"'?4#\4)/'?$&&'-42/$2)"'$2'/0$1'?%9')2/$&'/0"'&%1/'
1"=*"2/'"2<17'>4'1/43'/0"'?4#\4)/'%/'%29'/$*";'
1/43'3"<%&$2=7'>0"'/$*"'?$&&'6&%10'$2'/0"'<$13&%97'>4'
#"1)*"'/0"'?4#\4)/;'1$*3&9'#"1)*"'3"<%&$2=7
4. Follow your progress with the display.
' !""'1/"3'S'42'3%="'WV7
5. Measure your heart rate if desired.
' !""'1/"3'U'42'3%="'W`7
6. Turn on the fan if desired.
' !""'1/"3'V'42'3%="'W`7
7. When you are finished exercising, the console
will turn off automatically.
''D/'/0"'"2<'46'"%-0'1"=*"2/'46'/0"'?4#\4)/;'%'
1"#$"1'46'/42"1'?$&&'14)2<'%2<'/0"'2"a/'1"=*"2/'
46'/0"'3#46$&"'?$&&'+"=$2'/4'6&%107'86'%'<$66"#"2/'
' !""'1/"3'`'42'3%="'W`7
18

HOW TO USE A SET-A-GOAL WORKOUT
1. Begin pedaling or press any button on the
console to turn on the console.
''(4/"B'86'94)'*%2)%&&9'-0%2="'/0"'#"1$1/%2-"'<)#$2='
%'-%&4#$"'=4%&'?4#\4)/;'/0"'&"2=/0'46'/0"'?4#\4)/'
?$&&'%<])1/'%)/4*%/$-%&&9'/4'"21)#"'/0%/'94)'*""/'
94)#'-%&4#$"'=4%&7
''.0"2'94)'/)#2'42'/0"'-4214&";'/0"'<$13&%9'?$&&'/)#2'
427'>0"'-4214&"'?$&&'/0"2'+"'#"%<9'64#')1"7
2. Set a calorie, distance, or time goal.
''>4'1"/'%'-%&4#$";'<$1/%2-";'4#'/$*"'=4%&;'6$#1/'3#"11'
/0"'!"/'D'F4%&'+)//427'
''("a/;'3#"11'/0"'$2-#"%1"'%2<'<"-#"%1"'+)//421'
2"a/'/4'/0"'G2/"#'+)//42')2/$&'/0"'2%*"'46'/0"'
<"1$#"<'=4%&'%33"%#1'$2'/0"'<$13&%97'>0"2;'3#"11'
/0"'G2/"#'+)//427
''>0"2;'3#"11'/0"'$2-#"%1"'%2<'<"-#"%1"'+)//421'
2"a/'/4'/0"'G2/"#'+)//42'/4'1"/'/0"'<"1$#"<'=4%&7'
3. Begin pedaling to start the workout.
''G%-0'?4#\4)/'$1'<$5$<"<'$2/4'42"e*$2)/"'1"=e
*"2/17'>0"'/%#="/'13""<'64#'/0"'-)##"2/'1"=*"2/'
?$&&'%33"%#'$2'/0"'<$13&%9'%/'/0"'+"=$22$2='46'"%-0'
1"=*"2/7
''D1'94)'"a"#-$1";'\""3'94)#'3"<%&$2='13""<'2"%#'
/0"'/%#="/'13""<7'IMPORTANT: The target speed
is intended only to provide motivation. Your
actual pedaling speed may be slower than the
target speed. Make sure to pedal at a speed that
is comfortable for you.
Note: The calorie goal is an estimate of the
number of calories that you will burn during
the workout. The actual number of calories that
you burn will depend on various factors such
as your weight. In addition, if you manually
change the resistance during the workout, the
number of calories you burn will be affected.
''>0"'?4#\4)/'?$&&'-42/$2)"'$2'/0$1'?%9')2/$&'/0"'=4%&'
$1'#"%-0"<7'>4'3%)1"'/0"'?4#\4)/;'1/43'3"<%&$2=7'
>0"'/$*"'?$&&'3%)1"'$2'/0"'<$13&%97'>4'#"1)*"'/0"'
?4#\4)/;'1$*3&9'#"1)*"'3"<%&$2=7
4. Follow your progress with the display.
' !""'1/"3'S'42'3%="'WV7
5. Measure your heart rate if desired.
' !""'1/"3'U'42'3%="'W`7
6. Turn on the fan if desired.
' !""'1/"3'V'42'3%="'W`7
7. When you are finished exercising, the console
will turn off automatically.
' !""'1/"3'`'42'3%="'W`7
''R4)'-%2'*%2)%&&9'-0%2="'/0"'#"1$1/%2-"'46'/0"'
3"<%&1'%1'<"1$#"<'<)#$2='/0"'?4#\4)/'+9'3#"11$2='
/0"'W!/"3'E"1$1/%2-"'+)//4217'
19

HOW TO USE AN IFIT WORKOUT
R4)'*)1/'0%5"'%2'$Q$/'*4<)&"'/4')1"'%2'$Q$/'?4#\4)/7'
''J#"11'/0"'K%3'+)//42;'/0"'>#%$2'+)//42;'4#'/0"'I41"'
./7'+)//42'/4'<4?2&4%<'/0"'2"a/'?4#\4)/'46'/0%/'
/93"'$2'94)#'1-0"<)&"7'
To purchase an iFit module at any time, go to
www.iFit.com or call the telephone number on the
front cover of this manual.
(4/"B'>4')1"'%2'$Q$/'*4<)&";'94)'*)1/'0%5"'%--"11'
/4'%'-4*3)/"#'?$/0'%2'$2/"#2"/'-422"-/$42'%2<'%'N!P'
34#/7'R4)'?$&&'%&14'2""<'%2'$Q$/7-4*'*"*+"#10$37'>4'
)1"'%'?$#"&"11'$Q$/'*4<)&";'94)'*)1/'%&14'0%5"'94)#'
4?2'?$#"&"11'2"/?4#\'$2-&)<$2='%2'Z[L7WW+'#4)/"#'?$/0'
!!8,'+#4%<-%1/'"2%+&"<'@0$<<"2'2"/?4#\1'%#"'24/'
1)334#/"<A7
IMPORTANT: To satisfy exposure compliance
requirements, the antenna and transmitter in the
iFit module must be at least 8 in. (20 cm) from all
persons and must not be near or connected to any
other antenna or transmitter.
1. Begin pedaling or press any button on the
console to turn on the console.
''.0"2'94)'/)#2'42'/0"'-4214&";'/0"'<$13&%9'?$&&'/)#2'
427'>0"'-4214&"'?$&&'/0"2'+"'#"%<9'64#')1"7
2. Insert the iFit module into the console.
''J#"11'/0"'H4*3"/"'+)//42'/4'-4*3"/"'$2'%'#%-"'
/0%/'94)'0%5"'3#"5$4)1&9'1-0"<)&"<7'
''J#"11'/0"'>#%-\'+)//42'/4'#"e#)2'%'#"-"2/'$Q$/'?4#\e
4)/'6#4*'94)#'1-0"<)&"7'("a/;'3#"11'/0"'$2-#"%1"'
%2<'<"-#"%1"'+)//421'/4'1"&"-/'/0"'<"1$#"<'?4#\e
4)/7'>0"2;'3#"11'/0"'G2/"#'+)//42'/4'1/%#/'/0"'
?4#\4)/7'
For more information on the iFit workouts,
please see www.iFit.com.
''.0"2'94)'1"&"-/'%2'$Q$/'?4#\4)/;'/0"'<$13&%9'?$&&'
104?'/0"'<)#%/$42'46'/0"'?4#\4)/'%2<'/0"'%33#4a$e
*%/"'2)*+"#'46'-%&4#$"1'94)'?$&&'+)#27'>0"'<$13&%9'
*%9'%&14'104?'/0"'2%*"'46'/0"'?4#\4)/7'86'94)'
1"&"-/'%'-4*3"/$/$42'?4#\4)/;'/0"'<$13&%9'*%9'
-4)2/'<4?2'/4'/0"'+"=$22$2='46'/0"'#%-"7
''(4/"B'>0"'$Q$/'+)//421'*%9'%&14'#)2'<"*4'?4#\e
4)/17'>4')1"'/0"'<"*4'?4#\4)/1;'#"*45"'/0"'$Q$/'
*4<)&"'6#4*'/0"'-4214&"'%2<'3#"11'42"'46'/0"'$Q$/'
+)//4217
5. Start the workout.
''>4')1"'%2'$Q$/'?4#\4)/;'$21"#/'/0"'$Q$/'*4<)&"'$2/4'
/0"'-4214&"7
''D6/"#'94)'$21"#/'/0"'$Q$/'*4<)&"'$2/4'/0"'-4214&";'
3#"11'/0"'T4*"'+)//427'>0"'$Q$/'*%$2'1-#""2'?$&&'
%33"%#'$2'/0"'<$13&%97
3. Select a user.
''86'*4#"'/0%2'42"')1"#'$1'#"=$1/"#"<;'94)'-%2'1?$/-0'
)1"#1'$2'/0"'$Q$/'*%$2'1-#""27'J#"11'/0"'$2-#"%1"'
%2<'<"-#"%1"'+)//421'2"a/'/4'/0"'G2/"#'+)//42'/4'
1"&"-/'%')1"#7
4. Select an iFit workout.
''>4'1"&"-/'%2'$Q$/'?4#\4)/;'3#"11'42"'46'/0"'$Q$/'
+)//4217'P"64#"'14*"'?4#\4)/1'?$&&'<4?2&4%<;'94)'
*)1/'%<<'/0"*'/4'94)#'1-0"<)&"'42'???7$Q$/7-4*7'
' !""'1/"3'O'42'3%="'WZ7
'',)#$2='14*"'?4#\4)/1;'/0"'54$-"'46'%'3"#142%&'
/#%$2"#'?$&&'=)$<"'94)'/0#4)=0'94)#'?4#\4)/7'R4)'
-%2'1"&"-/'%2'%)<$4'1"//$2='64#'94)#'3"#142%&'/#%$2"#'
@1""'TM.'>M'HTD(FG'HM(!MIG'!G>>8(F!'42'
3%="'LLA7
''>4'1/43'/0"'?4#\4)/'%/'%29'/$*";'1/43'3"<%&$2=7'>0"'
/$*"'?$&&'6&%10'$2'/0"'<$13&%97'>4'#"1)*"'/0"'?4#\e
4)/;'1$*3&9'#"1)*"'3"<%&$2=7
20

6. Follow your progress with the display.
8. Turn on the fan if desired.
' !""'1/"3'S'42'3%="'WV7
''>0"'K9'>#%$&'/%+'?$&&'104?'%'*%3'46'/0"'/#%$&'94)'%#"'
?%&\$2='4#'#)22$2='4#'$/'?$&&'104?'%'/#%-\'%2<'/0"'
2)*+"#'46'&%31'94)'-4*3&"/"7
'',)#$2='%'-4*3"/$/$42'?4#\4)/;'/0"'H4*3"/$/$42'/%+'
?$&&'104?'94)#'3#4=#"11'$2'/0"'#%-"7'D1'94)'#%-";'
/0"'/43'&$2"'$2'/0"'*%/#$a'?$&&'104?'04?'*)-0'46'/0"'
#%-"'94)'0%5"'-4*3&"/"<7'>0"'4/0"#'&$2"1'?$&&'104?'
4/0"#'-4*3"/$/4#17'>0"'"2<'46'/0"'*%/#$a'#"3#"1"2/1'
/0"'"2<'46'/0"'#%-"7
7. Measure your heart rate if desired.
' !""'1/"3'U'42'3%="'W`7
' !""'1/"3'V'42'3%="'W`7
9. When you are finished exercising, the console
will turn off automatically.
' !""'1/"3'`'42'3%="'W`7
For more information about iFit, go to
www.iFit.com.
21

HOW TO CHANGE CONSOLE SETTINGS
>0"'-4214&"'6"%/)#"1'%')1"#'*4<"'/0%/'%&&4?1'94)'/4'
5$"?')1%="'$264#*%/$42;'1"&"-/'%')2$/'46'*"%1)#"*"2/;'
%2<'%<])1/'/0"'-42/#%1/'&"5"&'46'/0"'<$13&%97
.0"2'%2'$Q$/'*4<)&"'$1'-422"-/"<'/4'/0"'-4214&";'
94)'-%2'%&14')1"'/0"'$264#*%/$42'*4<"'/4'-0441"'%2'
%)<$4'1"//$2='64#'/0"'54$-"'46'/0"'3"#142%&'/#%$2"#;'1"/'%'
<"6%)&/'*"2);'-0"-\'/0"'1/%/)1'46'/0"'$Q$/'*4<)&";'%2<'
-0"-\'64#'<4?2&4%<17
''86'24'*4<)&"'$1'-422"-/"<;'/0"'<$13&%9'?$&&'104?'
/0"'?4#<1'(M'8Q8>'KM,NIG7'86'24'*4<)&"'$1'-42e
2"-/"<;'=4'/4'1/"3'W[7
6. Select an audio setting for the voice of the
personal trainer if desired.
''J#"11'/0"'<"-#"%1"'+)//42'/4'5$"?'/0"'%)<$4'1"//$2='
64#'/0"'54$-"'46'/0"'3"#142%&'/#%$2"#7'>0"'-)##"2/&9'
1"&"-/"<'%)<$4'1"//$2='64#'/0"'54$-"'46'/0"'3"#142%&'
/#%$2"#'?$&&'%33"%#'$2'/0"'<$13&%97'
1. Select the information mode.
''>4'1"&"-/'/0"'$264#*%/$42'*4<";'3#"11'%2<'04&<'
<4?2'/0"',$13&%9'+)//42'64#'%'6"?'1"-42<1')2/$&'/0"'
$264#*%/$42'*4<"'%33"%#1'$2'/0"'<$13&%97'
2. View usage information.
''>0"'<$13&%9'?$&&'104?'/0"'/4/%&'2)*+"#'46'04)#1'/0%/'
/0"'"a"#-$1"'+$\"'0%1'+""2')1"<7'>0"'<$13&%9'?$&&'
%&14'104?'/0"'/4/%&'<$1/%2-"'@$2'*$&"1'4#'\$&4*"/"#1A'
/0%/'0%1'+""2'3"<%&"<'42'/0"'"a"#-$1"'+$\"7
3. Select a unit of measurement if desired.
''>0"'?4#<'G(FI8!T'64#'G2=&$10'*$&"1'4#'/0"'?4#<'
KG>E8H'64#'*"/#$-'\$&4*"/"#1'?$&&'%33"%#'$2'/0"'
<$13&%9'/4'$2<$-%/"'/0"'-)##"2/&9'1"&"-/"<')2$/'46'
*"%1)#"*"2/7
''>4'-0%2="'/0"')2$/'46'*"%1)#"*"2/;'3#"11'/0"'
G2/"#'+)//42'#"3"%/"<&9'/4'1"&"-/'/0"'<"1$#"<')2$/'46'
*"%1)#"*"2/7
4. Adjust the contrast level of the display if
desired.
''J#"11'/0"'<"-#"%1"'+)//42'/4'5$"?'/0"'-42/#%1/'
&"5"&7'>0"'-)##"2/&9'1"&"-/"<'-42/#%1/'&"5"&'?$&&'
%33"%#'$2'/0"'<$13&%97'J#"11'/0"'W'!/"3'E"1$1/%2-"'
$2-#"%1"'%2<'<"-#"%1"'+)//421'/4'%<])1/'/0"'-42e
/#%1/'&"5"&7'
5. Determine if an iFit module is connected to the
console.
''86'%2'$Q$/'*4<)&"'$1'-422"-/"<'/4'/0"'-4214&";'/0"'
<$13&%9'?$&&'104?'/0"'?4#<1'.8Q8'KM,NIG'4#'N!P'
KM,NIG7'
''>4'-0%2="'/0"'%)<$4'1"//$2=;'3#"11'/0"'G2/"#'+)//42'
#"3"%/"<&9'/4'/)#2'/0"'54$-"'46'/0"'3"#142%&'/#%$2"#'
M('4#'MQQ7
7. Set the default menu if desired.
''J#"11'/0"'<"-#"%1"'+)//42'/4'5$"?'/0"'<"6%)&/'*"2)'
1"//$2=7'>0"'<"6%)&/'*"2)'$1'/0"'*"2)'/0%/'?$&&'
%33"%#'?0"2'94)'/)#2'42'/0"'-4214&"7'J#"11'/0"'
G2/"#'+)//42'#"3"%/"<&9'/4'1"&"-/'/0"'*%2)%&'*4<"'
*"2)'4#'/0"'$Q$/'*"2)'%1'/0"'<"6%)&/'*"2)7
8 Check the status of the iFit module if desired.
''J#"11'/0"'<"-#"%1"'+)//42'/4'5$"?'/0"'$Q$/'1/%e
/)1'<$13&%97'>0"'?4#<1'HTGHY'.8Q8'!>D>N!'4#'
HTGHY'N!P'!>D>N!'?$&&'%33"%#'$2'/0"'<$13&%97
''>0"2;'3#"11'/0"'G2/"#'+)//427'D6/"#'%'6"?'1"-42<1;'
/0"'1/%/)1'46'/0"'$Q$/'*4<)&"'?$&&'%33"%#'$2'/0"'<$1e
3&%97'>4'"a$/'/0$1'<$13&%9;'3#"11'%2<'04&<'<4?2'/0"'
,$13&%9'+)//42'64#'%'6"?'1"-42<17
9. Check for downloads if desired.
''J#"11'/0"'<"-#"%1"'+)//42'/4'5$"?'/0"'<4?2&4%<1'
<$13&%97'>0"'?4#<1'!G(,^EGHG8mG',D>D'?$&&'
%33"%#'$2'/0"'<$13&%97'
''>0"2;'3#"11'/0"'G2/"#'+)//427'>0"'-4214&"'?$&&'/0"2'
-0"-\'64#'$Q$/'?4#\4)/1'%2<'6$#*?%#"'<4?2&4%<17
10. Exit the information mode.
''J#"11'/0"',$13&%9'+)//42'/4'"a$/'/0"'$264#*%/$42'
*4<"7
22

FCC INFORMATION
>0$1'":)$3*"2/'0%1'+""2'/"1/"<'%2<'64)2<'/4'-4*3&9'?$/0'/0"'&$*$/1'64#'%'H&%11'P'<$=$/%&'<"5$-";'3)#1)%2/'/4'3%#/'
WU'46'/0"'QHH'E)&"17'>0"1"'&$*$/1'%#"'<"1$=2"<'/4'3#45$<"'#"%142%+&"'3#4/"-/$42'%=%$21/'0%#*6)&'$2/"#6"#"2-"'
$2'%'#"1$<"2/$%&'$21/%&&%/$427'>0$1'":)$3*"2/'="2"#%/"1;')1"1;'%2<'-%2'#%<$%/"'#%<$4'6#":)"2-9'"2"#=9'%2<;'$6'24/'
$21/%&&"<'%2<')1"<'$2'%--4#<%2-"'?$/0'/0"'$21/#)-/$421;'*%9'-%)1"'0%#*6)&'$2/"#6"#"2-"'/4'#%<$4'-4**)2$-%/$4217'
T4?"5"#;'/0"#"'$1'24'=)%#%2/""'/0%/'$2/"#6"#"2-"'?$&&'24/'4--)#'$2'%'3%#/$-)&%#'$21/%&&%/$427'86'/0$1'":)$3*"2/'<4"1'
-%)1"'0%#*6)&'$2/"#6"#"2-"'/4'#%<$4'4#'/"&"5$1$42'#"-"3/$42;'?0$-0'-%2'+"'<"/"#*$2"<'+9'/)#2$2='/0"'":)$3*"2/'466'
%2<'42;'/#9'/4'-4##"-/'/0"'$2/"#6"#"2-"'+9'42"'4#'*4#"'46'/0"'64&&4?$2='*"%1)#"1B'
d' E"4#$"2/'4#'#"&4-%/"'/0"'#"-"$5$2='%2/"22%7
d' 82-#"%1"'/0"'1"3%#%/$42'+"/?""2'/0"'":)$3*"2/'%2<'/0"'#"-"$5"#7
d' H422"-/'/0"'":)$3*"2/'$2/4'%2'4)/&"/'42'%'-$#-)$/'<$66"#"2/'6#4*'/0%/'/4'?0$-0'/0"'#"-"$5"#'$1'-422"-/"<7'
d' H421)&/'/0"'<"%&"#'4#'%2'"a3"#$"2-"<'#%<$4^>m'/"-02$-$%2'64#'0"&37'
FCC CAUTION: To assure continued compliance, use only shielded interface cables when connecting to
computer or peripheral devices. Changes or modifications not expressly approved by the party responsible for compliance could void the user%s authority to operate this equipment.
23

MAINTENANCE AND TROUBLESHOOTING
8213"-/'%2<'/$=0/"2'%&&'3%#/1'46'/0"'"a"#-$1"'+$\"'#"=)e
&%#&97'E"3&%-"'%29'?4#2'3%#/1'$**"<$%/"&97'
>4'-&"%2'/0"'"a"#-$1"'+$\";')1"'%'<%*3'-&4/0'%2<'%'
1*%&&'%*4)2/'46'*$&<'14%37'IMPORTANT: To avoid
damage to the console, keep liquids away from
the console and keep the console out of direct
sunlight.
CONSOLE TROUBLESHOOTING
86'&$2"1'%33"%#'$2'/0"'-4214&"'<$13&%9;'1""'TM.'>M'
HTD(FG'HM(!MIG'!G>>8(F!'42'3%="'LL'%2<'
%<])1/'/0"'-42/#%1/'&"5"&'46'/0"'<$13&%97
86'/0"'-4214&"'<4"1'24/'<$13&%9'94)#'0"%#/'#%/"'?0"2'
94)')1"'/0"'0%2<=#$3'0"%#/'#%/"'*42$/4#;'1""'1/"3'U'42'
3%="'W`7
86'/0"'-4214&"'<4"1'24/'<$13&%9'94)#'0"%#/'#%/"'
?0"2'94)')1"'/0"'-0"1/'0"%#/'#%/"'*42$/4#;'1""'
>EMNPIG!TMM>8(F'42'3%="'WO7
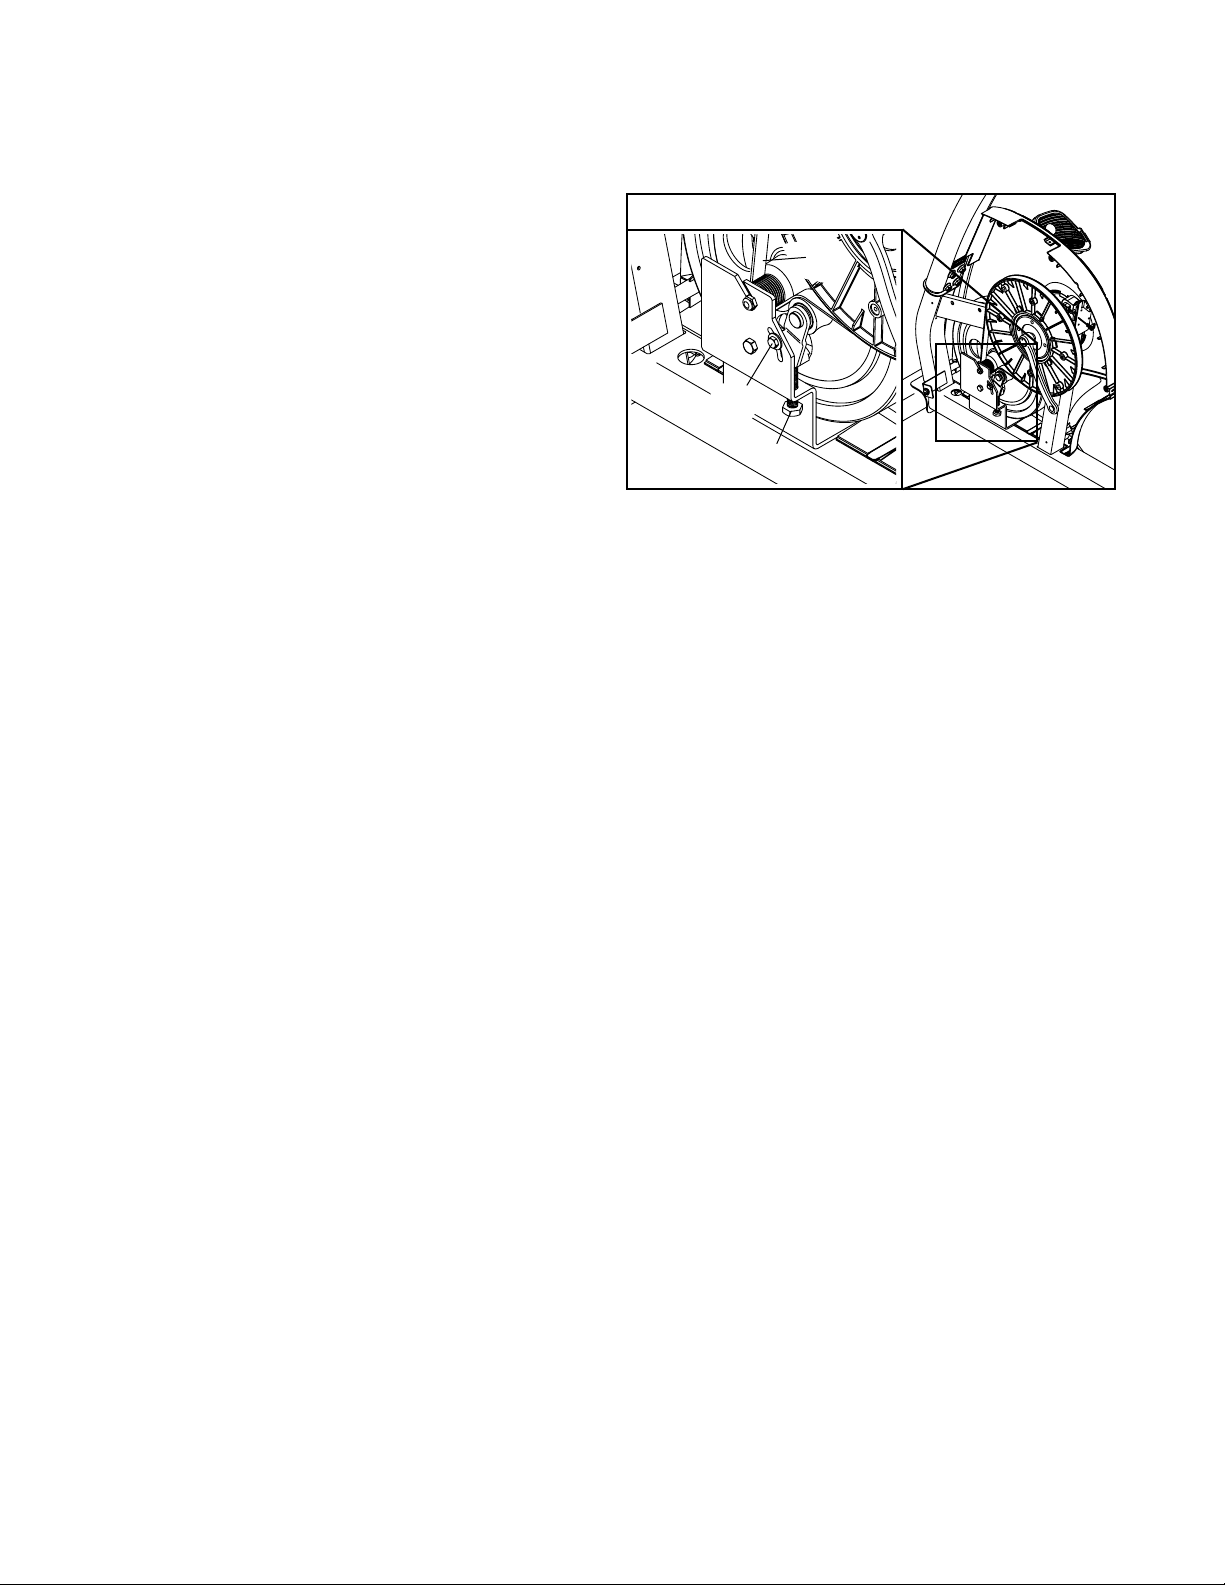
HOW TO ADJUST THE REED SWITCH
86'/0"'-4214&"'<4"1'24/'<$13&%9'-4##"-/'6""<+%-\;'/0"'
#""<'1?$/-0'104)&<'+"'%<])1/"<7'
(4/"B'Q4#'-&%#$/9;'/0"'E$=0/'!0$"&<'$1'24/'104?2'$2'/0"'
<#%?$2='+"&4?7
I4-%/"'/0"'E""<'!?$/-0'@SVA7'>)#2'/0"'E$=0/'H#%2\'D#*'
@LOA')2/$&'%'J)&&"9'K%=2"/'@O[A'$1'%&$=2"<'?$/0'/0"'E""<'
!?$/-07'("a/;'&441"2;'+)/'<4'24/'#"*45";'/0"'/?4'$2<$e
-%/"<'KS'a'WV**'!-#"?1'@``A7'!&$<"'/0"'E""<'!?$/-0'
1&$=0/&9'-&41"#'/4'4#'%?%9'6#4*'/0"'J)&&"9'K%=2"/;'%2<'
/0"2'#"/$=0/"2'/0"'!-#"?17'
LO
O[
SV
``
>4'%<])1/'/0"'#""<'1?$/-0;'6$#1/'unplug the power
adapter (not shown).'
See EXPLODED DRAWING A on page 30.'N1$2='
%'6&%/'1-#"?<#$5"#;'="2/&9'#"&"%1"'/0"'/%+1'42'/0"'>43'
!0$"&<'@SSA7'!&$<"'/0"'>43'!0$"&<')3?%#<7
E"*45"'/0"'KS'a'WV**'!-#"?'@``A'6#4*'/0"'D--"11'
H45"#'@S[A7'>0"2;'#"*45"'/0"'D--"11'H45"#7
J&)='$2'/0"'34?"#'%<%3/"#;'%2<'/)#2'/0"'E$=0/'H#%2\'
D#*'@LOA'64#'%'*4*"2/7'E"3"%/'/0"1"'%-/$421')2/$&'/0"'
-4214&"'<$13&%91'-4##"-/'6""<+%-\7'
.0"2'/0"'#""<'1?$/-0'$1'-4##"-/&9'%<])1/"<;')23&)='/0"'
34?"#'%<%3/"#'%2<'#"%//%-0'/0"'%--"11'-45"#'%2<'/0"'
/43'10$"&<7'>0"2;'3&)='$2'/0"'34?"#'%<%3/"#7
24
HOW TO ADJUST THE DRIVE BELT
86'/0"'3"<%&1'1&$3'?0$&"'94)'%#"'3"<%&$2=;'"5"2'?0$&"'/0"'
#"1$1/%2-"'$1'%<])1/"<'/4'/0"'0$=0"1/'1"//$2=;'/0"'<#$5"'
+"&/'*%9'2""<'/4'+"'%<])1/"<7'
>4'%<])1/'/0"'<#$5"'+"&/;'6$#1/'unplug the power
adapter (not shown).'
See EXPLODED DRAWING B on page 31.'N1$2='
%2'%<])1/%+&"'?#"2-0;'/)#2'/0"'I"6/'J"<%&'@LLA'-&4-\e
?$1"'%2<'#"*45"'$/7'
I441"2'/0"'KV'a'L[**'T"a'!-#"?'@ZSA7'>$=0/"2'/0"'
KW['a'U[**'T"a'!-#"?'@ZOA')2/$&'/0"',#$5"'P"&/'@S`A'
$1'/$=0/7'.0"2'/0"',#$5"'P"&/'$1'/$=0/;'/$=0/"2'/0"'KV'a'
L[**'T"a'!-#"?7
S`
See EXPLODED DRAWING A on page 30.'N1$2='
%'6&%/'1-#"?<#$5"#;'="2/&9'#"&"%1"'/0"'/%+1'42'/0"'Q#42/'
!0$"&<'@UZA'%2<'/0"'>43'!0$"&<'@SSA7'E"*45"'/0"'Q#42/'
!0$"&<'%2<'1&$<"'/0"'>43'!0$"&<')3?%#<7
E"*45"'%&&'/0"'!-#"?1'@``;'ZUA'6#4*'/0"'I"6/'%2<'E$=0/'
Q#42/'!0$"&<1'@WO;'WSAi'make sure to note the loca-
tion of each size of Screw.'
N1$2='%'6&%/'1-#"?<#$5"#;'="2/&9'#"&"%1"'/0"'/%+1'42'
/0"'&"6/'!0$"&<',$1-'@ULA7'E4/%/"'/0"'!0$"&<',$1-'%2<'
#"*45"'$/7'>0"2;'="2/&9'#"*45"'/0"'I"6/'Q#42/'
!0$"&<'@WOA7
ZS
ZO
.0"2'/0"'<#$5"'+"&/'$1'-4##"-/&9'%<])1/"<;'#"%//%-0'/0"'
&"6/'%2<'#$=0/'10$"&<1;'/0"'/43'10$"&<;'/0"'6#42/'10$"&<;'
/0"'&"6/'3"<%&'<$1-;'%2<'/0"'&"6/'3"<%&7'>0"2;'3&)='$2'/0"'
34?"#'%<%3/"#7
25

EXERCISE GUIDELINES
WARNING: Before beginning this
or any exercise program, consult your physician. This is especially important for persons
over age 35 or persons with pre-existing
health problems.
The heart rate monitor is not a medical device.
Various factors may affect the accuracy of
heart rate readings. The heart rate monitor is
intended only as an exercise aid in determining heart rate trends in general.
>0"1"'=)$<"&$2"1'?$&&'0"&3'94)'/4'3&%2'94)#'"a"#-$1"'
3#4=#%*7'Q4#'<"/%$&"<'"a"#-$1"'$264#*%/$42;'4+/%$2'%'
#"3)/%+&"'+44\'4#'-421)&/'94)#'3091$-$%27'E"*"*+"#;'
3#43"#'2)/#$/$42'%2<'%<":)%/"'#"1/'%#"'"11"2/$%&'64#'
1)--"116)&'#"1)&/17'
EXERCISE INTENSITY
.0"/0"#'94)#'=4%&'$1'/4'+)#2'6%/'4#'/4'1/#"2=/0"2'94)#'
-%#<$45%1-)&%#'191/"*;'"a"#-$1$2='%/'/0"'3#43"#'$2/"2e
1$/9'$1'/0"'\"9'/4'%-0$"5$2='#"1)&/17'R4)'-%2')1"'94)#'
0"%#/'#%/"'%1'%'=)$<"'/4'6$2<'/0"'3#43"#'$2/"21$/9'&"5"&7'
>0"'-0%#/'+"&4?'104?1'#"-4**"2<"<'0"%#/'#%/"1'64#'
6%/'+)#2$2='%2<'%"#4+$-'"a"#-$1"7
Burning Fatl>4'+)#2'6%/'"66"-/$5"&9;'94)'*)1/'"a"#e
-$1"'%/'%'&4?'$2/"21$/9'&"5"&'64#'%'1)1/%$2"<'3"#$4<'46'
/$*"7',)#$2='/0"'6$#1/'6"?'*$2)/"1'46'"a"#-$1";'94)#'
+4<9')1"1'-%#+409<#%/"'-%&4#$"1'64#'"2"#=97'M2&9'%6/"#'
/0"'6$#1/'6"?'*$2)/"1'46'"a"#-$1"'<4"1'94)#'+4<9'+"=$2'
/4')1"'1/4#"<'6%/'-%&4#$"1'64#'"2"#=97'86'94)#'=4%&'$1'/4'
+)#2'6%/;'%<])1/'/0"'$2/"21$/9'46'94)#'"a"#-$1"')2/$&'94)#'
0"%#/'#%/"'$1'2"%#'/0"'&4?"1/'2)*+"#'$2'94)#'/#%$2$2='
C42"7'Q4#'*%a$*)*'6%/'+)#2$2=;'"a"#-$1"'?$/0'94)#'
0"%#/'#%/"'2"%#'/0"'*$<<&"'2)*+"#'$2'94)#'/#%$2$2='
C42"7
Aerobic Exercisel86'94)#'=4%&'$1'/4'1/#"2=/0"2'94)#'
-%#<$45%1-)&%#'191/"*;'94)'*)1/'3"#64#*'%"#4+$-'
"a"#-$1";'?0$-0'$1'%-/$5$/9'/0%/'#":)$#"1'&%#="'%*4)2/1'
46'4a9="2'64#'3#4&42="<'3"#$4<1'46'/$*"7'Q4#'%"#4+$-'
"a"#-$1";'%<])1/'/0"'$2/"21$/9'46'94)#'"a"#-$1"')2/$&'94)#'
0"%#/'#%/"'$1'2"%#'/0"'0$=0"1/'2)*+"#'$2'94)#'/#%$2$2='
C42"7'
WORKOUT GUIDELINES
Warming Upl!/%#/'?$/0'U'/4'W['*$2)/"1'46'1/#"/-0e
$2='%2<'&$=0/'"a"#-$1"7'D'?%#*e)3'$2-#"%1"1'94)#'+4<9'
/"*3"#%/)#";'0"%#/'#%/";'%2<'-$#-)&%/$42'$2'3#"3%#%/$42'
64#'"a"#-$1"7'
Training Zone ExerciselGa"#-$1"'64#'L['/4'O['*$2e
)/"1'?$/0'94)#'0"%#/'#%/"'$2'94)#'/#%$2$2='C42"7'@,)#$2='
/0"'6$#1/'6"?'?""\1'46'94)#'"a"#-$1"'3#4=#%*;'<4'24/'
\""3'94)#'0"%#/'#%/"'$2'94)#'/#%$2$2='C42"'64#'&42="#'
/0%2'L['*$2)/"17A'P#"%/0"'#"=)&%#&9'%2<'<""3&9'%1'94)'
"a"#-$1"'i'2"5"#'04&<'94)#'+#"%/07'
>4'6$2<'/0"'3#43"#'$2/"21$/9'&"5"&;'6$2<'94)#'%="'%/'/0"'
+4//4*'46'/0"'-0%#/'@%="1'%#"'#4)2<"<'466'/4'/0"'2"%#e
"1/'/"2'9"%#1A7'>0"'/0#""'2)*+"#1'&$1/"<'%+45"'94)#'
%="'<"6$2"'94)#'g/#%$2$2='C42"7h'>0"'&4?"1/'2)*+"#'$1'
/0"'0"%#/'#%/"'64#'6%/'+)#2$2=;'/0"'*$<<&"'2)*+"#'$1'/0"'
0"%#/'#%/"'64#'*%a$*)*'6%/'+)#2$2=;'%2<'/0"'0$=0"1/'
2)*+"#'$1'/0"'0"%#/'#%/"'64#'%"#4+$-'"a"#-$1"7
Cooling DownlQ$2$10'?$/0'U'/4'W['*$2)/"1'46'1/#"/-0e
$2=7'!/#"/-0$2='$2-#"%1"1'/0"'6&"a$+$&$/9'46'94)#'*)1-&"1'
%2<'0"&31'/4'3#"5"2/'341/e"a"#-$1"'3#4+&"*17
EXERCISE FREQUENCY
>4'*%$2/%$2'4#'$*3#45"'94)#'-42<$/$42;'-4*3&"/"'/0#""'
?4#\4)/1'"%-0'?""\;'?$/0'%/'&"%1/'42"'<%9'46'#"1/'
+"/?""2'?4#\4)/17'D6/"#'%'6"?'*42/01'46'#"=)&%#'"a"#e
-$1";'94)'*%9'-4*3&"/"')3'/4'6$5"'?4#\4)/1'"%-0'?""\;'
$6'<"1$#"<7'E"*"*+"#;'/0"'\"9'/4'1)--"11'$1'/4'*%\"'
"a"#-$1"'%'#"=)&%#'%2<'"2]49%+&"'3%#/'46'94)#'"5"#9<%9'
&$6"7
26

SUGGESTED STRETCHES
>0"'-4##"-/'64#*'64#'1"5"#%&'+%1$-'1/#"/-0"1'$1'104?2'%/'/0"'#$=0/7'K45"'1&4?&9'%1'94)'1/#"/-0i'2"5"#'+4)2-"7
1. Toe Touch Stretch
!/%2<'?$/0'94)#'\2""1'+"2/'1&$=0/&9'%2<'1&4?&9'+"2<'64#?%#<'6#4*'
94)#'0$317'D&&4?'94)#'+%-\'%2<'104)&<"#1'/4'#"&%a'%1'94)'#"%-0'<4?2'
/4?%#<'94)#'/4"1'%1'6%#'%1'3411$+&"7'T4&<'64#'WU'-4)2/1;'/0"2'#"&%a7'
E"3"%/'O'/$*"17'!/#"/-0"1B'T%*1/#$2=1;'+%-\'46'\2""1'%2<'+%-\7
2. Hamstring Stretch
!$/'?$/0'42"'&"='"a/"2<"<7'P#$2='/0"'14&"'46'/0"'43341$/"'644/'/4?%#<'
94)'%2<'#"1/'$/'%=%$21/'/0"'$22"#'/0$=0'46'94)#'"a/"2<"<'&"=7'E"%-0'
/4?%#<'94)#'/4"1'%1'6%#'%1'3411$+&"7'T4&<'64#'WU'-4)2/1;'/0"2'#"&%a7'
E"3"%/'O'/$*"1'64#'"%-0'&"=7'!/#"/-0"1B'T%*1/#$2=1;'&4?"#'+%-\'%2<'
=#4$27
3. Calf/Achilles Stretch
.$/0'42"'&"='$2'6#42/'46'/0"'4/0"#;'#"%-0'64#?%#<'%2<'3&%-"'94)#'
0%2<1'%=%$21/'%'?%&&7'Y""3'94)#'+%-\'&"='1/#%$=0/'%2<'94)#'+%-\'644/'
6&%/'42'/0"'6&44#7'P"2<'94)#'6#42/'&"=;'&"%2'64#?%#<'%2<'*45"'94)#'
0$31'/4?%#<'/0"'?%&&7'T4&<'64#'WU'-4)2/1;'/0"2'#"&%a7'E"3"%/'O'/$*"1'
64#'"%-0'&"=7'>4'-%)1"'6)#/0"#'1/#"/-0$2='46'/0"'%-0$&&"1'/"2<421;'
+"2<'94)#'+%-\'&"='%1'?"&&7'!/#"/-0"1B'H%&5"1;'%-0$&&"1'/"2<421'%2<'
%2\&"17
4. Quadriceps Stretch
W
L
O
S
.$/0'42"'0%2<'%=%$21/'%'?%&&'64#'+%&%2-";'#"%-0'+%-\'%2<'=#%13'42"'
644/'?$/0'94)#'4/0"#'0%2<7'P#$2='94)#'0""&'%1'-&41"'/4'94)#'+)//4-\1'
%1'3411$+&"7'T4&<'64#'WU'-4)2/1;'/0"2'#"&%a7'E"3"%/'O'/$*"1'64#'"%-0'
&"=7'!/#"/-0"1B'f)%<#$-"31'%2<'0$3'*)1-&"17
5. Inner Thigh Stretch
!$/'?$/0'/0"'14&"1'46'94)#'6""/'/4="/0"#'%2<'94)#'\2""1'4)/?%#<7'
J)&&'94)#'6""/'/4?%#<'94)#'=#4$2'%#"%'%1'6%#'%1'3411$+&"7'T4&<'64#'WU'
-4)2/1;'/0"2'#"&%a7'E"3"%/'O'/$*"17'!/#"/-0"1B'f)%<#$-"31'%2<'0$3'
*)1-&"17
U
27

PART LIST
K e y N o . Q t y . D e s c r i p t i o n K e y N o . Q t y . D e s c r i p t i o n
K4<"&'(47'ZOW7LWc``7['E[cWLD
' W' W' Q#%*"
' L' W' N3#$=0/
' O' L' Q44/
' S' W' H4214&"
' U' W' E%$&
' V' W' D<])1/*"2/'P%#
' `' W' T%2<&"+%#
' Z' W' P%-\#"1/
' c' W' !"%/
' W[' W' !"%/'T%2<&"+%#^.$#"
' WW' W' !"%/'T%2<&"+%#'H%3
' WL' W' P#%\"'P&4-\
' WO' W' I"6/'Q#42/'!0$"&<
' WS' W' E$=0/'Q#42/'!0$"&<
' WU' W' Q#42/'!/%+$&$C"#
' WV' W' E"%#'!/%+$&$C"#
' W`' L' .0""&
' WZ' W' P#%\"
' Wc' L' I"5"&$2='Q44/
' L[' W' E$=0/'T%2<&"+%#'F#$3
' LW' W' E$=0/'J"<%&^!/#%3
' LL' W' I"6/'J"<%&^!/#%3
' LO' W' E$=0/'H#%2\'D#*
' LS' W' I"6/'H#%2\'D#*
' LU' S' KV'a'WZ**'!-#"?
' LV' W' D<])1/*"2/'P%#'T%2<&"
' L`' W' T%2<&"'P#%-\"/
' LZ' L' I%#="'!2%3'E$2=
' Lc' W' J)&&"9
' O[' L' J)&&"9'K%=2"/
' OW' W' H#%2\
' OL' W' P#%\"'Da&"
' OO' L' H#%2\'P"%#$2=
' OS' W' G<<9'K"-0%2$1*
' OU' W' K"-0%2$1*'Da&"
' OV' W' Q#42/'E%$&'H45"#
' O`' W' E"1$1/%2-"'K4/4#
' OZ' Z' K)10#44*'Q%1/"2"#^!-#"?
' Oc' W' 8<&"#
' S[' W' D--"11'H45"#
' SW' W' !"%/'H%##$%="
' SL' W' Q#%*"'J)&1"'.$#"^E"-"3/%-&"
' SO' W' K%$2'.$#"
' SS' W' >43'!0$"&<
' SU' W' H&%*3
' SV' W' E""<'!?$/-0^.$#"
' S`' W' ,#$5"'P"&/
' SZ' S' !/%+$&$C"#'H%3
' Sc' W' I"6/'T%2<&"+%#'F#$3
' U[' L' Q&%2="'!-#"?
' UW' W' J4?"#'D<%3/"#
' UL' L' !0$"&<',$1' UO' W' T"%#/'E%/"'K42$/4#
' US' W' H0"1/'!/#%3
' UU' Z' H%##$%="'P"%#$2=
' UV' W' D--"114#9'>#%9
' U`' W' N3#$=0/'H45"#
' UZ' W' Q#42/'!0$"&<
' Uc' Z' H%##$%="'P)10$2=
' V[' L' E%$&'E4<
' VW' W' KV'a'WU**'!04)&<"#'!-#"?
' VL' S' E4<'H%3
' VO' L' P#%\"'!3%-"#
' VS' U' KV'a'WV**'!-#"?
' VU' S' KW['a'WLL**'!-#"?
' VV' L' .0""&'P4&/
' V`' S' KZ'a'OZ**'!-#"?
' VZ' W' I%#="'KV'.%10"#
' Vc' L' KZ'a'LL**'!-#"?
' `[' S' KW['a'VL**'!-#"?
' `W' L' KV'a'VU**'P4&/
' `L' W' F#4**"/
' `O' L' W^Sn'a'WS**'!-#"?
' `S' Z' KZ'a'LZ**'P4&/
' `U' Z' KV'a'O[**'!-#"?
' `V' W' E"-"$5"#^.$#"
' ``' O`' KS'a'WV**'!-#"?
' `Z' S' KZ'a'L[**'!-#"?
' `c' W' KS'a'WV**'P#$=0/'!-#"?
' Z[' S' E%$&'!-#"?
' ZW' W' P%-\#"1/'P%-\
' ZL' S' KS'a'WL**'Q&%2="'!-#"?
' ZO' W' KW['a'U[**'T"a'!-#"?
' ZS' W' KV'a'L[**'T"a'!-#"?
' ZU' Z' KS'a'LU**'!-#"?
' ZV' W' Ga/"21$42'.$#"
' Z`' L' KW['I4-\2)/
' ZZ' Z' KV'.%10"#
' Zc' WS' KZ'o%*'()/
' c[' W' E"%#'E%$&'H45"#
28

K e y N o . Q t y . D e s c r i p t i o n K e y N o . Q t y . D e s c r i p t i o n
' cW' WL' KZ'!3&$/'.%10"#
' cL' L' H#%2\'H%3
' cO' L' KV'I4-\2)/
' cS' `' >#""'Q%1/"2"#
' cU' W' !/""&'.%10"#
' cV' U' KV'!3&$/'.%10"#
(4/"B'!3"-$6$-%/$421'%#"'1)+]"-/'/4'-0%2="'?$/04)/'24/$-"7'Q4#'$264#*%/$42'%+4)/'4#<"#$2='#"3&%-"*"2/'3%#/1;'1""'
/0"'+%-\'-45"#'46'/0$1'*%2)%&7'p>0"1"'3%#/1'%#"'24/'$&&)1/#%/"<7
' c`' W' E$=0/'E"%#'!0$"&<
' cZ' W' I"6/'E"%#'!0$"&<
' cc' `' !*%&&'KV'.%10"#
' p' b' D11"*+&9'>44&
' p' b' N1"#k1'K%2)%&
' p' b' J4?"#'.$#"^E"-"3/%-&"
29

EXPLODED DRAWING A
`[
K4<"&'(47'ZOW7LWc``7['E[cWLD
UZ
UL
L[
Sc
``
``
``
Vc
``
U`
Vc
``
`L
L
``
S[
SS
WO
`
``
ZU
``
``
WS
US
UO
``
``
UL
S
ZZ
Z
``
ZW
``
`U
``
ZZ
c
`U
LU
LU
ZZ
``
`U
ZZ
UV
`U
``
``
cZ
OZ
OZ
``
cS
c`
``
cS
cS
``
``
30

EXPLODED DRAWING B
K4<"&'(47'ZOW7LWc``7['E[cWLD
`Z
U[
cL
cW
LL
V`
O[
OS
Zc
W[
`Z
OU
Zc
cW
LS
``
cU
Lc
O[
WW
OW
LZ
Zc
OO
S`
Zc
``
VS
cc
cV
ZL
WL
OV
VO
VU
W`
OZ
SZ
LV
L`
VV
``
cO
Z[
VO
W`
VV
Z`
ZU
O
SV
SU
`c
O`
VW
`W
VL
U
Z[
V[
V
VL
OL
cc
VS
V[
Z[
cO
ZS
VL
VL
UU
Zc
SW
WU
VZ
Uc
`V
cW
UU
`W
O
cc
SZ
VS
Zc
OZ
ZU
LO
OO
Oc
`S
cc
LW
LZ
cV
W
U[
`O
Zc
WZ
cL
`S
UU
Zc
Uc
UU
cW
ZO
Uc
`S
ZV
cW
WV
Zc
SZ
UU
Uc
UW
SO
cW
SL
Wc
`S
SZ
Wc
VU
31
c[

ORDERING REPLACEMENT PARTS
>4'4#<"#'#"3&%-"*"2/'3%#/1;'3&"%1"'1""'/0"'6#42/'-45"#'46'/0$1'*%2)%&7'>4'0"&3')1'%11$1/'94);'+"'3#"3%#"<'/4'
3#45$<"'/0"'64&&4?$2='$264#*%/$42'?0"2'-42/%-/$2=')1B
d''/0"'*4<"&'2)*+"#'%2<'1"#$%&'2)*+"#'46'/0"'3#4<)-/'@1""'/0"'6#42/'-45"#'46'/0$1'*%2)%&A
d''/0"'2%*"'46'/0"'3#4<)-/'@1""'/0"'6#42/'-45"#'46'/0$1'*%2)%&A
d'''/0"'\"9'2)*+"#'%2<'<"1-#$3/$42'46'/0"'#"3&%-"*"2/'3%#/@1A'@1""'/0"'JDE>'I8!>'%2<'/0"'GXJIM,G,'
,ED.8(F'2"%#'/0"'"2<'46'/0$1'*%2)%&A
LIMITED WARRANTY
IMPORTANT: You must register this product within 30 days of the purchase date to avoid added
fees for service needed under warranty. Go to www.nordictrackservice.com/registration.
8HM('T"%&/0'r'Q$/2"11;'82-7'@8HM(A'?%##%2/1' /0$1' 3#4<)-/' /4' +"' 6#""' 6#4*' <"6"-/1' $2' ?4#\*%210$3' %2<'
*%/"#$%&;')2<"#'24#*%&')1"'%2<'1"#5$-"'-42<$/$4217'>0"'6#%*"'%2<'/0"'"<<9'*"-0%2$1*'%#"'?%##%2/"<'64#'
%'&$6"/$*"7'J%#/1'%#"'?%##%2/"<'64#'/0#""'@OA'9"%#1'6#4*'/0"'<%/"'46'3)#-0%1"7'I%+4#'$1'?%##%2/"<'64#'42"'
@WA'9"%#'6#4*'/0"'<%/"'46'3)#-0%1"7
>0$1'?%##%2/9'"a/"2<1'42&9'/4'/0"'4#$=$2%&'3)#-0%1"#'@-)1/4*"#A7'8HM(k1'4+&$=%/$42')2<"#'/0$1'?%##%2/9'$1'
&$*$/"<'/4'#"3%$#$2='4#'#"3&%-$2=;'%/'8HM(k1'43/$42;'/0"'3#4<)-/'/0#4)=0'42"'46'$/1'%)/04#$C"<'1"#5$-"'-"2/"#17'
D&&'#"3%$#1'64#'?0$-0'?%##%2/9'-&%$*1'%#"'*%<"'*)1/'+"'3#"%)/04#$C"<'+9'8HM(7'86'/0"'3#4<)-/'$1'10$33"<'
/4'%'1"#5$-"'-"2/"#;'6#"$=0/'-0%#="1'/4'%2<'6#4*'/0"'1"#5$-"'-"2/"#'?$&&'+"'/0"'-)1/4*"#k1'#"13421$+$&$/97'86'
#"3&%-"*"2/'3%#/1'%#"'10$33"<'?0$&"'/0"'3#4<)-/'$1')2<"#'?%##%2/9;'/0"'-)1/4*"#'?$&&'+"'#"13421$+&"'64#'%'
*$2$*%&'0%2<&$2='-0%#="7'Q4#'$2e04*"'1"#5$-";'/0"'-)1/4*"#'?$&&'+"'#"13421$+&"'64#'%'*$2$*%&'/#$3'-0%#="7'
>0$1'?%##%2/9'<4"1'24/'"a/"2<'/4'6#"$=0/'<%*%="'/4'/0"'3#4<)-/7'>0$1'?%##%2/9'?$&&'%)/4*%/$-%&&9'+"'54$<"<'
$6'/0"'3#4<)-/'$1')1"<'%1'%'1/4#"'<$13&%9'*4<"&;'$6'/0"'3#4<)-/'$1'3)#-0%1"<'4#'/#%2134#/"<'4)/1$<"'/0"'N!D;'
$6'%&&'$21/#)-/$421'$2'/0$1'*%2)%&'%#"'24/'64&&4?"<;'$6'/0"'3#4<)-/'$1'%+)1"<'4#'$*3#43"#&9'4#'%+24#*%&&9')1"<;'
4#'$6'/0"'3#4<)-/'$1')1"<'64#'-4**"#-$%&'4#'#"2/%&'3)#341"17'(4'4/0"#'?%##%2/9'+"942<'/0%/'13"-$'-%&&9'1"/'
64#/0'%+45"'$1'%)/04#$C"<'+9'8HM(7
8HM('$1'24/'#"13421$+&"'4#'&$%+&"'64#'$2<$#"-/;'13"-$%&;'4#'-421":)"2/$%&'<%*%="1'%#$1$2='4)/'46'4#'$2'-42e
2"-/$42'?$/0'/0"')1"'4#'3"#64#*%2-"'46'/0"'3#4<)-/i'<%*%="1'?$/0'#"13"-/'/4'%29'"-424*$-'&411;'&411'46'
3#43"#/9;'&411'46'#"5"2)"1'4#'3#4'/1;'&411'46'"2]49*"2/'4#')1";'4#'-41/1'46'#"*45%&'4#'$21/%&&%/$42i'4#'4/0"#'
-421":)"2/$%&'<%*%="1'46'%29'\$2<7'!4*"'1/%/"1'<4'24/'%&&4?'/0"'"a-&)1$42'4#'&$*$/%/$42'46'$2-$<"2/%&'4#'
-421":)"2/$%&'<%*%="17'D--4#<$2=&9;'/0"'%+45"'&$*$/%/$42'*%9'24/'%33&9'/4'/0"'-)1/4*"#7
>0"'?%##%2/9'"a/"2<"<'0"#")2<"#'$1'$2'&$")'46'%29'%2<'%&&'4/0"#'?%##%2/$"1;'%2<'%29'$*3&$"<'?%##%2/$"1'46'
*"#-0%2/%+$&$/9'4#''/2"11'64#'%'3%#/$-)&%#'3)#341"'%#"'&$*$/"<'$2'/0"$#'1-43"'%2<'<)#%/$42'/4'/0"'/"#*1'1"/'
64#/0'0"#"$27'!4*"'1/%/"1'<4'24/'%&&4?'&$*$/%/$421'42'04?'&42='%2'$*3&$"<'?%##%2/9'&%1/17'D--4#<$2=&9;'/0"'
%+45"'&$*$/%/$42'*%9'24/'%33&9'/4'/0"'-)1/4*"#7
>0$1'?%##%2/9'3#45$<"1'13"-$'-'&"=%&'#$=0/1i'/0"'-)1/4*"#'*%9'0%5"'4/0"#'#$=0/1'/0%/'5%#9'6#4*'1/%/"'/4'1/%/"7
ICON Health & Fitness, Inc., 1500 S. 1000 W., Logan, UT 84321-9813
J%#/'(47'OOS[LU'E[cWLD' J#$2/"<'$2'H0$2%'q'L[WL'8HM('8J;'82-7
 Loading...