


 Loading...
HP Scanjet 7000n Series
User Guide
Copyright and License
© 2011 Copyright Hewlett-Packard
Development Company, L.P.
Reproduction, adaptation, or translation without prior written permission is prohibited, except as allowed under the copyright laws.
The information contained herein is subject to change without notice.
The only warranties for HP products and services are set forth in the express warranty statements accompanying such products and services. Nothing herein should be construed as constituting an additional warranty. HP shall not be liable for technical or editorial errors or omissions contained herein.
Edition 2, 1/2011
Trademark Credits
Adobe®, Acrobat®, and PostScript® are trademarks of Adobe Systems Incorporated.
Java™ is a US trademark of Sun
Microsystems, Inc.
Microsoft®, Windows®, Windows® XP, and Windows Vista® are U.S. registered trademarks of Microsoft Corporation.
UNIX® is a registered trademark of The Open Group.
ENERGY STAR and the ENERGY STAR mark are registered U.S. marks.
OCR Technology by I.R.I.S., copyright 1987-2009, All Rights Reserved.
iHQC™ compression technology by I.R.I.S., copyright 2007-2009, All Rights Reserved (Patent Pending).
PDF-iHQC™, XPS-iHQC™ technology by I.R.I.S. copyright 2007-2009.

Table of contents
1 Product basics ................................................................................................................................................ |
1 |
Conventions used in this guide ............................................................................................................ |
2 |
Product features ................................................................................................................................... |
3 |
Product walkaround .............................................................................................................................. |
5 |
Front view ............................................................................................................................ |
5 |
Back view ............................................................................................................................. |
6 |
Serial number and model number location .......................................................................... |
6 |
2 Control panel ................................................................................................................................................... |
7 |
Use the control panel ........................................................................................................................... |
8 |
Control-panel layout ............................................................................................................. |
8 |
Home screen ..................................................................................................................... |
10 |
Buttons on the touch screen .............................................................................................. |
11 |
Control-panel help system ................................................................................................. |
11 |
Navigate the Administration menu ..................................................................................................... |
12 |
Jetdirect menus ................................................................................................................. |
12 |
3 Supported utilities for Windows .................................................................................................................. |
17 |
HP Web Jetadmin .............................................................................................................................. |
18 |
Embedded Web Server ...................................................................................................................... |
18 |
HP Digital Sending Software (HP DSS) ............................................................................................. |
18 |
4 Configure the product .................................................................................................................................. |
19 |
Supported network protocols .............................................................................................................. |
20 |
Configure the product to use the network .......................................................................................... |
22 |
View or change network settings ....................................................................................... |
22 |
Set or change the administrator password ........................................................................ |
22 |
Manually configure IPv4 TCP/IP parameters from the control panel ................................. |
23 |
Manually configure IPv6 TCP/IP parameters from the control panel ................................. |
24 |
Disable network protocols (optional) .................................................................................. |
25 |
Link speed and duplex settings ......................................................................................... |
25 |
iii
Configure e-mail settings .................................................................................................................... |
26 |
Supported protocols ........................................................................................................... |
26 |
Configure e-mail options .................................................................................................... |
26 |
Configure other digital sending settings ............................................................................................. |
28 |
5 Load originals ............................................................................................................................................... |
30 |
Supported document sizes ................................................................................................................. |
31 |
General document loading tips ........................................................................................................... |
32 |
Document loading tips for mixed-size documents .............................................................................. |
34 |
Load documents ................................................................................................................................. |
35 |
6 Scan and send documents .......................................................................................................................... |
37 |
Sign In ................................................................................................................................................ |
38 |
Preview a scan ................................................................................................................................... |
39 |
Use the Image Preview screen .......................................................................................... |
39 |
Send a scanned document to one or more e-mails ............................................................................ |
41 |
Use the address book ........................................................................................................ |
41 |
Create a recipient list ........................................................................................ |
41 |
Use the Personal or Shared Contacts address book ........................................ |
41 |
Add entries to the Personal or Shared Contacts address books ...... |
42 |
Delete entries from the Personal Contacts address book ................ |
42 |
Use the Send E-mail screen .............................................................................................. |
42 |
Send documents ................................................................................................................ |
43 |
Send a document .............................................................................................. |
43 |
Use the auto-complete function ........................................................................ |
43 |
Fax a scanned document ................................................................................................................... |
44 |
Use the Send Fax screen .................................................................................................. |
44 |
Send a fax .......................................................................................................................... |
45 |
Save to a network folder or USB storage device ................................................................................ |
46 |
Send or save a document using Quick Sets ...................................................................................... |
47 |
Scan to a workflow destination ........................................................................................................... |
48 |
7 Manage and maintain the product ............................................................................................................... |
49 |
Use information pages ....................................................................................................................... |
50 |
Embedded Web Server ...................................................................................................................... |
51 |
Open the Embedded Web Server ...................................................................................... |
51 |
Embedded Web Server options ......................................................................................... |
51 |
Use HP Web Jetadmin software ........................................................................................................ |
53 |
Controlling digital-sending security ..................................................................................................... |
54 |
Network authentication ...................................................................................................... |
54 |
iv
Secure e-mail ..................................................................................................................... |
54 |
Restrict software access .................................................................................................... |
54 |
Security features ................................................................................................................................ |
55 |
Secure the Embedded Web Server ................................................................................... |
55 |
Manage temporary job files ............................................................................................... |
55 |
Secure Storage Erase ....................................................................................................... |
56 |
Data affected ..................................................................................................... |
56 |
Secure File Erase .............................................................................................................. |
56 |
Secure Disk Erase ............................................................................................................. |
56 |
HP High-Performance Secure Hard Disks ......................................................................... |
57 |
Manage certificates ............................................................................................................ |
57 |
Load a certificate ............................................................................................... |
57 |
Load a certificate revocation list (CRL) ............................................................. |
57 |
Authentication and authorization ....................................................................................... |
57 |
Test and calibrate the touch screen ................................................................................................... |
59 |
Test the touch screen ........................................................................................................ |
59 |
Calibrate the touch screen ................................................................................................. |
59 |
Install the hardware integration pocket ............................................................................................... |
60 |
Clean the product ............................................................................................................................... |
63 |
Clean the touch screen ...................................................................................................... |
63 |
Clean the product glass ..................................................................................................... |
63 |
Clean the paper path ......................................................................................................... |
64 |
Clean the rollers ................................................................................................................. |
64 |
Order maintenance and scanning supplies ........................................................................................ |
68 |
Replace supplies and parts ................................................................................................................ |
69 |
Replace the rollers ............................................................................................................. |
69 |
Replace the keyboard ........................................................................................................ |
69 |
Replace the Jetdirect card ................................................................................................. |
70 |
Replace the hard drive ....................................................................................................... |
72 |
Upgrade the firmware ........................................................................................................ |
75 |
Upgrade the product firmware ........................................................................... |
75 |
Upgrade the HP Jetdirect Inside firmware ........................................................ |
75 |
8 Solve problems ............................................................................................................................................. |
77 |
Error codes ......................................................................................................................................... |
78 |
Basic troubleshooting tips .................................................................................................................. |
79 |
Restore factory settings ...................................................................................................................... |
80 |
Interpret control-panel status lights .................................................................................................... |
81 |
Control-panel message types ............................................................................................................. |
82 |
Control-panel messages .................................................................................................................... |
83 |
Installation problems .......................................................................................................................... |
84 |
v
Initialization or hardware problems ..................................................................................................... |
85 |
Check the Ethernet connection .......................................................................................... |
85 |
Check the power connection ............................................................................................. |
85 |
Reset the product .............................................................................................................. |
86 |
The product has stopped working correctly ....................................................................... |
86 |
Operation problems ............................................................................................................................ |
87 |
Product will not turn on ...................................................................................................... |
87 |
Lamp stays on ................................................................................................................... |
87 |
Scan does not start right away .......................................................................................... |
87 |
Only one side of a two-sided page scans .......................................................................... |
88 |
Scanned pages are missing at the scan destination ......................................................... |
88 |
Scanned pages are out of order at the scan destination ................................................... |
88 |
Optimize scanning and task speeds .................................................................................. |
88 |
The scan is completely black or completely white ............................................................. |
88 |
Scanned images are not straight ....................................................................................... |
88 |
Scan files are too large ...................................................................................................... |
88 |
Paper path problems .......................................................................................................................... |
90 |
Paper jamming, skewing, misfeeds, or multiple-page feeds .............................................. |
90 |
Scanning fragile originals ................................................................................................... |
90 |
Paper does not feed correctly ............................................................................................ |
90 |
Originals are curling up in the output tray .......................................................................... |
91 |
The bottom of the scanned image is cut off ....................................................................... |
91 |
The scanned images have streaks or scratches ............................................................... |
91 |
An item loaded in the document feeder jams repeatedly ................................................... |
91 |
Clear jams from the paper path ......................................................................................... |
91 |
Solve e-mail problems ........................................................................................................................ |
93 |
Validate the SMTP gateway address ................................................................................. |
93 |
Validate the LDAP gateway address ................................................................................. |
93 |
Solve network problems ..................................................................................................................... |
94 |
Contact HP Support ........................................................................................................................... |
95 |
Appendix A Supplies and accessories .......................................................................................................... |
96 |
Order parts, accessories, and supplies .............................................................................................. |
97 |
Part numbers ...................................................................................................................................... |
98 |
Accessories ....................................................................................................................... |
98 |
Cables and interfaces ........................................................................................................ |
98 |
Maintenance kits ................................................................................................................ |
98 |
Appendix B Service and support ................................................................................................................... |
99 |
Hewlett-Packard limited warranty statement .................................................................................... |
100 |
OpenSSL .......................................................................................................................................... |
101 |
vi
Customer self-repair warranty service .............................................................................................. |
103 |
Customer support ............................................................................................................................. |
104 |
Appendix C Product specifications ............................................................................................................. |
105 |
Physical specifications ..................................................................................................................... |
106 |
Power consumption .......................................................................................................................... |
106 |
Environmental specifications ............................................................................................................ |
106 |
Certificate of Volatility ....................................................................................................................... |
107 |
Volatile memory ............................................................................................................... |
107 |
Non-volatile memory ........................................................................................................ |
107 |
Hard-disk-drive memory .................................................................................................. |
107 |
Appendix D Regulatory information ............................................................................................................ |
108 |
Regulatory model number ................................................................................................................ |
109 |
Environmental product stewardship program ................................................................................... |
110 |
Protecting the environment .............................................................................................. |
110 |
Power consumption ......................................................................................................... |
110 |
Plastics ............................................................................................................................ |
110 |
Material restrictions .......................................................................................................... |
110 |
Disposal of waste equipment by users in private households in the European Union .... |
111 |
Chemical substances ....................................................................................................... |
111 |
For more information ....................................................................................................... |
111 |
Safety statements ............................................................................................................................. |
111 |
Index ................................................................................................................................................................. |
112 |
vii
viii

1 Product basics
●Conventions used in this guide
●Product features
●Product walkaround
1

Conventions used in this guide
Throughout this guide, several tips, notes, cautions, and warnings alert you about important information.
 TIP: Tips provide helpful hints or shortcuts.
 NOTE: Notes provide important information to explain a concept or to complete a task.
CAUTION: Cautions indicate procedures that you should follow to avoid losing data or damaging the product.
WARNING! Warnings alert you to specific procedures that you should follow to avoid personal injury, catastrophic loss of data, or extensive damage to the product.
2 Chapter 1 Product basics
Product features
Table 1-1 Features
Resolution |
600 pixels per inch (ppi) |
|
|
Memory |
● 512 MB of random-access memory (RAM). |
|
● Memory Enhancement technology (MEt) automatically compresses data to use RAM |
|
more efficiently. |
|
|
User interface |
● HP Easy Select full color control panel |
|
● Embedded Web Server (EWS) to configure the product and gain access to support |
|
|
Paper-handling |
● Document feeder: Holds up to 50 sheets of paper. |
|
● Two-sided scanning: The document feeder has an automatic duplexer for scanning |
|
two-sided documents. |
|
● Blank page suppression: Suppresses blank pages in scanned output (works best with |
|
white or light-colored pages). |
|
● Standard output tray: The output tray is located near the bottom of the product. This |
|
tray can hold up to 50 sheets of paper. |
|
● HP Precision Feed technology with multiphase pick process, advanced separation and |
|
intelligent picking technologies, mixed-stack handling, and ultrasonic double-feed |
|
detection. |
|
|
Connectivity |
● Local area network (LAN) connector (RJ-45) for the embedded HP Jetdirect card |
|
● One enhanced input/output (EIO) slot, which is occupied by the Jetdirect card |
|
● USB 2.0 connection for FAT-formatted portable storage device |
|
NOTE: USB-connected external hard drives are not supported. |
|
● Optional HP Digital Sending Software (DSS) |
|
● Hardware integration pocket |
|
|
Environmental features |
● Sleep Delay setting saves energy |
|
● High content of recyclable components and materials |
|
● Instant-on technology |
|
● Energy Star® compliance |
|
|
Product features |
3 |

Table 1-1 Features (continued)
Security features |
● |
Secure disk erase |
|
|
● |
Secure storage erase |
|
|
● |
Secure file erase |
|
|
● |
Authentication |
|
|
|
◦ |
User access code authentication |
|
|
◦ |
Windows (Kerberos and NTLM) |
|
|
◦ |
LDAP |
|
● |
Jetdirect card |
|
|
|
◦ |
IPsec |
|
|
◦ |
Password protection |
|
|
◦ |
SSL |
|
|
◦ |
TLS |
|
|
◦ |
SNMPv3 |
|
|
◦ |
802.1x authentication |
|
|
◦ |
IPP over TLS |
|
● Secure communication between the product and network servers |
||
|
● |
IPsec security (hardware) |
|
|
● Support for HP High-Performance Secure Hard Disk |
||
|
|
|
|
Scanning and sending |
● |
Modes for text, graphics, and mixed text and graphics formats |
|
|
● |
Embedded OCR |
|
|
● Job-interrupt feature |
||
|
● Control-panel animations (for example, jam recovery) |
||
|
● Scan and send to e-mail, fax, network folder, and USB device |
||
|
|
◦ |
Address book for e-mail and fax |
|
|
◦ |
Send to digital fax (Internet and LAN fax) |
|
● Retrieve contacts from a network directory (LDAP) |
||
|
● Automatic duplex (two-sided) scanning |
||
|
|
|
|
4 Chapter 1 Product basics
Product walkaround
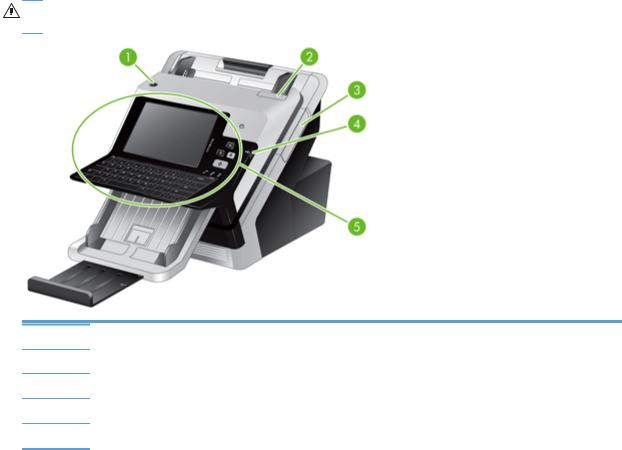
Front view
CAUTION: If you need to move the product, always lift the product from the base. Do not lift using the keyboard.
1Power button
2Document feeder latch
3Hardware integration pocket (HIP) panel
4USB connector for portable storage device
5Control panel
Product walkaround |
5 |

Back view
1Power switch
2Power connector
3USB ports
4Network link speed indicators
5Ethernet port
6Covered Ethernet port for service access
7EIO slot containing a Jetdirect card
Serial number and model number location
Model name |
Model number |
|
|
HP Scanjet Enterprise 7000n |
L2709A |
|
L2708A |
|
|
6 Chapter 1 Product basics

2 Control panel
●Use the control panel
●Navigate the Administration menu
7

Use the control panel
The control panel has an SVGA touch screen that provides access to all product functions, virtual and physical keyboard, and a keypad with buttons for common tasks. Use the buttons and keyboard to control jobs and the product status. The LEDs indicate overall product status.
TIP: If touch screen touches are yielding unexpected (or no) results, you may need to calibrate the touch screen. To verify that calibration is necessary, you should first test the touch screen. See Test and calibrate the touch screen on page 59.
Control-panel layout
The control panel includes a touch screen graphical display, job-control buttons, a keyboard, and three light-emitting diode (LED) status lights.
1 |
Keyboard |
Use the keyboard for entering text and numbers into fields on the touch |
|
|
screen. |
|
|
|
2 |
Touch screen |
Use the touch screen to access product functions. |
|
|
|
3 |
Sleep button |
If the product is inactive for a long period of time, it automatically enters a |
|
|
sleep mode. To place the product into sleep mode or to reactivate the |
|
|
product, press the Sleep button. |
|
|
|
4 |
Stop button |
Stops the active job and opens the Job Status screen. |
|
|
|
5 |
Start button |
Starts digital sending (e-mail and fax, for example), or continues a job that |
|
|
has been interrupted. |
|
|
|
6 |
Attention LED |
The Attention LED indicates that the product has a condition that requires |
|
|
intervention. |
|
|
|
7 |
Data LED |
The Data LED indicates that the product is receiving data. |
|
|
|
8 |
Ready LED |
The Ready LED indicates that the product is ready to begin processing |
|
|
any job. |
|
|
|
8 Chapter 2 Control panel

9 |
Reset button |
Resets the job settings to factory or user-defined default values. |
|
|
|
10 |
Touch screen brightness- |
Use this control to increase or decrease the brightness of the touch |
|
adjustment control |
screen display. |
|
|
|
Use the control panel |
9 |
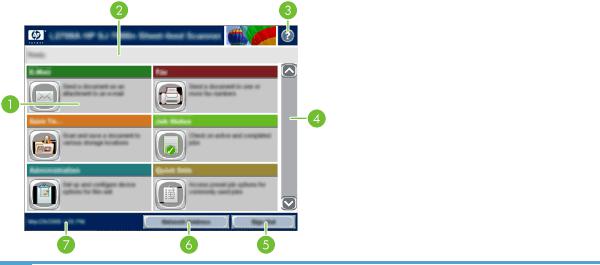
Home screen
The home screen provides access to the product features, and it indicates the current status of the product.
1 |
Features |
Depending on how the product is configured, the features that appear in this area can |
|
|
|
include any of the following items: |
|
|
|
● |
Fax |
|
|
● |
|
|
|
● |
Job Status |
|
|
● Save to Network Folder |
|
|
|
● |
Save to USB |
|
|
● |
Quick Sets |
|
|
● |
Workflow |
|
|
● |
Administration |
|
|
● |
Service |
|
|
|
|
2 |
Product status line |
The status line provides information about the overall product status. Various buttons appear |
|
|
|
in this area, depending on the current status. |
|
|
|
|
|
3 |
Help button |
Touch the Help button to open the embedded help system. |
|
|
|
|
|
4 |
Scroll bar |
Touch the up or down arrows on the scroll bar to see the complete list of available features. |
|
|
|
|
|
5 |
Sign In/Sign Out |
Touch this button to sign in or sign out of the product. After you sign out, the product restores |
|
|
|
all options to the default settings. |
|
|
|
|
|
6 |
Network Address |
Touch the Network Address button to find information about the network connection. |
|
|
button |
|
|
|
|
|
|
7 |
Date and time |
The current date and time appear here. You can select the format that the product uses to |
|
|
|
show the date and time, for example 12-hour format or 24-hour format. |
|
|
|
|
|
10 Chapter 2 Control panel

Buttons on the touch screen
The touch screen provides information about the product status. Various buttons can appear in this area.
Home button. Touch this button to go to the Home screen from any other screen.
Start button. Touch this button to begin the action for the feature that you are using.
NOTE: The name of this button changes for each feature. For example, in the digital fax feature, the button is named Send Fax.
Error button. This button appears whenever the product has an error that requires attention before it can continue. Touch the Error button to see a message that describes the error. The message also has instructions for solving the problem.
Warning button. This button appears when the product has a problem but can continue functioning. Touch the Warning button to see a message that describes the problem. The message also has instructions for solving the problem.
Help button. Touch this button to open the built-in online Help system.
Control-panel help system
The product has a built-in Help system that explains how to use each screen. To open the Help system, touch the Help button  in the upper-right corner of the screen.
For some screens, the Help opens to a global menu where you can search for specific topics. You can browse through the menu structure by touching the buttons in the menu.
For screens that contain settings for individual jobs, the Help opens to a topic that explains the options for that screen.
If the product alerts you of an error or warning, touch the error  or warning
  button to open a message that describes the problem. The message also contains instructions to help solve the problem.
Use the control panel 11

Navigate the Administration menu
From the Home screen, touch the Administration button to open the menu structure. You might need to scroll to the bottom of the Home screen to see this feature.
The Administration menu has several sub-menus that you can use for some setup tasks. (Use the Embedded Web Server to configure all settings.) Touch the name of a menu to expand the structure. A plus sign (+) next to a menu name means that it contains sub-menus. Continue opening the structure until you reach the option that you want to configure. To return to the previous level, touch the Back button  .
.
 NOTE: The Back button
  is not available on all screens.
To exit the Administration menu, touch the Home button  in the upper-left corner of the screen.
The product has built-in Help that explains each of the features that are available through the menus. Help is available for many menus on the right-hand side of the touch screen.
The table in this section provides general information about each menu. For information about specific entries in each menu, see the built-in Help.
Table 2-1 Administration menus
Menu item |
Description |
|
|
Reports |
Use this menu to view information pages and reports that are stored internally on the |
|
product. |
|
|
General Settings |
Use this menu to set options for setting the time and period of inactivity before the product |
|
enters sleep mode. |
|
|
Scan/Digital Send Settings |
Use this menu to set up e-mail, save-to-network-folder, save-to-USB-device, and digital- |
|
send-service options. |
|
|
Fax Settings |
Use this menu to set up fax-send options. |
|
|
Display Settings |
Use this menu to set up basic display and device behavior settings (keypress sound, display |
|
language, network address button display, sleep mode and interval, and more). |
|
|
Network Settings |
Use this menu to set up I/O timeout options and to access the Jetdirect menu. |
|
|
Jetdirect menus
Administration > Network Settings > Jetdirect Menu
Table 2-2 Jetdirect menus
Menu item |
Sub-menu item |
Sub-menu item |
Values and Description |
|
|
|
|
Information |
Print Protocols |
|
Yes: Use print protocols. |
|
|
|
No (default): Do not use print protocols. |
|
|
|
|
|
Print Sec Report |
|
Yes: Print the security report. |
|
|
|
No (default): Do not print the security report. |
|
|
|
|
TCP/IP |
Enable |
|
Off: Disable the TCP/IP protocol. |
|
|
|
On (default): Enable the TCP/IP protocol. |
|
|
|
|
12 Chapter 2 Control panel
Table 2-2 Jetdirect menus (continued)
Menu item |
Sub-menu item |
Sub-menu item |
Values and Description |
|
|
|
|
|
Host Name |
|
An alphanumeric string, up to 32 characters, used to |
|
|
|
identify the product. This name is listed on the |
|
|
|
HP Jetdirect configuration page. The default host |
|
|
|
name is NPIxxxxxx, where xxxxxx is the last six digits |
|
|
|
of the LAN hardware (MAC) address. |
|
|
|
|
|
IPV4 Settings |
Config Method |
Specifies the method that TCP/IPv4 parameters will |
|
|
|
be configured on the HP Jetdirect server. |
|
|
|
Bootp: Use BOOTP (Bootstrap Protocol) for |
|
|
|
automatic configuration from a BOOTP server. |
|
|
|
DHCP: Use DHCP (Dynamic Host Configuration |
|
|
|
Protocol) for automatic configuration from a DHCPv4 |
|
|
|
server. If selected and a DHCP lease exists, DHCP |
|
|
|
Release and DHCP Renew menus are available to |
|
|
|
set DHCP lease options. |
|
|
|
Auto IP: Use automatic link-local IPv4 addressing. An |
|
|
|
address in the form 169.254.x.x is assigned |
|
|
|
automatically. |
|
|
|
Manual: Use the Manual Settings menu to configure |
|
|
|
TCP/IPv4 parameters. |
|
|
|
|
|
|
Default IP |
Specify the IP address to default to when the |
|
|
|
Jetdirect server is unable to obtain an IP address |
|
|
|
from the network during a forced TCP/IP |
|
|
|
reconfiguration (for example, when manually |
|
|
|
configured to use BOOTP or DHCP). |
|
|
|
Auto IP: A link-local IP address 169.254.x.x is set. |
|
|
|
Legacy: The address 192.0.0.192 is set, consistent |
|
|
|
with older HP Jetdirect products. |
|
|
|
|
|
|
DHCP Release |
This menu appears if the Config Method item was set |
|
|
|
to the DHCP value and a DHCP lease for the |
|
|
|
Jetdirect server exists. |
|
|
|
No (default): The current DHCP lease is saved. |
|
|
|
Yes: The current DHCP lease and the leased IP |
|
|
|
address are released. |
|
|
|
|
|
|
DHCP Renew |
This menu appears if the Config Method item was set |
|
|
|
to the DHCP value and a DHCP lease for the |
|
|
|
Jetdirect server exists. |
|
|
|
No (default): The Jetdirect server does not request to |
|
|
|
renew the DHCP lease. |
|
|
|
Yes: The Jetdirect server requests to renew the |
|
|
|
current DHCP lease. |
|
|
|
|
Navigate the Administration menu 13

Table 2-2 Jetdirect menus (continued)
Menu item |
Sub-menu item |
Sub-menu item |
Values and Description |
|
|
|
|
|
|
Manual Settings |
(Available only if the Config Method item is set to the |
|
|
|
Manual value) Configure parameters directly from the |
|
|
|
control panel: |
|
|
|
IP Address: The unique IP address of the product |
|
|
|
(n.n.n.n), where n is a value from 0 to 255. |
|
|
|
Subnet Mask: The subnet mask for the product |
|
|
|
(m.m.m.m), where m is a value from 0 to 255. |
|
|
|
Syslog Server: The IP address of the syslog server |
|
|
|
used to receive and log syslog messages. |
|
|
|
Default Gateway: The IP address of the gateway or |
|
|
|
router used for communications with other networks. |
|
|
|
Idle Timeout: The time period, in seconds, after which |
|
|
|
an idle TCP data connection is closed (default is 270 |
|
|
|
seconds, 0 disables the timeout). |
|
|
|
|
|
|
Primary DNS |
Specify the IP address (n.n.n.n) of a Primary DNS |
|
|
|
Server. |
|
|
|
|
|
|
Secondary DNS |
Specify the IP address (n.n.n.n) of a Secondary |
|
|
|
Domain Name System (DNS) Server. |
|
|
|
|
|
IPV6 Settings |
Enable |
Use this item to enable or disable IPv6 operation on |
|
|
|
the server. |
|
|
|
Off: IPv6 is disabled. |
|
|
|
On (default): IPv6 is enabled. |
|
|
|
|
|
|
Address |
Type the server address, a 32 hexadecimal digit IPv6 |
|
|
|
node address that uses the colon hexadecimal |
|
|
|
syntax. |
|
|
|
|
|
|
DHCPV6 Policy |
Router Specified: The stateful auto-configuration |
|
|
|
method to be used by the Jetdirect server is |
|
|
|
determined by a router. The router specifies whether |
|
|
|
the Jetdirect server obtains its address, its |
|
|
|
configuration information, or both from a DHCPv6 |
|
|
|
server. |
|
|
|
Router Unavailable (default): If a router is not |
|
|
|
available, the Jetdirect server should attempt to |
|
|
|
obtain its stateful configuration from a DHCPv6 |
|
|
|
server. |
|
|
|
Always: Whether or not a router is available, the |
|
|
|
Jetdirect server always attempts to obtain its stateful |
|
|
|
configuration from a DHCPv6 server. |
|
|
|
|
|
|
Primary DNS |
Use this item to specify an IPv6 address for a primary |
|
|
|
DNS server that the Jetdirect server should use. |
|
|
|
|
|
|
Secondary DNS |
Use this item to specify an IPv6 address for a |
|
|
|
secondary DNS server that the Jetdirect server |
|
|
|
should use. |
|
|
|
|
14 Chapter 2 Control panel

Table 2-2 Jetdirect menus (continued)
Menu item |
Sub-menu item |
Sub-menu item |
Values and Description |
|
|
|
|
|
|
Manual |
Use this item to manually set IPv6 addresses on the |
|
|
|
server. |
|
|
|
Enable: Select this item and choose the On setting to |
|
|
|
enable manual configuration, or the Off setting to |
|
|
|
disable manual configuration. |
|
|
|
Address: Use this item to type a 32 hexadecimal digit |
|
|
|
IPv6 node address that uses the colon hexadecimal |
|
|
|
syntax. |
|
|
|
|
|
Proxy Server |
|
Specifies the proxy server to be used by embedded |
|
|
|
applications in the product. A proxy server is typically |
|
|
|
used by network clients for Internet access. It caches |
|
|
|
Web pages, and provides a degree of Internet |
|
|
|
security, for those clients. |
|
|
|
To specify a proxy server, enter its IPv4 address or |
|
|
|
fully-qualified domain name. The name can be up to |
|
|
|
255 octets. |
|
|
|
For some networks, you may need to contact your |
|
|
|
Independent Service Provider (ISP) for the proxy |
|
|
|
server address. |
|
|
|
|
|
Proxy Port |
|
Type the port number used by the proxy server for |
|
|
|
client support. The port number identifies the port |
|
|
|
reserved for proxy activity on your network, and can |
|
|
|
be a value from 0 to 65535. |
|
|
|
|
|
Idle Timeout |
|
Idle Timeout: The time period, in seconds, after which |
|
|
|
an idle TCP data connection is closed (default is 270 |
|
|
|
seconds, 0 disables the timeout). |
|
|
|
|
IPX/SPX |
Enable |
|
Not applicable for HP Scanjet Enterprise 7000n |
|
|
|
|
AppleTalk |
Enable |
|
Not applicable for HP Scanjet Enterprise 7000n |
|
|
|
|
DLC/LLC |
Enable |
|
Not applicable for HP Scanjet Enterprise 7000n |
|
|
|
|
Security |
Secure Web |
|
For configuration management, specify whether the |
|
|
|
Embedded Web Server will accept communications |
|
|
|
using HTTPS (Secure HTTP) only, or both HTTP and |
|
|
|
HTTPS. |
|
|
|
HTTPS Required: For secure, encrypted |
|
|
|
communications, only HTTPS access is accepted. |
|
|
|
The Jetdirect server will appear as a secure site. |
|
|
|
HTTPS Optional (default): Access using either HTTP |
|
|
|
or HTTPS is permitted. |
|
|
|
|
|
IPSec |
|
Specify the IPSec status on the Jetdirect server. |
|
|
|
Keep: IPSec or firewall status remains the same as |
|
|
|
currently configured. |
|
|
|
Disable: IPSec or firewall operation on the Jetdirect |
|
|
|
server is disabled. |
|
|
|
|
Navigate the Administration menu 15

Table 2-2 Jetdirect menus (continued)
Menu item |
Sub-menu item |
Sub-menu item |
Values and Description |
|
|
|
|
|
|
802.1X |
Reset 802.1X settings to factory defaults. |
|
|
|
No (default): Retain current 802.1X settings. |
|
|
|
Yes: Reset 802.1X settings to factory defaults. |
|
|
|
|
|
|
Enable Wipe |
Most configuration settings are erased during a cold |
|
|
|
reset. However, you can indicate whether to also |
|
|
|
erase stored digital certificates. |
|
|
|
Yes: Erase all stored digital certificates during a cold |
|
|
|
reset. |
|
|
|
No (default): Do not erase stored digital certificates |
|
|
|
during a cold reset. |
|
|
|
|
|
Reset Security |
|
Specify whether the current security settings on the |
|
|
|
Jetdirect server will be saved or reset to factory |
|
|
|
defaults. |
|
|
|
No (default): The current security settings are |
|
|
|
maintained. |
|
|
|
Yes: Security settings are reset to factory defaults. |
|
|
|
|
Link Speed |
|
|
The link speed and communication mode of the |
|
|
|
Jetdirect server must match the network. The |
|
|
|
available settings depend on the product and |
|
|
|
installed Jetdirect server. Select one of the following |
|
|
|
link configuration settings: |
|
|
|
CAUTION: If you change the link setting, network |
|
|
|
communications with the Jetdirect server and |
|
|
|
network product might be lost. |
|
|
|
Auto (default): The Jetdirect server uses auto- |
|
|
|
negotiation to configure itself with the highest link |
|
|
|
speed and communication mode allowed. If auto- |
|
|
|
negotiation fails, either the 100TX Half value or the |
|
|
|
10T Half value is set depending on the detected link |
|
|
|
speed of the hub/switch port. (A 1000T half-duplex |
|
|
|
selection is not supported.) |
|
|
|
10T Half: 10 Mbps, half-duplex operation. |
|
|
|
10T Full: 10 Mbps, full-duplex operation. |
|
|
|
100TX Half: 100 Mbps, half-duplex operation. |
|
|
|
100TX Full: 100 Mbps, full-duplex operation. |
|
|
|
100TX Auto: Limits auto-negotiation to a maximum |
|
|
|
link speed of 100 Mbps. |
|
|
|
1000T Full: 1000 Mbps, full-duplex operation. |
|
|
|
|
16 Chapter 2 Control panel

3 Supported utilities for Windows
●HP Web Jetadmin
●Embedded Web Server
●HP Digital Sending Software (HP DSS)
17
HP Web Jetadmin
HP Web Jetadmin is a simple print and imaging peripheral management software tool that helps optimize product use, control color costs, secure products, and streamline supplies management by enabling remote configuration, proactive monitoring, security troubleshooting, and reporting of printing and imaging products.
To download a current version of HP Web Jetadmin and for the latest list of supported host systems, visit www.hp.com/go/webjetadmin.
When installed on a host server, a Windows client can gain access to HP Web Jetadmin by using a supported Web browser (such as Microsoft® Internet Explorer) by navigating to the HP Web Jetadmin host.
Embedded Web Server
The product is equipped with an Embedded Web Server, which provides access to information about product and network activities. This information appears in a Web browser, such as Microsoft Internet Explorer or Mozilla Firefox.
The Embedded Web Server resides on the product. It is not loaded on a network server.
The Embedded Web Server provides an interface to the product that anyone who has a networkconnected computer and a standard Web browser can use. No special software is installed or configured, but you must have a supported Web browser on your computer. To gain access to the Embedded Web Server, type the IP address for the product in the address line of the browser. (To find the IP address, touch the Network Address button on the Home screen.)
HP Digital Sending Software (HP DSS)
You can install the optional HP Digital Sending Software. This software runs as a service on a network server and allows multiple products to send jobs through the server. It is not necessary to install any software or drivers on individual user's computers. For information about compatible versions of HP DSS and to purchase the software, see www.hp.com/go/dss.
18 Chapter 3 Supported utilities for Windows

4 Configure the product
You might need to configure certain network parameters on the product. You can configure these parameters from the Embedded Web Server or (for most networks) the HP Web Jetadmin software.
●Supported network protocols
●Configure the product to use the network
●Configure e-mail settings
●Configure other digital sending settings
19

Supported network protocols
The product supports the TCP/IP network protocol, the most widely used and accepted networking protocol. Many networking services utilize this protocol. The following tables list the supported networking services and protocols.
Table 4-1 Network device discovery
Service name |
Description |
|
|
SLP (Service Location Protocol) |
Device-discovery protocol, used to help find and configure |
|
network devices. Used primarily by Microsoft-based |
|
programs. |
|
|
Table 4-2 Messaging and management
Service name |
Description |
|
|
HTTP (Hyper Text Transfer Protocol) |
Allows Web browsers to communicate with the Embedded |
|
Web Server. |
|
|
EWS (Embedded Web Server) |
Allows you to manage the product through a Web browser. |
|
|
SNMP (Simple Network Management Protocol) |
Used by network applications for product management. |
|
SNMP v1, SNMP v3, and standard MIB-II (Management |
|
Information Base) objects are supported. |
|
|
LLMNR (Link Local Multicast Name Resolution) |
Specifies if the product responds to LLMNR requests over |
|
IPv4 and IPv6. |
|
|
TFTP Configuration |
Allows you to use TFTP to download a configuration file |
|
containing additional configuration parameters, such as |
|
SNMP or non-default settings, for an HP Jetdirect card. |
|
|
Table 4-3 IP addressing
Service name |
Description |
|
|
DHCP (Dynamic Host Configuration Protocol) |
For automatic IPv4 and IPv6 address assignment. The |
|
DHCP server provides the product with an IP address. |
|
Generally, no user intervention is required for the product to |
|
obtain an IP address from a DHCP server. |
|
|
BOOTP (Bootstrap Protocol) |
For automatic IP address assignment. The BOOTP server |
|
provides the product with an IP address. Requires the |
|
administrator to input a product's MAC hardware address on |
|
the BOOTP server for the product to obtain an IP address |
|
from that server. |
|
|
Auto IP |
For automatic IP address assignment. If neither a DHCP |
|
server nor a BOOTP server is present, the product uses this |
|
service to generate a unique IP address. |
|
|
Manual |
For manual IP address assignment. Requires the |
|
administrator to manually assign a static IP address. |
|
|
20 Chapter 4 Configure the product

Table 4-4 Security features
Service name |
Description |
|
|
IPsec/Firewall |
Provides network-layer security on IPv4 and IPv6 networks. |
|
A firewall provides simple control of IP traffic. IPsec provides |
|
additional protection through authentication and encryption |
|
protocols. |
|
|
SNMP v3 |
Employs a user-based security model for SNMP v3, which |
|
provides user authentication and data privacy through |
|
encryption. |
|
|
Access control list (ACL) |
Specifies the individual host systems, or networks of host |
|
systems, that are allowed to access the server and the |
|
attached network product. |
|
|
SSL/TLS |
Allows you to transmit private documents via the Internet and |
|
guarantee privacy and data integrity between the client and |
|
server applications. |
|
|
IPsec batch configuration |
Provides network-layer security through the simple control of |
|
IP traffic to and from the product. This protocol provides the |
|
benefits of encryption and authentication and allows for |
|
multiple configurations. |
|
|
Supported network protocols 21

Configure the product to use the network
View or change network settings
You can use the Embedded Web Server to view or change IP configuration settings.
1.Touch the Network Address button on the Home screen to locate the IP address.
●If you are using IPv4, the IP address contains only digits. It has this format: xxx.xxx.xxx.xxx
●If you are using IPv6, the IP address is a hexadecimal combination of characters and digits. It has a format similar to this:
xxxx::xxxx:xxxx:xxxx:xxxx
2.Type the IP address into the address line of a Web browser to open the Embedded Web Server.
3.Click the Networking tab to obtain network information. You can change settings as needed.
Set or change the administrator password
Use the Embedded Web Server to set an administrator password or change an existing password. When set, you must enter this password before you can access and change configuration settings.
1.Open the Embedded Web Server and click the Networking tab.
2.In the left-side pane, click the Authorization option.

 NOTE: If a password has previously been set, you are prompted to type the password. Type the password, and then click the Apply button.
3.Type the new password in the Password box and in the Confirm Password box.
4.At the bottom of the window, click the Apply button to save the password.

 NOTE: You can also set a local administrator password from the General Security option on the Security tab. When set, you must enter this password to change settings within the Embedded Web Server.
22 Chapter 4 Configure the product
Loading...