


Automatic Document Feeder
User’s Guide
HP ScanJet Scanners
© Hewlett-Packard Co., 1999
All Rights Reserved.
Reproduction, adaptation, or translation without prior written permission is prohibited, except as allowed under copyright laws.
RESTRICTED RIGHTS LEGEND
Use, duplication or disclosure is subject to restrictions as set forth in contract subdivision (c)(1)(ii) of the Rights in Technical Data and Computer Software Clause 52.227FAR14.
Material scanned by this product may be protected by governmental laws and other regulation, such as copyright laws. The customer is solely responsible for complying with all such laws and regulations.
Publication number
C5195-90000
Second Edition, September 1999
....................................................................................................................................................................................................................................
Warranty
The information contained in this document is subject to change without notice.
Hewlett-Packard makes no warranty of any kind with regard to this material, including, but not limited to, the implied warranties of merchantability and fitness for a particular purpose.
Hewlett-Packard shall not be liable for errors contained herein or for incidental or consequential damages in connection with the furnishing, performance, or use of this material.
This document contains proprietary information which is protected by copyright. All rights are reserved. No part of this document may be photocopied, reproduced, or translated to another language without the written consent of the Hewlett-Packard Company.
Changes or modification of this equipment not expressly approved by Hewlett-Packard could void the user’s authority to operate this equipment. Only use the cables, connectors, power cords and accessories supplied with this equipment or expressly approved by Hewlett-Packard.
FCC Radio Frequency Interference Statement for Model C5195
Note: This equipment has been tested and found to comply with the limits for a Class B digital device, pursuant to Part 15 of the FCC Rules. These limits are designed to provide reasonable protection against harmful interference in a residential installation. This equipment generates, uses, and can radiate radio frequency energy and, if not installed and used in accordance with the instructions, may cause harmful interference to radio communications. However, there is no guarantee that interference will not occur in a particular installation.
If this equipment does cause harmful interference to radio or television reception, which can be determined by turning the equipment off and on, the user is encouraged to try to correct the interference by one or more of the following measures:
•Reorient or relocate the receiving antenna.
•Increase the separation between the equipment and the receiver.
•Connect the equipment into an outlet on a circuit different from that to which the receiver is connected.
•Consult the dealer or an experienced radio/TV technician for help.
Changes or modification of this equipment not expressly approved by Hewlett-Packard could void the user’s authority to operate this equipment. Only use the cables, connectors, power cords and accessories supplied with this equipment or expressly approved byHewlett-Packard.
Contents
....................................................................................................................................................................................................................................
1 Installing the ADF |
|
What the ADF Can Do . . . . . . . . . . . . . . . |
1-2 |
Step 1: Unpack the ADF . . . . . . . . . . . . . . |
1-3 |
Step 2: Connect the ADF . . . . . . . . . . . . . . |
1-4 |
2 Using the ADF |
|
Tips for Better Paper Handling . . . . . . . . . . |
2-2 |
Scanning Pages from the ADF . . . . . . . . . . . |
2-4 |
Scanning a Single Page . . . . . . . . . . . . . . . |
2-8 |
3 Maintaining the ADF |
|
Cleaning the ADF . . . . . . . . . . . . . . . . . . |
3-2 |
Replacing the ADF Window . . . . . . . . . . . . |
3-4 |
Removing the ADF . . . . . . . . . . . . . . . . . |
3-6 |
Ordering Parts and Supplies . . . . . . . . . . . . |
3-7 |
4 |
Clearing Paper Jams |
|
|
Clearing Paper Jams . . . . . . . . . . . . . . . . |
4-2 |
5 |
Supplementary Information |
|
|
ADF Specifications . . . . . . . . . . . . . . . . . |
5-5 |
|
Regulatory Information . . . . . . . . . . . . . . |
5-6 |
|
FCC Declaration of Conformity . . . . . . . . . . |
5-7 |
|
Declaration of Conformity . . . . . . . . . . . . . |
5-8 |
i
1
Installing the ADF
............................................................................................
1-2 What the ADF
Can Do
1-3 Step 1: Unpack
the ADF
1-4 Step 2: Connect
the ADF
What the ADF Can Do
The Automatic Document Feeder (ADF) is a powerful addition to your HP ScanJet color scanner. With the ADF, you can automatically scan up to 25 pages at a time (more or less depending on the paper weight). In addition, you can:
•Automatically scan and convert multiple pages of text by using the ADF with optical character recognition (OCR) software. This dramatically reduces the time it takes to input text for
creating documents such as newsletters.
•Automatically scan multiple pages of images by using the ADF with image scanning software.
•Scan text and images at the same time by using the ADF with scanning software.
•Electronically store, retrieve, and send scanned documents as needed by
using document |
.................................................................................................................................................................................................................................... |
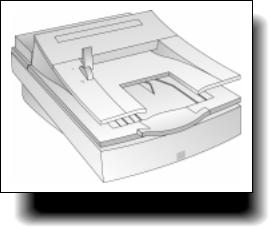
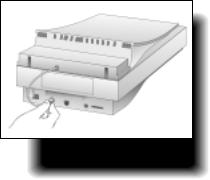
ADF on an HP ScanJet Scanner |
|
management software. |
|
The following sections |
|
explain how to install your ADF. |
|
What the ADF Can Do |
1-2 |
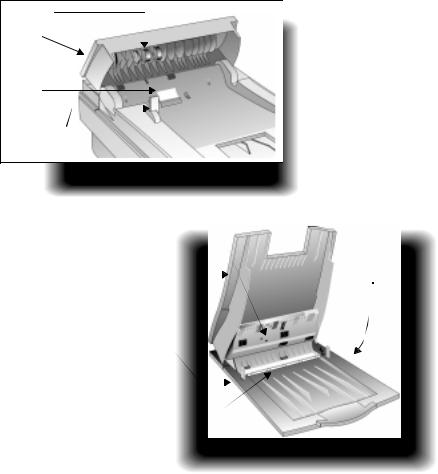
rollers
hatch
separation pad
paper load lever
Step 1: Unpack
the ADF
|
.................................................................................................................................................................................................................................... |
1 Check for damage while unpacking the ADF. |
|||||||||||
|
If you notice any damage, notify the dealer or mail |
||||||||||||
|
|
||||||||||||
|
|
order company where you bought the scanner. |
|||||||||||
|
|
2 Save the box and packing materials in case you need |
|||||||||||
|
|
to transport the ADF. |
|
|
|||||||||
|
|
3 Become familiar with the ADF parts shown below: |
|||||||||||
|
|
|
|
|
|
|
|
|
|
|
|
|
|
|
|
|
|
|
|
|
|
|
|
|
|
|
|
|
|
|
|
|
|
|
|
|
|
|
|
|
|
|
|
|
|
|
|
|
|
|
|
|
|
|
|
|
|
|
|
|
|
|
|
|
|
|
|
|
|
|
|
|
|
|
|
|
|
|
|
Hatch up |
|
|
|
|
|
|
|
|
|
|
|
|
|
|
|
||
|
|
|
|
|
|
|
|
|
|
|
|
|
|
|
|
|
|
flat gray bar |
|
|
|
|
mounting posts |
|
|||
|
|
|
|
|
|
|
|
|
|
||||
|
|
|
|
|
|
|
|
|
|
|
|
|
|
|
|
|
|
input tray |
|
|
|
|
|
|
(under ADF) |
|
|
|
|
|
|
|
|
|
|
|
|
|
|
||
|
|
|
|
output tray |
|
|
|
|
|
|
|||
|
|
|
|
|
|
|
|
|
|
|
|
||
|
|
|
|
user-replaceable |
|
|
|
|
|
|
|
||
|
|
|
|
window |
|
|
|
|
|
|
|||
|
|
|
|
|
|
|
|
|
|
|
|
|
|
|
|
|
|
|
|
|
|
|
|
|
|
Input tray up |
|
1-3 |
Step 1: Unpack the ADF |
Step 2: Connect
the ADF
Note If your ADF came with your scanner, start at Step 8 on page 1-6.
1Turn off the scanner by unplugging the power cord from the electrical outlet.
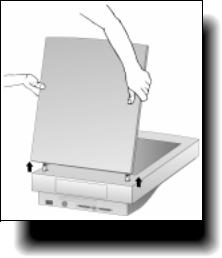
2Open the cover.
3Grasp both sides of the hinged end of the scanner cover and pull straight up until the cover comes off the scanner. You may need to move the cover from side to side to pull it off. Do not bend the cover too far back.
Removing the scanner cover
....................................................................................................................................................................................................................................
Step 2: Connect the ADF |
1-4 |
4Store the cover on a flat, smooth surface in a safe place. You will not need the scanner cover as long as the ADF is installed.
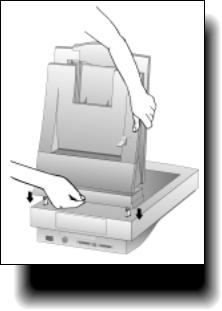
5Hold the ADF with the mounting posts perpendicular to the scanner.
6Align the mounting posts with the slots at the rear of the scanner body. Ensure both posts are in the same position.
7Lower the ADF until the mounting posts are seated firmly in the scanner.
Inserting the ADF
mounting posts
....................................................................................................................................................................................................................................
Step 2: Connect the ADF |
1-5 |
....................................................................................................................................................................................................................................
8Hold the ADF connector cable so that the arrow on the plug is on top. This helps you align the pins in the plug with their holes in the socket on the scanner.
9Attach the ADF connector cable by pushing it firmly all the way into the round accessory connector socket labelled ADF on the back of the scanner.
You may need to tip the scanner/ADF assembly on its side to connect the cable:
Attaching the ADF
connector cable
10 Plug the scanner’s power cord into the electrical outlet to turn on the scanner.
Note Never connect or remove the ADF from the scanner unless the scanner’s power cord
is unplugged from the electrical outlet.
1-6 |
Step 2: Connect the ADF |
2
Using the ADF
............................................................................................
2-2 Tips for Better Paper Handling
2-4 Scanning Pages
from the ADF
2-8 Scanning a
Single Page
Tips for Better Paper
Handling
Follow these tips when you scan with your ADF: |
.................................................................................................................................................................................................................................... |
|
|
• Remove any paper from the scanner glass before |
|
||
|
|
||
using the ADF. |
|
|
|
• Straighten any curls or wrinkles from your pages |
|
|
|
before putting them on the document tray. If this is |
|
|
|
not possible, do not scan these pages using the ADF. |
|
|
|
Instead, use the scanner glass, or make a photocopy |
|
|
|
of the documents and scan |
|
|
|
the photocopies. |
|
|
|
• Do not use the ADF to scan |
|
|
|
|
|
|
|
sheets of uncommon paper |
|
|
|
or other media, such as: |
|
|
|
• Transparencies |
|
|
|
• Gummed-back paper |
|
|
|
• Magazine pages |
|
|
|
• Lightweight |
|
|
|
(“onionskin”) carbons |
|
|
|
|
|
|
|
|
|
ADF on an HP ScanJet |
|
Tips for Better Paper Handling |
2-2 |
....................................................................................................................................................................................................................................
•Remove staples, paper clips, and any other materials from documents.
•Avoid documents with tears, perforations, or punch holes.
•Use the ADF with paper that fits the following dimensions:
|
Width |
Height |
|
||
Minimum |
5.8 inches |
8.3 inches |
|
14.8 cm |
21.1 cm |
|
|
|
Maximum |
8.5 inches |
14 inches |
|
21.6 cm |
35.6 cm |
|
|
|
•For paper smaller than the minimum size, use the scanner glass instead of the ADF. Paper smaller than the minimum may cause a paper jam.
•For paper lighter than 16-lb. bond (60 g/m2) or heavier than 28-lb. bond (105 g/m2), use the scanner glass instead of the ADF.
2-3 |
Tips for Better Paper Handling |
 Loading...