


hp scanjet 7400c series scanner user’s manual

2
&RS\ULJKW LQIRUPDWLRQ
© Copyright Hewlett-Packard Company 2000
All rights reserved. Reproduction, adaptation, or translation without prior written permission is prohibited, except as allowed under copyright laws.
7UDGHPDUN FUHGLWV
Microsoft, Windows, Windows NT, and Hotmail are U.S. registered trademarks of Microsoft Corporation. Pentium is a U.S. registered product of Intel Corporation.
All other products mentioned herein may be trademarks of their respective companies.
Back to TOC
:DUUDQW\
The information contained in this document is subject to change without notice.
Hewlett-Packard makes no warranty of any kind with respect to this information. HEWLETT-PACKARD SPECIFICALLY DISCLAIMS THE IMPLIED WARRANTY OF MERCHANTABILITY AND FITNESS FOR A PARTICULAR PURPOSE.
Hewlett-Packard shall not be liable for any direct, indirect, incidental, consequential, or other damage alleged in connection with the furnishing or use of this information.
NOTICE TO U.S. GOVERNMENT
USERS: RESTRICTED RIGHTS COMMERCIAL COMPUTER SOFTWARE: “Use, duplication, or disclosure by the Government is subject to restrictions as set forth in subparagraph (c) (1) (ii) of the Rights in Technical Data Clause at DFARS 52.227-7013.”
Material scanned by this product may be protected by governmental laws and other regulations, such as copyright laws. The customer is solely responsible for complying with all such laws and regulations.

&RQWHQWV
*HWWLQJ VWDUWHG
3ULQWLQJ WKLV LQIRUPDWLRQ
9LHZLQJ WKH SURGXFW WRXU
:KHUH GR , VWDUW"
6HOHFWLQJ DQG SUHSDULQJ LWHPV &RPSOHWLQJ \RXU ILUVW VFDQ
)UHTXHQWO\ DVNHG TXHVWLRQV
6FDQQLQJ IURP VFDQQHU EXWWRQV
2YHUYLHZ RI VFDQQHU EXWWRQV
6FDQQLQJ TXLFNO\ ZLWKRXW PDNLQJ FKDQJHV &KDQJLQJ VHWWLQJV IRU EXWWRQV
6FDQQLQJ IURP +3 3UHFLVLRQ6FDQ 3UR
2YHUYLHZ RI WKH +3 3UHFLVLRQ6FDQ 3UR VRIWZDUH 3HUIRUPLQJ D QHZ VFDQ
&URSSLQJ RU VHOHFWLQJ DQ DUHD IRU ILQDO VFDQ
*HWWLQJ D FORVHU ORRN ]RRPLQJ 6HOHFWLQJ RXWSXW W\SH
0DNLQJ RSWLRQDO DGMXVWPHQWV EDVLF
0DNLQJ RSWLRQDO DGMXVWPHQWV DGYDQFHG
&RPSOHWLQJ WKH ILQDO VFDQ 2WKHU IHDWXUHV DQG WLSV
8VLQJ DFFHVVRULHV
6FDQQLQJ IURP WKH$') 6FDQQLQJ IURP WKH ;3$
0DNLQJ RSWLRQDO DGMXVWPHQWV IRU WUDQVSDUHQW LWHPV
6KDULQJ WKH VFDQQHU RQ D QHWZRUN
3
7URXEOHVKRRWLQJ XVDJH DQG PDLQWDLQLQJ
&KHFNLQJ WKH EDVLFV 6WDUWLQJ WURXEOHVKRRWLQJ
5HVROYLQJ LVVXHV WKDW GLG QRW JHQHUDWH PHVVDJHV
5HVROYLQJ LPDJH TXDOLW\ LVVXHV 5HVROYLQJ LVVXHV ZLWK HGLWDEOH WH[W
5HVROYLQJ LVVXHV VHQGLQJ WR GHVWLQDWLRQV
5HVROYLQJ LVVXHV ZLWK DFFHVVRULHV &OHDULQJ MDPV IURP WKH$') &OHDQLQJ DQG PDLQWDLQLQJ 8QLQVWDOOLQJ WKH VRIWZDUH
2WKHU UHVRXUFHV VXSSRUW DQG VSHFLILFDWLRQV
$ 8VLQJ VRIWZDUH FRPPDQGV DQG FRQWUROV
8VLQJ NH\ERDUG VKRUWFXWV DQG WKH PHQXV
+3 3UHFLVLRQ6FDQ 3UR WRRO DQG LQIRUPDWLRQ EDUV
&RQWH[W VHQVLWLYH FXUVRUV
% *ORVVDU\
,QGH[
:RUNLQJ RQ WKH KRVW FRPSXWHU
:RUNLQJ RQ D UHPRWH FRPSXWHU

4 |
Back to TOC |

Back to TOC
*HWWLQJ VWDUWHG
This section contains the basics to help you get started with your new HP ScanJet scanner. From here, you can learn about viewing the product tour, preparing items before you scan them, and choosing which scanning method to use.
3ULQWLQJ WKLV LQIRUPDWLRQ
You can print this .pdf manual using the Print command on the File menu. Print the whole document, or print only the chapters or topics you want according to their page numbers. See the table of contents for page numbers of topics.
Getting started |
5 |
9LHZLQJ WKH SURGXFW WRXU
The product tour is a fast and easy way to explore the capabilities of the scanner and see some interesting ways you can use the scanner to meet your needs. The product tour, which only takes three minutes, begins automatically when you start the HP PrecisionScan Pro software, unless you disable it.
To view the tour at other times: On the Start menu, point to Programs, and click HP PrecisionScan Pro. Then, on the Help menu, click
Product Tour.

6 Getting started
:KHUH GR , VWDUW"
You can start scanning from one of these places:
●the scanner buttons
●the HP PrecisionScan Pro software
●another program
●the HP ScanJet Copy Utility
Where you start depends on what you want to do with the scan and on your own preferences.
8VLQJ WKH VFDQQHU EXWWRQV
Use the scanner buttons, which are shortcuts, when:
●You want to start at the scanner.
●You want to scan quickly without making changes.
●You want to scan an item using the default settings optimized for the destination you choose.
See "Scanning from scanner buttons" on page 15.
8VLQJ WKH +3 3UHFLVLRQ6FDQ 3UR VRIWZDUH
Use the HP PrecisionScan Pro software when:
●You want to view or change a scanned image before you send it. Changes might include resolution, cropping, or resizing.
●You want to send to a destination, such as a desktop publishing program, but there is no button on the scanner for that destination.
See "Scanning from HP PrecisionScan Pro" on page 31.
Back to TOC
8VLQJ DQRWKHU SURJUDP
Start scanning from within another program when:
●You want to bring a scanned item into an open program, such as your word-processing program.
●The program in which you are working is compliant with TWAIN. A program is compliant if a command like Acquire Image or From Scanner appears on a menu such as the File menu.
If you are unsure whether your program complies with TWAIN standards or you do not know the command for inserting a scanned item, see the documentation for the program.
See "Scanning from other programs (TWAIN)" on page 63.
8VLQJ WKH +3 6FDQ-HW &RS\ 8WLOLW\
Start scanning from the HP ScanJet Copy Utility when you want to make copies and need to make standard copy adjustments, such as reducing or enlarging or lightening or darkening. You can also choose a printer other than the default.
To start the utility: on the Start menu, point to Programs, point to HP ScanJet Utilities, and click HP Copy Utility. For help using the utility, click Help in the utility.

Back to TOC
6HOHFWLQJ DQG SUHSDULQJ LWHPV
Before placing items in the scanner, follow these guidelines for selecting and preparing them to prevent damage to the items and the scanner.
,WHPV IRU WKH VFDQQHU JODVV
The scanner glass can scan the widest range of items, including:
●Paper items
●News clippings, receipts, and business cards
●Items on all weights of media, including media lighter than 60 g/m2 (16 lb) or heavier than 105 g/m2 (28 lb)
●Gum-backed paper
●Multipart forms with carbon pages
●Old or worn photographs or documents
●Items containing tears, perforations, punch holes, wrinkles, or curls
●Flatter, three-dimensional items such as pages in books, fabric, and paper with texture
CAUTION Avoid placing items with sharp edges in the scanner. Doing so can damage the scanner.
Before placing an item on the scanner glass, make sure the item is free of wet glue, correction fluid, or other contaminating substances.
Getting started |
7 |
,WHPV IRU WKH $')
The HP ScanJet automatic document feeder (ADF), which is a fast, convenient way to scan multiple-page items, is included with some scanner models, or it can be ordered. The ADF accepts items that meet the following specifications:
●Items on standard Letter-, A4-, and Legal-size paper
●Items consisting of up to 50 unbound pages
●Items ranging in size from 148.5 by 210 mm (5.8 by 8.3 inches) to 215.9 by 355.6 mm (8.5 by 14 inches)
●Items ranging in weight from 60 to 105 g/m2 (16 to 28 lb)
●Items that are square or rectangular and in good condition (not fragile or worn)
●Items that are free of tears, perforations, or punch holes
●Items that are free of wet glue, correction fluid, and ink
Avoid multipart forms with carbon pages, transparencies, magazine pages, gum-backed pages, and light “onionskin” pages.
Before placing an item in the ADF, prepare the item by doing the following:
●Remove curls or wrinkles.
●Remove staples, paper clips, paper sticky notes, and any other materials from items.
If your item does not meet these guidelines or you cannot prepare it as stated, use the scanner glass.

8 Getting started
,WHPV IRU WKH ;3$
The HP ScanJet transparency adapter (XPA) is included with some scanner models or can be ordered. Use the XPA and its templates to scan:
●photographic negatives
●35 mm slides
●other transparent media up to 127 to 127 mm (5 by 5 inches) in size. For transparent items larger than these measurements, scan without using the XPA. Just cover the item with a piece of white paper and scan as you normally would.
Because these items are easily damaged, handle them only by their edges.
Back to TOC

Back to TOC |
Getting started |
9 |
&RPSOHWLQJ \RXU ILUVW VFDQ
Doing your first scan is easy. This section shows you how to take the same item and scan to print using the two primary scanning methods:
●the scanner buttons
●HP PrecisionScan Pro software
Before scanning, you will load the item in the scanner.
7R ORDG WKH LWHP LQ WKH VFDQQHU
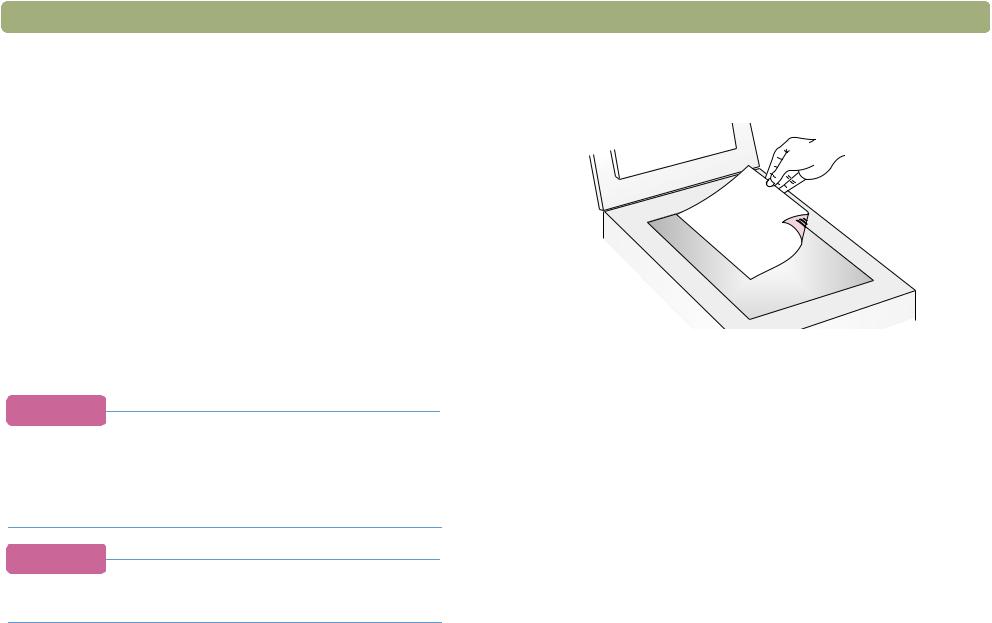
1 Choose an item to scan, such as a page from a magazine.
2 Place the item face down on the scanner glass and close the lid.
3See "To complete your first scan using the scanner buttons" on page 10.
10 Getting started
7R FRPSOHWH \RXU ILUVW VFDQ XVLQJ WKH VFDQQHU EXWWRQV
1Load the item in the scanner. See "To load the item in the scanner" on page 9.
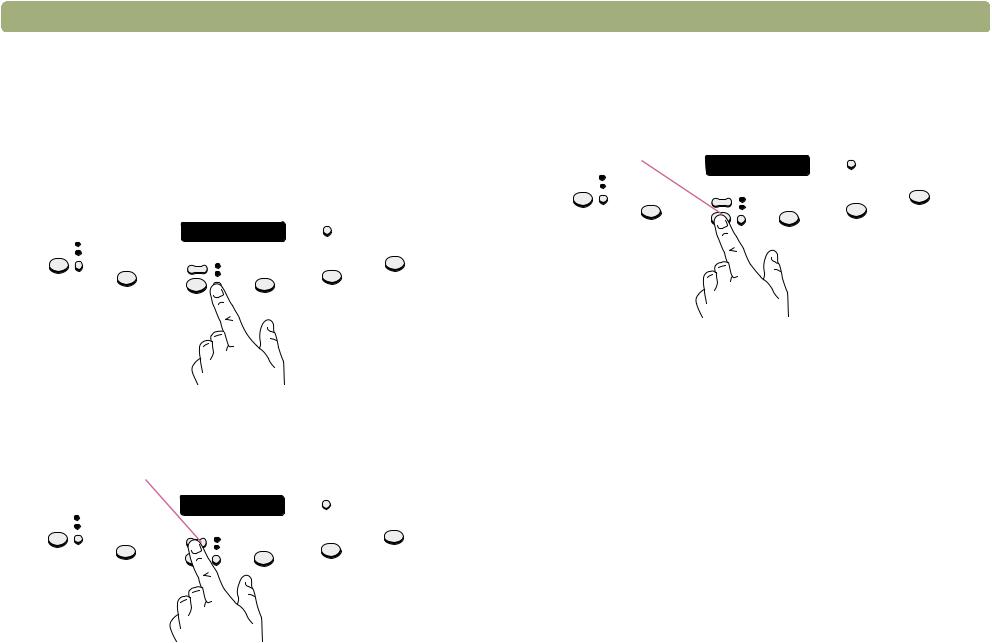
2Select COLOR COPY or B&W COPY by pressing the button until the light next to your choice is lit. Only select COLOR COPY if you are printing to a color printer.
 Color or B&W button
3To make more than one copy, press NUMBER OF COPIES until the number you want appears on the display.
Number of copies button
Back to TOC
4On the scanner, press COPY. The scanner scans the item using settings optimized for printing this type of item and then prints the item to the default printer.
Copy button
If you have not already scanned using the HP PrecisionScan Pro software, see "To complete your first scan using the HP PrecisionScan Pro software" on page 11.
Back to TOC
7R FRPSOHWH \RXU ILUVW VFDQ XVLQJ WKH +3 3UHFLVLRQ6FDQ 3UR VRIWZDUH
1Load the item in the scanner. See "To load the item in the scanner" on page 9.
2With the item loaded, press HP SCANNING SOFTWARE on the scanner. The scanner scans the item to the HP PrecisionScan Pro software, choosing the best settings for this type of item.
3When the scanned image appears in the preview window of the software, draw a selection border around the image or portion of the image you want. To do so, click on one corner of the area you want, and while holding down the mouse button, drag the cursor to the opposite corner. Release the mouse button to complete the border.
Selection border
Getting started |
11 |
4Experiment with the image. Change the output type or make other adjustments.
5When you finish: On the Scan menu, click Print.
6Select any printer options you want and click OK. The scanner performs a final scan including your changes, and the scanned image prints.
If you have not already scanned using the scanner buttons, see "To complete your first scan using the scanner buttons" on page 10.

12 Getting started
)UHTXHQWO\ DVNHG TXHVWLRQV
This section contains answers to some questions users frequently ask about scanning.
:KDW VHWWLQJV GRHV WKH +3 3UHFLVLRQ6FDQ 3UR VRIWZDUH VHW DXWRPDWLFDOO\ IRU DQ LWHP , VFDQ"
Based on the scanned item, the software automatically chooses optimal values for these settings:
●output type
●resolution
●sharpening
●exposure (midtones, highlights, and shadows)
●color (hue and saturation or black-and-white threshold)
Usually, the values the software selects provides optimal results. However, you can change these values in the HP PrecisionScan Pro software.
Back to TOC
+RZ FDQ , UHGXFH WKH WLPH LW WDNHV WR VFDQ"
You can reduce the time it takes to scan an item by scanning in black and white when the original:
●Is a black-and-white photograph or drawing.
●Is a color photo or drawing, but you want a black-and-white image to appear on the computer screen.
●Contains only text.
Scan color originals as black and white by changing the color option for the scanner button (such as E-MAIL) you will be using. See "Changing settings for buttons" on page 24. Or, in the HP PrecisionScan Pro software, clear the Automatic Set Type option and choose Grayscale or a black-and-white output type before you scan. See "Selecting output type" on page 36.
+RZ FDQ , UHGXFH WKH ILOH VL]H"
To reduce file size:
●Save files using a compressed format, such as compressed TIFF or JPEG.
●Avoid using the True Color output type unless necessary. This output type offers exceptional quality for color photos or drawings, but it also creates large file sizes.
●Set the resolution no higher than necessary. Generally, the resolution the software automatically sets provides the best balance between image quality and small file size.
●For photos, significantly reduce file size by cropping the photo to select just one area as the final scanned image. Or, resize the entire photo to smaller dimensions.

Back to TOC
6KRXOG , FKDQJH WKH UHVROXWLRQ"
The HP PrecisionScan Pro software sets the resolution for you. In almost all cases, you get the best results and the smallest file size if you use the resolution the software has determined to be best for the type of original you have.
:KDW LV WKH GLIIHUHQFH EHWZHHQ VFUHHQ DQG SULQW TXDOLW\"
A computer screen usually displays images at 72 to 75 pixels per inch (PPI). Print resolution is usually higher. Screens also use fewer colors to display an image. Even if an image looks incorrect on the screen, it might print the way you want.
:KDW LV WKH GLIIHUHQFH EHWZHHQ ]RRPLQJ DQG UHVL]LQJ"
Use Zoom In to view an area of the scanned image close up. Use Zoom Out to return to the original view of the image.
The zoom commands do not change the final size of your scan; they just give you a different view on a monitor. To reduce or enlarge the size of the final scan, use the Resize command on the Tools menu.
Getting started |
13 |
:KDW GR , QHHG WR NQRZ DERXW VFDQQLQJ WH[W"
When you scan an item containing text, you can use the text either as a scanned image, such as a fax or photo archive, or as text you can edit. Do one of the following to have the optical character recognition (OCR) software make the text editable automatically and send the text to a supported word-processing program:
●Use the EDIT TEXT scanner button. Editable text appears in the word-processing program associated with the button.
●In the HP PrecisionScan Pro software, use the output type of
Editable Text (OCR) or Text and Image. Then on the Scan menu, click Scan To, choose your word-processing program, and click
Scan.

14 |
Getting started |
Back to TOC |

Back to TOC |
15 |
6FDQQLQJ IURP VFDQQHU EXWWRQV
The scanner buttons provide an easy way to scan items directly to destinations or files using settings optimized for the destination you choose.
When you use a scanner button except HP SCANNING SOFTWARE, you do not view or change scanned images before they go to the destination or file. To view or change images, use the HP SCANNING SOFTWARE button, which sends the scanned image to the
HP PrecisionScan Pro software. See the next chapter, “Scanning from HP PrecisionScan Pro.”
7L S
You can change the default settings for buttons on the scanner. See "Changing settings for buttons" on page 24.

16 |
Scanning from scanner buttons |
Back to TOC |
2YHUYLHZ RI VFDQQHU EXWWRQV
|
|
|
more options |
|
e-mail photo |
number |
|
|
|
e-mail document |
of copies |
color copy |
|
|
|
|
|
||
|
|
b&w copy |
Edit Text |
|
|
|
|||
Fax |
Copy |
File |
HP Scanning |
|
Software |
||||
|
Scan using settings optimized for e-mail. The scanned image becomes a file inserted into a new e-mail message.
e-mail photo/e-mail document
Choose the original type before pressing E-MAIL to ensure the best settings are used. Choose E-MAIL DOCUMENT if the original contains text only or both text and graphics. The light next to the currently selected choice is lit.
Fax
Scan using settings optimized for faxing. The scanned image is inserted into a new fax message.
Copy
Print copies using settings optimized for printing. At the computer, you can click Cancel to choose additional copy settings in the HP ScanJet Copy Utility before the pages print.
number of copies
Choose the number of copies before pressing COPY.
color copy/b&w copy
Choose one before pressing COPY to ensure the best settings are used. Only use color copy if you are printing to a color printer and want a color copy. The light next to the currently selected choice is lit.
File
Scan using settings optimized for archiving scanned images as files. Scanned images are saved in .pdf format.
HP Scanning Software
Scan to the HP PrecisionScan Pro software to view the image or to make adjustments, such as changing resolution or resizing.
Edit Text
Scan and then convert text into an editable form and place it in a word-processing program.
more options
Open the dialog box for changing settings, such as output quality, for buttons on the scanner.
Back to TOC
6FDQQLQJ TXLFNO\ ZLWKRXW PDNLQJ FKDQJHV
Use the scanner buttons to scan quickly to a destination using settings optimized for that destination. A destination is a printer, file, or another program, such as your e-mail, fax, and word-processing program.
If you are scanning slides or transparent items using the XPA, you must scan from the HP PrecisionScan Pro software. See "Scanning from HP PrecisionScan Pro" on page 31.
( PDLOLQJ D VFDQ
When you e-mail using the scanner button, the scanner scans the item using default settings optimized for mailing. If you have a supported e-mail program, the scanned image automatically appears as a file attachment in a new e-mail message, which you then address and send.
7L S
If your e-mail program is not supported, choose E-mail anyway. The scanner scans the item using the optimal settings, and the computer prompts you to save the item as a file. Open your e-mail program and attach the file to a message as you normally do.
7L S
To view the scanned item before you send it, open the file attachment from the new e-mail message.
Scanning from scanner buttons |
17 |
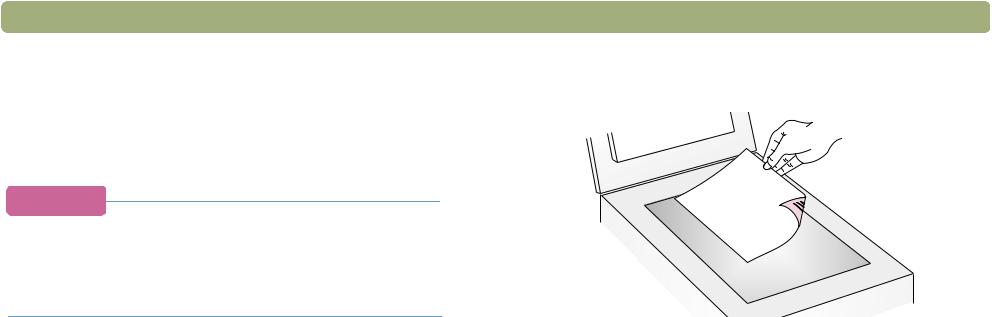
7R H PDLO D VFDQ IURP WKH VFDQQHU
1 Place the original face down on the scanner glass and close the lid.
Note: To load items in the ADF, see page 66.
2Select E-MAIL PHOTO or E-MAIL DOCUMENT by pressing the small button beneath the lights until the light next to your choice is lit. If the item contains both text and graphics, select E-MAIL DOCUMENT.
3Press E-MAIL on the scanner.
4If the scanner or the computer prompts you for another page, do one of the following:
●If you do not have more pages to scan, click Done.
●If there are additional pages of this item, load the next page and click Scan. Repeat until all pages are scanned. Then, click
Done.
5If you have a supported e-mail program, the scanned image automatically appears as a file attachment in a new message. Address the message and send it as you normally do. If the scanned image does not attach to a new message, see "Supported e-mail programs" on page 18.

18 Scanning from scanner buttons
6XSSRUWHG H PDLO SURJUDPV
Supported e-mail programs allow the scanner to scan an item as a file and attaches it to a new e-mail message. If a scanned image automatically appears as a file attachment in a new e-mail message, your e-mail program is supported.
If you are using an unsupported e-mail program, such as a Web-based program like Microsoft Hotmail® , the scanner cannot scan items directly into an e-mail message. The scanner scans the item but then prompts you to save it as a file. After saving the image as a file, open an e-mail message and attach the file as you normally do.
To be prompted to save the file, make sure that E-mail file is selected in the button options. Otherwise, you receive an error message when you press E-MAIL at the scanner.
See "Changing settings for buttons" on page 24 to check or change which e-mail program is set as the default, or to set E-mail file as the default.
Back to TOC
)D[LQJ D VFDQ
When you fax using the scanner buttons, the scanner scans the item using default settings optimized for faxing. If you have a supported PC fax program, the scanned image then automatically appears in a new fax message, which you then address and send. You do not make changes to the scanned image.
7L S
If your fax program is not supported, select Fax anyway. The computer scans the item using the optimal settings, and the computer prompts you to save the scanned image as a file. Open your PC fax program and attach the file to a message as you normally do.
Back to TOC
7R ID[ D VFDQ IURP WKH VFDQQHU
1 Place the original face down on the scanner glass and close the lid.
Note: To load items in the ADF, see page 66.
2Press FAX on the scanner.
3If the scanner or the computer prompts you for another page, do one of the following:
●If you do not have more pages to scan, click Done.
●If there are additional pages of this item, load the next page and click Scan. Repeat until all pages are scanned. Then, click
Done.
4If you have a supported fax program, the scanned image automatically appears in a new fax message. Address the message and send it as you normally do. If the scanned image does not attach to a new message, see “Supported PC fax programs” on this page.
Scanning from scanner buttons |
19 |
6XSSRUWHG 3& ID[ SURJUDPV
Supported PC fax programs allow the scanner to scan items directly into new fax messages. If a scanned image automatically appears in a new fax message, your PC fax program is supported.
If you are using an unsupported PC fax program, the scanner cannot scan items directly into a fax message. The scanner scans the item but then prompts you to save the scanned image as a file. After saving the image as a file, open a fax message and attach the file as you normally do.
To be prompted to save the file, make sure that Fax file is selected in the button options. Otherwise, you receive an error message when you press FAX at the scanner.
See "Changing settings for buttons" on page 24 to check or change which PC fax program is set as the default, or to set Fax file as the default.

20 |
Scanning from scanner buttons |
Back to TOC |
3ULQWLQJ FRSLHV |
7R SULQW FRSLHV IURP WKH VFDQQHU |
|
|
|
1 Place the original face down on the scanner glass and close the lid. |
You can scan an item and send it to a printer to make copies using the scanner button. At the computer, you will be able to select print quality and the destination printer before the copies print. Note that when you make copies, each page is treated as a separate print job, so the printer does not collate copies.
Note: To load items in the ADF, see page 66.
2 Select COLOR COPY or B&W COPY by pressing the button until the light next to your choice is lit. Only select COLOR COPY if you are printing to a color printer and want a color copy.
3 Select the NUMBER OF COPIES by pressing the button until the number you want appears.
4 Press COPY on the scanner.
5 To reduce or enlarge the copies, lighten or darken them, or change which printer prints them, click Cancel on the computer to set options in the HP ScanJet Copy Utility. Change options and click Copy. If you do not click Cancel, the number of copies specified on the scanner print directly to the default printer.
Back to TOC
6DYLQJ D VFDQ WR D ILOH
You can scan and save items directly to files for archiving purposes without making changes to them. The files are saved in .pdf format, which keeps the original page formatting.
7L S
To save a scanned image in a different file format, scan to the HP PrecisionScan Pro software, and on the Scan menu, click Save As.
Scanning from scanner buttons |
21 |
7R VDYH D VFDQ WR D ILOH IURP WKH VFDQQHU
1 Place the original face down on the scanner glass and close the lid.
Note: To load items in the ADF, see page 66.
2Press FILE on the scanner.
3In the Save As dialog box, name the file, choose a location in which to save it, and click Save.
4If the scanner or the computer prompts you for another page, do one of the following:
●If you do not have more pages to scan, click Done.
●If there are additional pages of this item, load the next page and click Scan. Repeat until all pages are scanned. Then, click
Done.
22 Scanning from scanner buttons
0DNLQJ VFDQQHG WH[W HGLWDEOH
You can make text on a scanned image editable. The integrated optical character recognition (OCR) program converts the text to be editable and then places it in a supported word-processing program. Graphics on a scanned image are discarded, or the OCR program might try to convert them and they will appear as random characters.
7L S
If a block of text appears in Microsoft Word or another word-processing program inside a frame you do not want, double-click the frame border and click Remove Frame or a similar command. To prevent this from happening in the future, see "Changing settings for buttons" on page 24.
Back to TOC
7R PDNH WH[W HGLWDEOH IURP WKH VFDQQHU
1 Place the original face down on the scanner glass and close the lid.
Note: To load items in the ADF, see page 66.
2Press EDIT TEXT on the scanner.
3If the scanner or the computer prompts you for another page, do one of the following:
●If you do not have more pages to scan, click Done.
●If there are additional pages of this item, load the next page and click Scan. Repeat until all pages are scanned. Then, click
Done.
4When the text opens in the word-processing program, check it carefully for accuracy.

Back to TOC
:KDW WR H[SHFW IURP 2&5 SURJUDPV
Optical character recognition programs convert some text more accurately than other text. Because OCR technology is never perfect, proofread all converted text carefully to ensure the characters have been correctly interpreted.
These types of text convert most accurately:
●text in standard fonts
●text in 9-point font or larger
●crisp, clear text
●black text on a white background
These types of text might convert less accurately:
●text close to non-text elements, such as bullets, lines, or graphics
●text in spreadsheets, tables, or forms
●letters that have gaps, that “bleed” along their edges, or that touch other letters
●underlined text
●text on colored paper
Handwriting cannot be converted.
Scanning from scanner buttons |
23 |
6XSSRUWHG ZRUG SURFHVVLQJ SURJUDPV
By default, text converted using the OCR program appears in Microsoft Word or WordPad. By changing the settings for the EDIT TEXT button, you can have text appear in a different, supported program instead. See "Changing settings for buttons" on page 24. The Edit Text tab in the HP ScanJet Button Options dialog box will display the supported programs installed on the computer.

24 Scanning from scanner buttons
&KDQJLQJ VHWWLQJV IRU EXWWRQV
When you use the scanner buttons, the scanner scans the item using settings optimized for the destination, such as e-mail, that is associated with that button. Settings are applied to all items being scanned until you change the settings again.
7L S
To change the settings only for the current item, you may want to scan using the HP PrecisionScan Pro software instead. See Scanning from HP PrecisionScan Pro (starting on page 31).
Back to TOC
7R FKDQJH VHWWLQJV IRU EXWWRQV
1Do one of the following:
●On the scanner, press MORE OPTIONS (if present).
●On the Start menu, point to Programs, point to HP ScanJet Utilities, and click HP ScanJet Button Options.
2Click the tab for the button you want. The box in the middle of the tab contains the settings that can be changed.
3Select a setting and click Modify.
4Change the setting and click OK. See "List of options for scanner buttons" on page 25 for more information.
5Repeat steps 3 and 4 to change any other settings for this button.
6Repeat steps 2 through 5 to change settings for another button.
7When finished, click Close.

Back to TOC
/LVW RI RSWLRQV IRU VFDQQHU EXWWRQV
( PDLO 'RFXPHQW WDE RSWLRQV
This tab contains the scanning options that are applied to items you scan using the E-MAIL and E-MAIL DOCUMENT scanner buttons together.
Prompt for Another Page
When Yes is selected, a prompt appears on the computer after you scan the first page of a job. The prompt asks if you have more pages to scan to this job.
When No is selected, you will not be prompted for more pages. Each job will be treated as a single-page job.
Dimensions of Original Document
Choose the size that most closely matches the item you are scanning. If a size is unavailable (grayed out), that size is not supported. For example, this can occur if the item is larger than the scanner glass. Some scanners support an optional automatic document feeder that allows you to scan pages larger than the scanner glass.
Quality
Choose one:
●Small file size with lower quality creates scans at 100 dpi.
●Normal creates scans at 200 dpi.
●Large file size with high quality creates scans at 300 dpi.
Output type will be Grayscale or Black & White Bitmap. The file type will be .pdf.
Scanning from scanner buttons |
25 |
Destination
Select the e-mail program into which scanned images will be placed as files when scanning is completed. If no compatible e-mail programs are installed on the computer, you cannot scan directly to e-mail. Instead, select E-mail File here in the Destination field. Then when you press E-MAIL on the scanner, you will be prompted to save the scanned image as a file, which you can manually attach to an e-mail message as you normally do.
If the e-mail program you want does not appear in the list, you can try to reinstall the e-mail program on the computer, which often allows the scanning software to detect the e-mail program correctly. If this is a newly released e-mail program, check the page for this scanner on the HP website for new drivers to support the e-mail program. Otherwise, visit the page for this scanner on the HP website to check for known conflicts with the program you want.

26 Scanning from scanner buttons
( PDLO 3KRWR WDE RSWLRQV
This tab contains the scanning options that are applied to items you scan using the E-MAIL and E-MAIL PHOTO scanner buttons together.
Automatic Cropping
When Yes is selected, the scanner includes only the item or items on the scanner glass in the resulting scanned image.
When No is selected, the scanner includes the entire area of the scanner glass, including blank areas, in the resulting scanned image.
Color
When Yes is selected, scanned images retain their color. When No is selected, scanned images will be black and white. No (black and white) allows items to scan more quickly and creates smaller file sizes.
Quality
Choose one:
●Small file size with lower quality creates scans at 75 dpi.
●Normal creates scans at 100 dpi.
●Large file size with high quality creates scans at 150 dpi.
For color photos, output type will be True Color. For black-and-white photos, output type will be Grayscale.
Back to TOC
Destination
Select the e-mail program into which scanned images will be placed as files when scanning is completed. If no compatible e-mail programs are installed on the computer, you cannot scan directly to e-mail. Instead, select E-mail File here in the Destination field. Then when you press E-MAIL on the scanner, you will be prompted to save the scanned image as a file, which you can manually attach to an e-mail message as you normally do.
If the e-mail program you want does not appear in the list, you can try to reinstall the e-mail program on the computer, which often allows the scanning software to detect the e-mail program correctly. If this is a newly released e-mail program, check the page for this scanner on the HP website for new drivers to support the e-mail program. Otherwise, visit the page for this scanner on the HP website to check for known conflicts with the program you want.

Back to TOC
)D[ WDE RSWLRQV
This tab contains the options that apply to items scanned for use with your PC fax program.
Prompt for Another Page
When Yes is selected, a prompt appears on the computer after you scan the first page of a job. The prompt asks if you have more pages to scan to this job.
When No is selected, you will not be prompted for more pages. Each scanning job will be treated as a single-page job.
Dimensions of Original Document
Choose the size that most closely matches the item you are scanning. If a size is unavailable (grayed out), that size is not supported. For example, this can occur if the item is larger than the scanner glass. Some scanners support an optional automatic document feeder that allows you to scan pages larger than the scanner glass.
Scanning from scanner buttons |
27 |
Destination
Select the PC fax program to which scanned images will go when scanning is completed. If no compatible PC fax programs are installed on the computer, you cannot scan directly to a PC fax program. Instead, select Fax File here in the Destination field. Then when you press FAX on the scanner, you will be prompted to save the scanned image as a file, which you can manually attach to a fax message as you normally do.
If the PC fax program you want does not appear in the list, you can try to reinstall the PC fax program on the computer, which often allows the scanning software to detect the PC fax program correctly. If this is a newly released PC fax program, check the page for this scanner on the HP website for new drivers to support the PC fax program. Otherwise, visit the page for this scanner on the HP website to check for known conflicts with the program you want.

28 Scanning from scanner buttons
)LOH WDE RSWLRQV
This tab contains the options that apply to items you scan using the FILE button on the scanner. The File destination is intended to allow you to archive files, so the file type used is .pdf, which keeps the formatting of the original item and provides a relatively small file size.
To create a file with a different file type, scan the item using the
HP SCANNING SOFTWARE button. Once the scanned image opens in the HP PrecisionScan Pro software, save it using the Save As command on the Scan menu.
Prompt for Another Page
When Yes is selected, a prompt appears on the computer after you scan the first page of a job. The prompt asks if you have more pages to scan to this job.
When No is selected, you will not be prompted for more pages. Each scanning job will be treated as a single-page job.
Dimensions of Original Document
Choose the size that most closely matches the item you are scanning. If a size is unavailable (grayed out), that size is not supported. For example, this can occur if the item is larger than the scanner glass. Some scanners support an optional automatic document feeder that allows you to scan pages larger than the scanner glass.
Color
When Yes is selected, scanned images retain their color. When No is selected, scanned images will be black and white. No (black and white) allows items to scan more quickly and creates smaller file sizes.
Back to TOC
Quality
Use one of the quality options below:
●Small file size with low quality creates scans at 100 dpi.
●Normal creates scans at 200 dpi.
●Large file size with high quality creates scans at 300 dpi.
If the Color option on this tab is selected, output type will be True Color. If the black-and-white option is selected, output type will be Grayscale or Black & White Bitmap. The file type will be .pdf.

Back to TOC
(GLW 7H[W RSWLRQV
This tab contains the options that are applied to items you scan using the EDIT TEXT scanner button. Text on these items is processed using the OCR program so that the text will be editable in your wordprocessing program.
Prompt for Another Page
When Yes is selected, a prompt appears on the computer after you scan the first page of a job. The prompt asks if you have more pages to scan to this job.
When No is selected, you will not be prompted for more pages. Each scanning job will be treated as a single-page job.
Dimensions of Original Document
Choose the size that most closely matches the item you are scanning. If a size is unavailable (grayed out), that size is not supported. For example, this can occur if the item is larger than the scanner glass. Some scanners support an optional automatic document feeder that allows you to scan pages larger than the scanner glass.
Flowed Text (Format)
When Yes (flowed text) is selected, output is converted to one column in what the software perceives to be the most logical order. Use this option to make more extensive changes to text.
When No, use framed text when possible is selected, text appears in a frame, positioned as closely as possible to the way they appear in the original, for example in columns. Text can be more difficult to edit extensively since the frames might not expand to hold additional text.
Scanning from scanner buttons |
29 |
Destination
Select the word-processing program into which the scanned image will be placed when scanning is completed. WordPad will always be available.
If you want a different word-processing program but it does not appear in the list, you can try to reinstall the program on the computer, which often allows the scanning software to detect it correctly. If this is a newly released program, check the page for this scanner on the HP website for new drivers to support the program. Otherwise, visit the page for this scanner on the HP website to check for known conflicts with the program you want.

30 |
Scanning from scanner buttons |
Back to TOC |
 Loading...