


HP MediaSmart 1080p LCD HDTV
User Guide
HP SL4778N 47-Inch MediaSmart 1080p LCD High-Definition Television
HP SL4278N 42-Inch MediaSmart 1080p LCD High-Definition Television

The only warranties for HP products and services are set forth in the express warranty statements accompanying such products and services. Nothing herein should be construed as constituting an additional warranty. HP shall not be liable for technical or editorial errors or omissions contained herein.
HP assumes no responsibility for the use or reliability of its software on equipment that is not furnished by HP.
This document contains proprietary information that is protected by copyright. No part of this document may be photocopied, reproduced, or translated to another language without the prior written consent of HP.
Hewlett-Packard Company
P.O. Box 4010
Cupertino, CA 95015-4010
USA
Copyright © 2007 Hewlett-Packard Development Company, L.P.
This product incorporates copyright protection technology that is protected by U.S. patents and other intellectual property rights. Use of this copyright protection technology must be authorized by Macrovision, and is intended for home and other limited pay-per-view viewing uses only unless otherwise authorized by Macrovision. Reverse engineering or disassembly is prohibited.
Manufactured under license from Dolby Laboratories. 


 “Dolby” and the double-D symbol are trademarks of Dolby Laboratories.
HDMI, the HDMI logo and High-Definition Multimedia Interface are trademarks or registered trademarks of HDMI Licensing LLC.
DivX, DivX certified, and associated logos are trademarks of DivXNetworks, Inc. and are used under license.
Microsoft, Windows Vista, and Windows XP are U.S. registered trademarks of Microsoft Corporation.
The Windows logo and Windows Vista are trademarks or registered trademarks of Microsoft Corporation in the United States and/or other countries/regions.
HP supports lawful use of technology and does not endorse or encourage the use of our products for purposes other than those permitted by copyright law.
The information in this document is subject to change without notice.
n
!
Text set off in this manner indicates important information you need.
c
CAUTION: Text set off in this manner indicates that failure to follow directions could result in damage to equipment or loss of information.
w
WARNING: This symbol is intended to alert the user to the presence of important operating and maintenance (servicing) instructions in the literature accompanying the appliance.
e
DANGEROUS VOLTAGE: Text set off in this manner indicates the presence of uninsulated voltages within the product enclosure that may be of sufficient magnitude to constitute a risk of electrical shock to persons.
Text set off in this manner indicates information you need.

Important Safeguards
WARNING: TO REDUCE THE RISK OF FIRE OR ELECTRICAL SHOCK, DO NOT EXPOSE THIS APPLIANCE TO RAIN OR MOISTURE.
eCAUTION: RISK OF ELECTRICAL SHOCK w DO NOT OPEN
CAUTION: TO REDUCE THE RISK OF ELECTRICAL SHOCK, DO NOT REMOVE COVER (OR BACK).
NO USER-SERVICEABLE PARTS INSIDE.
REFER SERVICING TO QUALIFIED SERVICE PERSONNEL.
e THIS SYMBOL IS INTENDED TO ALERT THE USER TO THE PRESENCE OF UNINSULATED “DANGEROUS VOLTAGES” WITHIN THE PRODUCT’S ENCLOSURE THAT MAY BE OF SUFFICIENT MAGNITUDE TO CONSTITUTE A RISK OF ELECTRICAL SHOCK TO PERSONS. REFER SERVICING TO QUALIFIED SERVICE PERSONNEL.
w THIS SYMBOL IS INTENDED TO ALERT THE USER TO THE PRESENCE OF IMPORTANT OPERATING AND MAINTENANCE (SERVICING) INSTRUCTIONS IN THE LITERATURE ACCOMPANYING THE APPLIANCE.
CAUTION: DO NOT PLACE THIS PRODUCT ON AN UNSTABLE CART, STAND, TRIPOD, BRACKET, OR TABLE. THE PRODUCT MAY FALL CAUSING SERIOUS PERSONAL INJURY AND SERIOUS DAMAGE TO THE PRODUCT. USE ONLY WITH A CART, STAND, TRIPOD, BRACKET, OR TABLE RECOMMENDED BY THE MANUFACTURER OR SOLD WITH THE PRODUCT. FOLLOW THE MANUFACTURER’S INSTRUCTIONS WHEN INSTALLING THE PRODUCT AND USE MOUNTING ACCESSORIES RECOMMENDED BY THE MANUFACTURER. A PRODUCT AND CART COMBINATION SHOULD BE MOVED WITH CARE. QUICK STOPS, EXCESSIVE FORCE, AND UNEVEN SURFACES MAY CAUSE THE PRODUCT AND CART COMBINATION TO OVERTURN.
iii
Federal Communication Commission Interface Statement
This equipment has been tested and found to comply with the limits for a Class B digital device, pursuant to Part 15 of the FCC Rules. These limits are designed to provide reasonable protection against harmful interference in a residential installation. This equipment generates, uses, and can radiate radio frequency energy and, if not installed and used in accordance with the instructions, may cause harmful interference to radio communications. However, there is no guarantee that interference will not occur in a particular installation. If this equipment does cause harmful interference to radio or television reception, which can be determined by turning the equipment off and on, the user is encouraged to try to correct the interference by one or more of the following measures:
■Reorient or relocate the receiving antenna.
■Increase the separation between the equipment and receiver.
■Connect the equipment into an outlet on a circuit different from that to which the receiver is connected.
■Consult the dealer or an experienced radio/TV technician for help.
Closed caption notice
This television receiver provides display of television closed captioning in accordance with § 15.119 of the FCC Rules.
FCC Radiation Exposure Statement
This equipment complies with FCC radiation exposure limits set forth for an uncontrolled environment. This equipment should be installed and operated with a minimum distance of 20 cm between the radiator and your body.
This transmitter must not be co-located or operating in conjunction with any other antenna or transmitter.
Operations in the 5.15-5.25GHz band are restricted to indoor usage only. IEEE 802.11b or 802.11g operation of this product in the U.S.A. is firmware-limited to channels 1 through 11.
Modifications
Caution: Pursuant to 47CFR15.21 of the FCC Rules, any changes or modifications to this equipment not expressly approved by the Hewlett-Packard Company may cause harmful interference and void the FCC authorization to operate this equipment.
This device complies with Part 15 of the FCC Rules. Operation is subject to the following two conditions: (1) This device may not cause harmful interference, and (2) this device must accept any interference received, including interference that may cause undesired operation.
Industry of Canada Radio Statement
This device has been designed to operate with the antennas listed below, and having a maximum gain of 5.1 dB. Antennas not included in this list or having a gain greater than 5.1 dB are strictly prohibited for use with this device. The required antenna impedance is 50 ohms.
Wireless LAN Antennas (internal to the TV):
■SL4278N: Wistron NeWeb Corp. 50.3YJ09.001
■SL4778N: Wistron NeWeb Corp. 50.3YK05.001
iv HP MediaSmart HDTV User Guide
Canadian Regulatory Notice
This device complies with RSS-210 of the Industry Canada Rules. Operation is subject to the following two conditions:
1)this device may not cause interference and
2)this device must accept any interference, including interference that may cause undesired operation of the device
Caution: The device for the band 5150-5250 MHz is only for indoor usage to reduce potential for harmful interference to co-channel mobile satellite systems.
IC Radiation Exposure Statement
This equipment complies with IC radiation exposure limits set forth for an uncontrolled environment. This equipment should be installed and operated with minimum distance 20 cm between the radiator and your body.
Cables
Connections to this device must be made with shielded cables with metallic RFI/EMI connector hoods in order to maintain compliance with FCC Rules and Regulations.
RESPONSIBLE PARTY
Hewlett-Packard Company
Attn: Product Regulations Manager
10955 Tantau Avenue
Cupertino, CA 95014-0770 USA
Important Safety Instructions
Electricity is used to perform many useful functions, but it can also cause personal injuries and property damage if improperly handled. This product has been engineered and manufactured with the highest priority on safety. However, improper use can result in electric shock and/or fire. In order to prevent potential danger, please observe the following instructions when installing, operating, and cleaning the product. To ensure your safety and prolong the service life of your television, please read the following precautions carefully before using the product.
1Read these instructions.
2Keep these instructions.
3Heed all warnings.
4Follow all instructions.
5Do not use this apparatus near water.
6Clean only with a soft cloth. If needed, dampen cloth with water. Never use solvents or abrasive cleaning solutions to clean this product or permanent damage may result.
7Do not block any ventilation openings. Install in accordance with the manufacturer’s instructions.
8Do not install near any heat sources such as radiators, heat registers, stoves, or other apparatus (including amplifiers) that produce heat.
9Do not defeat the safety purpose of the polarized or grounding-type plug. A polarized plug has two blades with one wider than the other. A grounding-type plug has two blades and a third grounding prong. The wide blade or the third prong are provided for your safety. If the provided plug does not fit into your outlet, consult an electrician for replacement of the obsolete outlet.
10Protect the power cord from being walked on or pinched particularly at plugs, convenience receptacles, and the point where they exit from the apparatus.
v

11 Only use attachments/accessories specified by the manufacturer.
12 Use only with the cart, stand, tripod, bracket, or table specified by the manufacturer, or sold with the apparatus. When a cart is used, use caution when moving the cart/apparatus combination to avoid injury from tip-over.
13 Unplug this apparatus during lightning storms or when unused for long periods of time.
14 Refer all servicing to qualified service personnel. Servicing is required when the apparatus has been damaged in any way, the power-supply cord or plug is damaged, liquid has been spilled or objects have fallen into the apparatus, the apparatus has been exposed to rain or moisture, does not operate normally, or has been dropped.
15 Power Sources—This product should be operated only from the type of power source indicated on the marking label. If you are not sure of the type of power supply to your home, consult your product dealer or local power company. For products intended to operate from battery power, or other sources, refer to the operating instructions.
16 Overloading—Do not overload wall outlets, extension cords, or integral convenience receptacles as this can result in a risk of fire or electric shock.
17 Replacement Parts—When replacement parts are required, be sure the service technician has used replacement parts specified by the manufacturer or have the same characteristics as the original part. Unauthorized substitutions may result in fire, electric shock, or other hazards.
18Safety Check—Upon completion of any service or repairs to this product, ask the service technician to perform safety checks to determine that the product is in proper operating condition.
19The apparatus shall not be exposed to dripping or splashing and no objects filled with liquids, such as vases, shall be placed on the apparatus.
20WARNING: Plug the power cord into a power outlet where access to the power cord connector is readily accessible in case power disconnection is required.
21Servicing: The user should not attempt to service the appliance beyond that described in the operating instructions. All other servicing should be referred to qualified service personnel.
■Water and Moisture—Do not use this product near water; for example, near a bath tub, wash bowl, kitchen sink, or laundry tub; in a wet basement; or near a swimming pool; and the like.
■Stand—Do not place the product on an unstable cart, stand, tripod, or table. Placing the product on an unstable base can cause the product to fall, resulting in serious personal injuries as well as damage to the product. Use only a cart, stand, tripod, bracket, or table recommended by the manufacturer or sold with the product.
■Ventilation—The vents and other openings in the cabinet are designed for ventilation. Do not cover or block these vents and openings since insufficient ventilation can cause overheating and/or shorten the life of the product. Do not place the product on a bed, sofa, rug, or other similar surface, since they can block ventilation openings. This product is not designed for built-in installation; do not place the product in an enclosed place such as a bookcase or rack, unless proper ventilation is provided or the manufacturer’s instructions are followed.
■The display panel used in this product is made of glass. Therefore, it can break when the product is dropped or applied with impact. Be careful not to be injured by broken glass pieces in case the panel breaks.
■Heat—The product should be situated away from heat sources such as fireplaces, chimneys, radiators, heat registers, stoves, or other products (including amplifiers) that produce heat.
■Lightning—For added protection for this television equipment during a lightning storm, or when it is left unattended and unused for long periods of time, unplug it from the wall outlet and disconnect the antenna. This will prevent damage to the equipment due to lightning and power-line surges.
vi HP MediaSmart HDTV User Guide

■Power Lines—An outside antenna system should not be located in the vicinity of overhead power lines or other electric light or power circuits, or where it can fall into such power lines or circuits. When installing an outside antenna system, extreme care should be taken to keep from touching such power lines or circuits as contact with them might be fatal.
■Outdoor Antenna Grounding—If an outside antenna is connected to the television equipment, be sure the antenna system is grounded so as to provide some protection against voltage surges and built-up static charges. Article 810 of the National Electrical Code, ANSI/NFPA 70, provides information with regard to proper grounding of the mast and supporting structure, grounding of the lead-in wire to an antenna discharge unit, size of grounding conductors, location of antenna-discharge unit, connection to grounding electrodes, and requirements for the grounding electrode.
7
6
5
4
|
1 |
2 |
|
|
|
Antenna Grounding |
|
|
|
|
Antenna Grounding |
Reference |
Grounding Component |
|
3
1Electric Service Equipment
2Power Service Grounding Electrode System (NEC Art 250, Part H)
3Ground Clamps
4Grounding Conductors (NEC Section 810-21)
5Antenna Discharge Unit (NEC Section 810-20)
6Ground Clamp
7Antenna Lead in Wire
■To prevent fire, never place any type of candle or flames on the top or near the TV set.
■To prevent fire or shock hazard, do not expose this product to dripping or splashing. No objects filled with liquids, such as vases, should be placed on the product.
■To prevent fire or shock hazard, do not place the AC power cord under the TV set or other heavy items.
■Turn off the main power and unplug the AC cord from the wall outlet before handling.
vii

Important Information
The TV must be serviced by an authorized service technician. The TV is not user-serviceable.
Changes can damage your TV and void your warranty. Changes or modifications not expressly approved by the manufacturer could void the user’s authority to operate the equipment.
Recycling Information
For information about how to recycle this product through HP, see: http://www.hp.com/recycle
Other recycling options may also be available in your area. If located within the U.S. and Canada, you may also call (1) (888) 485-1849.
Materials disposal
This HP product contains the following materials that might require special handling at end-of-life:
■ Mercury in the fluorescent lamp in the LCD.
Disposal of mercury may be regulated because of environmental considerations. For disposal or recycling information, please contact your local authorities or the Electronic Industries Alliance (EIA) (http://www.eia.org).
Cleaning precautions
Unplug the TV before cleaning the screen.
Using solvents, such as alcohol, or abrasive materials, such as a premoistened or chemically treated towel, may affect the TV or bezel paint.
Do not expose the product to volatile gases or fluids such as pesticides.
Do not put the TV in contact with vinyl or rubber products for an extended period of time. Extended contact may result in the removal of or degradation of the surface.
n
To maintain the high-gloss finish on your new HDTV, HP recommends cleaning the TV only with a Microfiber cloth.
Lifting precautions
The TV is heavy; be sure to use ergonomically correct lifting procedures when moving the TV.
Due to the size and weight of the TV, it is recommended that a minimum of two people move it.
To transport the TV, grasp the left and right ends of the panel in the areas below and above the screen. Do not lift the TV by the attached stand.
Never place the display with the glass screen facing downward, unless it is protected with pads.
viii HP MediaSmart HDTV User Guide

Table of Contents
Important Safeguards ..................................... |
iii |
Federal Communication Commission |
|
Interface Statement ......................................... |
iv |
Important Safety Instructions .............................. |
v |
Important Information .................................... |
viii |
Setting Up the TV for |
|
Digital Media................................. |
25 |
Verifying the TV connections........................... |
25 |
Completing the initial TV setup........................ |
25 |
Setting up a wired or wireless connection ........ |
25 |
Getting to Know Your TV................. |
1 |
Identifying Items in the Box .................................... |
2 |
Locating TV Controls and Connectors...................... |
3 |
Cleaning ............................................................. |
6 |
Cleaning precautions ...................................... |
6 |
Cleaning the TV.............................................. |
6 |
Setting Up the TV ............................ |
7 |
Selecting a Good Location..................................... |
7 |
Lifting the TV .................................................. |
8 |
Connecting to the TV............................................. |
9 |
Choosing the AV connection to use................... |
9 |
Connecting the TV signal sources.................... |
10 |
Connecting the cable TV or air |
|
broadcast antenna........................................ |
10 |
Connecting cable or satellite with |
|
a set-top box ................................................ |
11 |
Connecting a DVD player, VCR, DVR, |
|
game console, or camcorder.......................... |
13 |
Connecting a VCR for recording..................... |
16 |
Connecting a PC .......................................... |
16 |
Connecting an external sound system.............. |
17 |
Connecting the TV to your home |
|
network (LAN) .............................................. |
19 |
Connecting power to the TV........................... |
21 |
Removing or attaching the stand..................... |
21 |
Turning On the TV ......................... |
23 |
Turning the TV On and Off .................................. |
23 |
Using the First-Time Setup Wizard ........................ |
24 |
Operating the TV ........................... |
29 |
Using the Remote Control..................................... |
29 |
Using universal remote controls....................... |
29 |
Installing or replacing remote control |
|
batteries....................................................... |
29 |
Identifying the remote control buttons............... |
30 |
Selecting a Device to Control ............................... |
35 |
Selecting the Input Source .................................... |
35 |
Selecting the last source................................. |
36 |
Adjusting the Volume .......................................... |
36 |
Muting the sound .......................................... |
36 |
Changing Channels ............................................ |
36 |
Selecting the last channel ............................... |
36 |
Selecting a favorite channel ........................... |
37 |
Displaying program information...................... |
37 |
Changing the View by Using the Aspect Button ...... |
38 |
Turning On Captions........................................... |
39 |
Setting the SAP/MTS Stereo Mode........................ |
39 |
Setting the Sleep Timer ........................................ |
39 |
Adjusting the TV Settings...................................... |
39 |
Opening and closing the OSD........................ |
39 |
Operating a DVD Player or Other Device .............. |
40 |
Programming the Remote Control for a |
|
Home Entertainment Device.................................. |
43 |
Programming the device code ........................ |
44 |
Programming the device code using auto |
|
setup mode .................................................. |
45 |
Manufacturer’s codes .................................... |
46 |
Table of Contents
Table of Contents ix
Changing the TV Settings............... |
51 |
Using the OSD Menus......................................... |
51 |
Using the Picture Menu........................................ |
52 |
Adjusting the picture image ........................... |
53 |
Using the Audio Menu ........................................ |
54 |
Adjusting the audio....................................... |
54 |
Using the Channel Menu ..................................... |
56 |
Using the Parental (Control) Menu ........................ |
56 |
Using the Password....................................... |
57 |
Setting Parental Controls................................ |
57 |
Temporarily releasing a blocked program........ |
61 |
Reactivating parental controls after a |
|
temporary release......................................... |
61 |
Using the Setup Menu ......................................... |
62 |
Using the Time Menu .................................... |
62 |
Using the Caption (Closed Caption) Menu....... |
63 |
Caption menu .............................................. |
63 |
Selecting the OSD Language.......................... |
64 |
Starting the Setup Wizard ............................. |
64 |
Changing the Input Labels ............................. |
64 |
Setting the Standby Mode.............................. |
65 |
Returning to Default Settings........................... |
65 |
Using Digital Media ....................... |
67 |
Using the Main Digital Media Menu ..................... |
67 |
Identifying Media remote control buttons ......... |
68 |
Using context buttons .................................... |
71 |
Searching .................................................... |
71 |
Viewing Photos .................................................. |
71 |
Changing slideshow options .......................... |
72 |
Watching Video Files.......................................... |
72 |
Changing videos options ............................... |
73 |
Listening to Music ............................................... |
73 |
Using Media Services ......................................... |
74 |
Selecting Servers ................................................ |
74 |
Changing Settings .............................................. |
75 |
Viewing current network settings..................... |
75 |
Changing network settings............................. |
75 |
Using the Demo option.................................. |
76 |
Changing the Language option ...................... |
76 |
Viewing the DivX registration code ................. |
77 |
Using the Reset Options................................. |
77 |
Changing Slideshow options.......................... |
77 |
Changing Videos options............................... |
77 |
Changing the Servers option .......................... |
78 |
Updating software ........................................ |
78 |
Using Help......................................................... |
78 |
Finding Answers to Questions ....... |
79 |
Understanding TV Terms ...................................... |
79 |
What are analog TV, digital TV, and |
|
high-definition TV (HDTV)? ............................. |
79 |
What is the difference between progressive |
|
and interlaced signal formats for digital TVs? ...79 |
|
What is variable aspect ratio?........................ |
80 |
What is HDMI?............................................. |
80 |
Identifying Cable Usage ...................................... |
81 |
Answering MediaSmart TV frequently |
|
asked questions .................................................. |
83 |
Do I need a Media Center PC to use my |
|
MediaSmart TV? ........................................... |
83 |
Why does MediaSmart TV use Windows |
|
Media Player? .............................................. |
83 |
What version of Windows Media Player |
|
works with the MediaSmart TV?...................... |
83 |
Can my MediaSmart TV software |
|
be updated?................................................. |
83 |
Can MediaSmart TV play AAC format and |
|
other music file types? ................................... |
83 |
What is the wireless type to use to stream |
|
video to my MediaSmart TV?.......................... |
83 |
Can I play recorded TV shows or |
|
downloaded shows or movies from my |
|
Media Center PC on my MediaSmart TV? ........ |
83 |
Can I stream a DVD movie from my PC to |
|
the MediaSmart TV?...................................... |
84 |
How do I create an account for my |
|
online service?.............................................. |
84 |
Specifications ................................ |
85 |
PC Compatibility Chart........................................ |
88 |
Supported Media File Types................................. |
89 |
Digital media formats: Codecs versus file |
|
containers .................................................... |
89 |
Supported media .......................................... |
90 |
Troubleshooting ............................ |
93 |
x HP MediaSmart HDTV User Guide
Getting to Know Your TV
Congratulations!
Your MediaSmart HDTV not only features exceptional picture quality, but also brings your digital entertainment and your treasured photo and music libraries from your PC to your TV. By delivering exceptional visual performance and a digital media experience that is uniquely personal, we hope the HP MediaSmart HDTV will forever change your expectation of what a television should be.
HP Visual Fidelity Engine
Your MediaSmart HDTV features the HP Visual Fidelity Engine, which delivers unparalleled performance in beautiful 1080p full-HD resolution. The HP 3D Color Enrichment System generates rich colors and deep blacks while our Photorealistic Sharpness Enhancement delivers superior detail. Complimented with three HDMI inputs, the HP MediaSmart HDTV delivers the utmost picture quality from next generation HD game consoles and video players.
Your World in High Definition
The HP MediaSmart HDTV enables browsing of your entire library of digital photos, music, and HD video— even across multiple PCs—with unprecedented ease. The HP MediaSmart TV also provides online access to thousands of movies available to rent or own—and HP’s simple interface enables you to begin watching movies moments after downloading has begun.
The Next Generation of Wireless
Networking
Your MediaSmart TV also features integrated 802.11n wireless networking, which enables the streaming of high-definition video while providing compatibility to existing 802.11b/g/a Wi-Fi networks. An industry first, having 802.11n in your HDTV future proofs your investment for many years to come.
HP Legendary Quality and Unmatched
Support
We’re proud that you selected the HP MediaSmart television, and we’ll continue to stand by you with HP award-winning support. HP Total Care includes 24 x 7 telephone assistance and one full year of free in-home service, should you ever need it.
All specifications represent the typical specifications provided by HP’s component manufacturers; actual performance may vary either higher or lower.
Getting to Know Your TV
Getting to Know Your TV 1

Identifying Items
in the Box
Television with stand attached
Universal remote control
Ant/Cable adapter
AC power cord
Cable clamp
Documentation and
Installation CD
2 HP MediaSmart HDTV User Guide
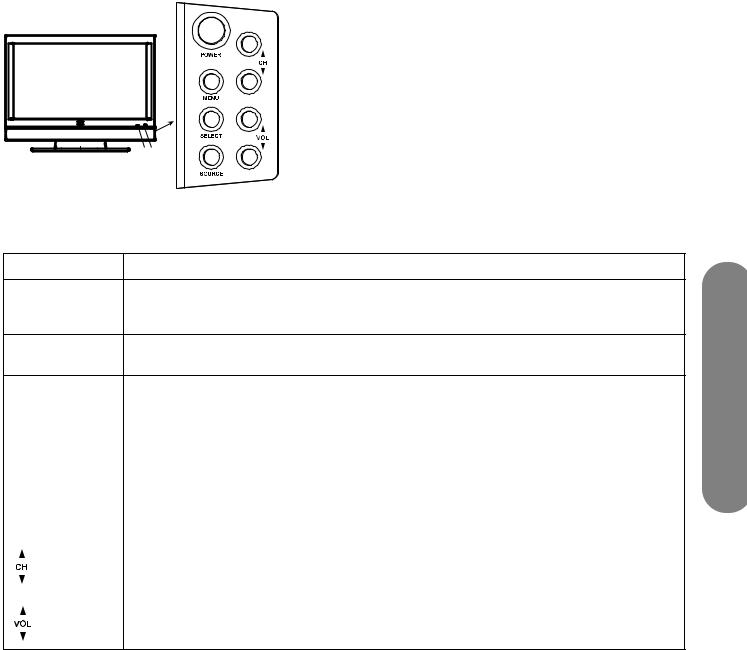
Locating TV Controls and Connectors
The TV contains controls (indicators and buttons) and connectors.
A B
TV Controls
The TV indicators are located on the front of the TV, and the buttons are located on the right side.
TV button |
Description |
A: Power light Power light shows whether the TV is on or off. The light is blue when TV is plugged in but turned off. The light is amber while the TV is powering up after you turn it on, and then it goes off after about
30 seconds. The light is off when the TV is not plugged in.
B:Remote control Remote control sensor is the location where you point the remote control. sensor
POWER |
Power turns the TV on or off. |
|
|
MENU |
Menu opens (or closes) the onscreen display (OSD). |
|
|
SELECT |
Select starts the Auto Sync function for a connected PC signal source (PC Input). |
[PC Auto Sync] |
In an OSD menu, selects the highlighted item. |
|
|
SOURCE |
Source selects the input source: Press Source to open the list of input sources. Press the Channel buttons |
|
to select the input source, and press Select. Press Source to close the list. |
|
In an OSD menu, functions as the Back button, or moves up one item or menu level. |
|
|
|
Channel buttons select the next lower or higher channel. |
|
In an OSD menu, move up or down in the menu. |
|
|
|
Volume buttons increase or decrease the sound level. |
|
In an OSD menu, move right or left in the menu, or adjust an item. |
Getting to Know Your TV
Getting to Know Your TV 3

TV connectors
The connectors are located on the left side (A), center (B), and right side (C) of the rear of the TV.
ANT/Cable In
|
|
AV Input |
|
St |
1 |
2 |
|
rdanda |
Video |
|
|
Definition |
R |
|
|
|
|
||
Input |
Audio |
|
|
L |
|
||
|
S-Vid |
|
|
|
1 |
2 |
|
|
|||
Component |
|||
Y |
|
||
|
|
||
High |
Pb |
|
|
|
|
||
Definition |
Pr |
|
|
|
|
||
Input |
R |
|
|
|
|
||
|
Audio |
|
|
|
L |
|
|
|
|
|
|
|
L |
R |
|
aDigit |
|
Audio In |
|
|
|
||
High l |
|
HDMI 1 |
|
Definition |
|
|
|
Input |
|
HDMI 2 |
|
|
|
HDMI 3
VGA
Input PC
Audio
L/R
 C
C
Audio Output
Digital |
|
Serial |
LAN |
Lock |
|
R |
RS-232 |
||||
(Optical) |
Service Port |
B |
|||
|
|
||||
|
|
|
|
||
|
L |
|
|
|
A
4 HP MediaSmart HDTV User Guide

Left side TV |
|
|
labels (A) |
Description |
|
|
|
|
ANT/Cable In |
Connect a coaxial cable |
|
|
|
from an off-air antenna |
|
|
or cable signal source. |
|
|
|
Standard |
For each AV Input |
|
Definition Input: |
connector set: |
|
■ |
AV Input 1: |
Connect an S-Video |
|
S-Vid, Video, |
cable and left-right audio |
|
Audio L and R |
cables from optional |
■ |
AV Input 2: |
equipment. |
|
||
|
S-Vid, Video, |
Or |
|
Audio L and R |
Connect a composite |
|
|
|
|
|
video cable and left-right |
|
|
audio cables from |
|
|
optional equipment. |
|
|
(Audio L and R |
|
|
connectors are shared |
|
|
within the AV |
|
|
connector set.) |
|
|
|
!
Both the S-Vid and Video connectors share Audio L and R connectors. (The AV Input 1 set of S-Vid and Video connectors share Audio connectors; the AV Input 2 S-Vid and Video connectors share Audio connectors.)
Do not connect video cables to both the S-Vid and Video connectors in a set.
Left side TV |
|
|
|
labels (A) |
Description (Continued) |
|
|
|
|
|
|
Component |
Connect component video |
|
|
High |
cables and left-right audio |
|
|
Definition |
cables from optional |
|
|
Input: |
equipment. Supports 480i, |
|
|
■ 1: Y, Pb, and |
480p, 720p, and 1080i |
|
|
analog standard and |
|
||
|
Pr, and Audio |
|
|
|
high-definition format inputs. |
|
|
|
L and R |
|
|
|
The TV automatically |
|
|
■ 2: Y, Pb, and |
|
||
determines what has been |
|
||
|
Pr, and Audio |
connected. Some set-top |
|
|
L and R |
boxes must be set for a |
|
|
|
specific output resolution. |
|
|
|
|
|
Digital High |
Supports 480i, 480p, 720p, |
|
|
Definition |
1080i, and 1080p digital |
|
|
Input: |
format inputs. The TV |
|
|
■ |
HDMI 1 (with |
automatically determines |
|
what has been connected. |
|
||
|
Audio In L |
|
|
|
Some set-top boxes must be |
|
|
|
and R) |
TV |
|
|
set for a specific output |
||
|
HDMI 2 |
||
■ |
resolution. |
Your |
|
■ |
HDMI 3 |
For each HDMI |
|
|
|
Know |
|
|
|
(High-Definition Multimedia |
|
|
|
Interface) connector: |
|
|
|
Connect an HDMI cable |
to |
|
|
from optional digital, |
Getting |
|
|
high-definition equipment. |
|
|
|
|
|
|
|
For HDMI 1 with Audio In L |
|
|
|
and R: Connect a DVI cable |
|
|
|
and DVI-to-HDMI converter |
|
|
|
and left-right audio cables |
|
|
|
from optional DVI |
|
|
|
equipment. |
|
|
|
|
|
PC Input: |
Connect a VGA (video |
|
|
■ |
VGA |
graphics array) cable and |
|
an audio cable from your PC |
|
||
|
Audio L/R |
|
|
■ |
(Line out) to use the TV as a |
|
|
|
|
monitor. |
|
|
|
|
|
Getting to Know Your TV 5

Center TV |
|
||
labels (B) |
Description |
||
|
|
||
Audio Output: |
For sound to an external |
||
■ |
Digital |
audio system: |
|
■ Connect an optical cable |
|||
|
(Optical) |
||
■ |
Audio Output |
for digital sound out to |
|
an optional external |
|||
|
L and R |
||
|
digital audio system. |
||
|
|
||
|
|
■ Connect left-right audio |
|
|
|
cables for stereo sound |
|
|
|
out to an optional |
|
|
|
external (analog) audio |
|
|
|
system. Use the left |
|
|
|
(white) connector for |
|
|
|
mono sound |
|
|
|
(single cable). |
|
|
|
||
Serial RS-232 |
Used for control |
||
|
|
purposes only. |
|
|
|
||
Service Port |
Used for service |
||
|
|
purposes only. |
|
|
|
||
LAN (Wired) |
Connect an Ethernet cable to |
||
|
|
your wired home network. |
|
|
|
||
Kensington |
Use to attach a lock to |
||
Lock slot |
secure your TV. |
||
|
|
|
|
!
Wireless local area network (LAN) antennas (not shown) are internal to the TV and can be used to connect the TV to your wireless home network.
Right side TV |
|
label (C) |
Description |
|
|
AC In |
Connect the included AC |
|
power cord. |
|
NOTE: Use only the |
|
provided power cord. |
|
|
Cleaning
Cleaning precautions
Unplug the TV before cleaning the screen.
The TV screen has a special antiglare coating. Using solvents, such as alcohol, or abrasive materials, such as a premoistened or chemically treated towel, may affect the screen coating or bezel paint.
Do not expose the product to volatile gases or fluids such as pesticides.
Do not put the TV in contact with vinyl or rubber products for an extended period of time. Extended contact may result in the removal of the coating or degradation of the surface.
Cleaning the TV
To maintain the high-gloss finish on your new HDTV, HP recommends cleaning the TV only with a Microfiber cloth.
Microfiber cloths contain a blend of synthetic fibers designed to clean the surface of the TV without scratching. All cloths specifically labeled as “Microfiber” on the packaging are suitable for use on this TV and can be purchased at a variety of
retail outlets.
To clean the screen, spray a soft lint-free cloth with water to lightly moisten it. Gently wipe the screen, but without pressing on it.
To clean the outer cabinet, use the same method.
Do not use liquid or aerosol cleaners.
n
To maintain the high-gloss finish on your new HDTV, HP recommends cleaning the TV only with a Microfiber cloth.
6 HP MediaSmart HDTV User Guide

8
Setting Up the TV
HP recommends professional installation from an authorized installer to ensure maximum enjoyment of your TV. Be sure to read all the safety information and precautions before starting installation. See the following topics:
■ |
“Important Safeguards” on page iii |
■ “Important Information” on page viii |
■ |
“Important Safety Instructions” on page v |
|
|
|
|
Selecting a Good Location
When selecting the location for your TV, consider the following conditions:
■Power cord length: Choose a location with easy access to an AC power outlet.
■Cable lengths and distances to attached units: Check that cables can reach the TV.
n
To view high-definition programming, you must have connected to the TV a high-definition signal source, such as an off-the-air high-definition antenna or cable HD signal, a cable or satellite provider HD set-top box, or an HD-DVD player. All sources, except an HD antenna or cable HD signal, must connect to one of the High Definition Input connector sets on the TV.
You may view high-definition digital media through your home network.
■Do not install the TV on an unstable cart or stand; the unit may fall over and cause injury.
■Do not install the TV where it has a protruding edge, such as on a small table where the display overhangs the table surface.
■Do not hang the TV from the ceiling; the unit may fall and cause injury.
■Avoid direct sunlight that may damage the display or interfere with the operation of the remote control.
■Avoid areas of high humidity or damp conditions that may cause fire or electrical shock.
■Do not install TV near appliances, such as a microwave, or near a heat source, such as a fireplace or radiator.
■Do not place the TV on a sloped or unstable surface.
■Provide a minimum of 4 inches (10 cm) of ventilation clearance around the TV.
■Wall-mounting: Your TV can be wall-mounted by using an HP-approved wall-mounting kit (sold separately):
LCD TV Flat Mount, Model PY043AA#ABA LCD TV Tilting Mount, Model PY044AA#ABA
To remove the TV stand, see “Removing or attaching the stand” on page 21. Then follow the installation instructions provided with the wall-mounting kit. HP recommends professional installation if you want to wall-mount your TV.
Setting Up the TV
Setting Up the TV 7
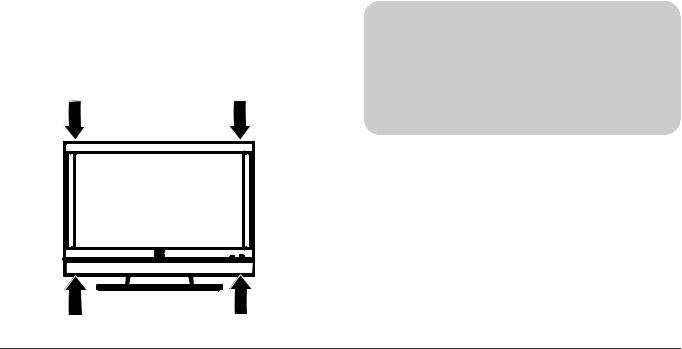
Lifting the TV
The TV is heavy; be sure to use ergonomically correct lifting procedures when moving the TV.
Due to the size and weight of the TV, it is recommended that a minimum of two people move it.
To transport the TV, grasp the left and right ends of the panel in the areas below and above the screen. Do not lift the TV by using the attached stand.
Move the TV gently. Never place the TV with the glass screen facing downward, unless it is protected with pads.
c
CAUTION: Do not lift or move the TV by using the attached stand. Instead, grasp the left and right ends of the panel in the areas below and above the screen.
8 HP MediaSmart HDTV User Guide

Connecting to the TV
Set up the TV by connecting cables and connecting the AC power cord.
Choosing the AV connection to use
When connecting optional audiovisual (AV) equipment as signal sources, the connectors on the equipment may limit the type of connection you can use.
When your optional equipment has more than one type of output connector, choose the connection that provides the best-quality playback image.
The following table lists the available optional AV equipment connections on the TV.
AV connection to use, in order of decreasing video playback quality (best to good)
Connection description |
TV connector |
Cable plug |
HDMI (High-Definition Multimedia Interface) transmits an all-digital signal. This is the recommended choice for high-definition signals, and for playback from a digital set-top box, DVD player, or DVR device.
For a DVI-D device, you can use a DVI cable with a DVI-to-HDMI converter to connect video to the HDMI 1 connector on the TV, and an audio cable to connect audio from the source to the Audio In L and R connectors on the TV.
Use this connection for standard or high-definition video signals in 480i, 480p, 720p, 1080i, or 1080p input format from a set-top box, DVD player, or other device. This TV does not support Dolby Digital audio input over HDMI. When connecting a set-top box, DVD player, or other device by means of the HDMI connector, set the device audio output to PCM format.
Component video (Y, Pb, and Pr) transmits video as separate red, green, and blue signals. Use this connection for standard or high-definition video signals in 480i, 480p, 720p, or 1080i format from a DVD player or other equipment.
S-Video transmits standard video as separate color and black-and-white image signals, and delivers a sharper image than a composite video connection.
Video In (composite video) transmits standard video as a single signal.
The procedures that follow describe how to connect optional equipment for each type of AV connection, including the audio connections when applicable.
Setting Up the TV
Setting Up the TV 9
Connecting the TV signal sources
w
WARNING: Before connecting the TV to any other electronic device, unplug the TV and electronic device AC power cords from the AC power outlet.
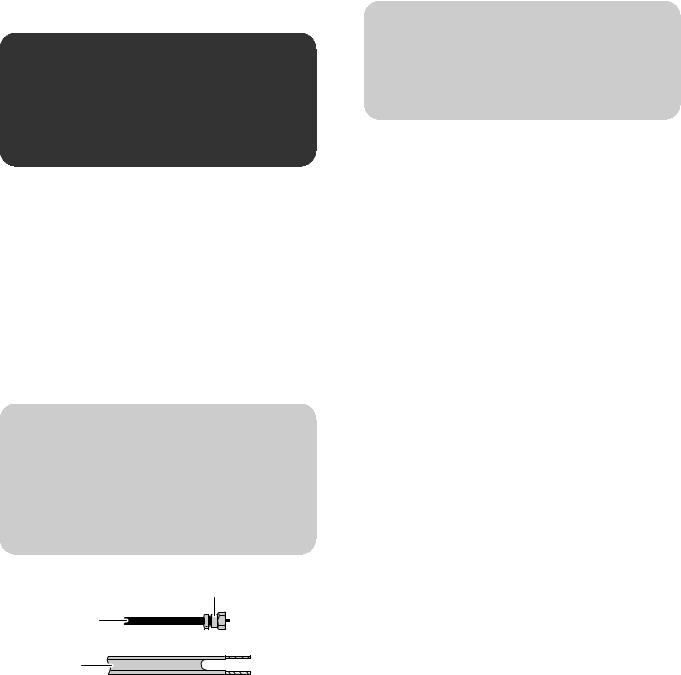
The following is an explanation of the types of connections that are used for a coaxial cable.
If your outdoor antenna uses a 75-ohm coaxial cable with an F-type connector, screw it onto the ANT/Cable In connector at the rear of the TV set.
■A 75-ohm system is generally a round cable with an F-type connector that can easily be attached to a connector without tools (sold separately).
■A 300-ohm system is a flat, twin-lead cable that can be attached to a 75-ohm connector through a 300/75-ohm adapter (sold separately).
n
An F-type connector should be finger-tightened only. When connecting the RF cable to the TV, do not use tools to tighten the F-type connector, because this may cause damage to the TV.
C
A
B
A75-ohm coaxial cable, round
B300-ohm twin-lead cable, flat
CF-type connector
n
To connect an external sound system, see “Connecting an external sound system” on page 17.
Connecting the cable TV or air broadcast antenna
Use standard 75-ohm coaxial cable to connect a ground antenna or cable TV input source to the TV. Use shielded coaxial cable to reduce radio frequency (RF) interference.
Optional equipment, cable TV service, and all cables are sold separately.
10 HP MediaSmart HDTV User Guide
c
CAUTION: Unplug power for the TV and all connected components before connecting the antenna or cable.
1Connect a coaxial cable to the input source.
2Connect the input source coaxial cable to the ANT/Cable In connector on the rear of the TV.
If you find it difficult to screw the
coaxial cable onto the TV connector, use the Ant/Cable Adapter from the
box; screw the threaded end of the
adapter into the input source coaxial cable, and then push the adapter onto the ANT/Cable In connector on the rear of the TV.
3Connect power to the TV; see “Connecting power to the TV” on page 21.
4Turn on the TV; see “Turning the TV On and Off” on page 23.
5Select the input source to view, as well as the Aspect, and other options; see “Operating the TV” on page 29.
Connecting cable or satellite with a set-top box
Connecting your TV directly to the audio and video output of your set-top box ensures a more vivid picture and enhances your viewing enjoyment. See “Choosing the AV connection to use” on page 9 for connector and cable information.
Optional equipment and all cables are sold separately.
You can connect a digital TV set-top box (air or cable), and other AV equipment, by using a connector set from one of the following inputs:
■Digital High Definition Input: Connect an HDMI cable from the digital, high-definition cable or satellite set-top box to any of the HDMI connectors.
Or
Connect a DVI-D cable and DVI-to-HDMI converter from the digital, high-definition cable or satellite set-top box with a DVI connector to HDMI 1, and left-right audio cables to Audio In L and R.
HDMI supports 480i, 480p, 720p, 1080i, and 1080p input formats. The TV automatically determines what has been connected. Some set-top boxes must be set for a specific output resolution. The HDMI connectors are:
■HDMI 1 (with Audio In L and R)
■HDMI 2
■HDMI 3
■Component High Definition Input: Connect component video cables and left-right audio cables from the high-definition cable or satellite set-top box.
Component supports 480i, 480p, 720p, and 1080i input formats. The TV automatically determines what has been connected. Some set-top boxes must be set for a specific output resolution.
The Component connectors are:
■1: Y, Pb, and Pr, and Audio L and R
■2: Y, Pb, and Pr, and Audio L and R
■Standard Definition Input: Connect an S-Video cable, or a composite video cable, and left-right audio cables from the cable or satellite set-top box. (Audio L and R connectors are shared within the AV connector set.)
Setting Up the TV
Setting Up the TV 11

The AV Input connectors are:
■1: S-Vid or Video, and Audio L and R
■2: S-Vid or Video, and Audio L and R
n
The Standard Definition Input (S-Vid, or Video) connectors do not pass high-definition TV signals.
To connect the set-top box:
c
CAUTION: Unplug power for the TV and all connected components before connecting the set-top box.
1Connect the set-top box input source cable(s) to the rear of the TV, using one of the connector sets:
■Digital High Definition Input: Connect an HDMI cable to any of the HDMI connectors: HDMI 1, HDMI 2, or HDMI 3.
Or
Connect a DVI-D cable and DVI-to-HDMI converter (from digital, high-definition cable or satellite set-top box with a DVI connector) to HDMI 1, and left-right audio cables to Audio In L and R.
■Component High Definition Input:
Connect component video cables and left-right audio cables to the Component connectors:
1:Y, Pb, and Pr, and Audio L and R
Or
2: Y, Pb, and Pr, and Audio L and R
■Standard Definition Input: Connect an S-Video cable, or a composite video cable, and left-right audio cables to the AV Input connectors:
1: S-Vid or Video, and Audio L and R
Or
2: S-Vid or Video, and Audio L and R
S-Vid connection
12 HP MediaSmart HDTV User Guide
Video connection
!
Both the S-Vid and Video connectors share Audio L and R connectors. (The AV Input 1 set of S-Vid and Video connectors share Audio connectors; the AV Input 2 S-Vid and Video connectors share Audio connectors.)
Do not connect video cables to both the S-Vid and Video connectors in a set.
2Connect the cables to the set-top box.
3Turn on the set-top box.
4Connect power to the TV; see “Connecting power to the TV” on page 21.
5Turn on the TV; see “Turning the TV On and Off” on page 23.
6Select the input source to view, as well as the Aspect, and other options; see “Operating the TV” on page 29.
Connecting a DVD player, VCR, DVR, game console, or camcorder
You can connect optional equipment to the TV, such as an HD-DVD, Blu-ray or other HD equipment, DVD player, VCR, DVR, and so on, including an external sound system. Optional equipment and all cables are sold separately.
To connect a VCR for playback, you can use either S-Vid or Video (composite video) connections. The TV does not have video output connectors.
Setting Up the TV
Setting Up the TV 13

c
CAUTION: Unplug power for the TV and all connected components before connecting optional equipment. Ensure that the optional equipment is powered off.
Connecting digital, high-definition equipment by using an HDMI cable
This is the recommended connection for HD video and audio. The HDMI cable is sold separately.
1Connect an HDMI cable to any of the HDMI connectors on the rear of the TV: HDMI 1, HDMI 2, or HDMI 3. (There are no separate audio inputs required for HDMI.)
2Connect the cable to the DVD player or source equipment.
3Turn on the DVD player, and start play.
4Connect power to the TV; see “Connecting power to the TV” on page 21.
5Turn on the TV; see “Turning the TV On and Off” on page 23.
6Select the input source to view, as well as the Aspect, and other options; see “Operating the TV” on page 29.
Connecting digital, high-definition equipment by using a DVI cable
The DVI-D cable, DVI-to-HDMI converter, and the audio cable are sold separately.
1Connect a DVI-D cable and DVI-to-HDMI converter to HDMI 1 on the rear of the TV, and left-right audio cables to Audio In L and R.
2Connect the DVI cable to the DVI-D connector on the DVD player.
3Connect the audio cable to the audio out connectors on the DVD player.
4Turn on the DVD player, and start play.
5Connect power to the TV; see “Connecting power to the TV” on page 21.
6Turn on the TV; see “Turning the TV On and Off” on page 23.
7Select the input source to view, as well as the Aspect, and other options; see “Operating the TV” on page 29.
14 HP MediaSmart HDTV User Guide

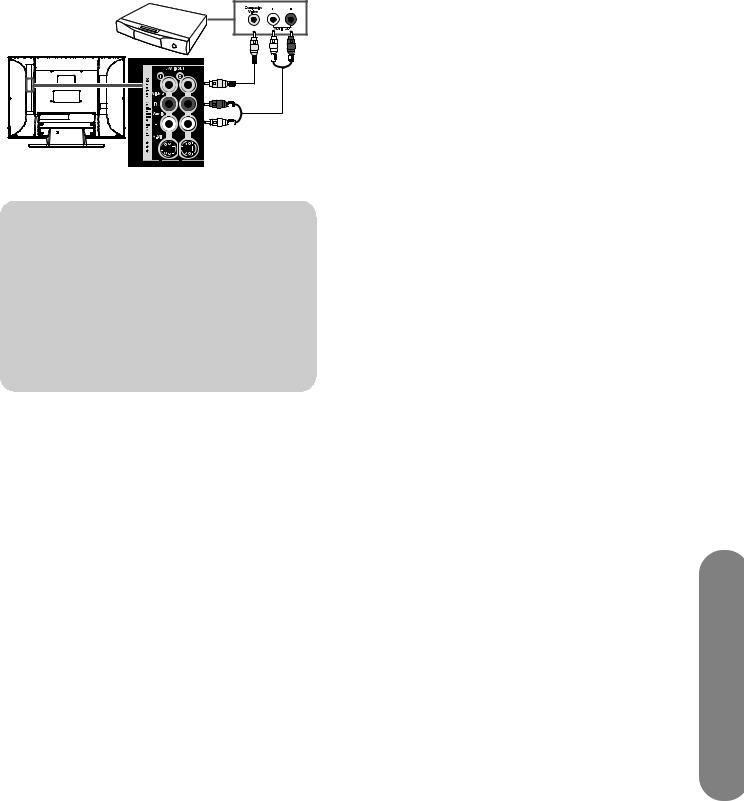
Connecting high-definition equipment using component cables
There are two sets of high-definition Component connectors you can use:
■1: Y, Pb, and Pr, and Audio L and R
■2: Y, Pb, and Pr, and Audio L and R
1Connect component video cables and left-right audio cables to the Component connectors on the rear of the TV.
2Connect the cables to the DVD player.
3Turn on the DVD player, and start play.
4Connect power to the TV; see “Connecting power to the TV” on page 21.
5Turn on the TV; see “Turning the TV On and Off” on page 23.
6Select the input source to view, as well as the Aspect, and other options; see “Operating the TV” on page 29.
Connecting standard-definition equipment by using S-Video or Video cables
Connect a standard-definition DVD player, VCR, game console, camcorder, or other AV equipment by using S-Vid or Video (composite video) connectors. These connectors do not pass high-definition signals.
!
The S-Vid and Video connectors share the audio connectors in the set. Do not connect video cables to both the S-Vid and Video connectors in a set.
1Connect an S-Video cable, or a composite video cable, by using the AV Input connector sets on the rear of the TV:
■1: S-Vid or Video, and Audio L and R
■2: S-Vid or Video, and Audio L and R
S-Vid connection
Video connection
Setting Up the TV
Setting Up the TV 15
2Connect the video cable to the DVD player or other source equipment:
For a DVD player, VCR, DVR, or other source equipment that has a S-Video connector, use a S-Video cable.
Or
For a DVD player, VCR, DVR, or other source equipment that has a composite connector, use a composite cable.
3Connect the audio cable to the left and right audio connectors on the TV for the connector set.
4Connect the audio cables to the DVD player.
5Turn on the DVD player, and start play.
6Connect power to the TV; see “Connecting power to the TV” on page 21.
7Turn on the TV; see “Turning the TV On and Off” on page 23.
8Select the input source to view, as well as the Aspect, and other options; see “Operating the TV” on page 29.
Connecting a VCR for recording
The TV does not output a signal for recording.
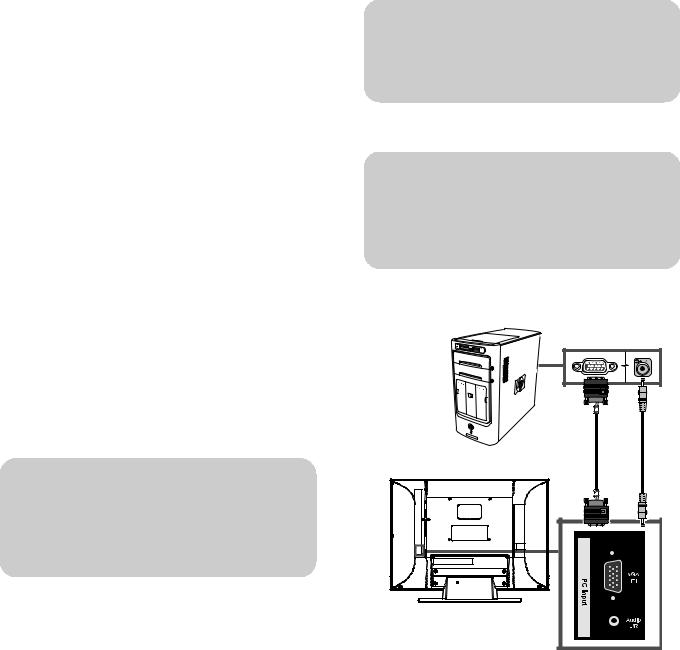
Connecting a PC
Use the following instructions when connecting a PC or other source equipment to the PC Input (VGA and Audio L/R) connectors on the rear of the TV. The PC Input is a selectable input source (PC in the source list). Cables are sold separately.
n
Refer to “PC Compatibility Chart” on page 88 for a list of PC signals compatible with the TV.
You can also connect a PC with a DVI connector:
■For a PC with a DVI-D connector, connect a DVI-D cable and DVI-to-HDMI converter to HDMI 1, and left-right audio cables to Audio In L and R.
■For a PC with a DVI-I connector, connect a DVI-I cable and a DVI-to-VGA converter to the PC Input (VGA) connector and audio to the PC Input Audio L/R connector.
n
Only the HDMI input connectors support 1080p format input.
To connect a PC by using the PC Input connectors:
c
CAUTION: Unplug power for the TV and all connected components before connecting a PC. Ensure that the PC is powered off.
1Connect the PC or source equipment video cable to the TV by using the PC Input (VGA) connector.
16 HP MediaSmart HDTV User Guide
2Connect the source equipment audio cable to the PC Input Audio L/R connector.
3Connect the VGA and audio cables to the PC or source equipment.
4Connect power to the TV; see “Connecting power to the TV” on page 21.
5Turn on the TV; see “Turning the TV On and Off” on page 23.
6Connect the power to, and turn on, the PC or source equipment.
7Select the input source to view, as well as the Aspect, and other options; see “Operating the TV” on page 29.
8Adjust the picture, including Auto Sync, by using the onscreen display (OSD) Picture menu PC Screen option; see “Adjusting the PC Screen image” on page 53.
You can also start Auto Sync for the PC image by pressing the Select button on the TV.
Connecting an external sound system
You can connect an external sound system to the TV by using the Audio Output connectors for a digital audio or analog audio signal:
■Use an optical audio cable and the Audio Output Digital (Optical) connector on the rear of the TV to provide a digital audio signal to an external sound system, such as a digital receiver or a surround sound system.
■Use an audio cable and the Audio Output Left and Right connectors on the rear of the TV to provide an analog audio signal to an external sound system, such as an analog amplifier or stereo system.
The input source signal and the Audio menu settings in the onscreen display determine the type of audio output. This TV does not support Dolby Digital audio input over HDMI. When connecting a set-top box, DVD player, or other device by means of the HDMI connector, set the device audio output to PCM format. See “Understanding audio output” on page 54 for information on the audio output type.
Selecting the type of sound system
The external sound system can determine how you connect the video/audio input sources to the TV and the TV to the external audio system. Select:
■Home theater system, see “Home theater system (without video pass-through)” on page 17.
■A/V receiver system, see “A/V receiver system (with video pass-through)” on page 18.
■Powered speakers or Amplifier, see “Powered speakers or amplifier” on page 18.
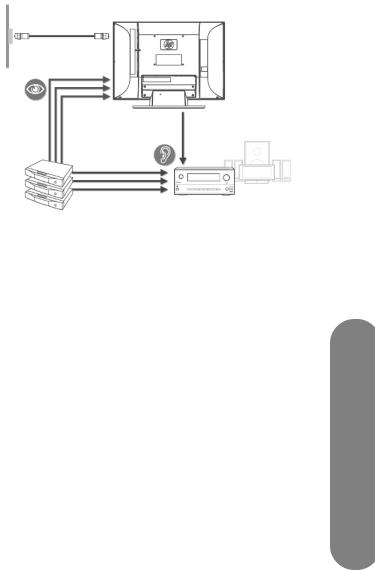
Home theater system (without video pass-through)
When you have a home theater system without video pass-through, do the following:
■Route the audio from all source devices to the home theater.
■Route the video from all source devices to the TV.
■Use the TV remote control to select the input source (Source button).
■Use the home theater remote control to select the audio input.
■Use the source device remote control to control playback.
Setting Up the TV
Setting Up the TV 17
■If using the TV ANT/Cable connector:
■Connect the signal source to the ANT/Cable connector. See “Connecting the cable TV or air broadcast antenna” on page 10.
■Connect audio cables from the TV Audio Output (either digital optical or analog stereo, or both) to the home theater input.
■If the home theater does not support Digital Dolby, set the digital audio format in the onscreen display Audio menu Digital Audio option to PCM. See “Choosing the digital audio output mode” on page 54.
To program the TV universal remote to control all the devices, see “Programming the Remote Control for a Home Entertainment Device” on page 43.
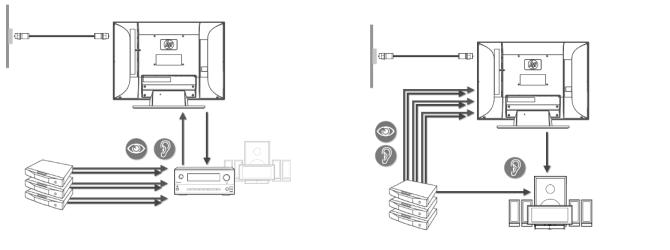
A/V receiver system (with video pass-through)
When you have an A/V receiver system with video pass-through, do the following:
■Route the audio and video from all source devices to the A/V receiver.
■For HDMI source devices, you may need to use a separate digital audio cable in addition to the HDMI cable.
■Use a single video cable from the A/V receiver to the TV.
■Use the TV remote control to select the input source (Source button) where you’ve connected the A/V receiver.
■Use the A/V receiver remote control to select the video source device.
■Use the source device remote control to control playback.
■If using the TV ANT/Cable connector:
■Connect the signal source to the ANT/Cable connector. See “Connecting the cable TV or air broadcast antenna” on page 10.
■Connect cables from the TV Audio Output (either digital optical or analog stereo, or both) to the A/V receiver input.
■If the A/V receiver does not support Digital Dolby, set the digital audio format in the onscreen display Audio menu Digital Audio option to PCM. See “Choosing the digital audio output mode” on page 54.
To program the TV universal remote to control all the devices, see “Programming the Remote Control for a Home Entertainment Device” on page 43.
Powered speakers or amplifier
When you have powered speakers or a stereo amplifier, do the following:
■Route the audio and video from all source devices to the TV.
■Connect audio cables from the TV Audio Output (either digital optical or analog stereo, or both) to the powered speakers or amplifier input.
■Use the TV remote control to select the input source (Source button).
■Set the digital audio format in the onscreen display Audio menu Digital Audio option to PCM. See “Choosing the digital audio output mode” on page 54.
18 HP MediaSmart HDTV User Guide

■Select the input on the powered speakers or amplifier.
■Use the source device remote control to control playback.
■If using the TV ANT/Cable connector:
■Connect the signal source to the ANT/Cable connector. See “Connecting the cable TV or air broadcast antenna” on page 10.
■If the powered speakers or amplifier does not support Digital Dolby, set the digital audio format in the onscreen display Audio menu Digital Audio option to PCM. See “Choosing the digital audio output mode” on page 54.
■For HDMI source devices, connect a separate digital audio cable from the source device directly to the powered speakers or amplifier. If the powered speakers cannot access a second input, use analog output from the TV. This TV does not support Dolby Digital audio input over HDMI, and does not output a digital audio signal from HDMI input.
To program the TV universal remote to control all the devices, see “Programming the Remote Control for a Home Entertainment Device” on page 43.
Connecting the external sound system
c
CAUTION: Unplug power for the TV and all connected components before connecting an external sound system. Ensure that the external sound system is powered off.
1Connect the external sound system to the TV:
■For a digital connection, connect an optical audio cable to the Audio Output Digital (Optical) connector on the rear of the TV and to the external sound system, such as a digital receiver or a surround sound system.
■For an analog connection, connect an audio cable to the Audio Out L and R connectors on the rear of the TV and to the external sound system, such as an analog amplifier or stereo system.
2Connect power to the TV; see “Connecting power to the TV” on page 21.
3Turn on the TV; see “Turning the TV On and Off” on page 23.
4Connect power to, and turn on, the external sound system.
5Define the digital audio format in the onscreen display Audio menu Digital Audio option; see “Choosing the digital audio output mode” on page 54.
6If desired, you can turn off the TV speakers by using the onscreen display Audio menu Speakers option; see “Using the Audio Menu” on page 54.
Connecting the TV to your home network (LAN)
Connect the TV to the router in your PC local area network (LAN) by connecting an Ethernet cable for a wired connection, as described in this procedure. For a wireless connection, the TV has internal wireless antennas, which are ready to use; no antenna or other connection is necessary.
The TV requires use of a router for connection to your established home network (LAN).
■A wired connection (Ethernet 802.3) uses an Ethernet cable and connects through a router.
■A wireless connection (Wi-Fi 802.11a/b/g/n) must use the TV internal wireless antennas and connect through a router.
n
HP recommends use of dual-band 802.11n Wi-Fi for best wireless performance.
Setting Up the TV
Setting Up the TV 19
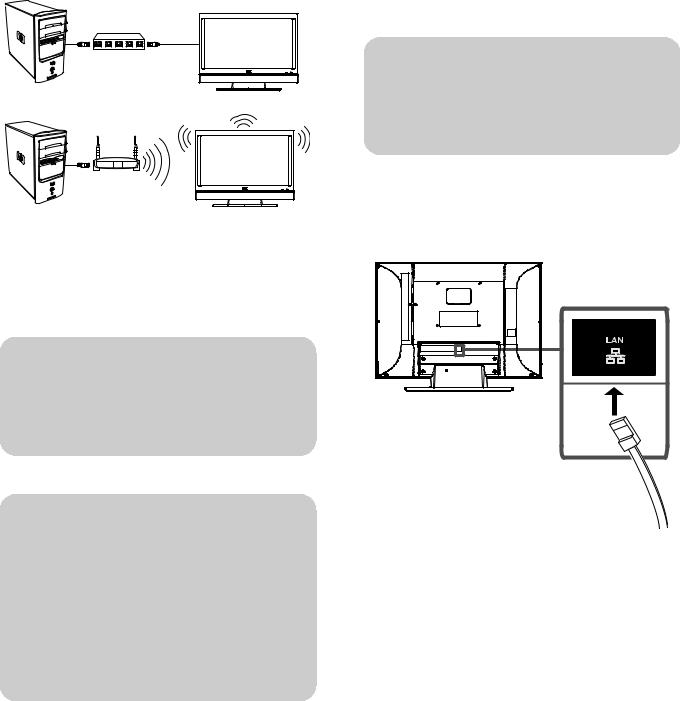
A
B
APC with LAN connection through a wired router to the TV
BPC with LAN connection through a wireless router to the TV
n
The TV internal wireless antennas do not function as a TV antenna for air-broadcast television signal reception.
!
You can connect your TV using both a wired and a wireless LAN connection to your PC router, but only one network connection is supported at a time.
To switch, select the network type by using the Media button, selecting the Settings menu, and then selecting Network; see “Changing network settings” on page 75.
Connect the Ethernet cable
Use these steps to connect the Ethernet cable for a wired connection to your home network:
c
CAUTION: Unplug power from the wall for the TV and all connected components before connecting to your network.
1Connect the Ethernet cable to your network router and to the Ethernet LAN connector on the rear of the TV. The LAN connector is beneath the edge of the TV LAN label.
2Connect power to the TV; see “Connecting power to the TV” on page 21.
3Turn on the TV; see “Turning the TV On and Off” on page 23.
20 HP MediaSmart HDTV User Guide
 Loading...