


HP DeskJet 955C, DeskJet 960Cse, DeskJet 960Cxi, DeskJet 980Cxi, DeskJet 990Cse User Guide
...quick help
hp deskjet 9xx series
table of contents
learn to print . . . . . . . . . . . . . . . . . . . . . . . . . . . . . . . . . 1
introducing the hp deskjet series printer . . . . . . . . . . . . . . . . . . . . . 2 terms and conventions . . . . . . . . . . . . . . . . . . . . . . . . . . . . . . . . . 3 notices and acknowledgments . . . . . . . . . . . . . . . . . . . . . . . . . . . 4 learning about printer features. . . . . . . . . . . . . . . . . . . . . . . . . . . . 5 using paper trays. . . . . . . . . . . . . . . . . . . . . . . . . . . . . . . . . . . . . 9 printing with the hp deskjet printer . . . . . . . . . . . . . . . . . . . . . . . . 11
printing on paper and other media . . . . . . . . . . . . . . . . 17
envelopes . . . . . . . . . . . . . . . . . . . . . . . . . . . . . . . . . . . . . . . . 18 transparencies . . . . . . . . . . . . . . . . . . . . . . . . . . . . . . . . . . . . . 22 labels . . . . . . . . . . . . . . . . . . . . . . . . . . . . . . . . . . . . . . . . . . . 24 business cards, index cards, and other small media . . . . . . . . . . . 26 photographs . . . . . . . . . . . . . . . . . . . . . . . . . . . . . . . . . . . . . . 28 greeting cards . . . . . . . . . . . . . . . . . . . . . . . . . . . . . . . . . . . . . 30 posters . . . . . . . . . . . . . . . . . . . . . . . . . . . . . . . . . . . . . . . . . . 32 banners . . . . . . . . . . . . . . . . . . . . . . . . . . . . . . . . . . . . . . . . . . 34 iron-on transfers . . . . . . . . . . . . . . . . . . . . . . . . . . . . . . . . . . . . 36 manual two-sided printing . . . . . . . . . . . . . . . . . . . . . . . . . . . . . 38
special features . . . . . . . . . . . . . . . . . . . . . . . . . . . . . . 41
infrared printing feature . . . . . . . . . . . . . . . . . . . . . . . . . . . . . . . 42 automatic two-sided printing module . . . . . . . . . . . . . . . . . . . . . . 45 automatic paper-type sensor . . . . . . . . . . . . . . . . . . . . . . . . . . . . 47
product maintenance . . . . . . . . . . . . . . . . . . . . . . . . . . 49
print cartridge status light . . . . . . . . . . . . . . . . . . . . . . . . . . . . . . 50 replacing print cartridges . . . . . . . . . . . . . . . . . . . . . . . . . . . . . . 53 automatically cleaning print cartridges . . . . . . . . . . . . . . . . . . . . . 56 manually cleaning print cartridges . . . . . . . . . . . . . . . . . . . . . . . 57 cleaning the printer case . . . . . . . . . . . . . . . . . . . . . . . . . . . . . . 60 refilling print cartridges. . . . . . . . . . . . . . . . . . . . . . . . . . . . . . . . 61 maintaining print cartridges . . . . . . . . . . . . . . . . . . . . . . . . . . . . 62 print cartridge part numbers . . . . . . . . . . . . . . . . . . . . . . . . . . . . 63 using the hp deskjet utility . . . . . . . . . . . . . . . . . . . . . . . . . . . . . . 64
solve a problem . . . . . . . . . . . . . . . . . . . . . . . . . . . . . . 65
printer lights are flashing . . . . . . . . . . . . . . . . . . . . . . . . . . . . . . 66 printer is not printing . . . . . . . . . . . . . . . . . . . . . . . . . . . . . . . . . 68 printer is too slow . . . . . . . . . . . . . . . . . . . . . . . . . . . . . . . . . . . 71 problems with printouts . . . . . . . . . . . . . . . . . . . . . . . . . . . . . . . 73 problems with the infrared printing feature . . . . . . . . . . . . . . . . . . 78 problems with the automatic two-sided printing module . . . . . . . . . 80 problems with the automatic paper-type sensor . . . . . . . . . . . . . . . 85
product specifications . . . . . . . . . . . . . . . . . . . . . . . . . . 87
product specifications for the hp deskjet 990 series printer . . . . . . . 88 product specifications for the hp deskjet 980 series printer . . . . . . . 93 product specifications for the hp deskjet 960 series printer . . . . . . . 98 infrared printing specifications . . . . . . . . . . . . . . . . . . . . . . . . . 103 automatic two-sided printing module specifications . . . . . . . . . . . 104 minimum printing margins . . . . . . . . . . . . . . . . . . . . . . . . . . . . 107 system requirements . . . . . . . . . . . . . . . . . . . . . . . . . . . . . . . . 109
index. . . . . . . . . . . . . . . . . . . . . . . . . . . . . . . . . . . . . 111
learn to print
•introducing the hp deskjet series printer
•terms and conventions
•notices and acknowledgments
•learning about printer features
•using paper trays
•printing with the hp deskjet printer
1

introducing the hp deskjet series printer
Congratulations! You have purchased an HP Deskjet printer which is equipped with several new features:
•Expanded print capability allows you to print information from devices other than your desktop computer using the infrared printing feature.
This feature may not be available in all printer models.
•Increased print speeds up to 17 pages per minute for black text and 13 pages per minute for text containing color or color graphics. Print speeds may vary with printer models.
•Greater flexibility in printing two-sided documents using the Automatic Two-Sided Printing Module. This feature may not be available in all printer models.
•Better print performance using the Automatic Paper-Type Sensor.
•Excellent photo quality through HP’s PhotoREt III, ColorSmart III printing technology.
HP Deskjet printers are designed to help you get the best results for your printing needs. Read about these and other features in the following sections.
1. hp deskjet printer 2. two-sided printing module
2

terms and conventions
The following terms and word conventions are used in Quick Help.
terms
The HP Deskjet 990cxi/cse, HP Deskjet 980cxi, HP Deskjet 960cxi/960cse series printers are referred to as HP Deskjet 9xx or HP Deskjet.
symbols
The > symbol guides you through a series of software steps. For example:
Click Macintosh HD > Utilities > hp deskjet > hp deskjet utility to open the hp deskjet 9xx utility screen.
cautions and warnings
A Caution indicates possible damage to the HP Deskjet printer or to other equipment. For example:
Caution! Do not touch the print cartridge ink nozzles or copper contacts. Touching these parts will result in clogs, ink failure, and bad electrical connections.
A Warning indicates possible harm to yourself or to others. For example:
Warning! Keep print cartridges out of the reach of children.
icons
A Note icon indicates that additional information is provided. For example:
For best results use HP products.
3
notices and acknowledgments
hewlett-packard company notices
The information contained in this document is subject to change without notice.
Hewlett-Packard (HP) makes no warranty of any kind with regard to this material including, but not limited to, the implied warranties of merchantability and fitness for a particular purpose.
Hewlett-Packard shall not be liable for any errors or for incidental or consequential damages in connection with the furnishing, performance, or use of this material.
All rights reserved. Reproduction, adaptation, or translation of this material is prohibited without prior written permission of Hewlett-Packard, except as allowed under copyright laws.
acknowledgments
Apple, the Apple logo, AppleTalk, ColorSync, the ColorSync logo, EtherTalk, Finder, LocalTalk, Mac, Macintosh, Mac OS, PowerBook, Power Macintosh, and QuickDraw are trademarks of Apple Computer, Inc., registered in the U.S. and other countries.
Adobe and Acrobat are trademarks of Adobe Systems incorporated.
TrueType is a U.S. trademark of Apple Computer, Inc.
Palm, Palm III, Palm V, and Palm VII are trademarks of Palm, Inc.
Copyright 2000 Hewlett-Packard Company
4
learning about printer features
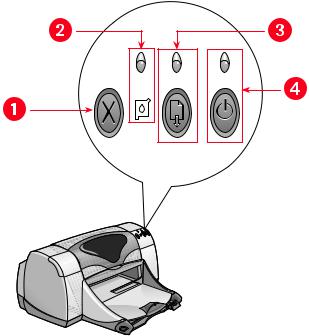
buttons and lights
The HP Deskjet printer buttons let you turn the printer on and off, cancel a print job, or resume printing. The lights give you visual cues about the state of the printer.
1. cancel button 2. print cartridge light and status symbol 3. Resume light and button 4. Power light and button
cancel button
Pressing this button cancels the current print job.
print cartridge status symbol and light
The light above the Print Cartridge Status symbol flashes when you need to check the status of the print cartridges.
5
resume button and light
The light above the Resume button flashes when an action is required such as loading paper or clearing a paper jam. When the problem is fixed, press the Resume button to continue printing.
power button and light
The Power button turns the printer on and off. It takes approximately five seconds for the printer to turn on after pressing the Power button. The green light above the Power button flashes when printing is in progress.
Caution! Always use the Power button on the front of the printer to turn the printer on and off. Using a power strip, surge protector, or a wallmounted switch to turn the printer on and off may cause premature printer failure.
See also:
print cartridge part numbers
paper trays
The printer has an In tray and an Out tray. Place paper or other media in the In tray for printing. Printed pages are deposited in the Out tray.
6

infrared lens
The HP Deskjet printer has a special Infrared (Ir) lens. The Infrared lens allows printing from an infrared sending device such as a Palm Pilot, or PowerBook computer. The infrared printing feature may not be available in all printer models.
See also:
infrared printing feature
automatic two-sided printing module
The Automatic Two-Sided Printing Module is a special hardware feature that enables the printer to automatically print on both sides of the media. If this feature is not included with your printer, it can be purchased separately.
See also:
automatic two-sided printing module
7
manual two-sided printing
Manual Two-Sided Printing is a feature that enables the printer to print both sides of a page when the Rear Access Door is attached.
See also:
manual two-sided printing
automatic paper-type sensor
The Automatic Paper-Type Sensor automatically determines the correct paper type for most paper or media placed in the printer’s In tray. This feature, particularly when used with HP paper and media, assists in obtaining the best printing results. The feature can be used with both HP and non-HP media; however, it is optimized for HP media. Because Automatic is the default printer setting, the printer is able to quickly select the appropriate paper type.
This feature is not recommended for printed or lined paper and media.
See also:
automatic paper-type sensor
8
using paper trays
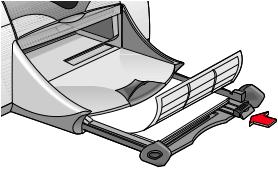
in tray
The In tray holds paper or other media to be printed.
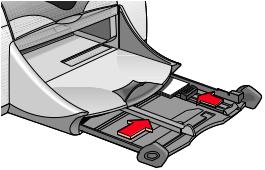
1. in tray pulled out 2. paper length guide 3. paper width guide
1. out tray 2. in tray pushed in
9

out tray
Change the position of the Out tray for different printing needs.
1. single envelope slot 2. out tray down 3. out tray extension
1. out tray up
Out tray down. Leave the tray in the down position for most types of printing and single envelope printing.
Out tray extension. Pull the tray extension out when printing a large number of pages. Also extend the tray when you are printing in draft mode to prevent the paper from falling out of the tray. When the print job finishes, push the tray extension back into its storage slot.
Out tray up. Place the tray in the up position to properly load banner paper. It must remain in the up position to print banners.
Do not use the Out tray extension with legal-sized paper. It may cause a paper jam.
10

printing with the hp deskjet printer
The printer is controlled by software installed on your computer. The printer software, also called the printer driver, provides dialog boxes which communicate your print requests to the printer. Select the printer you are using as the default printer before printing.
selecting the default printer using the Chooser
Use one of the following methods to select the HP Deskjet 9xx printer you are using as the default printer in the Chooser.
USB connection
1.Select Chooser from the Apple menu.
2.Select hp deskjet xx in the upper left window of the Chooser screen.
3.Select deskjet 9xx in the right window of the Chooser screen.
4.Close the Chooser.
AppleTalk network connection
1.Turn on both the computer and printer and verify that they are connected to the AppleTalk network.
You must use an external print server, such as an HP Jetdirect 300X External Print Server, to connect the printer to the AppleTalk network.
2.Select Chooser from the Apple menu.
3.Select the Active option next to AppleTalk.
4.Click the hp deskjet icon in the upper left window of the Chooser screen.
5.Select a zone where the printer is located in the AppleTalk Zones window.
6.Select deskjet 9xx in the right window of the Chooser screen.
7.Close the Chooser.
11
selecting the default printer using other options
Other options allow you to select a default printer without using the Chooser. Try one of these options:
•Click the printer icon on the menu bar, then select hp deskjet 9xx.
•Click the control strip icon on the edge of the desktop to expand the control strip. Click the printer icon on the control strip, then select hp deskjet 9xx.
•Drag the document you want to print to the hp deskjet 9xx printer icon on the desktop.
•Click the deskjet 9xx icon on the desktop, then click Printing on the menu bar. Select Set Default Printer.
The Print command sends your documents to the hp deskjet 9xx printer until you select a new default printer. If you change printers, verify that the formatting and pagination does not change in the document before you print it.
12
selecting print settings
The following instructions provide the most common method of selecting page layout and print options. The software program you are using may vary from the method provided.
controlling page layout
1.Open the file you want to print.
2.Click File > Page Setup to display the hp deskjet 9xx Page Setup screen.
3.Select the following options:
•Paper size: Choose the paper size, envelopes, or other media you have in the In tray.
•Scaling (%): Enter a number from 5 to 999. Numbers smaller than 100 reduce the image size, and numbers greater than 100 enlarge it. Changing the scaling size may also change pagination.
•Orientation: Choose the appropriate orientation icon for the document you are printing.
•Mirror Image: Select this option if appropriate.
•Rotate 180 degrees: Select this option if appropriate.
•Two-Sided Safe Margins: Select this option to adjust margins for twosided printing.
4.Click OK to save the layout options.
selecting print options
1.Open the file you want to print.
2.Click File > Print to display the hp deskjet 9xx screen.
The General default option screen appears. Select the number of copies to print, which pages are to be printed, and the print order on this screen. You can also view the current print options which are displayed across the bottom of the screen.
3.Click the arrows in the General field to view a list of additional options.
13
4.Select Paper Type/Quality to choose print quality options, paper type, ink density, and drying time.
5.Select Layout to choose multiple pages per sheet and two-sided printing.
6.Select Color to choose options for color, grayscale, and black and white image and text resolution.
•ColorSmart III allows you to adjust the ink saturation, brightness, and color tone for print images. The ColorSmart III option also allows you to disable image enhancements.
•ColorSync is used to match colors with other computers using the ColorSync matching system.
•Grayscale prints in shades of gray. You are able to optimize printing for fax and photocopy prints with this setting.
•Black & White prints only black and white with no gray or color. Black only is not recommended for use with glossy paper.
7.Select Background Printing to choose foreground or background print options and print time.
•Select Background to continue working on a document while printing takes place.
•Select Foreground for faster printing; however, you cannot work on other tasks until printing is complete.
Other features are also available with Background printing. Double-click the hp deskjet 9xx printer icon on the desktop for:
•Deleting a print request
-Click the job title or icon, then click the Trash icon, or
-Drag the document’s icon to the Trash icon on the desktop. These methods delete only the print job and not the document.
•Holding/Pausing a print request
-Click the job title or icon, then click the Pause button.
The print request pauses until you again select its title then click the Resume button.
-Drag the document icon to the Waiting to Print list of documents.
14
•Marking a print request urgent
-Click the job title or icon, then click the small clock.
-Click Urgent in the dialog box that appears. This action moves the print request to the top of the list.
•Sorting/changing the order of print request
-Select the column heading for the column you want to sort or change.
-Select the Print Time column heading to view and change print order.
-Drag and drop the print job title in the Name column to the desired print order position in the list.
•Stopping and restarting printing
-Select Stop Print Queue from the Printing menu option to stop printing.
-Select Start Print Queue from the Printing menu option to resume printing.
•Changing printers
-To move a print job from one printer to another printer of the same type, drag the print request icon to the desired printer icon.
-If the printers are not the same type, the printer software will not allow you to move a print request to an incompatible printer.
15
using the buttons in the print dialog box
The buttons at the bottom of the Print dialog box include:
Default: returns the print settings to the system default.
Edit Settings...: allows you to edit saved print settings.
Save Current Settings...: allows you to assign a name to the settings and save them under that name.
Preview: allows you to view your document before you print it so you can see how the document will print with the current settings.
Cancel: cancels settings you have entered and closes the Print dialog box.
OK: starts printing.
desktop printing
Desktop printing allows you to print several documents at once, or to print a document that is formatted for printing on a particular printer. Use one of the following methods to print documents from the desktop:
•Drag the icons of the documents you want to print to the printer icon on the desktop.
•Select the icons of the documents you want to print, then click
File > Print. Select print options from the hp deskjet 9xx screen, then click OK.
16
printing on paper and other media
•envelopes
•transparencies
•labels
•business cards, index cards, and other small media
•photographs
•greeting cards
•posters
•banners
•iron-on transfers
•manual two-sided printing
17

envelopes
Print a single envelope using the envelope slot, or print a stack of envelopes using the In tray.
printing a single envelope
preparing to print
1.Place the envelope—with the flap side on the left and facing up—into the single envelope slot.
2.Push the envelope forward until it stops.
printing envelopes
If your software program includes an envelope printing feature, do not follow these instructions. Follow the instructions provided by the software program.
1.Open the file you want to print.
2.Click File > Page Setup.
3.Select the following options:
•Page Size: Appropriate envelope size
•Scaling (%): Appropriate percentage (100 is the default)
•Orientation: Portrait
4.Click OK.
18
5.Click File > Print.
The hp deskjet 9xx screen appears displaying the General option screen. Click the arrows in the General field to select the following options.
6.Select Paper Type/Quality, then choose the following:
•Paper Type: plain paper
•Print Quality: Normal
7.Select Layout, then choose the following:
•Pages Per Sheet: 1 (Normal)
•Print Both Sides: Unchecked
8.Click OK to print.
printing guidelines
•Verify that the Out tray is in the down position.
•Avoid using envelopes that have clasps or windows.
•Avoid using envelopes that are shiny or embossed, envelopes with thick, irregular, or curled edges, or envelopes that are wrinkled, torn, or otherwise damaged.
19

printing stacks of envelopes
preparing to print
1.Pull out the In tray.
2.Slide out both paper guides and remove all paper from the tray.
3.Place no more than 15 envelopes—with the flap side on the left and facing up—in the tray.
4.Push the envelopes forward until they stop.
5.Slide the paper guides snugly against the edges of the envelopes. Slide the tray forward until it stops.
printing envelopes
If your software program includes an envelope printing feature, do not follow these instructions. Follow the instructions provided by the software program.
1.Open the file you want to print.
2.Click File > Page Setup.
3.Select the following options:
•Page Size: Appropriate envelope size
•Scaling (%): Appropriate percentage (100 is the default)
•Orientation: Portrait
4.Click OK.
20

5.Click File > Print.
The hp deskjet 9xx screen appears displaying the General option screen. Click the arrows in the General field to select the following options.
6.Select Paper Type/Quality, then choose the following:
•Paper Type: plain paper
•Print Quality: Normal
7.Select Layout, then choose the following:
•Pages Per Sheet: 1 (Normal)
•Print Both Sides: Unchecked
8.Click OK to print.
printing guidelines
•Never place more than 15 envelopes in the In tray at one time.
•Align the envelope edges before inserting them.
•Avoid using envelopes that have clasps or windows.
•Avoid using envelopes that are shiny or embossed, envelopes with thick, irregular, or curled edges, or envelopes that are wrinkled, torn, or otherwise damaged.
For best results use HP products.
21

transparencies
preparing to print
1.Pull out the In tray.
2.Slide out both paper guides and remove all paper from the tray.
3.Fan the edges of the transparency sheets to separate them, then align the edges.
4.Place no more than 30 transparency sheets in the tray with the rough side down and the adhesive strip toward the printer.
5.Push the transparencies forward until they stop.
6.Slide the paper guides snugly against the transparency paper and slide the tray forward until it stops.
printing transparencies
1.Open the file you want to print.
2.Click File > Page Setup.
3.Select the following options:
•Page Size: Appropriate size
•Scaling (%): Appropriate (100 is the default)
•Orientation: Appropriate orientation
22

4.Click OK.
5.Click File > Print.
The hp deskjet 9xx screen appears displaying the General option screen. Click the arrows in the General field to select the following options.
6.Select Paper Type/Quality, then choose the following:
•Paper Type: hp premium inkjet transparency film
•Print Quality: Normal or Best
7.Select Layout, then choose the following:
•Pages Per Sheet: 1 (Normal)
•Print Both Sides: Unchecked
8.Click OK to print.
printing guidelines
For best results use hp premium inkjet transparency film.
For best results use HP products.
23
labels
preparing to print
1.Pull out the In tray.
2.Slide out both paper guides and remove all paper from the tray.
3.Fan the edges of the label sheets to separate them, then align the label edges.
4.Load no more than 20 label sheets—label side down—in the tray.
5.Slide the paper guides snugly against the sheets and push in the tray.
printing labels
1.Open the file you want to print.
2.Click File > Page Setup.
3.Select the following options:
•Page Size: A4 Letter or US Letter
•Scaling (%): Appropriate percentage (100 is the default)
•Orientation: Appropriate orientation
4.Click OK.
24

5.Click File > Print.
The hp deskjet 9xx screen appears displaying the General option screen. Click the arrows in the General field to select the following options.
6.Select Paper Type/Quality, then choose the following:
•Paper Type: plain paper
•Print Quality: Normal
7.Select Layout, then choose the following:
•Pages Per Sheet: 1 (Normal)
•Print Both Sides: Unchecked
8.Click OK to print.
printing guidelines
•Use only paper labels that are designed specifically for inkjet printers.
•Never place more than 20 sheets of labels in the In tray at one time.
•Use only full sheets of labels.
•Make sure the sheets are not sticky, wrinkled, or pulling away from the protective backing.
•Do not use plastic or clear labels. The ink will not dry when used with these labels.
For best results use HP products.
25
business cards, index cards, and other small media
preparing to print
1.Pull out the In tray, then raise the Out tray.
2.Slide out both paper guides and remove all paper from the tray.
3.Align the media edges.
4.Place no more than 45 cards or other small media in the tray.
5.Push the cards or media forward until they stop, then lower the Out tray.
6.Slide the paper length guides snugly against the edges of the media.
7.Slide the colored fine length guide snugly against the media.
8.Slide the paper width guides snugly against the media.
9. Push in the In tray.
printing business cards, index cards, and other small media
1.Open the file you want to print.
2.Click File > Page Setup.
26

3.Select the following options:
•Page Size: Appropriate card size
•Scaling (%): Appropriate percentage (100 is the default)
•Orientation: Portrait
4.Click OK.
5.Click File > Print.
The hp deskjet 9xx screen appears displaying the General option screen. Click the arrows in the General field to select the following options.
6.Select Paper Type/Quality, then choose the following:
•Paper Type: plain paper
•Print Quality: Normal
7.Select Layout, then choose the following:
•Pages Per Sheet: 1 (Normal)
•Print Both Sides: Unchecked
8.Click OK to print.
printing guidelines
If an out of paper message appears, verify the media is positioned properly in the In tray.
For best results use HP products.
27

photographs
preparing to print
1.Pull out the In tray.
2.Slide out both paper guides and remove all paper from the tray.
3.Fan the edges of the photo paper to separate them, then align the photo paper edges.
4.Place no more than 20 sheets of photo paper—print side down—in the tray.
5.Slide the paper guides snugly against the edges of the photo paper and slide in the tray.
printing photographs
1.Open the file you want to print.
2.Click File > Page Setup.
3.Select the following options:
•Page Size: Appropriate paper size
•Scaling (%): Appropriate percentage (100 is the default)
•Orientation: Appropriate orientation
4.Click OK.
28
 Loading...